
2021 Walkthrough by: Louis Koot
If you have found this walkthrough via google search or via another site then you have probably not visited my site.
A lot more very detailed game walkthroughs can be found on my site at: www.pcgameswalkthroughs.nl
The young Parisian opera singer Mona de Lafitte is kidnapped by vampire baron Shrowdy von Kiefer and taken to his castle in Draxsylvania. After Shrowdy is pierced with a wooden stake by two vampire hunters, Mona can try to flee the castle. Mona searches the entire castle, including Shrowdy's mother's secret laboratory, looking for solutions to the problems she faces.

Mona is assisted in this by bat Froderick. But even after she succeeds in fleeing the castle, the difficulties are not over yet. Before Mona can set off for Paris, she will have to find a horse and buggy and soil from her grave so that she can travel safely. Mona denies it with all here heart, but the fact is that she is now also a vampire herself! And Baron Shrowdy is an evil spirit who continues to bother her in every way.
As you can read in the title, the game will consist of several Chapters. Chapter One has been released in 2009 and this walkthrough covers this Chapter One. The end of Chapter 1 One ends with a Cliffhanger. It's now January 2021 and still the sequels to Chapter One aren't be made, but rumors go around at various forum sites that, after more then 10 years since Chapter One has been released, the original writer of Chapter One is finally going to make the Chapters 2, 3 and 4......but these are still rumors and I don't know whether you can relay on them. But Chapter One of The Vampyre Story is now on sale at gog.com
|
A Vampyre Story is a comic Horror Adventure game that you control with your mouse. The game makes a bit of fun with the Dracula stories. You control Mona de Lafitte. Mona can transform into a bat and then she can also fly. Mona has a sidekick and that is the bat Froderick who is affectionately called Frodi by Mona. You can save as many times as you want but you cannot name your saves yourself. Save / load, exit you do at the game main menu screen that you access in the game by pressing the ESCAPE key on your keyboard.
Mona also has an Inventory that contains the things she collects. The inventory is a coffin and you open it with your right mouse button. So right click to open the inventory. You close the inventory again by moving your cursor past the coffin. The inventory / coffin is also where you will find sidekick Froderick.
Mona can do certain actions, such as flying, talking to other people, looking at things and opening doors or pushing things away. You let Mona do these actions via the Action Cross. Left click (so click with your left mouse button) on an object / item to reveal the Action Cross. Then keep the mouse button pressed. The Action Cross has 4 functions. Click on 1 of the 4 icons to have Mona perform the function.
You can quickly go through the videos and dialogues by pressing your Spacebar. However, it is not recommended to do this as you risk missing important information. With the TAB key you make all active "hotspots" visible on each screen. You can see the "hotspots" via a small bat. You can make Mona run faster by clicking where you want Mona to go and then pressing the space bar. Not all items you encounter in the game can be taken by Mona immediately. Items that can only be picked later are "temporarily" in inventory but marked there by a bluish shadow. Always use each of the 4 functions of the action cross on each item / object to hear all dialogues and possible clues. Always use all conversation options so that you never skip an option that could get you stuck later in the game. |
Intro: Dwarg Castle, Draxsylvania 1895.

Mona is singing on the stage of an empty theater.

Mona's only audience only is bat Froderick, who prefers to hear a polka, but still applauds.

Mona complains to Froderick. Mona would like to be in the theater again in Paris. Froderick says he will help her escape. Then Baron Shrowdy Von Kiefer enters.

Mona immediately asks where her "wine" is. She actually means where her 'blood' is.
The Baron leaves and Mona turns herself into a sweet little bat and she and Froderick fly after the Baron.

Mona and Froderick watch as a Gargoyle gives get the key to the boathouse at the Baron and then he rows ashore.

Mona then hears a strange voice. A sea monster emerges from the water. The Baron hypnotizes the monster and is able to proceed.

On land, vampire Shrowdy robs someone in a cloak. However, the cloaked man turns out to be a vampire hunter, who promptly put a wooden stake through the Baron's heart.

The Baron's last words are that he will never release Mona. Now that Shrowdy's heart has been pierced, Mona feels that she is no longer under the Baron's influence. She is free! Now to find a way to escape from the island! The vampire hunter wonders who Mona is. The Book appears and in the Book you read who all has contributed to this game and you see in photos how Mona grows up, becomes a singer and is hypnotized by Baron Shrowdy.
WARNING:
Always use all conversation options that you get or you will end up hopelessly stuck in the game later on. Don't be cocky, just do this. You will be irrevocably stuck if you skip questions / topics in conversation. You can quickly go through the conversations by pressing your space bar, but I don't advise this because you'll miss a lot of the story
Part 1: Escape from Dwarg Castle:
A: Find the key to the boathouse
Bridge:
Mona is on the bridge and she tries to open the door to the boathouse. Froderick is sitting on Mona's shoulder. Mona does not remember from which gargoyle the Baron received the key. Right click anywhere on the screen to open your Inventory, and see ..... Your Inventory is a satin-lined coffin. At the moment you only see Froderick in the Inventory. Close the inventory by moving your cursor to the left of the coffin.
Left click on the boat house door knob and hold down the mouse button to bring up the Action Cross.
Keep holding down the mouse button while standing on the hand icon.

The hand icon will now light up orange. Release the mouse button to activate the option. Mona rattles the door and says she can't open the door without a key. So we have to find the key to this door. Press your TAB key to view the "hotspots". At the bottom left you will see the hotspot "Lake Shore" and "Lake Monster". Behind Mono are 7 stone gargoyles. The first 3 gargoyles are "hotspots".

Left click on the front 3 gargoyles to open the action cross and use any of the 4 functions and then listen to Mona's commentary. Mona says the first gargoyles look too dumb to talk. Froderick is also of this opinion. Mona doesn't want to fly to the gargoyles and she doesn't want to knock them over. Mona flatters against the 3rd gargoyle to try to get the key out, which has no result whatsoever.
In the water under the bridge is the hotspot "Lake Monster". You can also see the monster swimming back and forth in the water. Click on the "Lake Shore" spot and then on the fly icon (Fly over to Lake Shore) but .... Mona says she cannot fly over running water because of the curse that Baron Shrowdy has cast on her. Click on the "Lake Monster" spot and then talk to Lake Monster. The monster doesn't show up, but Mona tries to befriend it, in case she has to sail the lake by boat. However, the monster does not answer. Place your cursor on the entrance to the castle, at the back of the bridge. You will then receive a red Arrow. Right click the red arrow and ... in the blink of an eye Mona is in the entrance hall of the castle.
Entrance hall:
Note: Press the TAB key to view all hotspots. There are 9 hotspots in the hall here. View all those hot spots with the eye icon. I will not tell you this every time.

To the left of the doorway to the bridge is a Rusty Sword on the wall. Try to get the sword. However, Mona says the sword is so rusty that it will likely fall apart if she tries to hit someone with it. But she can probably use it for something else. Mona will remember that the sword is hanging here. You will then see a blue sword in your inventory.

This happens with all items that you cannot immediately take with you, but that you have clicked on. It is a reminder that you know that you still have to grab this sword when you need it. Look at the tapestry (Banner) hanging above the doorway. It shows the coat of arms of the Von Kiefer family. Try to fly to it, but Mona refuses because she thinks the Banner is not attached tightly enough to the wall. You get a blue banner in your inventory box. Check out the other hotspots in the hall and then listen to the commentary of Mona and Froderick. The eyes of the Bear's Rug, lying on the floor in the hall, keep following Mona. You can't do anything else here in the hall. You can go outside again to the bridge from the entrance hall. You can go to the cellars via the bottom right and the Theater via the bottom left. Via the red arrow on the stairs you can go up to Mona's bedroom. Right click the red arrow you get on the stairs to go up, to
Mona's bedroom

To the left of the door is a cupboard with vases. Look at those vases and listen to Froderick tell Mona that they are urns that hold the ashes of the Baroness' deceased wives. Try to get an urn (Vase). You will then receive a blue urn in your inventory, as a sign that you can take the urn later. To the right of the doorway is a dressing table with a large mirror and 2 table lamps. The mirror is covered by a large drawing. On the dressing table is a bottle of perfume and a bottle of body oil. Take the bottle of Perfume and take the bottle of Body oil. Look at the drawing hanging over the mirror. The drawing was made by Baron Shrowdy and Froderick assumes that Mona may not look at her reflection in the mirror from the Baron. Try to tear the drawing from the mirror via the hand in the action cross.
Mona does not dare to rip the drawing off the mirror because she is afraid of what she will see in the mirror. Mona won't see anything in the mirror because Mona is a vampire and, as everyone knows, vampires don't have a mirror image and Mona doesn't want to see that because Mona still doesn't want to know that Shrowdy has turned her into a vampire.
To the right of the dressing table is Froderick's cage. Check out the Cage. There are bags of dried fruit and nuts in the cage.

Take the bags of dried Fruit and Nuts from the cage. It goes into your coffin

View Mona's Canopy Bed. Froderick says that Mona's actual bed is in the dark basement. Mona admits that this room is far too bright to sleep. Try to lie in the bed (Hand of the action cross) and Mona says she would rather stay up all night. Mona denies that this is because she is a vampire. She says she only suffers from a curse. To the left under the bed is a Perfume Refill Bottle. Take the Perfume refill bottle from under the bed.

Continue to the left. On the left wall is a large chest. The chest is open and full of Shrowdy's toys. Take an Animal Noise Toy from the chest.

To the left of the large four-poster bed is the passage to the Balcony. Walk on to the Balcony:
Balcony:

On the left you see the gray water of the lake. View the lake (Lake Warg). Sometimes you see people floating here, Mona says, face down. Right click to open the inventory coffin. Left click in inventory on Froderick and hold down the button and then click on the Mouth icon to talk to Froderick.

You will be given talk options / questions. At the bottom right you see the scroll arrow with witch you scroll down or up through the options.

You click on an options / question to use it. Use all options and go through them in order from top to bottom. Do not skip a question / option.
Froderick tells how he has met Mona. Froderick flew away from some of the bigger bats trying to get him, and Mona saved him. Froderick also explains that Shrowdy's mother inherited Castle Warg from her husband, Baron Von Kiefer. Von Kiefer died under suspicious circumstances, he got stones on the head, like all the previous men of the baroness. One day when the Baroness disappeared, Shrowdy went looking for her, but eventually came back with a friend. So Mona isn't the first to be hypnotized and kidnapped by Shrowdy and then turned into a vampire. End the conversation with "Well, that's enough talk for now".
A snow coverd Planter Box hangs on the right side of the balcony. Left click on the snowy planter box and then wipe away the snow with the Hand icon.

There are still flower bulbs in the planter. Right click to open the inventory. Then left click on Froderick. Froderick is then attached to your cursor. Close the inventory. Froderick now glows red. Click with Froderick on the Planter Box (Use with Planter Box) and Froderick examines the flower bulbs in the planter and then tells that they are Belladonna bulbs.

Right click to put Froderick back in the inventory.
Open the inventory again and then left click on the blue-rimmed Urn (Urn with Ashes). Take the urn from inventory and click it on the Planter and ....

Mona walks back into the bedroom to get the Urn from the closet.
The Urn contains the ashes of the old Baron Von Kiefer and Mona scatters the ashes from the urn into the planter.

However, nothing happens and Mona is somewhat disappointed about this. But well .... plants don't grow from ashes alone.
Go back into the bedroom and then back to the entrance hall. Back in the Entrance Hall, use the red arrow at the bottom right to go into the :
Torture chamber

When Mona has entered the torture chamber, she will be in the back, at the entrance / exit. To the right of Mona you can see a poker with hot coals and a very uncomfortable chair (Chair of Supreme Discomfort). On the wall, between the poker and the chair, hangs a sturdy Mace. Try to get that Mace . Mona does not need the Mace yet, so you get a blue mace in your inventory.

In the forground of the torture chamber are 2 coffins. The right coffin belongs to Mona and the left coffin is Shrowdy's coffin. These 2 coffins are the sleeping places for Mona and Shrowdy. Behind Mona's coffin is the Iron Maiden. Behind the Iron Maiden is a table with a Grinder on it. In the niche, to the right behind Mona's coffin, you can see the red eyes of many rats glowing.
Behind Shrowdy's coffin are 2 torture chairs. The Headless Clayman is seated in the left chair. The right chair is a "Nutcracker chair". Behind the chairs is the passage to the Cellars. At the bottom right you see a Fountain with a Gargoyle. From the mouth of the gargoyle water flows into the fountain. Continue to the 2 coffins. Check out both coffins and then try to open Shrowdy's coffin. Mona cannot do this because Shrowdy's coffin is locked with a combination lock. Take Mona's coffin. Mona does not want to carry her "bed" with her, so you get Mona's coffin blue in your inventory.
Barb the Iron Maiden:
Left click on the Iron Maiden and then use the mouth icon to talk to this friendly lady. Use any questions / topics of conversation and use the scroll arrow to scroll down.
Again, do not skip any question / topic. During the conversation you also get new questions / topics.

The Iron Maiden says her name is Barb. Barb is a torture device with iron pins inside. Barb is the "Torture Chamber Stenographer," which means that Barb records everything the Baroness' "guests" have to say while undergoing their torture.
Barb says the Baroness always wanted to know about "the Book of Shrowd". One day the Baroness tortured a man from Cabal, who told her where to find something she needed in the book. The Baroness went after it, but she never came back. Shrowdy thought the Baroness had fallen into a trap. He searched in vain for her for months. Then he came back to the castle and beheaded the man from Cabal. Then it turned out that it was not a real man, but a golem, made of clay. Barb also says that the Cabal wore a special belt, with a golden circle, on which was a star and in the center of the star was an eye.
Ask if Barb knows the combination of the lock on Shrowdy's chest via "Do you happen to know the combination to Shrowdy's coffin". Barb says the first number was at least a 0. A blue cloud with a 0 will be placed in your inventory. Barb has never been able to see the entire combination from her position but she advises to talk to Ozzie, the fountain gargoyle in the corner. Ozzie has a better view of the coffin and maybe he knows the whole code for the lock. If you have really used all the questions / topics of conversation (everything will be gray) then you end this conversation with "Well. I better be going. It has been very nice talking with you ".
Ozzie, the Fountain Gargoyle
At the bottom right you see the fountain in which Ozzie, the fountain gargoyle, spits his water. Stand between the two coffins and then talk to Ozzie (Bizarre Fountain).

However, Ozzie only makes a gurgling noise as it is difficult to speak when water is constantly pouring from your mouth.
So Mona will first have to make sure that no more water comes out of Ozzie's mouth.
Frankie, the Rat
Look at the bottom red eyes (Rats) in the niche. Mona walks to the alcove and starts a conversation with Frankie, an Italian rat, and his partners Joey, Sammy and Dean.

You're talking to Frankie. Use every option again, don't skip any option.

Frankie does want to send one of his partners through the water pipeps in exchange for a treat. Frankie also has information on the Book of Shrowd. He says information can be found in the baroness' secret lab behind the library. If Mona wants to know more, she must first "chill" the cat Pyewacket, who guards the kitchen, and bring tha cat's collar as proof.
When you end the conversation with Frankie, open the inventory.
Take the bags of Fruit and Nuts from the inventory and click on the Rats (Use with Rats) to give the fruit and nuts to the rats.
Frankie immediately sends his partner Dean through the water pipe to turn off the water pipe. Dean gets stuck in the pipe, but luckily the water stops in the fountain. Mona has not given all bags of fruit and nuts to Frankie because you still have bags of fruit and nuts in your inventory.
Ozzie
So speak again with Ozzie the fountain gargoyle (Bizarre Fountain). Ozzie has seen that Shrowdy uses 3 numbers before he steps into his coffin: 3 and 7. In your inventory you now have a blue cloud with the code: 03-03-07. Take this cloud from your inventory and click it on Shrowdy's coffin (Use with Shrowdy's Coffin) and ...

Mona will now open up Shrowdy's coffin

In Shrowdy's coffin you will find a pillow and pictures of Mona. There is a newspaper under the pillow, but you only see it when you slide the pillow away. Look at the photos of Mona and look at the Pillow. Mona doesn't want to take the pictures. Slide the Pillow away with the hand icon from the action cross. You will then see a newspaper (Draxsylvanian Tribune). Look at the Newspaper. Then take the newspaper.

Now go down to the dungeon, via the red arrow behind the 2 chairs on the stairs

Dungeon:

A burning torch and a unlit torch hang on the wall on the right. There is also a crooked Spike hanging next to the burning torch. On the back wall, behind the stairs to the left, are 2 chains. There is a large trapdoor in the middle of the floor. On the right side is a round handle (Pit Handle) on the trap door. On the left side of the trapdoor are 2 hinges that hold the trapdoor to the ground. Take that Unlit Torch. You get a blue-rimmed torch in your inventory. You never know when you will need it.

Look at the chains hanging on the wall behind the stairs to the left. Look at the Trapdoor (Pit) and look at the round handle (Pit Handle). Try to open the hatch by clicking on the handle with the hand of the action cross. Unfortunately .... Mona cannot open the hatch because the hinges are rusted. Mona must therefore oil the hinges. So take the bottle of Body Oil from your coffin and click it on one of the 2 Hinges (Use with Hinge). Mona sprays the oil on the right hinge, but unfortunately the bottle is then empty. The now empty oil bottle goes back to your inventory. Go back to the torture chamber at the top of the stairs
Torture room
Behind Shrowdy's coffin are 2 chairs. The Headless Clayman is seated in the left chair. The right seat is a Nutcracker Chair (Crushing Device). Walk to the two chairs. Place a Fruit and Nuts bag in this chair and ...... Mona activates the chair and this crushes the nuts. Nut oil will drip from the seat of the chair. Take the Empty Bottle from your inventory and click it on the seat of the chair (Use with Crushing Device) and .....

Mona fills the empty bottle with the Nut Oil. You then have a bottle of "All Natural Body Lotion made from Froderick's Fruit and Nuts" in your inventory. Go back to the:
Dungeon:
Use the bottle of "All Natural Body Lotion made from Froderick's Fruit and Nuts" on the left hinge of the trap door.
Both hinges are now loose. Click again with your hand on the handle and ..... The trapdoor will now open.

A terrible stench comes up from the hole and it is pitch dark. Take the unlit torch from your inventory and click it on the burning torch on the wall to light your torch.

Then take the now blue Burning Torch from your inventory and click it in the hole and ....

Mona now actually takes the unlit torch from the wall and light it up at the burning torch and throws the burning torch down into the hole and discovers that there are half-decayed corpses in the hole. Exit the dungeon and the torture chamber and go back to the entrance hall and then go outside to be back on the:
Bridge:
Rufus The 'Key gargoyle'
In the entrance hall, walk out to the bridge. Take the blue-rimmed Mace from your inventory and click with it on one of the front three gargoyles

Mona flies off to retrieve the real mace from the torture chamber and then uses it on the gargoyles to force them to give the key. Rufus, the leading gargoyle, however, manages to avoid the club and the club is swallowed by the Lake Monster.
Mona has destroyed the first 2 gargoyles, but Rufus is still standing. Talk to Rufus.

Rufus was once made by the Baroness to keep her company. In his spare time, Rufus was allowed to visit the library. When Shrowdy was born, Rufus briefly became Shrowdy's playmate. After Shrowdy complained about him to the Baroness, Rufus was banished to the bridge, where he had to keep the key in his mouth. Rufus only wants to hand over the key when Mona gets rid of the raven Edgar, who keeps shitting him full of bird droppings.
Raven Edgar
Continue to the right, to the still closed boathouse door. 2 braziers hang from the stone door frame. Above the left brazier you can just see the bottom of a turret. That turret is the residence of Edgar the raven. Click on the bottom of that turret and then choose the fly option in the action cross.

Mona turns into a bat and together with Froderick she flies up to the turret. On the turret, Raven Edgar is doing his laundry. To the right of Mona an Angelic statue is wobbling on the eaves. Try to push the statue down, hoping to smash Rufus the gargoyle with it.

Unfortunately, Mona is not strong enough to push the statue from the roof. Take the blue-rimmed Rusty Sword from your inventory and click it on the statue.

Mona is now going to pick up the sword from the entrance hallband use it to work the statue down. However, Froderick warns Mona that Rufus isn't exactly underneath the statue, so there's no point in throwing the statue down now. First, Rufus has to be in the right place. So Mona stops her attempt to bring the statue down but leaves the Rusty Sword stuck in the statue. Talk to Edgar now.

Edgar thinks that Rufus shouldn't complain. Edgar always suffers from a blockage in winter, due to a lack of rotting meat. You know where to find rotting meat. Edgar feels a little lonely here in the tower and cut off from life in the rest of the world.
When you've followed the conversation all the way and ended it, take the Newspaper (The Draxsylvania Tribune) from your coffin and click it on Edgar to give him the newspaper.

In exchange for the newspaper, Mona gets a Clothespin, which Edgar doesn't need right now. Fly back down via the red down arrow. Mona turns herself back into the bat and flies back down to the bridge. Go back to the Entrance Hall and then to the Torture Chamber and then to the:
Dungeon:
Back in the dungeon, left click in the square trapdoor hole. In the action cross choose the flight option again but ...... Mona does not want to fly into the hole herself to get rotting flesh out of the hole. Open your inventory and take out Froderick and then click with Froderick in the hole.

However, Froderick also refuses to fly the hole. Froderick has nothing against rotting flesh, but he can't stand the stench either. Open your inventory again. In inventory, combine the Clothespin with Froderick. So pick up the Clothespin in inventory and then click the clothespin on Froderick. You then have a blue-rimmed Froderick with clothespin. Open your inventory again and now take the blue-framed Froderick (Froderick with Nose Pin) out and send him into the hole.

Froderick returns with a piece of rotten meat. In your inventory you then have a blue bone with meat (Corpse Jerky). Go back, through the Torture Chamber and the Entrance Hall, to the Bridge. Walk all the way to the right again on the bridge. You now get the red Up arrow on the bottom of the turret. So right click the red up arrow and Mona and Froderick fly up again, to Edgar.

Edgar:
Take the blue-rimmed bone (Corpse Jerky) from your inventory and click on Edgar and ...

Froderick will now actually collect the bone and give it to Edgar, who has to do what a bird does. Down on the bridge, Rufus sees it coming and jumps to the side. So Rufus is now right under the statue, so now Mona can push downthe statue. The sword is still at the bottom of the statue. So left click on the Sword and choose the Hand option in the action cross and .....

Rufus falls to pieces. Right click the red down arrow again to fly back down.
Bridge

Now only his head is left of Rufus. Talk to the Rufus Head. You don't get any options for conversation now, but Mona and Froderick are now going to insult and threaten Rufus. This is too much for poor Rufus and he will spit out the key. Mona will then pick up the Key herself. In your inventory you then have the Key to Bridge Door. Walk to the right again, to the door. Take the Bridge Door Key from your inventory and click it on the door (Use with Metal Door) and the door will finally open

Mona enters the tower and sees the boat on the shore. Unfortunately the oars have disappeared. Then suddenly Shrowdy's ghost appears. Because he was made with black magic, he only lost his vampire body. Shrowdy doesn't want to let Mona leave the castle. Shrowdy crosses the oars and hangs over the boat. Mona, because she is a vampire, cannot touch the cross and bat Froderick is too weak. They will have to find someone else who can solve this problem.

B: The Book of Shrowds
Dining room
From the boat, go up the long wooden stairs and you will arrive in a large dining room. From the dining room you can go to 4 other locations. On the left is the exit to the Boathouse. Behind the dining table is a balcony. The church organ is on the balcony. You enter the Bridge through the doorway under the balcony. To the right of the balcony is the stairs to the Library. To the right of the stairs is the passage to the kitchen is the passage to the kitchen.

On the large dining table there is a plate, a sugar bowl (Sugar Bowl) and a cup with a straw (Sippy Cup). There's also a knife on the table.
Click on the Cup (Sippy Cup) to grab it. Mona does not need the cup but she takes the straw from the cup. Take the Knife, which is to the right of the board. Go to the:
Kitchen:
Look at everything you can look at with the eye of the action cross. On a shelf, in the niche to the left of the doorway, you will find a Can of Cat Food. Immediately take the can from your inventory and click it on the Demonic Can opener, which is on the table. Mona automatically empties the can into the food bowl, which is on the floor to the left of the table.

Cat Pyewacket is now approaching, but does not want to eat this food. Place your cursor back on the top shelf of the niche where you picked up the can of cat food. The left can is now a hotspot and that left can is a can of cat food for Siamese (Siamese Cat Food). Now grab this Siamese Cat Food can and open it again with the Demon Can Opener.

Mona automatically pours the food back into the food bowl. This time the cat will eat the food. Talk to the cat now.

So this is the cat Pyewacket, which rat Frankie has to;d Mona about. Pyewacket used to be the baroness' witch cat. Pyewacket's job was to guard two very special books in the library. Pyewacket also had some limited magical power at the time. Today Pyewacket is mainly engaged in hunting the rats, which it also eats.
Pyewacket wears a collar around his neck. While Pyewacket is eating, take the Knife from inventory and then click with the Knife on Pyewacket to cut the collar loose.

Walk back to the dining room and then go through the door, under the balcony with the organ, and you will come out on the bridge.
Back on the bridge you go again, via the Entrehal, to the:
Torture room
Take the cat collar from your inventory and click it on the rat eyes in the niche.

Frankie accepts the collar and keeps his part of the deal. Frankie gives Mona the 2 titles of books that she must pull out of the library and put back in order to gain access to the Baroness' secret lab. The blue-rimed book titles (Secret Book Titles) go into your inventory. Go back to the Entrance Hall and then to the Bridge. Walk over the bridge to the right again and through the opened metal door back into the dining room. In the dining room, now go up the stairs to the:
Library:

There is a reading table, a desk and 2 bookcases in the library. On the reading table are a coloring book (Coloring Book) and some crayons (Crayon). Look at the coloring book in which Shrowdy drew a newt. Get out of the coloring book via 1 of the 2 red arrows. Grab a crayon. Walk to the right bookcase. Then take the 2 blue Books (Secret Book Titles) from your inventory and click with them on the right-hand bookcase and.............

Mona looks for these 2 books in the bookcase but she does not find them. The filthy rats lied ... Frankie gave Mona the wrong book titles. On the Baroness' desk is a Sticky Note Pad and the Baroness's Journal. Look at the Journal with an eye in the action cross. However, Mona cannot open the diary to read it. Froderick says "Visit Von Kiefer, a dot and then com", something Mona finds very strange

NB: Back in 2009 you could only read the diary on the internet. You had to connect to the a web site via this link www.vonkiefer.com to read the journal on-line. Unfortenately now in 2021 that web site doesn't exist anymore so there's now way to read this journal...at least I couldn't find it
Left of the journal is a small yellow notepad (Sticky Note). Look at that Sticy Note. The yellow note block will appear large in your screen. Mona can still vaguely see the impression of what the baroness wrote on the previous sheet. Stay in this close-up screen but open your Inventory. Take the Crayon from your inventory and click it on the notepad and .....

Mona scratches with the grayon over the notepad and the print is then legible. Read the text through the eye in your action cross. The Baroness has listed the titles of 4 books: "A Teen Campers Guide to Crystal Lake", "Draxsylvania on 2 pints a day" "The Dark Night Returns" and "Sharpening your Fangs: A Parent's Guide to Raising the Perfect Vampire". Zoom out via the 1 of the red arrows
Now left click on one of the bookshelves in the right bookcase and then choose the Eye in the action cross. In your screen you will then get one of the shelves with books. Use the red arrow on the right to zoom out of the cupboard and use the green down arrow and the green up arrow to go up or down to the other shelves of the bookcase. There are 5 shelves of books for you to view. Click on each book and Mona will name the title of the book. You can see that there are also symbols on the spines of the books. Cat Pyewacket is standing between the books on one of the shelves.

NB.: The bookcase also contains the book "The Abbey". The Abbey is the title of an Adventure Game released by Crimson Cow, like A Vampyre Story. The Abbey is also known as "Murder in the Abbey". When you have looked at all books on all shelves, zoom out via the red arrow. Mona has no idea what to do with the books. Maybe it would be wise to talk to cat Pyewacket again. So walk back to the left and go back to the dining room and then back to the:
Kitchen

Kat Pyewacket is still eating. Talk to Pyewacket again and now ask the beast, "We found the titles of the secret library books. Can you tell us more about them?". Pyewacket is too tired to answer your question, however. The rats always try to sneak into the kitchen when she's sleeping and she never wakes up fast enough to get them. So she tries to stay awake now. End the conversation and go back to the dining room, the bridge, entrance hall and then to the
Torture room
Talk to the rats in the niche again and say, "We were thinking we might be able to leave some food out for you. What time do you think you're going to go up to raid the kitchen?" Frankie wants to know why Mona wants to know the time when he and his mates are going to raid the kitchen. Froderick then says that they don't want to leave the food in the kitchen for too long because of the cockroaches. Frankie then says that he and his buddies want to go to the kitchen around 3am. Say goodbye and go back to the:
kitchen
Go back to the kitchen and talk to cat Pyewacket again and say "Hey, we found out what time the rats are going to raid the kitches. It's 3 A.M". Pyewacket is delighted with this information, because now he has a chance to sleep until then. As a thank you, Pyewacket gives Mona the tip to swap the two secret books in the library. You now have the blue-rimmed swapped books (Secret Book Titles) in your inventory. Say goodbye to Pyewacket and go back to the:
Library
Walk back to the right-hand bookcase. Take the blue- books (Secret Book Titles) from your inventory and click them again on the right bookcase and ........

This time the trick works and the left bookcase slides open to reveal a secret passage.

Go through the secret passage and you end up in the:
Laboratory
Mona has ended up in a large cave and she is standing on the right suspension bridge. There is a brief chat between Mona and Froderick. In the middle of the cave an island "floats". Above the island hangs a Demon who fills the bottom of the cave with hot green snot.

When Mona and Frodi are finished, click the red arrow on the "island" to direct Mona to it. This is the actual laboratory. Look at everything. To the right behind the waterfall of snot is a Chalkboard with a recipe. To the left behind the snot waterfall you will find a Magische Orb, the Refrigerator and a Bunsen Burner. To the left of the refrigerator is the Potion Table with 3 small brown bottles on it. In front of the of snot is the Demonic Combination Lock. Also look at the Snot waterfall because it contains a Magical Item (Mysterious Item). View all these things with the eye of the action cross.

Look at the Chalkboard and then read the recipe in close-up and then click on it with the eye of the action cross so that Mona reads the recipe.

The Magic Orb appears to be the lab's power center, according to Froderick. The refrigerator is frozen shut and can not be opened now. If you look at the Bunsen burner you can see the thing in close-up. The 3 bottles on the potion table are empty. Each bottle has a symbol. Look at each of the 3 bottles. From left to right these are the Heart Beaker, Diamond Beaker and the Clover Beaker. Just look at these 3 bottles now, so don't take them.

Froderick thinks they need to put a plug in the demon's nose to get the Magic Item from the beam of snot. If you look closely at the snot you will see all faces in it. You can see the Magic Combination Lock in close-up again when you click on it with the eye in the action cross. You can see that the lock consists of 4 rings with symbols on them. In the center is a circle with colored stones.

You can turn the rings, with the red arrow that you get on each of the 4 rings. You have also seen all these symbols on the books, in the bookcase in the library. Don't do anything with the lock now. Exit the close-up via one of the red arrows at the edges of the screen and then go back to the library, via 2 times the red arrow on the right edge of the screen
Library:
In the right bookcase you now have to find and view the 4 books that the Baroness wrote down on the yellow note.
So left click again on the top shelf of the right bookcase and then choose the Eye again in the action cross.

Het slot wordt vastgehouden door een Demon die zijn tong uit zijn bek heeft hangen. Het is nu de bedoeling dat je elke ring gaat draaien zodat het symbool van het boek recht onder de tong komt te staan. In Ring A is dat de groene Ruit. In ring B is dat de Z. In Ring C is dat de gekantelde Maan. In ring D is dat de Spiraal. Maar je moet dit ook in de juiste volgorde doen. Op elk van de 4 ringen krijg je de RODE PIJL, als je de cursor recht onder de TONG op de ring plaats. Je draait een ring dus door met de rode pijl te klikken.
|
Via the red down arrow you go down to the next shelf. Look up the next 4 books and then write down the symbol on the spine of the book. Top Shelf = "A Teen Campers Guide to Crystal Lake Basin" This book has a
green diamond shape on the spine of the book. |

When you have found these 4 books and noted which symbol they have, and in what order they are on which shelf, zoom out and go back to the:
Laboratory
Zoom in again on the Demonic Combination Lock.
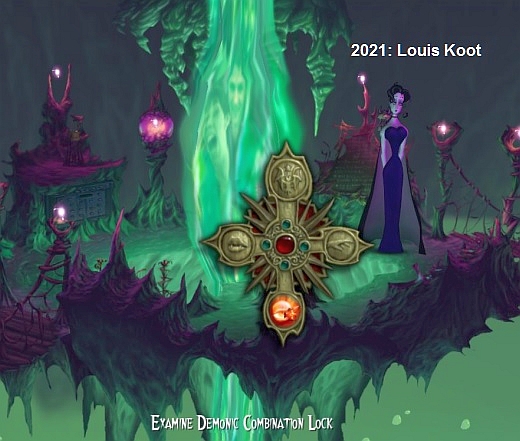
The lock consists of 4 rings. Name the 4 rings, from the inside to the outside, A, B, C, D.

You see symbols in each ring. In each ring 1 of the symbols is the symbol of 1 of the 4 books that you have found in the right bookcase. The lock is held by a Demon who has his tongue hanging out of his mouth. You now have to rotate each ring so that the symbol of the book is right under the tongue. In Ring A this is the green Diamond. In ring B it is the Z. In ring C it is the tilted Moon. In ring D it is the Spiral. But you also have to do this in the correct order. On each of the 4 rings you get the RED ARROW, if you place the cursor directly under the TONGUE on the ring. You turn a ring by clicking the red arrow.
here is the solution
Step 1: Place the red arrow in the middle of Ring A and then click as many times as necessary to click the green diamond under the Tongue.
Step 2: Place the red arrow on Ring D under the tongue. Then click as many times as necessary to click the Spiral under the Tongue.

Step 3: Place the red arrow on Ring C under the tongue. Then click as many times as necessary to snap the Tilted Moon under the Tongue

Step 4: Place the red arrow on Ring B under the tongue. Then click as many times as necessary to click the Z under the Tongue

It must then be like this.....

You hear "CLICK" and automatically zooms out and .... The ray of snot has disappeared and Mona automatically takes the Magic Object from the column.

It is the "Book of Shrowds," the Baroness' secret book. The book will appear large on your screen.
Left click on the book and then choose Hand in the action cross to open the book.

Only 1 flap of the book opens. Now keep clicking, with the red star cursor, until Mona has opened a flap with instructions for making a Golem.

Read the text on the flap so that Mona reads the text aloud. You can also click on the figure, the Golem, to make it move. Mona reads what it takes to make a Golem and that is: Belladonna. Bone from a murdered virgin. The breath of a gargoyle and The eye of a salamander. Mix everything in a crystal bottle and then spray it on a human shape, made of earth or stone.
C: Create a Golem:
A: The ingredients for a Golem
1: Get Belladonna
Do you remember seeing Belladonna bulbs in the window box on Mona's balcony? Those plants just have to grow. Because the Demon, which hangs above the island, now no longer vomits snot, you can now also open the refrigerator. So left click on the fridge and then open the thing with the Hand in the action cross.

The fridge is full of bottles and other things. Place your cursor on the items in the fridge. You then read the name of the bottle / item. Look at everything with the eye of the action cross and hear Mona's and Froderick's commentary. From left to right there is the following items in the refrigerator: Can of Diet Cherries Gone Wild; Can of Blueberry Sucker Punch; Can of Yellow D'Mellow; Schotchman's Miraculous Growth Fertilizer"and Dry Ice. Take all these items from the refrigerator.

Mona doesn't takeThe Dry Ice and the Plant Grower (Schotchman's Miraculous Growth Fertilizer) but you get it as blue items in your inventory. In your inventory you then have 3 cans of soda in the colors Yellow, Blue and Red and the blue Dry Ice and the blue Plant Grower.

Go back to the library and then to the dining room. In the dining room, take the exit again, under the organ balcony, to the bridge.
Then to the Entrance Hall and then to Mona's bedroom.
Mona's bedroom:
Go back to the balcony. Take the blue Plant Grower (Schotchman's Miraculous Growth Fertilizer) from your inventory and click it on the planter box

Mona flies back to the laboratory and now she actually takes the bottle of Plant Growth Solution from the refrigerator. She flies back to the balcony with the bottle and empties the bottle into the planter. The flower bulbs come out immediately. The bulbs have now grown into Belladonna flowers in the planter.Take a Belladonna Flower from the planter box. You've got your first ingredient.

2: The Breath of Rufus the Gargoyle:
Bridge:
As you have read in the "Shrowdy Book", your drink must be mixed in a crystal bottle and then sprayed. In your inventory you now have a spray bottle, namely the perfume bottle. You could catch the breath of Gargoyle Rufus in that bottle, at least ... if Rufus is willing to cooperate. Exit the balcony and Mona's bedroom and go to the Bridge, where the head of gargoyle Rufus still lies. Continue to the head of Rufus. Left click on the Rufus head and then use the Hand to try to break Rufus' mouth open.

Rufus doesn't talk anymore, but bites all the more when Mona tries to open his mouth.
Take the bottle of Perfume from your inventory and click it on the Lake Monster click spot, left under the bridge and ....

Mona empties the bottle over Inky the Lake Monster. The spray bottle is now empty. Take the, now empty, Perfume Spray Vial from your inventory and click it on Rufus's head. Rufus, however, refuses to breathe into the bottle. Take the clothespin from your inventory and click it on Rufus to put the clothespin on his nose. Then take the Empty Perfume Vial from your inventory again and click it again on Rufus and ................

You enter the close-up of Rufus who is now trying to hold his breath.

Rufus can only hold his breath for a few seconds at a time but then he has to exhale. You then see a puff of breath coming out of his mouth. You have to catch that cloud with the bottle.As soon as you see Rufus start to gasp for breath, click with your red star cursor on him to collect his breath cloud in the bottle. So you have to count how many seconds Rufus holds his breath and then click on him just before Rufus has to exhale to catch his puff of breath.
If you click too early or too late, the cloud of breath will not enter the bottle and you will have to keep trying this until you are successful. If you managed to catch a puff of breath, Mona says "YES" and then she stands up and you are automatically out of the close-up. In your inventory you then have the filled perfume spray bottle (Crystal Vail with Some Ingredients)

A tip to solve this puzzle: Rufus takes a breath first and then keeps his mouth tightly closed for a few seconds. After a few seconds, Rufus runs out of breath and has to exhale in order to inhale again. When Rufus exhales a cloud of breath comes out of his mouth and you have to collect that cloud in the bottle by quickly clicking on Rufus. Try to count how many seconds Rufus can hold his breath before having to open his mouth again Then, just before the cloud comes out of his mouth, click on Rufus
3: The Eye of a salamander
Library
Once you've caught Rufus's breath, go to the library. Shrowdy's coloring book is on the reading table. Take a closer look at the coloring book again, so left click and then choose the Eye in the action cross. Shrowdy has drawn a salamander. The magic is in the eye, the Baroness wrote. Stay in the close-up screen and open your inventory. Take your Knife from your inventory and then click with the knife on the Salamander to cut the drawn eye of the salamander (Paper Eye of Newt) out of the page.

Get out of the Close-up. Now all you need is the Virgin Bone Marrow.
4: Virgin bone meal
In the library, go through the secret corridor to the Laboratory again. Continue to the island and then walk as far as possible to the left, to the left suspension bridge. You will then get the red arrow on the left edge of the screen. Right click this red arrow and Mona will end up on the left suspension bridge.

Then right click the red arrow in the red tunnel entrance, left, and Mona ends up in the:
Private dungeon of the Baroness:

Mona stand at a canyon. On the other side, a skeleton (Skeleton) hangs in shackles. To the right of the skeleton are 3 windows. In the middle of the canyon you will see two Wooden Columms with a platform on top. At the bottom of the 2 columns is a plinth (Columm Supports). Behind Mona you see, in the red-lit tunnel, a Note on the wall and there's also a lever.
Read the Note through the Eye in your action cross. Mona reads that the skeleton, that's on the other side of the canyon, is from an Irish nun and that her virginity had been checked. The Baroness needed blood from a virgin. To the left of the note is the lever that should lower the platform so you can go to the other side. Left click on the lever and then choose Hand to pull the handle down. Unfortunately ..... The platform does not drop, everything is stuck.
Left click on the skeleton and then choose the fly option and Mona will fly to the skeleton to get some bones from it. Unfortunately, this does not work because the bones of the skeleton are too fragile. So Mona and Froderick return without bones. Check out the windows. Froderick says the windows face east. Go back to the laboratory via the red arrow and then the red arrow on the island.
Laboratory:
Read the recipe written on the blackboard again. So left click on the blackboard and then choose the Eye to get in the close-up. Then click on the text again and choose the eye again so that Mona reads the recipe again. It is a recipe for an acid that attacks organic matter. Maybe you can get those wooden columns down with this. You need:
|
3 cups, the following: Purple Heart, Orange Diamond, Green Clover. |
Get out of the close-up of the blackboard. Walk to the left, to the table where Potion Table is. Zoom in again on the 3 bottles and now pick them up all three.
You get 3 blue bottles in your inventory. On the bottles you see a heart, a clover and a diamond.

Behind the bottles is a Demon Snot Spout. You have to fill the 3 bottles.
Take the blue Heart Bottle from your inventory and Use it with the Demon Spout and Mona will fill the heart bottle for 1/3 with Demon Snot.

In inventory you have 3 soda cans, one blue, one green and one yellow. However, you need purple. To get purple you have to mix red and blue. However, you cannot just mix the drinks together because then they will evaporate. The red can is a diet drink, so a drink without sugar. Go back to the Dining room. There is a Sugar Bowl on the large dining table. Take the red Can of Diet Cherries Gone Wild from your inventory and click it on the sugar bowl.

Mona puts a scoop of sugar in the red can to sweeten it. Go back to the library and then again through the secret corridor to the
Laboratory:
Mix the drinks
|
Purple drink Zoom in again on the 3 bottles that are on the bottle table. -Take the Red Can from your inventory and click it on the real Heart Bottle to add the sweet drink from the red can to the snot.
The Heart on the bottle will now turn purple.The blue heart bottle in your inventory now also has a purple heart. Red drink -Take the blue Diamond Beaker from your inventory and click it on the Demonsnot Faucet to also fill this bottle for 1/3 with snot.
The diamond on the real bottle and on the blue bottle is now red. Green drink -Take the Blue Clover Bottle from your inventory and click it on the Demon Snot Faucet.
The Clover on the real bottle and on the blue bottle is now green.
Pink drink Now you need one more pink drink. Zoom out of the bottle table and now zoom in on the Bunsen burner, which is on top of the refrigerator. According to the recipe, the order is: Warm, Cool and Warm. This refers to the order in which you have to pour the drinks into the kettle. Purple and green are cool colors, orange is a warm color. The boiler is on the burner (Cauldron's Content). At the bottom of the burner is the wing nut (Control Valve) to light the burner. -Now take the Purple Heart Bottle from your inventory and empty it into the Kettle of the burner.
"It Worked, It Worked" Mona shouts . You get the Cauldron with Ingredients and the blue, now empty, Clover Bottle in your inventory. According to the recipe, you should now heat the mixture hot with demonic heat. You can light the Bunsen burner, but the flame is nothing. That is not hot enough. Zoom out of the Bunsen burner and zoom in again on the table where the three bottles are on. Take the blue Clover Bottle from your inventory and click it on the Demonsnot Tap to fill the real clover bottle with 1/3 snot again.
Zoom out of the bottle table and go back to the library and then to the dining room and then to the: |
Kitchen:
Organic Acid:
The cat is still eating. On the left is the large furnace. On top of the furnace is a Cauldron. You see 2 grates under the boiler. The right grate is the Warm Furnace grate.Take the Cauldron with Ingredients from your inventory and place the cauldron on the right grate. However, the furnace is not hot enough. Take the Clover Bottle, which contains the snot, from your inventory and click it on the same grid (Use with Warm Furnace) and .....

Mona walks to the right and throws the bottle into the furnace through the right grate. The cauldron is now properly heated and Mona will automatically puts the cauldron with Acid in your inventory. Now to get the bonefrom the skeleton. So leave the kitchen and go back to the laboratory through the secret hallway in the library and then on to the:
Private Dungeon of the Baroness:
Take the Cauldron with Acid from your inventory and click on one of the 2 Wooden Columns and .....

Mona flies to the 2 columns to pour the acid into both pedestals. The 2 columns will disappear and the platform will bend. The skeleton also falls.

Left click on the skeleton and then use the Hand in the action cross to pick up a few bones from the skeleton, but ...
The ghost of the Irish Shannon appears and Mona is startled and backs away. Talk to the ghost and don't skip any conversation options.

Shannon wants to guard her bones until the bones can be buried in blessed ground. So Mona is not allowed to take bones from Shannon.Shannon waits for the sun to rise when her beloved William will come to rescue her. Only then will Mona be able to grab a few bones from the skeleton, but of course Mona cannot wait that long.
So Mona must somehow cause the sunrise to happen earlier than usual. So she must deceive Shannon. Exit the dungeon by going 1 screen to the right. Mona is then again in front of the left suspension bridge in the entrance of the dungeon. Above Mona you will see a red lit hole, you now get the red Up arrow on that hole.

Right-click the red Up arrow and ... you will end up in the:
Theater:
Mona is on the scene. Left and right you get the red arrow on the green curtains.

Via the right red arrow you go back through the hole to the laboratory, but of course you don't want that now. Go through the left curtain to the left. Mona is then on the left side in front of the stage. You see the Control Panel with 3 levers. There is also a Note on the panel. A large Dedication Plaque hangs above the stage. On the left and right there is a Mask on the plaque. The left mask is a Tragedy Mask and the right mask is a Comedy Mask. On the left and right wall are the heads of various animals. On the left wall are the: Bunny, Buck Head, Boar. On the right wall you will find the: Beaver and Bear.

First, view everything except the levers with your eye in your action cross and listen to commentary from Mona and Froderick. Then walk to the levers. Left click on the note and then choose the eye in the action cross to have the note read by Froderick. Then, with the eye of your action cross, look at the Levers and listen to Froderick's explanation. With the 3 levers you can lower the various background curtains from the stage. According to Froderick, there is one with a large sun. He sometimes startled Shrowdy by suddenly lowering this curtain. That can come in handy!
Try to move the levers with the hand of the action cross. So left click on the Control Panel and then choose Hand. Unfortunately .... the levers are stuck because Froderick dropped his nuts and fruit in the slots. Froderick doesn't fit in the slots of the levers though, so there's no point clicking the panel with Froderick. At least not like that. Open your inventory and then combine the Straw with Froderick. Then take the blue Froderick with Straw from your inventory and click it on the control panel and .....

Froderick sucks up the nuts. Click again, with the hand of the action cross, on the control panel and now you get to the close-up screen of the 3 levers. Behind the levers you see the stage. Each lever moves in a slot. Each slot has 6 positions after which you can click the lever. Number the levers, left to right, A, B, C. Number the positions in each slot, top left to bottom right, 1 to 6.

You move a lever to a certain position through the slot by clicking in the slot at that position. Each handle lowers a panel by one third of a background. There are multiple backgrounds. You now have to lower a complete Sunrise or a Sunset background with the 3 levers. You do this by clicking each lever to 1 specific position in its slot. Make sure the 3 levers are in the starting position and that no background cloths have come down on stage.
Then click: Lever C to position 3. Lever B to position 2. Lever A to position 6 and ...... On the stage you now see a complete sunrise.

Get out of the close-up and click the red arrow in the gate to the left of the stage to return to the stage. Then take your Knife from your inventory again and click it on the sunrise background signs (Use With Theather Backdrop) and ..... Mona cuts out the theater cloth and puts it rolled up on the stage.

Take the piece of rolled-up theater cloth. You get the blue in your inventory because Mona thinks it is too heavy to carry with her now. Go back through the hole via the right red arrow and Mona is again in front of the entrance to the Private Dungeon of the Baroness; Walk through the tunnel again. Behind the ghost you see windows. Look at those windows again. According to Froderick, they face the east, where the sun rises. Combine the blue theater cloth with Froderick in your inventory. Then click with the blue Froderick on the Windows (Use with Dungeon Windows) and ......

Froderick flies out to hang the sunrise canvas on the outside against the windows. Mona meanwhile talks to ghost Shannon. You can't do anything for a while because Froderick needs some time to put the canvas in front of the windows. Then Froderick comes back and the ghost goes to the windows to watch the sunrise. Unfortunately, Shannon is not completely convinced that the sun has actually risen.
Open your inventory. Left click in your inventory on the Animal Noise Toy and look at it in close-up through the eye of the action cross. The animal Noise Toy has a red lever and a red arrow. You can click the red arrow on 8 different animals and then hear the sound by clicking the red lever. Well .... at sunrise you usually think of the sound of a rooster. So click the red arrow to the Rooster and then click on the red lever to check if you also hear a rooster crowing.

Leave the red arrow on the rooster and get out of the close-up. Then combine Froderick with the Animal Noise Toy in your inventory. Mona asks if Froderick wants to take the toy behind the theater screen. So take the blue Froderick from your inventory again and click it on the dungeon windows. and ......

Froderick flies away and, after waiting patiently for a few moments, you hear the rooster crowing. Now Shannon believes it is morning and she flies off to her be with her Wilhelm
Left click on the Skeleton again and then choose the hand again in the action cross and ....

Mona walks to the skeleton and she finally takes a Bone from the skeleton. Pheew ... that was quite a hassle to get abone. Now the bone marrow has to be ground out of the bone. Hey ... isn't there a Grinder on a table in the torture room? Exit the private dungeon and go to the torture chamber. You can do this via the long route or via the short route. The short route is through the hole above the entrance of the private dungeon to the Theater stage, then through the left curtain and then right bottom to the Entrance Hall. In the Entrance Hall you go to the bottom right to the:
Torture room:
Behind Barb, the iron maiden, is the Grinder on the table. Take the Bone (Skeleton Bones) from your inventory and click it on the Grinder and ...

a little later Mona finally has the bone powder of a murdered virgin (Skeleton Dust).
So now you have all the ingredients to brew the drink you need to make a Golem. You need a Golem to escape from the castle.
B: Make a Golem:
Mona is still in the torture room. Open your inventory. Combine in inventory the Paper Eye of Newt, the Bone Marrow (Skeleton Dust) and the Belladonna with the Perfume Spray bottle (Crystal Vail with some Ingredients) and you have made a Golem drink. The Perfume bottle is now in your inventory (Mixed Potion Ingredients). The drink should be sprayed on a human made of stone or soil. Well ... in the left chair, which is behind Shrowdy's coffin, sits the headless Clayman. Look at the Clayman again with your eye.
Froderick now says that this Clayman has been a Golem, and Barb has already told you that too. However, the Clayman has no head....... But ... on the bridge is still the head of Rufus the gargoyle. So go back to The bridge. Walk back to the Rufus Head and try if you can pick up the head now ..... but of course Rufus does not let himself be picked up just like that. Open your inventory and take out the blue Banner that you took in the entrance hall from the wall at the beginning of the game. Click with the Banner on the head of Rufus and .....

Mona flies back to the Entrance Hall to really take the banner off the wall. With the Banner, Mona flies back to the bridge and wraps Rufus's head in the banner. In your inventory you then have the blue Rufus Head in Tapestry. Go back to the Torture room.......Click with the blue Rufus Head In Carpet on the Clayman. Mona and Froderick now actually pick up the Rufus Head and put the Rufus Head on the Clayman. Rufus has some comment. Take the Perfume Spray Bottle (Mixed Potion Ingredients) from your inventory and click it on the Clayman and .....

The Clayman, with the head of Rufus, comes to life. Mona orders Clayman / Rufus to go to the boathouse to chase Shrowdy's ghost away.
This happens but it does not go entirely according to plan because Clayman and the boat also disappear.
D: Escape from the castle:
Boathouse and on the lake:
Mona and Froderick are standing on the dock of the boathouse, without a boat. Luckily Mona has her blue coffin. Click with Mona's Coffin on the water and .....

Mona flies off to retrieve her real coffin from the torture chamber and Mona and Froderick sail away across the lake in the coffin. But of course Inky the Lake Monster pops up and Inky isn't going to go away. Open your inventory. Now combine the Empty Crystal Perfume Vial, now empty again, with the Perfume Refill Bottle.

You fill the spray bottle with the perfume from the refill bottle. Take the Perfume bottle from your inventory and click it on Inky to blind Inky with it, so that we can sail past Inky. However, it does not work because Inky is too fast and keeps diving away. Open your inventory again and take the blue ice cube out. Click on Inky with the blue ice cube (Dry Ice).

Mona rows back to get the ice from the refrigerator in the lab and she tosses the ice from the bridge into the lake. Inky will eat it right away. Continue to the right and then through the door to the dining room. In the dining room, go through the left door to the boathouse and go down the wooden stairs. Click with the red arrow on Mona's coffin. Mona sails up the lake again, up to the shivering, reappearing Inky. Take the Perfume Spray bottle from your inventory again and click it again on Inky.

This time Inky shivers so much from the icy ice that he does not duck in time. Mona blinds him and Inky goes away
Madame Strigoi
Mona continues on to the shore, where the two vampire hunters are just preparing for a visit to the castle.

The old man says that a vampire will never voluntarily leave the castle and say hello. Then Mona comes sailing. When Mona has lugged her coffin ashore, she hears Madame Strigoi's voice in her head. This gypsy, who knows a lot about things that should be hidden, calls Mona to her via her crystal ball and Mona ends up with Madame Strigoi in her caravan.

Mona still pretends that she's not a vampire at all, but Madame Strigoi nevertheless convinces Mona that she definitely needs her coffin to sleep in it or Mona will die.
We are now in
2021: Walkthrough by: Louis Koot


