2020: Walkthrough by: Louis Koot
If you have found this walkthrough via google search or via another site then you have probably not visited my site.
A lot more very detailed game walkthroughs can be found on my site at: www.pcgameswalkthroughs.nl
The screenshots that are in this walkthrough are made when I played the game in 2012 and wrote the Dutch walkthrough, so the text on all screenshots is in Dutch. I do not have the game anymore so I can't make new screenshots with English text on it. I'm sorry for this but it can't be helped
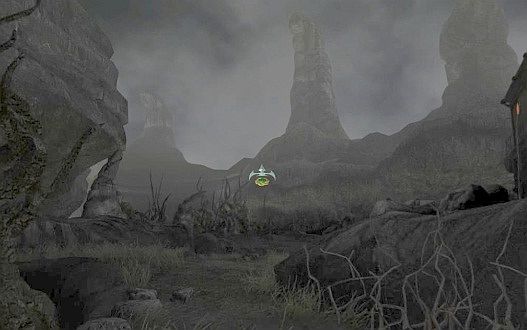
When you start the game for the first time, you will first see a video that summarizes what has happened in Aura Fate of the Ages. Then click on "New Game" to start The Sacred Rings. The game then begins with the intro video in which we meet Bargul, the leader of the Legion of Shadow.
We experience through the intro movie that not Durad but Bargul is the actual bad guy. With the help of the powers of Wizard Gugon, Bargul has Durad under control, but Gugon fears that he will not be able to sustain that much longer. Bargul orders his soldiers to find and capture Umang and he gives them his Amulet to help them with this. Then we see Umang fall from the sky and fall unconscious on the floor, just in front of a house. The resident of that house, Nikifor, comes out of the house and walks towards the unconscious Umang ...... and here the game begins for you ..... in the House of Nikifor .....
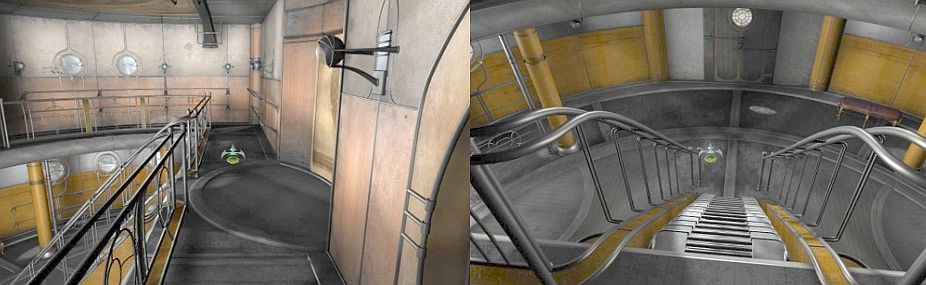
Chapter 1: The House of Nikifor:
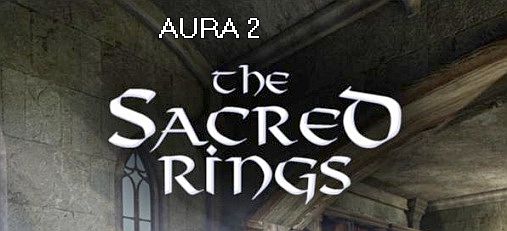
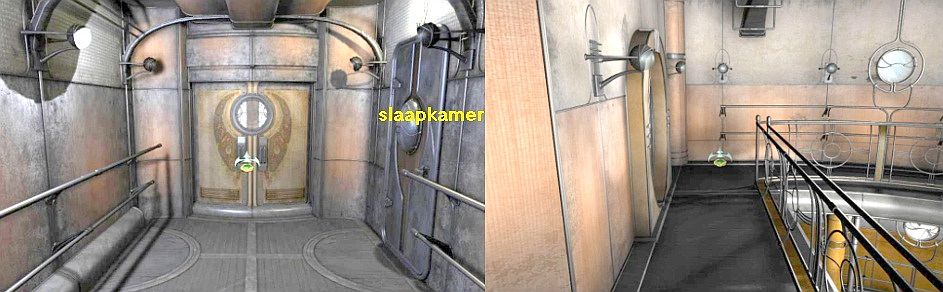
Bedroom:
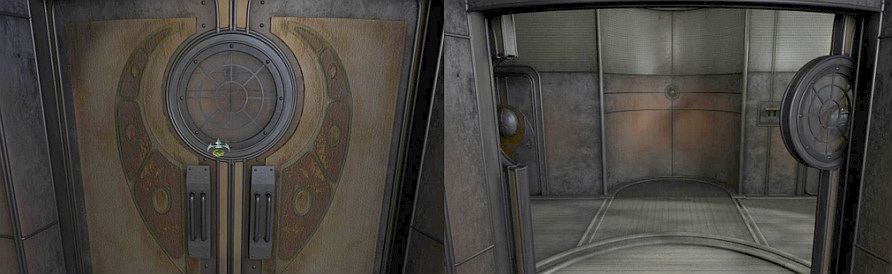
Nikifor has carried Umang into his house and Umang has regain his consciousness. Nikifor tells Umang that he can sleep here in his house. There is no way out of this world. However, Nikifor does not intend to simply give Umang free board and lodging. No .... Umang will have to work for a living. The first job Umang has to do for Nikifor is figuring out how to open the large steel door. Umang finds it a bit strange that Nikifor does not know how to open a door in his own house. Meanwhile, Nikifor goes to bed to take a nap.
Umang, that is you, has the Amulet and Tetrahedron in inventory. Right click opens your inventory. On the right side of your inventory is the Big Book where all documents and drawings are stored. So this book is Umang's Journal.
In the right corner of the bedroom is a round cupboard. Go forward, turn right and continue forward to the round cupboard doors.
Open the right door of the round cupboard by clicking on the door knob. There is a book in the cupboard.
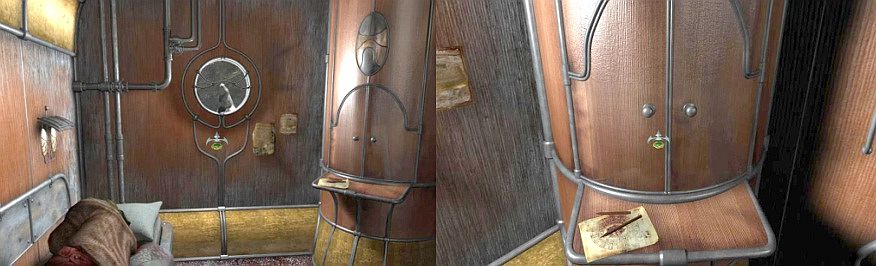
Take the book from the cupboard and browse through the pages to read them.
In this book you can read about various animals and various elements. Those animals and elements are numbered 1 to 29 and with each animal and element there is a statement and you can read the meaning. Now read especially what it says at number: 1 = Elephant. 7 = Owl. 17 = A stack of Wheat. Note down what you read.
1 = Elephant = I depend only on myself.
7 = Owl = Decisiveness is more important than eloquence.
17 = Stack of Wheat = It belongs to the grazer instead of the reaper.
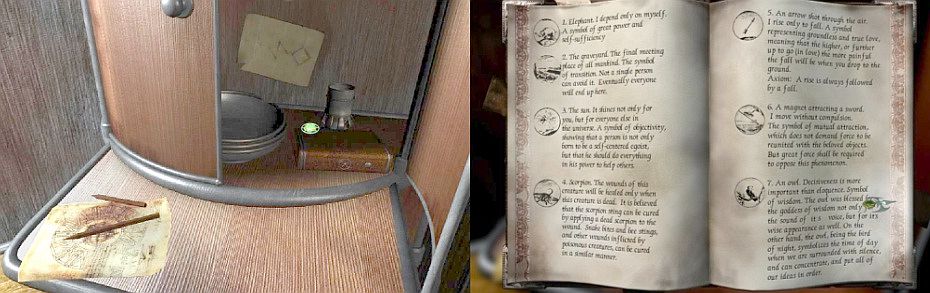
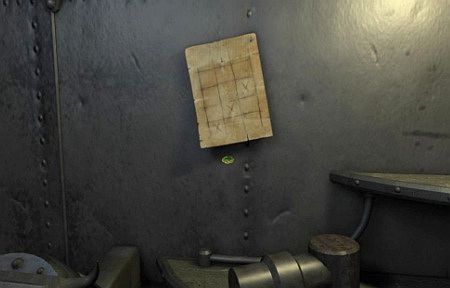
Close the book if you have read this information and have written it down. You close the book via the down arrow. The book is placed back in the cupboard. Close the cupboard door via the down arrow. Turn around and head forward to the door of this bedroom. Click forward on the door and you will end up in the hallway. There are double doors on both sides of the corridor. Turn left. You see the double doors on the other side of this short corridor. On the left you see a gray door.
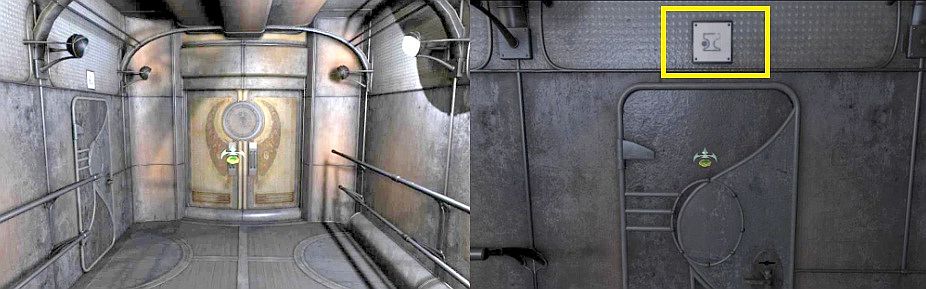
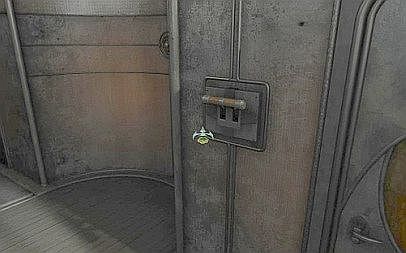
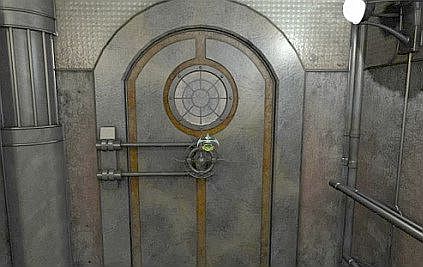
Go forward to the double doors and then turn left to the gray door. Try if you can open this door. Unfortunately this door is locked. However, you will see a white symbol above the door. Draw the symbol because you will have to be able to recognize it later. Turn left. You look back through the corridor and now see the double doors on the other side, near the bedroom door. Go forward and then click on the double doors. The doors slide open and you end up on a balcony.
You can descend to the ground floor via the stairs under your feet, but we will do that later. You can also take a look outside on the narrow outside balcony through the doors. But don't do that now either. Turn left. In the corner you see another door. Go forward, turn left and open the door. You end up in the:
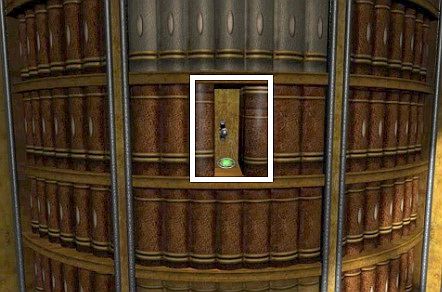
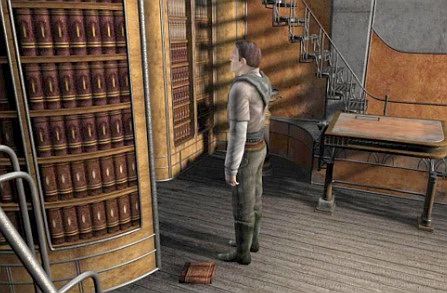
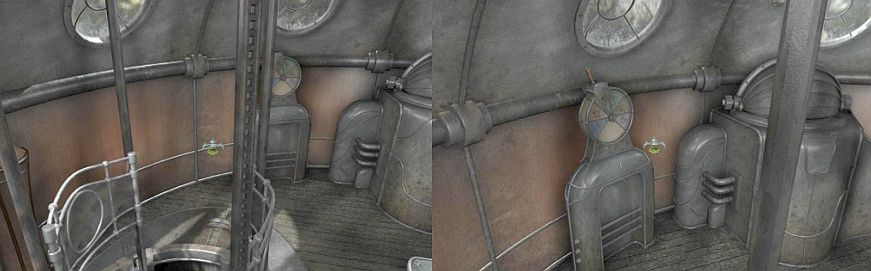
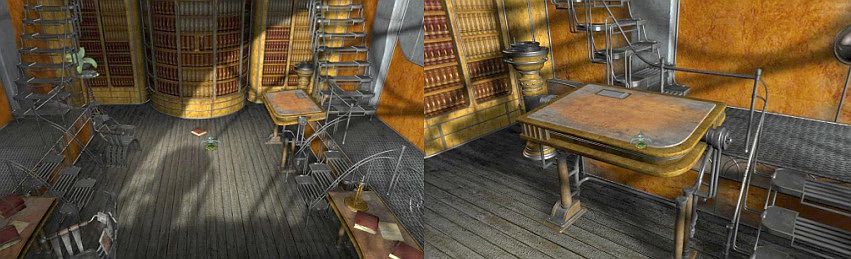
Library:
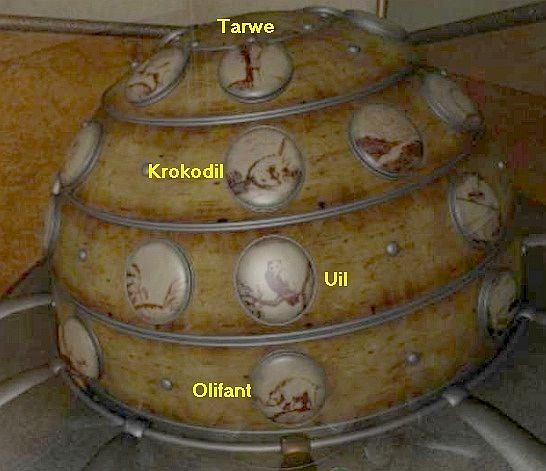
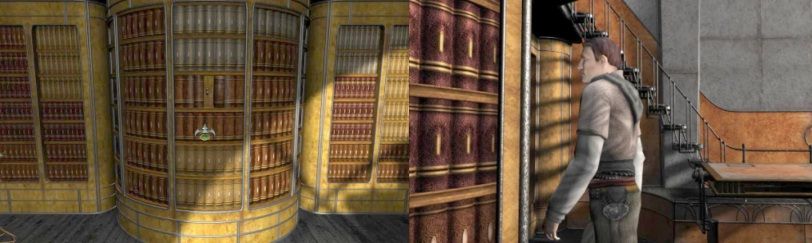
There is a large bookcase on the left wall and on the back wall. There is a staircase in front of the bookcase. A bird cage hangs in the right part of the bookcase. There are 3 compartments in the bookcase that have a door. There are 2 scrolls in the open box, to the left next to the stairs. There is a desk on the right wall. In the corner, behind the desk, is a Globe.
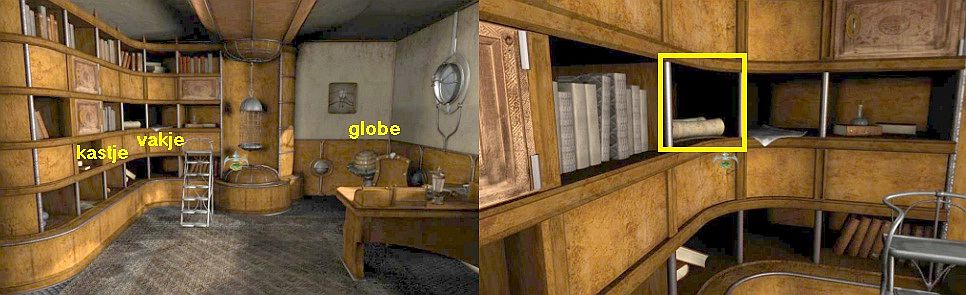
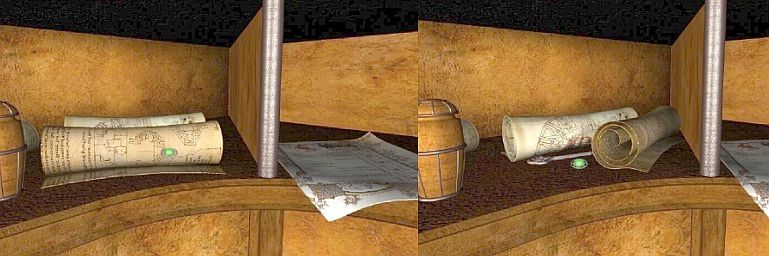
Go to the stairs in front of the bookcase. To the left of the stairs are 2 scrolls in one of the open compartments of the bookcase. Go forward to that box and then click on the front scroll. You slide the front scroll away and a key appears. Take the key, it turns out to be the Cabinet Key.
Step backwards via the down arrow. Now turn left. You now stand in front of the lower door that closes the lower compartment. Click forward to the door. Open your inventory and then take the Cabinet Key and click the key in the keyhole of the door.
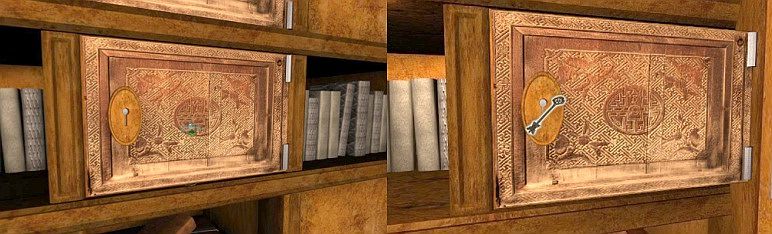
The door opens. In this small compartment is a white letter. Take the letter. Read the letter
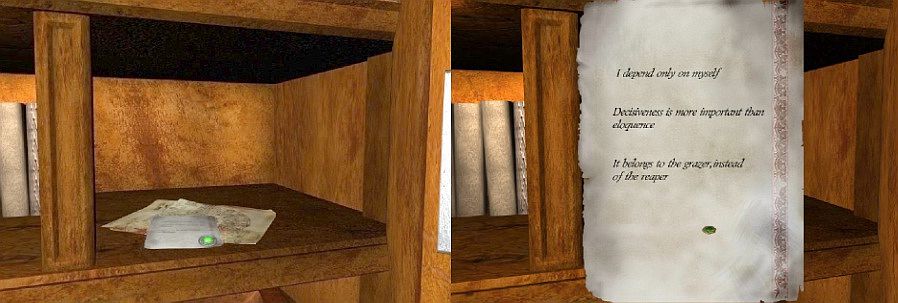
I depend only on myself Decisiveness is more important than eloquence It belongs to the grazer, instead of the reaper, it says on the letter. Those are the quotes that you also read at the numbers 1, 7 and 17 in the book that is in the bedroom cupboard. Do you remember which 2 animals and which element they were? 1 = Elephant, 2 = Owl and 3 =Wheat.
Zoom out via the down arrow. Then turn clockwise so that you see the Globe that is in the corner.
Aim your forward arrow on the globe and then move forward to the globe. You are zoomed in on the globe.
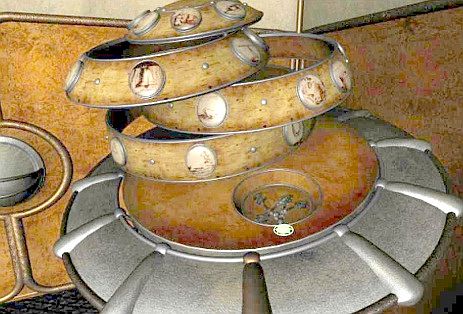
The Globe:
The Globe has 4 Segments that you can rotate. In each segment there are medallions where you see the pictures of the animals and the elements from the book that you have found in the bedroom closet. So now you have to place the Elephant, Owl and Wheat medallion in the segments at the front. But the Globe has 4 segments. So you don't know 1 medallion. Number the segments, from top to bottom, as A, B, C, D.
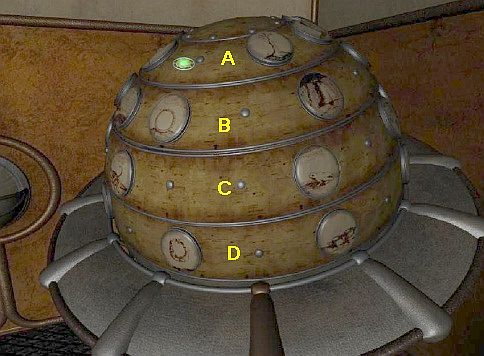
|
Click on Segment A until you have the Wheat medallion at front. The correct medallion must also be placed in segment B. You just don't know which medallion it should be. So just click on Segment B as many times as you need to get the right medallion in Segment B at front. It turns out to be the Crocodile
As soon as you have the right Medallion in front of Segment B, the 4 segments turns open
There are 4 keys in the Globe. Take the 4 keys from the globe. They are the 4 Generator Room Keys. The globe will close again. |
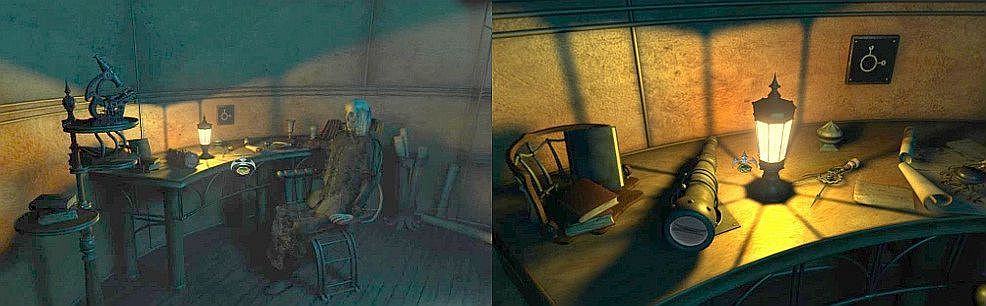
Turn around to the desk. Go forward to the desk. You will stand next to the desk, so turn left and look down at the desk.

There is a book on the desk and on the edge of the desk are 2 trays. The left tray is open and empty, the right tray is closed with a roller shutter. Zoom in on the desk. You zoom in on the book on the desk. It is a Captain's Diary

Click on the book to open it and read the 2 pages. You read: "Today we visited the Manula Valley. We found a strange looking Portal there. I believe it is a Keepers Portal. It seems that time still had some influence on war. Wonder where this portal will end up and whether it still works ". At the bottom of the left page is a drawing of the Portal. On the right page you can read: "I finally succeeded in calculating a complete set of coordinates with which you can travel from the Manula Valley to" The Forgotten Land ". This will be my last trip. The route from Manula is South, South, West, West, South, West, North, West, South ".Close the book and ...
Nikifor has softly entered the library and wants to know why you are snooping around in his things. Umang asks what Manula is. Nikifor once visited the Manula Valley once. Umang then says that he thinks Nikifor's house can move, that the house is a vehicle that can move. Nikifor finds this a ridiculous idea and begins to doubt Umang's intellectual abilities.
Nikifor has disappeared again and you have put the book back on the desk.
Now click with your cursor on the roller shutter of the right tray, which is behind the book on the edge of the desk.
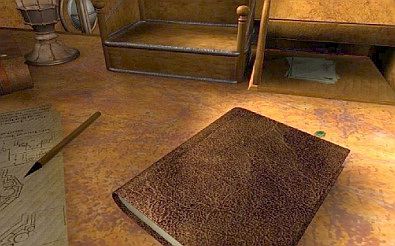
The hatch rolls open and you take a sketchbook from the roller shutter box.
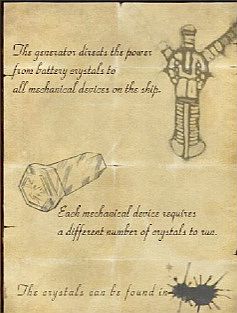
The sketchbook has 5 pages. You then hear yourself read a piece of text: "I had some trouble activating all the devices in the vehicle. But once I had put all the Crystals in the right places it went without saying". On the 1st page you can see and read about the generator.
The generator gets power from so-called Battery Crystals that are in all mechanical devices. However, each device needs a different number of those crystals. The bottom line tells you where you can find the crystals for the devices, but unfortunately ..... a large ink stain prevents you from knowing your crystal location
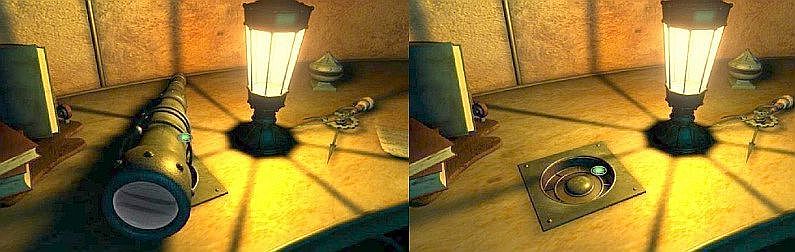
Browse to the following pages of this sketchbook. You now see a sketch of the Telescope and you read that a key is needed to activate the telescope. The key of the telescope is in the save and you will see a clue about how to open the safe.
Scroll to the 3rd page. You see 4 symbols that are used for the Navigation Map. Scroll to the 4th page. This is the "Self Destruct" page and you read that you must use the self destruct function very carefully, at the right time and then make sure you get away. Scroll to the 5th page. You see a code. It is a code for a Security Box.
All codes and the like are automatically stored in your Journal, so it is not really necessary for you to copy symbols and codes. Put back the sketchbook and open the Journal book in your inventory and then browse it. You see that in your Journal all hints and instructions found so far have been saved. So if, for example, you will soon have need of the Security box code, you can find it in your Journal.
Close the Journal and zoom out of the desk via the down arrow. Turn around to look at the doors of the library. In the corner to the left of the doors is a pillar. Go 2 clicks forward to the doors and then turn left and go to the pillar in the corner.
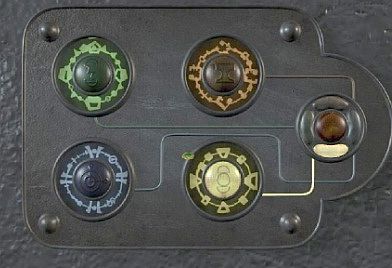
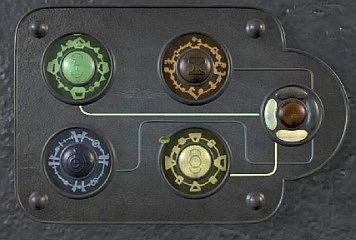
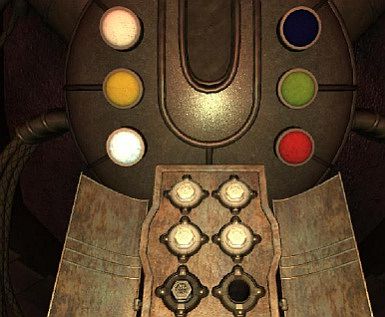
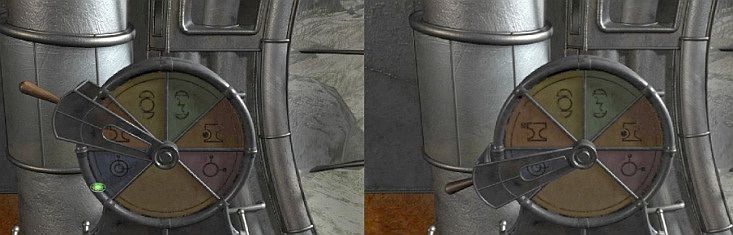
You come in the close-up of the code panel that sits on the pillar. This is the:
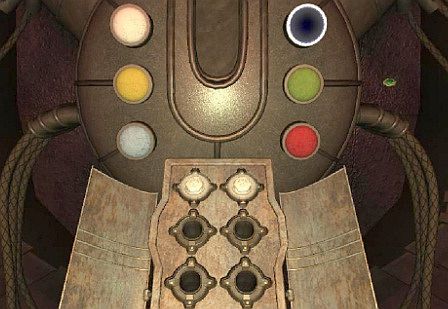
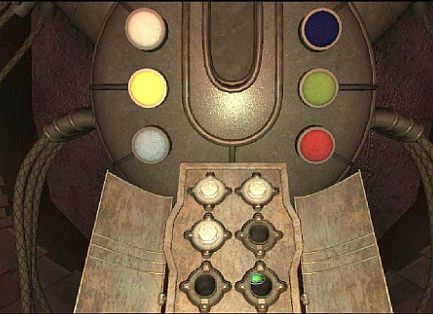
Security Box.
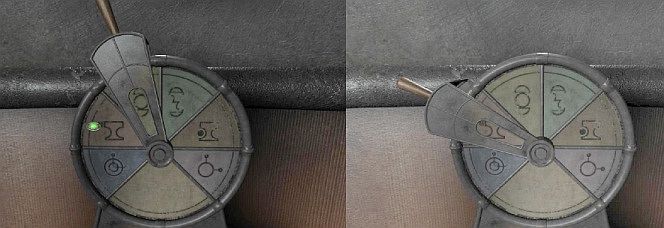
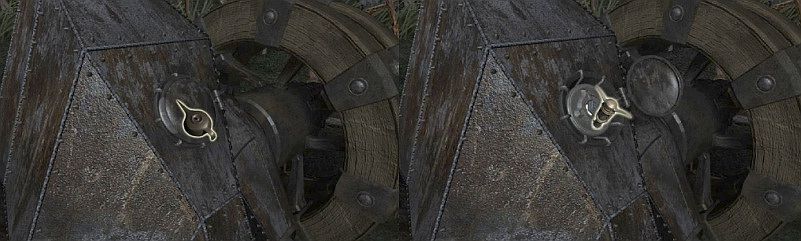
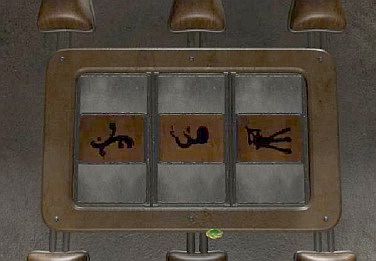
The panel has 2 compartments. In the left compartment are 3 windows with arrows above and below the windows. In the right box there is 1 small window with an arrow underneath. Above these 2 boxes you see an arc box with a symbol in the middle segment that belongs to a device in the house. In the window of the right box, you now see 2 bars. Those 2 bars represent 2 crystals and belong to the symbol that you see now at the top of the arc box. You must now put the Code of this Security Box in the 3 windows of the left box, as you saw it on the last page of the sketchbook.
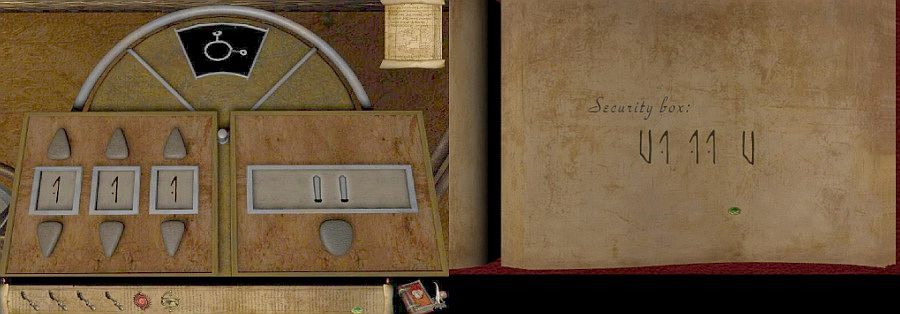
You can read this code in your Journal. You put the 3 symbols of the code in the 3 windows by clicking on the arrows, below and above the windows. If you have put the code in the 3 left-hand windows then click on the button below the window in the right-hand box and ....
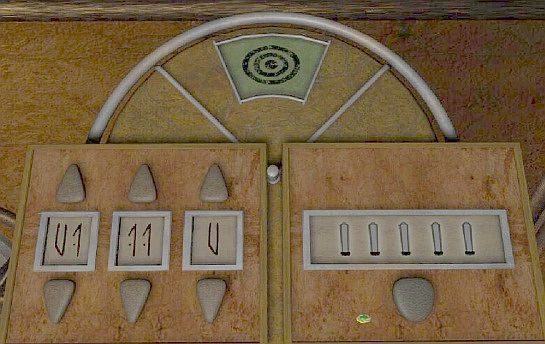
A new symbol appears in the arc box and in the right box you "read" the number of Crystals that belong to this symbol. So every time you click on the button in the right-hand box, a new symbol appears in the arc box and you see in the right-hand box the number of bars, Crystals, that belong to that symbol. You can make 6 different symbols appear in the arc trap. Draw all those 6 symbols and note the number of bars, crystals that belong to each symbol.

The symbol that has 1 crystal is therefore the symbol that you also saw above the gray door in the hallway when you came out of the bedroom. These 6 symbols are each above a door in Nikifor's house and in the rooms behind those doors are the devices that you need to start by putting in the correct number of crystals. However, you must first find those crystals.
Have you checked all these 6 symbols and added the number of crystals? Then zoom out via the down arrow. Turn right to the double door and leave the library. You are back on the balcony. Turn right, 1 click forward, turn left and look down the stairs.
Descend the stairs. At the bottom of the stairs you are standing in front of the outside door of the house.
However, do not go outside now. Turn to the stairs.
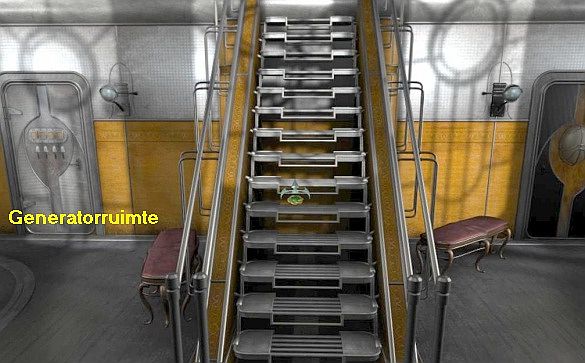
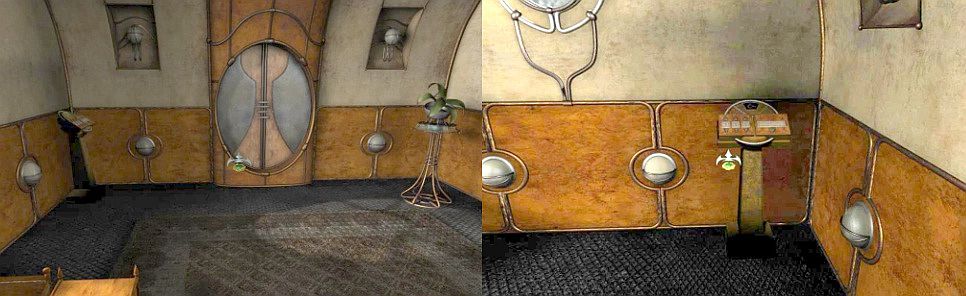
You now see a door on the left and a door on the right next to the stairs. Go, in 2 clicks forward, to the left door. You are at the door of the:
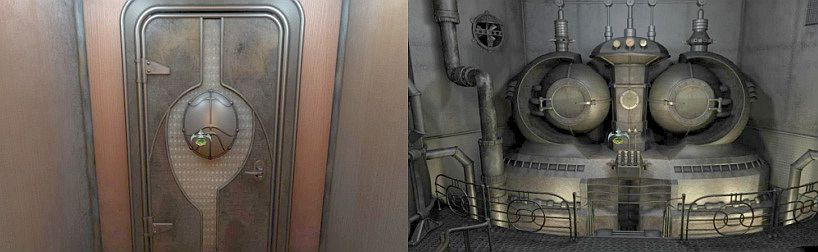
Generator Room:
|
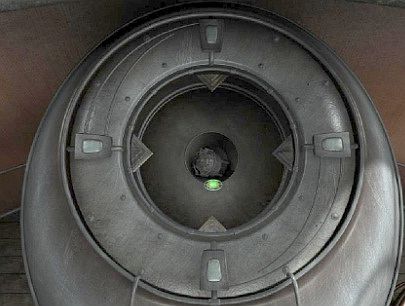
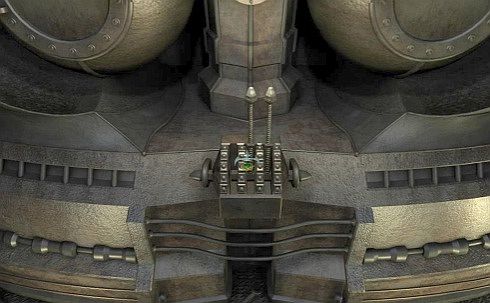
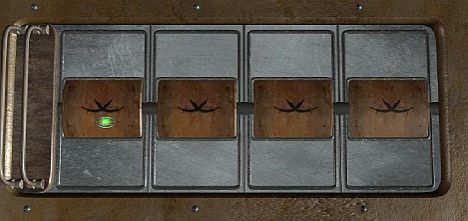
Door The door has 4 keyholes. Above each keyhole is an arrow button and above the arrow buttons you see 4 boxes. Number the keyholes, from left to right, 1, 2, 3, 4. In the Globe you have found the 4 Generator Keys. Number the 4 generator keys in your inventory, from left to right, also 1, 2, 3, 4.
As soon as you have put a key in a keyhole, a symbol appears in the box above the keyhole. So there is now a symbol in every box. You must now turn the keys so that the correct symbol appears in each of the 4 squares. You turn the keys by clicking on the arrow buttons above the keyholes. Assuming you put the 4 keys in the keyholes in exactly the same way as I did, then click once on each of the 4 arrow buttons to turn each key 1 click. Umang says "Success" and you automatically zoom out the door.
|
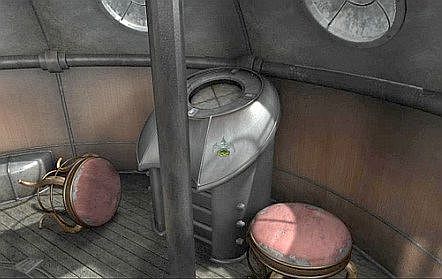
Click on the door with the forward arrow. The door opens and you end up in a dark, narrow corridor with metal walls. Turn right and look down. You see the stair hole in the floor. Go down the stairs to the actual Generator Room. You are then faced with a niche.

There is a round manometer with a lever in the niche, but you do not yet know where to put the lever, so keep off it. Turn left. You see the generators, 3 on each side. At the end there is a panel on the wall, but we will also leave that panel for a while. Turn around completely and go to and through the door. You are then in the:
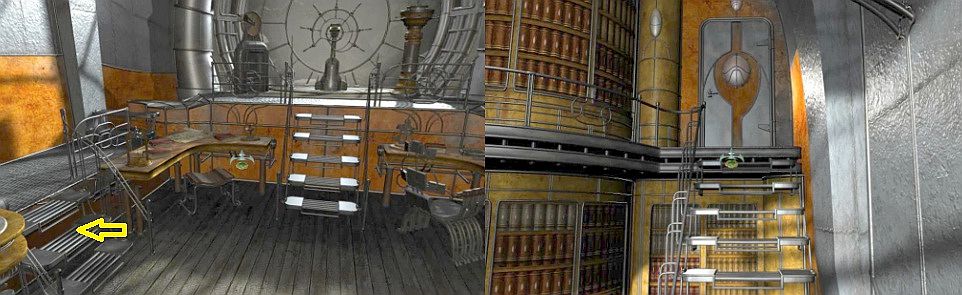
Pump room:
First look around here. Right in front of the door you see the big Pump. On the left is also a machine. To the left of the door is a semicircular work table. There is a diagram on the wall above the work table. Go forward to the corner to the left of the work table. Then turn clockwise to the work table. There is a large wrench on it the work table. Take the Wrench.
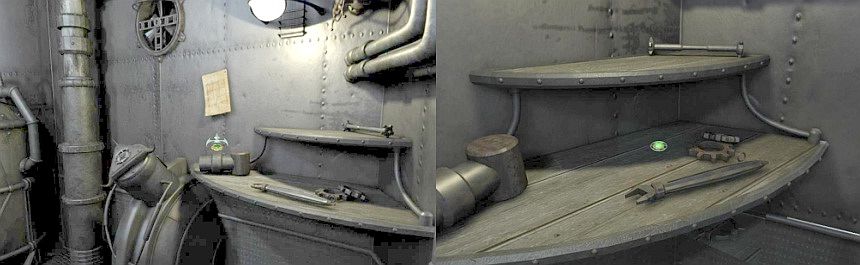
Examine the schedule on the wall. You see a diagram of 15 squares on it. There is an X in boxes 9, 11 and 13. Remember this.
Turn around so that you look at the large pumping machine again. Now move forward to the pump machine. The lever mechanism is located in the middle.
Aim your forward arrow at the lever mechanism and click forward. You are then in the close-up of the mechanism and Umang says that a lever is missing. The mechanism consists of 4 rings with dots. There is a lever between the 2nd and 3rd and between the 3rd and 4th ring. However, there should also be a lever between the 1st and 2nd ring, but that lever is gone. Take the Wrench from your inventory and then place the wrench between the 1st and 2nd ring.

Now the mechanism has 3 levers again. You must now click the 3 levers to the correct position in the slots. You have seen the position of the 3 levers on the diagram above the work table. There are 5 dots on the rings. Number the dots, from top to bottom, 1 through 5. By clicking on the levers you always click them down 1 position.
|
Click 4 times on the left lever to lower it completely. The 3 lever will automatically lift up again and the pump is now activated. |
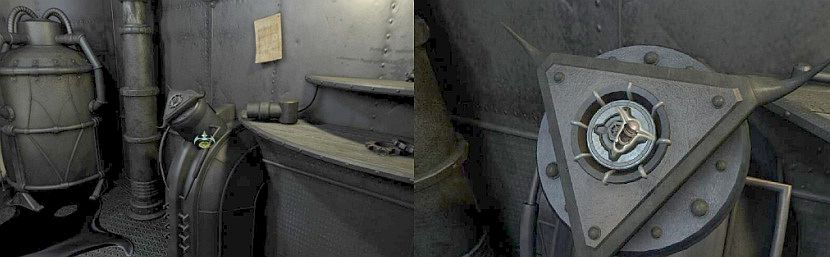
Turn around so that you look again at the door and the desk. To the right of the door you see a round "Manometer" with a lever.
So go back to the door in 2 clicks, then turn right and click forward to the manometer.
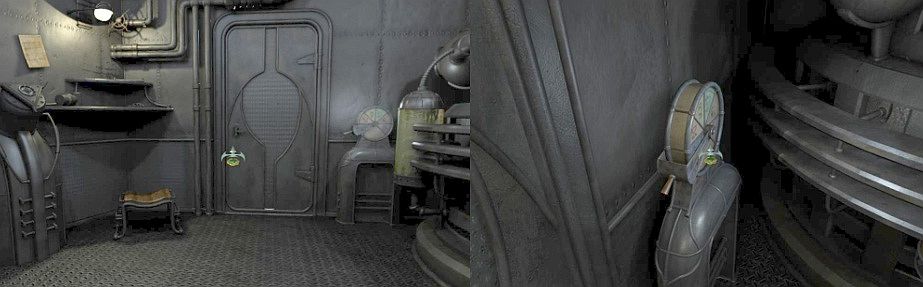
You see 6 symbols on the pressure gauge. Number the symbols, from left to right, 1 to 6. You also saw the symbols 1, 2, 5 and 6 in the Security Box. The symbols 3 and 4 are new to you. The manometer lever is now at the bottom left on symbol 1. Click on symbol 3 to put the lever on symbol 3.
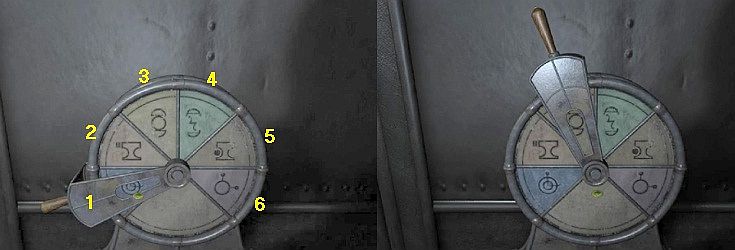
You automatically zoom out of the manometer and you are zoomed in on a panel with 4 circles, a Green Circle, an Orange Circle, a Blue Circle and a Yellow circle. In each circle there is a symbol and in the Yellow Circle the third symbol of the manometer is now illuminated. The 4 circles are each connected to the button and you will see that the connection between the Yellow Circle and the Red Button is now "open".
Zoom out via the down arrow and you are back at the manometer. Zoom out of the pressure gauge via the down arrow. Turn left and click on the door to return to the Generator Room. Go forward 1 click and then turn right. You are again in front of the manometer, in the niche in front of the stairs. Zoom in on the manometer. Well ... use the same principle as with the pressure gauge in the pump chamber. The lever of this manometer is now on symbol 2. Click on the green symbol 4 to put the lever on symbol 4.
You will then see the Circle Panel again and see that the Green Circle has now also been activated.
Zoom out twice via the down arrow. Turn left and go now, in 4 clicks, to the panel, at the back wall of this narrow Generator Room.

The panel opens automatically. This is the:
Crystal activation panel:
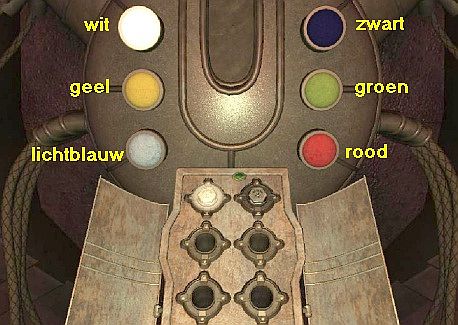
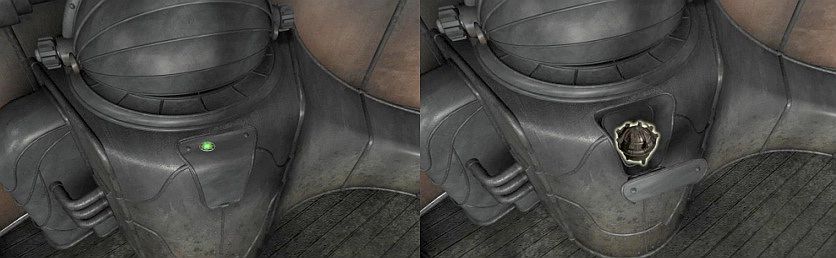
You see 6 round holes in the panel. There is already a Crystal in the top 2 holes. Above the panel you see 6 round buttons. The 6 round buttons each have a different color. There is a white button, a yellow button, a light blue button, a black button, a green button and a red button. Above the door, to the right of the bedroom, you saw a white symbol and through the Security Box you found that at that symbol 1 crystal belongs. Now click on one of the two crystals, which are now in the top 2 holes of the panel. The crystal will burn. Click on the White Round Button and the White Round Button will also light up.
You have unlocked that door next to the bedroom. Zoom out via the down arrow. Turn around and go back 1 click and ...Nikifor comes down the stairs and a conversation follows. It becomes clear that Nikifor does not know his "own" house well. Nikifor disappears again.
Go forward 3 clicks, turn right and up the stairs again. At the top, turn left and click on the door to get back to the stairwell. Continue to the front door, turn to the stairs and go up the stairs and through the large yellow doors back to the corridor.
So on the left is the bedroom. Go through the corridor to the yellow doors on the other side and then turn left again. So you are back at the gray metal door with the white symbol above it. If all is well you can open this door now. So click on the door and ..... the door will open. You end up in a small:
Storage Room:
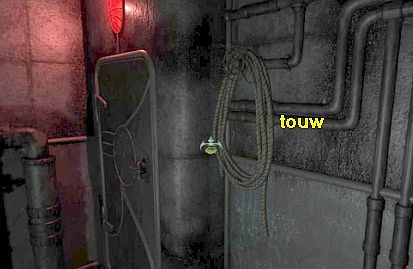
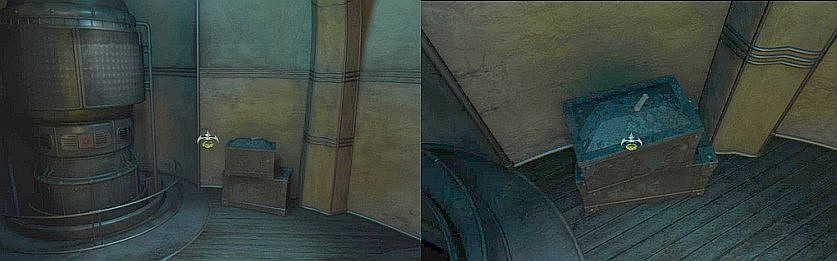
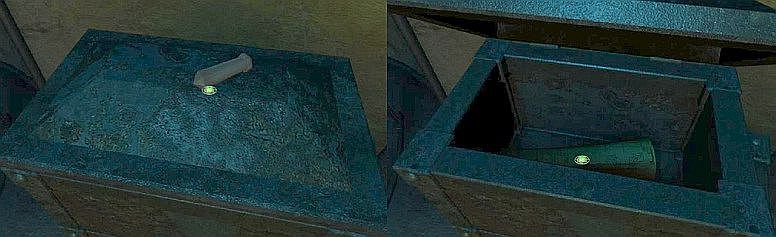
There is an open shelf unit on the rear wall. In the wall, to the right of the rack, is a closed round hatch. To the right of the round hatch is a closed cupboard. To the left of the rack cabinet is an iron barrel and on that barrel is a lamp. Go forward to the rack. Then turn anti-clockwise to the iron barrel and take the Lamp. It is a water lamp.
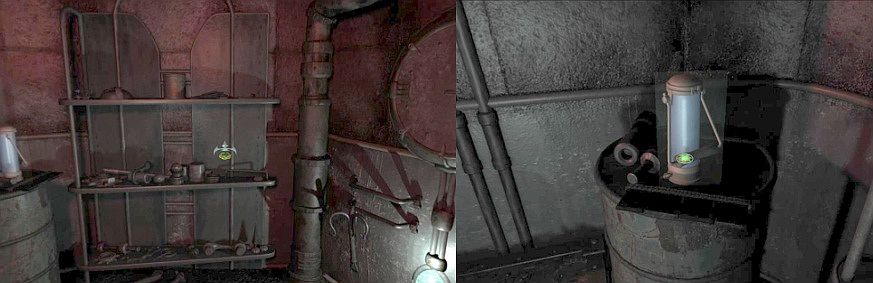
Turn it left. A rope hangs on the wall, next to the door on the right. Go to the rope. Take the rope.
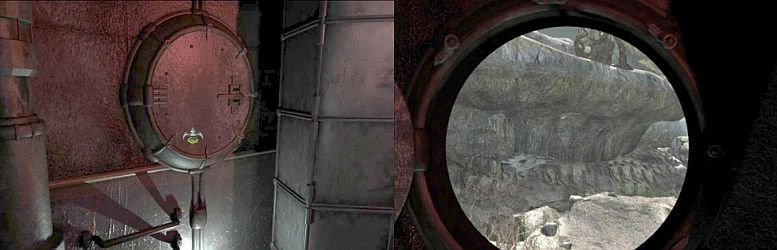
Zoom out and turn left again and go forward to the round closed hatch. Click on the hatch handle.
The hatch swings open and you look outside through the round window.
Turn right to the cupboard, which is on the right next to the window. Look up at the upper part of this cupboard and then click forward.
Click on the door handle of the upper compartment of the cupboard to open the door.

Take the Oil can and the Crystal Capsule from the now opened box. Zoom out.
Turn left again to the opened window. Look down and slightly to the left. Beneath the now opened hatch you see two metal brackets. Take the rope from your inventory. Now click the rope to the lower bracket and ..... Umang can now climb out through the window through the rope.

So now climb forward through the round window and ..... You are outside. Stand still and look down and turn back.
There is a crowbar in front of the rope on the floor. Take the crowbar.
Look up along the rope and click forward to climb back into the storage room through the rope through the window.

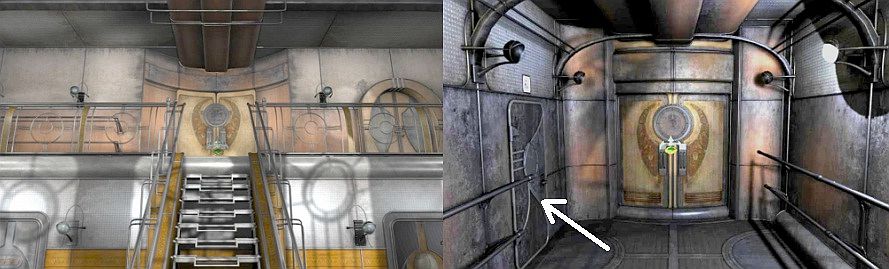
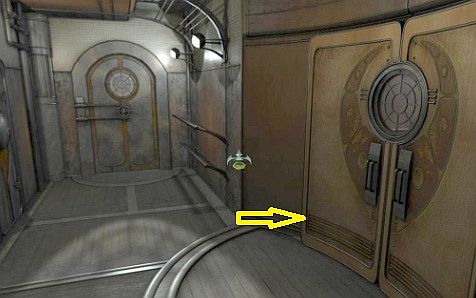
The rope is naturally stored in your inventory again. Exit the storage room through the door. Back in the corridor, turn left and go through the yellow double doors. You end up in the long corridor and face a semicircular niche.
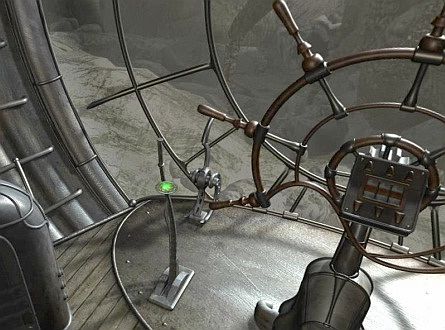
There is a door at each end of this corridor. The door at the right end brings you outside on a balcony. The door on the left is locked. Left and right next to the semicircular niche is also a door. Both these doors take you to the control room of the house. To the right of the semicircular niche is a lever that you now best leave alone
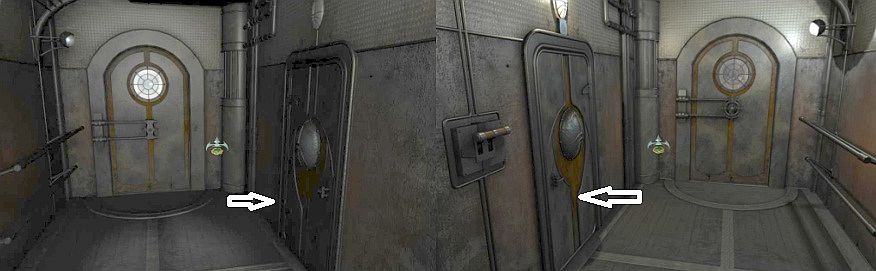
You can enter the control room through both doors, next to the semicircular niche.
So go through one of the two doors, next to the semicircular niche, to the:
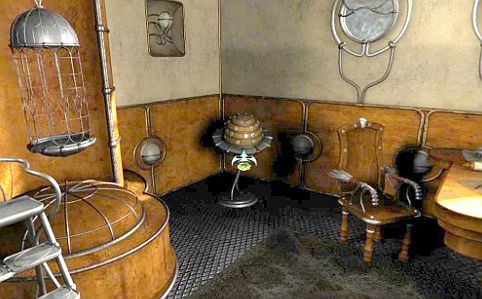
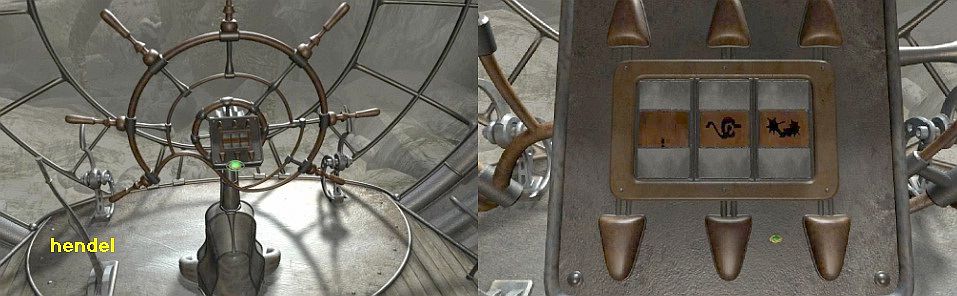
Steering wheel room:
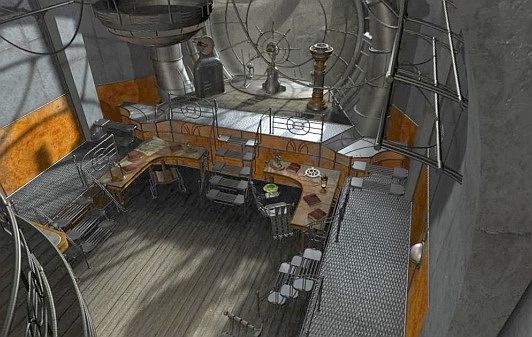
You stand on the upstairs balcony and look out over the steering wheel room. I entered the hall through the door on the right-hand side of the semicircular niche. So I am now on the right side of the balcony. But it doesn't matter if you went in through the left door. You are above the bookcase. On the opposite side stand the steering wheel in the large convex window. Go down the stairs and then go to the Steering Wheel. If you do this via the right staircase you will notice, on the way to the steering wheel, that on the right wall there is the Circle Panel on which you have activated the green and yellow circles with the 2 manometers in the Generator room.

At the steering wheel you see that there is also a manometer, but we are not doing anything with that yet. Stand straight in front of the steering wheel and then turn around so that you look back through the room to the balcony above the bookcase. Then look down and then descend the stairs to the floor of the room. Go to the round middle part of the bookcase.

One of the books has fallen out of the round part of the bookcase and is now on the floor.
So where a book should be in the bookcase is now a space visible and in that space you see a button.
Click on the button, but ... unfortunately ... Umang tells you that it is "locked".
Turn around so that you again look at the stairs under the steering wheel. You have to go back to the Generator Room to press another button on the Crystal Panel so that the button, here in the bookcase, will be activated. So go back via 1 of the 2 side steps to the one of the 2 side balconies and then walk up the stairs and leave the Steering Wheel Room back to the corridor.
In the corridor you go through the double doors back to the corridor where the bedroom and the storage room are and you follow the route back to the Generator Room.
Walk back to the Crystal Activation panel and now activate the 2nd crystal as well. Both crystals that are now in the top 2 holes are then activated. Click on the Black Round Button and it will now turn on. The white button is now off.
Zoom out and go back to the Steering Wheel room and stand in front of the round middle part of the bookcase.
Click on the button again and ...
The round middle part of the bookcase now opens and you see Umang enter the secret room through this secret door.
Secret room:
In the right corner there is a round cupboard and there are 2 boxes for that cupboard. On the left is a desk. In front of the desk a rather skinny body sits in the desk chair. Go to the desk. Could it be that the corpse in the chair is the original owner of this "house" ?. The Black Symbol is on the wall above the desk. There is a lamp on the desk and to the left of the lamp lies a telescope (Spyglass)
Click forward on the telescope. Take the telescope (Spyglass). A button will now be visible in the desktop, but don't touch it yet
Zoom out and turn around to the large round close tin the other corner of the room. This round closet has the Red Symbol. To the right of the closet are 2 crates. Aim your forward arrow on those 2 crates and then go there. Look down at the crates.
There is a Crystal on the upper chest. Zoom in on the boxes and then grab the Crystal from the top box. Then click on top of the box to open the top box
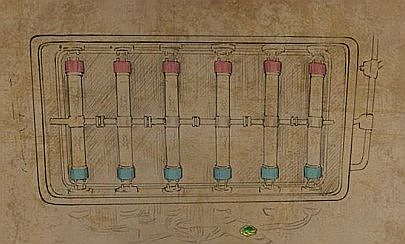
There is a rolled-up drawing in the chest. Take the Drawing from the box. The drawing is saved in your Journal, so view the drawing in your Journal. You see a system of 6 tubes that are interconnected. The tubes have a red cap and a blue cap.
Close the Journal and zoom out of the box. Turn around again and go to the desk again
Now zoom in again on the button that you exposed when you grabbed the telescope. Now click on the button and .....
The upper part of the round closet opens.
So turn around again to the round closet. In the opened upper part of the closet you can now see the 6 tubes that you also saw on the drawing that you just fished out of the box. Go forward again to the 2 crates and then turn counterclockwise to the closet and click forward to the tubes in the cupboard. You cannot do anything with these 6 tubes yet. They are not yet activated. You have seen from the Security Box that 6 Crystals belong to the Red Symbol. So to activate these tubes, 6 crystals are needed, which you then have to place in the Crystal Activation Panel. You now have 1 crystal in your inventory and there are already 2 crystals in the Crystal activation panel. So you still have to find 3 crystals
Zoom out, turn around and go through the door and out of this secret room, back into the steering wheel room. Go up or down the stairs to the doors on the balcony, above the bookcase, and leave the steering wheel room again. Back in the long corridor you go to the lever on the right next to the semicircular niche on the wall.
Click on the lever and ....
in the ceiling of the semicircular niche a round hatch will open briefly but also close again. The hatch in the niche is broken. Zoom out of the lever and turn right and go to the door at the back of the corridor. Click on the door wheel to open the door.
You end up outside on a narrow balcony. Turn to the opened door clockwise.
Click on the door to close the door. There are ladder rungs on the outside of the door.
There are 3 rungs under the door window and another 1 above the door window.
Look up and then click forward to the top ladder sport and .... you end up on it:
Roof:
On the right you see a dome with round windows and on the left a kind of machine. Between the dome and the machine is the "motor" of the lift. On the machine you see the "target" symbol that you know requires 5 crystals. The paddle wheel of the elevator is blocked by a stone. Take the crowbar from your inventory and click it on the stone and ...

You can see how Umang removes the stone with the help of the crowbar.

Turn around, look down and go down the ladder to the balcony.
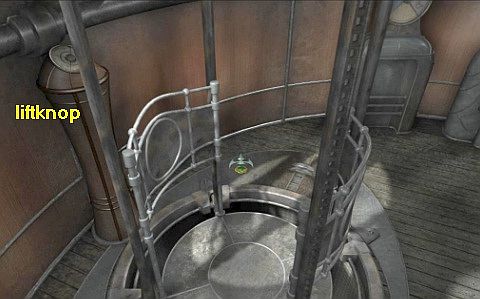
Then turn to the door and click forward on the door to open the door again. Then go forward back into the corridor and go to the lever again. Zoom in on the lever again and now click on the lever again and .... The elevator now comes down in the semicircular niche.
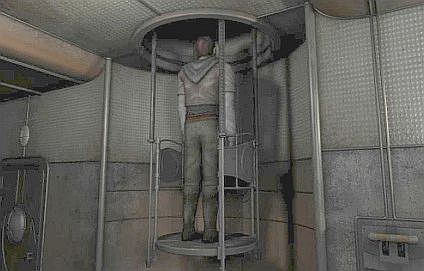
Well ... go to and in the elevator and then press the button and you'll see Umang go up with the elevator and end up in the:
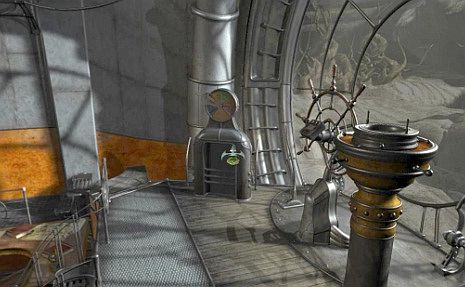
Telescope Room:
You are now in the dome that you saw when you were standing on the roof. You are still standing on the elevator and you see the large telescope in front of you. To the right of the telescope is a low cabinet. To the left of the telescope is also a low cabinet with a roller shutter at the top. The manometer stands in front of that roller shutter cabinet. Now first take a look at the low cabinet that is to the right of the telescope.
There is a round screen on top of the cabinet. On this cabinet is the yellow symbol and from the Security Box you know that 3 crystals belong to this symbol. However, you must first activate this cabinet and you must do so on the Crystal Activation Panel in the Generator room. So zoom out, turn around and get back on the elevator.
Press the elevator button to go down with the elevator and then follow the route back to the Generator Room.
Generator Room:
How to put a new crystal in the Crystal Activation Panel:
Zoom in again on the Crystal Activation panel. You have already activated the two crystals in the top 2 holes. You have 1 crystal in your inventory. However, you cannot just put the crystal from your inventory into the holes in the panel. Open your inventory and then take the Crystal Capsule out.

The Crystal will then automatically be in the capsule. Now place the Capsule above the 2nd hole in the left row so that the capsule "lights up". Then click the capsule into that hole and .... the Crystal is then pressed into the hole. The empty capsule will automatically disappear to your inventory. Click on the crystal to activate it. The 3 crystals are now all three activated. Now click on the Yellow Round Button to activate the machines in the Telescope Room.
Zoom out and make sure you come back to the Telescope room.
Telescope Room:
|
Back in the Telescope room you go back to the cabinet, which is to the right of the telescope. Make sure that you are completely zoomed in on the cabinet. You are then in the round screen of the cabinet. The screen is divided into 4 segments by an X and also consists of 3 layers. There are 4 buttons around the screen, Up, Right, Down, Left.
You must now click on these 4 buttons in the correct order and you must do this in 3 steps. Step 1: Click: Up, Down, Right, Left. The top layer segments in the screen will then disappear. Step 2: Click: Right, Down, Up, Left. The middle layer segments has then disappeared. Step 3: Click: Down, Right, Up, Left. The bottom layer segments has also disappeared and the cabinet is now open. The Telescope Key is in the cabinet.
Take the Telescope Key. |
Zoom out of the cabinet. Turn around so that you look at the pressure gauge on the other side of the elevator.
Then, via the elevator, go to the manometer.
To the right of the manometer is the cabinet with the roller shutter. That cabinet still needs to be activated. Zoom in on the manometer. The lever of this pressure gauge is now on symbol 3, but must be set to symbol 2. So click on Symbol 2 to put the lever on it.
You will see the 4 Circles panel again, but nothing has changed. But you have now given power to the roller shutter cabinet.
Zoom out twice. Turn around to the roller shutter cabinet and go 1 click forward and then turn left.

You are now standing in front of the roller shutter cabinet. There is a flap under the roller shutter. Open the flap.
Behind the flap there is a keyhole. Take the Telescope Key from your inventory and then click it in the Keyhole and .....
The roller shutter opens and .... this machine is activated, causing the telescope to drop.
The round window opens and the telescope sinks further down and now "looks" through the window.
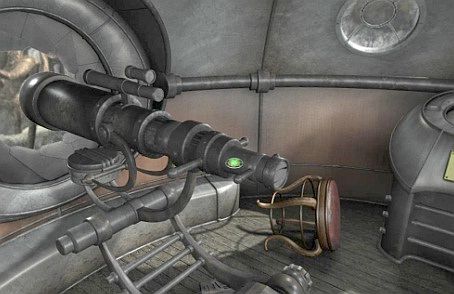
Click on the lens (back) of the telescope to look through the telescope .....
Umang sees the soldiers from Durad's "Shadow Legion" through the telescope and he alerts Nikifor.
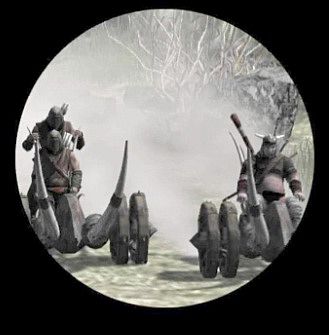
The soldiers want Nikifor to hand over Umang to them, but Nikifor refuses. Nikifor too is now convinced that he lives in a strange "house" and he wants Umang to move his "house" to escape the soldiers. Unfortunately, Umang does not have enough crystals, but Nikifor suggests stealing the crystals from the soldiers' vehicles. However, Umang wants to wait until it is night to try this.
Like a Thief in the night:
So it's night and we are back in the bedroom. Umang has to go outside to steal the crystals from the soldiers' vehicles. This must of course happen without Umang being discovered. You have already climbed out through the round window in the storage room, so maybe you can do it again. So leave the bedroom. It's dark in the house now. Go to the storage room door and try to enter it again. O ... the door is locked again. Also the door to the long corridor and the elevator is now locked again
So go back to the Crystal Activation panel, in the Generator room. Zoom in again on the panel so that it is open again. The 3 crystals in the 3 holes are still activated. So turn 2 of the 3 crystals off, so leave 1 crystal on, and then click the Round White Button again. Zoom out and go back to the storage room door. Click on the door again and the door will open. The round window in the storage room is still open. So go back to the round window, look down again and click the rope again on the upper bracket, under the window. Then go outside through the window.
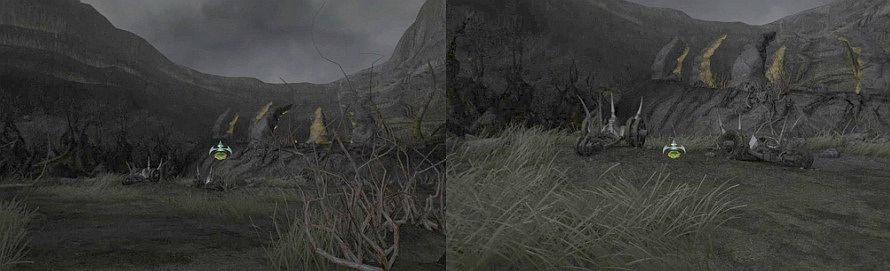
Outside:
If Umang is discovered by the soldiers he will be shot dead and then it is Game Over. If this happens to you, you must load the last saved game to start again from your last save. So save your game now here and keep saving your game after every successful move. You must think of this yourself because I'm not going to tell you to save your game after every move
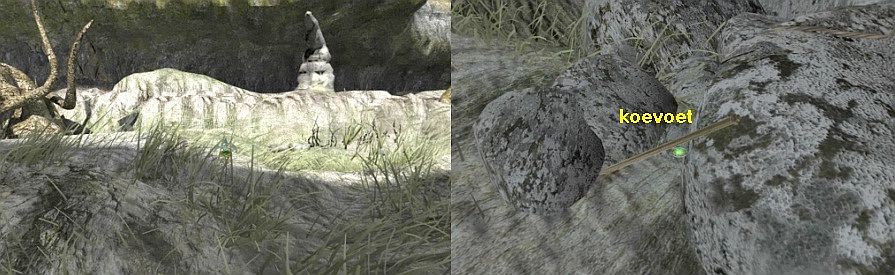
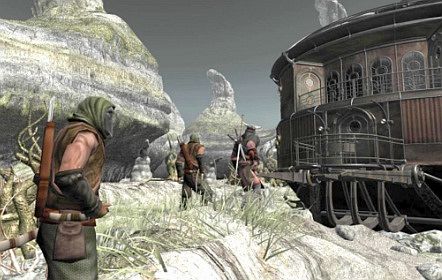
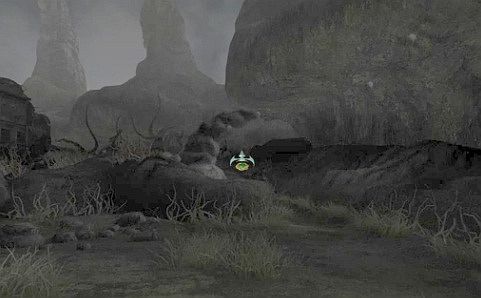
Via the rope you have climbed out of the round window. So you are now outside and beneath the round window of the storage room. It is dusk dark, so you don't see much. Go 2 clicks straight ahead to the rocks. Then turn left and look for the arrow that points to the camp of the soldiers, at the rear of the house.

Click 3 clicks forward to the campsite ....
You see 3 soldiers at the campfire. Two of the soldiers fall asleep.
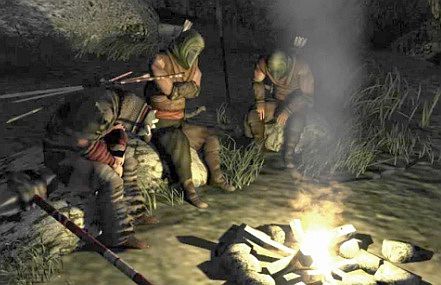
Do not go any farther to the camp because then you will be killed by the soldiers.
Turn around completely, so that you can aim the arrow at the high rock points at the front of the house.
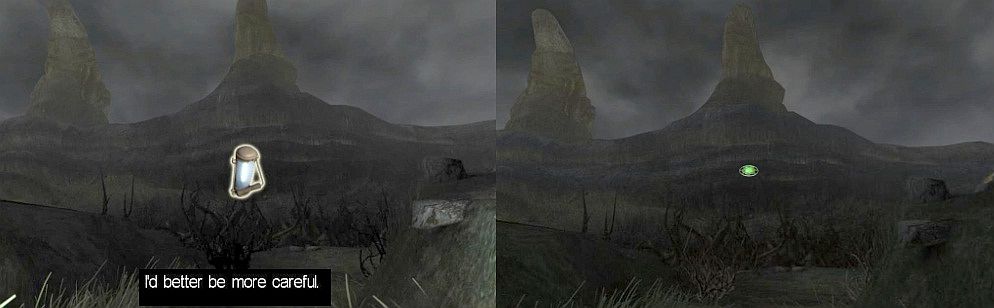
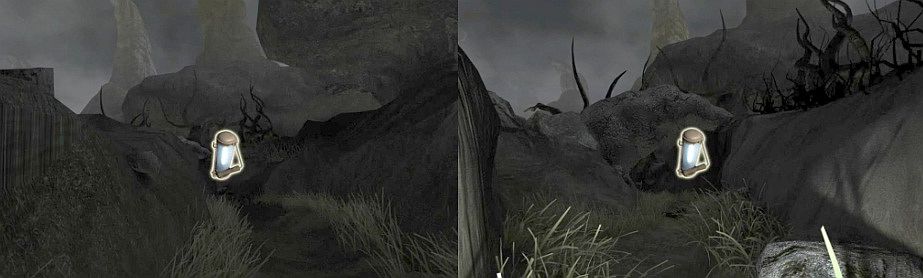
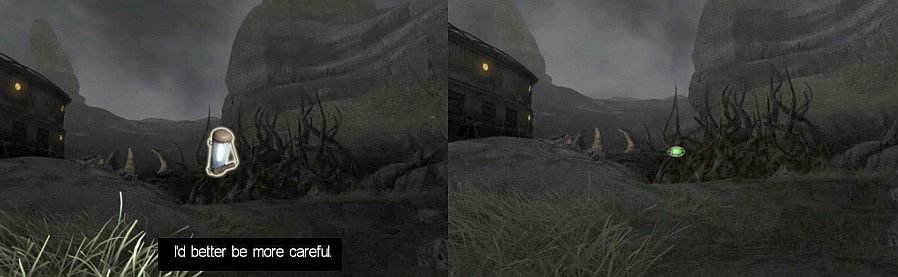
Click 3 times forward. You cannot continue because the path has now become too dark. But you do get your action cursor on the dark edge below the big rock points. Now take the Water Lamp from your inventory. Move the Water Lamp to the rock below the right-hand rock point. The Water lamp "turns on".
Now always look for the places in the screens where your Water Lamp lights up. Then click to take another step forward and then repeat this. With the help of the Water Lamp you have to follow the road to the other side of the house, where the Tricycles of those 3 soldiers are parked. When you get close to those 3 Tricycles, Umang will say "I better be more careful" when you click with your burning water lamp on the screen again. Then store the Water Lamp back in your inventory (right click)
Now click twice forward to the right rock point. Your Water lamp is then off.
Now turn slightly to the right until your Water lamp is on again and click again 2 clicks forward.

Your Water lamp is then off again. Turn slightly to the right again. Your Water lamp turns on at a crack between the rocks.
Now click 4 times forward with the burning Water lamp. You will see a number of high rock points again in front of you and your Water Lamp is still on. If you click forward again, Umang says "I better be more careful". Now put the Water lamp back in your inventory and then click 1 time straight ahead with your active cursor to the high rock points.
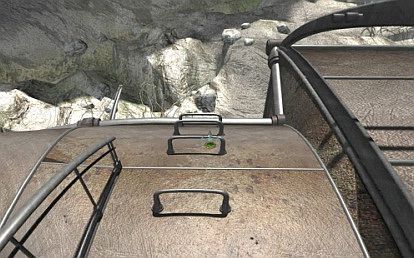
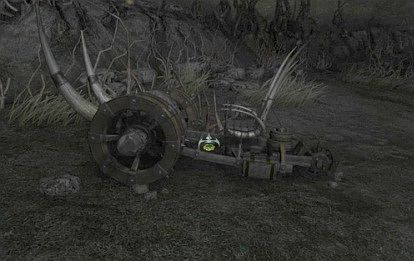
Then turn right and you will now get the Forward arrow to the 3 Tricycles, which are standing together in the distance.
Then go 2 clicks forward to the Tricycles. You are then between the two Tricycles.
Zoom in on the left Tricycle.
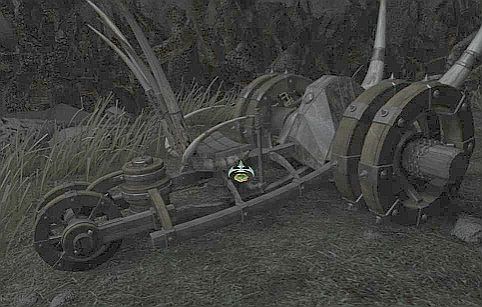
You zoom in on a round flap in the back of the Tricycle. Umang warns that the thing is rather rusty and will make a noise if you open the cover. That must therefore be prevented. Take the Oil can from your inventory. Click with the Oil can on the round valve to oil its hinges. Then click on the cover to open it, silently. There is a Crystal in the round hole, but you cannot take the crystal out with your hands. Take the Crystal Capsule from your inventory and then grab the crystal from the Tricycle with the capsule.
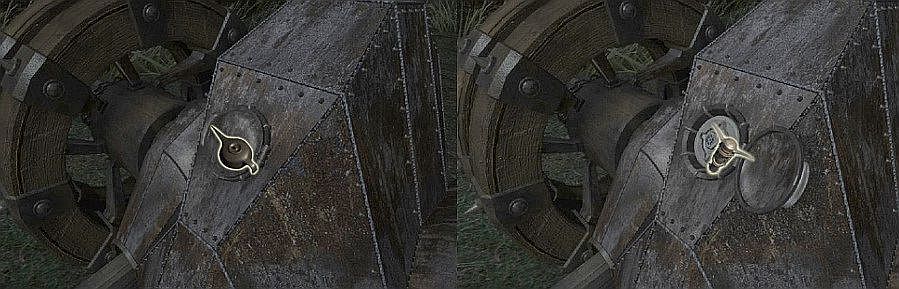
Zoom out, turn to the right Tricycle and zoom in on it.
Use the Oil can on the round valve again, then open the valve and take the Crystal from this 2nd Tricycle using the Crystal Capsule.
Then zoom out again. You now have to go back to the other side of the house, to the rope hanging from the round window of the storage room.
Turn right and look for the Forward arrow and then click forward 2 times.
Then take the Water lamp from your inventory again. Aim your burning Water lamp on the rock cleft and click 4 times forward.
Then turn slightly to the left and go forward again 3 times via the burning Water lamp.

Via the rock gap you end up behind the 3 high mountain points. Click one more time forward with your burning Water lamp

Your lamp is then off and in the distance you see 2 curved rock points. Turn around. You see the soldiers' camp in the distance again.
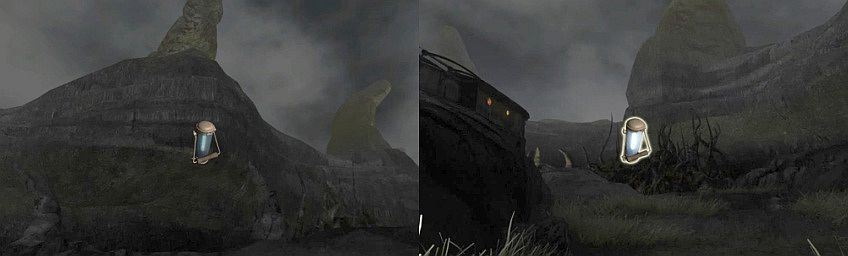
Move forward with your burning water lamp 1 click. If you want to go forward one more time, Umang says again "I better be more careful". So put your lamp away again and then, with your active cursor, click forward one more time.
Turn left to the house and, using the forward arrow, go forward, look up the rope and climb back into the storage room via the rope
Then leave the storage room through the door and .... Umang meets Nikifor in the hall again. Nikifor says that he has now locked all doors in the house and that we have to go to sleep for a few hours, and that is happening now.
The next morning:
You wake up in the bedroom again. Well ... there's nothing to do here and those soldiers are still outside. So it is high time to make sure that you can disappear with the "house". Go back to the Crystal Activation Panel in the Generator Room. Now, with the help of your Crystal Capsule, put the two Crystals that you have stolen from the two Tricycles into 2 of the still empty holes. There are now 5 crystals in the panel. Make sure that you have activated 4 crystals and then click on the Light Blue Round Button, so the button to the left under the yellow button.
Zoom out and turn around. Go back to the stairs and then check whether the lever of the manometer, in the niche for the stairs, is still on Symbol 4 (the green symbol). If this is not the case, set the lever to Symbol 4. Go up the stairs to the bedroom corridor. Then leave the hall through the other yellow door to the Long Hall. You are then again in front of the elevator in the semicircular niche. Go through the door left or right to the:
Steering wheel chamber:
We have to activate the steering wheel now. Go to the Steering Wheel and then zoom in on the pressure gauge that is to the left of the Steering Wheel. The lever of this manometer is on Symbol 2. You have to put the lever on the symbol with 4 crystals. So that is Symbol 1. So click on Symbol 1 to put the lever on it.
In the 4 Circle Panel you can see that the Orange Circle is now also activated and connected to the red button.

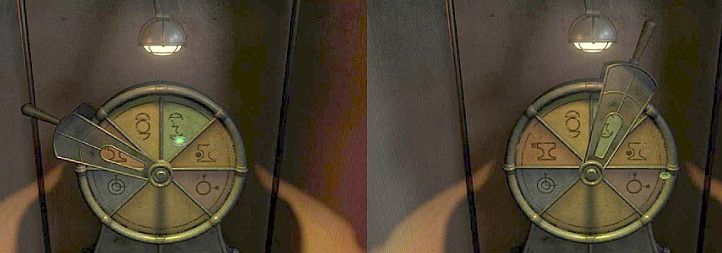
Zoom out twice and turn around to the steering wheel. To the left of the steering wheel is a large lever in the floor. In the middle of the steering wheel is the "Destination Panel". Zoom in on the "Destination Panel" of the steering wheel. You now see a large screen with 3 windows. In every window there is a Tumbler that you can turn to see another symbol on the Tumblers. These are the Destination Symbols for the home. You will now see a symbol on the middle and on the right Tumbler. These two symbols are therefore for the place where the "House" is NOW. Copy these two symbols.
Zoom out of the screen. Turn around so that you look at the bookcase. To the right of the bookcase is a table.
Go down the stairs and walk to the round part of the bookcase and then go to the table.
You zoom in on the table and a screen slides open in the table top. You are in the:
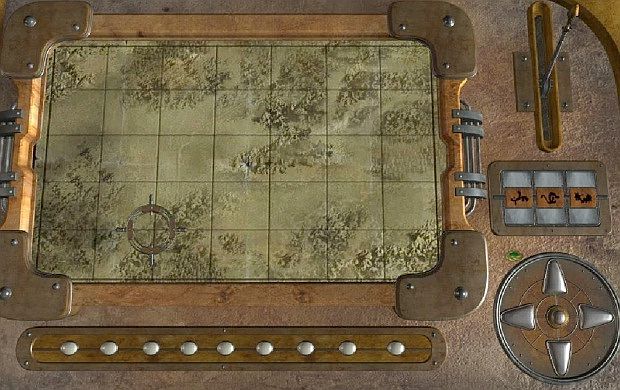
Map Table:
You see Tumblers with the same symbols each now. You must now place other symbols in the 4 windows.
Open your Journal book and then browse to the page where the 4 symbols are for the Navigation Map. These are the 4 symbols that you must now set, from left to right, on the 4 Tumblers. So check them out. Number these 4 symbols, from left to right, A, B, C, D.
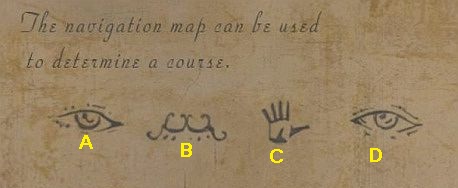
Zoom out to return to the Tumbler screen. Number the 4 Tumblers, from left to right, 1, 2, 3.4. Click on the Tumblers to turn them to another symbol. Then put symbol A in Tumbler 1. Put Symbol B in Tumbler 2. Put Symbol C in Tumbler 3. Put Symbol D in Tumbler 4.

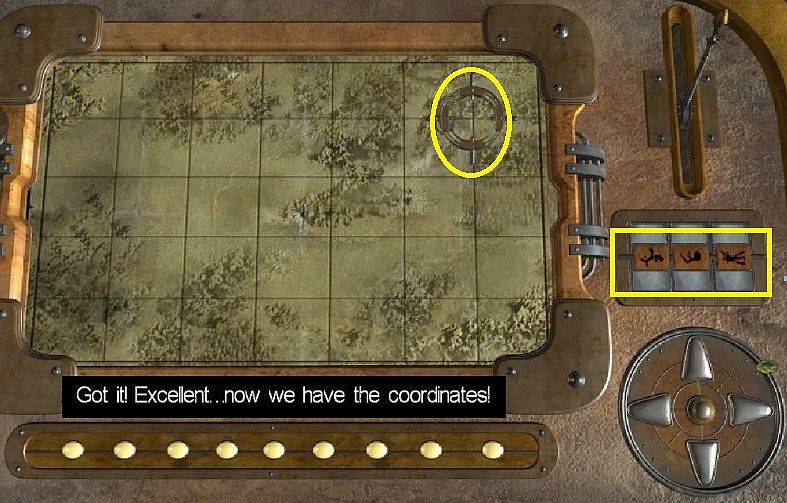
Everything disappears again and the window closes. The table top now turns around and you now see the Navigation Map. However, Umang says he needs the exact coordinates. At the top right is a Lever. Beneath the Lever you see 3 compartments with tumblers. Below the 3 tumblers you will see a circle with 4 arrow buttons. On the steering wheel you saw 2 symbols on the tumblers 2 and 3. Did you draw them over? Now place here, on the tumblers 2 and 3, also those 2 symbols and .... the round map finder on the map then moves to the exact position of the house.
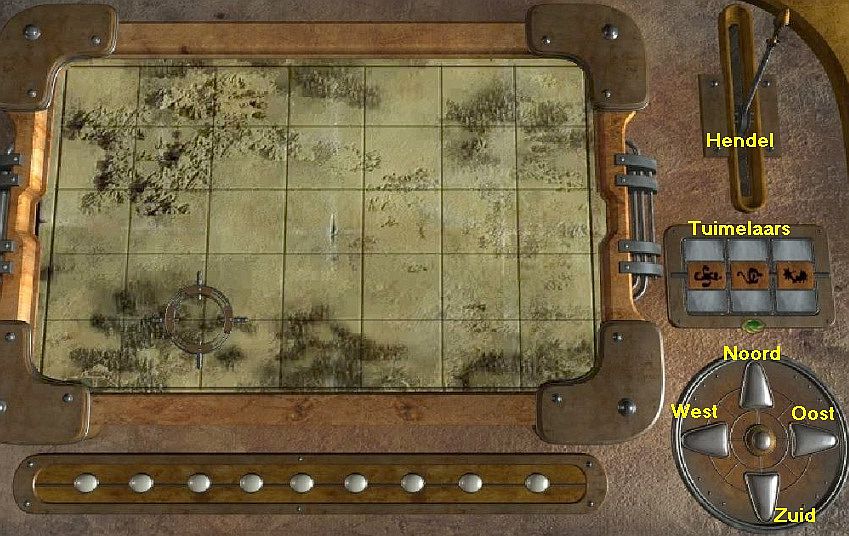
Now you have to determine the exact position of the Manula Valley on the map, because, according to the Captains Journal from the library, the Manula Valley is where the Keepers are. You can now also click on the lever. Click 3 times on the lever. Every time you click on the lever, the map moves on the screen and the symbol on the left tumbler changes. After clicking the lever 3 times, the Manula Valley map is on the screen and the correct symbols are displayed on the tumblers.
Now you have to set the correct route with the 4 arrow buttons in the circle.
You have read the route in the Captains Journal and it is also stored in your own Journal and was:
South, South, West, West, South, West, North, West, South.
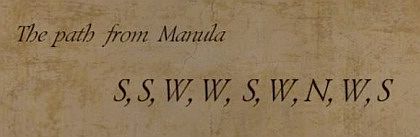
You should now see the Arrowheads of the circle as the directions of the compass. The top arrow button is North. The right arrow button is East. The bottom arrow button is South. The left arrow button is West. However, the South, South, West, West, South, West, North, West, South route from the Captains Journal is the route FROM Manula to where the house is now. So you now have to TURN this route upside down and read backwards, so: South becomes North, North becomes South, West becomes East, East becomes West.
The route from the house to the Manula Valley then becomes: North, East, South, East, North, East, East, North, North.
So click in this order on the 4 arrow buttons: North, East, South, East, North, East, East, North, North, and .............
All 9 lights under the card are on and Umang says you did well. The round Map Finder is now on the Manula Valley.
The 3 Tumblers now have the Symbols for the Manula Valley. Draw those 3 symbols on the 3 tumblers over because you have to put these 3 symbols on the steering wheel. Zoom out of the table. The Transport Machine must be activated. The transport machine is the thing that stands on the roof and has the "Target" symbol on it. This requires 5 activated Crystals. So go back to the Crystal Activation Panel in the Generator Room and now activate the 5th crystal so that all 5 crystals are activated. Then click on the Green Round Button.
Zoom out and return to the Steering Wheel Room. Back in the steering wheel room you go back to the steering wheel. Zoom in again on the "Destinations Panel" of the steering wheel. Now place the 3 symbols that you last saw on the coordination table on the 3 red tumblers.
When you have set the 3 correct symbols you will automatically leave this screen.
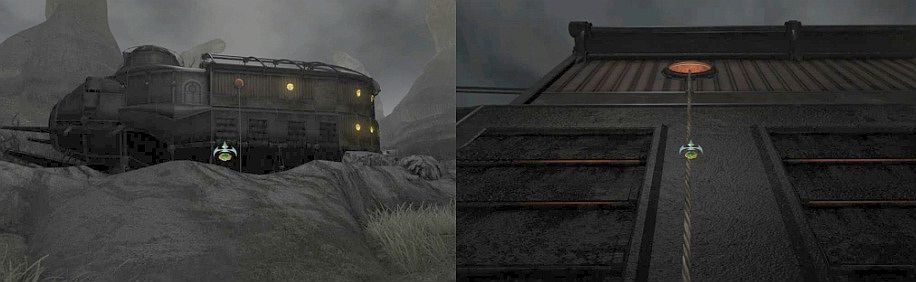
The large lever is on the floor to the left of the steering wheel. Click on that lever and .....
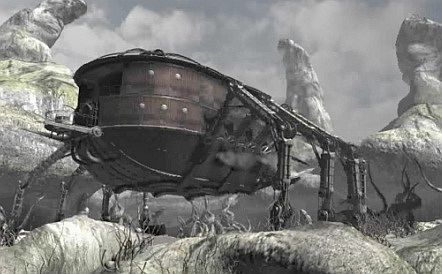
The 6 generators start and ...... From the "House" come 6 large steel legs. The house is a ..... SPIDER.
The "house" starts moving and crushed 1 of the soldiers, who cannot follow their Tricycles.
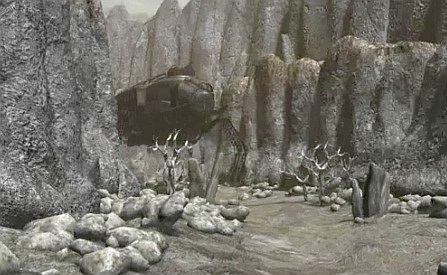
We end up in the Manula Valley through a narrow gap
Self Destruct
Umang has stopped the house at the end of the narrow gap. Nikifor is afraid that the Shadow Legion soldiers will also get through the k quickly leaves will come. The gap must therefore be blocked and you are the one who will have to do that.
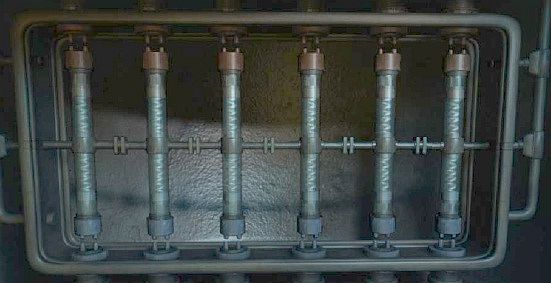
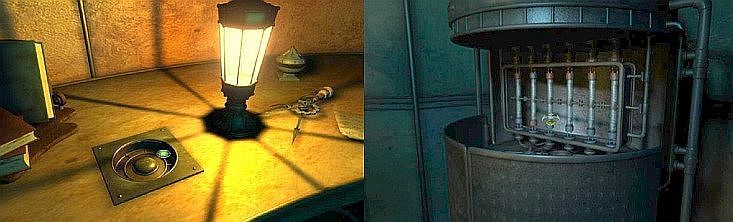
You stand in front of the steering wheel in the steering wheel room. Have you not read anything about a "self destruct" option in the Captain's Diary, which is on the desk in the library? You can read this again in your own Journal. In the Secret Room, behind the round part of the bookcase, you have previously opened the round cabinet and noticed that there is a system of 56 tubes in that cabinet. Well .... that cabinet is the "Self Destruct" mechanism of the house.
You have also seen that the Red Symbol is on that cabinet and you know from the Security Box that you need 6 activated crystals for the red symbol. You already have 5 crystals in the Crystal Activation Panel, so you still have to find 1 crystal. Leave the Steering Wheel Room and go to the Generator Room and then through the door on the right to the:
Pump room:
Go to the work table from which you previously took the wrench. To the left of the work table is one of the "engines" of the large pump. At the top of this "engine" is the crystal that supplies the power for the pumping machine. Zoom in and use your Crystal Capsule to get the Crystal out of this "engine".
Zoom out and leave the Pump Room to the:
Generator Room:
Go to the Crystal Activation Panel and, with the help of your Crystal Capsule, place the 6th Crystal in the last open hole.
Then activate all 6 Crystals so that they are all clear white and then press the Red Round Button.

Zoom out and go back to the:
Steering Wheel Room / Secret Room:
Go back to the round middle part of the bookcase and press the button between the books again.
The round middle part opens again and you automatically enter the Secret Room again.
If you have followed the walkthrough exactly so far then the round cupboard, which is in the right-hand corner, is already open.
If not, you first go to the desk to press the button in the desktop.

|
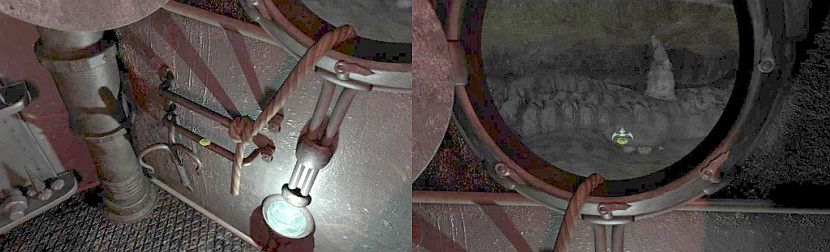
Go to the round cabinet so that you are zoomed in on the 6 tubes in the cabinet. Umang says "I don't have any other choice". By this he means that the only way to block the gap is to blow up the house. The 6 tubes have red and blue caps. The drawing that you have taken from the box next to the cupboard shows that the red caps are at the top and the blue caps are at the bottom.
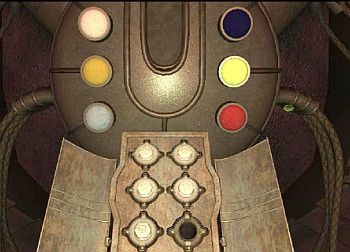
First Save Your Game Here So now you have to make sure that for each tube the red cap is on top and the blue cap is on the bottom. Number the tubes, from left to right, 1, 2, 3, 4, 5, 6.
Only tube 2 is now in the wrong position. But .... if you click on a tube then not only does that tube turn but also 3 other tubes. Try to find out which tubes influence each other when you click on them. For example, click on tube 2 and see which tubes turn over. You then discover that:
Now that you know this, it's not that difficult, provided you start from the beginning of the puzzle. So load your last save game and make sure you zoom in again on the 6 tubes in the round case. If the initial arrangement of the tubes for you is also the same as for me, so only tube 2 has blue on top and red on bottom, then the solution is as follows: Click on the tubes: 2, 5, 6, 3 and ......
|
Nikifor comes in and Umang screams to him that he must RUN. Nikifor does not understand, but when Umang runs away, he still runs along. The Self Destruct mechanism is starting up and Umang and Nikifor have just left the house safely just in time.
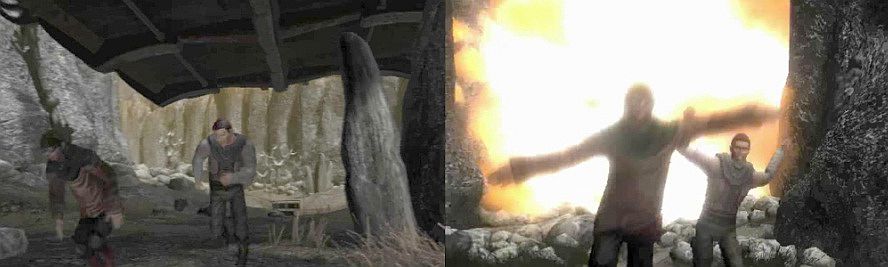
The house blows itself and as a result, access to the valley is now completely blocked.
I can understand why Nikifor is so angry now and wants nothing to do with Umang anymore.
We go to :
2012: Original Dutch Walkthrough by: Louis Koot
January 2020: English translation by: Louis Koot