2023: Walkthrough by: Louis Koot
If you found this walkthrough via Google search or another site, you probably haven't visited my site.
Many more highly detailed game walkthroughs can be found on my site and here is the url of my site: www.pcgameswalkthroughs.nl
Chapter 6:
You now play as Valentina.
In the castle library, Valentina thanks butler Edwrd and decides to call her Archbishop to inform him of all the events. In inventory Valentina has a Dagger, her Dictaphone, Matches, her Bible and the "Gordon file". So Valentina wants to call her boss. So click on the telephone, which is on the desk in front of the Gordon Family Tree, and Valentina will call her boss.

The Archbishop, like Valentina, believes that Mordred should be put back in the Black Mirror. So Valentina has to find the entrance to the catacombs. In those catacombs, deep under the castle, there must be an old chapel and in that chapel the Black Mirror should be found.
Examine the carpet, which is on the floor in the center of the room. Because the floor of the library is a little higher than the floor of the main hall, Valentina thinks that there must be a secret space under the floor and she therefore suspects that there must be an entrance to the catacombs here in the library. In the corner, between the two large bookcases, is the thick pillar that you, as Adrian, have already looked at. Now look at that thick columns again with your eye and listen to Valentina. Then take the Matches from inventory and click with them on the thickcolumns and......

Valentina strikes a match and holds the lit matches near the pillar. The flame flickers, so there is a light draft coming from the pillar. When Valentina has turned off the match, click on the columnswith the gear cursor and.....Valentina discovers that 1 of the metal tiles is loose and she removes the tile, exposing a strangely shaped keyhole in the pillar. Click on the columns again with the gear cursor to see the keyhole in close-up.

In the close-up, click with your eye on the keyhole (Strangely shaped hole).

The hole is shaped like a gear. On the right bookcase, find the exit cursor to get out of the close-up. Leave the library into the main hall. With your eye, look again at the pillar (Foundation stone) on which the globe stands. Valentina then tells you that this was once the entrance to the catacombs, but Marcus Gordon has sealed this entrance. Go up the stairs and then to Lady Victoria's room.

To the left of the bed are the monitors to which Lady Victoria was attached. Look at those monitors (Machines) and Valentina will find a syringe with Adrenaline and she stores the syringe in inventory. On the dressing table, as you know, is Victoria's jewelry box. As Adrian, you have already looked at and opened that jewelry box. Now, as Valentina, take another look at that jewelry box and.........
Valentina also briefly lists what is in the box, but then she lifts the box and notices that the box is actually much heavier than she thought. Valentina then looks at the bottom of the box and discovers that there is a secret compartment in the box. But she cannot open the secret compartment and therefore wants to show the box to Adrian. So Valentina now stores the jewelry box in inventory.
Leave the room and in the hallway we meet Adrian, who has just woken up. Talk to Adrian and use all conversation options.

Valentina doesn't want to tell Adrian that Father Fredericks is dead, but she does tell him about the Black Mirror, the Catacombs and the strange keyhole in the library. When the conversation is over, take the Jewelry Box from inventory and give the box to Adrian. Adrian opens the box in his own unique way and.....

..........Valentina finds a Sword handle among the debris of the box. View the Sword handle in inventory. Valentina reports that there are 4 jewels on the thing, but that there should actually be 5 jewels on it. The back of the handle is shaped like a gear.....say...could this be the key that fits in the gear keyhole? Go back to the Library. Click on the columns again with your eye cursor to return to the close-up of the keyhole. Then take the Sword Handle from inventory and click the thing in the keyhole and ..... The handle fits exactly in the keyhole, but nothing else happens. Valentina puts the handle back in inventory. Could it be that there is a gem missing on the Sword handle that nothing happened? Go back to the floor and now give the Sword handle to Adrian and then talk to Adrian about the missing gem.

Adrian thinks that the missing jewel is in Angelina's bracelet... but there is one problem...
.......that bracelet is now in the police station. Valentina thinks Adrian should get the Bracelet back.
At the top left of your screen you will now see the photos of Adrian and Valentina.

By clicking on Adrian's photo you become Adrian again. By clicking on Valentina's photo you become Valentina again. From now on you can switch between Valentina and Adrian to control either Adrian or Valentina. However, you cannot decide at any time whether you are Valentina or Adrian...... that is only possible if their photos are at the top left of the screen. Now click on Adrian's photo to continue playing as Adrian.
As Adrian:
Open the map and travel to Willow Creek. It is evening and it is raining cats and dogs.
Adrian ends up back on the dock at Winterbottom's house.
Go over the bridge to the square and then duck back into the police station and talk to Spooner.

Spooner tells Adrian that his "case" is closed. Due to the letter from Angelina, which Adrian found on Louis's corpse, the judge is now convinced that Adrian is innocent of all the murders committed in Black Mirror 2. Continue talking via the conversation options and ask Spooner about the missing bracelet. Adrian gets the Bracelet back. Travel back to Warmhill via the map. You will then end up on the quay at Winterbottom again. Then go left into the forest. Adrian is then back on the path that goes to the castle. Go up another screen, to the bend in the path. Then follow the left forest path, over the stone bridge, and then the narrow path to the Forest Hut.

The hut door has been smashed. Look at the door and then click to peek inside.........We don't get to see what gruesome thing Adrian sees in the cabin, but it must be something very bad and Adrian comes out again and he is not "happy" ". Is it Ralph who lies lifeless in the cabin? Return to the Castle Gates, via the map. Adrian does not end up straight at the castle gates but ends up at the bend in the forest path.

Adrian hears Ralph's voice singing a verse. However, we don't see Ralph. Continue to the castle.
Castle
Look in the letter box and Adrian finds Edward's sunglasses in the mailbox and takes the glasses with him.

Enter the castle, through the small gate and then through the front door, or click on the map on the castle's Main Hall. Go to the 1st floor.
Enter Adrian's bedroom, so click above with your exit cursor in the hallway (Passage). Open the large closet again.

Adrian now automatically takes the pliers and the grave candle from the closet. In inventory, combine the Pliers with the Bracelet to break a red ruby from the bracelet. Then combine the loose red Ruby with the Sword Handle to place the ruby in the handle. If you have not yet grabbed the Rope from the window at the beginning of Chapter 5, then look at the window here with your eye to grab the Rope now. Leave the room. Talk to Valentina in the hallway about the Ritual Room, the Black Mirror and the strange notes.

Valentina tells a whole story about the Black Mirror and she confesses that she is the one who sent Adrian those anonymous notes about the keeper. Go to the Library and zoom in again on the keyhole in the corner columns and then insert the Sword Handle into the keyhole again and...... the pillar now opens and Adrian sees that a spiral staircase goes down in the pillar. Valentina now also comes to the library automatically and together Adrian and Valentina descend the spiral staircase and end up in the:
Catacombs:
Water well room:
It may be that Valentina did not automatically come with Adrian to the catacombs. If this happens in your game, click on Valentina's photo to become Valentina again. Then, as Valentina, also go to the Library and then click with the Exit cursor in the opened pillar to also take Valentina to the Catacombs. In the Waterwell Room, click on Adrian's photo to become Adrian again.

In the middle of the room is the large well in the floor. There is a chain in the Well and that chain is attached to a grid in the ceiling. Look, with your eye, at the Chain and the Well. There is a wide edge around the well and in that wide edge you see, left and right, a circle with symbols. Look at the 2 Symbol Circles in the wide edge of the well. The left symbol in the wide border represents a Bird and the right symbol a House/Barn.
A wide moat, filled with water (Drain), runs around the wide edge. Also view the moat (canal). Adrian thinks that there must also be a drain somewhere through which the water from the canal can flow away. So Adrian thinks that the water has to be drained from the canal. Behind the well there are 4 pillars with symbols on them. Number those 4 pillars, from left to right, 1, 2, 3, 4. Look at those Symbols on the 4 pillars with your eye. On pillar 1, Adrian sees a House and a Jug. On pillar 2, Adrian sees a Pitchfork and a Flower. On pillar 3, Adrian sees a Bird and a Head. On pillar 4, Adrian sees a Fish and a Hand.
Go talk to Valentina and ask her about the Symbols (Hieroglyphs) and about an Other exit. Valentina thinks that all those symbols are 6,000 years old. Valentina knows approximately the meaning of the symbols, but she doesn't say anything else about them. Stay Adrian. Valentina remains standing here. As Adrian, go back to the library via the spiral staircase on the left in the large gate, and then through the great hall to the kitchen. In the kitchen, click on the Cellar Door.
Cellar:
Adrian is back in the hall above the cellar. The stairwell, down to the basement, is dark so Adrian does not want to descend to the basement without light. With your eye cursor, look again at the Bucket, which is behind the stairwell in the corner. The bucket is full of road salt. Now Adrian wants to grab a handful of salt from the bucket, so click on the bucket with the hand cursor to grab a handful of salt from the bucket.

The light switch is on the wall to the right of the bucket. There is a socket under the light switch.
Take the Extension cable from inventory and click it on the socket to plug the cable into the socket.

Then pick up the other end of the cord, which is now on the ground, and then click the cord in the dark stairwell to lower the cord down into the basement.

In inventory click with the Lighter on the Grave Candle to light the candle.
Now click again with your exit cursor in the stairwell and.....

Now that he has light, Adrian descends the stairs to the Cellar. Adrian stands at the bottom of the cellar stairs with the burning candle in his hand. To Adrian's right are wine barrels. The candle doesn't give much light, so Adrian can't look very deep into the basement. The end of the Extension Cord is on the floor to the left of Adrian. Look at the extension cord again with your eye. Walk a little to the right and.....There is an old construction lamp (Construction light) on the floor. Look at the construction lamp with your eye.

Walk back slightly so that you see the end of the extension cord again.
Now pick up the extension cord again and click the cord on the construction lamp and........

Adrian plugs the construction lamp into the extension cord and...... there is light in the basement. Adrian stands in front of the wine barrels. Behind Adrian there is a red power cable, down from the ceiling (3-phase power cable). On the right is the Well and between Adrian and the well there is a large puddle of water on the floor. At the back is a wide Dark corner with a fence in it. To the right of the dark niche there is a Large lever)on the wall.

Examine the red power cable. Adrian reports that the power cable hangs exactly above the beginning of the pond. Also look at the puddle. Adrian reports that the sewer under the floor must be clogged. Examine the large lever to the right of the dark corner. Adrian reports that it is the Power Lever that turns on the power in the basement, but the lever doesn't get any power. Continue to the Well and then to the right side of the cellar.

To the right of the large well is an old water pump. Look at the Well with your eye and......Adrian screams at Valentina and she answers. So Valentina is standing under the well, under this cellar, in the well room. Behind the water pump is another stack of wine barrels and a wire rope hangs over the wine barrels, which is attached to the thick pipe that hangs above the wine barrels. Examine the wire rope and Adrian reports that this is the "ground wire" for the water pump. Look at the water pump with your eye. The Controls that operate the water pump are located on the back of the side of the water pump. Look at the control buttons with your eye. Then click with the gears on the middle part of the water pump to open the lid of the engine housing.

The end of the chain, which you also saw in the water well room, hangs in the well. The chain runs over a pulley here. First look at the chain again with your eye. Then click on the chain with your hand cursor to grab the chain. Your cursor is then the chain......click with the chain cursor in the opened motor housing of the Water Pump to hook the chain to the pump.

There is a drain grate in the floor, in front of the well. A red power cable (Power connection) plugs into the front of the water pump. Look with your eye at the point where the red power cable plugs into the water pump (Power connection). Adrian looks at the cable and tells something about it. Now click with your hand cursor on the "power connection" to pick up the red power cable and then click with this power cable on the drain grate , in front of the water well. Adrian puts the other end of the cable through the grate and the cable is now in the water.

Now pick up the Wire rope and then click it to the engine of the water pump, where you also clicked the chain.

Walk back to the left, to the red power cable hanging down from the ceiling.
Now click with your hand on the red power cable (3-phase power cable).
Then click the cable in the puddle of water and Adrian ensures that the end of this cable is in the water.

Take the Gritting salt from inventory and throw the salt into the pool of water to make the water more conductive.

Now click with the gear cursor on the Power lever (Large lever), on the wall to the left behind the water well, to turn on the power.

Walk back to the water pump and see, the water pump now has power because a red light is now on the button panel.
Click with your gears on the Controls and..........

If you have done everything correctly, the pump will turn on and you will see how an iron cage is pulled up from the well in the well room.

In the meantime, Valentina has also come to the basement to see what you are doing here.
Take the Rope from inventory and click with it on the edge of the well to tie the rope to a pillar of the well and hang it in the well.

Go back to the left and then back up the stairs. If all goes well, Valentina will come along automatically. If she does not do that, switch to Valentina and move her to the left and then also up. Then switch to Adrian again and go back to the library as Adrian, via the kitchen and the large hall. Then switch back to Valentina and take her back to the library as well. In the library, take Adrian and Valentina down the spiral staircase in the corner back to the Catacombs

Catacombs:
So here the cage is now hanging above the water well, but unfortunately the well is still full of water.
The rope is now also hanging in the cage.
Talk to Valentina about the cage and about the Rope. Adrian explains to Valentina what to do.
Click twice with the gear cursor in/on the cage and.....Adrian steps into the cage.

When Adrian is in the cage and has closed the door again, quickly click on Valentina's photo to switch to Valentina:

Take Valentina to the Cellar and there to the Well.
Click with your eye on the edge of the well to make Valentina scream to Adrian that she is now in the above Adrian at the water pump.
Then walk to the water pump and leave Valentina at the pump.

Switch to Adrian. Adrian may have stepped out of the cage in the meantime. That happens when you take too long to take Valentina to the basement.
Once Adrian has stepped out of the cage, make sure Adrian gets back into the cage. Then click with your gear cursor on the Rope.

Adrian gives a tug on the rope and that is the signal for Valentina to turn on the water pump.
Adrian sinks into the cage and down into the well

Adrian is then completely underwater in the well and does not have much time before he is in danger of drowning:
The Symbol Discs puzzle in the well:
So Adrian could die here. You can solve this puzzle via the Auto-solve handle, which will appear again in the bottom right after a few minutes. You can also let Adrian go back up in the cage, to the water well room, by pressing your ESCAPE button. You can do this to breathe fresh air between the various phases of the puzzle.
Adrian is standing, underwater, in the cage, and on the wall you see a round stone disk. You have to act quickly now because if you delay too long, Adrian will drown and it will be GAME OVER. You will see a thick arrow on the left and right. If you click on the left arrow you turn counterclockwise. If you click on the right arrow you turn clockwise.

On the stone disk you will see a "star" with 8 points. There are symbols in 4 of the points of the star. There is a "label" on top of the disk and there is also a symbol in that label. The symbol in the "Label" tells you which disk you see. There are 4 Stone Discs in the well. In the well room you looked at the symbols on pillars 1, 2, 3 and 4. Adrian has told you which 2 symbols are on each pillar. So you now have to click on the symbol on each of the 4 Discs that corresponds to the symbol in the "Label". So there is a "House" disk, a "Pitchfork" disk, a "Bird" disk and a "Fish" disk. The "Jug" belongs to "House". �Pitchfork� needs a �Flower�. �Bird� goes with �Head� and �Fish� goes with �Hand�
You start with the "House" disk and on this disk you click on the star point with the Jug on it.

Click the Right Arrow to rotate right. You see the next disk and for me this is the Pitchfork disk.
The Flower belongs to Pitchfork. so click on the Flower Symbol.

Click on the right arrow to turn right again. You will then see the 3rd disk and in my case this is the Bird disk.
Bird belong to the head symbol, so click on the Head symbol in the star.

Click on the Right Arrow again to rotate clockwise again. You see the Fish Disc.
Fish corresponds to the Hand, so click on the Hand symbol in the star

If you have done all 4 discs correctly, your screen will turn black.
Adrian falls further down with the cage and ends up on the floor of a cave.
A little later Valentina also comes down the pit via the chain. We have ended up in:
Sarcophagi cave:

You're still Adrian. First, look at everything you can view with the eye cursor. There is a closed Stone Door in the left corner. There is a Stone Door in the right corner. The right Stone door is the entrance to the Labyrinth, so don't click there yet because then you leave this cave and that is not the intention yet because Adrian and Valentina aren't ready yet to enter the labyrinth.
There are 5 niches in the large wall. The middle niche is deep and in that niche there is a very large statue. Below the statue is a Sacrificial Bowl (Dish). In each of the 4 other niches there is a sarcophagus and above the sarcophagus hangs a large stone slab with a relief or hieroglyphs. Number the 4 sarcophagus niches, from left to right, A, B, C, D. First look at the left Stone Door with your eye. Adrian walks to the door and reports that this door has an iron band and 6 locks. There is a rusty Helmet on the ground in front of Niche A. Adrian doesn't want to take the helmet. There is a rusty Sword on the ground in front of Niche B. Pick up the Sword and.......

........Adrian gets under the influence of Mordred by the sword. Valentina becomes a little anxious, but Adrian regains his composure and throws the sword away. Look at 1 of the 4 sarcophaguses in the niches A, B, C, D. After you have viewed 1 of the 4 sarcophaguses with your eye, you can click on each sarcophagus with your gear cursor. Click with the gear cursor on Sarcophagus A and.....

Adrian tries to open the sarcophagus but the lid is too heavy so Valentina helps him. Then click twice with your eye on Sarcophagus A. In Sarcophagus A Adrian finds an Arrowhead which he stores in inventory. Open Sarcophagus B and then look in the sarcophagus again and ..... Adrian takes a Wooden Shield from Sarcophagus B. Open Sarcophagus C and then look inside. Adrian retrieves a metal Fish from Sarcophagus C. There is nothing of importance in Sarcophagus D, but if you don't believe me, you can also open sarcophagus D.
Check out the large statue in the middle alcove. The statue depicts a guy holding a huge sword and Adrian wonders if it's Mordred. From the statue niche, 2 stone bands run across the floor to the abyss. On the right stone band, close to the edge, is a small boat. Look at that small boat and Adrian picks it up and puts it in inventory. It is a small wooden boat.

Look at the Offering Dish, which hangs under the statue in the middle niche. Adrian presses the bowl down and.......you now see a number of chains containing capsules moving up and down again. An offering bowl means that an offering must be made. So sacrifices have to be made to get those capsules down in the chains. Click on the offering dish with the gear cursor to get a close-up of the bowl.

Below the dish are the Arrowhead, the Boat, the Fish and the shield. The scale is a scale.
1 by 1, pick up the arrowhead, boat, fish and shield and then drag the item onto the bowl and then release to place the item in the bowl.

Once you have placed all 4 items in the dish, the dish has dropped all the way down. Then go out of the close-up, via the bottom left exit and you will see the chains with the capsules rise and fall again. In 1 of the chains, 1 of the capsules has now dropped all the way to the floor and that is the capsule at the bottom of the chain that hangs between Niche A and Niche B. Look at that capsule with your eye. Then click on this capsule with your gear cursor.

Adrian opens the capsule and takes out a Golden Key.
There is a hole in the left stile of the right stone door.
Look at that hole and Adrian reports that the hole is the size of a hand but he can't see how deep the hole is.
Now click with your hand cursor in the hole and......

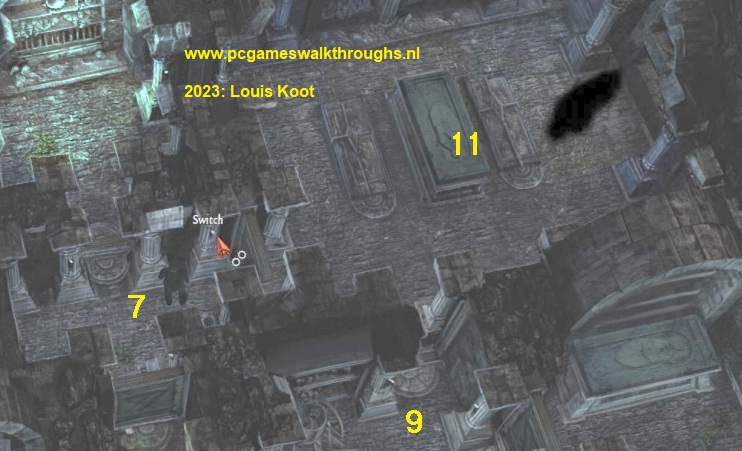
Adrian fishes a map out of the hole. After Valentina has also commented, you will see the map large on your screen.

It is the map of the Labyrinth that you will soon find yourself in. On the map you see 11 rooms containing the Roman Numerals I (1), II (2) and III (3). Those Roman Numerals indicate how many Switches you have to activate in the rooms. This map is of no use to you, so click the map away.
Now become Valentina again by clicking on her photo.
As Valentina, you look at the relief plate hanging in Nis B with your eye.
You end up in the close-up of the relief. The relief is divided into 2 halves.

Look at the top half with your eye and listen to Valentina. The Black Mirror is depicted in the top half. Also look with your eye at the 7 people standing under the Black Mirror and listen to Valentina again. Valentina does not understand the Hieroglyphs on the bottom half of the stone, but she suspects that they belong to the group of 7 people depicted under the Black Mirror. Exit, to the right of the relief, out of the close-up and become Adrian again, As Adrian now click with the exit cursor on the right stone door to enter the Labyrinth.....but...

......Angelina hesitates and points out to Adrian a warning written in Latin that is carved into the gate of the Exit Door. The warning reads that "It is written in the book of the Keeper that if the Keeper enters the Darkness his Soul will be seized by the Shadows." Ok.....take this warning to heart and then go through the right Stone door and.....you end up in:
The Labyrinth:
There is no Auto-Solve lever to auto-solve this Labyrinth puzzle. You'll have to do it all yourself.
You are Adrian. Valentina has come along and she closes the door to the next room by pulling a switch, because in the next room there is a Demon Shadow and they don't like light. Save your game now because getting through this labyrinth is difficult and dangerous. The Labyrinth consists of 11 rooms that are connected by doors. On both sides of the doors is a pillar with a switch on it that allows you to open and close the door between 2 rooms.
These switches are linked together and work like a so-called "hotel switch". So if you click on a switch in one room, the switch on the other side of the connecting door is also activated. The aim is to find 3 items in the Labyrinth without Adrian or Valentina being killed by the Demon Shadows. There are 2 Demon Shadows roaming the Labyrinth and those Demons are afraid of light. Number the 11 rooms, 1 to 11, with room 1 being the top left and room 11 being the top right.

Adrian and Valentina start in Room 1 and there is now a Demon Shadow (A and B) in rooms 3 and 11. You have to keep switching between Adrian and Valentina and you start as Adrian. So you always have to activate the switches in certain rooms, as Adrian or Valentina, to open or close the connecting doors.

If you end up in a dark room and then open a door to a room with a Demon Shadow, it is GAME OVER. You can save your Game as often as you want. So you start in Room 1, top left. Valentina has already closed the door to room 3, where demon A is located. You are Adrian
|
Step 1: Adrian Valentina quickly closed the door between room 1 and room 3 because room 3 contains a black demon.
Room 5: Adrian: There is a Sarcophagus in Room 5. Open the Sarcophagus.....Valentina will help automatically.
Then look in the Sarcophagus. Adrian finds a Crown.
Step 2: Adrian:
Step 3: Valentina:
Step 4: Adrian:
In Room 3 there is a Rack (Nice). Take a Bowl from the Rack.
Step 5: Valentina:
Step 6: Adrian:
Look in the sarcophagus and Adrian will fish out a Staff.
Adrian has now found the 3 items and stored them in inventory. Now to get back safely to the Sargophagus hall. Adrian and Valentina are now both in Room 11 and have to return to Room 1, but that is where the front Demon Shadow is now. The other Demon Shadow is still in Room 9. Now first bring Adrian and then Valentina back to Room 7. Step 7: Adrian:
Step 8: Valentina:
Step 9: Adrian:
Step 10 Adrian en Valentina:
Adrian and Valentina can now safely exit the Labyrinth, so head back through the gate to the |
Sarcophagi room:
The 6-Lock Door Puzzle:
Adrian:
Valentina came along automatically. Zoom in again on the Offering Bowl in the middle niche to get a close-up of the offering dish again.
Under the dish are now also the Staff, the Crown and the bowl that Adrian found in the labyrinth.

Now place the Crown, the Staff, the Bowl and the Arrowhead in the dish and then step out of the close-up.
On the rightmost chain, i.e. the chain between statue niche andniche C, a capsule has now sunk all the way to the floor.

Look at that Capsule and Adrian will take out the 2nd Golden Key. Now click with your Exit cursor on the left Stone Door, the 6-lock door. Adrian walks to the left door and says again that the door has 6 locks. Take 1 of the 2 Golden Keys from inventory and click with it on the door and......

Adrian tries the key in each of the 6 keyholes and reports that the key fits in each keyhole but that he cannot turn the key. Adrian leaves the key in the door. Also click the 2nd Golden key in the door and the 2nd key also fits in every keyhole but does not turn either. Adrian also leaves the 2nd Golden key in the door. Now becomes Valentina again.
As Valentina, look at the Relief in Niche B again and then click again with your eye in the close-up on the hieroglyphs under the Black mirror. Now Valentina thinks that the people depicted represent a Priest, a Hunter, a Beggar and a Peasant. Move out of the close-up and talk to Adrian and use the Hieroglyphs topic to tell Adrian about the hieroglyphs in the relief. Then becomes Adrian again.
Go back in the close-up of the Offering Dish. You now have to identify the 4 attributes that are typical of a Priest, a Hunter, a Beggar and a Farmer. A priest has a staff. The Hunter has an arrowhead. The bowl belongs to the Beggar. Fish belongs to the Farmer. So now place the: Staff, the Arrowhead, the Scale and the Fish in the bowl. You automatically move out of the close-up and 6 capsules have now sunk down in the chains. Click with your eye on 1 of the 6 capsules, for example the capsule to the left of the offering bowl and.......

Adrian takes a Golden Key from each capsule and you then have 6 Golden Keys in inventory.
Take those 6 Golden Keys from inventory and click with them on the 6-locked door and.....

...the keys fit and Adrian now opens the door. So go through the now opened door and we end up on an intermediate screen.
Adrian and Valentina are standing on the right in the gate of the 6-lock door. The path disappears through a gate on the left.

Click with your exit cursor in the left gate to walk along the path to the next screen and Adrian and Valentina end up in the:
Chapel:

Valentina automatically came along. This chapel was built together by Mordred and Marcus, but Mordred also murdered his brother Marcus here. There is an Altar on the round platform. To the right of Adrian and Valentina is the cover plate of a sarcophagus in the floor. There is also a sarcophagus in the floor on the left. Click with the gear cursor on the right sarcophagus.
Adrian and Valentina slide the cover open slightly. Then click with your eye cursor on the sarcophagus to look inside and... Adrian reports that there is a skeleton in it and Valentina reports that these are the remains of Maria, Mordred's wife. Adrian then takes a Sword Point from the grave. It is the sword point of Mordred's Sword with which he killed his wife Maria.
There is also a sarcophagus in the floor on the left. Also open the left sarcophagus and look inside and you will hear that Mordred's skeleton lies in it. Become Valentina again. Click with your eye on the altar at the front of the dais. Valentina then walks through the right gate onto the dais to view the altar and reads what is written on the altar in Latin. Valentina reads: "At dawn the King sent his warriors to battle the darkness." Furthermore, Valentina reports that "the symbols are the same as those in the 1st room". Become Adrian again. Now, as Adrian, also click on the altar with your eye cursor and... Adrian also walks onto the platform via the right gate to view the altar. Now you come to the close-up of the top of the altar.
The Altar puzzle:
You see the top of the altar. You see 35 boxes in 5 rows of 7 boxes each. There is a symbol in each box. You can click in each box with your gear cursor. Number the boxes, from top left to bottom right, 1 to 35. Box 15 contains the Sun and box 14 contains the Moon. It is a maze and you have to take the correct route from the Sun to the Moon.
However, you may only click on those symbols that relate to the Latin phrase that Valentina has just read: Sunrise, King, Warrior and Darkness. You must then combine the symbols that you saw on the top half of the relief in Niche B of the sarcophagus room. So the King includes: Crown, Bread, House, Ship, Shield and Chalice. Warrior includes: Axe, Head, Sword, Arrow, Shield and Bow.
Here is the solution: Click on the boxes: 15, 8, 9, 16, 17, 18, 19, 20, 27, 34, 35, 38, 21 and 14 and......

the altar sinks, with the entire front of the platform, into the ground to open a Secret Passage.

So click with your exit cursor in the gate of the Secret Passage. Adrian and Valentina end up in:
Mordred's Secret Laboratory:
Adrian remembers having been here as a child. You briefly see a part of the vision again in which little Adrain follows his sister through the hole in the ground. Adrian then walks to the fireplace and.....finds the hole he and Angelina went through. Adrian now also remembers that Butler Bates "saved" him and Angelina and that Bates then closed the hole. Adrian now also remembers that he was injured when he wanted to help Angelina, and was thus able to open the Stone Door

On the right you see 2 iron pillars and on the left you see 2 iron pillars. Between the right pillars is a rack with 3 old swords in it. Look at that sword rack (Old swords) with your eye and Adrian takes a sword from the rack and becomes Mordred again for a moment. Valentina panics a bit but she manages to get Adrian back in line. So on the right is the Stone Door, which Adrian just told you about. Take a look at the Alchemy table, and also take a look at the book on the lectern. Adrian does nothing else with the alchemy table or with the book. Talk to Valentina about "Mordred's Lab" and then about the "Dagger".
Adrian asks Valentina for her dagger and.....he then deliberately cuts himself on the hand with the dagger. Valentina wants to know why Adrian cut himself now and Adrian now says that when he wanted to help Angelina he was also injured and was able to open that Door with his blood. Adrian walks to the Stone Door and places his bloody Hand on the door and......The Door opens.
Click with the exit cursor in the now open door and.......

.......Angelina goes through the door first and Adrian follows. We then end up in:
Mirror room:
We see Valentina and Adrian in the Black Mirror and between them both we see a Skull

Adrian and Valentina then have a long conversation during which Adrian also quotes from the Book of the Keepers.

Valentina warns Adrian not to touch the Black Mirror under any circumstances.
Mordred's soul is still trapped in the Mirror and the Spirit within Adrian is the "shadow of Mordred's Soul" and it tries to force Adrian to touch the Mirror.
Now becomes Valentina again. As Valentina you look at the Black Mirror with your eye.

Valentina then asks Adrian to read the Book of the Keeper again and Adrian does so.
2 new pages have become available, which Adrian reads aloud.

Click the book away again. Look at the Altar in the middle of the room with your eye and......
Valentina then reports that she must try to get Mordred's Shadow out of Adrian,
But at the same time she must prevent Mordred's Soul from escaping the Mirror. No matter how we look at it...Adrian must die to defeat Mordred.
Walk back to the laboratory via the stairs at the bottom left. Back in the laboratory,
Valentina asks to read a certain part of the Keeper's Book again and Adrian then reads a certain part of the book.
This time Adrian reads about Mordred's Sword.

When Adrian has finished this, click the book away and listen to Valentina.
Valentina thinks that Mordred was involved in artificially creating life. Mordred wanted to put King Armundorf's soul into his son's body. To do that, he had to lay the king's bones on the altar. The experiment failed and his son died. If the dead person was an evil person, his soul goes into the Mirror. If he were a good person, his soul would go to heaven. Hence the ghost of Mordred's son is not in the Mirror.
As Valentina, now also click on the alchemy table with your eye and......
.......Valentina now gets an idea on how to save Adrian, so listen to Valentina......

Now click, as Valentina, with your eye on the book that's on the lectern and also on the rack in which the 3 old swords are located.
Valentina then gets an idea about which sword Adrian should use
It is not possible to kill Mordred with a "normal" sword... After all, Mordred is already dead. It is also not possible to take a weapon through the mirror. Valentina then asks Adrian to read the part about Mordred's sword again and this gives Valentina the idea that they need Mordred's Sword. Mordred writes about his sword that he had made a shadow with it, with which he could fight on the other side. He thought it was a shame that his sword got a black spot that spread. Say...wasn't there a big black spot on the wall in the sitting room of the Black Mirror castle, above the writing desk?Loop terug, via rechtonder terug, naar de:
Chapel
You're still Valentina. Look again at the left Sarcophagus of Mordred.

Valentina gets another idea.....and she tells her idea to Adrian....So listen patiently to Valentina and Adrian...
Valentina wants Adrian to take Mordred's bones out of the grave and then place the bones on the altar in the Mirror Room, as he would if they were also in the grave. Adrian will then die and his soul will disappear into the Mirror where he can then battle with the Soul of Mordred and perhaps defeat him. Valentina can then bring Adrian back to life with an Adrenaline injection.Valentina then leaves, because she is now going back to the Castle to get Mordred's sword and a book on poison. You are now Adrian again
Adrian must therefore retrieve Mordred's skeleton from the left grave and then place the skeleton on the altar in the Mirror Room. But he must then place the skeleton exactly as it is now in the grave. Take the Polaroid camera from inventory and click with it on the Mordred grave, i.e. on the left sarcophagus, and......

Adrian takes a photo of Mordred's bones so that he can use the photo to put the bones back together correctly later.
Now click on the grave with your hand to remove Mordred's bones from the grave.

Go back to the Mirror room. Take Mordred's Skeleton from inventory and click with it on the altar and....Adrian places the skeleton on the altar.

Now click on the altar with your gear cursor and.... you end up in the close-up and in the:
Put Mordred's Skeleton back together again:
Top left is the photo Adrian took of the skeleton. You can enlarge the photo with your eye cursor. All of Mordred's bones are on the altar and you now have to piece Mordred's skeleton back together, exactly as you see in the photo at the top left. Click on the photo to view it large on your screen.

If you don't feel like doing this or you find it too complicated, simply wait a minute or 2 until the Auto-solve lever appears and then click on it and let the game solve the puzzle automatically. I also don't feel like doing this puzzle, so for once I'll use the Auto-solve lever here.

So if you expect a complete explanation and solution from me for this puzzle then I'm afraid you will be very disappointed. You then automatically exit the puzzle, which is solved....Adrian also reports this and also says that he now has to wait until Valentina is back. So.....switch to Valentina. Valentina has now ended up in the sitting room of the castle. There is a large black stain on the wall above the writing desk . Take your Dagger from inventory and click with it on the black spot and...Valentina cut away the wallpaper and then insert a Sword into the wall hole. Take the Sword

The tip of the sword is broken off.....it is Mordred's Sword. Adrian already has the tipof the sword, because it stabbed into Mary's frame. Click the Exit to leave the living room and.....Valentina reports that she will first go to the library to pick up a book about poison and that she will then go back to the Mirror Room and.... This happens and we are then automatically back to:
Mirror room/Lab
Valentina comes back into the mirror room and asks Adrian if he is ready. Use all conversation options and when the conversation is finished,
Valentina will automatically walk back to the lab to get the poison.
Click on the Alchemy Table, which is near the left pillars (Alchemy table) and Valentina takes the Poison.

Go back to the Mirror Room. Adrian is now stretched out on the altar.
Take the Poison from inventory and click it on Adrian to make him drink the poison and.....

.....Valentina gives Adrian the poison and...

....So Adrian dies now......Watch how the Shadow leaves Adrian and how Adrian's soul chops Mordred's soul to pieces in the Black Mirror.

We then return to reality.
Quickly, take the Adrenaline Syringe from inventory and click it on Adrian to bring him back to life....

Valentina was initially afraid that it would not be possible to bring Adrian back to life, but her fear turned out to be unfounded
Continue watching the final end scenes at your leisure...

.....it is very short and that is a shame for a game series that took us almost 7 years.........
THE END
After the credits have rolled, you will see another scene with Adrian and Valentina......Adrian is writing his autobiography..........

In the EXTRA MENU of the home Menu screen you should now have all the "Pictures", "Videos" and "Mini Games" available,
2023: Walkthrough door: Louis Koot