
2019: Walkthrough by: Louis Koot and Dick Leeuw
If you have found this walkthrough via google search or via another site then you have probably not visited my site.
A lot more very detailed game walkthroughs can be found on my site at: www.pcgameswalkthroughs.nl
Chapter 2: Pinwheel Harbour:
You end up in a house on the top floor. Take a look around. You can open drawers and cupboards, but you won't find anything of interest here.

Find the stairs and descend to the ground floor. You are then in the kitchen / dining room.

Go right to the big cupboard, open the door and there you find a numbers wheel.
At the back, near the right window, you can pick up a book .... you will then read page 1 of the "Painter's Journal" .....

I suspect that this is Jean's diary because after all we are poking around in Jean's brain. Ok .... go out the door and ......
Phyllis comes forward and you get the message that you have indeed arrived in Pinwheel Harbour.

Until now the game was linear, so you didn't have to make any choices about which route you would follow. From now on this will be different because the game
is no longer linear. You can follow various routes through this harbour town. Phyllis will tell you in a moment what the intention is but I can also tell you in advance .... you should look for 8 red ribbons .... each ribbon represents a memory of Jean.
You can go forward and then down the long wooden stairs or you turn around, following the road past the house you came out of. I go forward and then down the long
wooden stairs to the lower street. So if you want to follow me, you go down the long wooden stairs.
Bell
House:

The long staircase takes you to a lower street and further down you see a small square where a rowing boat rests against a stone garden wall. Descend the short stairs
to the square. On the left is a billboard on the wall in which the village announcements are hung. To the right is the rowing boat against the garden wall of the A. Bell house ....
Yes ..... the house of Alexander Graham Bell, inventor and founder of telephone company Bell and the man who is wrongly accused of having invented the telephone
...... that is not the case because the real inventor of the phone was the Italian Antonio Muecci ....

Enter the front garden of the Bell house and turn right and .........
well ..... you have found your 1st red Ribbon. Continue to the red ribbon and click on it to
make the thing disappear.

Phyllis now tells you that such a red ribbon is a memory fragment from Jean and that you have to find even more of these red ribbons. The red ribbons are stored in
your Case, so just press your T-key to go back to your Case. In the Case you see that the red ribbon is stored in the box next to the gray "Pinwheel Harbour "door.

Press your T-key again to return to the front garden of the A. Bell house. Now enter the house. You end up in the kitchen. A
wrench is on the small table.

You may need a wrench later in the game, so grab the wrench and click it to your pocket. Press your T-key again to go back to your Case and store the spanner in 1 of
the 4 storage cupboards. Press T key to return to the kitchen of the Bell house. Now go, via the stairs, to the upper room .... it is the bedroom that you end up in.
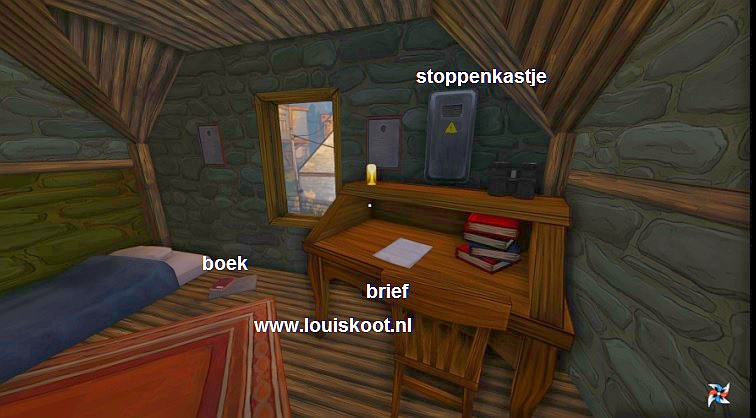
On the desk lies the "Inspirations" letter ..... read the letter. There is a Fuse box above the desk. Open the fuse box. There is a
75A plug in the box
..... note this but leave the plug in the box. Click on the note that hangs under the fuse .... you read a number code on the note .... 0427 .... write this down.

A book is lying on the floor near the bed. Pick up the book .... The book belonged to Alexander Graham Bell. Store the book in your pocket and travel back to your
Case to store the book in one of your 4 storage cupboards. Return to Pinwheel Harbour .... you end back up in the bedroom of the Bell house. Well .... nothing else to do here, so go down the stairs and leave the house. To the left of the house is the shower room
where you have absolutely nothing to look for, so walk out the front garden. Next to the billboard is a letter ... read this "Theft Report" letter ..... you read about the theft of a load of beer from the owner of the local pub JD Taylor .....
Remember this name JD Taylor ....

Walk further and ......... On the left is the Post Office and in the house opposite the Post Office, you will see a red ribbon hanging in the window of the floor. To
the right is the Forge and when you enter it you first hear the voice of young Jean and then Phyllis who tells you something about the forge and the mine. However, do not yet explore the forge, but turn left into the dead-end side street and then enter the
post office through the front door.
Post office:

On the left wall hangs a notice board with a calendar and a poster for the "Pinwheel Annual Morris Dance Competition". This poster will be saved by Phyllis
in your Case when you click on the poster to view it in more detail. A newspaper is on the wooden bench. In the newspaper, the "Pinwheel Post" of May 2, 1966, you read about an accident in the Brimclif Mine that has cost 20 lives. Behind the counter
you see a note but you cannot get behind the counter because of the package elevator that blocks the passage. So go back outside and then, via the stairs on the side of the post office, to the top floor. You end up in a small room that serves as storage space.
A pulley with a rotary handle hangs above the hole. There is a letter on the boxes .... read this "Tuesdays Hand Over" letter.

Stand against the gate and then look up at the pulley. With this pulley the package lift is raised and lowered. Click once on the rotary handle to lift the elevator
up. Go back outside, down the stairs and then back into the post office through the front door and see ..... you can now go behind the counter.

So do that and read the "Just Nipped Out" note on the cupboard ..... Look on the shelfs in the counter, it is possible that you find a figurine there, one
of the Grumpy Knocker brothers
Forge:

The wooden floor is full of holes, but the tile floor still looks reliable. On the left is a turning wheel in a cupboard and a lever on the stone outer wall. Go grab
that rotary wheel and put the thing in your pocket and keep it with you ..... Phyllis then tell you again that you can store items that you pick up in your Case, but we already knew that. Turn around to the wall handle .... with this handle the blue lathe is
switched on and off, but if you lower the handle you will notice that there is no power. Behind the lathe is the stairs to the upper floor.

Cross over the shaky wooden floor to the doorway and go down the stairs to the boiler room.
Turn around. The large furnace is in the corner and you also see a "cupboard" with a round meter and a copper knob.

Stand in front of the "cupboard" and then place the turning Wheel on the copper button ....
Then click on the rotary wheel so that the knob of the rotary wheel hangs to the right and ...... the oven switches on and you hear Jean.

Leave the cellar. Through the holes in the wooden floor you can see that there is a basement under the floor .... but how to get there? Behind the lathe is the stairs
to the top floor. So go behind the rack to the stairs and go up the stairs. On the upper floor there are 2 desks, a double bed and a chest of drawers. At the chest of drawers you can descend a staircase to reach a narrow back room via the balcony.

On the right desk is a Bible that you can grab and then store it in the Case, and a "Damage Floor" letter that you read. On the other desk is a radio that you
can turn on, and a "Dear Aaron ....." note that you also read through. Continue to the chest of drawers ........ you can open the drawers of the chest but you will find nothing. At the chest of drawers you can walk to the side balcony and the narrow
back room ..... If you do that, you can grab 2 loose white plugs, which lie on a chest, by the window.

These 2 plugs are important for a film projector that you will find in the basement right away. You can leave these plugs here and then come and pick them up if
you think you need them, or you can put them away in your Case. I grab them right now. If you had another item in your pocket and you now grab the plugs, that other item will be placed here on the crate ...... Again .... it is wiser to store items, that you grab and not immediately can use in the game, in the cupboards in your Case so that your pocket is always empty for the next
item.
Return to the bedroom with the bed and the 2 desks. Above the stairs is a Hoist with a
cable. The cable of the hoist hangs above the lathe and at the other end there is a heavy anchor on the cable ..... that anchor hangs exactly above the weak wooden floor of the ground floor ......

Stand in front of the hoist and then click 3 times on the hoist lever to hoist the cable down 3 turns. Then go back down to the blue lathe ..... the hoist cable
is now hanging on the lathe ..... if you now have the furnace on and you have lowered the hoist cable then click again on the wall handle and ...... the cable is connected to the lathe and the lathe starts to rotate so that the hoist also starts to move
and ...... well .... turn around and see ..... there is now 1 large hole in the wooden floor through which you can jump down to the basement.

So jump into the basement through the hole in the floor. The anchor is now lying on the ground. On the wall a fuse box with a lever.
Red cables connect the fuse box
with all kinds of machines. In the corner, the red cable that runs over the wall is broken .... Turn around and walk on.

On the table is a book and the "Experimental" letter. The book is an A. Bell book that you can save in your Case. If you had already put the white plugs in
your pocket, the plugs will be placed here on the table when you take the book and put it in your pocket. The "Experimental" letter tells you about the broken red cable and that a connector is needed to fix the cable ..... At the back of the basement
there is a Film Projector on the floor and the door to the next basement.

The Film Projector is broken but you can "fix it" by repairing the red cable ..... The rear door is locked but the key is in the door lock. Now walk
back to the fuse box ......... you need the 2 white plugs to repair that red wall cable. If you now have the plugs with you, you will be ready quickly. Have you left the 2 plugs on the crate, or stored in your Case, then you are going to pick them up and then
repair the red cable with the 2 white plugs. Do you have the 2 plugs here on the table because you have taken the 2nd A. Bell book, then of course you take the plugs from the table and repair the broken red cable with it.

Then pull the lever of the fuse box down and ........... the power goes on and you hear Jean ....

... back to the film projector, which is now standing upright ..... descend the stairs and stand in front of the projector and click on the white buttons and ...
this projector projects the paint pallet of Jean and Phyllis tells a few things

When Phyllis has finished talking and the projector has stopped then you go through the door here ..... the door is locked but the key is in the lock, so you have to
click the key to open the door. Then enter the back cellar room and ..... you will find your 2nd red Ribbon ..... Click on the red ribbon to make it disappear to the Case ..... Search this storage cellar further.

At the bottom of the front rack is a beautiful Ornamental Key. Take the key and go and store it immediately in 1 of your cupboards in your case

Then come back here immediately and walk on to the rear rack. There is a "Reminder" note on the rear rack where you can read something about a closed door
...

Then walk up the stairs and ..... you end up in the kitchen of the local pub:
The Crow's Nest Pub:
There is a bulletin board in this little kitchen, on which there is a note from Elaine Gregon, the owner of the pub.
Read this "Barred Customers" note. You read that Elaine no longer wants to admit various people as guests in her pub.

Turn around and walk into the actual pub. You end up behind the bar. Turn left and .... there is another note from Elaine on the cupboard ..
. read this "Number for you" note. You read about a safe and you read that the number code for that safe is
1513.

So there must be a safe somewhere here, but you won't find it below. You are in the lower taproom of the bar and can leave the bar through the door at the back .....
you end up on the quay of the harbour ... But do not go out here yet. In the back corner is the stairs, so first go up the stairs. Halfway up the stairs is the pub door, through this door you goto the street outside the pub.

The stairs take you to the upper tap room, the "CrowsNest", of the pub and here is a broken Film Projector on the floor.
Behind the film projector is the attic door but it is locked. On the table to the left of the film projector is a box of matches

Turn around ... you look back at the stair wall. There is a painting on the wall .... the door in the corner is of the toilet and there is nothing to find there.

Below the image on the painting you see an empty area ...... Stand right in front of the painting ...... You can write in the empty area .... You must type a name in
the empty area and that is the name of the previous owner of this pub, JD Taylor, the name you have read on the "Theft Report" ....... So type, via your own keyboard, the name "JD Taylor" in the box and ....... The painting pops open and .....
well .... you have found the wall safe of the pub. The save has a numeric code lock but the lock lacks the 4th digit ring ..... So you have to look for such a digit ring.

NB: there was such a number ring in the Case, but for some obscure reason it disappeared with me. But no worries .... there are more and more of those number rings.
Take the box of matches from the table and go and put the matches away in your Case.

Return to the pub and leave the pub through the front door, halfway up the stairs and ...... you end up in the square.
The 3rd and 4th Red Ribbons
On the left is the forge, the post office and the A. Bell house. To the right is "Morris Dancer House".
Behind the "Billboard" house you can go up the stone stairs and we are going to do that now.

Climb the stone stairs and ... you end up in the place between the 2 houses and here is your 3rd red Ribbon. Click on the ribbon to send it to your Case.

When you have sent the red ribbon to your Case, turn right and climb further up the next staircase. You end up in the upper street of the village.
We will soon enter the corner house here, but now you turn left and you continue to the 1st house on the left ...

... that is the house where the 4th red ribbon hangs in front of the window and where you just found the 3th red ribbon downstairs on the square.
Enter that
house and ....... In the opened safe is a number ring, but first send the 4th red ribbon to your case by clicking on the ribbon ...

Once the red ribbon has disappeared, take the number ring out of the safe and store it in your pocket ....

Keep the ring with you now because you need the thing to open the safe in The Crow's Nest Pub.
Leave this house and walk back to the corner house and enter it now ...

Lover's Note house:

You end up in the sitting room on the ground floor. The house has a floor and an attic. First, let's go to the attic.
Go into the kitchen on the left and then up the
stairs to the floor. Upstairs is a bedroom and a small bathroom.

However, first go left and then up the stairs to the attic. There are 2 desks in the attic.

On the right desk you will find the "A Lover's Note # 2" that you read. On the other desk you can listen to a message on the answering machine, if you click
the desk cover up and then click on the answering machine. Go back to the floor and then enter the bedroom. Between the 2 beds is a bedside table and in the top drawer you can read the "Lover's Note # 1".

Go back to the ground floor and then to the bedroom in the corner. Turn to the left and read the announcements on the notice board.

On the bedside table is the "Lover's Note # 3" ... absolutely read this "Lover's Note # 3" because it contains a numeric code 0911, being the birthday of the lover

Ok .... we are ready in this house and you have the number ring in your pocket. So now go back to the Safe, in the "Crow's Nest" of the:

The Crow's Nest Pub
Stand in front of the door of the wall safe again and then place the number ring in the empty compartment of the lock.
Below in the bar you have read the number code 1513 in the "Number For You" letter, so put 1513 on the 4 rings and the safe door opens ...

In the safe is the key for the attic door, the door behind the broken film projector.
Take the key from the save and open the attic door with it by putting the key in the keyhole of the door ....

Climb the stairs ... you end up in the attic in the rooms of Elaine .... walk straight to the bedroom .....

In the corner is a glass aquarium with a toy boat. Walk towards it and click on the glass container and pick up the toy boat and put the thing in your pocket ....

You hear Jean saying that she wants to launch the boat .... and you also have to do this to repair the film projector, which is located below. So we will do that first. Walk back to the other room. On the desk lies the diary of Elaine ... Click on the diary and read through the page ..... In the drawer of the desk is a white Flashlight. You may need a flashlight later, so I would just grab the flashlight.

The boat is
put here, go to your case and put the flashlight on a shelf.

Walk to the ribbon and click on it to make it disappear to your case.

The corner house that you look at is the workshop of Alexander Graham Bell and we will also go inside there later. But not now, so turn around and walk back and walk up the
quay. We will continue to search the port later. Along the A.Bell Workshop a path goes along the river ..... the first part of that path is a wooden jetty. Walk up the wooden jetty and then follow the jetty and then the path and the next wooden jetty.

In the distance you can see the 6th Red Ribbon ..... the ribbon is at a harbour in the river. Walk on to the red ribbon and let it disappear

Turn around and look down at the harbour .... there are 2 toy boats in the harbour. Step into the river and then turn to the harbour and look down.
You are standing in the river and in front of the harbour. Place the toy Boat in the middle harbour and ....

.... the harbour opens and the 3 boats sail up the river ...... you have repaired the film projector in The Crow's Nest Pub, so go back to the pub....

Go in the pub to the upper tap room and see ..... the film projector is now standing so press the white buttons and ....

.... this projector is projecting a medallion from Jean and you will hear Jean's treating doctor again. You are ready at the pub.
Leave the pub on the street side again .... you will be back on the village square.

We are now going to examine the house, right in the corner .... that's yje....
Morris Dancer's House

You enter the hall of the ground floor and you hear the young Jean and then Phyllis, who tells you a bit about the "Maypole Morris Dance Competition", the
highlight of the year in this village. The dining room is on the right and the kitchen on the left. The stairs lead, of course, to the floor where there are a number of bedrooms. On the left wall is a table with an Order form and an Envelope. That
Order Form will soon become important but now you do not know why. You can view the form but do not do anything with it. You can see that a stamp has to be placed on the envelope.
Take a look in the Dining Room. There is a low chest of drawers in the corner and a notice board on the wall. On the notice board you read various calls .... there is
a.o.
a note from Jean who has lost her beautiful Music box. Open the drawer of the cupboard. There is a stamp booklet in the drawer. Open the stamp booklet ..... 1 stamp is left in the booklet. You can now take the Postage Stamp with you or you can leave it for a
while in the booklet. You can also store the stamp in your Case or deposit it here on the box, on the black plate .... I do the latter.

Behind the dining table is the bathroom ... in the bathroom you can read a "Reminder" about that no sugar can be stored in the fridge. Go back to the hall
and then enter the kitchen. There is also a notice board in the kitchen where you can read the note about the Music box. There is also a small note about stamps on this notice board.

Back to the hall and then up the stairs to the floor. The floor has 3 rooms. First enter the smallest bedroom ....

The "Grumpy Knocker" book is on the chest of drawers in the smallest bedroom. You can grab this book and store it in your Case

The "Grumpy Knocker" story is important for repairing the film projector in the workshop of A. Bell .... but more about this later. You must have viewed
this book. Go back to the corridor and then enter the other room. This room has the Film Projector of this house, but there is also a children's bedroom here.

There is nothing to find in the cupboard, so enter the children's bedroom through the other door.
On the bed is a note on which you can read what is needed for a "May Day equipment" and that is a Hat, 2 Bells and a Stick.

Walk to the table .... there are 3 trays on the table .... in 1 tray there is a Belt with bells. There is also a Stick and a Hat .... Leave everything as it is

... on the note you read that 2 "Bells" are needed for a "May Day outfit ....." "Bells" means a tambourine with bells. So 1 tambourine is missing and we will now order that thing via the Order Form. So go back to the ground floor hall. If you have no further item in your pocket then you will first collect the stamp.

if you had stored the stamp in your Case then you press T to go to your Case to collect the stamp. If you had not yet removed the stamp from the drawer in the dining
room, you can do so now. Then go to the table in the hall and make sure that you zoom in on the Order form .... The Form has 2 boxes where you have to type something .... in the left box you type the name of the item you want to order and in the right box the
number.
Type baldrics in the left box and 1 in the right box.
Then place your cursor on the stamp box of the envelope and then click to stick the stamp on it and......

........the form will disappear in the envelope. Take the envelope and put it in your pocket .....

Now look for a letterbox ..... Oh yes ..... there is a letterbox at the post office ....
Exit the house and follow the street back to the post office and put the envelope in the blue letterbox

When the letterbox has swallowed the envelope completely, you enter the post office and ....did not know that US MAIL was sooooooo fast ......
....

You have the 2nd tambourine with bells, but before you run back to the Morris house you first go behind the counter.
Under the counter you will find a figurine
of a Grumpy Knocker ....

Maybe you have taken the figurine of a Grumpy Knocker the first time that you were in the Post office but if the figurine is still there, pick it up and then store it
in the Case.
When you get back you go back to the Morris house and to the bedroom where the table is on which the stuff for the May Day outfit is located.
Stand in front of the table again and place the tambourine with bells in the left box and .......

You hear Jean and she is satisfied. Walk back to the front room and see .......
.... the projector here has now also been repaired, so click on the white buttons of the thing and ...

....
this projector projects Jean's engagement ring .....
So, ready here. Back down and leave this house. On the town square you turn to the Crow's Nest Pub. To the left of the pub is a tunnel to the harbour

Walk through the tunnel to the harbour and you'll end up at the A. Bell workshop again. Now enter the workshop.

A.Bell Workshop:

You hear Jean and then Phyllis when you step inside. Walk up the stairs and upstairs look briefly at the desk. A bove the desk is a note that you can read. Then turn around and walk on and on the floor lies the film projector.Walk on to the next door. If you try to open that door it appears to be locked.

There is no key in the door and you will not find a key for this door either. Next to the machine, however, a plate hangs on the wall. The plate contains drawings
but there is also a text written on it. Go read the text on the wall plate. You read that "If you close one door another door will open" ..... Hey ...... did you leave the front door open? .... I think so .... walk back down the stairs and
then close the front door and ...... the door above will open.

Back up and through the now opened door into the next room. 3 Bells are hanging on the back wall and on the round table is a letter and a Hammer to knock on the bells

Read the letter .... you need the Hammer to hit the 3 Bells in an certain order, but wait a while. So you can now pick up the Hammer and carry it with you or leave
the thing on the table for a while. Turn left .... you look further through this space. There is a long table and a safe on the wall and a desk at the back

Walk to the table and the safe. Read the letter on the table. There is nothing in the drawer of the table. There is an A.Bell book on the safe that you can grab and
store in your Case ..... If you had the Hammer in your pocket, the hammer will be placed on the safe when you take the book from the safe. View the code lock of the safe .... in the lock the 4th digit ring is missing. Walk on to the desk ..... on the desk is a
newspaper and an A.Bell book and a wheel. Take the newspaper and read the article .... You read that quite a few people from the village drowned in the mine.

You can store the A.Bell book and the Wheel in your Case, but you can also leave them here on the desk.
In the drawer you see a loose partition that you can lift out of the drawer ..... do that and then take the number ring from the drawer
....

Put the number ring in your pocket and go back to the safe. Zoom in again on the number lock of the safe and then insert the number ring just found. Now the number
code ....... In the fuse box of the A.Bell house you have read the note with 0427 on it ..... Phyllis has saved that note in your Case for you .... Well ...0427 is the code for this safe ....

so put 0427 on the number rings and ..... the safe will open ...... The 2nd "Grumpy Knocker" is in the safe.

Take the "Grumpy Knocker" from the safe and listen patiently to the 2nd part of the story.
When the Storyteller is finished with the "Grumpy Knocker" story, press the T-key and place the figurine on a shelf in the Case.

you hear Jean about memories and you hear the "ping" sound as a sign that you have now repaired the projector.
Turn around and walk back to the front room and see ...... the projector is now standing.
Well, start the Projector and this projector will project the lost Music box from Jean ......

Done here but we still have to find 2 red ribbons, so leave the workshop. Walk down the stairs to the quay and then follow the quay straight ahead.

You go past the Crow's Nest pub and the forge and you arrive at the first boathouse. To the right of the boathouse is the long stone staircase that goes up to the A.Bell house, but we are not going back to that yet. In the distance you can see the 2nd boathouse standing on a hill ..... we will go there first .... So walk on and continue along the beach to the 2nd boathouse. Climb the stairs and then enter the boathouse

In this boathouse is the large version of the toy boat that you have previously launched. Walk to the left and then make the 7th Red Ribbon disappear to your Case

Ok ..... 1 more red ribbon to go, as Phyllis also tells you. Leave this boathouse and walk across the beach back to the quay.
When you are past the first boathouse, turn left and go to the stone stairs

Go all the way up the stone stairs .... you end up at the back of the house where you started this chapter

Turn left and walk to the white house in the corner and enter.

At the back window you will find your last one, so the 8th Red Ribbon. However, first turn to the right and read the "reminder" note that hangs above the
sink. Then walk towards the red ribbon .... halfway you can grab a bottle of DJ Taylor Beer from the table and store it in your case .... Continue to the red Ribbon and let it disappear to your Case and ....Phyllis starts to talk again and then you get the
message that you should teleport back to your Case, so do that ....

In your Case: Take photos:
Go to the 2 gray doors to the left of the seat ...... The Pinwheel Harbour door has now become somewhat transparent. The 8 red ribbons are now in the left box and Jean's Music Box is on the box. Phyllis tells you to activate the Music box and then walk through the Pinwheel Harbour door .... So click on the Music box and then on the glittering Pinwheel Harbour door and .......

the glittering door becomes a wooden door that then opens. Step through the bright white light inside.
You end up in a dimly dark front hall and you now have a photo camera in your hand .....

Continue to the next door .... the door will open automatically when you walk up to it and you end up in the Hall ..... so there is a Hall, a storage room, a
dining room and a kitchen . In each of these rooms you must now take a picture of the items that are important to Jean because of her birthday, when she was a young child .... and which you have read about in all the houses you have searched. Here in the hall
there is a table with packages on it ..... take a picture of the table and .... the hall becomes lighter and there are presents on the table and you hear the guests.

Then go into the storage room .... there are boxes in the corner and there is wrapping paper on those boxes ......
...

Back to the hall and now go into the dining room. At the back is a small table and a chair .
... on that table is a bottle of JD Taylor beer .... take a picture of the bottle of beer and .....

the room becomes lighter and you hear someone snoring and the sound of breaking glass.
Back to the hall and now to the Kitchen. On the table is the birthday cake .... take a picture of the birthday cake ...

the kitchen becomes lighter and saucers and cups appear on the table and you hear the guests talking ....
Ready ..... return to your Case, through the white door ........

Phyllis is going to tell you a whole story of which the most important thing is that you have to go back to Pinwheel Harbour to continue to the next part of the
village ..... in the meantime,while Phyllis is talking, go downstairs and take a look in your Dark Room and see .. ... the 4 photos you have just taken are now on the line in your DOKA.

Press your T key to return to Pinwheel Harbour .... you will end up where you were and where you found your 8th red ribbon ....
if you have followed my walkthrough then that is the white corner house, behind the Bell house.
Pinwheel Harbour:

You look out through the back window again. Turn around and leave the house and walk to the A.Bell house.
Then turn right and go down via the long stone stairs back to the harbour

Back downstairs you walk across the quay to the wooden jetty at the A.Bell Workshop

Follow the wooden jetty and the path back to the toy boats harbour and then on to the gate of the stone bridge.

If you have been here before then you will have noticed that the gates of the bridge gate were closed and locked ....
..... well ... the gates are now open so walk through the gate and ..... you end up in:
The Park:

The park is hilly and on the right you can walk down to the river. Don't do that yet, just wander through the park because you can find and read 2 "Painter's
Journal" books here. If you follow the left-hand park wall you will come to an easel with a book on it .... that is the "Painter's Journal # 10"

If you go to the river you will find "Painter's Journal # 3" on a table.

The other two gates of the park are closed, so you think you will not get further here .... but nothing could be further from the truth. Walk back to the bridge gate and then walk down to the river and step into the river .... So you can walk through the river and you have to do it now

Follow the river upstream .... you hear Jean reporting that she used to let toy boats sail in the river ....

The river meanders a bit and you go under 2 stone bridges and then ..... you see in the distance the entrance to the Industry / mine complex ....
.. wade further and you end up under the building ...... go out of the river via the stone stairs and ......

Walk across the bridge to the other side and go through the "wet" gate and ........ after the Loading you have arrived in:
Chapter 3: Brimcliff Industrial Centre part 1
2015: Original Dutch Walkthrough by: Louis Koot
2019: English translation by: Dick Leeuw