
2019: Walkthrough by: Louis Koot and Dick Leeuw
If you have found this walkthrough via google search or via another site then you have probably not visited my site.
A lot more very detailed game walkthroughs can be found on my site at: www.pcgameswalkthroughs.nl
Chapter 7: Brimcliff Mines
Find the entrance to the Mine
You will be back on the Pinwheel Harbor quay. Continue to the wooden jetty at the A. Bell workshop.

Follow the jetty and then the path along the river to the bridge and go under the bridge into the park.
Inside the park go to the right and step into the river, wade upstream through the river to the next bridge.
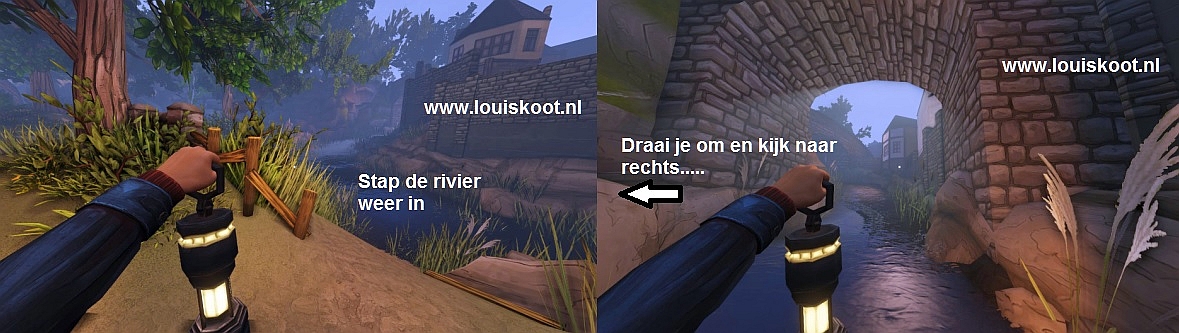
Do not continue under the bridge now ... Just before the bridge, turn to the left and you see .... In the rocky bank you now see the entrance to a tunnel

Wade to the tunnel entrance, stoop and crawl into the tunnel ... Stand up again and walk on and .... you will then reach the Entrance of the Brimcliff Mine

Step through the "water thin" port and .... your screen will go black for a moment but then you will end up in the:
A: Upper shaft:
Red Ribbon 1 and Film Projector 1
You hear Phyllis telling that she has been ordered to turn off her machines for the night...
... there will soon be no contact with Phyllis for a while and perhaps that is a good thing .... but perhaps not .....

In the distance you see a white sign hanging on the shaft wall. Continue to the white sign and view it. You will see an "Engine Diagram"
on the board. You
see 5 rotary valves and you see how to turn those 5 rotary valves. Number the 5 rotary valves, from left to right, 1 to 5 and then note which way you should turn them, so whether the knob of the valves should be on the left or right.

Walk on and .... you end up in the Lift cave. A channel flows through the cave and the large lift is across the channel ....
unfortunately the bridge to the lift has
not been rolled out

Follow the path further to the left of the elevator and then go through the opening into the next corridor ....
You have arrived at the machine with the 5 rotary valves ....
....however, only 4 rotary valves are attached to the pump machine ..... Rotary valve 4 is missing. It is never easy ....

Look, when you are at the rotary valves, to the left .... the room at the bottom of the stairs is flooded and there is Film Projector 1, which you can repair by
solving the 2 puzzles here. On the other side you see red Ribbon 1, on the "balcony". Under the "balcony" is the entrance to a narrow tunnel but that entrance is blocked .....

Turn right again and follow the corridor further .... beyond the rotary valves, this upper shaft ends in a wide section. On the left is a warning sign and a letter.
There is a table and further to the back the Depth Lever hangs on the wall .. On the back wall there is another large white "Knocker Code" sign and to the right of that sign you see 2 curved
pipes.

Read the warning and read the "Flooded" note on it ....

Take a look back at the rotary valves and .... you will see the lever to which the warning refers ......

Walk to the table and read the letter on it. On the table there is also a pipe and a box of pipe tobacco
... You can grab both items and store them in your case or
you can leave them here. On the other side a part of the fence is open and there is also a note .... walk towards it ..... You look into a mine cart tunnel. Read the "Do Not Ride The Skips" letter ..... 2 miners had a accident when they descended to
these mines in a mine cart, from the Industrial Centre ..... their extra weight caused the cart to derail and let the bridge collapse ......

Take a look at the Depth Lever ..... a certain Depth must be set and then you can pull the lever down .... The depth you set determines the depth to which the large
lift will descend. You do not know this depth yet. View the large white "Knocker Code" sign. Well ..... you did this once in Ore Tramming of the Industrial Centre ...... A = tin and B = iron but now it is about the "Receive from Industrial
Centre" line.

To the right of this board are the 2 bent pipes on which you have to hit the code again with a Bell Hammer ..... Oh .... you didn't bring a Bell Hammer ?. So go back
to your Case and get 1 of your 2 Bell Hammers from the cupboards where you had stored them. If you had left the Bell Hammer somewhere in the Industrial Centre then you have to travel back to the place where you left the Bell Hammer,
through the large screen in your Case. Return with a Bell Hammer here and stand in front of the 2 bent pipes.
Left is B = iron and right is A = tin. With the Bell Hammer in your pocket, click once on A, 3 times on B and once again on A and .....

You hear Jean .... turn around and walk to the opening in the mine cart tunnel and see .......
..... now a few full mine carts are coming. The missing rotary valve 4 is located in the trolley that stops before the opening.

If you do not want to lose the Bell Hammer, you first have to put it away in your Case. Then return here and grab the rotary valve from the mine cart ..... Go back to
the pump and place the rotary valve on the empty spindle. Then turn the 5 rotary valves according to the diagram that you viewed earlier in the corridor ...... so from left to right the position of the buttons of
the valves must be like ...... right, left, left, right, left .... then pull the lever down .....

Go back to the rotary valves and look again in the room on the bottom of the stairs, where the film projector is and see .... the tunnel entrance is now
free in the back.

follow the tunnel until you can go no further because of the mine cart and then turn around ....
You are now behind the balcony and can now walk to the balcony via the stairs ....... so do that

You see a desk on the left, on the balcony. First let the red Ribbon 1 disappear to your Case .....

On the desk is a letter and a blackboard. Read the letter and try to decipher what is on black board ......
At the bottom right of the blackboard you read ... F 380
....

F 380 is the depth that you have to set on the number rings of the Depth Lever.
So return to the Depth Lever and put on the number rings as depth 380 and then pull the lever down and ....


... So turn on the projector ..... this projector is projecting a Stethoscope ........

Ready here ...... we go deeper into the mine ..... go back to the lift cave and see .....
the bridge to the lift has now been rolled out, so go over the bridge and into the elevator .....

In the elevator is a full mine cart and on top of the kibble is a big reel with tape, Grab the Tape Reel and go first store this thing in your Case ..... don't know
when we need this tape. Then pull the lever down and ..... you go down with the elevator .... As the elevator descends, turn around and read the letter that hangs to the left of the elevator doors.


First enter the left side corridor. Walk on and you will end up at a cupboard

Read the letter on the cupboard. Open the door of the small cupboard and then click on the answering machine .... You hear that unknown man again. Turn around and
walk on. The corridor ends at a watery gate. Just before you reach that gate you can read the "Reminder" that hangs on the metal plate on the wall.

The side corridor ends here ..... The stairs lead down to a piece of tunnel with knee-deep water on the floor. If you stand in front of the opened watery gate you
will read that this is the lift to Brimcliff Industrial Centre ..... Let's see where this lift takes us. Step through the watery gate doors and ..... You are then in an elevator.

Pull the lever up and ...... your screen will go black for a moment and then you will end up in the hall with the nodding machine in the Industrial Centre ....

Well ... we know this .... so we can easily return from the mine to the Industrial Centre via this elevator. Step back into the elevator, pull the lever up again
and .... after loading you are back in the mine. You can now see Ribbon 2 hanging in tunnel at the bottom of the stairs. Walk down the stairs and wade through the water to Ribbon 2 and let the ribbon disappear to your Case.

This tunnel is a "dead end", so turn around and go back up the stairs and follow the side corridor back to the main corridor

Back in the main corridor you cross straight and enter the side cave, via the stairs

In the back right corner of the cave hangs Ribbon 3. Next to the ribbon is a locker and a table.
Walk to Ribbon 3. Open the door of the right cupboard. There is a purple light bulb in the cupboard.

First let the red Ribbon 3 disappear to your Case and then take the purple Lightbulb from the cupboard. Hold the purple light bulb now with you and turn to the table.
A schematic image of the main lift shaft hangs on the fence ..... The shaft goes to a depth of 480 fathoms. There is a letter on the table and a lamp holder. There is no light bulb in the lamp holder. Read the letter and then insert the purple light bulb into
the lamp holder and ......

The purple light makes 3 codes visible on the lift shaft diagram .... Note those 3 codes and the depth associated with those codes ......
F-400 = code 0314, F-420 = code 1151 and F-480 = code 1403.

Return to the main corridor and continue on the main corridor. On the boxes there is a
"Knocker" letter that you read

....... The footbridge over the canyon is gone ... on the left is a deep niche where the 2nd Depth Lever hangs on the wall

Depth 400:
Walk to the Depth Lever ...... The depth is now set at -380 fathoms but you must now set the depth at -400 fathoms.
So zoom in on the number rings and set the rings to 400 and then pull the lever down .....

the lever will automatically raise again but you have now set the depth to 400F, as you can see on the panel ..... because the light at 400F is now green

Turn around and walk out of the niche and you will see red Ribbon 4 and the bridge over the canyon has now also been rolled out.
On the
rails is a yellow drilling machine.

Go click red Ribbon 4 to your Case. View the yellow drill .... The drilling machine needs 3 drill heads.
Walk to the suspension bridge and walk across the suspension bridge to the other side of the canyon

Halfway through the suspension bridge you take a look to the left and to the right. On the left you see a red ribbon on a "balcony". On the right you also see a "balcony" and there is also a ribbon on it ..... I have no idea how to reach those 2 "balconies" right now

Once you have reached the other side of the canyon, you will see the red Ribbon 5 at the end of the corridor.
Walk on to red Ribbon 5 ..... You are in a corridor with cupboards and a gate

You can't open this gate yet .... behind this gate is the Left Pillar Room. Just before the red ribbon 5 is a niche on the left side, there lies
Film Projector
2 on the floor. At Red Ribbon 5 there is a wooden box, on a metal box ..... you cannot open the wooden box .... the wooden box will open automatically when you have repaired film projector 2. Let red Ribbon 5
disappear to your Case and then turn around .....

Go and store the "Knocker" in your Case and return here. Walk back to the canyon and then descend to the left, down the stairs and then follow the path at
the bottom of the stairs to the lower corridor. You will now also see the Ribbons 7 or 8 on the right "balcony".

This corridor is also a dead end and in the back is red Ribbon 6. In the left wall there are 2 huge steel doors.
The metal door near Ribbon 6 has a code handle ......

Let red Ribbon 6 disappear to your Case and then zoom in on the Door Handle. In the side cave you have seen, on the elevator shaft diagram, the 3 codes that
belong to those depths 400, 420 and 480. With the Depth Lever you have set the depth to 400. So now put code 0314 on the number rings.

the lever pops down and .... the large metal door slides open ...... and you now look into a room with pillars .....
some pillars reach from the ceiling to the floor but other pillars float just above the floor ....... This is the Right Pillars room.

A fire is burning in the coal furnace at the back of this room. To the left is a gate and behind that gate is a narrow "alley" ..... To the rear left in the corner is a door in the gate .... Open that gate door and enter through the "alley". Immediately turn right and ..... Through a hole in the rock wall you look into a narrow long cave ... at the back of the cave you see a desk and above that desk is a painting ...... Zoom all the way. .... You can't crawl through the hole ..... in the bottom right is a metal plate

Press and hold your right mouse button to Repair this cave with your Core Memory Artefact keep your right mouse button pressed and you will end up in the:
Open the door again and step back into the living room and find another answering machine that you have not listened to before ...

you hear Jim and the unknown man again .... you will automatically return to the hole in the wall.... . Turn around. On the right pillar is a letter that you read


All 14 pillars now have such a ring and you can click those rings down. when you click the ring down on a pillar then it turns out to be steam pillars.
You now
have to lower the ring on 5 pillars and that must be the 5 good pillars and that must also be done in the right order.
Click a ring of a pillar down and if that ring does not stay down then you have done a wrong pillar. If you click the ring down on a pillar and the ring then stays down, that was a good pillar, but if you do the wrong pillar as 2nd,
then the rings go up again on both pillars .....
I have marked them as A, B, C, D, E.


Here you can see all 5 pillars with their rings clicked down ..... When you click down the last Pillar E, you hear also Jean


Turn on Film Projector 2 .... this projector projects a baby teat ......

when the projection is ready, the wooden box in the corridor is now open too, so go to the wooden box and take the drill head out,

Go and store the drill head in your case and then return here. Go back over the canyon and back to the depth lever:


....in a mysterious way you have arrived at:
Turn around and walk back into the main shaft ..... the front part of the main shaft has remained the same .... there is still the elevator, the side cave and the
side corridor to the elevator to the Industrial Centre. But the left part of the main shaft is now different because ..... you are now at the bottom of the canyon.


Under the wooden "balcony" you see the
red Ribbon 7. That "balcony", above ribbon 7, is the Chapel and you reach it via the stairs ....
but the Chapel is currently closed via a metal plate, at the top of the upper stage. There is another wooden box in front of the stairs. Walk on to red Ribbon 7 and let the ribbon disappear to your Case. Turn around and ....... Under the stairs are 2 letters
on 2 boxes and there is a suitcase. Read the 2 letters .... they are a "Dear Benjamin" and a "Dear Steven" letter. Then open the suitcase and pick up the BIBLE.


Like I said ..... the Chapel is closed with a metal plate.
Zoom in on the number rings of the Lever and then put code 1151 on the number rings and ......
the lever will automatically pop down and this will open the Chapel ....

So now also climb the 2nd stairs and .... you are in the Chapel:
|
Look around the Chapel. There is an Altar and there are 5 reading desks. There are also 8 boxes on which candles are burning. What you should do here is
the following: A: First you have to put the Bible on the altar. B: Then you have to blow out all the candles and you have to do that in a certain order. C: Then you have to light 5 candles again and you have to do that in a certain order. D: Finally, you must place the Bible, out of the suitcase, on each of the 5 Lecterns and you must also do this in the correct order. |
First go through the chapel and learn where all the desks are and where the candles are. In the illustrations, I have numbered Desks as A,
B, C, D, E and the candles as 1, 2, 3, 4, 5, 6, 7, 8 ..... Also read the Letter that lie on a chest, between the candles 7 and 8. Candles 8 are therefore behind desk D and candles 6 are past Desk
D and candles 7 are on the barrel at the rear right.

Here some clearer pictures of all candles

Ok .... if you have the positions of all desks and candles in your head then you stand in front of the altar. Put the Bible on the altar:

Now you have to blow out all the candles and you do that by clicking on the candles. Make sure that you are close above the candles and then click on one of the candles to blow out that group of candles
Solution
A: Blowing out candles:
the order in which you have to blow out the candles is: 6, 7, 3, 5, 8, 1, 2.
When you have blown out all groups of candles then you have to light 5 groups of candles again, and you do that too by clicking on the candles.
Light up these candles again: 1, 2, 5, 6, 8
Once you have lit the right groups of candles, you must place the BIBLE on each of the 5 Lecterns / desks ... Take the Bible from the altar and then place the Bible on a
Lectern. Then pick up the Bible again and place it on the next Lectern and so on until you have placed the Bible on each of the 5 desks .... on the last lectern the Bible then remains and Film Projector 3 is solved.
You do not need 5 Bibles .... you only need the Bible that you have taken from the suitcase, beneath the chapel.

You hear Jean and Film Projector 3 has been repaired. So go to the projector and turn the thing on .... Projector 3 projects a Medal.

|
It could be that my solution of this candle puzzle won't work in your version of the game. If that is the case then you must do this candle / bible puzzle all over again.
If all is well then the puzzle will be solved in your game too. If the projector still isn't repeared then I don't now of any other solution for this puzzle |

Go back to the depth lever and now set depth 480 on the number rings and pull the lever down again

Depth 480:
Again you have mysteriously dropped one level deeper. However, the front part of the main shaft is still the same, with the lift, the side cave and the side corridor.
But the back part is completely different again. Walk to the green/yellow cart on the rail.

On the left is the Tape recorder and also the green Drilling machine is here again ..... take a look at the Tape recorder ..... 6 reels can be placed on the tape
recorder .... In the elevator you have found such a tape reel and you still have to find 6 and we will now first look for the reels and put them all away in the Case. Beyond the Tape Recorder there are 2 crates. On the front chest there is a Ring and on the
back chest is the 2nd Tape reel and further down is the 4th Film Projector on the floor.

Grab the Ring and go and put the thing away in your case. Return and take the Tape Reel and go and put it away in your Case .... You now have 2 Tape Reels in your Case and still have to find 5 ..... Stow all Tape Reels together in 1 of your Case Cabinets. Return to the mine. Opposite the 2 boxes is an orange gate with a gate door. Behind the orange gate is a pump with rotary valves. The gate has a numeric code lock, but you now know the code. Zoom in on the code lock of the orange gate door and then put code 1403 on the number rings .... the gate door opens, but you may have to take a step back for this ..... At the pump is then Tape Reel 3

Grab Tape Reel 3 and go and store the thing in your Case and return here. To the left of the orange fence is the 3rd wooden box containing the 3rd Drilling Head, in
front of the Drilling Machine. Via the stairs you can go up to the Bridge, but we do thatlater. Turn around and ..... You see a metal case and a large metal door. Behind the metal cupboard you can go up the stairs. Tape Reel 4 is on the cupboard, so go grab
the Tape Reel and store it in your Case.


Note that Father's letters are uppercase and separated by dots. At the back left is Tape Reel 5.
Walk back to the stairs ..... you can read a letter up here that lies on a barrel behind the stairs

But first go up the stairs to the bridge because on the back of the bridge there is Tape Reel 6. Grab the Tape Reel and put the thing in your Case.


On the easel is the
"Painter's Journal 4", which you naturally read through.


Go and store Tape Reel 7 in your Case and return here. Further on you read the letter that is on the box and then you go, through the tunnel to the right.... This is
the tunnel that you repaired when you, at level 400 and in the right pipe room looked through the hole in the rocks ....


Pick up the blank paper and put it in the typewriter and type the letter and then read the letter. Open the cupboard door and then pick up the "Knocker
figure" and listen to the continuation of the "Knocker story". So go and store the number ring and the Knocker figure in your case .... you can click the number ring on your safe immediately. You now have found 7 Tape reels in the Brimcliff Mine
......

The Tape recorder has 3 compartments and you can place 2 tape reels in each compartment. So there are 6 positions on the Tape recorder where you can place a Tape
reel. Position 1 is the playback position. The red Play button is located on the front of the Tape recorder. Place the tape reel that you now have with you on position 1 on the tape recorder ..... Position 1 is the playback position ........ Press the Play
button and ..... You hear the word that is recorded on the Tape ... but the word is played backwards ..... In my case I now hear the word ERA ... but this is backwards ......

Go to the right sideof the Tape Recorder and then bend and then crawl behind the Tape Recorder ... On the back of the Tape Recorder is the red Reversing button


Now you can listen to all your Tapes in the right way. You have found 7 Tape reels and on each Tape reel 1 word is recorded ..... They will be: Are, Broken,
Help, Fragments, Torn, Everyone and Remember. 6 of these words start with the letters of F.A.T.H.E.R .... So you have to place the 6 tape reels with the correct words on the correct places on the Tape Recorder
You first listen to a Tape via position 1 and the Play button ..... if there is one of the 6 words on the Tape, pick up the Tape from position 1 and immediately place
the tape in the correct position on the Tape recorder. Then go and get the next Tape from your Case and place it first in position 1 and press the Play button to hear the word on the tape. Is it another good tape than take the tape from position 1 and place it
directly in the right position ..... keep going until you have all 6 tapes on the recorder and in the right order. Press the Play button again to play all the tapes one after the other and ..... if you have done well you will hear Jean and Film Projector
4 has been repaired
This is the solution .....

projector 4 projects a Ticket


Go with the Drill Head to the Drilling Machine and place the Drilling Head on the Drilling Machine.
Go and pick up both other Drill heads from your Case and place them on the Drilling machine and ....

So go through the main shaft back to
the side cave and then follow the rails and ...

....... where previously you could not continue, the drill has now cleared the passage for you.
Walk further and you'll end up at a large cage where Film Projector 5 is on the floor and further on you'll see a Lever ....


There is a layer of water in the cave and light is burning now. If you stand next to the Lever on the edge then you peer into the cave and you see a bird cage hanging in front of you. There are 6 of those bird cages in the cave but now you only see the first cage. Each bird cage hangs above a tile ......
Now you have to pull the lever down ..... This will make it dark in the cave and you will not see the bird cages ....You
can keep your Lamp up to have some light while you go through the dark cave. In
the dark cave 1 Birdcage will always light up briefly and be visible ....

Then run to that briefly lit bird cage, which you saw for a moment, and as soon as you stand on the tile, benearh the bird cage, you hear a bird chirp .... Look around to discover
the next lit bird cage and run towards it until you get up the tile under the birdcage ... you hear the bird chirping again ...... You have to do this 6 times because you have to end up on each of the 6 tiles beneath each of the 6 birdcages ...

I can't help you with this ..... I can't give you a route through the cave to get from one birdcage to the next birdcage and I also don't really know if there is a certain order in
which those 6 birdcages appear to you for a moment. I pulled the lever down to make it dark in the birdcage cave and then ran through the water to the 1st birdcage, which became visible in the distance with me ...... Just before I reached the tile of that birdcage
the cage was already dark again and that happened with all 6 bird cages .... On the tile I heard the chirping and a little later, turning around, the next bird cage appeared in the distance ..... and that's how I got it done and it turned out to be good .....
...... on the last tile, Jean screamed "YES" and the projector was fixed when I returned to it.

So do your best and reach each of the 6 tiles, beneath each of the 6 bird cages to hear the bird chirp 6 times and then hear Jean scream "YES" when you are on the last tile.
All 6 bird cages then remain visible

You can check if the film projector has been repaired if you walk back to the handle but don't leave the cave .... to the left of the handle is a hole in the rock
wall and through that hole you can look into the cage where the film projector is lying in ..... without leaving the cave, you can see if the projector is still down or standing.

I have succeeded, so I assume that you will also succeed in getting this 5th projector in the Brimcliff Mine repaired. If that works, then you go tto the projector and turn on the thing ..... this 5th projector projects a photo of Jean with a man and on the back of the photo you can read that the photo was shot during a trip to the USA and on the beach of Philadelphia .......... Would that man be Jean's husband?


Now take the purple Light bulb out of the lamp holder again and put it in your pocket. In Pinwheel Village you will need a purple light bulb and I cannot promise
that you will find another one, so take this purple one light bulb now with you back to your Case

Now you are really done here, so press your T key to return to your Case and store the purple Lightbulb in 1 of your cupboards.
We now continue to take the 4 photos behind the Brimcliff Industrial door and then behind the Brimcliff Mine Door. So we continue with:
2015: Original Dutch Walkthrough by: Louis Koot
2019: English translation by: Dick Leeuw