
2019: Walkthrough by: Louis Koot and Dick Leeuw
If you have found this walkthrough via google search or via another site then you have probably not visited my site.
A lot more very detailed game walkthroughs can be found on my site at: www.pcgameswalkthroughs.nl
Chapter 10: Pinwheel Village part 2:
The Film Projectors
A: Docks: Pinwheel Export
The first film projector of the village is also on the
ground here.

Here in the harbour there is only 1 company established and that is the Pinwheel Export company, the company that exports the products from the mine and the Cider from
the Field Apple Cider factory. The white house that you see is the house and in the background you see the large shed annex office of the export company. As you know by now, you have to solve 2 puzzles to fix a film projector .... the 1st puzzle ensures that
the projector slides against the table and the 2nd puzzle ensures that the table with the projector on it stands up .

That door must be opened because in that loft there are 2 pipes, tin and iron, which you must hit according to again a "Knocker code". That is the 2nd part
of the puzzle .... if you do that right then a mine cart full of ore will come out of the mine. But before we solve the projector here, we can do something else first, while we're still here.
Walk to the closed door and the mine entrance and then follow the quay further to the right and walk all the way to the end.

In the far corner, at the very end of the quay,
is the entrance to a tunnel ...... The tunnel is closed with a fence because the tunnel is considerably damaged, so
you cannot enter it .... however, if you look through the fence into the tunnel the you see that there is such a gray / white sign at the back of the tunnel where you can point the lamp / artefact to repair the tunnel ...... GSo take your lamp / artefact
in your hand (press F key) and then aim your white dot at that white board and thenpress your right mouse button and hold it down and .......


....... when that is over you will automatically be zapped back to the tunnel entrance, which is now open.

Just before you reach the desk you see that there is also such a "Knocker codes sign" on the wall.

On the desk is a number ring for the safe in your case and there is a blank sheet of typing paper.
Put the blank paper in the typewriter and type the letter and then read it ... it's "Memory Journal 6" that you typed.

...... one more number ring and the code and you can probably open your safe to see what the secrets are.

write down, or remember, the "Knocker code" of the line "Send shipment to Dock ready to export" ......
the code is somewhat vague but it is: A x
4, B x 2, A x 2.

Now enter that house .... you end up in the kitchen / dining room.

Next to the refrigerator is a stove and from that stove comes a thick hose ..... that hose disappears through the outside wall to the pipe house under the outside
staircase. Take a look on the 2 top floors. On the first floor there is only a bathroom and the outside door to the alley behind the house. There is a bedroom on the 2nd floor


Take the Harmonica from the drawer and go and put the thing in your Case. From your Case, take the Shard of the Field Cider Bottle back .... you know ... the shard of the thick bottle that you broke in the shredder in the Devlin mine, that was in chapter 1...

I have advised you, in Chapter 1, to keep this bottle shard in your Case ..... if you did not do that then you will not have this shard now and
that means you have a problem now .....what problem then? Well ... you'll find out in a moment.
Return, with the shard, back to the main house and go back to the kitchen on the ground floor .......
Now stand in front of the stove and, with the shard in your pocket, click on the hose of the stove and ...........

... you cut a hole in the hose through which steam escapes from the hose and as a result the pressure falls away and, outside, the metal door of the pipe house will
now be open. So go outside and to the pipe loft and see ..... the metal door has disappeared and you can now see the 2 bent pipes

NB: Now you see your problem If you did not have the shard anymore....... you could not cut the hose from the stove and therefore this door will be
still closed......... no problem .... In the Pinwheel Export shed you can find such a large Field
Cider bottle and also in a shed from the Field Cider factory is such a bottle. In the Field Cider factory you will also find a shredder that you can use to break the bottle to retain such a shard.
You will have to hit a "knocker code" again on these 2 pipes, but we will now first solve part 1 of the puzzle.
Go back to the projector and then
walk past the house to the stairs and up the stairs to the terrace

Continue and descend via the next staircase to the Pinwheel Export warehouse. There is a "Reminder" note on the poles of the veranda that you can read.
Walk
up the veranda and use the "Welcome" mat, so open the door and enter the shed.


Take the yellow light bulb from the drawer and go back to your Case. Put the yellow light bulb in one of your cupboards and take the Purple Light Bulb (did you take it back from the Brimcliff Mine?) Back to the shed. Back in
the shed you can read that note on the table and then you go to the corridor with the staircase ....

Turn around and see ..... on another table you can grab such a thick Field Cider bottle.

So if you didn't have the shard anymore, you can grab this bottle and then break the bottle in the shredder that you can find in the Field Cider factory, where you have found red Ribbon 4. With the shard, you can still cut the hose from the
stove to open the pipe rack.

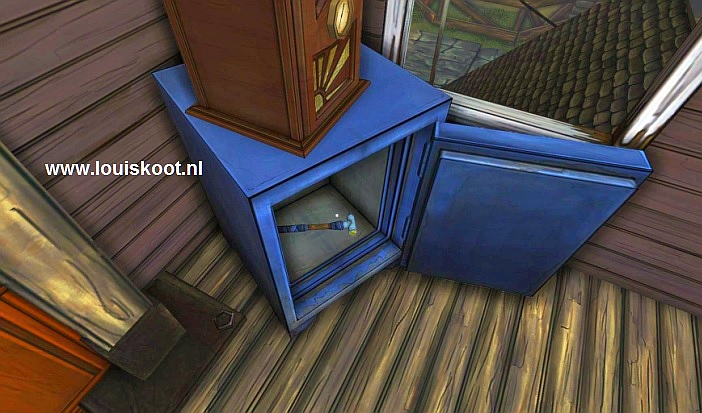
Read the letter and then open the desk drawer. There is such a sheet of graph paper in the drawer that you used in Mill Management on the graph roll. Such a role is also here but you cannot do anything with it. Take the sheet of paper from the drawer and place it on the desk at the stamp. You see that there is a flap in the drawer .... take the flap out of the drawer and ........ in the box you will see a tiny piece of paper but you can't take it because you're carrying the flap. So first go back to your Case to put that drawer Flap in one of your cupboards. Then go back and now you can take that piece of paper from the drawer. ...... Take that tiny piece of paper from the drawer ....... there is a code on the paper ... 0451 ...... you cannot take this code paper with you, so write the code and click the piece of paper back in the box in the drawer

If you had the Purple Lamp with you then it is now in the drawer because you have lifted the cover out of the drawer. So when you click
the piece of paper back into the drawer you will get the purple light bulb back in your pocket. The safe here lacks a number ring ..... if you still have a number ring in your case, you can click it here on the safe and then you can open the safe
with the
code 0451 just found. In this safe, however, is only a Bell hammer and you all ready have 2 of them in your Case.
NB: In the hotel you will also find a safe that also lacks a number ring but in that safe you can score a Knocker figure. You will find the number ring for that safe in the school. You have to decide for yourself whether you want to open the safe here to get your 3rd Bell Hammer or to use the number ring for the safe in the hotel

In the Brimcliff Mine you have seen that a purple lamp makes invisible codes / text visible .....
With the yellow light bulb that does not work here, so screw the Purple Light Bulb into the lamp holder and .....

Descend the two stairs back to the ground floor and go back to the blackboard in the side room.
Stand straight in front of the blackboard and click on the line at Origin and then type PLYMOUTH on the line. At Destination, type
NEW JERSEY and ....

.... the projector is now
sticking to the table but it still is lying on the floor


NB: If you couldn't get this pipe loft open because you didn't store the shard of the Cider Bottle in your case after you used it in the Devlin Mine in Chapter 1, then you can't solve the second part of the Film Projector here now. You can however go on with the solving other puzzles and then solve this projector when you have gain access to the Field Cider Factory, where you can break another Cider Bottle in the shredder.
First store your Bell hammer in your pocket because otherwise you cannot click on the 2 pipes ....... Then hit the correct code on the 2 pipes ...... left pipe is B =
iron, right pipe is A = Tin .... So according to the "Send shipment to Dock ready to export" rule you hit the 2 pipes ..... 4 times on pipe A, 2 times on pipe B and 2 times on pipe A.

... you see a mine cart with cargo coming to the entrance of the Min

The film projector is now standing up so run towards it and turn the thing on ... this projector projects a Passport ...

B: Pinwheel Cinema: Projector 2:
Open Dr. Foster's practice:
There is also a broken film projector in the Pinwheel Cinema, but you cannot enter the cinema from the street. To get to the cinema you have to go through
the Doctor’s house. You are still at the solved projector 1 in the Docks. Climb up the stairs, on the side of the house, and then go back through the tunnel to the Starting house.


In the white house you can find a few notes and a flashlight and a recorder .... if you don't find this interesting then you skip this house and you go straight to the doctor's house.
But if you really want to get everything out of the game, just go in there.
White House:

There is absolutely nothing to find in the attic, but in the main
bedroom you can read a Journal page again, in the open book that is on the table.


Back down .... in the living room you can then score a recorder to store in your Case. Ok ... that's it for this house .....
Back outside and continue to the stone stairs and then, right in the corner, enter the Doctor's House
Doctor Foster's House:
Of course you end up in the waiting room ..... Jean screams something about lost car keys.
There is a bell on the desk of the doctor's assistant and the appointment book. On
the other side of the waiting room is the surgery room door.

Dr. Foster is not present and will be gone for a week or so. However, patients can call the Emergency Doctor via a telegram. The door of the surgery must be opened because through the surgery you can then enter the cinema, where the film projector can be found.

To open the surgery door, a doctor's appointment must be entered in the appointment book, witch lies on the secretary's desk here .....
but which name, day and time must you enter? We will now find that out in the May Day House
The May Day House:


Take a look around in the kitchen and you will understand why I called this house the May Day house .... on the table and on the counter there are all May Day stuff
...... You can put the hat and the 2 tambourines, which are on the counter, in your Case. Go up the stairs ....

Enter the left bedroom and open the drawer in the table in front of the bed


Stand behind the desk of the doctor's assistant so that you can write in the appointment book. First push on the bell, which is on the desk .... You must then write
the Vicki appointment in the appointment book, on the last line ..... If you don't know anymore, you can use the E-key to pull the appointment card out of your pocket to read it again.

Then type in the date column 30 and in the time column
you type 12:15 ..... and ..


....... you end up in the:
Pinwheel Cinema:
Immediately open the outside door by clicking on the white door key that protrudes into the keyhole .....

You can now, if it turns out to be necessary later, also
enter the cinema via the street. However, do not step outside now but turn around.On the left wall there is a blackboard .... it is the "Emergency Assembly Point" sign that must be filled in where Vicki will meet the emergency doctor. At
the desk there is another journal book in which you can read another page about the films.

At the back left you can walk into the cinema room .... do that and take a look around ... you also hear Jean and you can read all the posters.
There is nothing more to do in the hall, so go back to the hallway and continue to the stairway.

There is a gray paper on the notice board on which you can view and learn some Morse codes ....
this is important because you have to decipher 2 telegrams in a moment
....


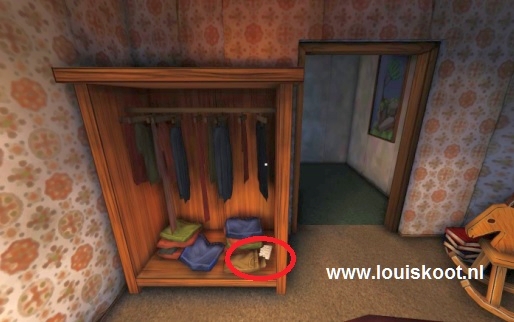
Take a look at the Telegraph ... you can't do anything with it yet. Walk into the narrow aisle .... In the rack cabinet stand and lie the film boxes .....
You can
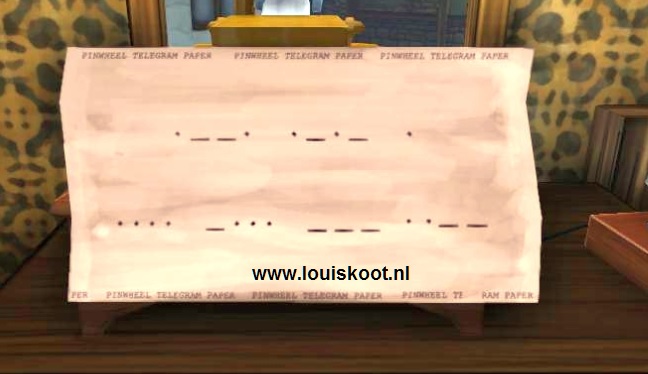
open a few of those film boxes .... In the box, which is at the back and then at the bottom of the rack, you will find a Telegram.....


Compare the Morse code on the telegram with the codes on the gray paper, you then know what is on the telegram

you must now send this telegram via the telegraph ..... So run back up and stand in front of the Telegraph.
Insert the Telegram into the slot of the Telegraph and ..... the telegram is sent ....

Wait until the sending is done because you will receive an answer immediately.

Take the return telegram from the telegraph and view it


When Phyllis has stopped talking and the projector has gone out, then you go back down.
In the narrow corridor you can still read a letter from Paul Wainwright, the cinema manager.

Leave the cinema through the front door .... So you end up in the street that goes from the cart square to the market square.
We continue this walkthrough with
C: Fields Apple Cider factory: projector 3
2015: Original Dutch Walkthrough by: Louis Koot
2019: English translation by: Dick Leeuw