Montague’s
Mount
2020: Walkthrough by: Dick Leeuw
If you have found this walkthrough via google search or via another site then you have probably not visited my site.
A lot more very detailed game walkthroughs can be found on my site at: www.pcgameswalkthroughs.nl
Game controls: WASD keys and use the mouse to view and grab objects. You can set other keys for the controls, but you should not use the arrow keys for that because you will need them later. Press i for inventory and the x and z to navigate through, the q key is for the compass. You can get some achievements in this game, a few of them are important for the game, of the rest I have not completed 1 but that does not affect the game. You have to look at many things, some you have to take with you but you can only take 5 items with you at a time.
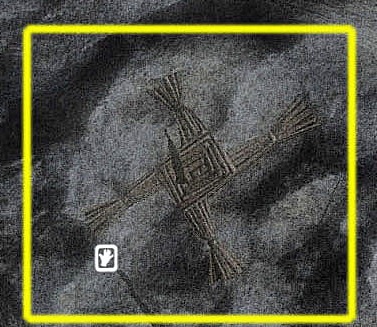
You will find these crosses, crosses or ST throughout the game. Birgid of Kildare, there are 22 of them. I found 19 of them.
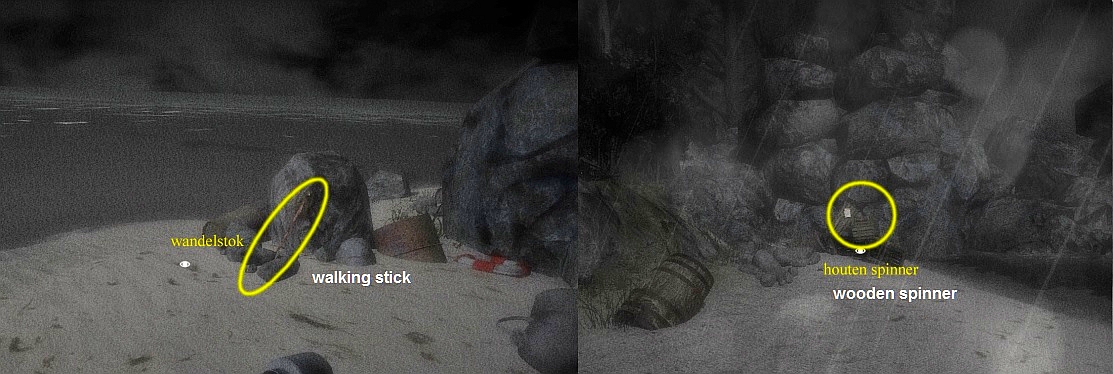
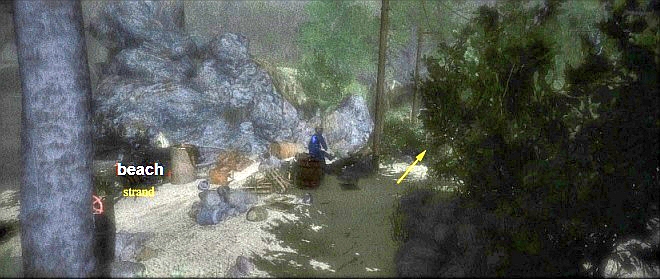
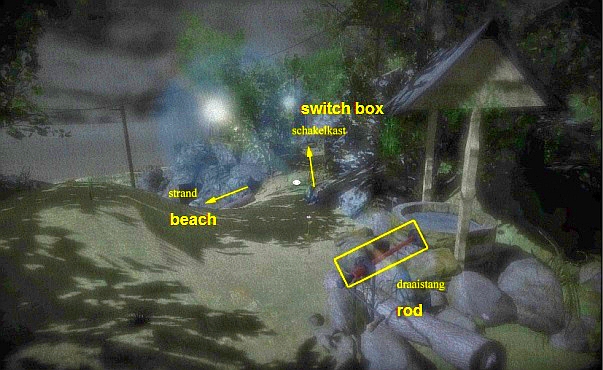
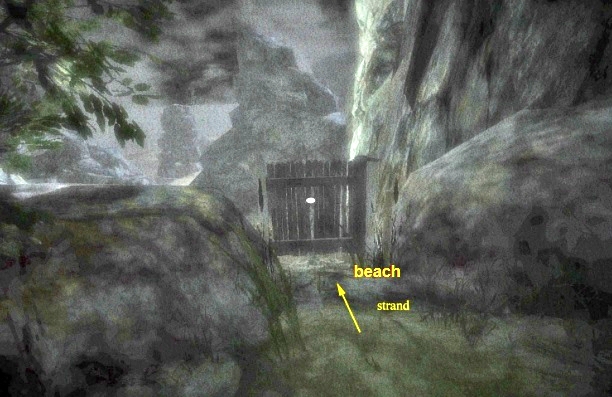
Start on the beach, 2 things important here: walking stick and a wooden spinner, both of which you take.
Also view the many other objects here on the beach.
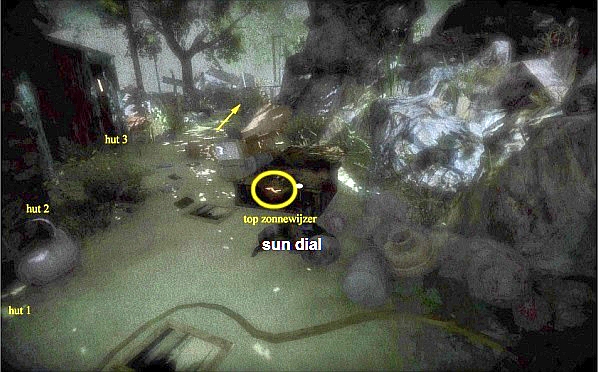
If you have a walking stick you can open the gate, walk through and you will come across 3 huts, the first 2 are open and the third one is closed.
You can look around the huts but there is no power yet.
Follow the path and go through the gate.
At a beach you get a vision, when you have control again, grab a turning wheel on the beach. Follow the path further, just before the closed gate you turn right.
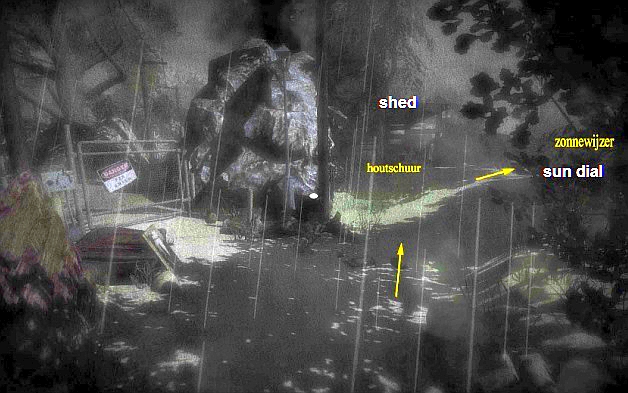
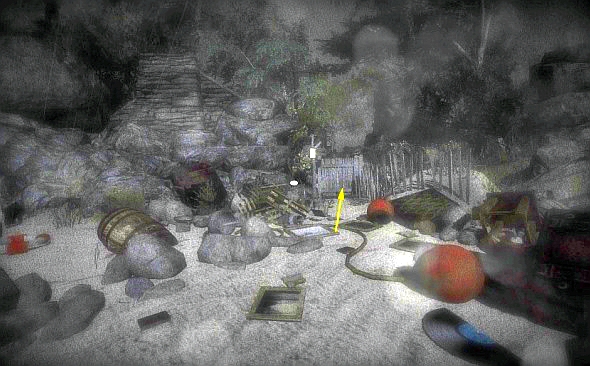
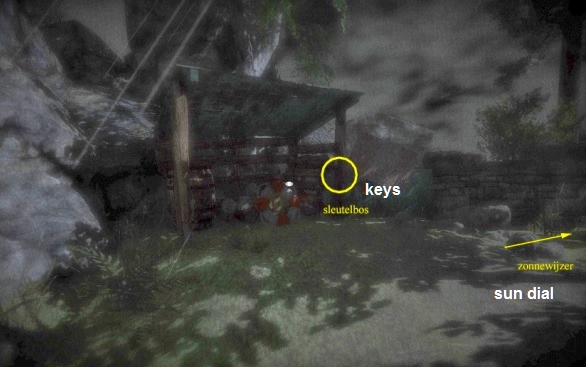
You'll reach a wooden shed. There is a bunch of keys on the right post, take the keys.
Continue past the wooden shed and you will come to a sundial and a power generator.
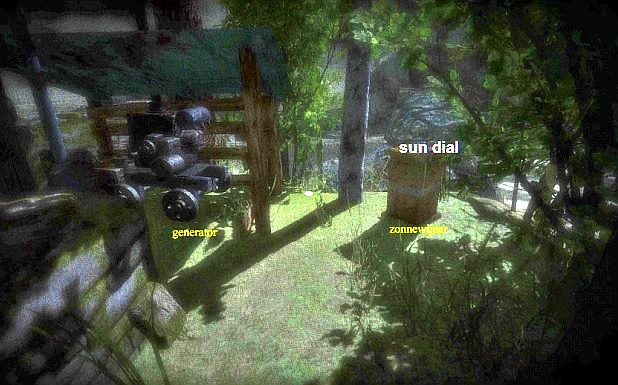
Go back to the beach.
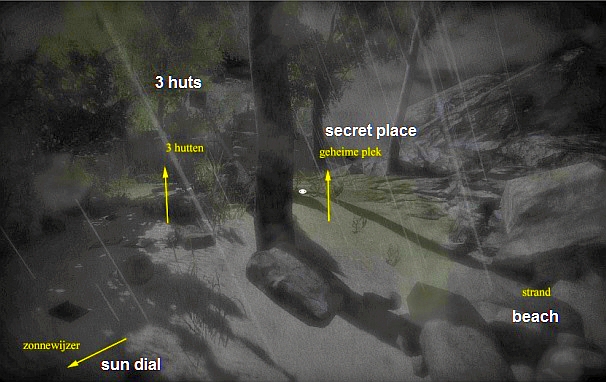
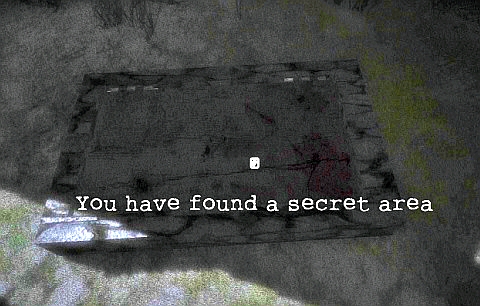
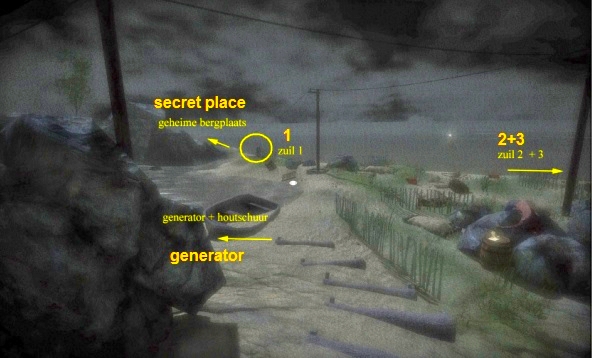
Continue to the right of the wall and you will come to a secret place.
Take a map from the chest, return to the beach and now walk to the left of the wall, back to the 3 huts.
Go to the locked hut, use the key ring on the door, inside you will find a jerry can, take it and............
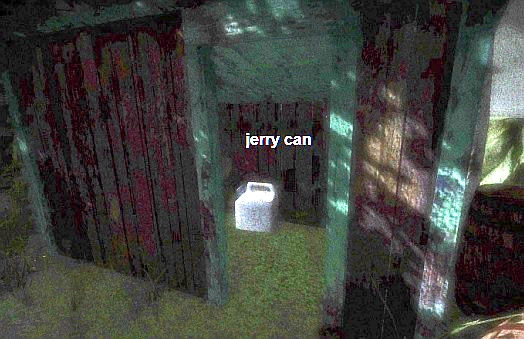
......... go back to the power generator. Open your inventory and select the jerry can, now click on the motor and you must play a little game.
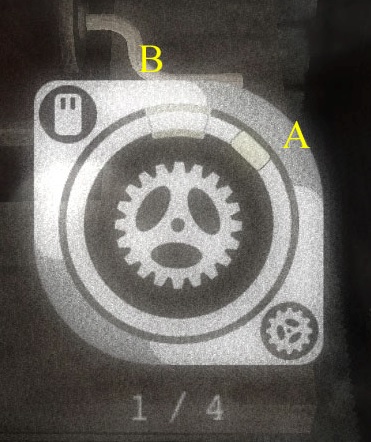
You have to hit 4 times with A in the small box B. A will spin faster and faster, if you miss you have to start over. If this is successful, the generator will supply power and the lights will turn on. You must do this mini game with all generators that you come across and also with the gramophone.
Walk back to the 3 huts. To the right of the doors to cabin 1 and 2 is the light switch, check all drawers and cupboards inside. In hut 2 there is a wooden spinner next to a gramophone and a television, you can turn on the television and play a movie, for the gramophone you need a whole LP, which you can find later in the game. In the first hut hangs a flat cupboard on the wall, open the doors of this cupboard.
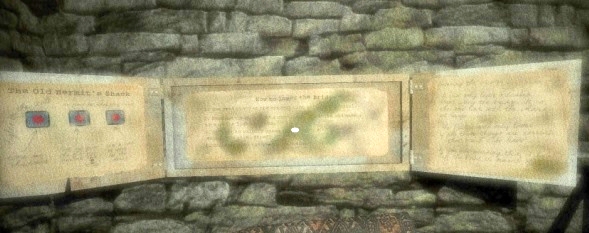
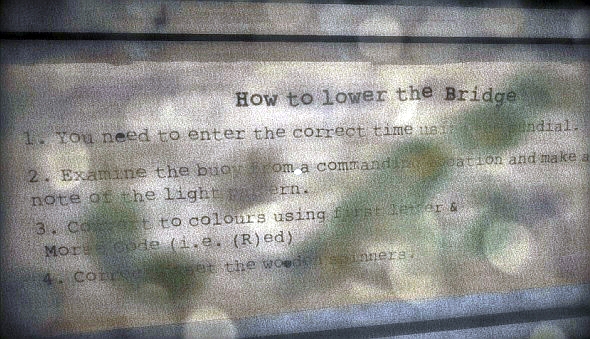
Inside the cupboard is an explanation of how to lower the bridge later in the game.
|
There are 3 things that must be done:
There is a clock on 1 of the huts and that clock has stopt at 10.10. |
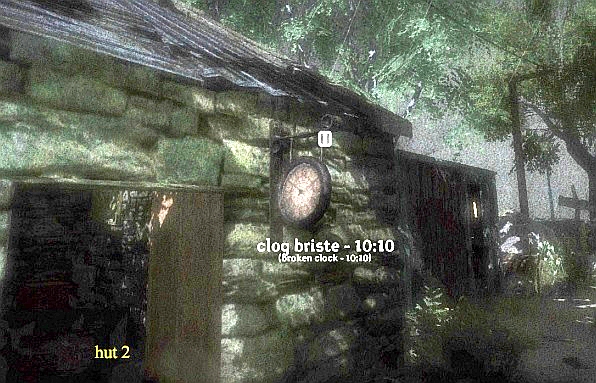
Just in front of the huts is a suitcase with a triangle on it, take it, you will need it at the sundial.
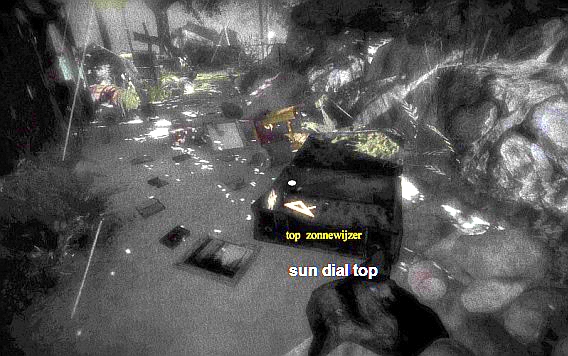
Place the triangle on top of the sundial and use both buttons of your mouse to set the time to 10:10, so you need to right click and left click.
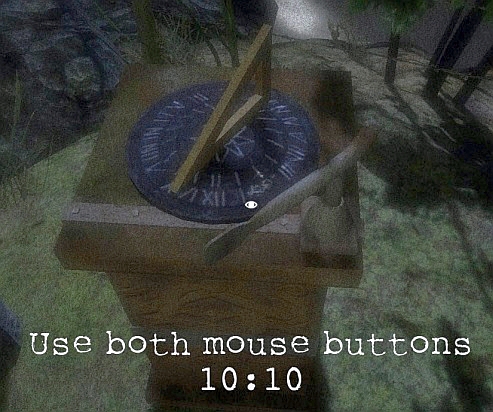
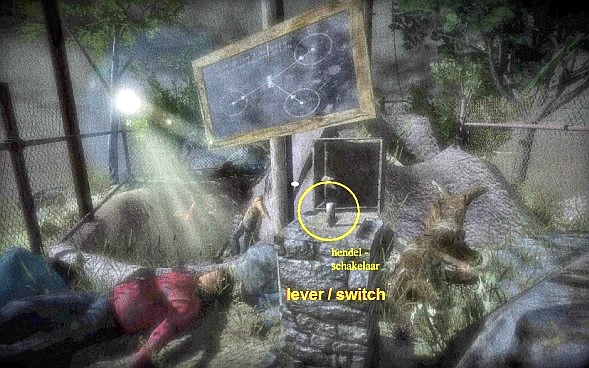
If you have set the sundial correctly, walk to the gate, flip the switch and you can open the gate.
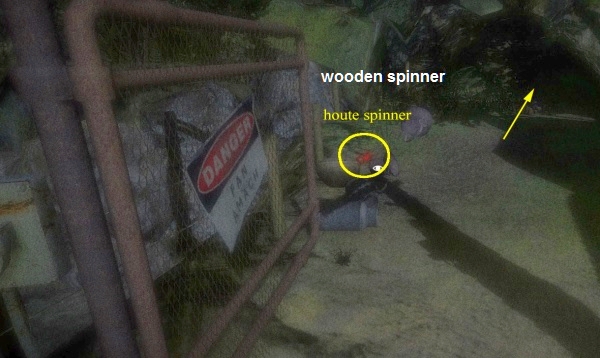
Go through the gate and just behind the opened gate is another wooden spinner, pick it up and walk on.
Open the gate and when you are back in control, go a little further to the right, to the lookout.
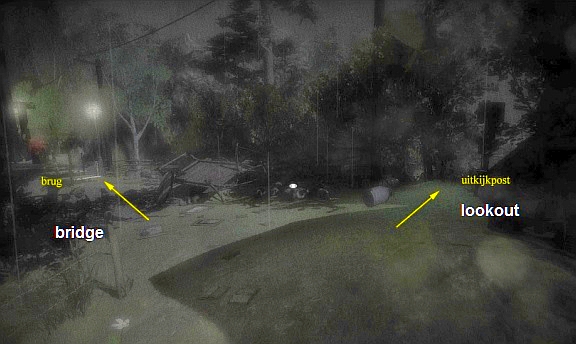
You can see the buoy and the Morse signals. - · · · (B), · - · (R), - - · (G), · - · (R)
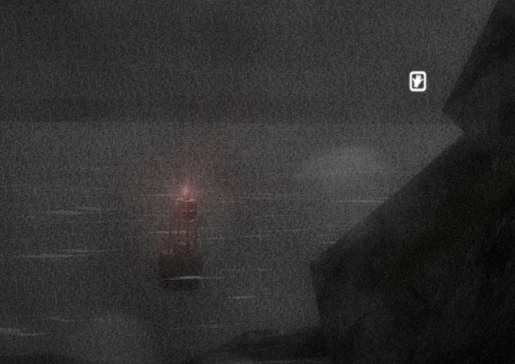
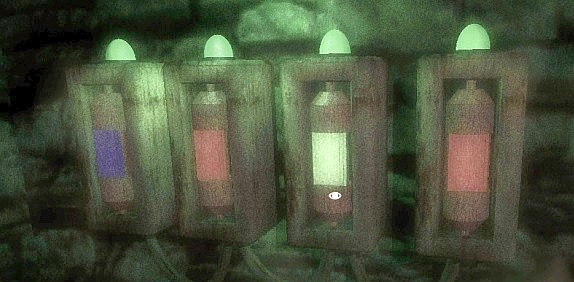
Record the signals and translate them into letters using the table in hut 1. Walk back to the path and walk to the bridge. On the jetty to the left of the bridge is another wooden spinner. Take this one, you now have 4 spinners. There are 4 boxes in the hut, put the 4 spinners in the correct boxes and turn the spinners to the correct colors: blue, red, green and red.
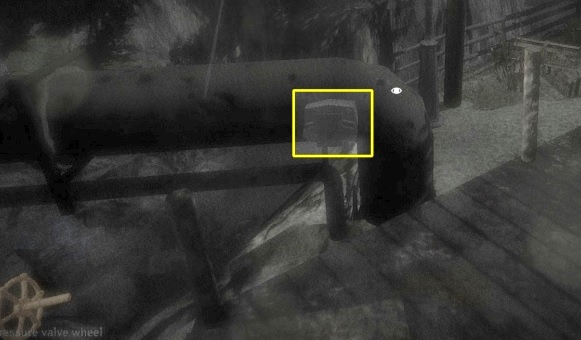
Go to the bridge and put the turning wheel in the cupboard on the large pipe, click on the turning wheel and the bridge will slowly descend.
Go back into the hut, there is a drawer in the table next to the oven, there can be a whole LP in the drawer.
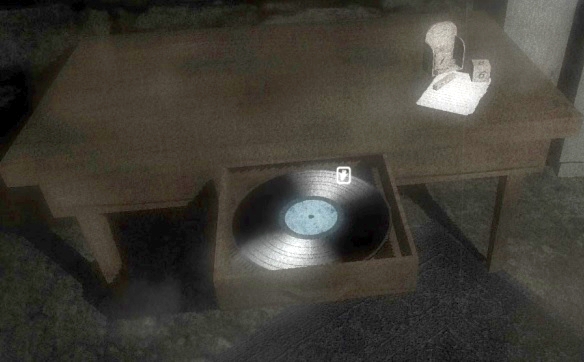
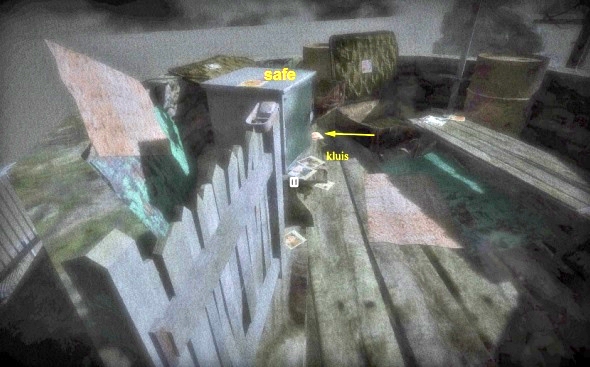
If ithe LP isn't in this drawer then you will find the LP in a drawer under the safe in the hut just across the bridge on the right. Also check the other cupboards and drawers for the squares. Cross the bridge, keep right and you will come to a locked gate and a hut, on the left side of the hut you will see a light and a button behind a grate.
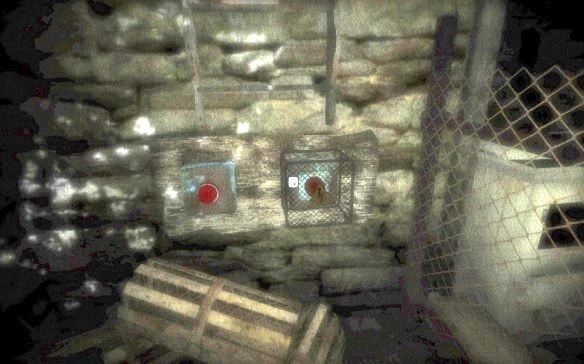
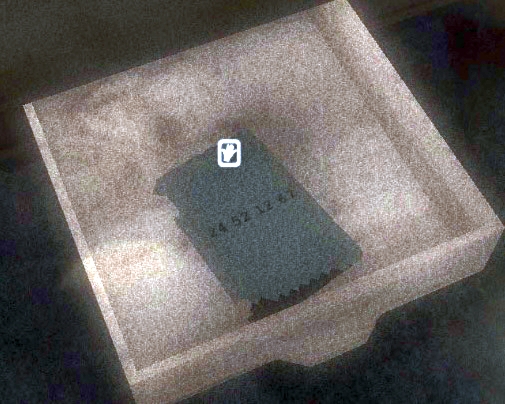
Click on the grate, click againon it, the grate will come down and now press the button. The light next to the button will light up and the red light at the gate will turn green, the gate is now open. On the right is a safe on a table, in the table is a drawer with a booklet containing the code for the safe: 24 , 52, 12 and 67. It is possible that the LP is in this drawer.
There is a piece of tile in the safe, take this tile piece. When you have found the LP you walk back to the middle hut where the gramophone is, put the LP on it and click on the lever on the side, you get the game again with 4 times hit. If that is successful, click on the button on the front of the gramophone, the LP will now be played.
Go back to the hut on the other side of the bridge, now open the gate and continue to the beach. At the top of the stairs to the beach is a wooden shed on the left, inside on the left is a rod, take it. To the right of the wooden shed, walk into the jungle and there you will find a secret hiding place again.

Now go down the stairs to the beach, follow the beach. You come to a gate. On the ground is a plate. There's an opening in that plate.
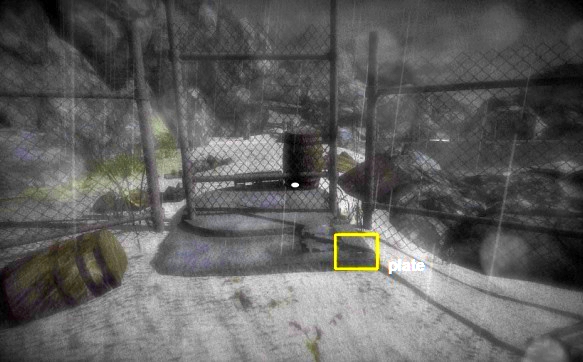
Place the rod, that you found in the wooden shed in the opening of the plate. The rod will be a lever, so clickon the lever and the gate will go open.
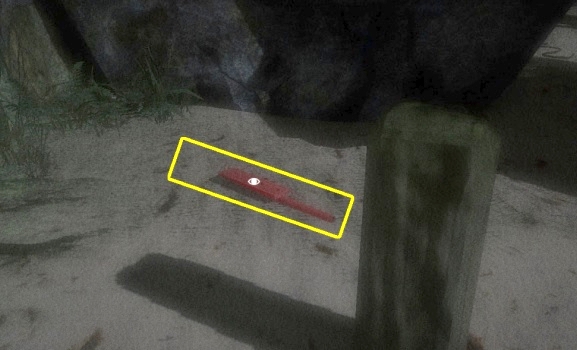
Just before you crawl under the rock arch you will find a plank with a stick on the left, pick it up.
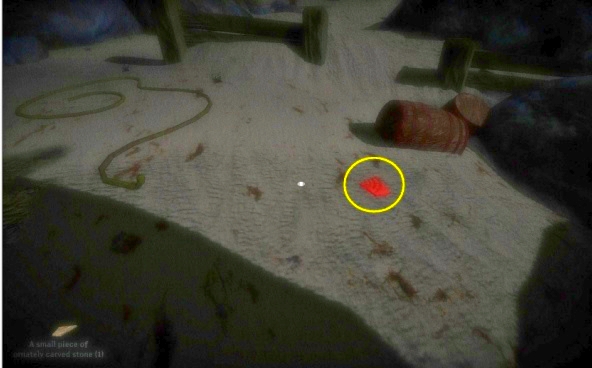
Just after the rock arch you will also find another piece of tile on the beach.
At the end of the beach you will find a lifting mechanism and a garage door, zoom in on the door and you will see a code: 55, 10, 14 and 82.
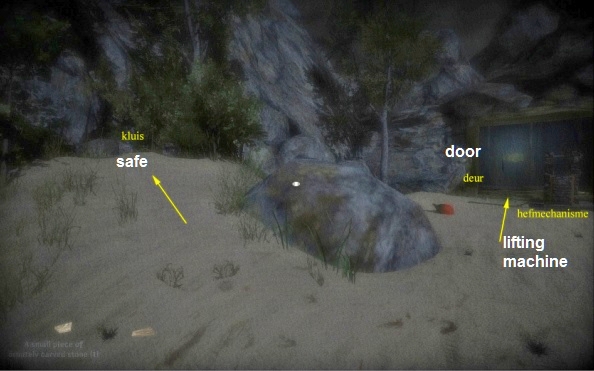
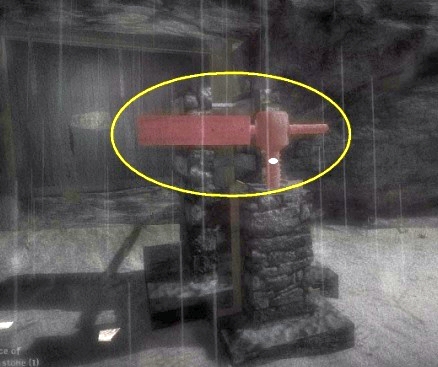
Just before the lifting mechanism you see a sand slope on the left. Upstairs you will find a safe, use the code for the door here. There is a large screw in the safe, take it and walk back to the lifting mechanism. Put the screw in here and insert the plank / stick into the screw. Click a few times on the plank / stick and the garage door will open.
Walk in and all the way to the back, there are a number of things that you can view and another piece of tile, take this tile piece.
You are done on this stretch of beach, walk all the way back to the bridge and just before the bridge you turn right.
Follow this path to the end there you will find a lift, click on the lever and you go down
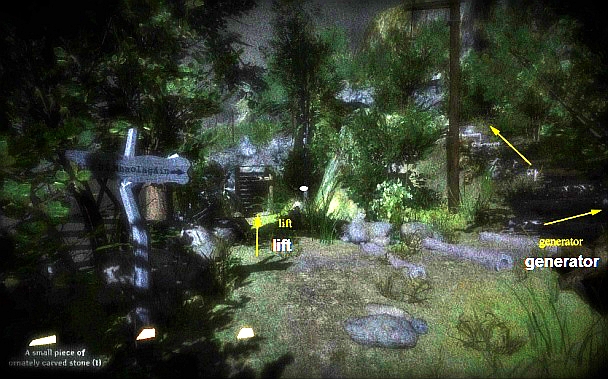
At the end is a large cross and to the left of it is a pile of wood.
On top of the stack of wood is another piece of tile. Turn around and go up again with the elevator and walk a bit further. There you will find a path that goes up on the left. After a short distance see a generator with a jerry can next to it, take the jerry can and use it on the generator. You must so the game again with 4 times hit. Follow the path further up.
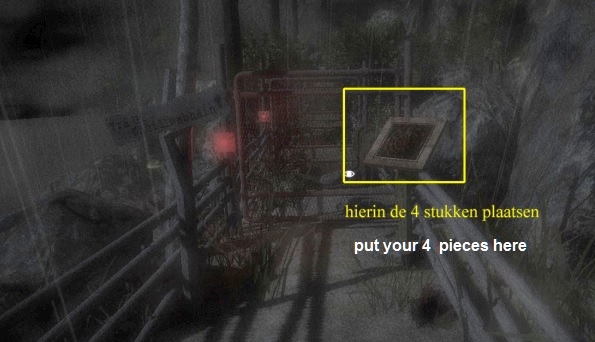
You come to a column and 4 closed gates. Place the 4 pieces of tile in the column and then the 4 gates go open.
Follow the path further, you will come to a junction: straight ahead you will come to a closed gate and when you turn left you go down.
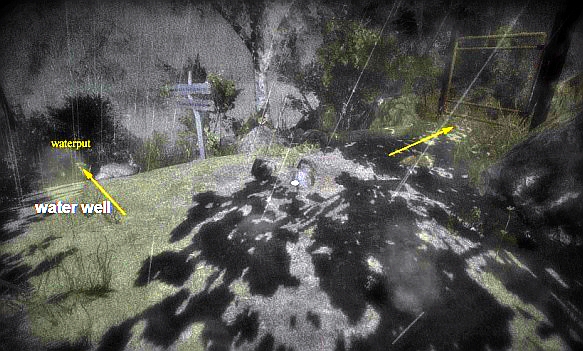
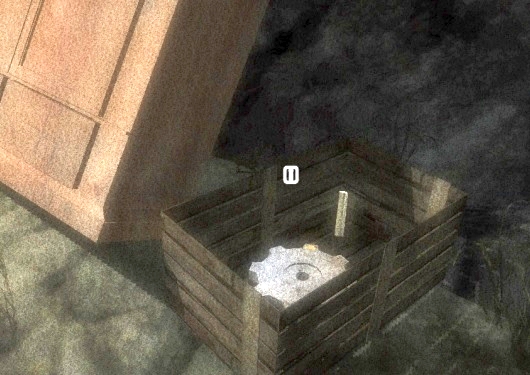
You now have to go down and you come to a well, nothing can be done with that because you are still missing a part.
Straight ahead you come to a closed gate, so follow it down to the beach on the left.
At the bottom you immediately turn left onto a small beach.
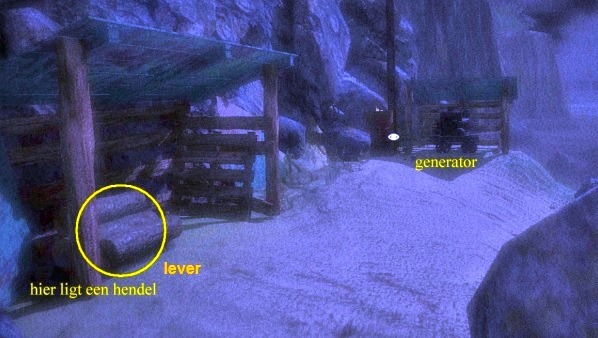
At the end you will see a generator and to your left you will see a wood shed. There is a crank on the pile of wood, take it. Walk back to the well and use the crank on the rod at the well, a plate is now lifted up in the well, there is a key, take it and go to the locked gate. Use the key to open the gate.
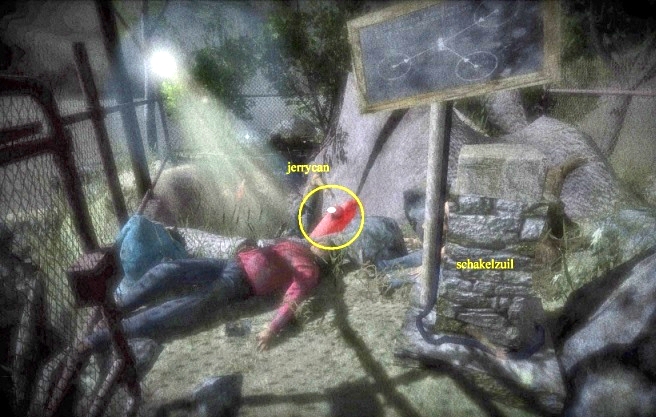
You see a column with a sign above it and a number of bodies. Behind it, half burried in a hole, is another jerry can. Take it and walk down to the generator and start the generator with the jerry can. Walk back up to the column with the sign above it, now the top of the column is open. Click on the lever that you see there, now the other 3 columns are also active and open.
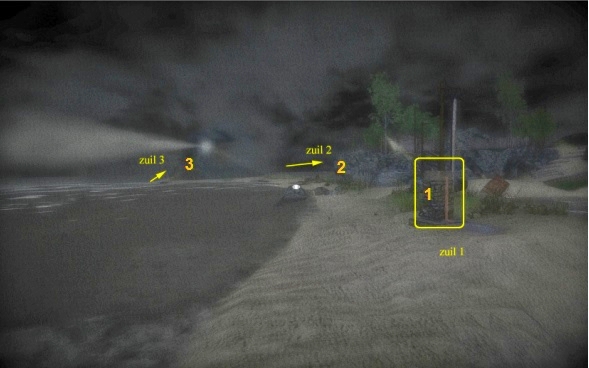
When you walk down to the beach you will see a hut and a number of graves on the right, here you can view everything and you will also find 1 of the 22 crosses. You are now at the compass puzzle. There are 3 columns here on the beach: go down stairs, straight on to the beach then keep left towards the rocks, there it says nr 1. If you walk around the rock on the right you will see column 2. Column 3 is behind the lighthouse. Walk to column 1. Walk around the rock for a while, there you will find another secret location with a map.
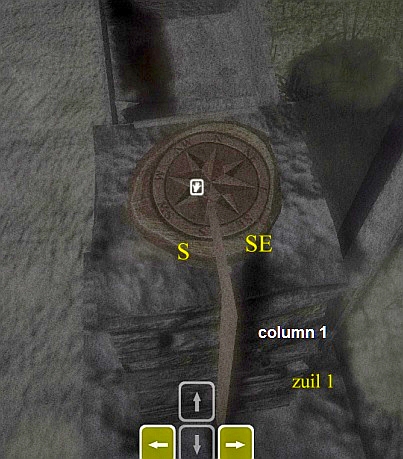
Walk back to column 1 and stand on the plate and look at the top of the column, this is a metal compass rose with a rod above it. Now press the Q key and hold, you will see a white compass ring with an arrow in it. The rod should now have the same direction as the arrowhead on the compass ring.
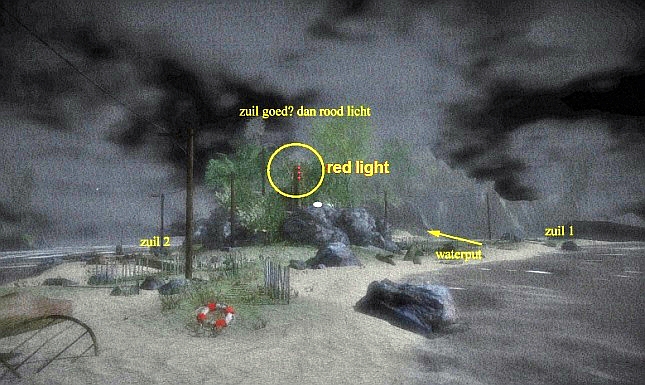
Walk along the beach, around the rock to column 2. If you walk along the rock you can see a pole with 3 lamps on the rock,
if there is now 1 red lamp on then you know that column 1 is in the right position. Now put column 2 correctly.

Then walk towards the lighthouse, stop past the rock and turn around, if you have done the first 2 correctly you will see 2 red lights on a pole. Continue around the lighthouse and do the same at column 3. If you did it correctly you will get a notification that you hear a metal noise.

You are done here, walk back to the stairs, up along the well and then left at the fork. The gate is now open after solving the compass puzzle.
Through the gate and you will come to a fork.
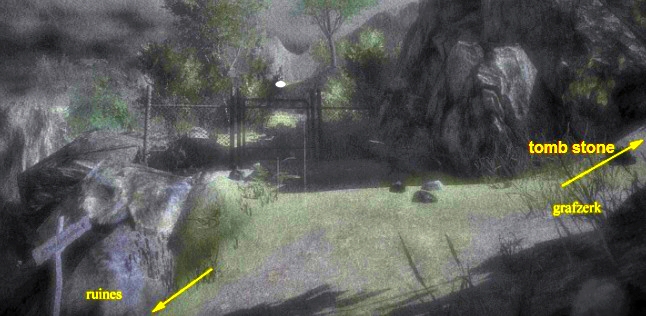
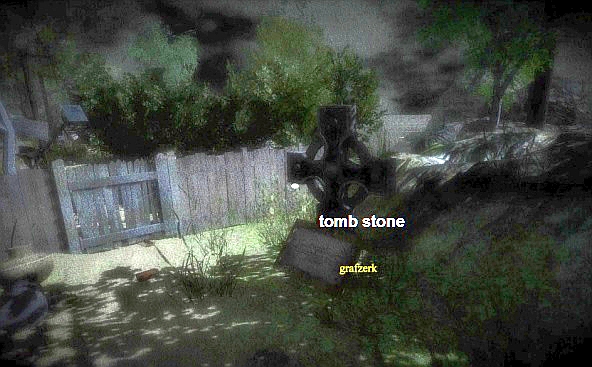
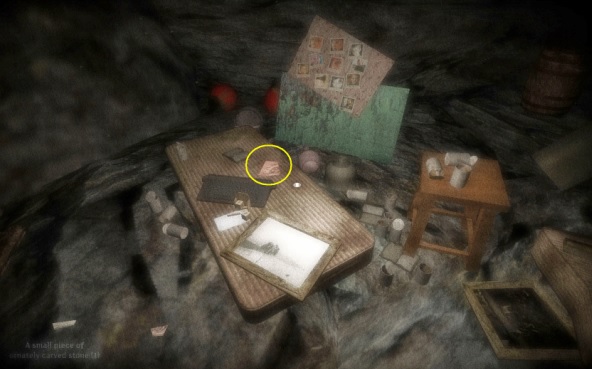
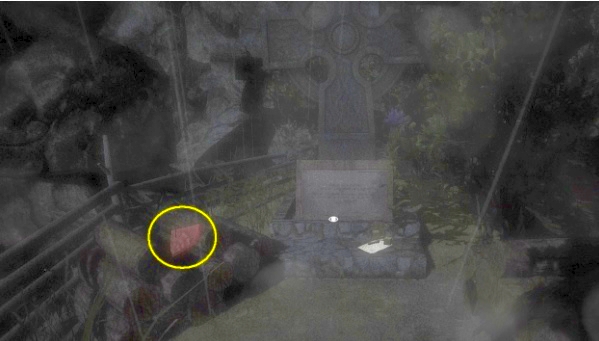
Go right to a gravestone, there is also 1 of the 22 crosses. Turn around and go back and now go down to the right along the path, you will pass a chapel with a candle and also 1 of those crosses. Follow the path further and you will come to a hut, enter the hut and you will again receive the message of a secret hiding place. In the left corner is the shed, open it. In it a note 3-51. Click on the oven door, another sheet with 2-32 on it, another cross. There is also a note 4-79 on the table and a note with 1-5 on the floor near the safe.
The combination for the safe is: 5, 32, 51 and 79. Open the safe and there is again 1 of the 5 cards. Follow the path further along a few ruins, one of these also has a cross. Walk up the beach and you will see the entrance to a cave, walk in it until you come to a closet. Against it is a chest containing a gear and a candle. Get both of these.
Continue on a piece of beach and a sandy path, further through bushes and you will see a hut, just before you see a signpost.
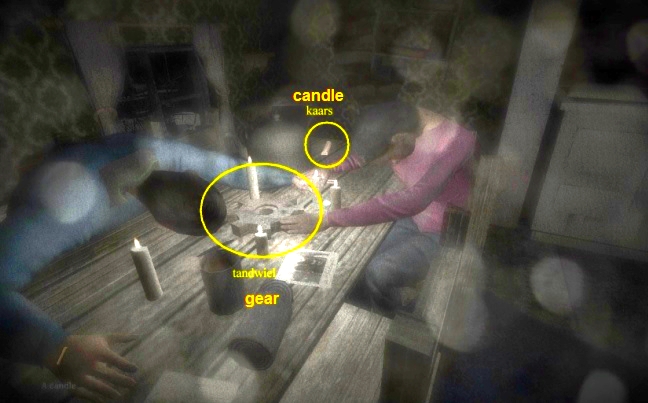
Enter the hut, at the back wall you see 2 chests on the ground, the right is closed and the left contains 1 gear.
Here you can place the gear that you have with you.
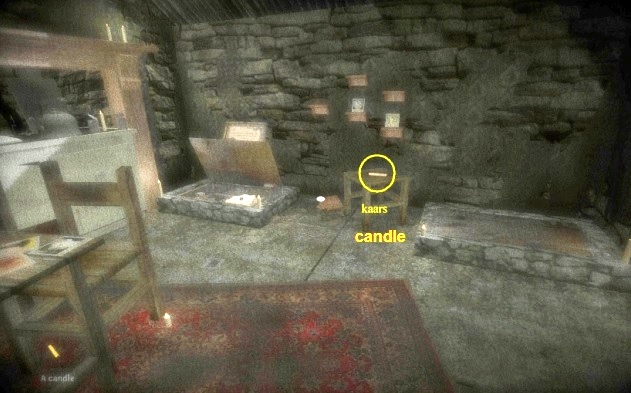
It fits against the other gear. There is a candle on a stool between the boxes, leave it for now because you can only take 5 objects with you at the same time and we will come back here anyway. Exit the hut and follow the path to the back, you will see a number of ruins and also find a tombstone, there is also a hut. Enter here, on the table is a gear and also a candle, take both of these.
In the back in the corner is a cupboard, in the right drawer is also a candle, take this too.
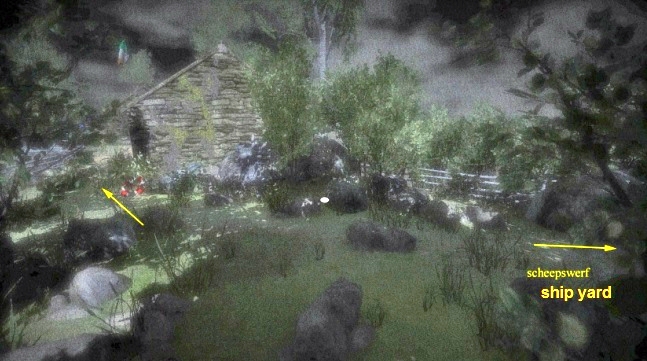
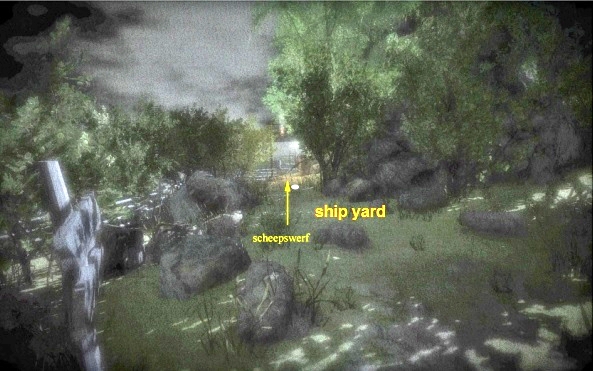
Go back past the hut to the signpost and now turn left, cross the bridge and you will come to a yard.
Just past the rowboat you will see a jerry can, take it and use it on the generator in the left corner.
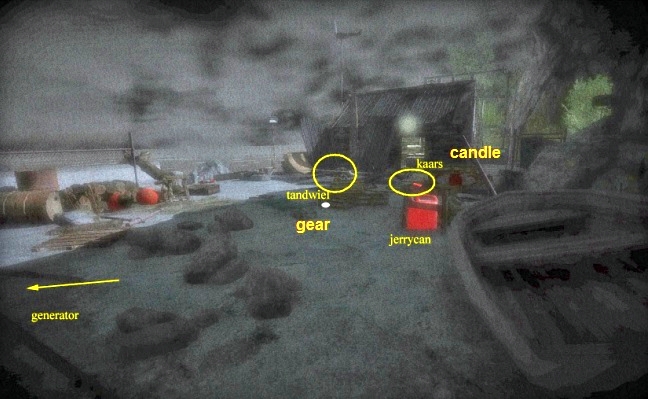
The lights will come on and you will see a gear, take this and now walk back to the hut with the 2 boxes.
Now put the 2 gears in place and pull the lever, the other box is now unblocked, open it and take the candle out.

Also take the candle on the jack (you now have 5 candles) and walk back to the yard. Here is a cabin with a large wheel with a fan above it.

On the wheel are 6 candle holders, place the candles in them, you now need 1 more candle, it is located where you found the jerry can.
Take it and place it on the wheel, the heat from the candles will turn the fan and raise the gate next to the hut.
Crawl under the fence and follow the path, you will also encounter a vision, further on.
There is a fork at 2 banks, we first turn left and you come to a tower.
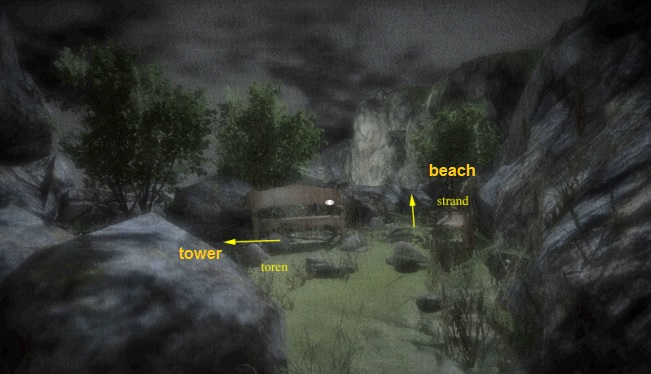
Just in front of the tower is a rock with a plaque.
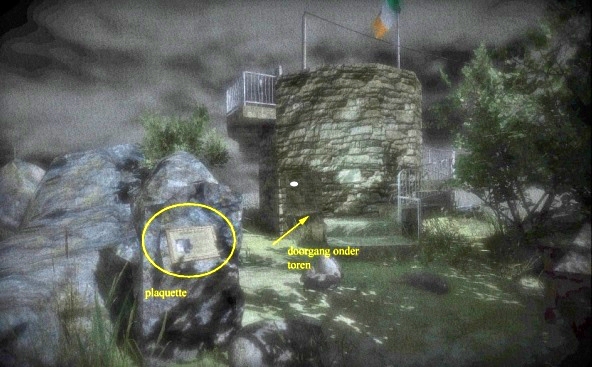
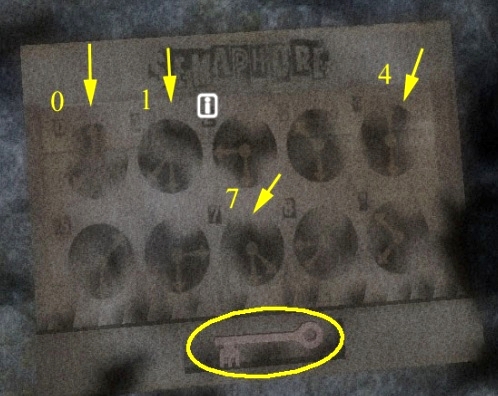
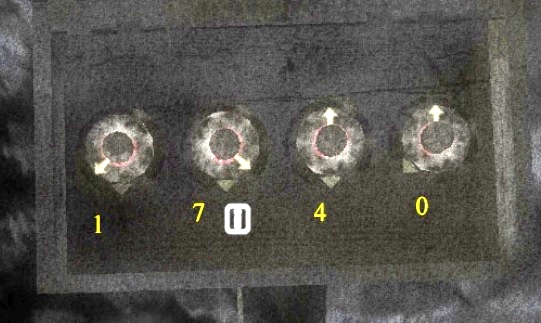
Click on this and the record drops away and then it turns. You now see 10 dials with numbers, underneath is a key.
Take the key and draw the figures for the 1,7,4 and 0. You will need these further down.
Walk under the tower, there you will see a chest. Open it and take the key.
Continue to the railing next to the sign, look down and you will see a buoy going on and off.
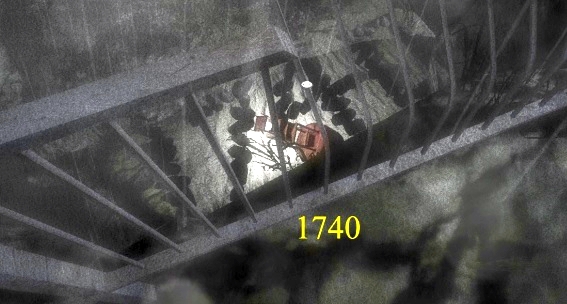
When the buoy is on, you will see 1740 on the ground, made of stones. Walk up to the top of the tower, the gate is closed.
Go back down and back to the path with the 2 benches, now turn left, you will come to a gate.
The gate is locked, first click on the gate, then you will get the message: need an object, select the bronze key in your iventory. Click on the gate again and you will now get the message: open the bracket. Click on the bracket and then on the gate and the gate will open. Go down the stairs and follow the beach to the end, there you will find another secret hiding place with a map in it.

A bit back opposite a small peninsula you will find a sand hill,
on this is a large stone with a panel behind it on a pole, open the panel with the last key.
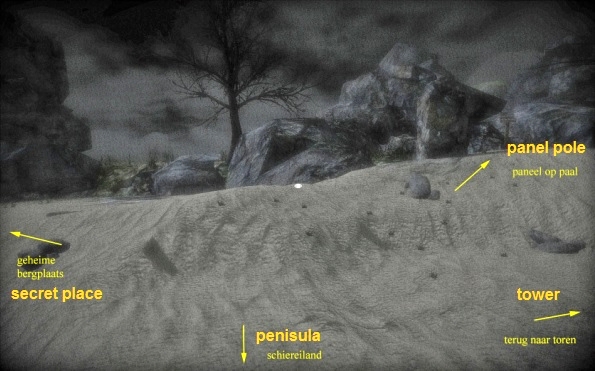
It contains 4 dials, here you have to set the code 1740.
Now the gate on top of the tower can be opened. So walk back to the tower and then upstairs, open the gate.
When you have control again you walk up the roof and take another cross, open the cupboard and there is paper. Grab this and then the ending movie begins.
2017 Walkthrough door: Dick Leeuw