
Nancy Drew 1:
Secrets Can Kill:
2002: Original a Dutch Walkthrough by: Louis Koot
2024: This English translation also done by Louis Koot
If you have found this walkthrough via google search or via another site then you have probably not visited my site.
A lot more very detailed game walkthroughs can be found on my site at: www.pcgameswalkthroughs.nl
When you start the game you can determine the playing level. You can choose from: Junior, Senior and Master Detective. This walkthrough is based on the Senior Detective level. After the intro, in which Nancy reads a letter to her father in which she tells that a student from the local High School was found murdered yesterday and that SHE has been asked to investigate the murder, you start this game in:
Aunt Eloise's House:
You start this game in the hall of Aunt Eloise's house. Right in front of you, against the wall and under the large mirror, stand a fragile table. On this table there is a clock and a table lamp and there is also a note on it. Now move your magnifying glass onto the table. The magnifying glass will turn red. This means that you can do something there, so click your mouse and zoom in on the table. Pick up the note and read it quickly.
It is a short message from Aunt Eloise informing you that she has closed the school library for the rest of the day but that if you want to go to there, you can find the key in her house safe. She also tells that you can find the combination for this safe somewhere in the house.
When you are done reading fnd the ZOOM OUT ARROW and zoom out twice. The table also has 3 drawers. Click on the right drawer to zoom in and then click again to open it. Then move your magnifying glass over the things in this drawer and you will notice that you can pick up 1 item. That's the Phone Card, under the keys. So click on this phone card and it disappears into your inventory. Close the drawer and zoom out.
Then move your magnifying glass to the left edge of your game screen. The magnifying glass now turns blue to indicate that you can go in that direction. Now click to the left 6 or 7 times in succession and you will see the passage to the Living Room. So you look into the living room. Place your magnifying glass at the height of the coffee table, or on the couch behind it, and click. You then walk into the living room and stand close to the sofa, which has 3 cushions. Then click 7 times to the left. To the left of the second sofa, which has 2 cushions and is in front of the window, is a very small round table with a stack of books on it.
Click on this stack of books to zoom in and then click on the books again. You then open one of these books and it turns out to be a plant catalogue. You will see 4 images of plants with their names underneath. The first letters of these names are green while the remaining letters are brown. So those green letters must be important. Write them down and then put them together and they turn out to form a name: MITCH. Okay, zoom out 2 times and then go 5 steps to theright.
You will then see, at the bottom center of your screen, just a part of the coffee table on which you will see a cup, a few candles and a teak box. Click on this teak box and then click on it again to open its drawer. There are all kinds of little things in this drawer and you can't pick any of them up. Close the drawer and zoom out. Then go 4 times right.
To the right of the sofa is a small table with a table lamp and a photo on it. The table has a drawer. Click to zoom in and then open the drawer of the table. Take out the Remote Control and then click on the envelope that is partially underneath the scissors. The envelope now appears on your screen. Click on it and a card will appear. It is an invitation to the 25th reunion of Paseo Del Mar University. At the top of this card you will see 4 strangesymbols. Because you cannot take this invitation with you, it is best to copy these 4 symbols , but do so in the correct order from left to right. Then zoom out to put the envelope away again and then click on the notepad on the left in the drawer. Read the note. Then close the drawer and zoom out.
Then go 4 timesright and open the top doors of the beautiful teak bookcase. Hela.........a TV/Video set appears. So you can use the remote control here, but that makes no sense now. Zoom out and then click on the books on the right of the bookcase. Then click on the 2nd row of brown books on this shelf and a book will open. The book has a secret compartment containing a key, a passport and some money. Take the key and zoom out 2 times. Go 3 times right and then zoom in on the wooden box under the landscape painting. Use the key you just found to open this boxt and then take a Coin from it on the right. It's a quarter. Close the box by clicking on the inside of the lid and zoom out again.
You look into the hall again. Click in the hall to get there and then go about 7 times to the left. You now look at that table again and to the left of it is a niche in which you see a tapestry hanging on the wall. Click on this tapestry to zoom in and then click on the sensually lying lady on this tapestry. The tapestry moves aside and you now see the Wall Safe. Click on the safe to zoom in on its combination lock. You now see 3 rows of 4 round push buttons each. Each of these 12 buttons has a symbol. 4 of these symbols should look familiar to you now because you saw them at the top of that invitation to the 25th reunion. You have drawn these 4 symbols, right?
s f k d
Well, now click these 4 buttons, in the same order as they were on that invitation, and the safe will open. Take the right key from the inside of the door and then click on the box that is in the save. Then click on it again to open the box and then click on the contents to zoom in on it. Well, this is your first puzzle in this game and it is an ordinary sliding puzzle of a flower arrangement and this is how it must be
Complete this puzzle, it's not really difficult, and the drawer of the box will open. Inside is a yellow note. Click here. They are the Login Name and Password for the school computer. Because you are not allowed to take this note with you, it might be wise to write down these two details for yourself. So: Login Name: Eloise Drew and Password: O WISE ELDER. The real puzzler now sees that this password is an anagram of Eloise Drew. Zoom out 3 times to close the safe completely and then click on the piece of the tapestry that is still visible to hide the safe behind it again. Zoom out and then go about 14 times left and you will be in front of the double outside doors. Zoom out here, so click the curved arrow and you leave the house.
The Map:
You will end up on the map where you will see all the locations you can go to. To play this game in a somewhat orderly manner it would be best to click on the Paseo Del Mar High School building. After all, that's where the murder happened and that's where Nancy would like to start her investigation. So click on the school building and, after you have put the 2nd CD in your nice new computer, you stand in front of the entrance of the school.
Paseo Del Mar High School
Enter the school. You enter the arrival hall. Right in front of you you see a display cabinet (there is also one behind you) containing, among other things, a few photos. You can click on the display case and then zoom in on the photos to take a closer look, but it is not important for the game. If you turn left and right you will see that there are 2 corridors leading from this hall. Now let's first make sure we find our way through this school. Standing in front of the display cabinet, now turn 7 clicks to the left and you then look through the left corridor.
There are rows of green cupboards against the walls in this corridor, left and right. On the right you see 2 wooden doors and between these two doors there is a notice board. Click on this notice board and you will zoom in. The floor plan of the ground floor of this school hangs at the bottom of the middle section. Zoom in further and thefloor plan will appear large. Because you are not allowed to take this map with you, it is best to draw it over or always look at the screenshot below to find your way through the school.
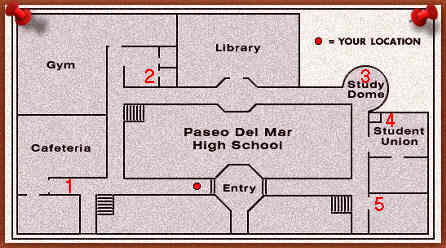
Then zoom out twice and you look down the hallway again. At the back of the hallway you will see double gray doors. Click on those doors and you go there, but you don't quite get to those gray doors. If you turn slightly to the right, you will see an arrow on the blue wall that points to those double gray doors. So that is the entrance to the Cafeteria. So you are standing here at an intersection of corridors, because if you turn to the right for a moment you will see the next long corridor that goes towards the Gymnasium and the Library.
Now turn back so that you are looking at the double gray doors of the cafeteria again. In the back part of this corridor there are green lockers on the left and right. Look at the row of lockers against the left wall and you will see that there is a yellow stripe on the 3rd locker. Click on this locker to get there. That yellow stripe is police tape and this locker is the locker of the murdered student, Jake Rogers. Take a closer look at the lock of thelocker by clicking on it. It is a number combination lock and to open the locker you must set the correct number combination. But you don't know that yet, so you can't open the locker yet. But now you know where you can find thislocker
Zoom out 2 times and turn slightly to the right so that you can clearly see the right wall of the corridor again. In front of the green lockers, on the right wall, there is another notice board. Zoom in on it. In the middle of the left part of this notice board you will see a narrow note pinned. Click on it to see it enlarged on your screen.
Well, either it was written by someone with a language deficiency or it is secret language. Because what do you read .Fin dthem omin gedit ion Anddi scove ranot here rime, Thean sweri sin blanc kandwhi Tow how illdot heti me. So you now have to make a well-flowing sentence with these "words" and that requires a little bit of knowledge of the English language, so here is this sentence: "Find the morning edition and discover another crime. The answer is in black and white to who will do the time".
So you are asked to find the morning newspaper. Zoom out 2 times and click 4 timesright. You are now looking again through the corridor that goes towards the Gymnasium and the Library. There is a blue "Senior Prom" Banner hanging down this hallway, near the restrooms. If you now hold your magnifying glass under this banner at the level of the toilet doors, you will get the red magnifying glass there, so click and you will go a long way through this corridor. You arrive past the toilets and just in front of the double gray doors of the gymnasium. Stay still and now turn 13 clicks to the left. You then look back through the hallway to the toilets.
There is another notice board in front of these toilets. Click on it and then click on the purple note pinned to the right part. There is something written down, but to read it you will have to stand up and then turn your head so that you can read it, because it is upside down. You will then read the following: In the face of danger Against a killer if you dare A very unlikely couple Could be a helpful pair.
Then zoom out 2 times and click back right 12 times and you will look back through the hallway to the gray double doors of the Gym. To the right of these doors you will see another notice board. Click on it and you will end up in the corner of that hallway with a trash can and an opticians sign on the wall. That notice board is now to the left, but leave that alone for now. Click on that optician's sign to take a closer look. If you place the letters on this board upside down, one after the other, starting at the bottom right and then working your way up from right to left until finally the very large E, you will read the following: "If you can read this Then make no mistake A genuine first class Detective you'll make"
If you have this, zoom out and turn 6 times left and you will see that notice board hanging next to the gymnasium doors again. Click on it to zoom in and then click on those 3 small notes hanging at the bottom of the right part. Well, the left note is written upside down and the other two are either in mirror writing or backwards.
After I painfully strained my neck to read upside down, the note on the left reads: "Nowhere to run, Nowhere to Hide, let the books in the Library be you answer guide". The middle note contains a message written backwards. After some puzzling I read: "A symbol of Kanji Worn with great pride, Reflects a big secret That someone must hide". The note on the right is in mirror writing. So you need a mirror to read this, but then you read: "He did what it took To make the grade, Even if it meant cheating To keep up his charade"
So it seems that someone wants you to read some books in the school library and there is someone who, with a lot of pride, wears a Chinese Character and a third person seems to have messed things up. If you have seen this, zoom out and turn 6 timesclockwise back to theoptician's sign. Then turn further 8 times right and in the corner there is a boy playing with a rugby ball. This is Hulk Sanches. Click on him and then ask him anything. After first asking him some general questions, you then ask him a question about Jake, the murdered student. Hulk will then abruptly end the conversation.
Then turn 6 times right and you will see the 2 soft drink machines. In the corner behind these vending machines there is a poster on the wall. Click on this poster, and THIS IS REALLY VERY IMPORTANT, if you forget to click on this poster NOW you will get a few more chances later, but it is IMPORTANT that you have clicked on this POSTER at some later point in the game. It turns out to be 2 posters, but the importand poster is the Judo Poster. It is a poster of the "Crane School of Self-Defense". It also has a telephone number: 555-JUDO.
Zoom out and turn 4 times clockwise. You are then looking at the corridor behind the soft drink machine (this is the corridor with the toilets). Click on the leftmost photo on the wall and you are back in the corridor with the toilets. Immediately turn 6 times left and you look again through the long corridor towards the Library and Study Dome. Halfway through this corridor there is a small hall. Click there with your red magnifying glass and you will end up in that hall.
The corridor continues straight ahead and ends in the Study Dome, but here in the hall you now turn 7 times counterclockwise. You see the wooden Library Doors. We are not going into the library yet. There is another notice board to the left and right of the doors. Zoom in on the notice board hanging to the right of the library doors. On the right part you will find a narrow note. Zoom in and you'll see strange words. Well, you must now have some knowledge of the English language to make the following sentence: "There's more than one way to remove a chain so thick, a side from the combination, Mel's boltcutter can do the trick"
Someone here is trying to tell you that "there are many roads leading to Rome" and that to remove a lock or chain you don't always have to know the right combination, but that a large pair of pliers often does a good job. Zoom out and turn right 2 times and you will look through the last part of this corridor again. So at the back you can see part of the Study Dome. Click your red magnifying glass there and you are in the Study Dome.
Run 4 times left and click on the Japanese-looking guy who is "studying" here. This is Hal Tanaka. Talk to him about New Faces, Doctor and of course Jake. Hal also abruptly ends the conversation at one point. Then run 5 or 6 times left and you will see another notice board. Zoom in on it. On the top left of this board you can zoom in on a narrow note. it's the note hanging under the "Get Involved" call. You will then see that it is a news letter from the school. The bottom part contains a series of sentences and these are turned upside down. so turn your head and you read, from right to left: "Jake's Locker combo Was part of his name Just find a phone To decode his name"
Well...a clue about the number combination for Jake's locker. So this combination has to do with the name JAKE and you need a phone to decipher it. Zoom 2 times out and turn 4 times left and you will look again down the long corridor you just came through. Continue turning 8 times left and you will be faced with a second corridor that departs from the Study Dome. It is a short hallway with another row of green lockers and toilet doors against the wall on the right and there is also a "Senior Prom" banner hanging in this hallway. There is another notice board on the left wall and behind it you see a passage with a telephone sign
That is the entrance to the Student Union Honk. On the other side of that passage you can vaguely see another notice board. First click on the notice board just in front of you on the left wall and zoom in on the right part, on the "Save the World" poster. There is a white note above the left side of this poster. This note contains a lot of sentences written in "broken" letters. The top half with large letters and the bottom half in smaller letters. If you study these sentences carefully, you can derive the following sentences from them:
Top half: "A Crane contestant in a masked disguise won the prize money despite all the lies"
Bottom half: "The ultimate hang-out in the center of everything is the place you need to go to set up the final sting"
Zoom out 2 times and then click with your red magnifying glass on the double gray doors at the back of this short corridor and you will end up there. On the left you will see a wooden door. Click on this door to get closer to it. It turns out to be the "Maintenance" door. Click on the lock mechanism of this door to zoom in on it. Tt is a code lock in BRAILLE. To open this door you must click the correct Braille buttons in the correct order. Because you don't know this code yet, you can't open this doornow. But, just like with Jake's locker, at least you now know where to find this door.
Zoom out 2 times and turn 9 times right. You look into another long hallway. So this is the right corridor that leads from the arrival hall. You will also see the arrival hall halfway down this corridor. So that's where the entrance is and if you were to go there, but you don't do that now, you would have made a complete tour through the school. You now also know that both corridors, from the arrival hall, lead into the Study Dome.
Turn further through 8 times on the right and you will look back through the short corridor to the Study Dome with (now on the right) the entrance to the Student Union Honk. Now click on the notice board on this side of the passage to the Student Union to zoom in on it and then in the middle part on the note that hangs under the "Student Bulletin Board" banner. It is an announcement about the Year books. You notice that some words are underlined. If you read these underlined words one after the other, you will read the following sentence "Search below Danger Sign in kitchen"
Then zoom out 2 times and then click on the passage to the Student Union Honk and you will enter there. Spin 6 times left. There is a girl standing to the left of the magazine rack. This is Connie Watson. There are a few posters on the wall above the magazine rack. Click on the Judo poster. It is a poster of a Men's Judo Tournament and you read that this tournament is sponsored by the "Crane school of Self-Defense". Yes, that is the same Crane school whose poster you saw at Hulk Sanches.
Zoom out and now click on Connie to talk to her. Talk to her about Jake and some other options. During the chat, also notice the medallion she wears around her neck. If you look very closely you will see a Chinese character depicted on this medallion. As soon as you ask her a question about Jake she abruptly ends the conversation. Then turn 5 times left and you will see 3 telephones on the wall.
Click on the middle phone and then 2 times on the phone book. This opens and you see that the bottom right corner has been torn from the right page. You can just see that it is the telephone number of the local pharmacy. Close the phone book and zoom 1 timesout Then click on the phone itself and take your phone card from your inventory and click it on the slot of the phone. You now zoom in on the telephone keys. The 3 names of Nancy's friends with their telephone numbers will now appear at the bottom of your screen. You can call them up to get some hints, so why not. Call:
Bess Marvin: she advises Nancy to use Aunt Eloise's Login Name and Password to break into the School Computer and then view some documents.
George Fayne: She advises Nancy to visit the School Library for further instructions.
Ned Nickerson: He gives Nancy the following hint about Jake's locker:
"On my locker, the combination is related to my NAME."
So this last hint is clearly a hint for the number combination for Jake's locker. Before you zoom out, take another look at the push buttons on the telephone. Each key not only has a number but also 3 letters. Remember that phone number on the Judo Poster at Hulk? that was 555-JUDO. If you now look for the keys on the keys with which you can make the word Judo and then write down the numbers of these keys in order of this word, you will find out that the full telephone number, in numbers, is: 555-5836. Dial this number just for fun and you will hear the answering machine of the Crane Judo school. This is of no further use to you, but you now know that you can decipher number/word codes in this way, using the telephone keys.
Zoom out, your telephone card will return to your inventory, then zoom out again 2times and then go 7 times left. You see a wooden door with a window in it. Zoom in and you will notice that this is the door to the Teachers' Room. The door is locked tight and you can't open it. However, Nancy thinks that in this room she will probably be able to find the School Computer. But you have to find another way to get in there.
Zoom out and then click on the large notice board, right next to the door. Bottom left, there is a red/white note on this brick board. Click on this note to zoom in. The note itself doesn't tell you much, but if you look closely you will see the same series of black letters in the edges of the note. If you look very carefully you will read that it says: "Side of School" so these hints refer you to the side of the school building.
Zoom 2 times out and then click on the toilet door in the hallway and you will be back in front of the double gray exit doors. Turn right 6 times and you look again through the long corridor towards the arrival hall. Stand still. On the left, at the bottom of your screen, there is a wad of paper on the hallway floor. Zoom in on it 2 times and this turns out to be that torn corner from the telephone book. So you now also have the telephone number of the pharmacy, 555-DRUG. It's not important at all, but you can call this number later, when you get back to the phone, just for fun.
Zoom 2 times out and turn 2 times right and you will see another notice board hanging on the right corridor wall (the last of the notice boards). Click on it and then in the middle part, at the bottom, on the white note. If you read the last paragraph of this letter, you will certainly notice the following sentence "Student Files under lock and key will show the lies of a doctor-to-be"
Hmmm.....the only student we've met so far who wants to be a doctor is Hal Tanaka......Did he lie about something? Zoom 2 times out and click once through the corridor and you are back in the arrival hall. Turn 6 times left and keep your cursor on the exit and then click when you see the zoom out arrow. You will end up on the map. Click on Maxine's Diner and add CD 1 to your computer.
Maxine's Diner
Go inside. You are immediately in front of the counter. The large black "Menu" sign hangs on the wall behind this counter. Click there. You will then see some words in red letters. On the left part these red letters spell out: "Soup Ladle", on the right part you read: "Bolt Cutter". Zoom out and turn 3 timesright. You will then see the Juke Box, the Toilet Door and the first of the tables that are along the wall here. There is a menu on this table. Click on it to zoom in and then click on it again to open the map. View the names of the product groups. You will see that these have purple, red and green letters. The red letters spell Danger and the purpel letters spell Atosbadge. This is clearly an anagram, so you turn it into Sabotage.
Close the menu and zoom out and then go 7 timeslefts. There's a guy behind the counter. This is Daryl Gray. Talk to him and follow as many of the conversation options as possible, but Daryl will also abruptly end the conversation at some point. Then click on him again and continue asking questions. You then find out that Daryl is the one who found Jake's dead body. Ask further about Hulk, Hal and Connie and also ask about Jake's locker.
After the conversation, turn 2 times left and click on the left corner of the counter and then on the double gray kitchen doors. Then click on these doors again and you are in the kitchen. Immediately spin 5 timesleft. You will see a table under the "Clean Up Spills" indication. There is a black container on this table. Click on this container and then take out the large Soup Laddle. Zoom out and continue turning 14 times counter-clockwise. You go past the doors and then you look at the 2 large refrigerators. A letter is taped to the front. Zoom in on this and then click on it. It is a "To Do" list and next to point 8 is something written in red pen. I haven't been able to determine what this means or if it actually importand to the game.
So zoom 2 times out again and continue turning 2 timesleft. You are now looking at the side of a dishwasher with a stack of dishes on it. Another large letter is taped to this side. Zoom in on it 2 times and you will see that this is a Work Schedule. All those red circled boxes are not important, but at the very bottom of this letter you will see a lot of numbers.
This is another simple code puzzle. You just have to replace the numbers with their corresponding letters from the alphabet, so 10 = J and 1 = A etc. Once you have done this you will read the following sentence: "Jake's fate happened deliberately, gravity was not his worst enemy". It is confirmation of the fact that Jake was deliberately pushed down the stairs and therefore murdered. Zoom 2 times out again and turn 4 times left. You see a cutting board on a table and on this cutting board there is a knife and some tomatoes. Zoom in and you will read, between the tomatoes and the knife handle, the following warning carved into the plank: "Watch Out".
Zoom out and now click, under the cutting board and under the table. You now look under the table and you see a broken gas pipe on the wall. The pipe is supported by a "Bolt Cutter". You really want these Bolt Cutter , but if you take it and then leave the kitchen, the entire diner will explode, including Nancy. Save first and then try this..........
What you need to do is take the Bolt Cutter and then IMMEDIATELY place the large soup laddle in the place of the bolt Cutter. So take the Bolt Cutter and immediately place the soup laddle on the spot where the Bolt Cutter was and you will stay safe. Then zoom out and turn 13 times right and enter the Diner through the doors. Click on the exit. You don't get outside yet, but you end up near the exit. Well, for fun, you can now use your quarter on the on the Juke Box where you can listen to about 6 different songs. You can also throw your quarter into one of the pinball machines. You can really do this endlessly because your quarter never runs out. Go outside and on the map click on the school building again and then go inside.
School Library
It's time to pay the school library a visit. So go to the intermediate hall where the library doors are. Open the library doors with the Silver Key from your inventory and click to enter. You are then looking at the counter. Zoom in on the counter and then on that stack of forms at the bottom right of your screen. Such a form will now appear large on the screen and you will see that it is a Sat Preparation form. If you read the story you will notice a number of bold words. If you now put these bold words together you get the following sentence: "Sabotage should cause concern, but with the gloves you will not burn". Apparently someone is trying to warn you about sabotage and that you better wear gloves so you don't burn your fingers.
Zoom out 2 times and then go right 4 times. You then look into the right side of the library and in the distance you see a chest of drawers, against the wall under the painting. Click red magnifying glass on it and then again and your screen is then filled with the narrow drawers of this chest of drawers. Click on the top half to open a drawer and then click on the card. A card with letters on it will now appear on your screen. It's a word search puzzle. You need to have some knowledge of the English language, but after some puzzling I recognized the following words:
DINNER MURDER HULK CRANE BAD DANGER HARM MAY POEM MITCH NAME JUDO CONNIE MAXINES TASK BOILER VIDEOTAPE JAKE DARYL HAL
Close this drawer and zoom in on the bottom half of the drawers to open another drawer there. Another card will appear on your screen and it has blue and green letters. Well this is very clear. You have to make a blue sentence and a green sentence. Do that and you will read: "The boltcutter you must take, or you could be the next Jake".
Well, we've already done this, because this is a reference to that gas pipe in the Diner. Also close this drawer and zoom out. It's time to refresh your knowledge of some things by reading some nice thick books. There is a low bookcase in front of you. This is divided into 3 compartments and the compartment you currently see contains Green/White books. You can't read any of them here, so turn to the left a few times and you will see the 2nd compartment in which you will see Purple and also Red books. First zoom in on the Purple books and then open book F.
It's a book about fingerprints, check it out. You can probably copy the drawings, but what else should you do with them? Zoom out and then zoom in on the
red books in the same compartment. Then open Book B.
It's a book about Braille. On the right page you will see all the braille characters for our regular alphabet. Well, remember that code lock on the "Maintenance" door? That is also in Braille, so copy these Braille characters. You see that these braille characters have different colors.
The following letters are important: ACDGHIMNOPRSTU. If you put these together by color and then rearrange them, you will read the following:
"Mitch drops gun".
Close the book and zoom out and then turn further to the left and you will see the leftmost compartment of this bookcase. Zoom in on the White/Red books on the top row and then open Book K (11). A Kanji Book with Chinese Characters and what they represent. Nancy will now recognize one of these characters as the Chinese character she saw on Connie's Locket. It's the Crane bird sign. Haven't we come across this Crane word before? Yea.....TheCrane School of Self-Defense.....
Close the book, zoom out and then zoom in on the Green books in this compartment and then open Book M. Morse Codes. Well, you can now copy all these morse codes with the correct letter, but I have not come across anywhere else in the game where you have to use Morse code. You can get a hint here if you rearrange the colored letters: ACDEFINPRTV, because then you read "Find VCR Tape". So you have to find a Video Tape.
Zoom out again and when you see the bookcase in front of you again, you will see a large chest of drawers behind it, agains the wall. It is an archive cabinet with small archive drawers. Zoom in on it and then open the Eng-Ess drawer and click on the cards in this drawer. One of the cards will appear on your screen. Apparently someone has looked for and borrowed a book on English Drafting, write down the number. Then zoom out, close the drawer and zoom out again.
Then click 5 times left. You will then see a desk. There is nothing to do there so continue 11 times left. You then look to the other side of the library to theFiction Section and you see the rows of bookcases there. Click with your red magnifying glass at the height of the round pillar and you will end up between two of these bookcases. On the left bookcase you will then see a red magnifying glass, approximately in the middle, so click to zoom in on those books and then open the 2nd book from the left entitled: "Optical Illusions". Take a look at it. It tells you not to always believe everything your eyes show you. Close this book and then open the 5th book from the right entitled: "Facets of Danger". Please read the 2 pages. At the very least, it is a nice exercise in the English language, but what should you do next? Close this book again and zoom out now.
You see that you were in cupboard H-J. Now click 4 timesleft so that you then see all the bookcases lined up to your left. Now move your magnifying glass, from the back towards you, over these bookcases and you will get a red magnifying glass on the 4th cabinet. Click to zoom in on that and then open the book "Palmistry for All". It is a book about palmistry knowledge, it's of now use to you but perhaps you learn something from it. Close the book and zoom out. Now click 11 times right and you will see the bookcase on your right. Immediately on the first one, right in front of you, zoom in and open the book "The Zodiac and You". Don't forget that you also have to click on the right page to reveal the next 2 pages. Then close this book and zoom out.
Then click 1 time right and zoom in on the bookcase that is against the back wall. Open the book "Dream Symbols and their meanings" and read through it. You will notice that in some of the red words have letters in a different color. If you put these letters together you will read: "Don't Run Nancy". Another warning. Close the book and zoom out. Then go 4 times right and click your red magnifying glass on the stairs.
You arrive halfway up the stairs and stand in front of the wall on which a copper plate is attached with information about the library. Read what's on this copper plate picture. Among other things you read: ROBILE MOOR ROND, this is of course another anagram and so you make it: "BOILER ROOM DOOR", and this means the "Maintenance" door. Also write down the numbers: 6-6-83. If you compare these numbers with the telephone keys that have the same number, you will probably find out something. You can now go left or right further up onto the entire circular balcony.
I just went to the right, so click 7 times right and then click the stairs further up. You will then end up on the balcony and in front of you you will see a number of reading booths. Click and you will end up on the right side of these reading booths near the side balustrade of the balcony. In front of you is a seating area. Click on the table, click on the table again and then on the open book. Next to the book is a yellow piece of paper. Read this and it might be useful if you write down that telephone number at the top, it is C.S.S.D 555-3836. Isn't this the phone number of the Crane Judo School? And who are CW and DG? Connie Watson and Daryl Gay? Are they an item?
You may also want to copy over all those groups of letters at the bottom of this paper. Don't let me stop you from this. At the top of this yellow note it says: "THE FIRST SHALL BE LAST" and this is therefore a clue to this puzzle. It is actually a conversion code. The alphabet is reversed here, so Z = A and Y = B, if you replace the letters in this way you read: "The one with the temper and the Iron Fist is more than a prime suspect on Jake's blackmail list". What is meant by "Iron Fist"? A gun? Didn't you read the clue "Mitch Drops Gun" downstairs in a book? And did Jake, the murdered one, Blackmailed somebody?
Zoom out 3 times and then click your red magnifying glass on the right side of the round pillar on the wall, near the edge of the painting that you can still see. You will then arrive at a narrow passage to the other side of the balcony. You see rows of bookcases again. Click on the round pillar, in front of you, on the corner, and you will then be at the bookcases. You see a few of them on the left in front of you. Now hold your magnifying glass on the 3rd bookcase (the 3rd one away from you) and then click and turn about 14 times left and you have turned completely around.
In the 4th cupboard (from the back wall) you get a red magnifying glass, so click and open the "The Judo Handbook" book. This describes the Crane Style of Judo. View the various judo moves on these pages. Close the book again and zoom out. Then turn back to the right 3 times and you will look in bookcase 600's. Open the book "Boiler Operations" and read these instructions. This will become important at the end of the game. Close book and zoom out.
Continue 6 times right and click on the next bookcase. Open the book: "Dictionary of Handwriting Analysis" and read it through. Close book, zoom out and turn 2 times right. Zoom in on the 3rdbookcase from the back and open the book: "A Sign of the Times". It is a book about sign language. On the left page you see the gestures for numbers. You will see that 3 of them are blue while all the others are black. Well, those blue ones will be important. So copy them, so it concerns the numbers: 2, 3 and 5.
On the right page you see the gestures for the letters from our alphabet. Here are 4 gestures drawn in blue, the letters A, E, J, K. So Jake and 235. Could this be part of the code for Jake's locker? Think back to the hint you got from Ned Nicleson when you called him. You may also be able to use the push buttons on your telephone for this. Close the book again and zoom out. You have now read everything that was important to read in the library, so go 3 times rght and click on the top of the stairs, go down, go 6 times right and then click your red magnifying glass on the double library doors at the very back of the library. room. You get there, open the doors and step outside into the hallway.
Looking for Jake's Locker Code
You are then back in the "hall" in front of the library. Go to the Study Dome and talk to Hal again. Ask him about Connie, Hulk and Daryl. Also ask him about Jake's locker. Hal tells you, among other things, that Hulk was seriously injured a while ago and that Connie did go out with Jake. Ask him more about Daryl's father. Then go to the Student Union Honk and talk to Connie. Ask her about Hal, Hulk and Daryl and confront her with what you now know about her Locket. Then go to Hulk and also ask him about Connie, Hal and Daryl and especially about his injury. You find out that Hal did hang out with Jake and that Hal's locker is the locker next to Jake's. He also tells you that Connie can often be found in the Gymnasium. If you ask him about Jake's locker, he will refer you to Hal.
So back to Hal in the Study Dome. Ask him about Jake's locker again. Hal now tells you that he once saw that Jake could not open his locker and that he heard Jake say that he wished he had a phone with him at that moment. Another clue that you might be able to figure out Jake's number combination over the phone. So now go to the phones in the Student Union Honk. Zoom in again on the middle phone, put your phone card back in the slot to get a clear view of the phone keys and now look for the keys with which you can spell JAKE and write down the numbers of these keys, in the order of JAKE. The number you then get is: 5253. Jake's number combination. Then also look at which series of letters correspond to the keys: 6-6-83, the number you found on that copper wall plate in the library where you made that anagram "Boiler Room Door". You will then find the following letter combinations: For key 6: MNO; For key 8: TUV, for key 3: BEF
After some puzzling I found that you can use this to make the word NOTE. It must be a 4-letter word, because that number also consists of 4 digits. Could this be the code word for that Maintenance door? Not sure yet. Need more clues. You can now call your friends again, but the only one who gives you a different clue now is George because she then tells you that the code lock of the Maintenance door is in Braille (but you already know that) and that you will probably be able to find this code in the school computer.
Zoom out 3 times. It is high time to see if we can now open Jake's locker, so to see if the combination of numbers found is really the correct one. So go to the hallway where the Cafeteria doors are and zoom in on Jake's locker and then on the combination lock. Enter the code 5253, near the arrows in the middle and from the left to the right and......The locker opens. On the top shelf, click on the Video box, the English book and the Judo Magazine. The Video Box is empty and in the English Essay book you can read an English essay. You see the number of this book, it's the number on that archive card from the library, the card from the Eng-Ess drawer. So it's this book that someone borrowed, but was that Jake? In the Judo Magazine you can read an article about the Men's Judo Tournament and that it was won by a mysterious unknown winner (you must then click on the unfolded magazine again).
Once you have looked at all of this, zoom out and then click on Jake's Jacket hanging in the closet. You then look at the floor. There is a Stanley knife on the floor in front of thelocker. Pick this up because you'll need it right away. Look at the floor of thelocker. At the bottom you see a video camera and below it a Newspaper. It is absolutely necessary that you click on this newspaper and then read the Article about the Pharmacy Burglary. If you forget to click on this newspaper, then you will never be able to finish this game. When you have read the article zoom 2 times and close the locker and zoom out
Looking for a way to get into the Teachers' Room
It's time to enter the teachers' room, but as you already know, the door to the teachers' room in the Student Union Base is tightly locked. However, think back to that clue you found on that big notice board, it told you "Side of School". So should you go to the side of the school building? Find the arrival hall and go outside through the door. On the map you immediately click on the school building again, but you are not going inside now. Move your cursor all the way to the right edge of your game screen and then place your cursor on that very last bit of the green hedge. Your magnifying glass will then turn red again, so click and.........
You now indeed end up on the side of the school building. You will see 4 windows, 2 above and 2 below, and a grille between the two bottom windows (this grille is not important now, but you will come out here later when you flee from the Boiler Room). Click on the bottom rear window. You then stand directly in front of this window and look through it into the Teachers' Room. The window consists of several parts. Move your cursor over the left part and you will get the red magnifying glass on one of the diamonds in that part. Then take the Stanley Knife from your inventory and click it on that diamond. You cut a nice round hole out of it. Click on this hole and the window will open, so click again and you will climb into the Teacher's Room.
Teacher's Room.
Immediately click on the right Computer, Then click on the Keyboard or the mouse and....
.... then use your own Keyboard to enter the correct Login Name and Password
Login Name: Eloise Drew and press your ENTER key. Password: O Wise Elder and press your ENTER key again
On the welcome screen click on the monitor icon and you are then on the Windows Desktop. You see all kinds of icons and, as an experienced computer user, you know that you can click on them. You can click on any of these icons to then open some documents, but the most important one is that KEY ICON on the right. Click on that and you will then see a PASSWORD document. Then look up the code word for that MAINTENANCE Door and this turns out to be, indeed, NOTE. But I already told you that when you got to the phone Close this document and don't forget to click on the Printer Icon, bottom left. You will then hear that a document is printed out that you can read immediately. If you do not click on the printer icon, there will be no document in the printer, it is not really important, but that document gives you some additional hints.
Zoom 2 times out. Then click on the phone to the right of the computers and then on the purple notepad next to this phone. You will see the following: B-4; UCD: N-ME; X-M-N; D; L-F-8-R....... What are you supposed to do with this now? Well, it contains a hint, but you will have to "translate" it a bit. Now you have to remember that nowadays everything is ABBREVIATED, just think of our word "EVEN" which is often abbreviated to "FF" nowadays. Well, that's how this puzzle works. After some thought and trying, I found that you can use this to create the following sentence: "Before you see the enemy examine the elevator"
|
Here's my explanation for this puzzle
Before = B-4 |
Zoom out 2 times and then turn right 9 times. You will see a bookcase next to the door. Click in the middle compartment of thisbookcase and then on top of the stack of books. A book then opens. On top of the right page is a gold-colored piece of paper. Click on it and this paper will appear on your screen. It has a large circle with a question mark in the middle. There are 12 of those hand gestures drawn around the top half, 6 red and 6 black. Around the bottom half you see 12 circles, also 6 red and 6 black. Well, I really didn't copy all those hand gestures from that library book when I was there, so I can't tell you what it says here. I also can't tell you what those 12 circles mean. If I click anywhere on this sheet again, it simply disappears back into the book. I don't think it's really important because I was able to finish the game.
Close this book and zoom out. Turn right 10 times. You see a large filing cabinet against the wall. Click on this cabinet and then open the "Senior Final Papers" drawer. Then click on the TANAKA folder in this drawer, at the front left. This will appear large in your screen. Then click on the name tab to open the folder. So this folder contains Hal Tanaka's English Exam Essay, but...Nancy now tells you that this essay is the same as the Essay you saw in that English Essay Book in Jake's Locker. Hal Tanaka simply copied this down and submitted it as his own exam paper. So Hal has committed examen fraud.
Close the folder, zoom out, close the drawer, zoom out and now click on the world map that hangs on the wall to the left of thisfiling cabinet There are letters on the white edges of this map and if you look very closely you can read the following on the top and bottom edges: "A trophy was not the only prize, but also money of a greater size". On the side edges of this card you see the letters CW........the initials of Connie Watson? So one of our students won a Trophy and a Money Prize. During our search through the school, we have only come across 1 event where prizes could be earned. That was the Men'sJudo Tournament. Could that have been Connie Watson.....But it was a Men's tournament, right?
Okay, zoom out and turn 7 times right and then click on the printer. If you previously pressed the printer icon on the computer, there is now a document in this printer. If you did not do that, there isn't a document in the printer now. Zoom in on this document. It turns out to be a Security Detail Report. You can read it through and you will learn some facts about Hal, Jake and Hulk. It's not really important, but it confirms your suspicions that you must have by now. At the bottom of this document you will see the following: BR19LL5. K5YP14. If you replace the numbers with the corresponding letters from the alphabet, it will read: "Braille Keypad". A clue to the lock on the Maintenance door?
Zoom out. Well....... this is about all you can learn from this Teacher's Room, so climb back out through the window and then buzz 2timesOut and then go back into the school. Aren't you also burning with curiosity to see whether NOTE is really the right code word for the Maintenance Door? I do.....So lets find that Maintenance door again
Boiler Room 1e time
Go to the short hallway near the Student Union room and zoom in on the Maintenance Door and then on the Braille Code Lock. Well, I hope that when you had the Braille Book in front of your eyes in the library, you copied all those Braille characters, because you now have to translate NOTE into Braille. The lock has 3 rows of cutouts on which the Braille characters are depicted. Now first translate NOTE into Braille and then press the correct 4 buttons in the order of the word NOTE. Oh well......you didn't copy that Braille script, didn't you......was it too much effort......Well...here is how you do this
In the top row, click on the RIGHT most button.
In the top row, click the SECOND button from the right.
In the top row, click on the LEFTmost button.
In the middle row, click on the RIGHTmost button
The door opens, so click to go through, but you have to change CDs.
You are standing in front of the elevator doors. Click twice on the button to the right of these elevator doors and you will now automatically go down with this elevator and you will end up in the Boiler Room. Click on the Boiler and then on the lever. you now see 3 levers, but you can't do anything with them yet. Zoom out again and turn 5 times left. You see a toolbox on the floor and above it, on the wall, a plaque. Click 2 times on the toolbox to open it and then take out the Rubber Gloves. Close the toolboxremember the hint about "Gloves"? Well, you now have these gloves. Zoom out.
You can now click on that plaque on the wall for a clue about the boiler, but it is not necessary. You now also see a square man hole in the floor into which a ladder descends, to the left of the boiler. Click on that man hole and you look at it. Behind this man hole is a picture on the wall. Zoom in and it turns out to be a vintage image. The year is: 1967. Write this down because you MAY need it later.
You cannot enter the man hole any further, so zoom out and then turn right 4 times. To the right behind the boiler you will see a grille in the wall. Click on that and you will be at thisgrille. You can't open this grillenow, but you now know where this grille is. This grille will soon be your escape route out of this room.
Zoom out again and turn clockwise 5 times. Past the power box you will see some woodencrates. You can't do anything with it now, but later, when you are here again, there will be a matchbox on the crates. Well, you've seen everything there is to see here, so turn back to the elevator and press the button again 2 times and you'll go back up. Then click on the Maintenance door and change the CD. You are back in the short corridor near the Study Dome and the Student Union. Let's go visit all 4 of our friends again to have another chat with them.
So go to Connie, Hal and Hulk. Ask them anything you can and confront Hal about his Exam cheating. Connie gets pissed and Hal now tells you that he was blackmailed by Jake. Ask Hulk about the pharmacy break-in and also about the video camera in Jake's locker. Hulk gets really pissed off. Ask them about everything and then go to Daryl in the Diner and ask him about the Pharmacy Break-in. After his answer, ask him the question that starts with: "Hal, Hulk and Connie were all involved...........". Daryl then tells you that someone left him a note for you.....Be carefully now....Do not respond with the option "Pressure the Suspects", because if you do you'll never finish this game because you will not get this note So respond with any other answer. Then end the conversation and a large envelope will appear on your screen. Click this envelope and a note will come out. Someone invites you to go back to the Boiler Room. Zoom out and leave the Diner.
NB: if you didn't click on this envelope to open it, but immediately zoom out, assuming that this envelope will then end up in your inventory, so that you can read the note in inventory, then you are so wrong. You will never see this note again and you can not complete the game
Boiler Room 2e time
Enter the school again and run to the Maintenance door and open it again with the Braille buttons for Note.
Now SAVE YOUR GAME here.
Take the elevator down to the Boiler Room and click on the boiler again to see those levers again. . All three levers are fixed with a chain in a certain position and this threatens the boiler to overheat and explode. Take the Bolt Cutter from your inventory and click with it on the chain, between the left and the middle lever. Well, you've lost the chain, now you just have to adjust the levers correctly.
The middle lever is now in the right position so stay off it.
Click 2 times on the eft lever. Then click 2 times on the right lever. Then click 1 time on the left lever.
The boiler is now cooling down again. If, for some reason, you did not have the Bolt Cutters then you can still shut off the boiler in this way......put on your Rubber Gloves and zoom in on the levers of the Boiler. The chain is secured with a padlock. Remember that year you found here the first time, on the left wall behind the boiler? that year is 1967. Well, this is the number combination with which you can open this lock. The chain is then gone, so click on the levers as described above.
Turn left to the elevator......Ooooo.....Sabotage.....you can no longer leave with the elevator. Turn further to the left and you will see a matchbox on the crates. Click on the matchbox a number of times and you will see a telephone number on it. It is the number of the Pharmacy, but these are matches from the Diner..... This matchbox was not here before, but now it is....... does the saboteur have something to do with the Diner and the Pharmacy? T
urn around and then click on the wall grille on the right behind the boiler. You get there, click again on the grille to remove it and then crawl through the ventilation shaft. Don't forget to grab the VideoTape that's here in this shaft and then crawl further through the shaft. Click on the grille at the end and you will come outside and find yourself on the side of the school.Zoom 2 times out and on the Map you go to your Aunt's house.
Go inside and to the living room and then to the TV cabinet, that's on the right. Open this cabinet, turn on the TV and the VCR with the remote control and put the Video tape you just found in the recorder. Watch the videos Jake made of his victims....well...Hulk is the burglar, Connie is the mysterious Winner of that Judo Tournament, Hal is the Plagiarist and Daryl... .......Well, Daryl appears to see a drug courier for Mitch. Mitch???.....we haven't come across that one yet, except here in the living room as a name in that plant book. Turn off the TV and the video recorder and leave the house and go to the diner.
The Diner is probably closed now, so go to school and inside and talk to Hal, Hulk and Connie and confront them with what you saw on the Video Tape. Then go back to the Diner, it is now open again, so go in and talk to Daryl. Also confront him with the Videotape and he will now tell you everything about Mitch and the blackmailing Jake. Jake also tried to blackmail Mitch, but Mitch turned out to be cut from a completely different cloth than our young students. Mitch just killed Jake. Now Daryl wants to help prove that Mitchis guilty. Go back to school and ask Hal, Connie and Hulk if they want to help too, but Connie refuses. Now this is importand.......Tell Conny that Daryl's life is at stake, but connie still refuses to help out. Then go back to the Diner. It's evening, the Diner is Closed.......SAVE YOUR GAME HERE
Endgame
Go to the Pharmacy.........Now watch carefully...... You will see Daryl and Mitch arguing. Mitch pulls out a gun and points it at Daryl.....Suddenly Connie appears and kicks the gun out of Mitch's hand. The gun mysteriously ends up in your inventory. Immediattely select the gun and keep it at the bottom of your game screen. You see Mitch's appear again, quickly click with the gun on Mitch and......YOU WIN......Mitch surrenders. If you don't manage to click the gun on Mitch very quickly, you really only get very little time for this, then it's Game Over and Mitch wins. Then try again, via your last Save or via the game's "Second Change" option
The End
2002: Original a Dutch Walkthrough by: Louis Koot. 2024: This English translation also done by Louis Koot