
Nancy Drew 3:
Message in a Haunted House.
2003: Original a Dutch Walkthrough by: Louis Koot
2024: This English translation also done by Louis Koot
If you have found this walkthrough via google search or via another site then you have probably not visited my site.
A lot more very detailed game walkthroughs can be found on my site at: www.pcgameswalkthroughs.nl
This walkthrough is based on the game option: Senior Detective but it is certainly not the only way to play this game.
Nancy Drew is in San Francisco, in a large old Victorian style house. The owner, Rose Green, is a friend of Hanna and is renovating the house. During this renovation there were a number of unexplained "accidents". Nancy stays at the house to assist Rose with the renovation, but of course she investigates to find an explanation for all these accidents.
Nancy's Room
You start the game in Nancy's room and you see part of the room. In the corner, near the window, is a sideboard and to the right of the window is the fireplace with the mantelpiece. Click your red magnifying glass on the mantelpiece and you are instantly a lot closer to that sideboard. If you move your magnifying glass back and forth over this sideboard the magnifying glass does not turn red anywhere. So you can't do anything here.
Now move your cursor to the right edge of the game screen and your cursor will now become a right-pointing Arrow. Click your mouse and you have turned clockwise once. Click again and then again and you have turned a total of 3 times right. In the remainder of this walkthrough I will indicate the direction you should go, so right once or right twice or inks once or left six times or forward once or forward eight times...etc...etc...
Now look at the mantelpiece of the fireplace. There is a small table to the left of the mantelpiece. Now click on the mantelpiece and you will zoom in on it a little more. There is a green statue on the mantelpiece. Click twiceon this statue and you will be right on top of it. It's a Green Dragon. Click on the copper plate under the dragon and read what it says:"Daughters of diligence earn the gold of nine dragons". Well, I may not be a daughter, but I am certainly diligent. Gold? Also take special note of the Chinese Character depicted on the left of this copper plate. It is the symbol for Daughter
Then move your cursor to the bottom edge of your game screen and you will get the curved "zoom out arrow". Click your mouse and you are zoomed out 1 time. Then do that 2 more times and you will see the entire mantelpiece again. Now click on that table, to the left of the mantelpiece. Nice inlaid table, isn't it? With a nice white Dragon on it. Zoom out once and then go 6 times left. Nancy's suitcases are on a low table, under the tapestry. Well...I also have that when I'm on holiday. Never unpack my suitcases, why, I'm on holiday after all!
Click twice on the top suitcase. Well Nancy, you're right, your suitcases are indeed locked. Don't trust your hostess? No doubt you've been wondering all along what that key is for, which has been winking at you seductively at the bottom right of that little screen. That screen is Nancy's very large storage bag, or Inventory as we seasoned adventure gamers say among ourselves, and Nancy puts all the objects she picks up into it, with the idea of being able to use them again someday. This is also the case with this key. Click on the key (your inventory will close) and your cursor is now this key.
Click on the suitcase with the key and it will open. Well, what you can expect to find in a suitcase from a girl who is traveling... CLOTHES... but also a diary. Click 2 times on the diary and it will appear open on your screen. Read what Nancy has written in it now. By clicking on the right pages you turn a page and by clicking on the left page you turn back and close the book. There isn't much in it now, so read it through and then close the book. Zoom out, close the suitcase by clicking on the lid and then zoom out again.
Go left 5 times. You then look at the door of Nancy's room. To the left of the door hangs another tapestry, a Gobelin. There are all kinds of letters on this Gobelin. Click on it to zoom in and you will read the "fairy tale" woven in gold letters on this tapestry:
"Listen, my child, to this story of dreams. And know that the beginning is more. Difficult than it seems. When the ten daughters are reunited in order.
When the four-sided box loses its border. When the eye of the phoenix is in your hand. When the bird of fire can see again.
When the moon sleeps and the sun plays.
The King of the sky will shine his rays. And hidden beneath a river of colors. Will lie a gate to golden wonders "
Do you have this? Then zoom out and go left 4 times. You are now looking at the bed. Click on the foot end to get a better look at that dragon symbol. It's two dragons looking at each other. Zoom out and then click on the right upright of the bed (i.e. on the right at the foot end). You zoom in a little closer and you see that it has a kind of "vase shape" on it with a copper knob on top. Click on it twice again and you will hear Nancy say "It's Stuck".
Zoom out twice and go left once. To the left of the bed is the bedside table with a table lamp, an alarm clock and a fan. Click on it to zoom in and then click the alarm clock. You will see the current time on this alarm clock (for me it was 6:45 am) and if you click on the ALARM button you will see the alarm time (for me it was 0.600 am). By clicking on the CANCEL button you zoom out again. Do that and then zoom out 2 more times. Turn right 6 times and you look at the door again. It's time for Nancy to get to work, so click on the door and then the doorknob and the door is open. Click forward once and you are in the hallway in front of Nancy's room on the 1st floor.
Corridor 1st floor:
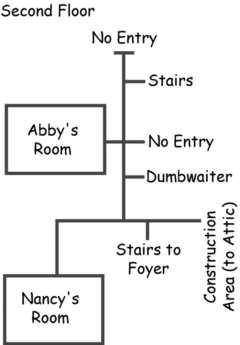
You see that the corridor goes around the corner on the right. Click 2*Forward and you have turned the corner and you are at a junction. You can go straight ahead and turn left. Straight ahead goes to the door of the attic and the door of the stairwell to the Foyer, but there is such a renovation mess there now, Nancy doesn't want to go there. She wants to turn left. So click on that hatch in the wall of the corridor to the left and you are in that corridor. On the right you can just see a small part of that hatch. Click on that hatch and you will be right in front of it. It's a roller shutter. Click on it and it will open. Behind it is the elevator shaft of the so-called "Dumbwaiter", the service elevator. The elevator is not there, so close the hatch and zoom out
In front of you you will see the three doors again. On the right is the door to the stairs that goes to the 1st floor, at the back is a door that you will never go through and on the left is the door to Abby's room. Click on Abby's door and you will be standing in front of it. Then click on the door again (in the upper part) and Nacy knocks on the door and Abby will appear in the doorway. Abbey doesn't invite Nancy in but starts scaring Nancy with her talk about Ghosts. Talk to Abbey and it doesn't matter what you talk to her about, her answers are always the same. Abbey talks about, among other things, a certain Valdez.
When Abby has gone back into her room to "meditate" you zoom out and look at that door at the back of the hallway again. Go 1 time forward to this door and then click on the wall to the right of this door and you will be in a narrow hallway. Go 1 time forward and in front of your feet is the narrow spiral staircase that goes down to the ground floor corridor. Go 5 times forward down these stairs and you will be in the ground floor corridor.
Corridor Ground Floor
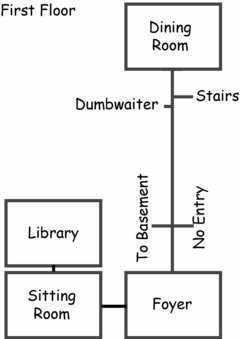
Right-click on the hatch of the dumbwaiter and then open this hatch. Click on the piece of rope hanging in the shaft and Nancy, very observant and smart as she is, will let you know that the rope has been cut. Well, you had already seen that yourself. Close the hatch and zoom out twice and you have turned around in this corridor and in front of you will see the double doors of the Dining Room. Click on the door buttons to open these doors and then go forward 1 time and you will be in the Dining Room.
Dining room
If all is well, and that depends on how quickly you went through the previous part, then Rose will now be sitting here at the large dining table. Click on Rose to start chatting with her. Rose gives you all kinds of information about the house and also tells you about the "accidents". Ask further about this and especially ask about the previous owner of this house. At some point, Rose will ask you to do a chore for her. It concerns a piece of the floor in this dining room and then the conversation suddenly ends. Then click, to the right of Rose, on the floor in front of that high white sideboard. You then zoom in a little on this spot. Then click again on that spot on the floor twice in succession and you will be zoomed in on your first puzzle of this game.
You will see a screen that consists of two parts. In the left part you see a floor tile with a piece of the mosaic on it. Some parts of this are white. On the right you see a lot of loose brown pieces. The idea is to place these brown pieces from the right part on the white parts in the right part so that that part becomes completely brown. You can rotate the loose pieces by clicking on them with your right mouse button and you drag them by clicking on them with your left mouse button and then dragging them to the place where you want them. Then left click again to put it in place. You really have to do this very precisely. The puzzle is only properly solved when there is no longer a single line of white visible. Nancy herself indicates that you have solved the puzzle correctly.
After solving this puzzle, zoom out twice and chat with Rose again. To start, tell her that you have solved the puzzle. Well... Nancy is here to help with the renovation, so Rose has another job for her. Rose wants Nancy to go to the hallway of the 1st floor, there is a ladder somewhere with which Nancy have to demolish a few tiles from the ceiling. Rose also says that Nancy need a chisel and/or a paint scraper for this and that she have to go to Charlie, the handyman. Then talk further with Rose and you will learn that Abby is co-owner of the house. Without Abby's money, Rose wouldn't have been able to buy the house. Rose also tells that Abby is going to hold a seance tonight to ask the spirits about all those "accidents".
Go 1 time left and you will see the large dining table in all its glory in front of you. There are 2 click spots on this table. One on the far left and one where Rose is sitting at the table. Unfortunately, you can't take a closer look at the things that are on the table right in front of Rose now because Rose is still there. For this you will have to wait until Rose has left.
You can look at the other spot, on the left, on the table, but there you will only see that someone is busy giving some ornaments a new coat of paint.. Then zoom out and go 5 times left, to an "antique" sideboard. There is a tea set on it and on the left you see a notepad on it. Click on this notepad and you are zoomed in on the sideboard. Then click on the notepad again. It's the "work schedule" that Rose has also talked about. You read: Louis (Yes, I'M IN): Noon to 5pm; Charlie: 8 am to 5 pm; Abby: It's out from 3:00 PM to 6:00 PM. So these are the times when you might find these people at their "workplaces"
Zoom out and then click on the right drawer, then click on it again to open the drawer and then click on the piece of paper that is on top of the yellow pages. It is a fire insurance policy and you read that this house is now insured up to one million dollars against fire damage and earthquake damage. Suspicious, right? Be sure to notice that red Chinese Character that you see at the top left of the policy. This is the Fire symbol.

Then zoom out, close the drawer and zoom out again. Go 8 times left and you will see an alcove with a fragile table in it. Click on this table and then on the magazine thats on it. Click on the magazine again to open it. Then click on the left page to enlarge it and read what you need to assemble a "Four-Posted-Bed". I don't know if it's useful to write down this list of necessities, but I'll do it anyway, so
|
Requirements for a "Four-Posted_Bed: 65 slats of 6 inches |
If you have this, zoom out 1 time and click at the bottom of this page to close the magazine and then zoom out 2 times. Then go 8 times right and click on the double doors and then on the door button to open them. Go 2 times forward through the hallway to that stained glass door at the end and open it by clicking on the door button again. Go 2 times forward into the large central Hall.
Central Hall
Then turn 9 times right or left and you will see the large central staircase to the 1st floor. This staircase has a left part and a right part and both parts turn upwards and end on top of the "Balcony". There is the large passage gate to the 1st floor corridor. If you now look at the left staircase part, then turn right 2 more times so that you see the right part of this staircase. Then click on the bottom part of these stairs and you will be right in front of it. Now click 3 times forward so you go up the stairs and you just barely reach the top, but you are now standing on a spot in front of a wall full of paintings. You see a rope hanging and this rope is attached to a piece of wood on the wall. Don't do anything with it now, but remember that this rope and this click spot is here. This will become important later.
Renovation of the 1st floor corridor
Go forward 2 more times up the stairs and you will be on the "balcony". Then click on the white wall on the right and you will be in the passage gate. In front of you you see a nice table against the wall of the hallway. Go forward one more time and you are there. You are back on the 1st floor corridor. To the left it goes to Nancy's room and also to Abby's room and the narrow spiral staircase. But you now want to go right to the "work area". So click on the wall to the right of the table and you have turned clockwise. In front of you is the "work area" and you will see a ladder. Click on the ladder and you are standing in front of it. Click on the ladder again and you climb up and then look at a spot on the ceiling. How so.... Leakage......8 ceiling tiles clearly have water damage. Hey.....didn't Rose just ask to tear out these tiles? But that is not possible without tools. Just click on these tiles and you will hear yourself saying that you need a "Paint Scraper".
Central Hall
Zoom 2 times out and you will see the passage gate again. Click in it and you will be back in this gate. Go forward 2 times and you will suddenly bump into the balustrade of the "Balcony". If you now click on this balustrade on the left, you can go down one side of the stairs. If you click on the balustrade on the right, you can go down the stairs from that side . Just click on the left side of the balustrade and descend the stairs via 5 times forward. At the bottom, click 1 time forward to the other stairs and then zoom 1 timeout. Then turn 7* times right and you will see the scaffolding.
There is a paint can under this scaffolding. Click on the paint can and then on the box to the right of it. Hey.....a sharp crimping knife appears. Click on this knife and it disappears in your inventory. Zoom out and go 5 times right. You are now looking at the stained glass doors at the end of the hall. You cannot open these doors. But in the window above these doors you see a number. Click on it to zoom in. Yes, it is a 4 digit number. But because you're seeing this from the wrong side of the door, you're seeing it backwards. It's not really difficult to decipher, it's the number 4653...the address number of this big house. It must be important, so just make a note of it and then zoom out.
Turn 3 times rght. You see a sitting area, 2 chairs with a table in between and a series of paintings at the top of the wall. You can click on both the table and the paintings, but it doesn't bring you anything, so turn further 5 times right and you will see a door and the large grandfather clock and you then look at the left stairs again. On the two outposts of these stairs are 2 copper bird heads. Click on it to zoom in and then click on the left Bird's Head. Hey...this thing is missing 1 eye and if you click on the empty eye socket you will hear Nancy confirm this.
Zoom out and then click on the right Bird's Head and you will see what such an eye looks like. Zoom 2 times out and you look again at the door between the 2 stairs. You already know that this door is the connection between this central hall and the ground corridor to the Dining Hall. Go back 5 times left and then click on the door next to the grandfather clock, open it and go 1 time orward into the Sitting Room.
Sitting Room.
Well, this one is full of Victorian knick-knacks, couches, couches and cupboards. Go 2 times right and you will see the double doors that lead to the Library. This will come shortly. Turn further clockwise and the desk will be in the corner. Click on it to zoom in. There's an old telephone on the desk and maybe it's ringing now. Click further 2 times on the phone and you are zoomed in on the dial. The telephone numbers of yourself and your friend Bess and a certain Emily will now appear in the "conversation window".
You can now call Bess and Emily by dialing their numbers. You will then hear that George is with Bess and, because you are playing at Senior Detective level, they will give you more difficult to understand hints. It is of no use to you at the moment, but it is still good to have this conversation option "out of the way". Call Emily and after her story ask her mainly about Chinese characters, Dragons and Valdez.
Then zoom 2 times out. On the left and right there is a drawer under this desk, under the rounded corners. Click on the left drawer and then open it. There are 2 letters in there that are written by hand and that I really haven't read through. Close the drawer and then zoom 2 times out and turn 5 times right. In the other corner, behind the "sofa" is a cupboard with a floral motif on the door. Click on this cupboard and open the door. There is a red fire extinguisher in this cupboard. Click on it.....you can't take this fire extinguisher with you, but if you ever need a red fire extinguisher, you now know where to find it. Close the cupboard and zoom out.
Continue turning 4 times right and you will see the fireplace behind the sofa. Click on the fireplace and you will zoom in on it a bit. There are two large chairs in front of this fireplace and a box on the back chair. Click on the box to zoom in and then click on the box and then look into the box. There are a lot of papers in there. Click on the yellow paper. It is an 1894 list of telephone company subscribers. On the 3rd line you read: "Valdes Hotelier: 4653 California Street"......Hey that is this address. Zoom out and then click on the white paper in this box. It is a letter from 1902 about the auction of this house.
Now zoom 5 timesout and turn 1 time right. See that window recess in the corner beyond the fireplace? Click there......Oh......you zoom in and you see the curtains move and hear a squeaking/groaning sound. Zoom out, go 1 time right and click on the chair at the 2nd window. You zoom in, then click on that table on the left. Look at the wood carving at the bottom of this table, isn't that a bird?
Zoom out and then click on the table that is on the right between the windows. Then click twice on the book, it is a book about "Subterranean" Sanfrancisco. Open the book and read the short article and you will know that there is a network of tunnels under this city. Also under this House? Close book and zoom out 4 times and then go 3 times right. Then click on the double doors of the Library, open them and go inside
Library
Immediately straight in front of you you will see the Fireplace. Click on the fireplace and you will zoom in on it. Hey....there are 3 tiles missing from the top edge. Click on this empty spot and you will hear your alter ego say: "It won't fit". What doesn't want to fit? Maybe you should find a few tiles and try again here later? Zoom 1 time out. There are 2 copper bars in front of the fireplace. Click on the left copper bar. Well, is that a Bird's Head too? Click on it again and you will hear Nancy say: "It's stuck".
Zoom 2 timesout and turn 5 times left. You then look at the desk. Click on the desk and you will be behind it. You can't open all those drawers. Click on the open book that is to the left of thelLaptop on the desktop. It's a chess book. Learn how to do the Knight's move in a game of chess. Close the book again and then click on the laptop computer. O.....Yes....a login name and password are required. Do you know that? I don't, so......but wait, click on Maze Game that is written in red letters at the bottom of the screen. A screen will now open with instructions on how to play this game. Just wait until this goes away and then you can play the Maze Game.
| You can decide not to do this, but if you want to find out all kinds of codes and passwords, you will have to struggle through this maze game. I can't tell you the right way through the maze because you always start this maze game in a different place.
I can tell you that in the first part of this maze, in the corridors with the wooden floor and wooden paneling, you have to look for a dark blue floor tile with a black "wave" pattern on it. Step on this tile and the light in the maze turns on. Then you have to go through these corridors to the next part, which is a "garden part". You also have to go through this to get to a part like the first part where you also have to go through and then you finally arrive in a part with on the floor black marble tiles and pillars and statues in niches. Somewhere in this last part there is a long corridor that ends and in the back you see a "pink" floor tile with green "diamonds" on it and behind it a large head. Go to this tile and you you hear a sound and then you suddenly end up in the computer on the familiar Windows Desktop. Once you have entered the computer, click on the Key icon. You will then open a document with Codes and passwords, here they are:
|
Nice, now you know the password for this laptop, but not yet the login name. Close this window and then click on the File Cabinet icon. You then open a document about a hotel. So this house was called the "Golden Gardenia Hotel" in 1888. Zoom out of the computer and you look back at the desk. Then click at the top of your screen at those 2 green chairs and you are there. Click on the table between these 2 chairs. Ha, nice, a game of Mahjong.....Click on the 4 loose Mahjong stones on the right. Study these stones, but especially the Chinese Symbol for the number 4.

Zoom out twice and turn left 4 times. In the corner, next to the globe, is a stack of boxes. Click there and then on the books that are on these boxes. Open the book: "Legends of San Francisco" and read everything about Lizzie Appelgate. Close book and zoom out. Then turn 9 times Counte-rclockwise and you look at the corner of the room, left of the desk. Here too is a stack of boxes. Click there and then on the books that are on these boxes and open the book and read about the Firebirds. Close book and zoom out. Well that's it here, so turn times left and click on the door to the sitting room, open it and go 1 time forward and then 3 times left and click on the door to the central hall, open it and go 1 time forward to the scaffolding and then turn 3 times left.
Demolish ceiling tiles
Click on the bottom of the right stairs and then go 5 times forward, up these stairs. Maybe along the way you hear "someone" whispering "I See You". At the top of the balcony, right click on the wall of the passage gate and then 1 time forward. Then click on the right of the cupboard on the corridor wall and then twice on the ladder. You are back on top of the ladder near those 8 "wet" ceiling tiles. Take your knife from your inventory and use it to remove the 8 "wet" ceiling tiles. A hatch becomes visible in the ceiling. Click on the keyhole and you will hear Nancy whining again that it is locked. Zoom out and now first go back to Nancy's room. As soon as you enter your room you hear a scary hissing sound. Go to Nancy's suitcases, open them and read through the diary because it now contains new facts. When done reading close the suitcase and zoom out completely.
Basement
You've now been just about everywhere you could go in the house, except the basement. Let's take a look there now. So leave Nancy's room and then go up the spiral staircase at the back of the "Abby" hallway to the Ground Floor hallway. When you get down there, click to the left of the dumbwaiter elevator and then on the door in the right wall. Open the door and go 3 times forwar,d down the stairs, and you are in the basement. If all is well, you should see Charlie at work here now. Charlie is the handyman who does the heavy lifting during this renovation. Go talk with Charlie and talk to him in detail.
Charlieconsiders himself a hard and competent worker and believes that all those "accidents" are not his fault. When Charlie abruptly ends the conversation, click on the large pianola on the right. You then zoom in on a hatch in this thing behind which the music roll is supposed to be, but unfortunately, Nancy will again say that this hatch is stuck and therefore cannot be opened. Zoom out and then click on the keyboard of this pianola. You zoom in on it. Then click on the keyboard again and then you can click on the different keys to play a little piano. I hope you're more musical than me, because I don't have a musical ear and you certaintly do not want to hear me sing a song.
You are supposed to recreate a piece of music here on the pianola, but which one? Zoom 3 timesout and then click on the piano stool in front of this pianola. You then look under the pianola. Click on the stool again and you are zoomed in on the green seat. Click on the seat and it will unfold. Click in the compartment of the stool and a music manuscript will appear on your screen. It is the music of the piece "Swannee River". You can't do anything else with it, but under the title you see the Chinese Character for the word River.

Copy this and then zoom 2 times out. Turn left and click on the fireplace behind Charlie. Nancy would rather wait until Charlie is gone to do this, so we'll have to do this later. Turn 2 times left and you will see the bar. To the left of this bar is a table with an upside-down stool on it. Click there and then click twice on the newspaper that is on this table. Read the article about "S.F's B&B Room" and then zoom out 3 times. Then click on the back wall of the bar, to the right of this table, and you are zoomed in on it. At the very bottom left of your screen there is a small book against this wall. Click on it and it will appear on your screen. The booklet is entitled: "Famous Non-Alcoholic Drinks and how To Mix them." Open it and write down the 2 recipes for the 2 drinks that you will most likely have to mix in this game.

If you have that, close the book and zoom 2 timesout and then turn 12 times left and you will look at the corner of the basement right in front of the stairs. Click on the boxes there and then twice on the very old faded newspaper and read the article about the scandalous escapades of a number of society ladies. Then zoom out 3 times and go back up the stairs and then go back to the Dining Room and there talk to Rose again. Tell Rose that you broke those ceiling tiles but don't tell her you found a secret hatch behind them. Rose doesn't want to know anything about it, but she now asks to see if you can repair that service elevator in the Ground Floor corridor. After this, talk to Rose about everything, but especially ask her who owns the laptop computer on the desk in the Library. So that laptop is from Louis. Could Louis also be the login name? You already know the password.
When this conversation is over, go to the Sitting Room via the Ground Floor corridor and the Central Hall and go to the desk, to the right of the library doors in the corner. Zoom in completely on the telephone dial and call Home and ask Hannah about everything. You can also call Bess and George, but they don't have much to say. After this telephone conversation, go back into the Ground Floor corridor through the sitting room, the central hall and through the door under the stair balcony and immediately click on the door on the left because this is the basement door.
Basement again
Go back into the basement and click on the Fireplace again. Zoom in all the way until you click on the grille. Now it gets annoying because this grille is also stuck. Zoom out twice and then climb onto that corner of Charlie's work table that you can just see at the bottom right of your screen. You will then see the corner of the basement behind Charlie's work table and to the left of the pianola. You see a large round table with 4 chairs. Click on the corner of Charlie's work table at the bottom right of your screen and then on his rusty red toolbox and take out the screwdriver.
Zoom out twice and then click on the thick "leg" of the table, between the 2 front chairs. You zoom in there and you see that there is a door in the leg. Open it and you have opened a secret compartment in the table leg. Unfortunately this is empty so close the door and zoom out 3 times. You then look at the fireplace again. To the left of this, click on the right end of the bar. An old antique cash register stand here. Zoom in and then click on the rightmost button and the cash drawer opens......Brrrr......Cobwebs, but also an old Key. Take this key with you.
Close the drawer and then zoom 4 times out and you are now turned around again and looking at the stairs. Click forward and then right on the stairs. Who is up there slamming the cellar door so hard? Are we being watched? Now go back to the workplace on the 1st floor corridor and climb the ladder again to the newly discovered ceiling hatch.
You can do this in 2 ways. You can use the narrow spiral staircase that goes from the Ground Floor Corridor to the 1st floor and ends in the "Abby" hallway at the back. Or you can go up via the Stairs in the main hall. I suggest that you take this last route and then go up via the right stairs. You will then find out (if you didn't know this already) that there is a square spot in this right staircase and its creaking. This knowledge is important in the end game that you will be playing in about 2 months. Then you need to know which of the two stairs in the main hall is creaking. In any case, when you are back on the 1st floor corridor at the workplace on top of the ladder, open the ceiling hatch with the key from the cash register and click 1 up through the opened hatch and you will be in the attic.
Attic
Go 2 times right and click on the table. Then click on the book to the left of the candle. It is the "Mysterious Story Book". Open it and read through the story of Captain Steubing's hidden treasure. Close the book and zoom out. Then click on the desk to the right of the table and try to open its lid,but it's locked. Zoom out and go 3 times right. On a chest, behind an old chair, is an old wooden toolbox. Click there and take out the crowbar.
Zoom out and go right. Click on that box
at the top. There is an old antique sewing machine on it and a book on the left. Open this
book and read through it. It's a bit difficult to read but it's about a
pyramid puzzle and a house full of puzzles.
Close book and zoom out twice and go right 1 time. On a large chest you see a doll's head and there is also an old gramophone on it. Click on the doll's head and then open the iron box behind it. Take out the
old iron here. Close the box and zoom out and go 2
times right.
Click on the front stack of old newspapers...Why? ....no idea.......they're just very old newspapers. Zoom out and then click on top of that large upright barrel. There is a tile on this barrel. Click on it and the tile disappears into your inventory. Would this tile fit in the open spaces of the fireplace in the library? Zoom out and go 3 times right. You see a large wheel against the wall and below it is the hatch in the floor through which you entered. Click on that hatch and then click on the "handle". The string breaks off. How to get out of the attic now. I take it you don't want to spend the rest of your life here? I'm glad you just found that nice crowbar. So take that crowbar from your inventory and pry open the hatch with it and then climb down the ladder to the 1st floor corridor. Return to the basement via the spiral staircase at the back of the "Abby" hallway.
Basement
When you are back back in the basement, zoom in completely on that grille that is on the floor of the Fireplace. Also pry this grill open with your crowbar.......a large, very dark hole that will lead to underground tunnels. But I've always been terribly afraid of jumping into dark holes, so I'll come back here when I've found some light. Close the grille and zoom completely and now go to Nancy's room on the 1st floor via the spiral staircase.
Nancy's room
First take a look at Nancy's diary here because new facts may have been added. Then go to the bed and click on the right bedpost at the foot end again. Zoom in all the way and then use Charlie's screwdriver on the ball on top of the pole. You unscrew this and a large key will appear. Just put this in your inventory. Click the ball back on the pole and zoom out completely. Wherewould this key fit into? Maybe on the lid of the desk in the attic? So go back to the Attic.
Attick
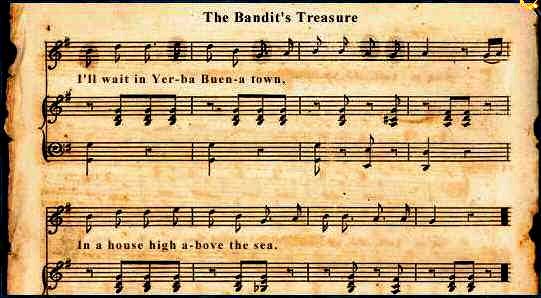
Go to the desk again and open the lid with the key you just found. The desk does indeed open. Click on those papers on top. A somewhat scorched piece of sheet music will now appear on your screen. Click on the top half of this paper again and it will appear enlarged. It's the musical score for "The Bandit's Treasure". Maybe this is the tune you should play on the pianola in the basement? Look at the top half and notice that 5 of the musical notes are faintly circled. You know what, just neatly copy this entire top half.
If you have this, zoom out twice and click on the desk a few more times and you will find the following items to view: a photo of a lady, a "poster" of the performance of the piece "the Bandit's Treasure" and,
this is important, a booklet explaining the construction of the Chinese Character for the word "Beginning".
Draw this symbol, it is the circled symbol on the right page.

Then close the lid and zoom out completely and return to the 1st floor corridor via the floor hatch. Go back to the basement.
Basement
Charlie is probably working here again. Leave him alone, he's paid to work and not to chat with you. Now zoom in completely on the keys of the pianola. If you then move your magnifying glass over the keys, you will notice that there are 8 clickable keys. Number these 8 keys from left to right as: 1, 2, 3, 4, 5, 6, 7, 8 and then take your drawing of that musical notes. Well, which musical notes are these, and with which of the 8 keys do they correspond to and in what order should you press those 5 keys?.
I can't "read" musical notes, so I had to look this up and learned that those 5 circled notes are B-E-G-A-G, and on the piano these are the keys 6-2-4-5-4. So click these 5 keys in this order and the hatch in the pianola will open. In that compartment, click on the piece of music roll that is underneath the large roll. The piece now appears on your screen. It is a piece of the "Bandit's Treasure" music and at the top it is written: "My love, here is the key you'll need". .....Key, what key I don't see a key. Oh...wait...could all those square holes on this piece of paper be some kind of code. Then we must quickly look for a way to decipher this code. Close the hatch and zoom out completely and then go back to the desk in the attic.
Attic
Open the lid of the desk again and click on the paper with the notation again. When this appears on your screen again, click on the text that you see at the very bottom. This part now appears enlarged on your screen. Then take the piece of music roll from your inventory and click it on this text and......letters now appears in some of the holes and if you read the holes from left to right , then you read: "Find Diego on Stairs". Stairs.....does this perhaps mean the central stairs in the main hall? You now know that one of those bird heads, on the left post of the left staircase, is missing an eye. Does that have anything to do with this? Zoom out 3 times, close the music stand (the piece of music roll flops back into your inventory) and go back to the 1st floor corridor via the hatch. Click on the left in the passageway to the "balcony" and then click 2 times forward until you are standing with your nose against the balustrade.
Balcony railing puzzle
Click in the middle part of the balustrade (not left or right but in the middle). You then zoom in on the bottom of the balustrade and look at 5 of the posts. Take a look at the "feet" of these 5 posts. There is a letter on each "foot". If you click on one of these 5 "feet" it will rotate, plus some others, and you will see different letters. What you need to do now is to turn these posts so that they read Diego from left to right.
| If you click on
post 1, you rotate the posts: 1 and 3 If you click on post 2, you rotate the posts: 1,2,3,5 If you click on post 3, you rotate the post: 3 If you click on post 4, you rotate the posts: 1,2,3,4 If you click on post 5, you rotate theposts 1,3,5 |
So make sure you get the Diego word here and once you succeed, theposts will automatically rotate 3 times to create the following: "Coins False Floor". A secret compartment will then immediately open in the bottom beam of the balustrade. Click in it and you will see a rolled up scroll inside. Click on the scroll and then click on the "wooden" closure in the shape of a Chinese Character. This disappears into your inventory. Then click on the scroll again to open it and read what is written on it. it's hard to read but one sentence stands out in the top paragraph...."Here is the tool that you'll need to find the treasure" er uit.
Tools? Does this writer mean the wooden "buckle" that was used as a closure on this scroll? In the form of that Chinese Character?. The second paragraph is a mystery. As far as I've been able to decipher it, this reads:"The stars and the moon will shine on you. As you begin your quest. Move like a knight upon ?????. To quickly past the test. Take care to keep your path in check. Along the outside border. So you may see the sun return. To claim it's rightful order" What does this mean again? We'll find out. Click the scroll back into the box and zoom out 3 times and now go via the stairs and the living room to the Library
Library
There will be a someone sitting behind the desk here that we haven't met before. It's Louis.
Changing the time in the game
Louis may not be here now. If you paid attention at the beginning of this game, you will have found that work schedule in the dining room. On it you could read, among other things, that Louis will be in between 12:00 P.M and 5:00 P.M. Now, if it is BEFORE 12:00 P.M or AFTER 5:00 PM, then Louis will not in the library. Then rush to Nancy's room and go to the alarm clock to the left of the bed. Check what time it shows. If the time is not between 12:00 PM and 5:00 PM, but for example 11:00 AM (as was the case with me), press the ALARM button and then set the ALARM time to 12:00 PM using those arrows on the right. Then press SET. THhe alarm goes off and NOW it is 12:00 noon in the game. So you can always repeat this if something needs to be done somewhere in the house at a certain time. Then hurry back to the library and Louis will be there behind the desk
Talk to Louis. According to himself, Louis is an antiques dealer. At one point he abruptly ends the conversation. What now? Wouldn't Abby be having a séance? Maybe it is now? Leave the library and go up the central staircase in the large hall and through the passage gate into the 1st floor corridor. When you come out of the gate, click on the wall to the left of the cupboard and face the junction of the corridor. Wait a minute, don't go into the "Abby" hallway yet. Right in front, on that small piece of wall, you see a ventilation grille. Click 1 click forward and then click on that grille at the bottom right of your screen. It appears large on your screen. The grille is secured with 4 screws. Take Charlie's screwdriver from your inventory and unscrew these 4 screws. There is a loudspeaker box in the ventilation shaft. Could this be the source of all those strange noises you keep hearing? Close the grille and now go knock on Abby's door. Abby comes outside and invites you to attend the séance.
Cut scene: We see Abby and Rose performing a séance while sitting at the round table in the basement.
Abby "summons" the "spirit" of Valdez. And this one "appears".
After this scene we find ourselves back in Nancy's room. Take a moment to look through her diary. Check the alarm clock to see if it is now 10:15 am. If not, make sure the alarm clock shows this time. Leave the room and now go to the Dining Room via the spiral staircase at the back of the "Abby" hallway. As you walk through the 1st floor hallway, you hear a woman crying. But that comes from that speaker in the ventilation shaft. When you get to the exit of the "Abby" hallway, you will see a shadow running in that direction at the back of the hallway to the spiral staircase. Who was that?. So go to the dining room.
Dining room
Rose is away, so this is a great opportunity to go through her things on the table. Click on the table at Rose's workplace and then click on the items there. Read through all the papers. You will find 4, including 2 from an insurance company. Read it through and also notice the letters on Rose's coffee mug: HCR. Maybe this is important. Do not know. If you have seen this, go to the basement and open the secret compartment in the leg of the round table. Hela, now there are some things in there. Click in the box and you will now see a Smoke Machine, a film projector and a cassette tape. Take the cassette tape with you. Maybe we'll find a cassette recorder somewhere. Close the box and zoom out completely.
"Repair" the Dumbwaiter elevator
It is time, to "repair" that service elevator, as Rose asked us much earlier. So leave the basement and go to that service elevator in the Ground Floor Corridor. Open the hatch and then take the heavy iron from your inventory and click it on the end of the rope in the shaft. The elevator now has a counterweight again and you hear the elevator coming down, but not up to here. Close the hatch and go, via the spiral staircase, to the "Abby" corridor on the 1st floor and click on the hatch of the service elevator, open this hatch and.....Yes...there it is. Then click on the elevator. Click in the elevator and then take out the 2nd tile. Then click on the teacup and draw over the Chinese Character for "Eye"

Zoom out, close the hatch and go back to Nancy's room. You pass that ventilation grille and you hear groaning.
FIRE
Look at Nancy's diary again and read that she thought the séance was fake, and so it was. Turn around to the door and click on the door. Someone slides a letter under the door and then runs away. Click on the letter to read what it says: "Leave the Mansion NOW" it says......someone wants you to get out of here. Go to the sitting room. There, turn to the fireplace and........Oooooooo.....FIRE FIRE.......Don't panic Nancy.......THINK...where was that fire extinguisher again.....quickly.....turn 4 times lLeft and open that cupboard in the corner. Take out the fire extinguisher,.... unfortunately it will disappear into your inventory. Close the cupboard, zoom ou and turn right again. Take the fire extinguisher from your inventory and click on the smoke and then on the burning box on the chair. Luckily, you put out the fire and after this you are in the Dining Room with Rose. Now talk to Rose in detail. So Louis has a client who wants to buy the house? After this conversation, return to the Library.
Library
Louis is still here, so talk to him in detail now. Use all options. After this conversation, Louis has to leave here, but he's not leaving. Well, you know from the "Work Schedule" that Louis isn't here until AFTER 5:00 PM. So quickly go to Nancy's room and make sure that the alarm clock there shows 05:00 pm or 05:30 pm. Then quickly return to the library and when you get there, turn around so that you are looking at the door to the sitting room. To the left and right of this door are bookcases divided into 3 parts. Click on the middle bookcase to the left of the door and you will zoom in on a number of compartments in this bookcase. Click in the compartment under the horse, a book will appear on your screen. It is the "The History of the piano" book. Open it and...well...I should have known that earlier
Close the book, zoom out and turn right and make sure you are on the bookcases to the right of the door. Click on the middle bookcase again. Then click in the compartment with a row of dark red books. Some of these books then slide aside and you see the 3rd tile. Pick it up, zoom out. Well.....where was another place where you saw that 3 tiles were missing?....Think Nancy, think...Oh yes.....here in the library of course. The fireplace.
Turn completely around and click on the fireplace a few times until you zoom in on the spot where the 3 tiles are gone. So place your 3 tiles in the right place here. Nancy will tell you if you click a tile in the wrong place, so this is not difficult. Once you have placed the 3 tiles, zoom out 1 time and then click 2 times on the left "bird's head bar", that is in front of the fireplace.
Oh... did that go too fast... the secret passage closed again before you realized that you had to click in there. Once you have clicked on the "bird bar", you will automatically zoom out of the fireplace and you will see that the rear bookcase in the left corner is open, but because you were too slow to react quickly, this secret passage has already closed again. So try again, I mean click on the "bird bar" again and then click INSIDE the Secret Passage at the right time.
Secret Closet
You are now standing in a kind of secret closet. Click 1 time forward (on the wall in front of you)......Ooooo....did you saw that lever go up. The "door" has closed behind you again. You now see some paintings, but just in front of them you also see a small staircase, leaning against the low wall. There is something on top of that low wall. Click there and it turns out to be a lantern..... Pick it up and it disappears into your inventory. Then move your cursor up to the top of your screen. There is a stone protruding from the "long" wall. Click at that spot. You zoom in on this stone. Click here. The stone goes away. Click in the hole. Hey two peepholes. Click on these peepholes and you will look into the library and you will see that "Mahjong" Table. Zoom out, and click right on the black joint, then left on the opened stone. This closes again. Zoom out completely and then click on the paintings at the back. Then click on the girl's painting at the bottom and draw over the symbol for "Child".

Right click on the lever. You automatically turn around. Quickly, click on the bookcase before it closes again. You're back in the library.
You are now the proud owner of a lantern. So why don't you go into that hole now, under the grille in the basement fireplace. So on to the basement
Basement
Zoom in completely on the grille in the fireplace and open it again with your crowbar. Then click with your lantern in the dark hole and you will be under the house in an underground corridor. Go 1 time forward and then click again 1 time forward but not straight but on the left. You are at a dead end. There is a box/crate here. Click on this crate with your lantern and you will stand on top of it and your head will stick out of the hole. Click 1 time forward, so actually you go up, and you are out of the corridor and.........you are now in a secret room behind the bar of the basement. Click your lantern back into your inventory and then click on the things that are to the right of the narrow stairs. Then click on the brown book...... it's the "El Diablo" book. Read the story about a masked bandit who roamed the "Domingo Baca Trail" between 1875 and 1880 and who was suspected of carrying out the "Great Christmas Robbery". The loot from this robbery has never been recovered to this day. Close the book and then left click on the cardboard from the Chinese takeaway and draw over the King Symbol.

Zoom out and click on the diskette that is on the floor in front of the thermos flask. This will appear on your screen and it is the "Term Paper" diskette. Click on it again and the diskette disappears into your inventory. Click on the crate and a postcard of San Francisco will appear on your screen. Click on it again and you will see the back. Read it. It's a card from Charlie, our charming handyman, to his mom and dad. Click on it and zoom out. It is clear that someone is secretly sleeping here. But who? Click on the stairs and then go 2 times forward up the stairs and then click on the gray door to open it. Click forward and you are in the Ground Floor Corridor. You came through a panel that you willnever be able to open from the hallway. Could Louis still be gone, in the library? Then you can probably insert the diskette you just found into his laptop to see what is on it. So go to the Library.
Library
Click on the desk. Take the diskette from your inventory and click it on the bottom right corner of the laptop. It takes some searching and trying to get the diskette into the laptop. If this is successful, click on the laptop screen. Oh yes, a Login name and a password. Well......you know that one. You've been in this laptop before, through the maze game. And then you found that Code/Password document, under the key icon, and you dutifully copied all those codes and passwords to them, didn't you? .........ANTIQUES. But what would the Logging name be? Well, what about Louis? It is his Laptop after all. So enter Louis and push Enter and then Antiques and again Enter and,,,,,,,,,now you don't have to go through that maze anymore. Click on the floppy disk icon and read through Charlie's Final Papers on the Great Christmas Robbery. It doesn't help you much, but Charlie isn't completely pure either. Zoom completely out of the computer, and go to Abby's room door in the "Abby" hallway
Abby
Abbey is a sleep and what a snorer she is. Well.....what were you thinking.....it's already late at night, so go to Nancy's room and go to the alarm clock. The alarm clock says it is 11:00 PM, so eleven o'clock at night. Click on the ALARM button and then set the time to 08:00 am and press the SET button. RING RINGRINGRING..Good morning Nancy, it's now 8 o'clock early the next morning....no time for breakfast and coffee......Go to Abby, knock on her door and talk to her very extensively. Try to use as many of the conversation options as possible. Once Abby has gone back into her room, you go back to the Library
Library
Open the secret bookcase door by pulling the bird rod of the fireplace again, and then quickly enter the secret passage.
Open the peephole stone here and peek through the peepholes......
....a cut scene starts in which you see Louis take a book from the bookcase and put it in his suitcase.
Suddenly Louis is called and he leaves the library, leaving his briefcase on that chair.
Quickly go through the procedure of closing this peephole, then open the secret door with the lever and go back into the library
NB: You have to do this part from zooming out at the peepholes til searching through Louis' suitcase fairly quickly and accurately.
Otherwise you will be caught by Louis and it will be Game over.
Click 1 time forward towards the door and then turn to the left and click on the suitcase on the green chair. The suitcase has two combination locks, but luckily you know the combination because you have already found it in Louis laptop 4653-4868. So click on the left lock and set it to 4653 in the middle and then put 4868 on the right lock. Zoom out and click on the book in the suitcase. Open the book. It's a Chinese book. You learn a Chinese phrase: "Gum Bo Fu" . Close the book and quickly continue rummaging through the things in Louis Suitcase. You will find some papers that you can read, which will help you discover that Louis is a swindler. He is already in contact with a client to sell the hidden treasures in this house. Then zoom out of the suitcase and close it.
Go to the living room and use the telephone on the desk in the corner to call Emily and ask her anything, including about "Gum Bo Fu". Emily doesn't know what it means, but advises you to ask anyone you can speak to. So go take a tour around the house. First go to the Ddning room and talk to Rose there. She doesn't know. Go to the basement and ask Charlie there. He does not know. Then ask Charlie about anything and everything. Okay, now Louis. But Louis is out.
So go to Nancy's room and do the trick with the alarm clock. Set the alarm clock and press the ALARM button. Then set the ALARM TIME, using the arrows on the right, to 12:00 PM and press the SET button. The alarm goes off and it is now 12 o'clock in the afternoon. So to the library and there is Louis, sitting behind the desk again.
Ask Louis the "Gum Bo Fu" question. Louis wants to know where you got these words from. Well, it isn't wise to tell him you got that from that book in his briefcase, so lie. Tell him you read it in a magazine. Louis then tells you that "Gum Bo Fu" is the name for houses where books were kept. Ask him about Charlie again and end the conversation.
It's about time to go rummage around Abby's room. But for that, Abby has to be out of her room. On the "Duty Schedule" in the dining roomyou can read that Abby is always out between 3 p.m. and 6 p.m. It's probably not even 3 o'clock yet, so go to Nancy's room and do the alarm clock trick. Set the alarm for 3:00 pm and press SET and it will be 3 in the afternoon. Now go to Abby's room. When you are at Abby's door, save your game first, because there is a good chance that once you are in Abby's room you will waste too much time and Abby will come back while you are still in her room. If this happens, it's game over.
Search Abbey's room
Open the door via the doorknob and go 1 time forward into the room. Immediately turn 10 times Counter-clockwise. You will see a chest against the wall. Click on it and open the chest by clicking on the lock. There is a book in the chest. Click on this book. It's the "The Art of Illusion" book. Open it and read it. Close book, zoom out, close chest and zoom out. To the right of this chest you will see a large "painting" on the wall, above that ventilation grille. Click twice on that painting*and the painting will open. Hela.....you are now looking into the hallway through the backside of the hallway mirror. Close the painting and zoom out. Click on that strange shaped cupboard in the corner. You zoom in on it. Then click on the 3 books in the compartment below the photo. The "Zodiac and You" book will appear on your screen. Open it and read it and learn the order of the signs of the zodiac as stated on the right hand page: So this order is: Rat; Ox; Tiger; Rabbit; Dragon; Snake; Horse; Goat; Monkey;Rooster; Dog; Bear.
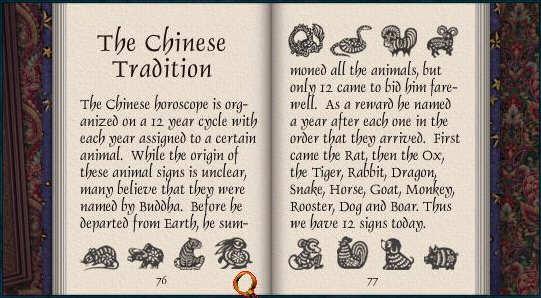
It is important that you know this order because later you will need it to solve a puzzle. Close book and zoom out. Turn rght and zoom in on the "desk". on the "desk" is the "Fortune Telling" book. It's not really important. Zoom out and then click on the drawer under the desk. Open the drawer and click on the "bar". Oh, it's not a bar but a package of Chinese Incense. You will see the Chinese Character for "Moon" on it, so copy it.

Close the drawer and zoom out completely and then turn all the way clockwise until you see the table to the right of the bed (nothing of importance can be found in the chest of drawers). Click on this table and then on the book. It's the "Old West Romance" book. Open it and read through the "Lizzie Applegate and the Bandit" story. Close book and zoom out. Now turn 5 times clockwise, you turn past the large cupboard and you see a shelving unit containing the stereo system. Click on the middle shelf and you zoom in on it. On the left of this shelf is a jewelry box. Zoom in on it and open the jewelry box and take out the Spider Brooch. This disappears in your inventory.
Close the jewelry box and zoom out twice. Turn 3 or 4 times left and you look at the large standing closet. Zoom in on this closet and then on the lock. Click the Spider Brooch on the lock and the closet will open. Wow.....that's a nice installation. There are monitors on the top shelf, a sound system on the middle shelf and a large cassette deck on the bottom shelf. First zoom in on the bottom shelf. Take the cassette from your inventory and click it on the right screen of the recorder and then click on the red button below it. ......so that's the "Ghost" of Valdez.
Take the cassette out of the recorder again, zoom out and zoom twice in on the middle shelf. Play around with the numbered white buttons for some "spooky" sound effects. Then zoom out, close the closet and zoom out. Turn back to the "Stereo" cabinet and zoom in on the jewelry box again, open it and place Abby's Spider Brooch back in the box in exactly the same place where it was in this box. Close the box, zoom off completely and get out of Abby's room as quickly as possible.
NB: I have described Abby's room in detail above, but because there is a good chance that Abby will return before you have been able to look ateverything I will tell you that you can skip most things in Abbey's room. What's really important in Abby's room is finding and reading "The Zodiac Book" and finding the Moon symbol and finding the Spider Brooch to open the cupboard so you can listen to your cassette in Abby's recorder. If Abbey returns to her room while you are still there then it is GAME OVER
You made it and got out of Abby's room in time. Go to the Dining Hall. Rose is there. Talk with Rose and she will now tell you that you will soon be all alone in the house, because everyone else will be gone. Rose also tells that she has removed a tapestry from your room and that someone has delivered a letter for you. Rose left this letter in your room. End the conversation and go to Nancy's room
The Puzzles in Nancy's Room:
Back in Nancy's room go to the table where Nancy's suitcases are on. There is now an envelope on the chair to the left of this table. Click on the chair and then on the Envelope. Open the envelope and read the note. It is from Emily and she gives you the translation of "Gum Bo Fu", so it means: "Gold Treasure Mansion". Look at those 3 Chinese characters at the bottom of this note. Draw the left most symbol over..... This is the Symbol for Gold.

Then zoom 3 times out and then turn 6 times left. You then look into the corner to the right of the bed.
There was a tapestry hanging there before....Oh yes...Rose removed that.
Click on the wall in this corner and then click on it again and then click on the bottom panel.
Zodiac puzzle
Well, now you know why you had to read through that Zodiac book in Abby's room. On the panel you see all 12 animals from the Zodiac. You now have to click on them in the correct order and this is the order as mentioned on the right page of the Zodiac book. I hope you had enough time to write that part out, if not.........Number the animals, from top left to bottom right, as 1 to 12 and then click on them in this order: 11, 7, 1, 9 , 10, 6, 8, 2, 5, 3, 12, 4. The panel slides open and the safe appears behind it. Click on the safe's dial.
Safe puzzle:
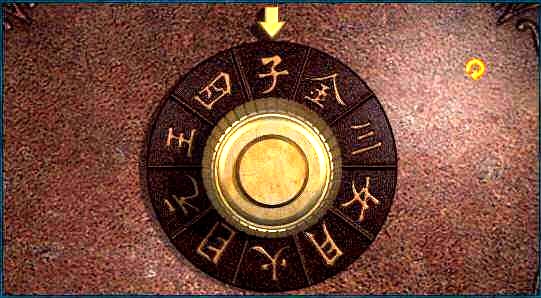
You see a dial and it has 10 Chinese Characters. You have also found all 10 of these characters during your wanderings through the house. You also see an arrow, and a thick button in the middle of the dial. This button resets the puzzle if you make a mistake. Now place your cursor, left or right, on the edge of the symbol dial. Your cursor will then become a curved arrow. If you then click, the symbol disc will rotate 1 click and the next symbol will be below the arrow. If you do this on the left side, the dial turns counter-clockwise, if you do this on the right side, the disk turns clockwise.
You now have to place the correct symbols under the arrow by turning the dial and then clicking on the arrow. Then turn the dial again until the next correct symbol is under the arrow and click on the arrow again. You must place each of the 10 symbols under the arrow and then click on the arrow, but this must be done in the correct order.
What is this correct order? Do you remember, here in Nancy's room, that tapestry to the left of the room door? Doesn't that have that poem from the Daughters on it? In that poem, all these 10 Chinese Characters are mentioned in a certain order. Well, in that order you now also have to put these 10 Chinese Characters under the arrow here. I hope you have drawn all these Characters. Well here they are again, and in the correct order:
Child |
2.
Begin |
Daughter |
Four |
5.
Eye |
6.Fire |
7. Moon |
8. King |
River |
Gold |
Child; Get started; Daughter; 4, Eye, Fire; Moon; King; River; Gold. Click on the ARROW again AFTER each Symbol
...the Safe opens. It's Lizzie Applegate's safe. There are some things in there.Click in the safe and look at the stuff, but save that pyramid on the right for last: you will find: A note from "El Diablo" A note from DIEGO, An testament. A jewelry box that you can open. A marriage certificate and a PYRAMID. Once you have looked at the other items, click on the PYRAMID
The Pyramid puzzles:
You will see a recess in this side of the pyramid. Click on it and Nancy says that "something's missing here." Well, doesn't the shape look familiar to you? Doesn't it look like that wooden "buckle" you took from the Scroll from the Balustrade of the balcony? Take that "bucle" from your inventory and click it in the recess on the pyramid. The Pyramid turns over. Oh....is that a puzzle?
Pyramid Moon puzzle
You see the 2nd side of the pyramid. Click on the "moons". Well, doesn't that Daughter's poem on the tapestry say that the Moon has to go "to sleep" so that the Sun can rule again? So you need to change these 16 moons into 16 suns. There are 16 moons in 4 rows of 4 moons. Number the rows, from top to bottom, as 1 to 4 and within a row you count from left to right. Then click: In row 1 on moon 3, In row 2 on moon 1, In row 3 on moon 4, In row 4 on moon 2. The moons turn and become suns. The suns turn and become moons and then suns again and then thePyramid turns again and you see side 3 of the Pyramid.
The Sliding Puzzle:
.....another puzzle: Click to zoom in. It is an ordinary sliding puzzle and you have to make the image of the Phoenix bird.
It's not difficult, but it is difficult. This is how the bird should be:
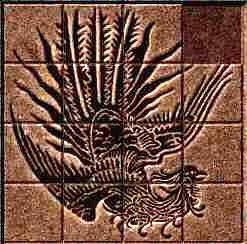
If you succeed, the entire pyramid will open and a red jewel will come out and it will disappear into your inventory. Zoom out, close the safe and then zoom out 3 times. Leave Nancy's room and go down the stairs at the back of the "Abby" hallway (again you will see a shadow flash away). Go through the Ground Floor Corridor door into the Central Hall.
Click forward and then turn completely around so that you are looking at the stairs. You are then looking at the door under the balcony. Now click on the left stairs and then on the left "Bird Head" post. Zoom in completely on this Bird's Head and then place your red jewel in the eye socket....and.....a beam of light now appears and it points to that mosaic in the middle of the hall floor. Click on that mosaic to zoom in.....it is .the Phoenix bird. Click on it and Nancy says for the umpteenth time that it is broken...Now Save Your Game here
End game in the Central Hall
You have to act very quick in a moment.
Take the crowbar from your inventory and click it on the Phoenix bird on the floor. Oh.....Gold.....Nancy has found the treasure, but then.......Nancy gets knocked down. Your screen goes black for a moment and then Nancy comes to her sences and sees who the villain is... it is Louis..... You must stop him. Now you must act quicly. Click on the stairs on the right (this is the left stair, but it is now on the right from Nancy's point of view) Go 5 times forward, all the way up these stairs and you will reach the balcony. Go 2 times forward and down the other stairs a bit. Then click to your left on the wall with the paintings where the rope is attached to that plank. You zoom in on that plank.
Click on the rope. The Large Chandelier on the ceiling above Louis' head now drops slightly.
Click on the rope again. The Chandelier drops another bit.
Click on the rope again and......The Chandelier hurtles towardsLouis and.......
.... well.....Nancy has brought another case to a successful conclusion
NB: Try this endgame again, but then if you go to that rope via the other staircase, i.e. the "CRACK STAIRS" and see what happens then...
The End
2003: Original a Dutch Walkthrough by: Louis Koot
2024: This English translation also done by Louis Koot