
2020: Walkthrough by: Louis Koot
If you have found this walkthrough via google search or via another site then you have probably not visited my site.
A lot more very detailed game walkthroughs can be found on my site at: www.pcgameswalkthroughs.nl
Chapter 1: Lilah's Dream:
The Office:
A: Atlas Face Bureau:
Here the world seems to be turned upside down, and that is literally the case, because here you walk over the walls and the ceiling is the ground, etc. You are welcomed with a speech from the Bureau Chief. The Bureau Chief welcomes you to the "Regional Administration Facility" and he says to come to him immediately. The Bureau Chief tries to roll out a bridge towards you. This fails because the bridge gets blocked against a large statue of Atlas, who bears a globe.

So the bridge is broken. Now it is up to you to repair the bridge, because you have to go to the Chief. However, you have entered a totally bureaucratic world, so you have to do everything according to the bureaucratic rules, or as the Bureau Chief has said "You have to go through the Proper Channels". So you are in Lilah's dream, which she told about in the video you watched in the PDA.

You are high above the "office" of the Bureau Chef. In fact, you are on a lift. So look down and you will see the red lift button.

Press the red button to go down with the elevator and to land on the "Bureau Atlas Face".

The "Bureau Atlas Face" is in fact the "Ground Floor" of the bureau.

Right in front of you is the huge Atlas statue. Atlas carries the globe on his neck. The Information Desk is in front of Atlas. Go forward to the Information Desk. There is a monitor behind the Information Desk. Click on the monitor. The monitor emerges. The monitor is a so-called Vidbot. Read the message on the monitor. So do what it says and press the bell on the counter, or click on the monitor again. The receptionist's mouth appears. Listen to the announcements from the mouth.

The receptionist tells you that you must repair the bridge and she also says that there is probably a Booth here that can help you further. After that you have to go to the Bureau Chief as soon as possible. To the left and right of the big Atlas statue are the various other booths and in each booth there is a Vidbot that may be able to help you with more information. Below the information desk you will see a series of strange symbols. Those symbols are the Obsidian form of our alphabet.
Learn the Obsidian alphabet:
Turn right. In the corner, you see a red door and you also see the HINTS booth.

Aim the yellow arrow at the red door and then move forward 3 clicks.
You go through the red door and you are in a small room with a table. There is a Book on the table.

Click on the book. The book opens and a Mexican guitarist emerges from behind the book. Click on the guitarist.
The guitarist starts playing a tune and at the same time the letter A appears in its Obsidian form on the right page of the book.

Click the right page to turn the page, then click the guitarist again and watch the Obsidian B form. Continue in this way to see the entire alphabet in Obsidian form. Draw all the letters on a piece of paper, because you will have to be able to recognize them later. The alphabet therefore has 26 letters, A to Z, so you are busy with this. Are you ready, so when you get to the Z, click the blue turn arrow to turn around to the red door. The door is still open. Go forward 2 clicks. You are then 1 click away from the information desk. Turn clockwise 2 times. You look at the red door again and at the HINTS Booth.

We are now going to visit the various booths to the left and right of Atlas. There are 10 booths, 5 to the left and 5 to the right of Atlas. A Vidbot is present in all booths. Most Vidbots will only tell you nonsense, but there is 1 Vidbot that will give you the "Bridge Repair Form" and tell you what to do with this form. Finding the right route can be very confusing here. That is why I made a drawing of the arrangement of the vidbot booths.

So we start with the booths on the right side of Atlas. Most of these booths contain hilarious videos about Vidbots in the different sections of THE OFFICE. Don't miss the reference to MYST in Sources Booth and the squabbling Vidbots in the Mediation Booth. The front right Booth is the Hints Booth Go forward diagonally left to the:
Hints Booth:

You can supposedly ask the Hints Vidbot for hints. However, it is all total baloney what the lady in the monitor tells you. Anyway .... if you like to play with the Hints Vidbot, click on the monitor. The lady in the monitor then asks if you want a hint. Click the Yes or the No button. Again ..... it is of no use to you, because the Vidbot only fools you. You can endlessly click on the monitor and the Yes or the No button to be tricked by this Vidbot again and again. When you have had enough, click on the bottom left or bottom right with the yellow back arrow to leave the Hints booth. You see the red door again. Now turn left, using the blue arrow on the left edge of the screen. You will then see that you are now standing right in front of the information desk and you will see a gate.

Go forward 1 click. You go through the gate door and then stop again. You can turn further forward or clockwise to the Sources Booth and the Travel booth

Turn right, using the blue arrow on the right edge of the screen. You are then exactly between the Sources Booth and the Travel Booth.
The Sources Booth is the right booth and the Travel Booth is the left booth.

Sources Booth:
Go forward diagonally to the right into the Sources Booth. Click on the monitor of the Vidbot and ... well ... this is the makers' joke about MYST.
You see one of the sons of Atrus, I believe it's Sirrus, who screams that he needs the Yellow Page.

This is also completely nonsense. So step back and then enter the Travel Booth diagonally to the left.
Travel Booth:
|
This is the "travel agency" of the Office. A rotating cube appears in the monitor of the Vidbot. The cube is the Office version of the Globe.
Click on the rotating cube and .... the "tour guide" will tell you about the various departments of the Office. You have to click on the cube 6 times. You then know that the Office has the following 6 departments
When you have heard all this, step back and turn left again. Then go forward 1 click again. You are then at the very back and cannot go any further. Turn right again. You see the Productivity booth and the Operations booth.
Go diagonally right to the: |
Productivity Booth:
This Booth is also completely nonsense. The message "Touch Screen To Start" appears on the monitor.
So click on the screen and .... You can then play a game of PONG.

Grab the blue bar and move it across the screen and bounce the red and blue balls back.
Well ... have fun with it ... it's completely useless. Step back and then go diagonally left to the
Operations Booth:
Numbers appear in the monitor. Touch the monitor and ... you see a weird guy with a weird hat on his head asking if you didn't find the dream fascinating.
You will run into this guy later because this is the Conductor.

Step back to leave the booth. Well ... these vidbots booths on the right side were all big jokers .
You stare at the back wall again. Turn left. You will then see the 3 rear booths on the left side.

Go forward 1 click. You come to a stop exactly behind Atlas. Turn left and then look up via the blue up arrow.
You now see Atlas in its full glory and you now also see various other departments of the Office.

Look down again and turn right and go 1 click forward to the Mediation Booth and the Bridge Repair Booth.

The Mediation Vidbot talks complete nonsense again, but if you want to be fooled again, you can activate that Mediation Bot.
The 2 Vidbots in Mediation only fight and eventually shoot each other.

You have to enter the Bridge Repair Booth because the Bridge Repair Bot explains what you need to do to get the bridge repaired. So enter the Bridge Repair booth.
Bridge Repair Booth:
A road barrier will appear on the Vidbot's monitor

There is a printer on the right below the monitor. Click in the monitor screen and you will receive instructions from the male mouth.

These instructions are printed out on paper.
The Bridge Repair Vidbot prints a form for you and tells you that you must get that form stamped in the Department of Pre-Approval, in the Security Face.

So take the printed "Bridge Repair Application 3A-7/4" form from the printer.
The form will be stored at the bottom of your screen and will remain there until you need to use it.

NB: in the English version of the game you will get another document from the Bridge Repair Vidbot here and then you must search for the "Repair Request 3A-7/4 " form yourself in the Archive, the Record Face. The Vidbot will tell you that the Bridge Repair Request 3A-7/4 form is filed under "Standard Damage" in one of the filing cabinets in the Archive. For some dark reason the German version has chosen to give you the "Bridge Repair Application 3A-7/4" form now, so you don't have to do the puzzles in the archive
Exit the Bridge Repair booth, turn left and go forward 1 click again.

Right in front of you is the gate, but on the right you can visit the Reception booth and the Office Hygiene booth.
However, both are completely bland, but if you like it then turn clockwise.

Reception Booth:
On the right is the Reception Booth. Activate the Reception video bot and watch the dance in the monitor.

When the dance is over, you can click on the monitor again. You will then see an explanation of cell division.
Hygiene Office Booth:
In the Hygiene Office booth, the guy in the monitor is obsessed with a stain on the inside of the monitor and is trying to polish the stain, which he is unable to do.

Rebel Control Booth:
Continue forward through the gate. On the right is the Rebel Control Booth, but this Booth is also totally nonsense.
But you can answer the questions of the guy in the monitor with Yes or No.

B: The library

Straight ahead is the upside-down Library. Because everything is reversed here and upside down, you see the floor of the library deep below you.
Go forward 1 click. You then walk over a ladder in the cupboard wall of the library and then have to go further down to the floor.

However, first turn to the left. 5 blue books protrude from the front bookcase. Click on the 5 blue books with the blue hand cursor to drop them.

Turn right again and go forward 1 click and you are on the floor of the library. Turn left. You look through the library.

Go forward 1 click and then diagonally forward left. You are again in front of a ladder, which is between the left bookcases.
Move the cursor up and then click with the blue up arrow and ..... Your screen tilts as you climb up the ladder.

Climb further up to the top of the ladder. The screen tilts again. The Atlas Face is now the right wall.
Right in front of you see a box and deep below you see the floor of the Security Face.

That loft, which you see right in front of you, is a lift. Enter the elevator and then turn right.
You are now in the elevator and in front of the red elevator button.

Click the red elevator button and .... you go back to the Record Face, the Office Archive .:
Record Face
Turn left. You will now see the filing cabinets to the left of the elevator in the archive. A computer terminal is attached to the top side of the 2nd filing cabinet.
The screen is tilted again, so the gray wall behind the filing cabinets is the floor of the Security Face.

You must get the "Bridge Repair Application 3A-7/4" stamped for approval and you must do that at the Department of Pre-Approval, but where is that ?. From the elevator, go 1 click forward to the 2nd filing cabinet. Then turn left and ... you will see a red slide on the wall. This wall is the NEXUS, or the intersection from which you can go to the various other departments of the Office.
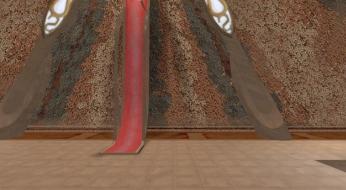
Go forward to the red slide. You are then right in front of the red slide.
Click with your yellow forward arrow on the slide and ...... you should now insert CD 2 in your computer.

So take CD 1 out of your computer and put CD 2 in it. Then click OK to continue.
After loading CD 2 you automatically go up the red slide. The screen is then tilted again. You're at the:
C: Nexus:

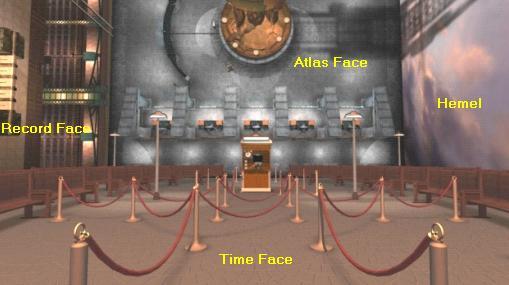
The Nexus is a large turntable with a large lamp in the middle. Go forward to the lamp. The Nexus acts as a crossroad.
Via this NEXUS you can therefore go to the Record Face, the Security Face, the Time Face and the Starry Sky, because you can rotate the Nexus.

There is a lever in front of the lamp. You can push the lever to the left and pull it to the right. When you push the lever to the left, the Nexus turns 1 turn clockwise. If you pull the lever to the right, the Nexus always rotates 1 turn counterclockwise. To push or pull the Handle, grab the handle with the blue hand cursor and then push the handle to the left or pull the handle to the right. By rotating the Nexus, you aim the red slide to another section and you can reach that department via the red slide.
Do nothing for now, but now, using the blue arrows, first turn a few times clockwise. You will see that you can now only return to the archive from the Nexus. However, you should now go to the Security Face. So grab the lamp handle and then pull the handle 1 time to the right and .... The Nexus turns 1 time counterclockwise. Behind the lamp you will see a wall with benches. That is the Time Face department. The Archive, so the Record Face, is now to the left of the lamp.

Turn now, via the blue arrow, 2 times left, or right, around and ... below you now see the glass cubicles of the Security Face.
At the bottom center of your screen you will see the red slide, to slide down to the Security Face

Now click twice with the yellow forward arrow on the red slide and you slide down and while you slide down the screen tilts. You end up in the:
Security Face department:

You are welcomed by a Vidbot. The Vidbot tells you that you have to go to the Department of Pre-approval to have your form stamped there.
The Vidbot offers you a number of entrance tickets.

Click on the entrance tickets to grab them. At the bottom left you have 2 blue, 2 yellow and 2 red entrance tickets. You are standing here in Box 2. On the left is cubicle 1 and on the right is cubicle 3. There are a total of 9 cubicles. The Vidbot disappears again. Turn right and then go forward 1 time and ...

.........you walk past booth 3 and you turn left around the corner and you come to a stop in front of the entrance of cubicle 3.
Turn left. You can see the glass entrance door of cubicle 3.

On the right is the Ticket Machine where you have to insert the entrance tickets to get to cubicle 3.
Go forward to the door of cubicle 3.

These glass cubicles are yet another variant of the well-known maze. The Security department consists of 9 glass cubicles. You are now at the entrance of cubicle 3. You have to go through the all 9 cubicles to end up in cubicle 7 because there you must get the "Bridge Repair Application 3A-7/4" stamped. Cubicle 7 is the Department of Pre-Approval. However, you need 3 BLACK entrance tickets to enter that cubicle 7.
So now you have to go through the 9 maze cubicles via a certain route to collect those 3 black entrance tickets. Ticket machines are located at the doors to the next cubicle in each cubicle. You always need the good entrance tickets to enter the next cubicle. But the ticket machines also give you new entrance tickets back. By following the correct route through the cubicles you will exchange entrance tickets and you will eventually have 3 black entrance tickets with which you can then enter cubicle 7
In each cubicle there is a Vidbot that you can activate and then listen to the nonsense that he, or she, tells. However, I would not do this at first, because I first go through the cubicles via the correct route to cubicle 7 to get the "Bridge Repair Application 3A-7/4" stamped. Once the form has been stamped, you can still go through all 9 cubicles to activate the vidbots. So you start at the entrance of Booth 3. If you click on the ticket machine with the yellow forward arrow, the correct cards are automatically inserted into the machine and the door opens.
The correct route to follow through the cubicles is on this MAP that I have made of this cubicle maze

So the correct route is: 3, 6, 5, 8, 9, 6, 9, 6, 9, 6, 9, 6, 9, 6, 5, 2, 1, 4, 1, 4, 7
To enter cubicle 3 you need 1 red and 1 blue access cards. Click with the yellow forward arrow on the ticket machine and ....
automatically 1 blue and 1 red card are inserted in the machine. However, you receive 2 yellow cards in return and you end up in Cubicle 3.
You have now had the first part of the route: 3, 6, 5, 8, 9, 6 and so you are back in Cubicle 6. Now you have to go 4 times between cubicle 6 and cubicle 9. So from 6 back to: 9, 6, 9, 6, 9, 6, 9, 6. This will cost you 1 blue card, 1 yellow card and 1 red card each time, but you will always receive 1 yellow, 1 red and 2 blue cards back. If you have been back and forth 4 times between cubicle 6 and cubicle 9 then you are back in cubicle 6. Then follow the blue arrows route, like this
Back in cubicle 4 then go forward to the ticket machine in cubicle 7. You will see that you need 3 black cards to enter cubicle 7.

Well ... you now have 3 black cards, so click on the ticket machine and ... you end up in cubicle 7.
Cubicle 7: Department of Pre-Aproval:

Go to the vidbot in the stamp booth and click on the monitor.
The vidbot welcomes you and then takes your Bridge Repair form and then stamps the form.

The vidbot then tells you to bring the stamped form to the "Immediate Action" department in the Time Face department.
Step back and turn left.

Then exit cubicle 7 through the glass door. Then turn left and go forward 2 times and then left around the corner.

You are then back at the starting point, in front of cubicle 2. Turn right. You are back in front of the red slide. Go up the slide to the Nexus lamp. So you see the Time Face department behind the Nexus lamp. It is the wall on which you see the brown benches. You must now turn the Nexus so that the Time Face department is right behind you. So grab the Lever and then pull it to the right 2 times. The Time Face department is then right behind you. Right in front of you is the Security Face.

So turn around and go down the red slide to the:
D: Time Face department:
At the back of the room is the "Immediate Action" booth. Aim the yellow forward arrow at the booth and then click and ..... you automatically go between the ropes to the booth. There is of course another Vidbot in the booth. On the left behind the monitor you see a number of clocks and you also see that all those clocks are stopped. Click on the monitor to activate the Vidbot.

The Vidbot takes the stamped form and finds it in order. The Vidbot initially says the bridge will be repaired immediately. But then the Vidbot says that the Sun clock is broken and that you have to repair the clock. The bridge can only be repaired when the Solar Clock is running again.
Turn left. You see the archive and get the oblique yellow right arrow.

Click and .... You walk counterclockwise past the loft to the rear and you are then facing the:
|
Solar clock puzzle
The solar clock is stopped and you need to get it running again. The clock has 3 rings, the Sun ring, the Moon ring and the Earth ring. On the left is a large lever. Pull the Lever and ..... The clock starts to run, but the whole thing is going wrong. The Sun, Moon and Earth collide and that is not the intention.
There are dots around the buttons. Those dots are the hours. Below the thick rotary knobs you see the small Reset button with which you reset the buttons and the clock to the starting position. Click the Reset button to return the puzzle to the initial position. All 3 buttons are then pointing up, so at 12 o'clock. Then do the following:
The 3 rings are then like this:
Click on the big lever again and ...... If you have done it correctly you will hear music and the 3 rings will rotate without the Sun, Moon and Earth colliding. If you have done it wrong, the rings collide again and you have to do the puzzle again. Reset the buttons with the reset button and try again. |
When you have the Solar clock running correctly again, turn right and click diagonally left and then just left. You are then at the front of the Vidbot booth again. The hands of all the clocks in the booth are now rotating very wildly, which is not a good sign. Click on the monitor again and ..... the repair guy appears and then ..... he ...... isn't that Max..........

Max tries to tell you something but he quickly disappears again and the Vidbot talks to you again.
The Vidbot takes your document again and is very happy that it is correctly stamped and ensures you that he will do everything he can to get the bridge repaired now. Unfortunately there is one small problem ..... the repair service has a large backlog, so for the time being the bridge cannot be repaired. It's best to come back in about a year or so. Shit .... have you put in all that effort for nothing? Turn right and ...... you will hear a woman's voice asking you to meet her at the LIGHT. Which light? Well ..... at least you know of the existence of one light, namely the NEXUS. Turn right again and go back to the red slide and then back up to the:

Nexus:
Go back up to the lamp and ... you hear the female voice again, The woman tells that she can tell you how to get to Max. However, you must turn the light OFF to see her. Grab the Lever and then pull it to the right 2 times to turn the Lamp 2 times counterclockwise and ..... The Lamp will go out and the woman will appear. The woman says that besides the bridge and the Nexus, there is another way to reach the Chief of the Office. The woman says that behind you there is a telephone with which you can call the Chief of the Office and she also shows you the telephone number.

The woman then disappears again. Grab the lamp Lever again and then push it 3 times to the left, so the Lamp will turn 3 times to the right. The lamp is then on again and you will see the Archive behind the lamp again. Now turn around completely, via the blue arrows on the edge of the screen. The Lamp is behind you and you now see the Star Sky.

At the bottom of your screen is now not a red slide but a red Bridge.
At the end of the red bridge, the Telephone will hang. Go forward 2 clicks across the bridge. You end up in the:
|
Telephone puzzle
On the left you see 3 oblique rectangular boxes. On the right you see a red button with 3 circles above it. If you click in the 3 circles you put numbers in it. In the circles you have to put the phone number that the woman showed you. So click in the circles to place the numbers 9, 3, 4 from left to right. A cube will then appear on the screen. The cube will unfold completely and will be divided into the 3 "boxes".
|
Balancing Rock:

You see a thin elongated rock that balances on the tip of a large rock. You also have the "hand". With this hand you can tilt the big pointed rock. Before you do that, first turn around. You see the "door" and you see that it now gives access to where you just were, the NEXUS.

Turn back to the rock again. So you can tip the large pointed rock on which the thin elongated rock balances on with your hand cursor. For example, place your hand on the bottom right of the big rock and then pull the cursor to the right and ..... the big pointed rock then tilts to the right. Turn around and see ..... the "door" now gives access to another part of the Office. So by tilting the rock, you are actually tilting the entire desk. Tilting the rock gives you direct access to another part of the desk. Turn back to the rock. Now put the tip rock again with the tip up. Then place the hand on top of the tip of the rock, on which the flat rock balances, and then pull the hand cursor down and ..... you now pull the rock FORWARD, so towards you.

So the rock falls forward. Turn around and see ....through the "door" you can see just 1 point of the orange star of the star sky at the bottom.

Now go forward 2 clicks through the door. You are then on the Universe.
So you are in fact facing an abyss here. Directly below you see the floor of the Security Face. Turn right.

You will then see the red slide of the Nexus. Go forward 1 click and turn right. You see the tilted Time Face and the left tip of the gold star.

Go forward 1 click and turn right again.
You are now directly in front of the left side of the gold star and you see the bridge above the Atlas Face department.

Go forward and ..... the Chief of the Office appears in the golden star but .... unfortunately .....

The Chief of the Office must twist his "head" very strangely to be able to look at you, because you are in fact on the back wall of his office. So you have to get on his floor. So it is still not good. Turn around via the blue turn arrow and then go 1 click forward to the red slide. Then turn left and go 1 click forward to the corner. Then turn left and go forward 2 clicks. In the right corner you will see a Gate.

Go diagonally right forward to the gate. You end up behind the gate, so turn left. You are now right in front of the gate. The gate is a ladder. Move your cursor up to get the blue up arrow. Then click to stand on the first rung of the ladder. Your screen will now tilt slightly and you will get the yellow forward arrow. Click forward and .... you are now going forward cross the ladder and when you stop the screen tilts again. Move the cursor on the screen until you get the yellow oblique left arrow.

Click forward and .... you will now walk around the ladder and you will end up on a narrow ledge.

Click forward and ..... Oops ..... you almost fall down .... You can't go any further here. You're on the wrong side of the ledge. Turn 2 times counterclockwise because you have to go back now. When you are turned around you will see that you are in fact above the Rebel Control Booth. Only you now see the Vidbot from above.

Go forward 1 click. You end up on the ladder again. Walk back over the ladder, via the yellow down arrow, and when you have stopped again, climb further down via the blue down arrow. You are then back on the floor. Well .... this was the wrong ladder. Turn left and go diagonally right 1 click forward. Then turn right. You now look across and see the Time Face again. On the other side you now also see a fence / ladder in the corner.

Go forward. You automatically go all the way to the other side. When you stop again, turn right. In the left corner is the ladder.

So go diagonally left to the ladder in the corner. Then turn right again. You are now right in front of the ladder.
Click the blue up arrow and then click the yellow forward arrow and ....
you hear triumph music and you automatically walk a long way over the ladder.

When you have stopped again, the ladder is tilted again. Now find the diagonal right arrow and then click to walk around the ladder again.
You are on the gray ledge again, but now on the other side.

Go forward 1 click and ... now you walk on the ledge.
At the highest point you come to a halt and ... you hear the Information Vidbot below you. Turn right.

You see the Nexus. Look down and ..... the Information Vidbot is angry with you because you are on top of her.
You now also see Atlas, which is now on its side.

Look up again. In the middle of the screen you get the yellow forward arrow to the Nexus. Click and .....
...... you walk on the Information Vidbot, which is getting even angrier. Go forward again and ... You are now walking forward over Atlas

You end up on top of the Globe of Atlas. Go forward 1 more click and ..... FINALLY ..... you have reached the Bridge.

Cross the bridge to the:
Chief of the Office:
The chief is angry with you because you've not acting according to bureaucratic rules to reach him. The Chief of the Office will go all out for a while, but because an Office Chief also gets his orders from above, he lowers a film screen and you see a video with Max. In fact you are looking inside Max's brain.

When the movie ends, you will be in the second REALM of Obsidian and that is:
Chapter 2: The Spider Realm, Max's dream.
2009: Original Dutch Walkthrough by: Louis Koot
2020: English translation by: Louis Koot


