
2017:
Walkthrough by Dick Leeuw en Louis
Koot
Text Dick Leeuw. Screenshots by Louis Koot
2018: Walkthrough by: Dick
Leeuw and : Louis
Koot
If
you have found this walkthrough via google search or via another site then you
have probably not visited my site.
A
lot more very detailed
game walkthroughs can be found on my site at: www.pcgameswalkthroughs.nl
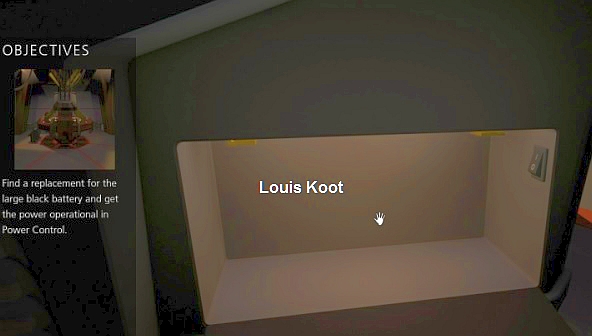
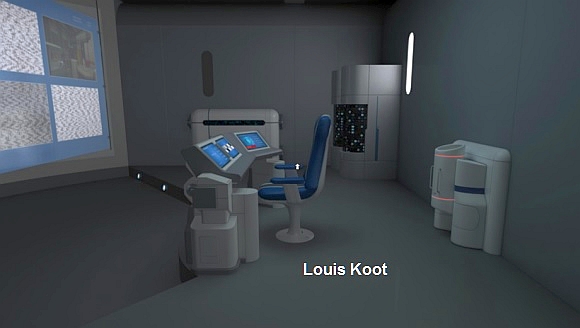
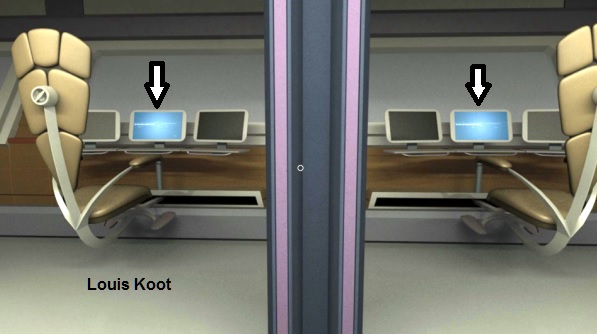
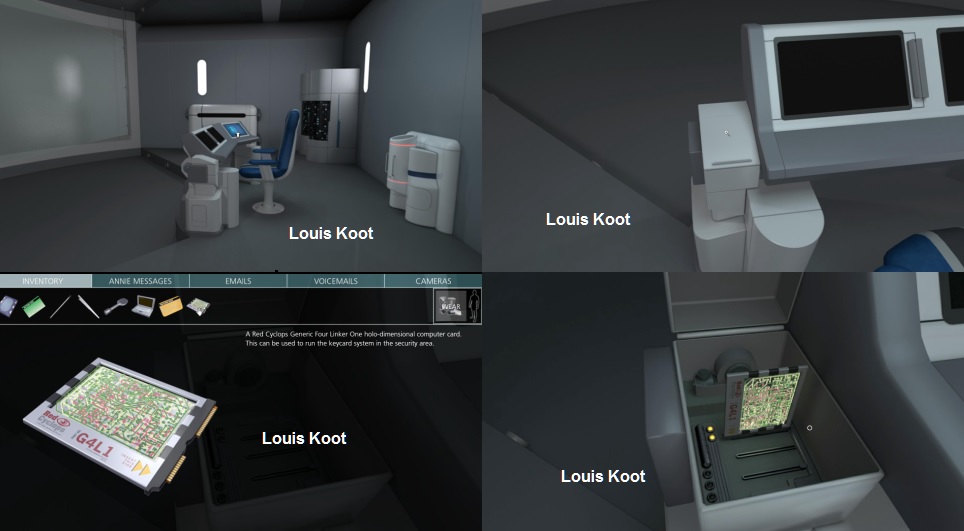
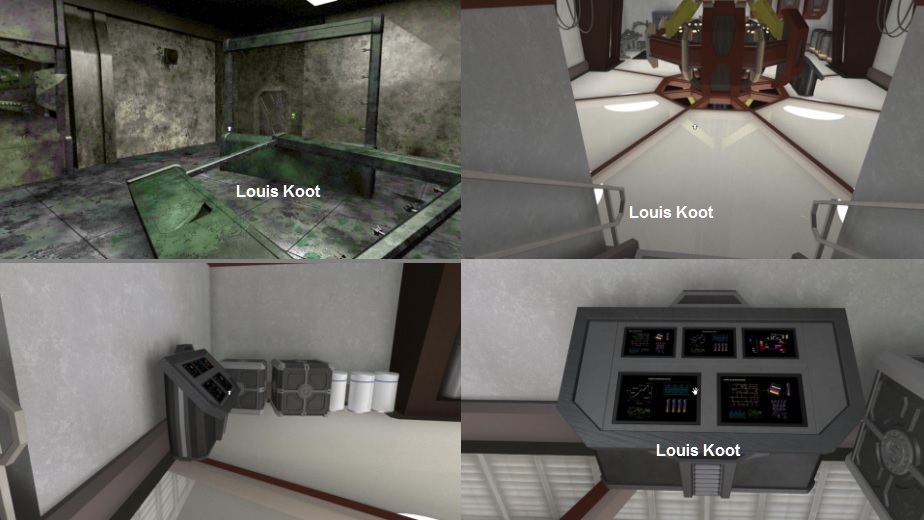
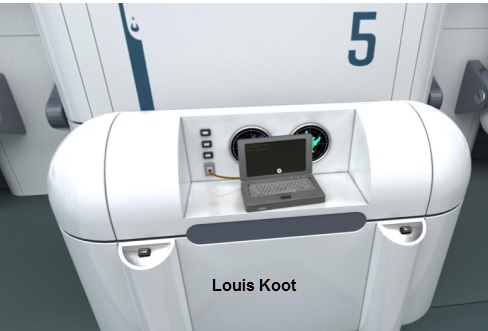
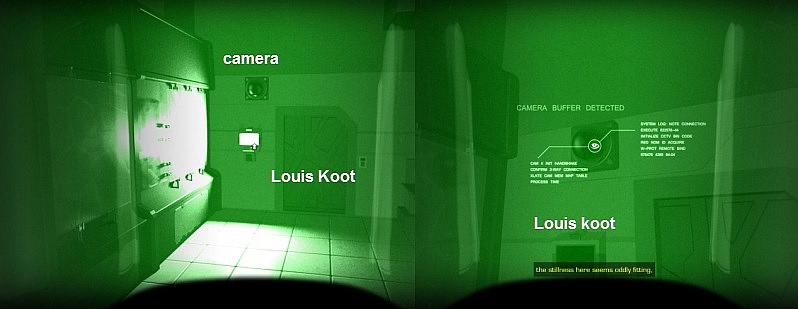
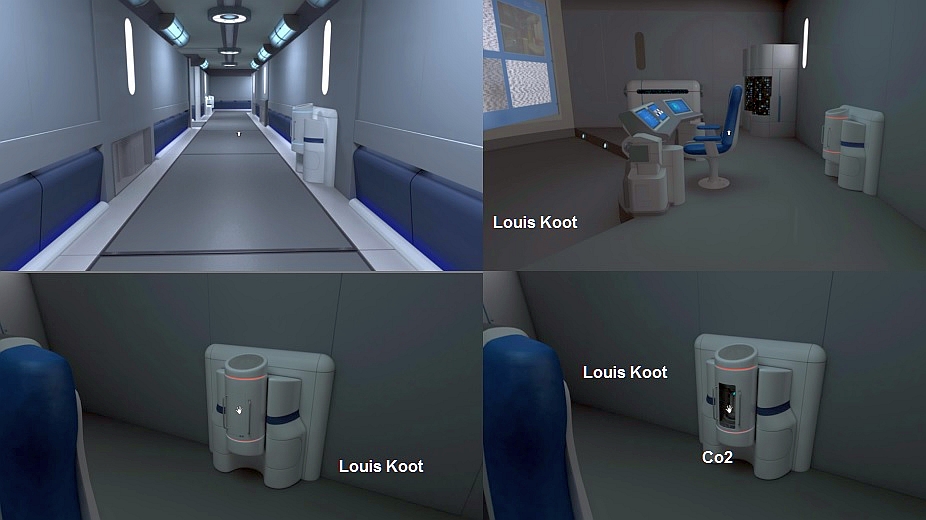
Sickbay
After
starting the game you choose new game, you get an introduction movie. If you
have control again you are in the sick bay of the spaceship, you see a message
about "press F1" for help with the controls. You see in the corner on the right
a number of devices including a computer and a hologram projector, both do not
work because there is no power.

If
you move your mouse over the projector you get a hand cursor, interaction is
possible. You can click on the glass of the projector and the glass will rise
If you click on the clamps you get the message that the clamps are tight, they
do not go loose. You need an instrument that you still have to find.
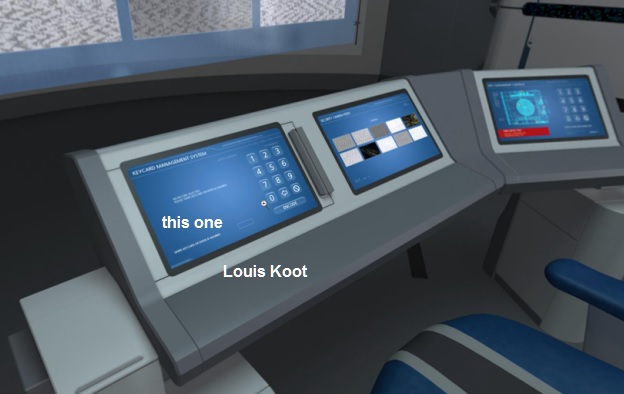
When
you are zoomed in, go to the bottom of the screen to zoom out. You can zoom in
on the computer but now you get the message that there is no power on it.
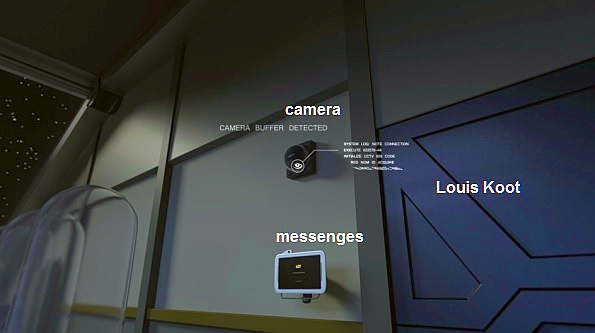
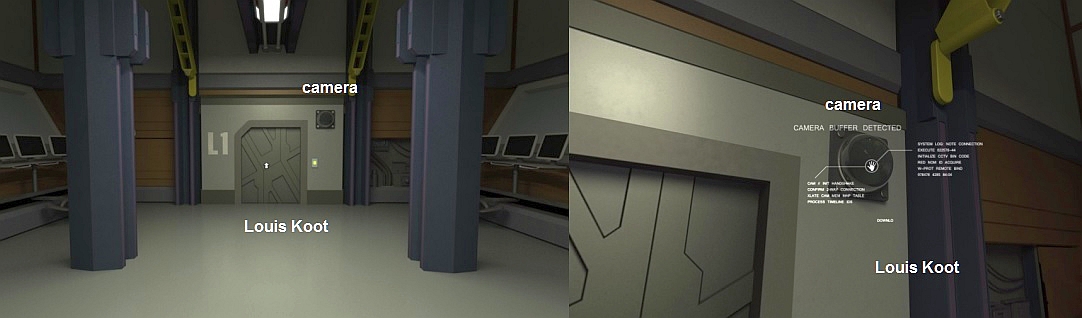
On the
wall behind and above the computer hangs a camera.
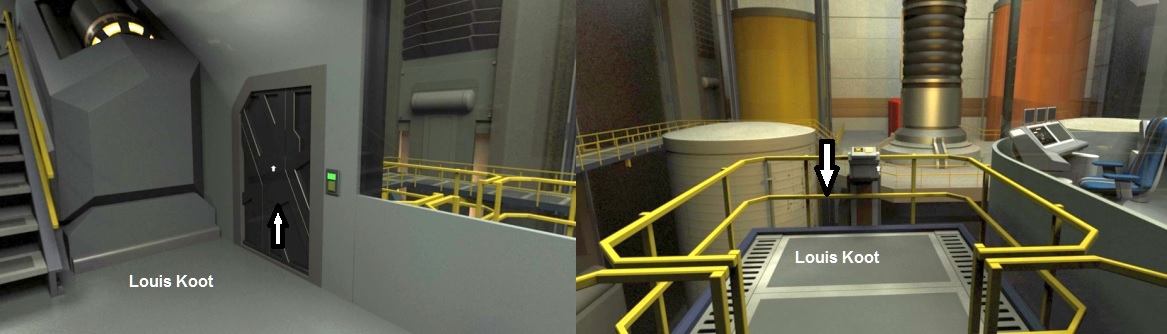
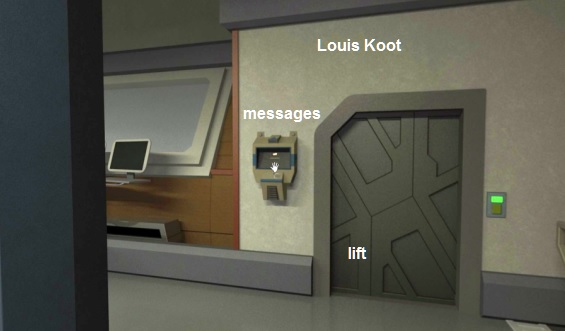
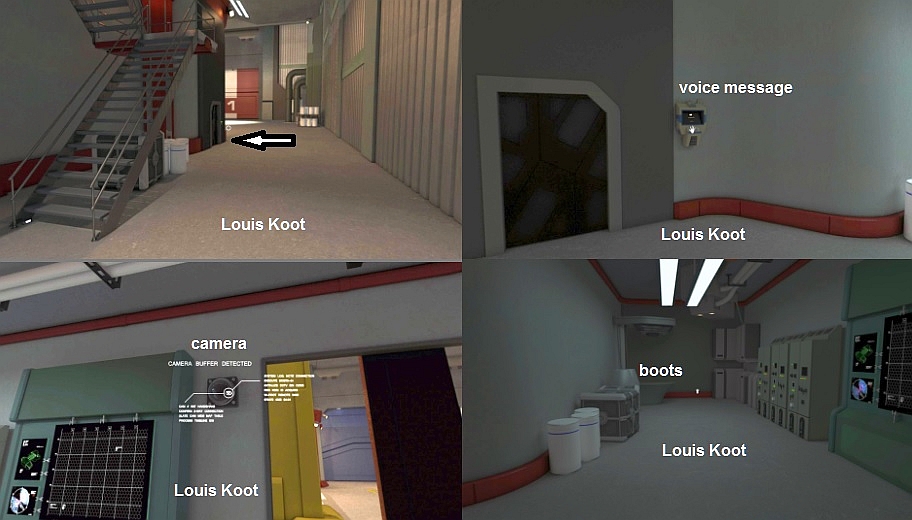
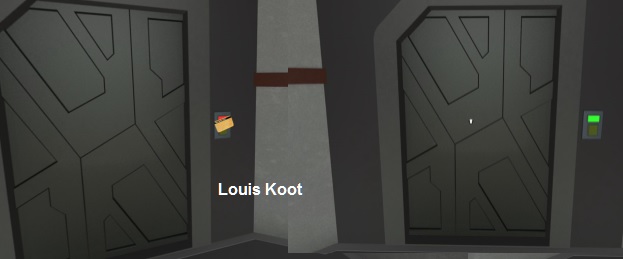
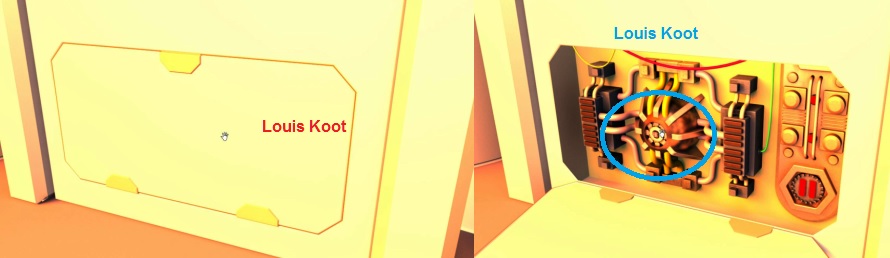
Turn left, you see a door on the left and a door at the end of the corridor.
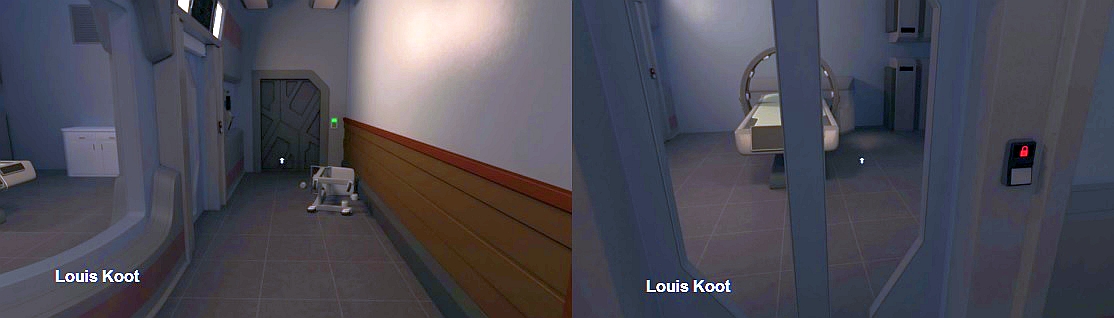
Go
forward, the door on the left is closed. You need a pass to open it. There is a
terminal next to that door, but it also has no power.
Click
on the door in the back, you become dizzy and blurry, you will be told that the
door is blocked. Turn to the right and look down, close to the table you get a
hand cursor.
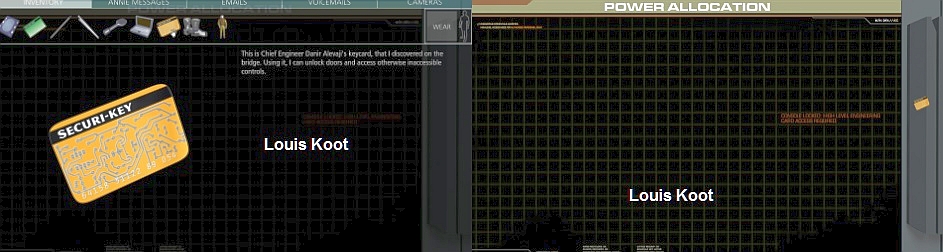
Click with that and you pick up a green card
(keycard), which is
placed in your inventory.

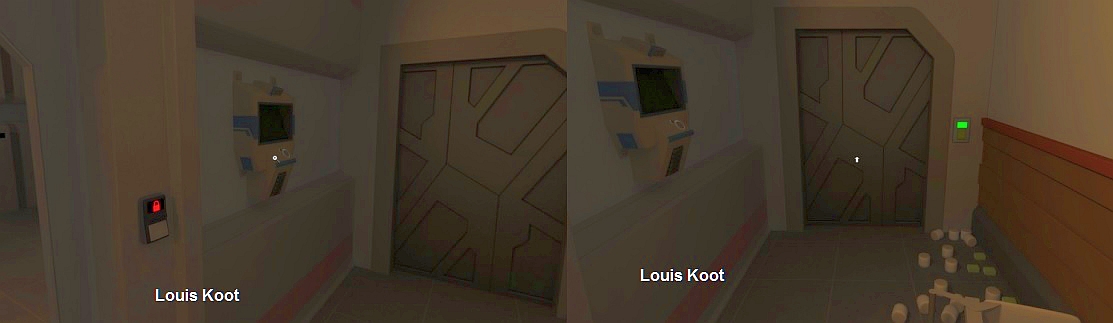
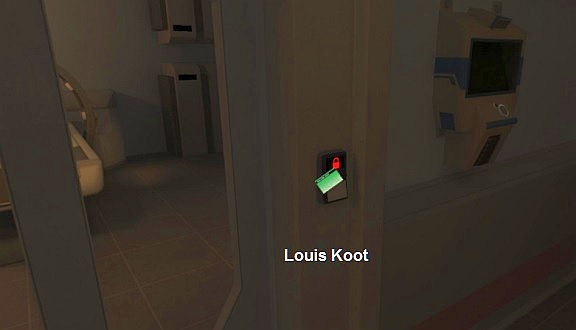
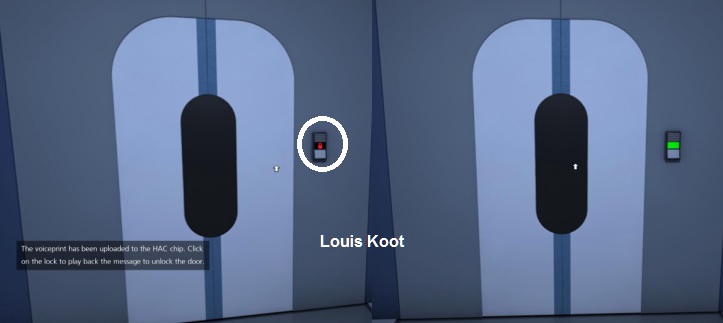
Walk back to the locked door and click right, your inventory appears with the
green card. Click on the keycard and then click right, you are now out of your
inventory and you have the pass to your mouse. Click on the card slot with the
card and the button will turn green, your card will be in your inventory again.
Enter
the room and you will be notified that your goal has been updated, click on Tab
and you will see what your goal is for the moment. You have to find a way out of
this space.
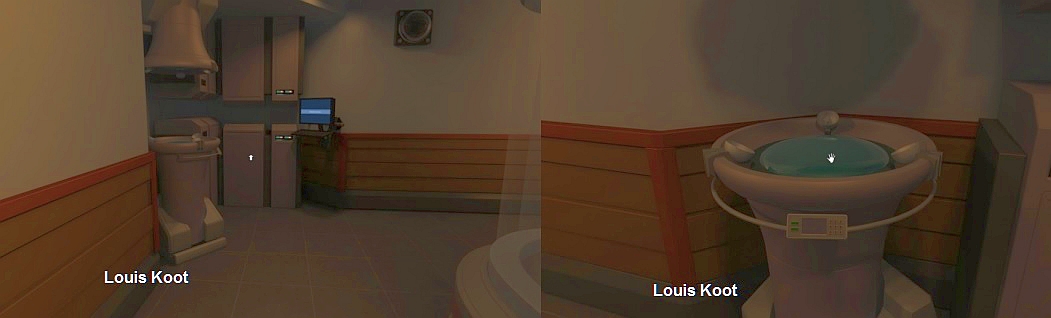
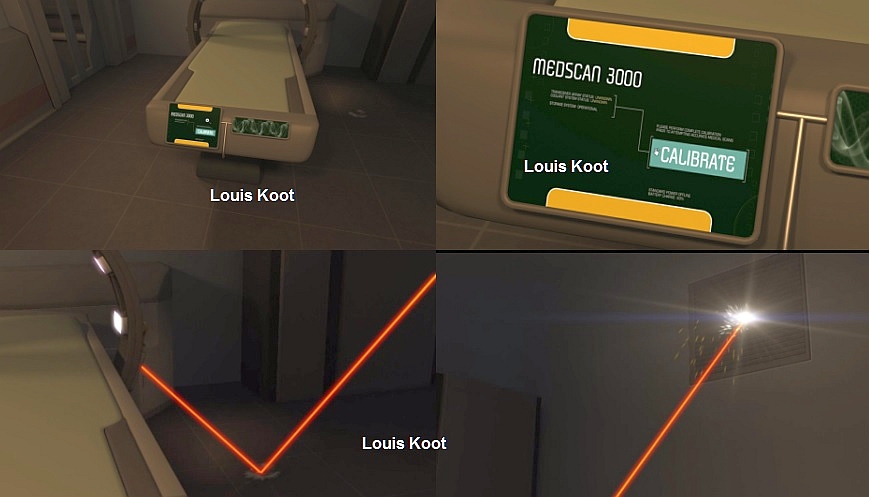
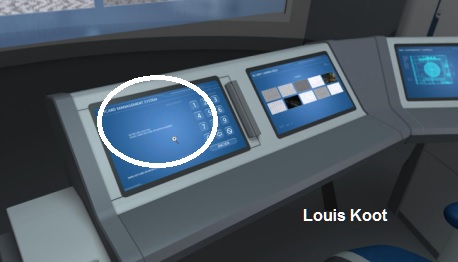
You are right in front of a scanner and when you click on the
control panel you see that the scanner has no power.
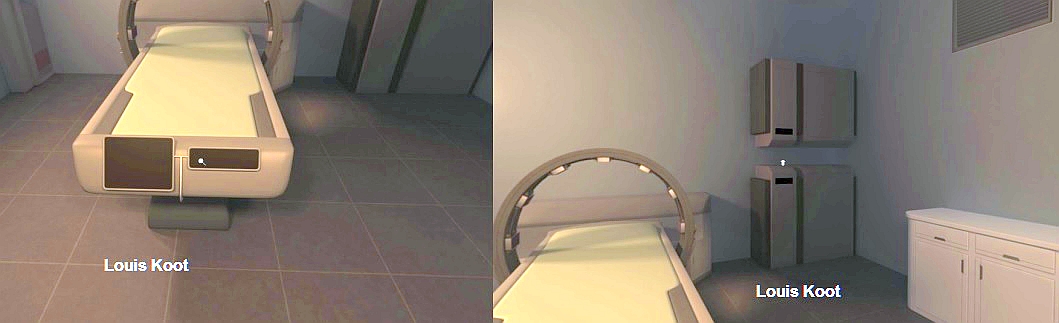
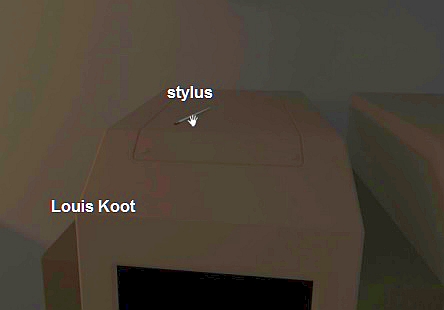
To
the right in the corner are a few computers, on the left box is a pen (stylus).
Grab this Pen (Stylus).
If
you are there, look down between the computer and the scanner, there you see a
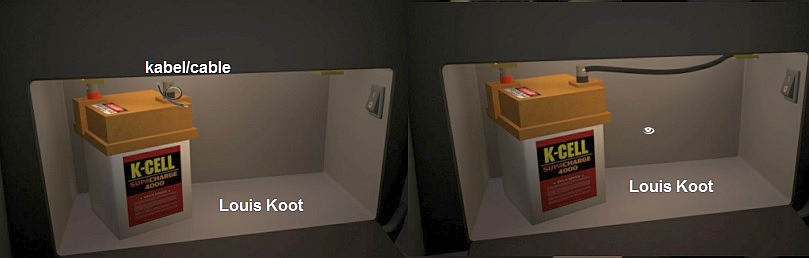
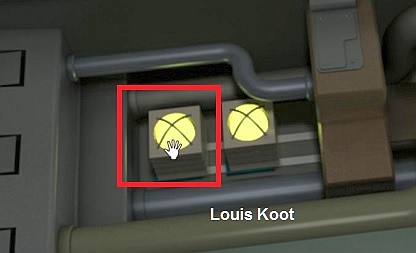
small door, zoom in on it and click on the door.
You see a battery and a switch,
click on the switch and you hear a device start up.
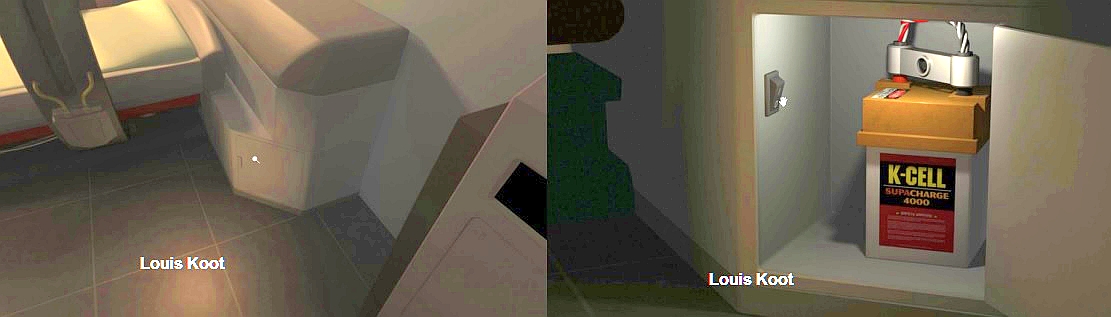
Click
next to the door, you zoom out and you see that there is now voltage on the
scanner. The computers now have power.
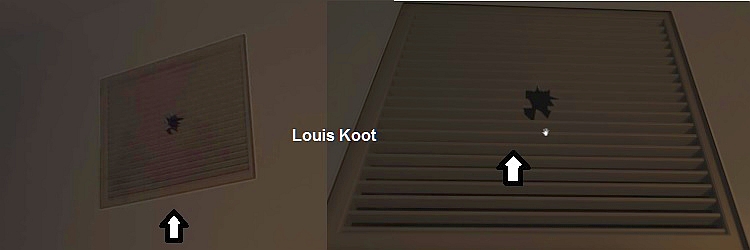
You see a cupboard on the right with a
grid above it, walk towards it and climb on the cupboard. If you try to remove
the grid, that does not work.

Climb
down again and go to the front of the scanner and zoom in, click on
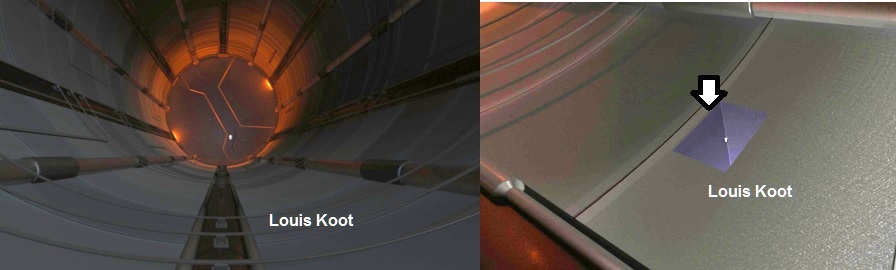
"Calibrate" and you will see something go wrong with the scanner.
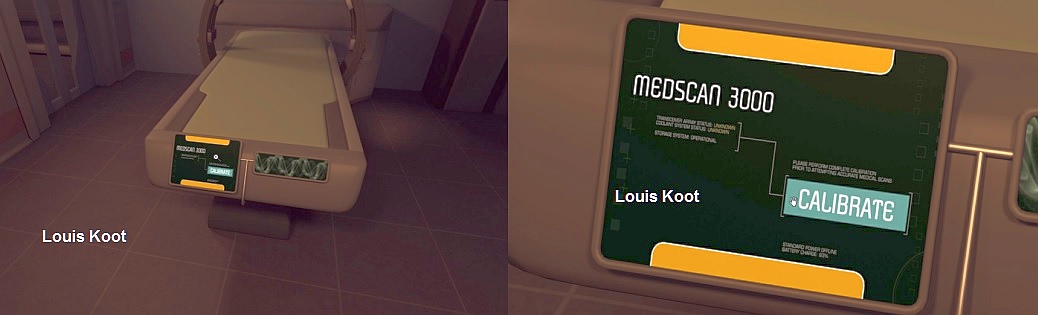
There
is a beam coming out and that causes a burning spot on the ground, you can’t
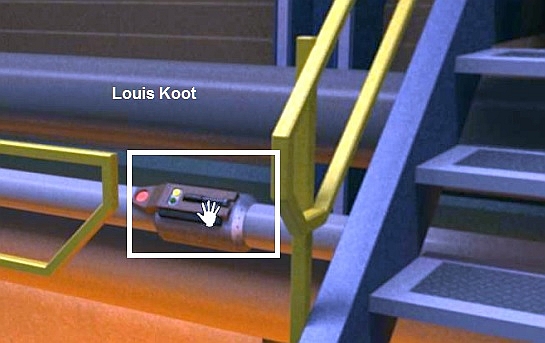
do anything with it yet.
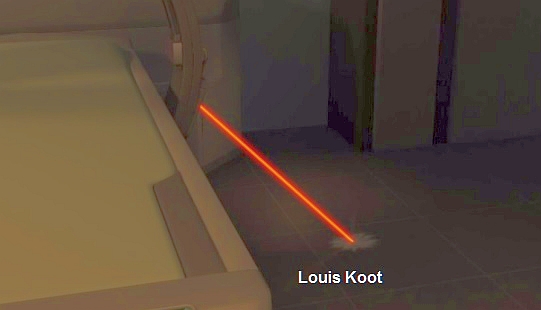
Previously
you needed a sharp object and that was the case with the hologram projector.
Walk back to the projector, click on top of the glass to zoom in and then again
to open the glass.
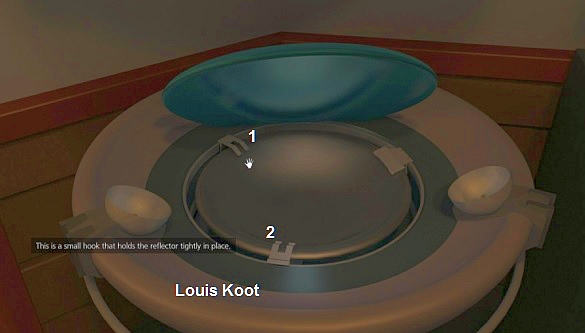
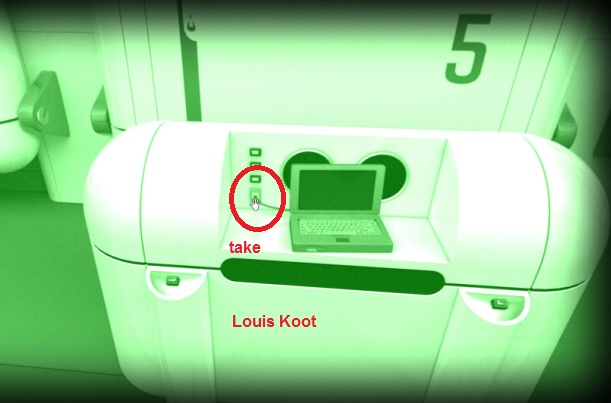
Now
take the Pen (Stylus) from your inventory and click on the clips. The clamps
rise and then take the reflector out of the projector.
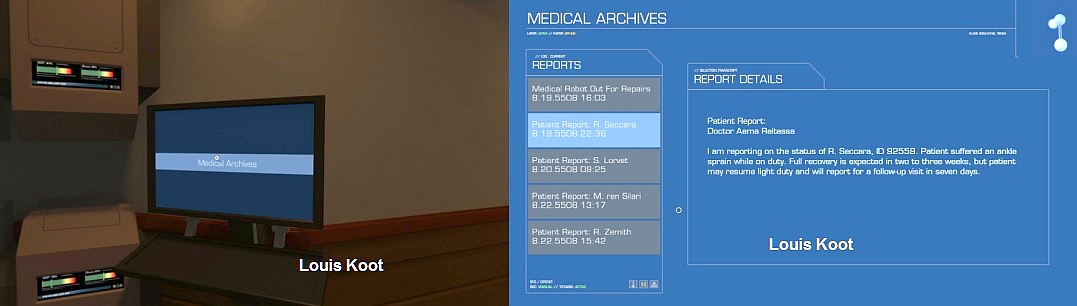
Turn
around to the computer with the medical archives, you can see the latest medical
reports here. You will need this later.
Then
click at the bottom of the screen to zoom out. Return to the room with the
scanner and walk to the corner with the computers.
Turn around, you will now see
the burned spot on the ground. Now take the Reflector and put it on the burned
spot.

Walk
back to the control panel and press the button again. Again a beam is created
but this is now reflected and burns a hole in the grid.
Ventilation
shaft:
Climb
back on the cupboard and take the grid out of the opening.
Climb
into the tube, click ahead and turn to the left.
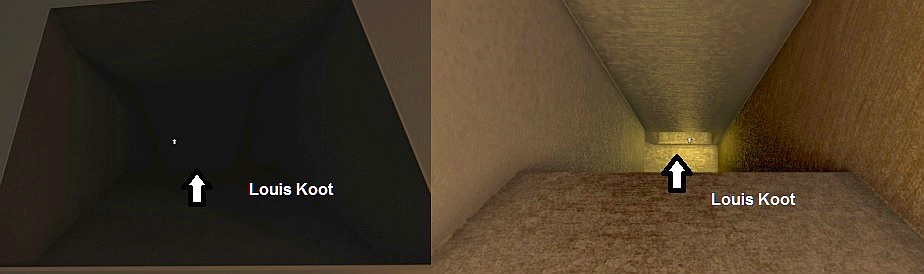
You
see a rotating fan and a crowbar (Prybar) in front of it. Take the crowbar
(Prybar)
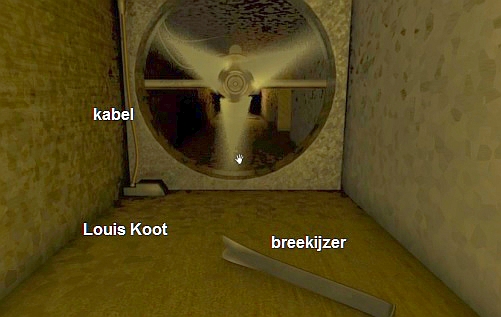
A
cable runs alongside the fan. Take your Prybar from your inventory and click on
the cable at the top, the cable is broken and the fan stops. Take the
piece of
Cable from the left corner.

Zoom
in on the fan, grab a fan blade and turn the fan so that a blade is straight up.
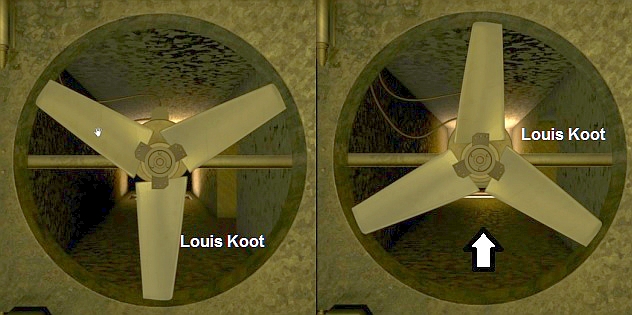
You
can now crawl under the fan and you come to a grid in the bottom of the tube.
Click on the grid and it opens, click in the opening and you enter a room.
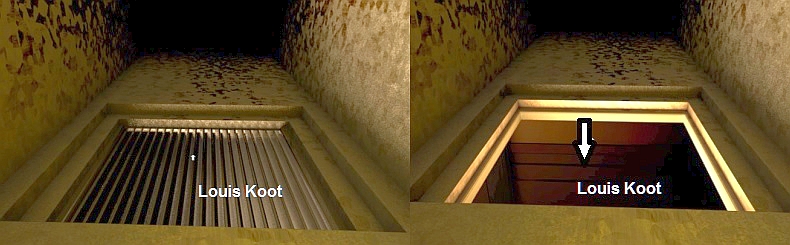
You
have now reached your goal and you get a new assignment, press your Tab
key to read
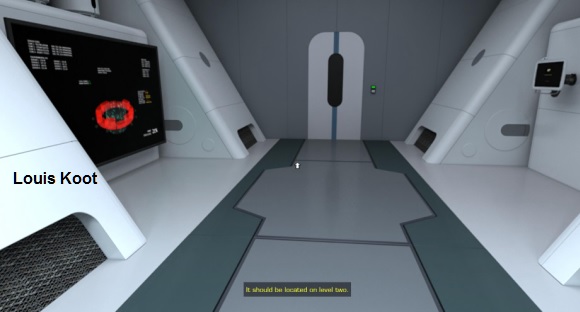
which one it is. You are now in a storage room.
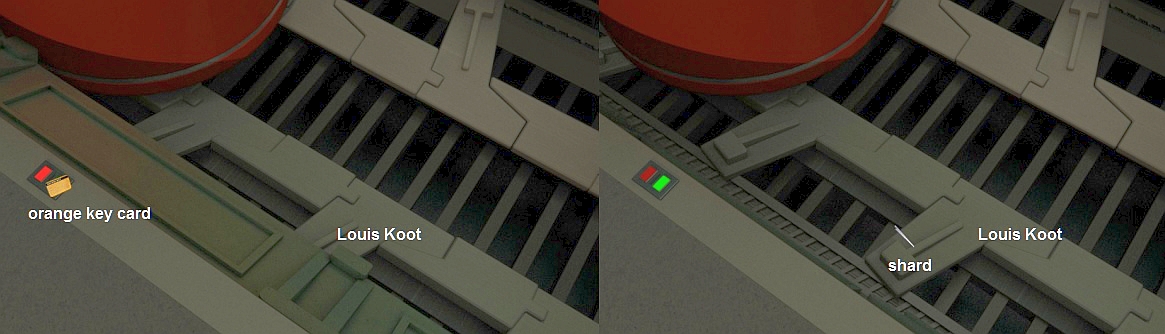
Look
around in this room and on the floor under the grid you can see a piece of the
grid -Shard, pick it up.
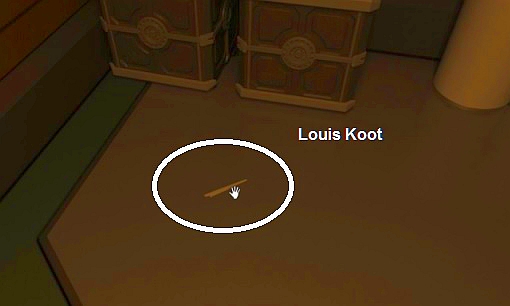
You
can look at the rest of the stuff but you cannot do anything with it. Turn
around and click on the door.
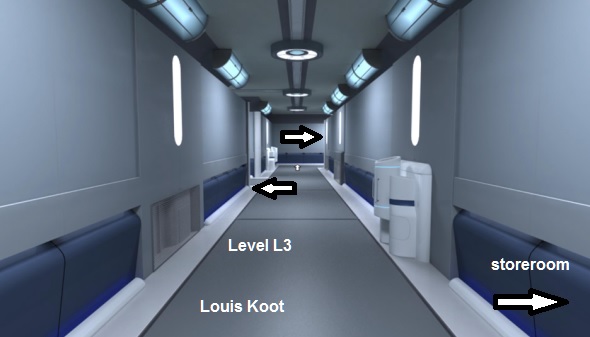
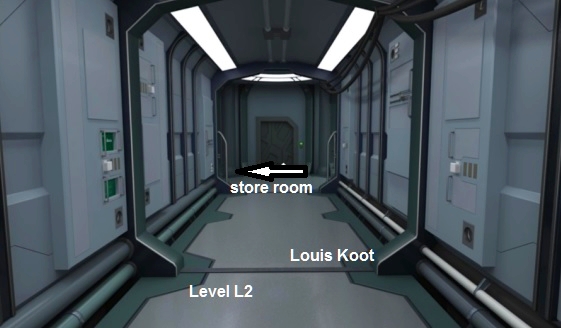
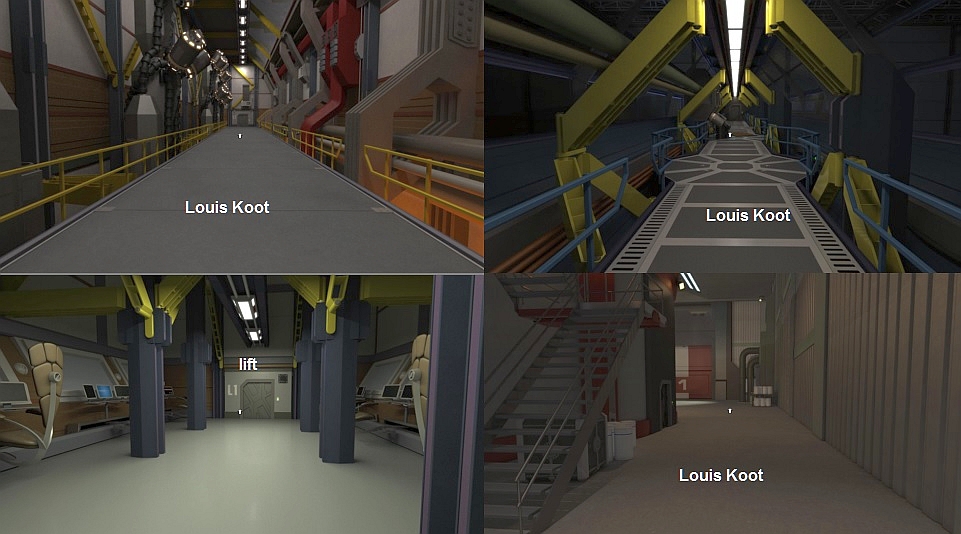
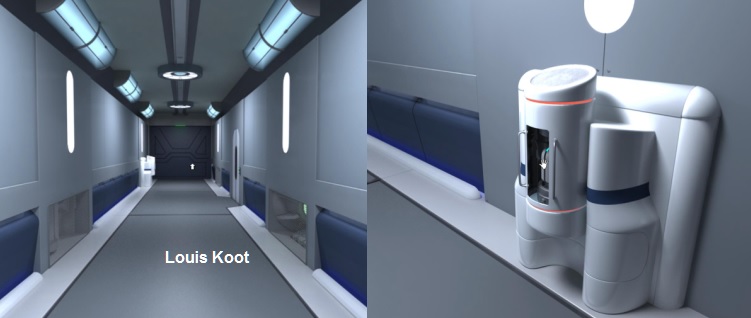
Corridors:
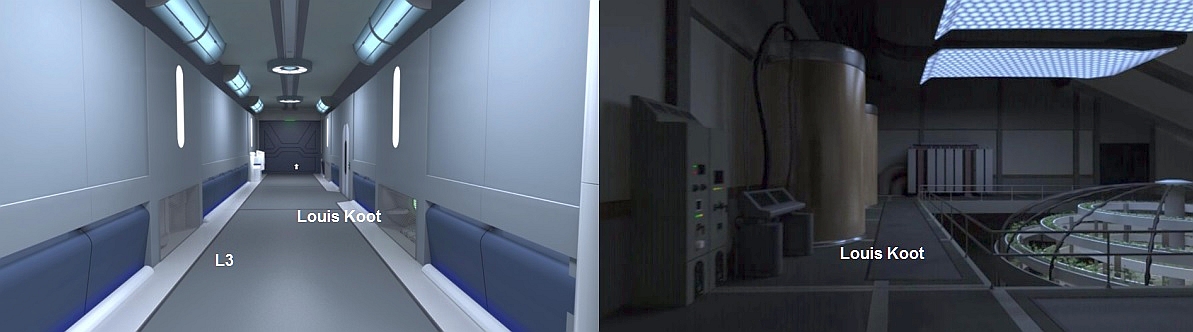
Level
L2
Behind
you is the door of the storage room, at the end of the hallway you see a big
door. You are here in the corridors of the 2nd floor, L2.
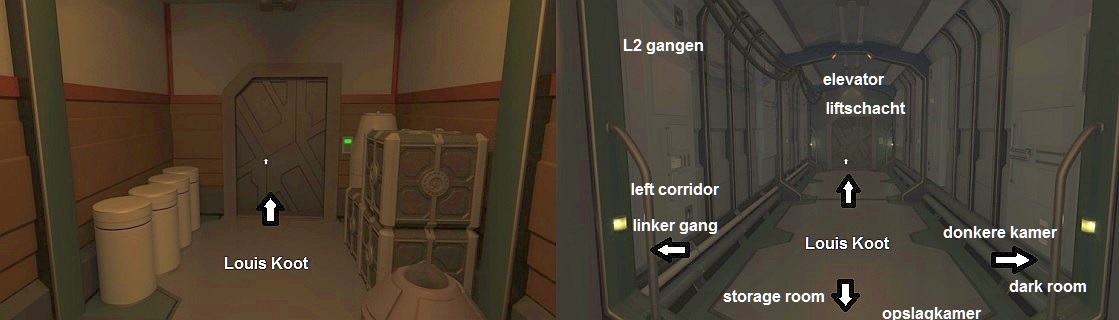
To
the right is a door, enter there. It is very dark and you cannot do anything now.
Turn around and go back to the hallway. You now look in the left corridor, at
the end is a heavy Fire door. There is a room on the left and 1 on the right,
left is closed. Walk to the end of the corridor, halfway there is a ventilation
shaft. Here you just crawled through. Just behind the shaft hangs a few monitors
on the wall that you can view with your eye cursor. Walk on to the large fire
door and click on it ....... unfortunately ..... the fire door is closed (too
little power?)
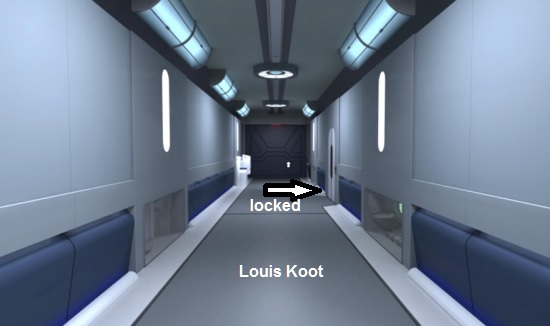
Turn
to the door on the right, this is the door to the sick bay and this one is
blocked.
Take
the Prybar from your inventory and click on the door. You open the door and go
through it and you are back in the sick bay.
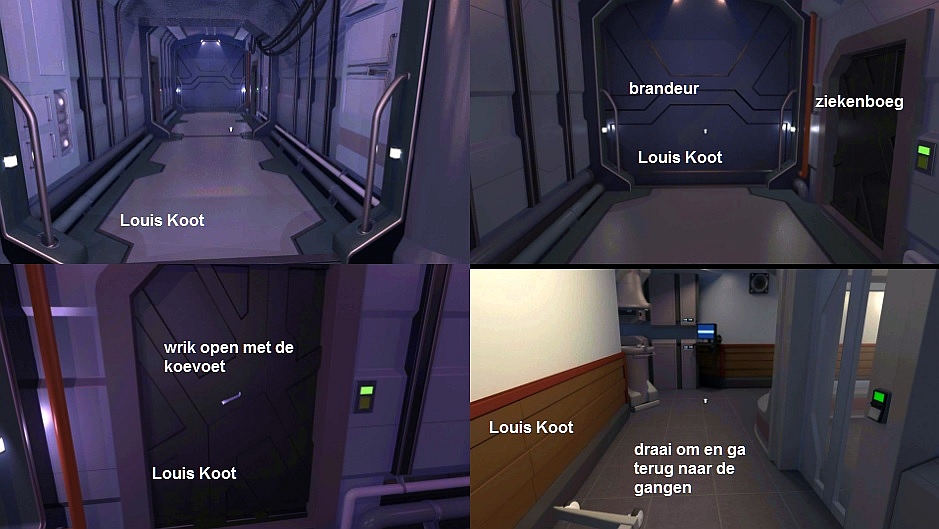
For
this moment you can’t do anything in the infirmary, so turn around and go back
to the L2 hallways. Walk straight and then left and to the door at the end of
the corridor. This is the elevator door, but this door does not open. So grab
your Prybar
again and force the door.
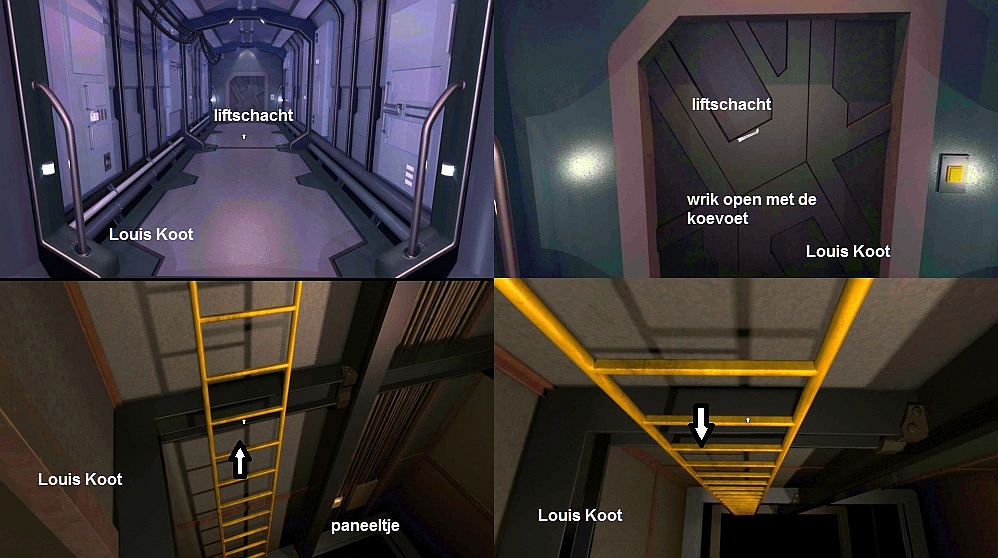
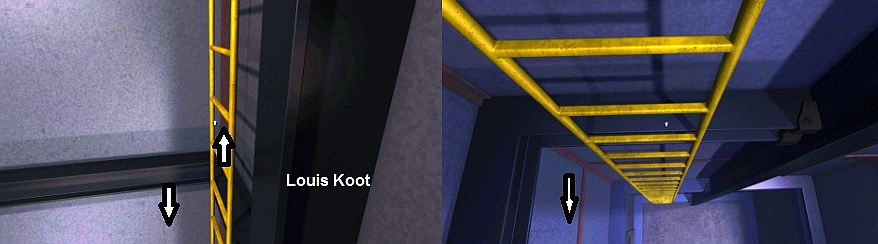
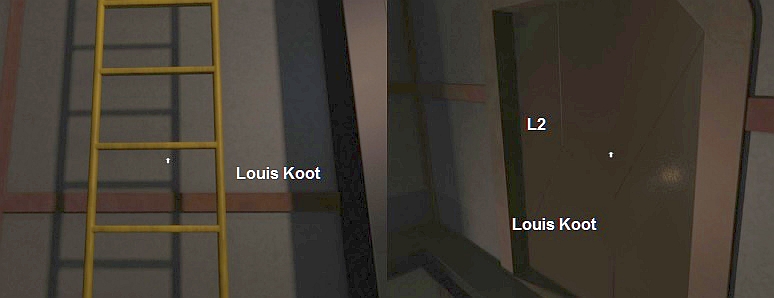
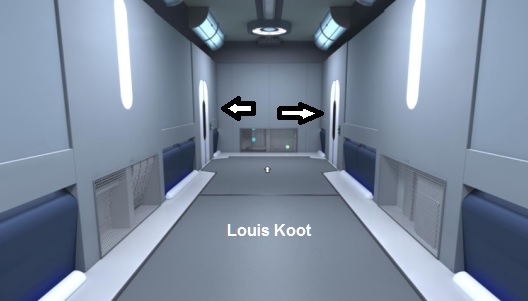
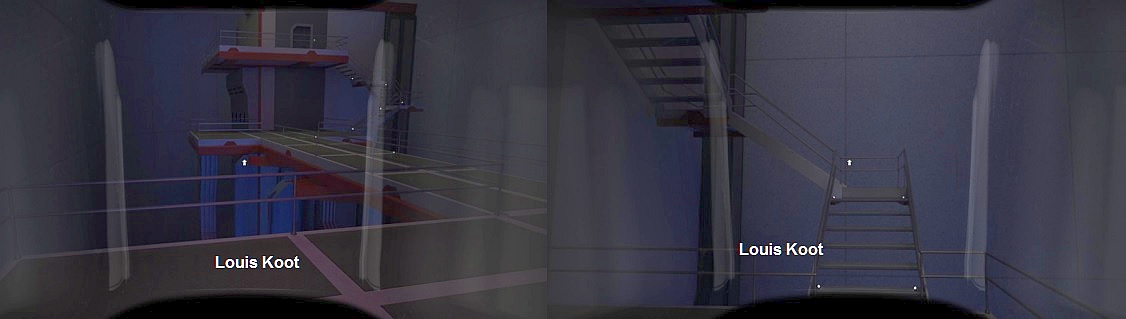
You
enter a lift shaft. On the left you see a ladder against the wall, the elevator
hangs a floor higher and below you see a lighted panel, to the right of the
ladder. Click ahead on the ladder and go down 1 floor, then step down the ladder
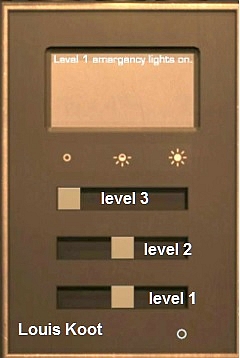
to the right and then look left. You see that illuminated control panel, with
this you control the lighting on the floors. Zoom in on it and then turn off the
lights on level 3 and on level 1 on half.
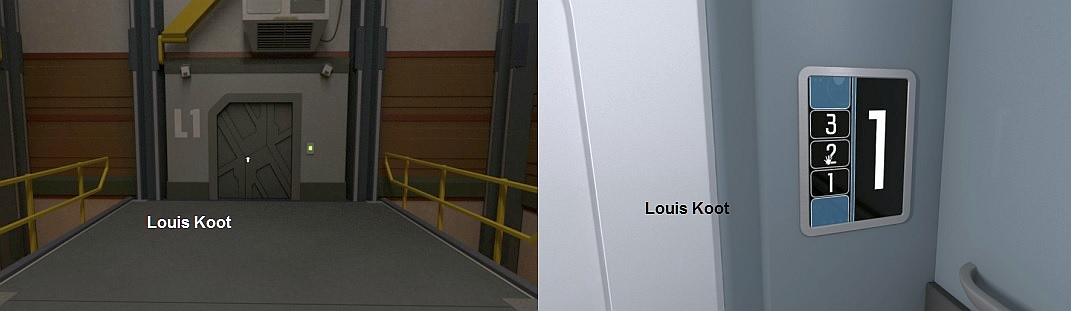
Step
back on the ladder and go further down, click on the door (2x) and you guessed
it. Grab your Prybar and click on the door.
Level
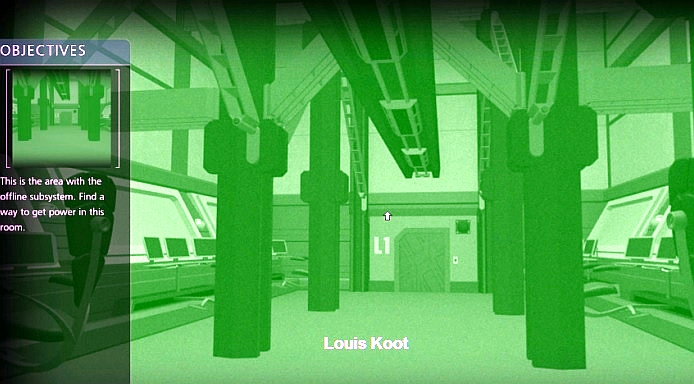
L1
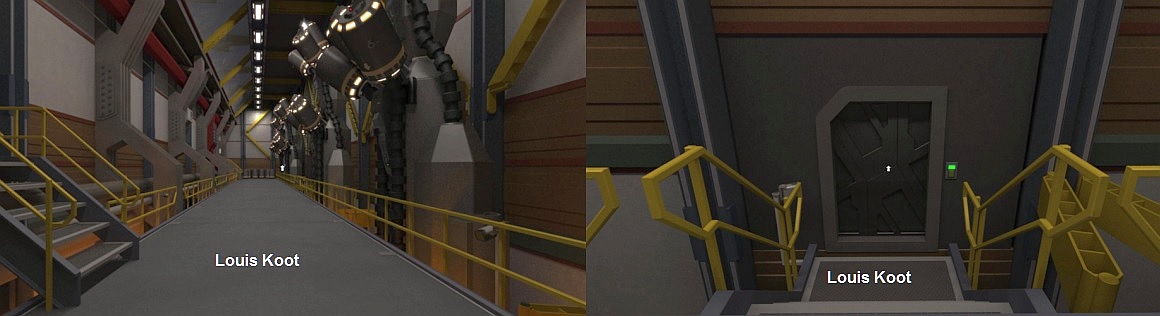
You
enter a dark corridor with a few lights on the side. You are now at level L1 and
this is a service corridor. On the left is a door with a green light. That door
gives access to the Power Control Room. Do not enter yet, but first walk to the
end of the corridor, halfway there is a locked door on the right. At the end
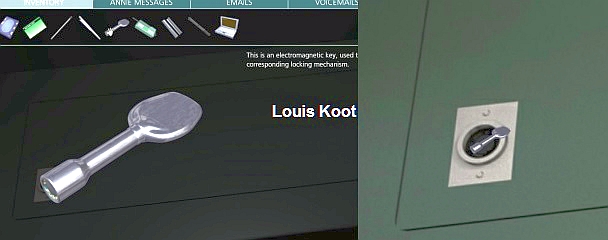
there is also a locked door on the left, you can also see a number of cylinders
here.
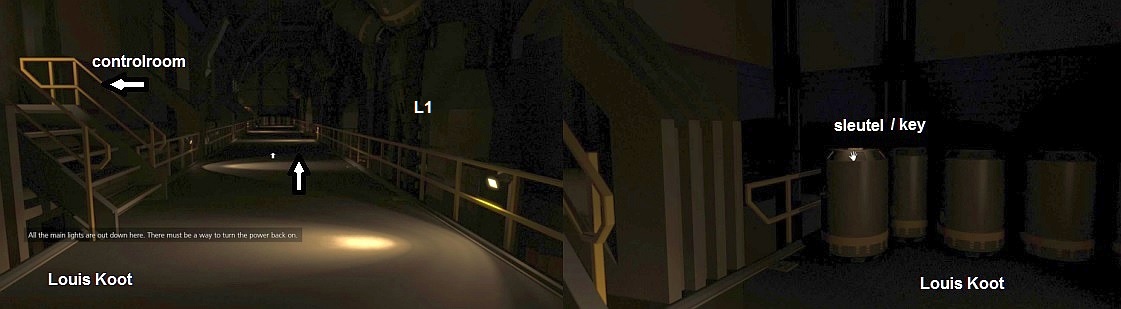
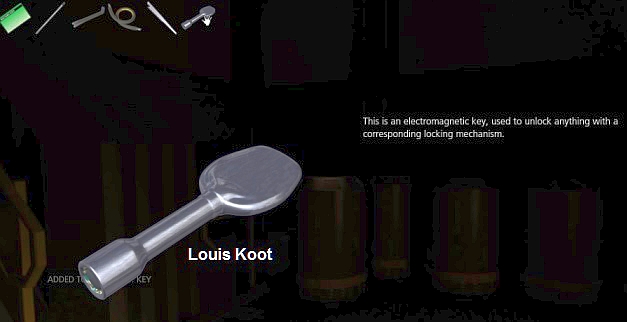
On the left cylinder is a Key..... Take the
Key .
Turn
around and walk back to the elevator shaft, but if you are still one step away,
turn right. You are standing at the door of the

Power
Control room:
This
door has a green light to indicate that you can enter. Click on the door. ......
you go inside and are now in the poorly lit Power Control room. Go down the
stairs and walk to the left to the control panel of the machine. No power, you
can zoom in on the display but you have nothing on that now. Look down and you
can zoom in on a hatch on the front right side.
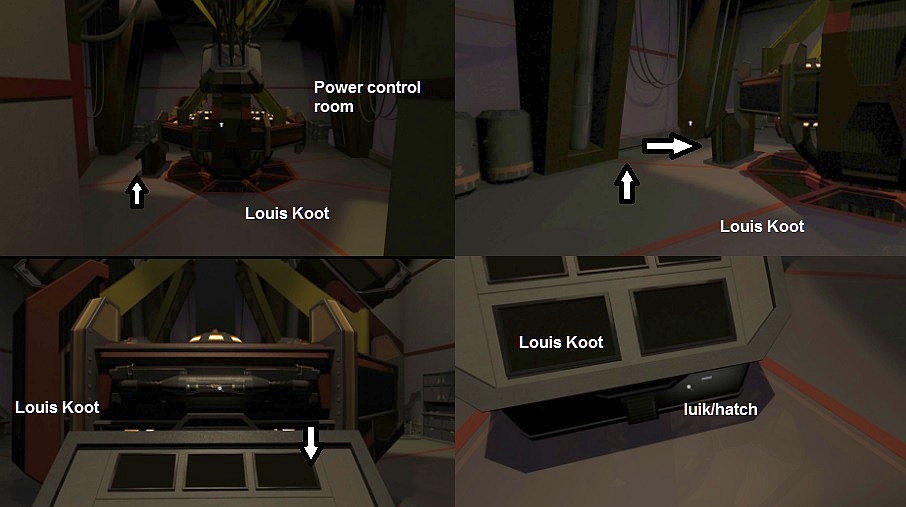
Click
on the hatch and you will get a dizziness and blurred vision again ..... if you
can look normal again, click on the black box .....
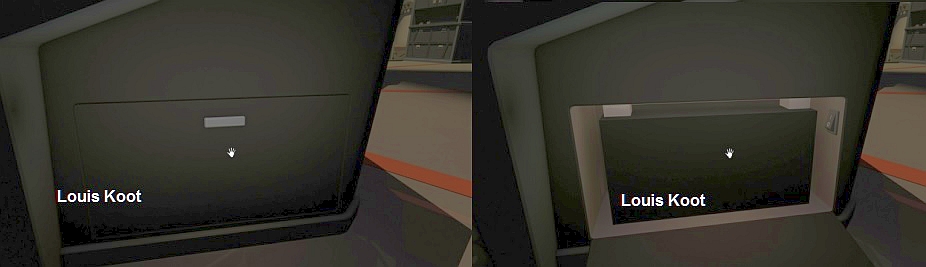
this
black box is a battery but it is empty or broken, so you need another one .....
you get a new goal to complete.
In
the infirmary you saw a battery and it works as you know, so you have to return
to the infirmary. Up the stairs and through the door to the hallway, right to
the elevator and click on the elevator door. Climb up 2 floors via the ladder
and go back through the L2 door
Walk
through the L2 hallways to the fire door in the other hallway and then go right
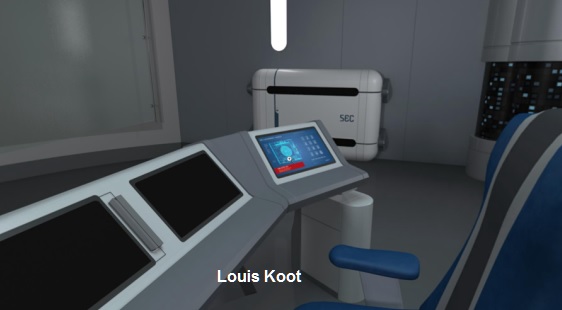
again through the door to the infirmary. Enter the room with the scanner and
walk on to the computer to the right of the scanner and look down at the
shutter, zoom in and click it open and you will see the battery again
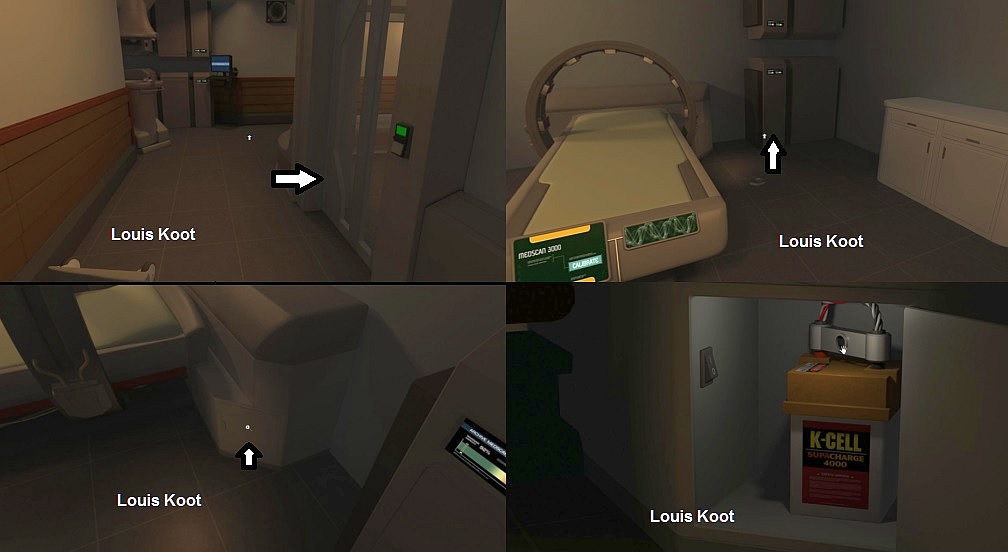
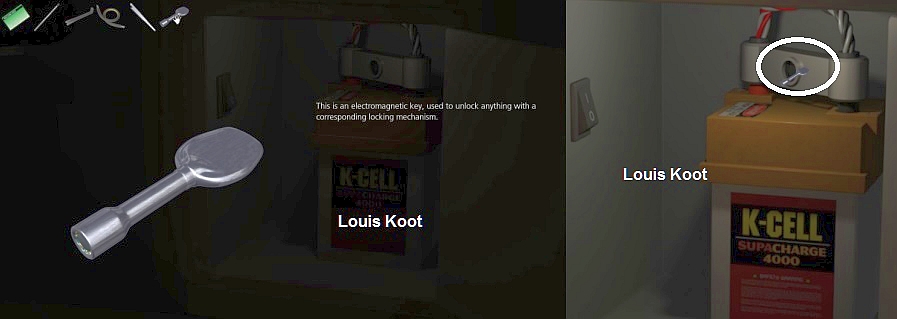
On top of the battery is the gray bracket that secures the battery.
Take the Key
from your inventory and click on the gray bracket above the battery, it is now
disconnected and you can take it now, so grab the battery.
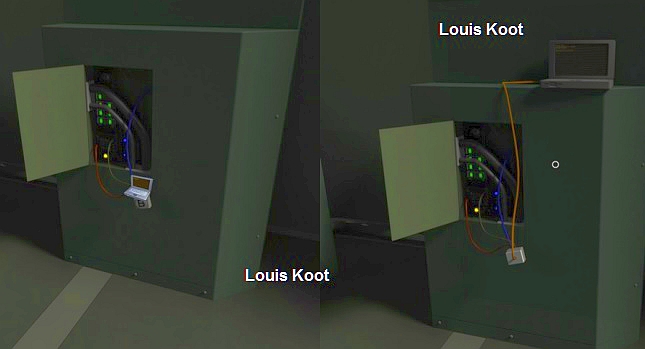
Go
back to the Power Control Room down on Level L1 via the elevator shaft. Go back
to the panel where you previously removed the broken battery. Zoom in and open
the cabinet. Take the new battery from your inventory and place it in the left
corner, take Cable the from your inventory and connect the battery to the machine.
If
the switch is off (0), turn it on (1).
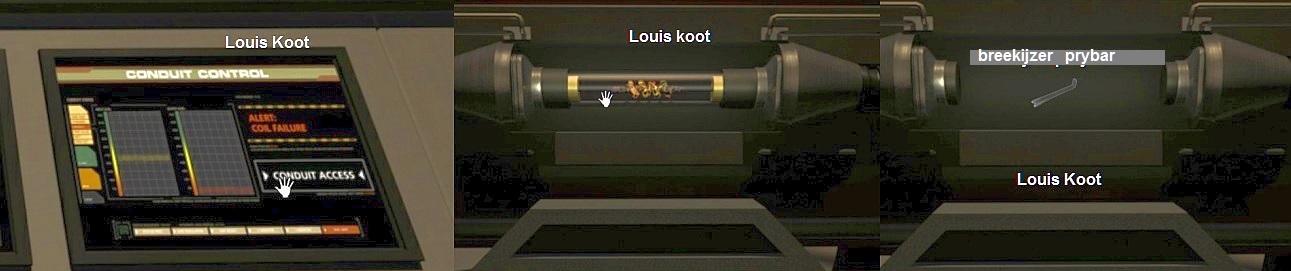
Zoom out and look at the monitors on the
top row. Above the monitors you see a burnt-out coil. Go to the right monitor
and see the "Conduit Access" button, click on this button and you can
now remove the burnt-out coil. Now you must put something in its place here,
take your Prybar from your inventory and place it on the spot where the coil
was.
Flash
boom bang, you go all the way to black and slowly the image comes back. All
lighting in the room is now on, there is also a report about the Central
computer control room. You go there in a moment, but first you have to search
the room here. From now on you will regularly hear messages about the
broadcasting system.
Zoom
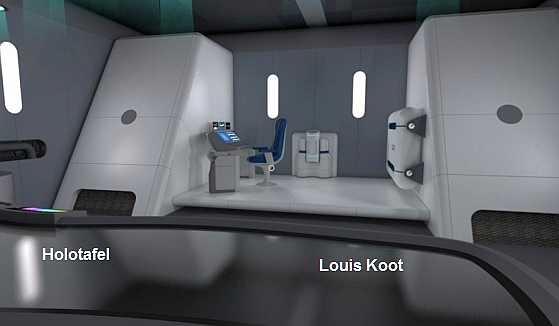
out of the control and go back to the stairs. To the left of the stairs is a
cupboard and a workbench.
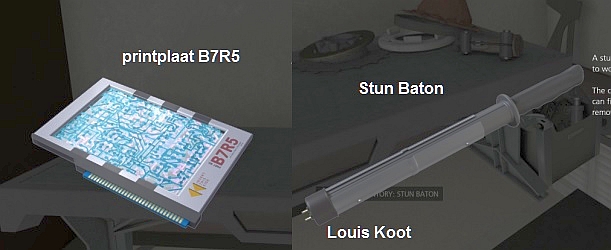
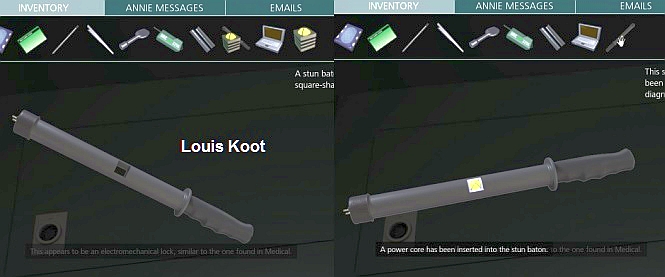
On the workbench you will find a
PCB B7R5 print board, and inn
a box to the right of the workbench you will find a Stun Baton.
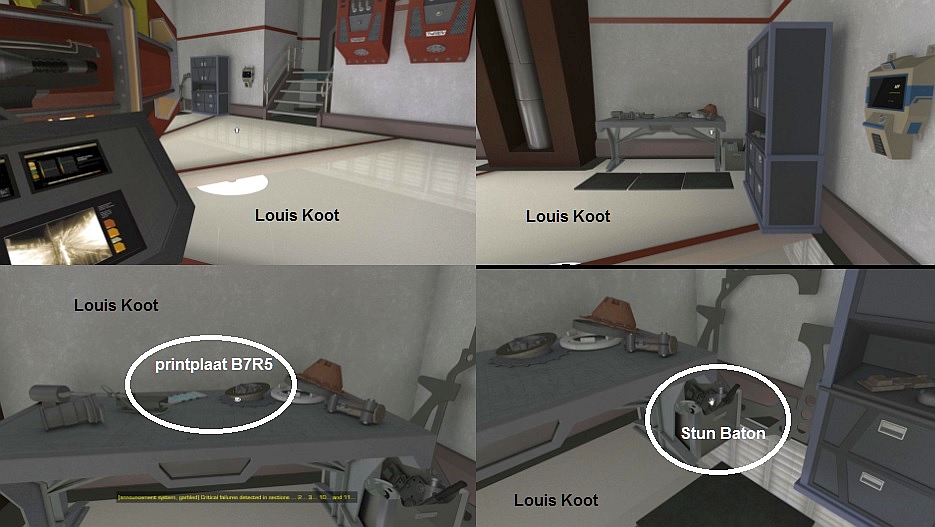
Grab
both and these are now in your inventory.
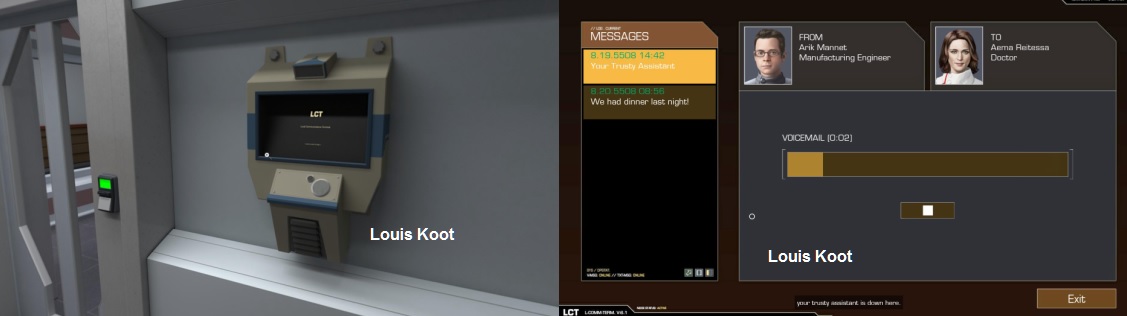
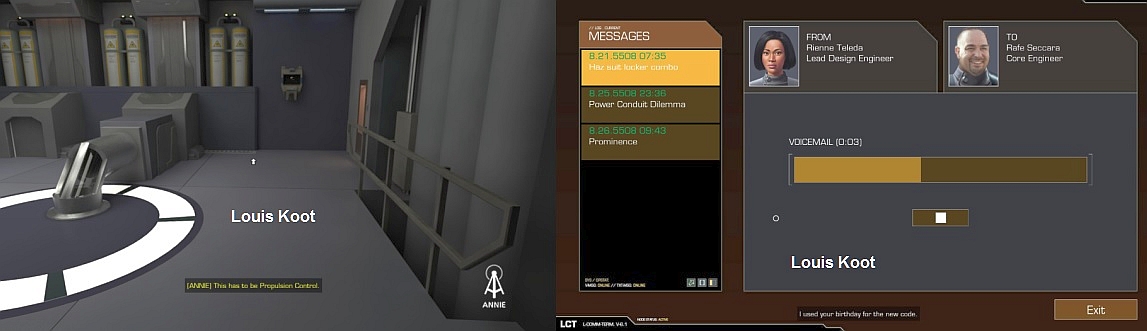
To
the left of the stairs there is also a LCT- Local Communication
Terminal, you can read messages on this, read the messages, 2 of them are
sound recordings.
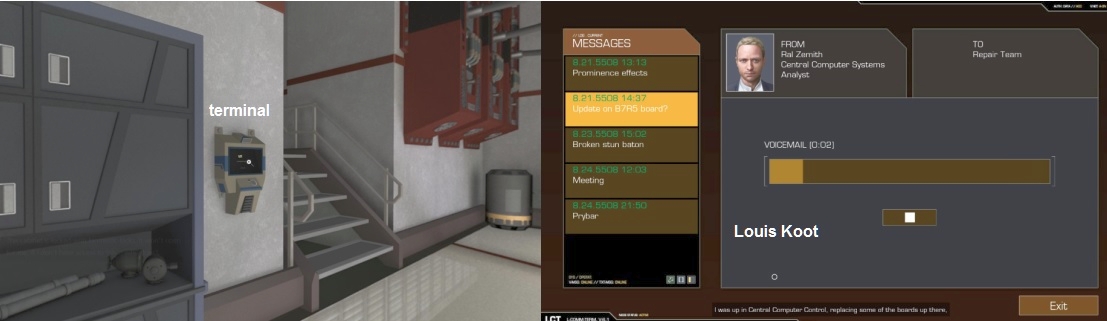
In
one of the messages you come across the name Zemith,
who works in Central
Computer Systems. You also come across the name Vryse
who mentions something
related to ANNIE. You have also encountered a terminal in the infirmary, maybe
there is more information available on that terminal. Go back to the long corridor ...... there
is now light in the corridor. You can see if you can enter anywhere but no, all
doors are locked up too, the key card does not work here. Go back to the
elevator ........ You can see that the light next to the door is now on, so the
elevator probably works again. So press the button and the lift will open, you
can now also go to the other floors.
Go
to L2, walk through the hallway and go back to the
infirmary. To the right is a
terminal (TCL). Zoom in and read the messages.
Go
to the computer with the medical archives.

Now
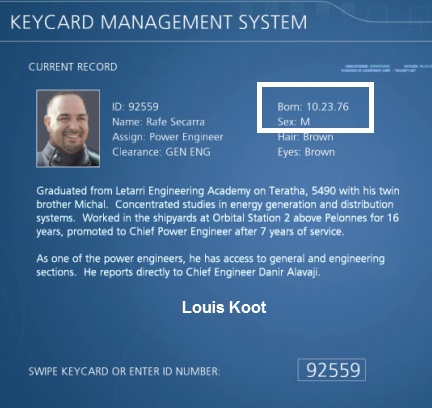
read the medical reports more carefully by ....... You come across a number of
names with corresponding ID numbers, write down these names and their ID numbers
because some you need later.
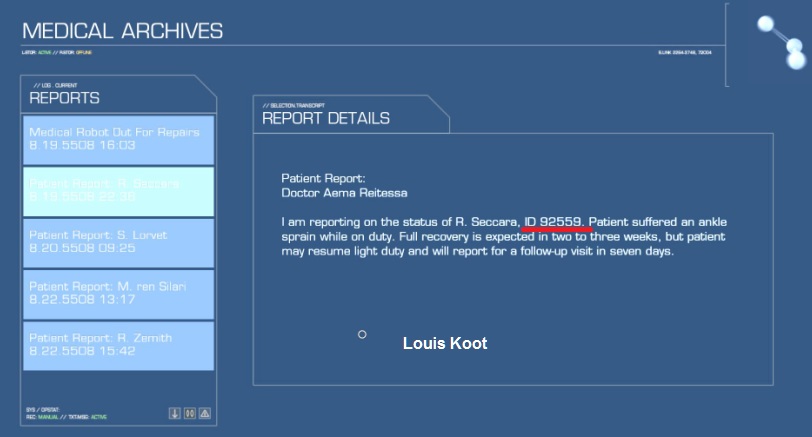
So
make a note of the following ID numbers: R. Seccara ID 92559; Saia Lorvet ID
72724, M.ren Silari ID 41348 and R. Zemith ID 58426.
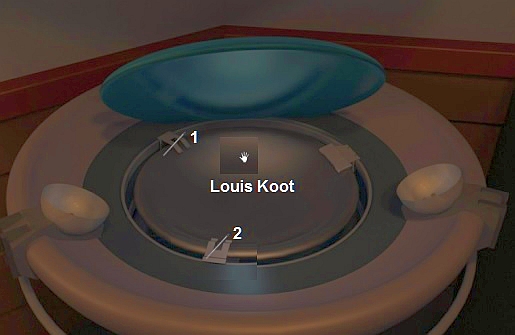
You
can also play with the hologram projector for that you have to replace the
reflector, the reflector is still on the floor next to the scanner. You can get
it and put it in the projector, but it is not necessary for the game. Leave the
sickbay and go to the left, you can now walk into the room right in front of you
but it is still dark. Turn left to the elevator and go up to level L3 with the
lift.
Level L3
L3
has a different layout as L2 and L1. Immediately right next to the elevator is a
door, enter here. You get a blackout again. Look around and you will find 2
boxes on the floor and on the first shelf, you can zoom in on both boxes but
only in the box on the floor is something you need later. Take the print
board PCB B7R5
here.

This
was all here so go back to the hallway, turn right and walk to the end and turn
right. You see a door on the right.
Go
to that door, it is a door with a card reader but unfortunately the keycard that
you have in your inventory is not valid here.
Walk back through the corridor and
enter the side corridor, at the end you see two doors.
Go
through the door on the left first and search the room.
An
LCT hangs to the right of the door, read the messages. 1 of the messages is
about a URC.

Here,
too, a camera is hanging on the wall, further to the back is a console. On the
console is a device, this is the URC, take it.

There
is also a hologram table, you can turn it on but what you have to do with it is
still unknown. Leave the room and enter the room opposite, look around for a
moment.
Again
there is a camera here, on the left you see a video wall with a console with 3
screens in front of it. The left is for the key card management, the middle one
is for the cameras and the 1 on the right is a kind of fire control panel. The
cameras do not seem to be at all right. Zoom in on the left screen.
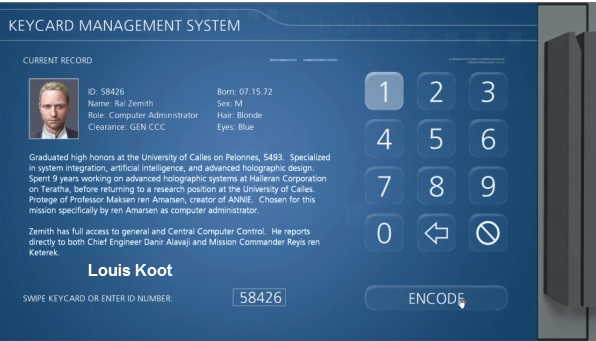
Take
the key card from your inventory and swipe it through the
card reader on the right.
The card is from Dr. Reitessa and this is not valid for that other door. You have
come across 2 names: Zemith and Vryse, from Zemith we have an ID number. You are
now going to program the card for this name, first click the arrow button to
delete the data.
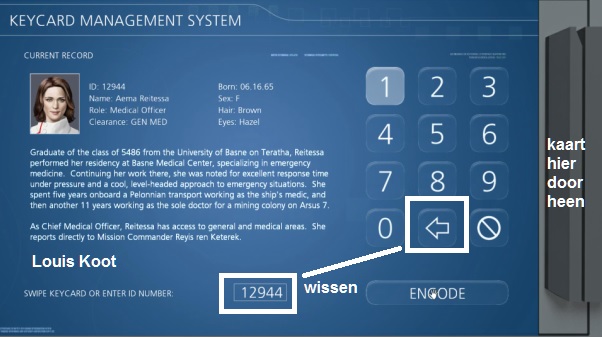
Then
enter the ID number of Zemith - 58426- and pull the card through the scanner
again, the card is now reprogrammed.
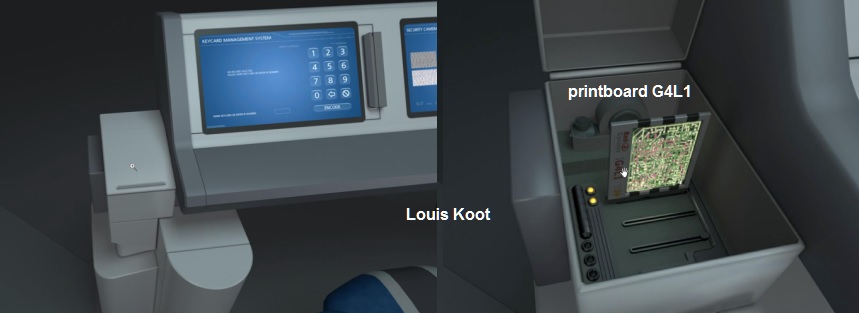
Zoom out the screen and then zoom in on the box to the left of the screen, click
to open it and you will see a circuit board - G4L1 - take this board. Now the
video wall and 2 screens are out.
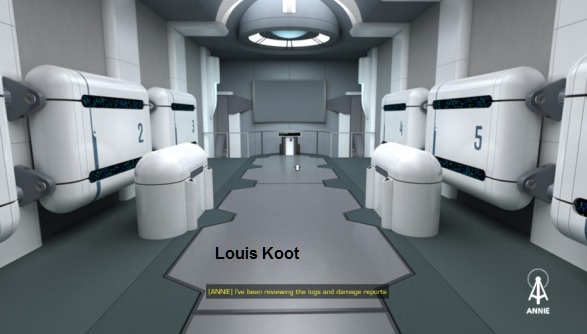
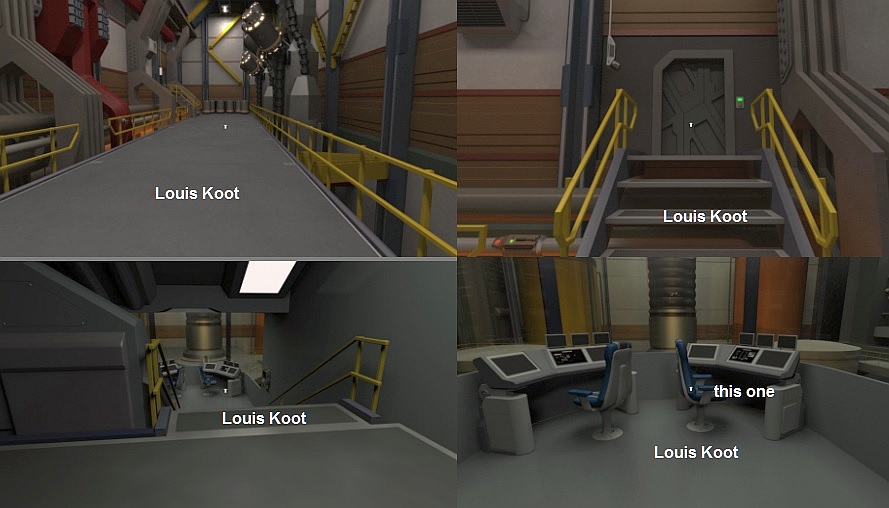
A.N.N.I.E
Leave
the room. Go back to the room with a card reader, your key card will now be
accepted. Go inside.
You
get a new assignment. Turn to the left and go to the LCT and read the message.

Turn
back to the right and go to the central column, you will see a red screen. Zoom
in, it looks like the computer is offline. Click the maintenance mode button.

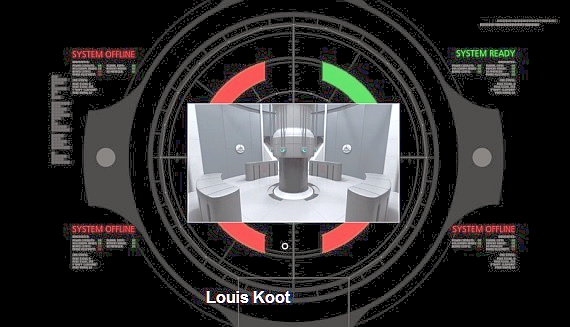
You
now see 4 machines coming up from the floor.
Zoom
out and look around, on the monitor 3 machines are red and 1 green, on the
machines you also see 3 x red and 1 x green. Go to each of the 4 red machines
and open the drawer under the status lights, you will see a number of printed
circuit boards, 1 of which has burnt out. Click on it to remove this board, note
which board it is and take the same board from your inventory. Click the plate
in place and click on the button to change the color so that it is different
than any other. The order of the colors must be red, orange yellow, green, blue
and purple.
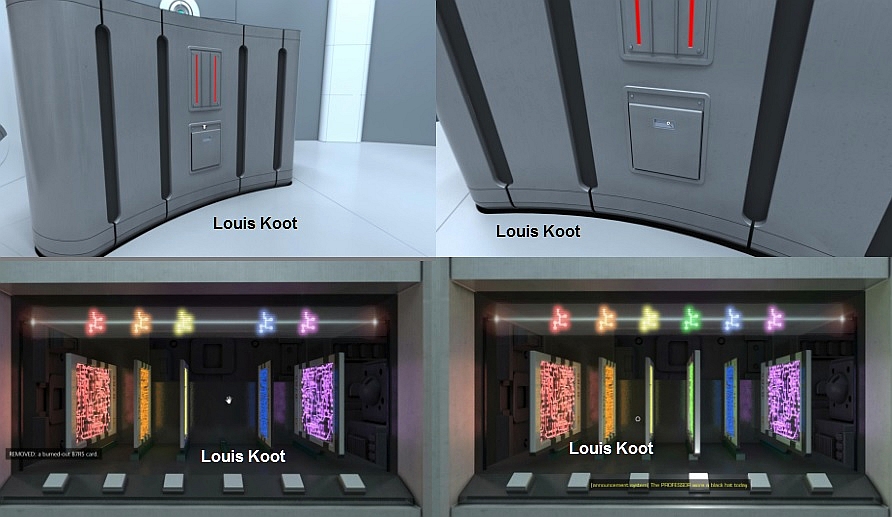
If
you have done this well, you zoom out and you will see that the status lights
are green now, also do this with the other machines ...... you have 3 printed
circuit boards and in 3 of the 4 machines is a burnt out circuit board ,replace
the boards with the right boards from your inventory.
When
you have
you replaced the circuit boards then you go back to the monitor, you see that
now everything is green.
Now click on "Initiate start-up" and
.....
A.N.N.I.E. start up again but the computer is not completely okay yet.
You
will receive a new order again. Walk in the direction of the exit, on the left
you see the big screen that is working now. You can see that ANNIE is now
operational for 21%.
You
will also see a notification that ANNIE must have access to the Data archives
that you find on L2, so go to the elevator and go down to L2.
Level
L2: Store Room:
On
L2 you go to the dark room, ANNIE now report that you have a new interface. So
you are a robot, right click and you will arrive at your new interface with 4
tabs. You can view it now but we will come back to that later. You can find all
messages here.

Right
click again to close your interface, ANNIE reports that she has activated
something else and that is your improved view (e-viz).
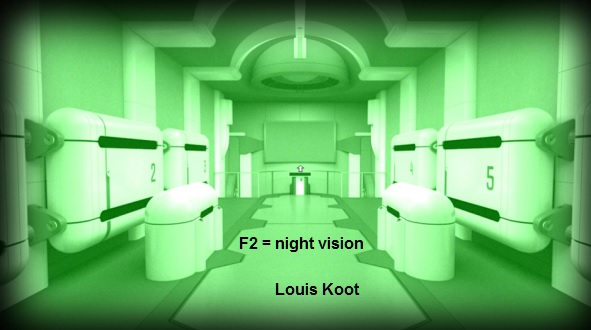
Press
F2 to turn on e-viz, you do not need lights in the room now because you can now
see in the dark.
Walk
to the end of the room and you will hear from ANNIE that they think they know
what is wrong. You have to go to L1 to an Energy substation to activate it in
order to divert the current so that it can enter this room. Turn around and walk
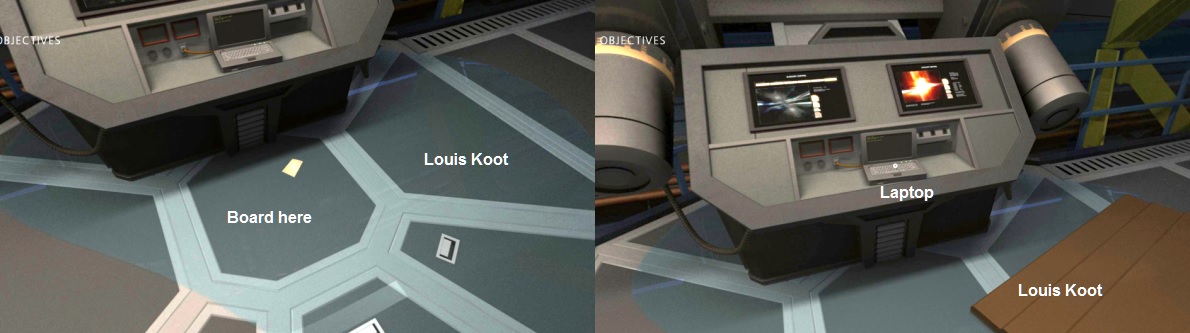
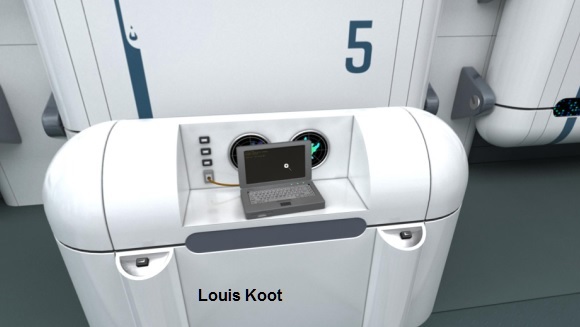
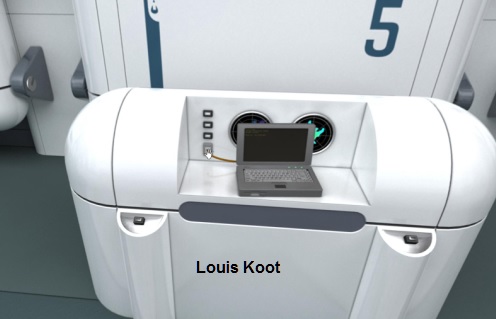
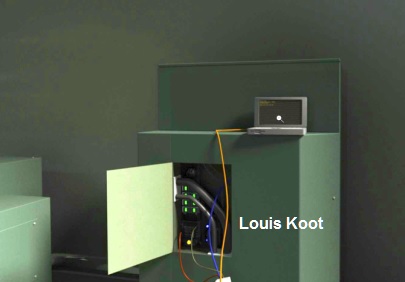
back to the door, halfway you see a console in front of cabinet 5. This can be
opened, inside you will find a laptop.
It
does not work now, no power, but click on the plug to take the laptop with
you.
Leave the room, if you have not turned off e-viz do it now because otherwise you
see nothing in a lighted room. Go to the elevator, in the meantime you get a
radio uplink from ANNIE, she can now communicate directly with you and can also
see what you see and react to. In the elevator click on L1 and downstairs you
leave the elevator, the doors that were closed first are now open.
Level
L1:
Go
to the door on the right halfway down the hallway, go in there and you'll come
to another hallway / walkway.
The
first half of this corridor is lit, the rest is dark. You can walk to the end,
there is a door but unfortunately no power.
Halfway down the corridor is a
console with a connection point for the laptop (BELOS), so take the laptop out
of your inventory and connect it here.
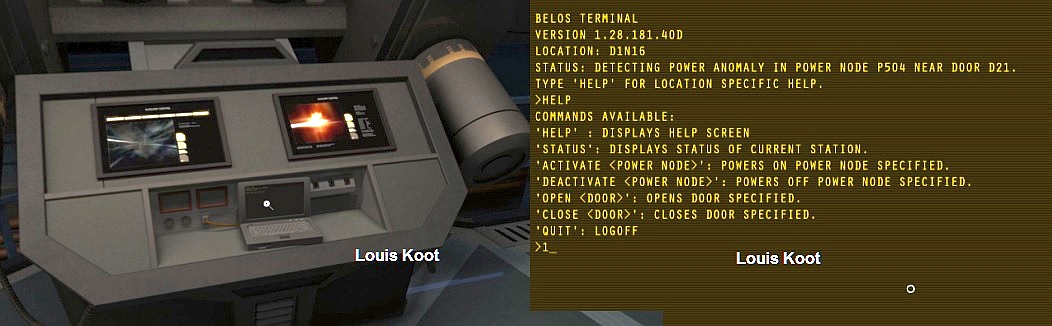
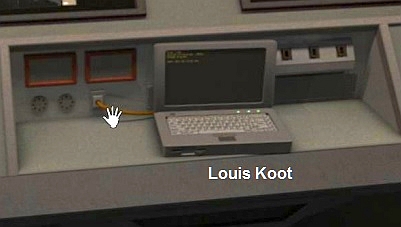
Zoom
in on the screen, you operate this laptop with your keyboard. Type in HELP and
click enter and you will see which commands are possible. You read on the screen that
there is a current deviation in P504 and you want to correct the current so just
type: ACTIVATE P504 and click on enter. You now hear electricity crackling, you
want to look at it so type QUIT and click enter, you are now zoomed out from the
laptop screen.
There
is a liquid on the ground and the electricity flows through it, you cannot get
through it. You also see that the light in the whole corridor is now on and that
the door now has power but you cannot go there yet. Click on the laptop
again to
zoom in and type OPEN D21, click on enter. Now the door is opened remotely. Now
type DEACTIVATE P504 to turn off the power and click on enter. Type
QUIT again
and click on enter and you are zoomed out again.
The
light is off again but the door is no longer locked so walk back and go through
the door, unfortunately now there is no light but that is no problem. Press F2
to switch on your night vision. You will also receive an update from ANNIE.
Click on the tab-key and you see your new assignment, you have to get power to
this room.
Walk
to the elevator door on the other side of the room, to the right of the door is
a large wooden Board)
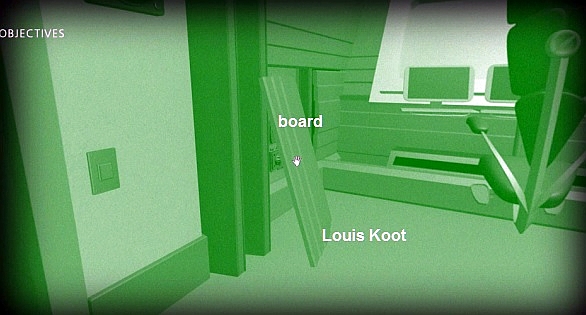
Take
this wooden Board and go back to the hallway / walkway. Press F2 to switch your
night vision off again. Walk back to the console halfway and lay the wooden
Board over the pool of liquid.
Zoom
in on the laptop and type ACTIVATE P504, click enter. Click on the plug of the
laptop to take it back.
The
power has been restored and you can now walk across the shelf to the door, enter
the room again. Here the light is also burning now, this is the manufacturing
room (Manufacturing) You will receive an update / reminder of your order to
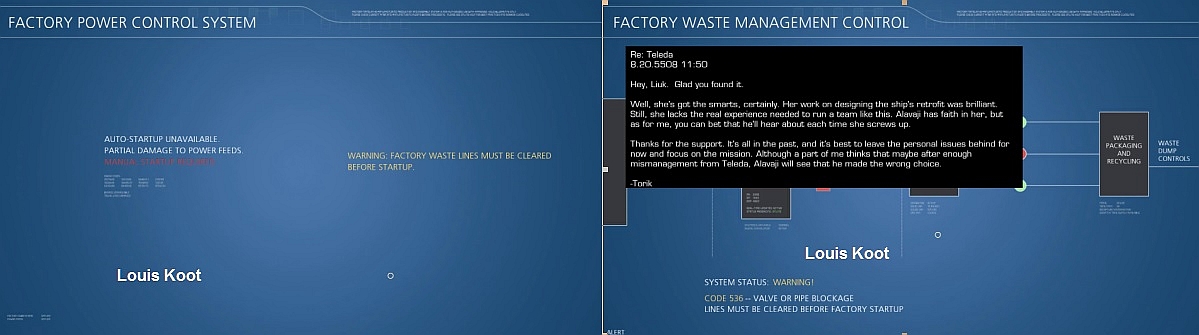
activate the energy help station. Here 2 workstations are active in the room, go
to the middle of the room. On the left you see 2 illuminated screens, on the
left the FACTORY POWER and on the right the FACTORY
WASTE.
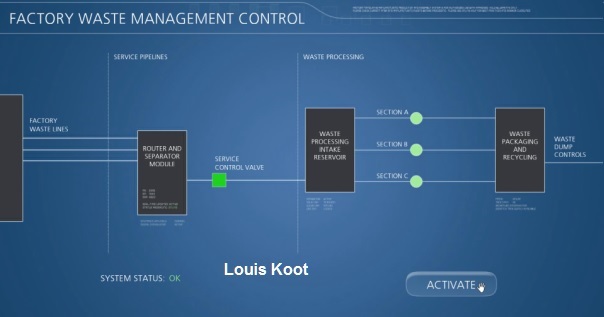
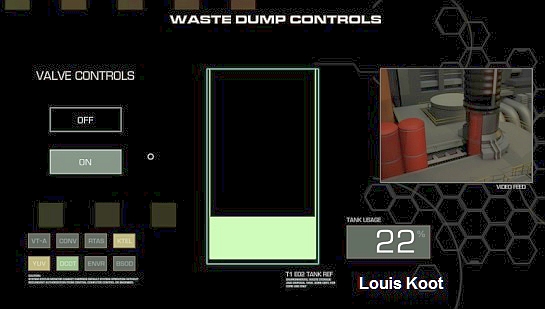
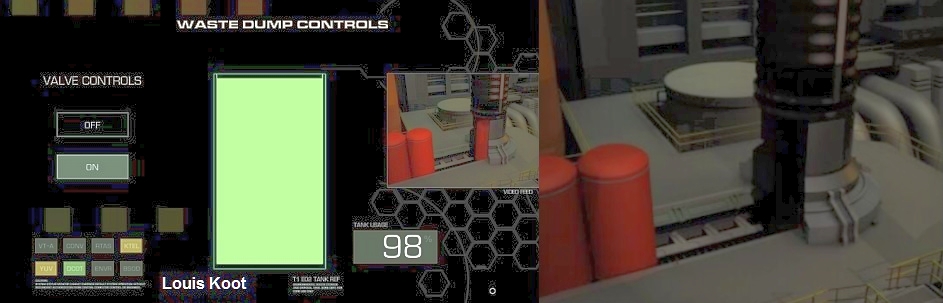
On
the left screen you can read that the automatic start-up does not work and that
there is a problem with the waste pipes. Click on the right screen, there you
see 2 red indicator lights. A service control valve and in section B waste
processing give problems that have to be solved before you can restart the
FACTORY. On the left in the corner is ALERT, click on it and you see a message
between 2 employees.
You
can try the elevator here, but unfortunately it also has problems.
So go back to
the Service corridor via the corridor / walkway, turn to the right and walk to
the end of the corridor. Go left into the room.
Go
down the stairs and turn to the right, there is the LCT. Read the messages.

The top message
tells about the shut-off valve in the Service corridor that
is automatically closed when you close a valve in the lower part of the Waste
processing. You must manually reset these later when the problem is solved. You
will find the shut-off valve in the Service corridor just next to the entrance
to the Waste processing.
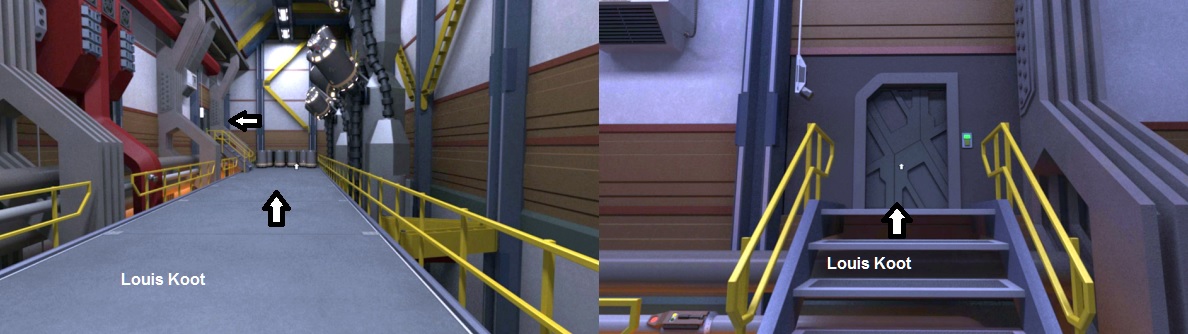
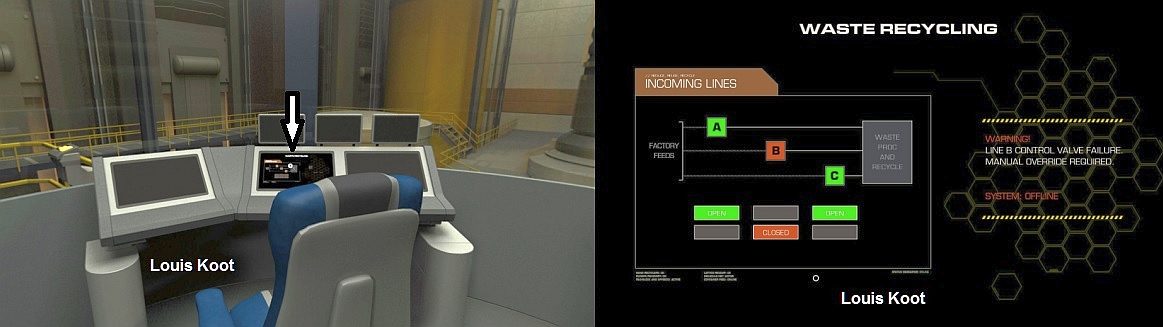
Go
forward and zoom in on the screen to the left, you will see that the valve in
pipe B is closed. It must be opened manually.
Go
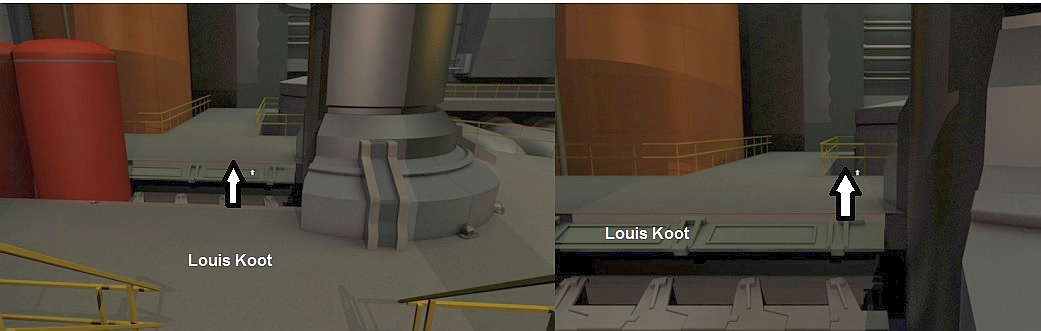
through the door to the walkway, turn right and go to the lift platform.
Press
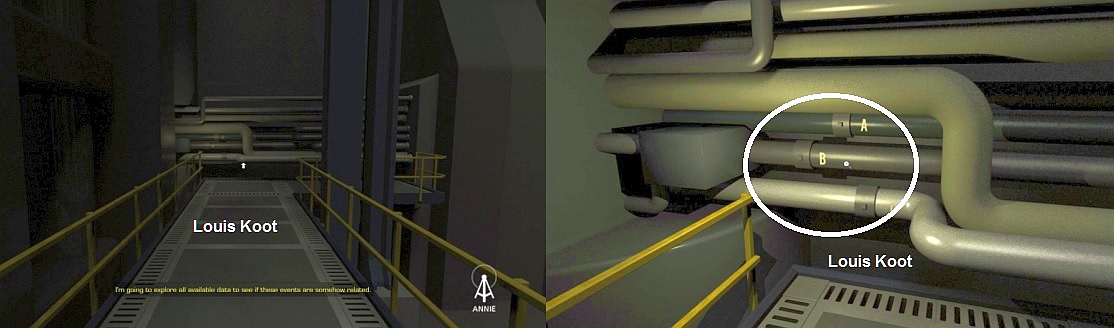
the button to go down, walk to the back and you will see the pipes A, B and C. B
is closed and there is no lever on, you have to make something to open that
valve.
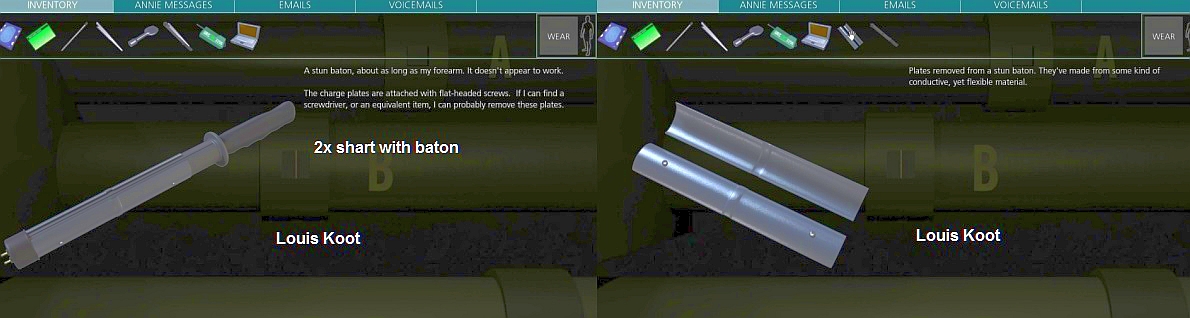
Right-click
to open the inventory, grab the "Shard" and click on the broken
"Stun Baton". The side plates are now unscrewed. Pick up the
"Shard" again and click it again on the "Stun Baton". Now
the broken core is removed and you have a rod with a hole in the middle, so a
lever for the valve.
Now
click with the "Stun Baton" on the bolt in pipe
B, click and turn this
rod horizontally so that the valve is now open.

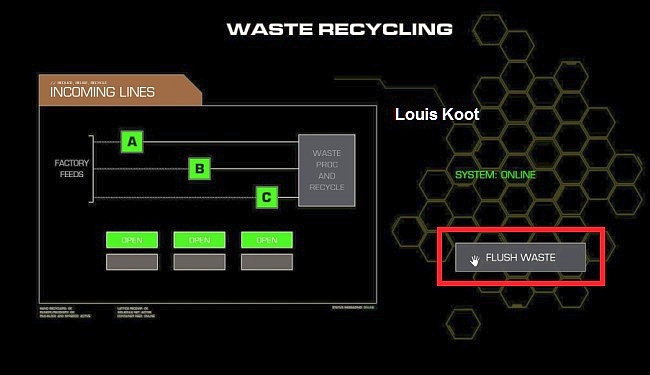
Get
the powered Stun Baton back again because you will need it later. Zoom out.
You
will receive ANNIE messages every time from now on. Go back to the lift platform and
click the Up button, here you can walk around the walkway but that does not have
any extra value. Enter the office again and look again at the screen on the
left. Everything is now green, so click on "Flush Waste". You hear
that liquid is flowing again.
Go
up the stairs and to the Service corridor, to the left of the stairs you see a
slider with a yellow light next to it. Zoom in and the slider opens, you get a
green light.
Walk halfway into the Service corridor and turn left, go down the stairs and walk across
the walkway to the other side. Enter the room - Manufacturing.
Manufacturing:
|
Halfway
the room you turn to the left and then zoom in the right screen, all the lights
are now green. Click on "Activate" to send everything to Waste
Processing.
Zoom
out and zoom in on the left screen, witch is the Factory Power
System. You see that a manual
start has to be done.

Click
on "Start-up" and in the next screen you see a list of subsystems and
3 flow circuits.
You
now have to divide the different subsystems over the 3 current circuits, if you overload
1 circuit then the puzzle will reset.
There
are several solutions, this is one of them. Click on the square in the subsystem
and drag it with a mouse to a circuit.
Number
of subsystems from top to bottom 1 to 6.
Solution:
|
1.
Drag the square from 2 (orange) to A, wait until it is lowered and then drag it
to C.
2.
Drag the square from 3 (yellow-green) to A, wait until it is lowered and then
drag it to the remainder at C.
3.
Drag the square from 1 (red) to A and wait until it is lowered and then drag it
to B.
4.
Drag the square from 6 (purple) to A, when it is lowered drag it to the
remainder of B.
5.
Drag the square from 4 (green) to A.
6.
Finally drag the square from 5 to A.
|
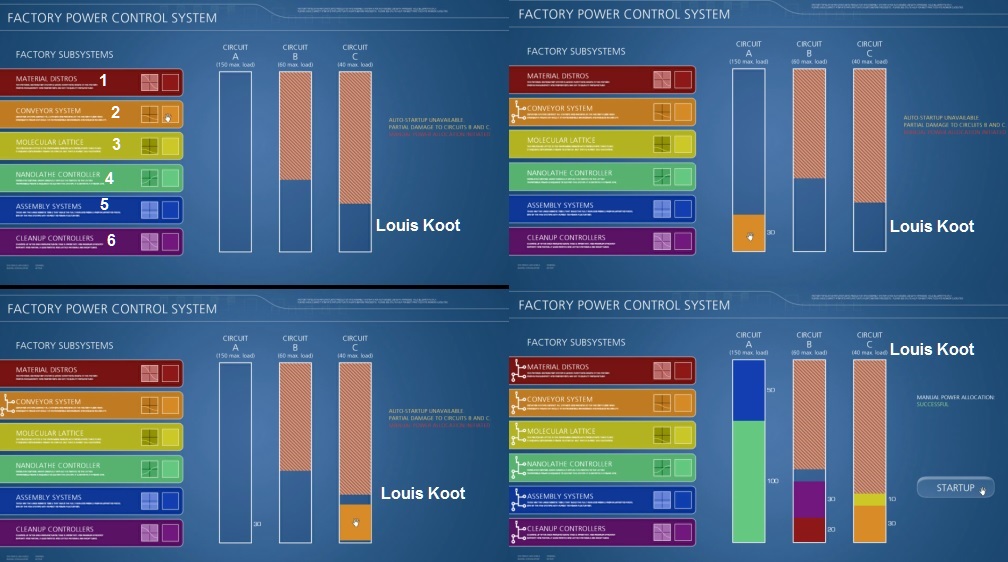
When
you have done this all correctly you will get a message on the screen and a start-up
button will appear. Click on the "Start-up" button
and you get the
compliments of ANNIE but she asks if you want to come to the Data archives
because she has problems there.
|
You have to go back to L2, read the messages on the LCT left of the door.
Now
go via the walkway and the Service Corridor to the elevator, to L2 and then to
the Data archives, that is the room left in the hall. The light now burns here.
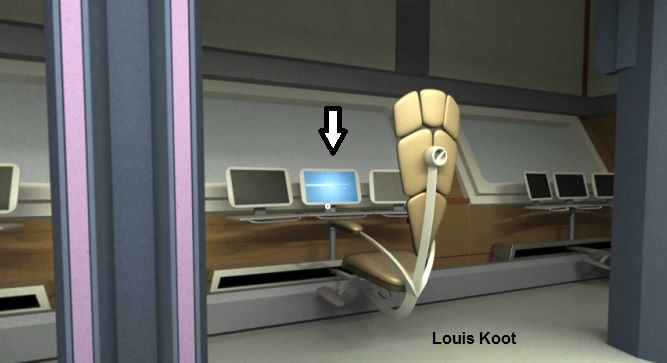
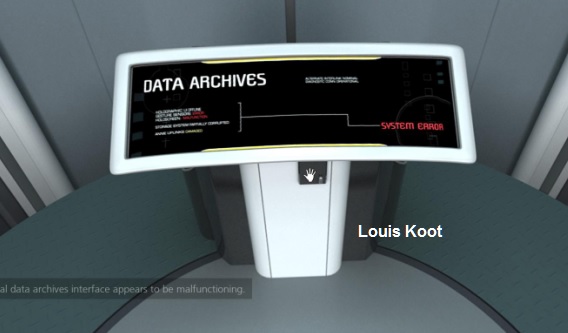
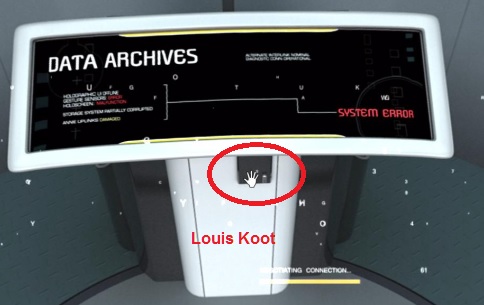
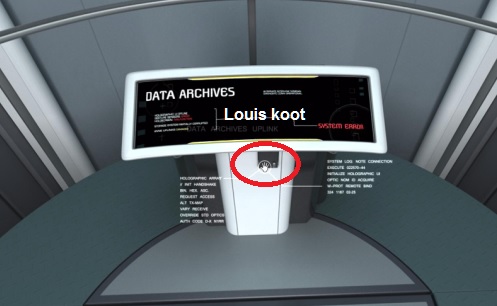
Data
Archives
Walk
to the end of the room, you will see a large screen with a console in front of
it.
If you click on it you will be notified that an error has occurred, you have
to find another way to consult the archives.
Just below the display you will
find a HAC connection.
Turn
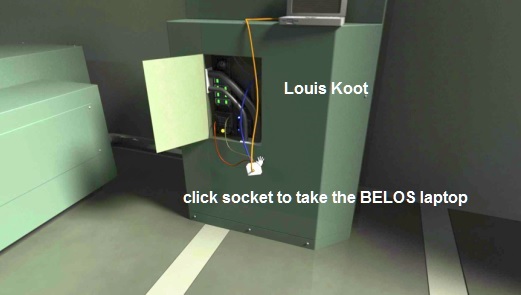
around and go to the console in front of cupboard 5, this is the cupboard where
you found the BELOS machine. Open the cabinet and connect the BELOS LAPTOP
to
this cabinet again by clicking on the socket with the laptop. There is now power
here so now you can use it here. Zoom in on the screen of BELOS and type HELP,
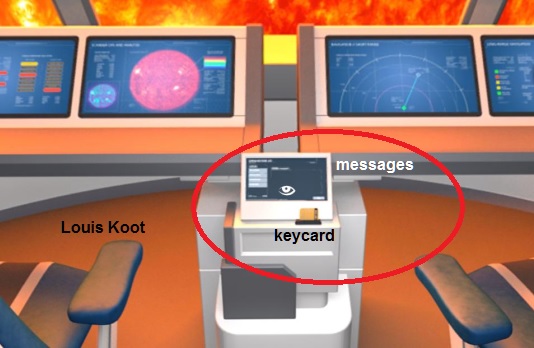
click on enter. You will now see which commands are possible here.
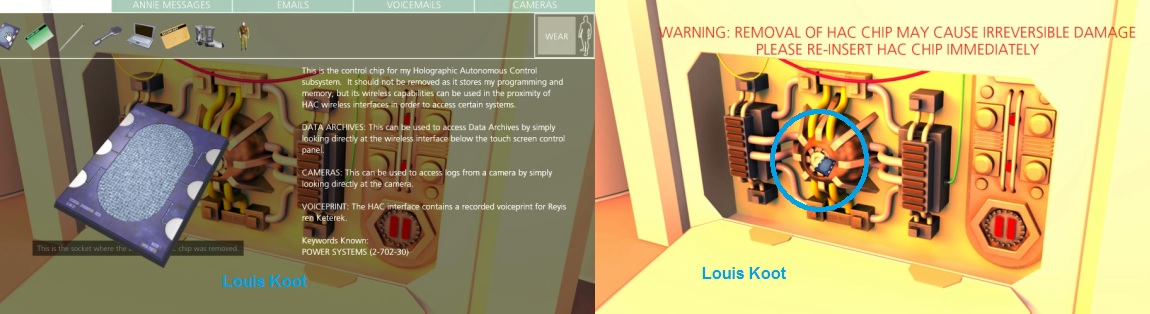
In
your inventory you will find a HAC chip and if you move your mouse above it you
will get an explanation and also a keyword: POWER SYSTEMS. Go to the screen of
the BELOS laptop and type LOOKUP POWER SYSTEMS, click enter. You now get a
memory address: 2-702-30. Now type LOAD 2-702-30 and click enter. You can now
reach the archives. Return to the console with the large screen and click on the
HAC slot below the display.
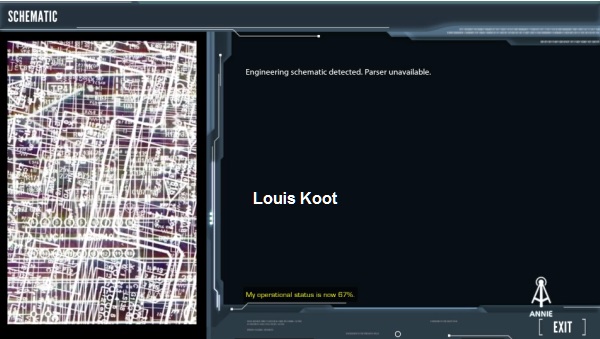
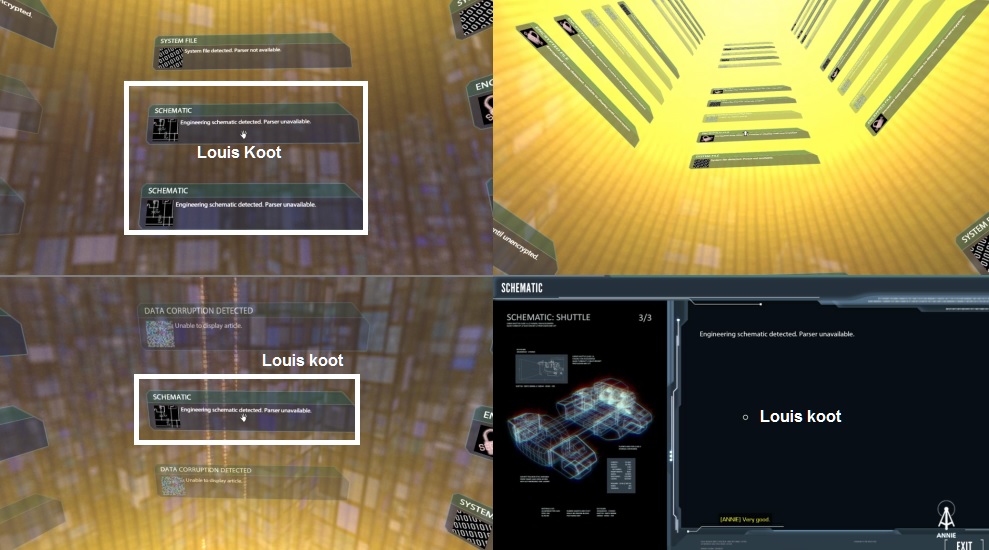
You
now make a trip through the memory and you enter a yellow column. At the top you
will find a file named "SCHEMATIC", click on it.
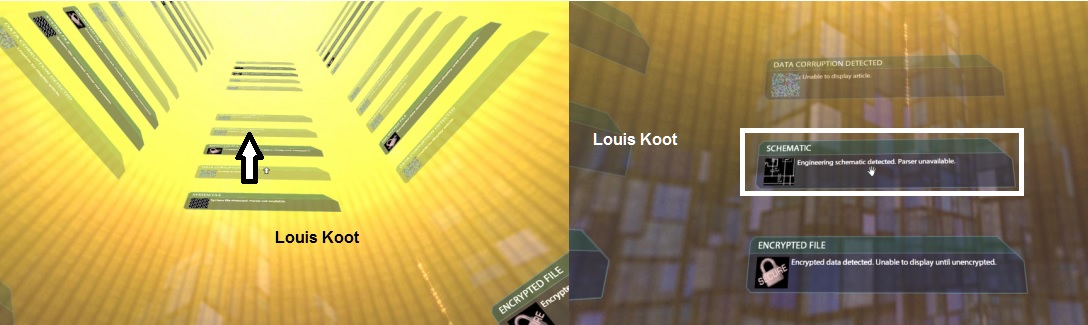
You
cannot do anything with it yourself, but ANNIE now has access to that data
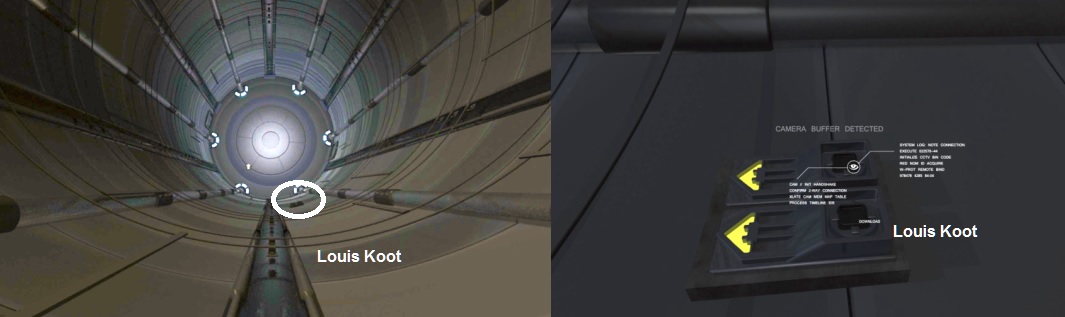
through you. If ANNIE has read the data, she is able to reprogram your HAC chip.
You
can read a few files here, but that is not necessary. Click down a few times and
you'll be back in the room with the console, you will get an message from ANNIE
that you can now download the camera buffers. You will find a new tab in your
inventory: cameras. You can now download and listen to the buffers of the
cameras everywhere. You can also look up other keywords via BELOS and read
things in the archives.
Take the BELOS Laptop back and leave the room,
You now must go to the Security room. Go to L3, turn left into the hallway and
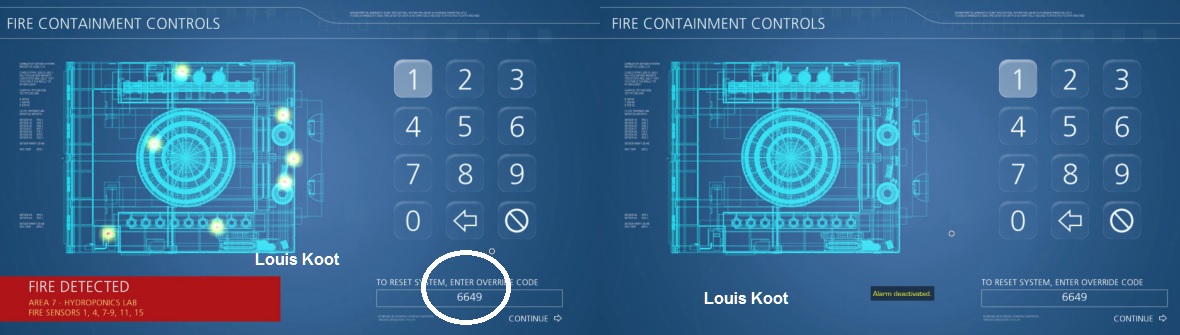
then right into the room. Click on the camera to download the buffer,
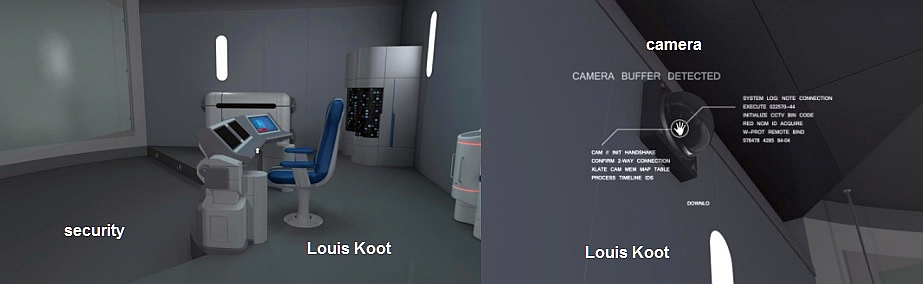
Go
to your inventory and listen to the camera's recording.

You
will hear a conversation about a fire alarm and a code to bypass this: 6649. Go
to the console, only 1 screen works, the fire control screen.
Enter
the code 6649 here and click on continue, the fire alarm is now cancelled and
the fire doors are no longer blocked.
Exit
the room, go to the left and at the T-junction you go left again. Follow the
corridor and you will see that the fire door now has a green light.
Go through
the fire door and you come in kind of large greenhouse full of plants,
You can see the starry sky through the window. So you are in space.

On
the walkway you see different types of machines, most of them are for
controlling the temperature and humidity in this room. Just next to the door
there is an LCT with a camera above it,
Read the message on the LCT. Then
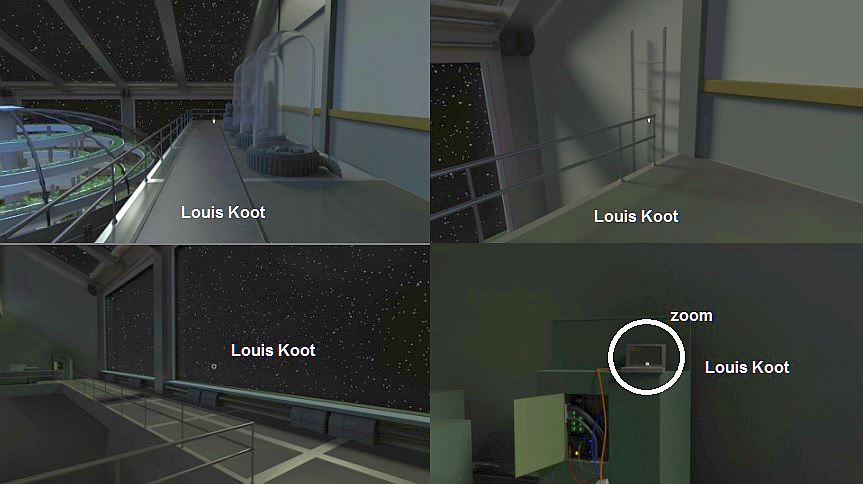
download the camera buffer and listen to the conversations of the 2 cameras in
this room.
Walk
along the 3 glass domes to the end of the walkway, you will see a ladder against
the wall. Click on it and go down.
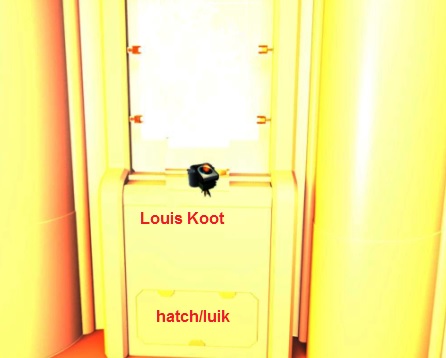
Turn
clockwise or counter clockwise that does not matter but behind you is a cupboard
/ machine. Walk towards it and zoom in on the rectangular hatch with a keyhole.
Take
the Key from your inventory and click with key on the keyhole.
The
hatch opens and inside you see two blocks with a yellow lamp on it, take the
left one.
This is a kind of battery and you needed this for your Stunt Baton
that you found but that had a broken battery.
Go
to your inventory and click on the battery, then click with the battery on the
Stun Baton and last you take the plates that you have previously removed from
the Stun Baton and click with the plates on the Stunt Baton with the new
battery. You now have a fully working Stunt Baton.
Zoom
out and turn to the window, walk along the window to the other side of the
walkway. You will see a cabinet with an open panel and a connection point for
BELOS Laptop. So connect the laptop here
This
point has been used by the mechanic Teleda to regulate gravity in the cafeteria.
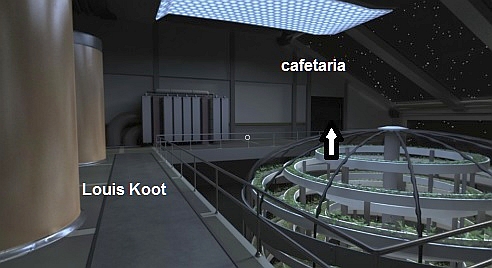
So now looking for the cafeteria.
Turn around and return to the walkway, follow
it to the end on the other side. Click on the door and you will enter the
cafeteria.

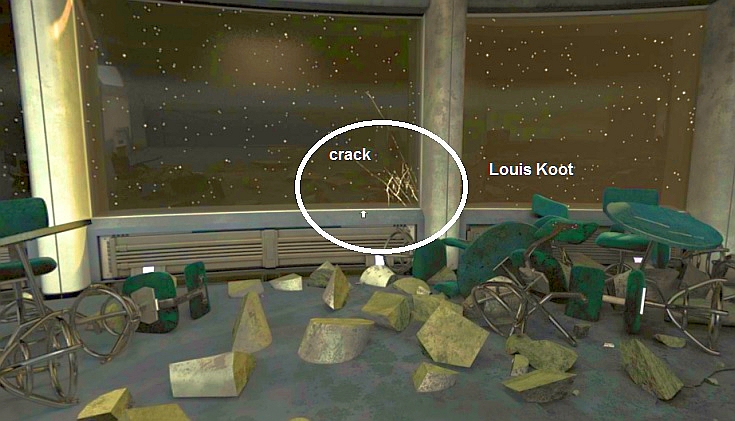
Cafeteria
It's
a mess here, an explosion has taken place. You get a few messages from ANNIE.
There is a crack in the window and the elevator is blocked by debris.
Your
new assignment is to remove this debris so that you can use the lift again. Or
you have to enter the elevator shaft via another entrance. This lift has an
connection with Manufacturing chamber on L1.
So go back through the walkway, through the fire door, to the elevator and then
to L1. You are back in the service corridor, halfway you go right down the
stairs and through the door. You are back on the walkway, at the end is the door
to the Manufacturing room. Go in there and walk to the elevator, there is a
camera.
Download
the buffer and when you listen to the recording you will hear that the doors of
the lift will automatically open in the event of an electric shock.

So
use your Stun Baton on the elevator door, a moment later you're in the elevator
shaft. You see a ladder against the wall, you can only go down because the upper
part of the ladder is broken down. This part is on the floor of the elevator
shaft. Go down and of course the elevator door is also closed here so use your Stun Baton on the door.
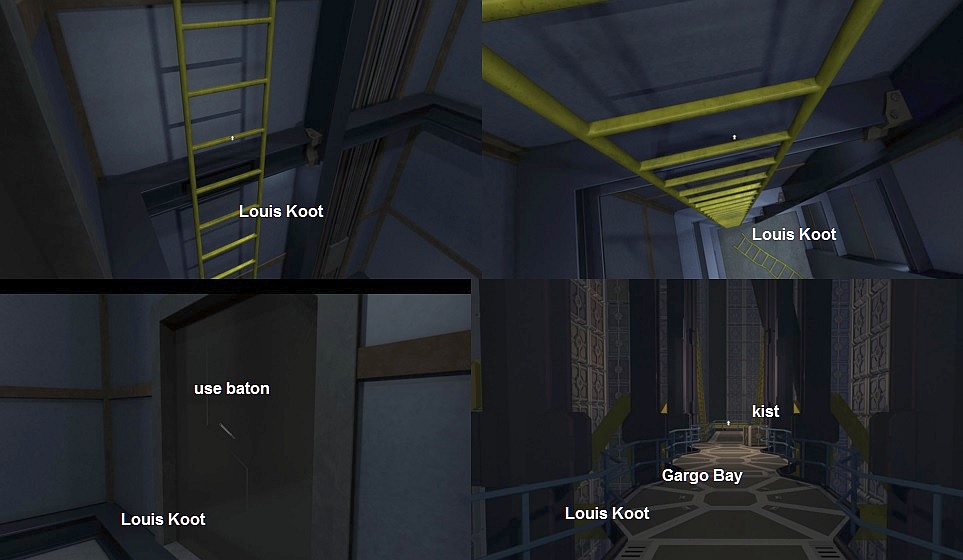
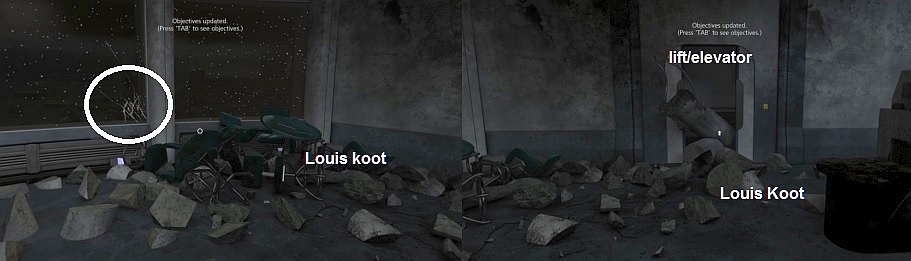
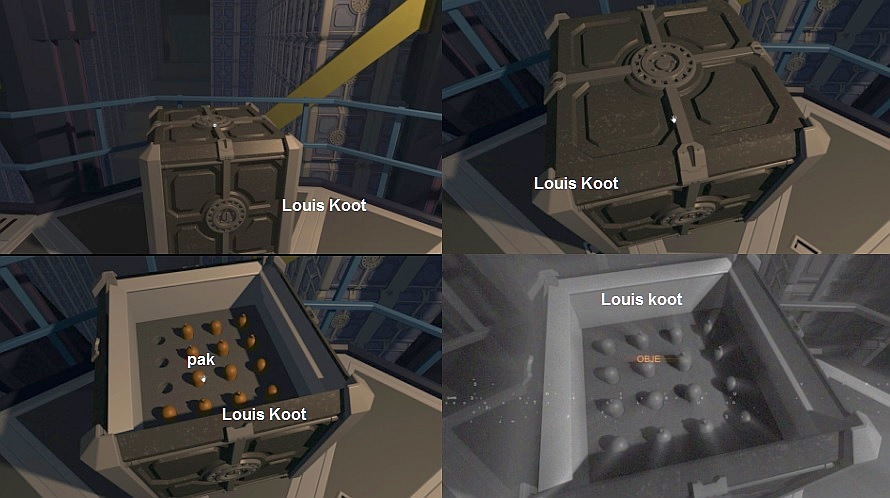
Cargo Bay
You
are now in the cargo bay (CARGO). Further on you see a box, walk towards it and
zoom in on it. Click on it to open the box, you get a hand on the objects in the
box but as soon as you take 1 of those things you get a blurry vision again and
the game continues automatically.
When
the picture is normal again, ANNIE says that you have committed the sabotage and
she breaks the connection, she also switches you off. A little later you will be
restarted and ANNIE says she has searched all logs and data, which shows that
someone has changed your program and that the sabotage was happening outside of
you. She restores the contact, she also says that you have saved the mission by
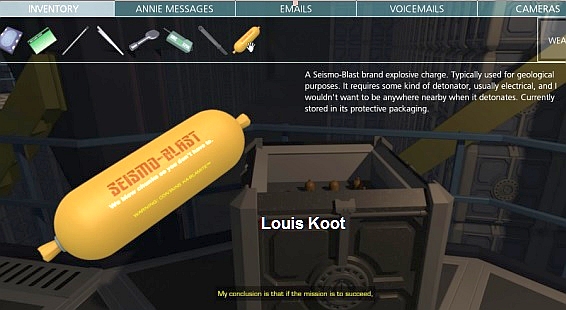
restarting ANNIE. There are explosives in the box, seismic charges, and you now
have 1 in your inventory.
You
are done here now, you have to go back to the cafeteria. So go back to the
elevator shaft and climb to the Manufacturing room, go across the room to the
walkway and via it to the Service corridor. Enter the elevator and go to L3,
follow the corridor and go through the fire door.
Greenhouse
/ Cafeteria
You
are back in the greenhouse. On the other side in the right corner is the
entrance to the cafeteria.
Enter
the Cafeteria again. It is still a big mess there but you also see that there is
a crack in a window.
If
you can have an explosion to take place at that window, then there is a big chance
that decompression will occur in the room, so all the junk will also be sucked
out the room. You have an explosive charge in your inventory, to make it explode
now without you being close to it you have to combine a number of things. You
need a detonator,
you can use the Stun Baton for that but then you are still around when it
explodes so you need a remote control. In the description of the Stun baton and
also in that of the URC you can read that you can connect them to a universal
port. Well, let's find out how to operate the URC.
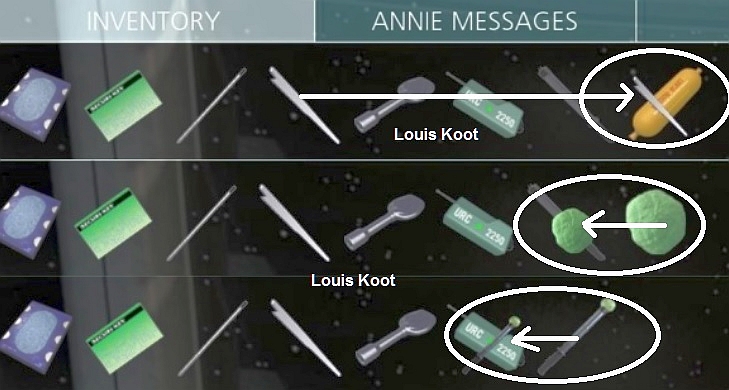
In
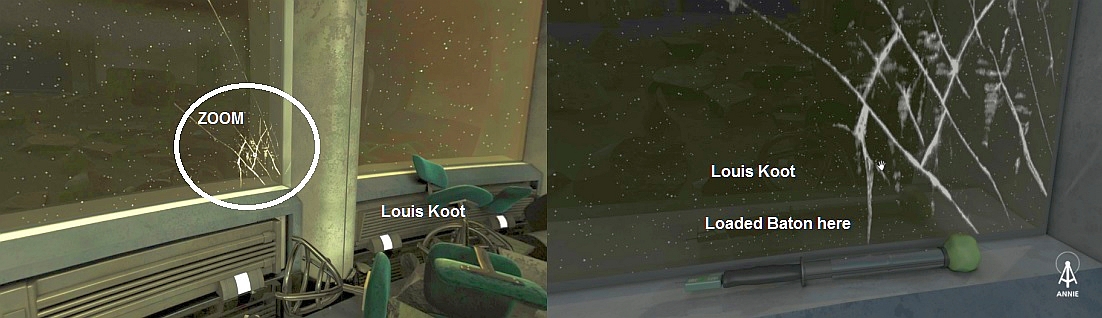
your inventory you are now going to combine a number of things. Grab the Shard
and it on the packed explosive charge,
you now have an
explosive sphere. Combine that Explosive Sphere with the
Stun Baton and now you
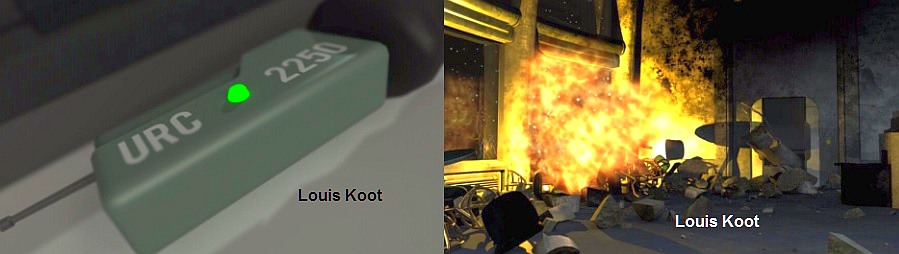
have to combine it with the URC, if you have looked closely you saw on the URC
the number 2250, this is the frequency of that URC. Now you can detonate this
remotely.
Walk
to the window with the crack and zoom in on it and then lay the explosive Baton
before the crack on the windowsill
Leave the cafeteria and walk through the greenhouse to the corridor at L3,
follow the corridor and enter the side corridor.
Enter
the left room, in the left corner at the back of the room, you see the console
with 3 screens. Go to the console and zoom in on the middle screen
This
middle screen is a signal generator. In this screen, set the frequency to 2250
and then press the transmit button.
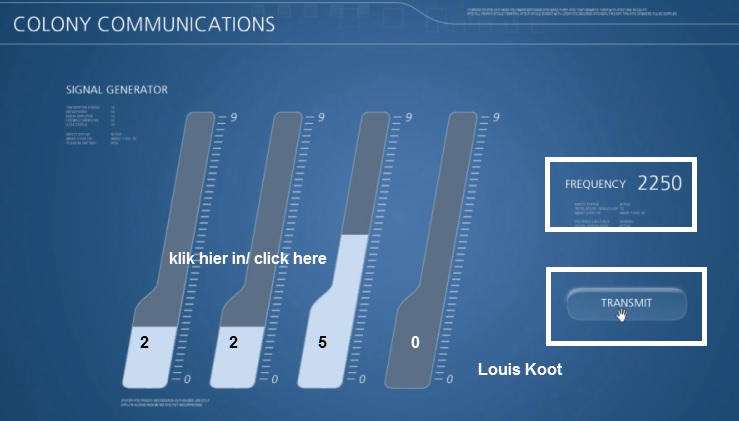
........
but the explosion is not going to happen yet because according to ANNIE the rubbish is
still too heavy to be removed by decompression.
Earlier
you heard and read in the emails and on the camera recordings that one Teleda
was busy removing the clutter by turning off gravity. So you have to go to the
greenhouse and then to the right , to the corner with the ladder.
Go
down the ladder and walk past the window to the other side, to the chest with the
open panel ......
If
you had not connected the BELOS laptop here yet, you can do this now by clicking
on the socket with the laptop. Then zoom in on the screen of the BELOS laptop
and ....... Type HELP and click on enter to see the commands that are possible.
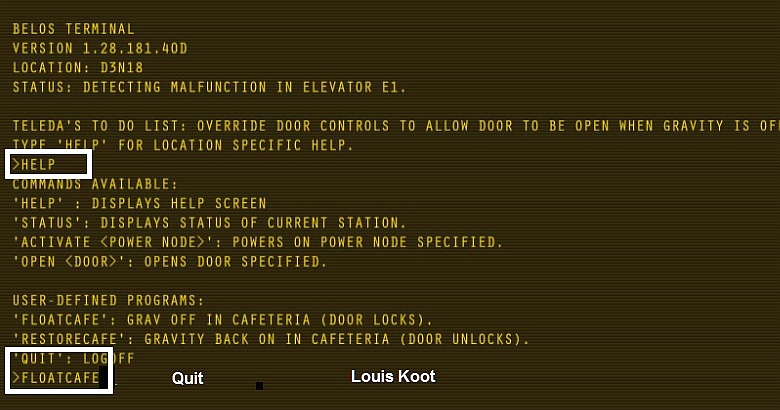
Now type in FLOATCAFE and click on enter, you will hear the door of the
cafeteria close and also ANNIE will put another penny in the bag. Now type QUIT
and click on enter, you are zoomed out.
Return
to the room with the signal generator and press TRANSMIT again and ........
.....
You get a vision of the cafeteria and you see the explosion and also that all
the rubbish is blown out.
You
also hear ANNIE and also that she has closed the shutters in the cafeteria and
also that the pressure is also recovering. ANNIE also says that the spaceship is
oriented differently by the explosion and that it is now picking up a weak
signal. Because you are here now you might as well now look at this first.
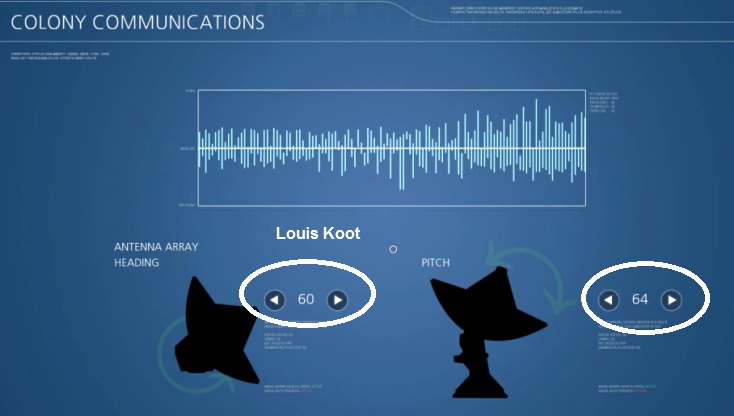
Zoom
out and zoom in on the left screen, this is the controls
of the antennas.
Change
the Pitch and the Array until the signal becomes clearer. You hear the Morse
signs better and better. About 60 for both adjustments is good.
ANNIE now receives the message and decrypts it. You now hear from ANNIE what
happened.
The crew went to NEW LETARR with shuttles and are now in trouble
because they do not have many more supplies.

You
will have to make sure that there are new stocks with a shuttle is sent there. You
are now done here so go back to the greenhouse and to your BELOS computer.
Zoom
in again on the BELOS Laptop screen and type RESTORECAFE and click enter.
Gravity is restored and you hear the door unlock, type QUIT and click enter to
zoom out.
Take
the BELOS laptop back by clicking on the plug.
Now
go back to the Cafeteria. The mess is gone and you can reach the elevator. Enter
the elevator.

You
see that there are 5 floors, 1 to 4 and CL. CL is the cargo bay where you have
been before, so L1 is the Manufacturing room.
You are now on Level L3 so you
have Level L2 and Level L4 to investigate. You first go to L2, so click on
2.
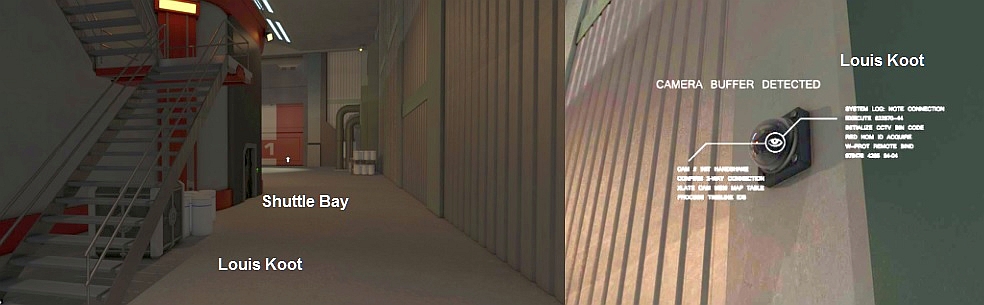
Leave the elevator and you are in a hangar.
Shuttle
Bay
Turn
to the right and you will see a camera on the wall, go with your eye cursor on
the camera to download the recording and listen in your inventory (Cameras) to
the recording
Turn
slightly to the left and walk in the direction of the door with the number 01,
you come to the place where the shuttles were. Unfortunately no more to see.
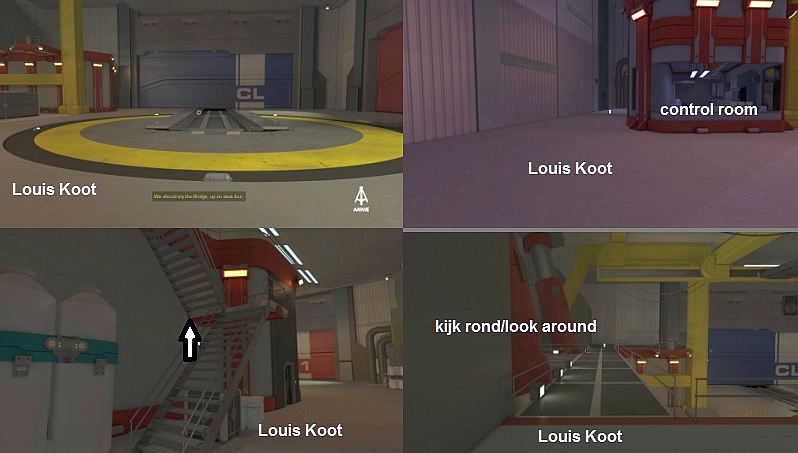
ANNIE says that the shuttles are all launched and you have to go to L4 to find
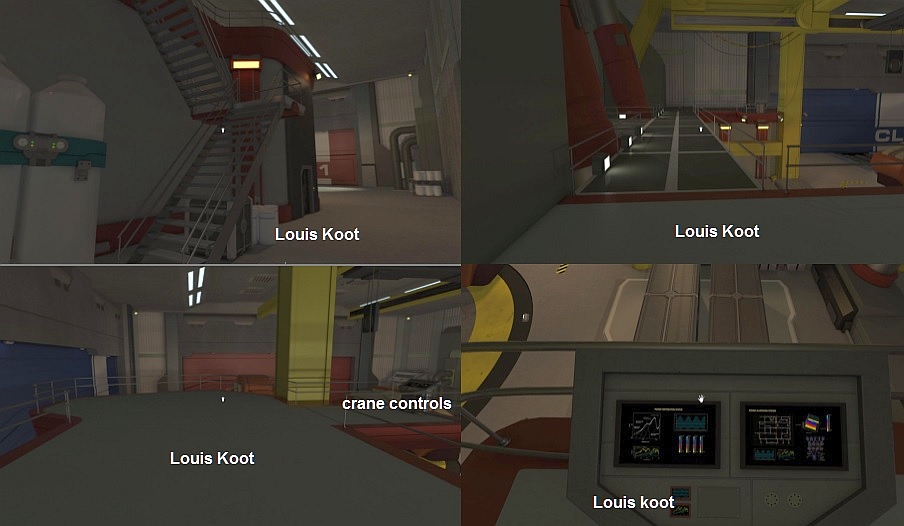
the bridge. But you go search the hangar, take the stairs upstairs. You will
find a fire door that is closed and also the control panel of the crane.
Go
back down and go to the control room of the hangar. Just next to the door there
is an LCT, zoom in and view the message. A camera hangs on the opposite of the
door, download the files. Listen to the recordings in your inventory. From all
these messages you learn that 1 man stayed here trying to repair the spaceship.
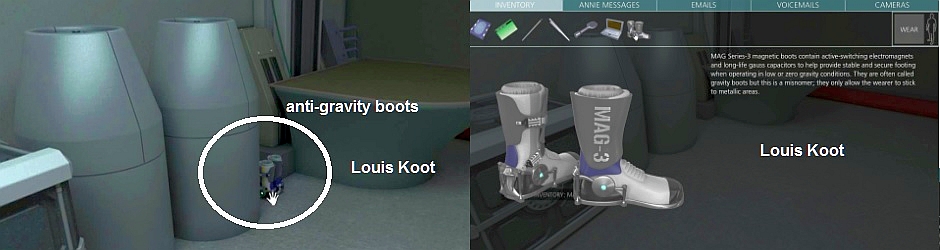
Walk
to the back of the control room, on the left you will find a pair of magnetic
boots (Anti-gravity boots). Take these.
Go
back to the elevator and go to Level L4. Turn left and up, there is a camera.
Download the files and listen to them. It seems that someone is still aboard the
ship.
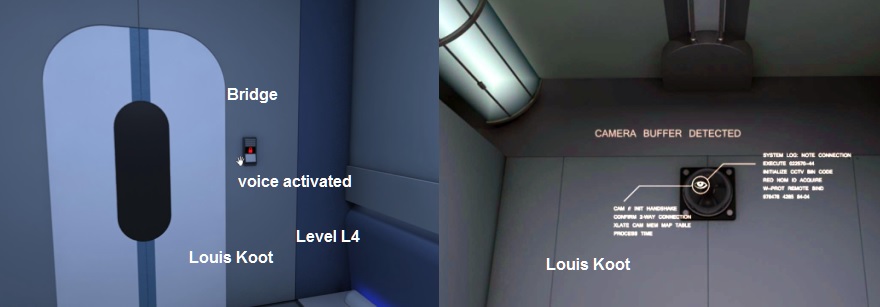
Turn
around, there is the door to the bridge but it is closed with a lock that
responds to voices. Only certain staff members with a specific sentence have
access. ANNIE will try to help you with a recording of such a sentence and
voice. Enter the elevator and return to Level L3. Walk through the cafeteria and
go to the greenhouse. Turn to the right and walk to the corner, on the right in
the corner you see an opening of an air ventilation
channel. Climb through the
opening and continue walking until you are in the HABITAT
SILO, temporary living
quarters. There is no gravity here so you are floating around.
Go
to your inventory and pick up the magnetic boots and drag them to the right to
the WEAR box.

You're
wearing these boots now and now you can walk here. The door with the red lights
is the airlock to the outside, don’t use this door but turn around and walk to
the other side. Then turn slowly to the right while you look down. You will find
a connector with yellow lights on the floor, go with your eye cursor on it and
your download again a message and an email. Read these messages.
Walk
back again and find the entrance to the air duct, crawl through it to the
greenhouse.
Turn
to the right and go through the fire door, follow the corridor and walk into the
side corridor. Enter the room on the left.
In
the back of the room is a console with 3 screens, zoom in on the right screen.
ANNIE has already loaded the voices and fragments there.
On
the left are 3 names, click on the name R. Ren Keterek because of that you have
enough samples to be able to put together the right pattern.
Drag
the samples to the empty box so that you get the same pattern as the top box and
click on test.
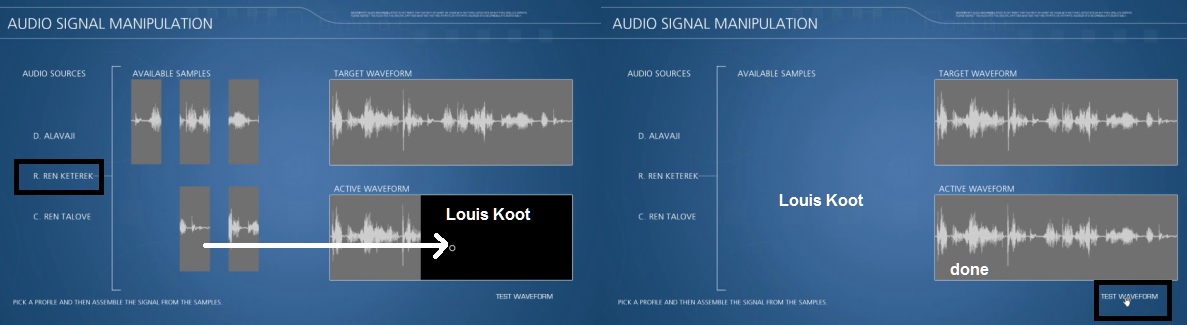
If
you've done well, ANNIE will tell you that she sends this pattern to your HAC
chip. Now you can open the door to the bridge. Now go back to the cafeteria and
to the elevator there and with the lift back to Level L4. Click on the lock on
the right of the Bridge door, the recording will now be played and the door will
open.
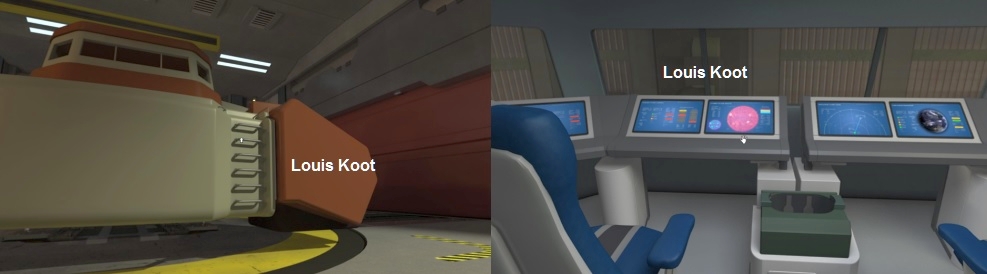
Go
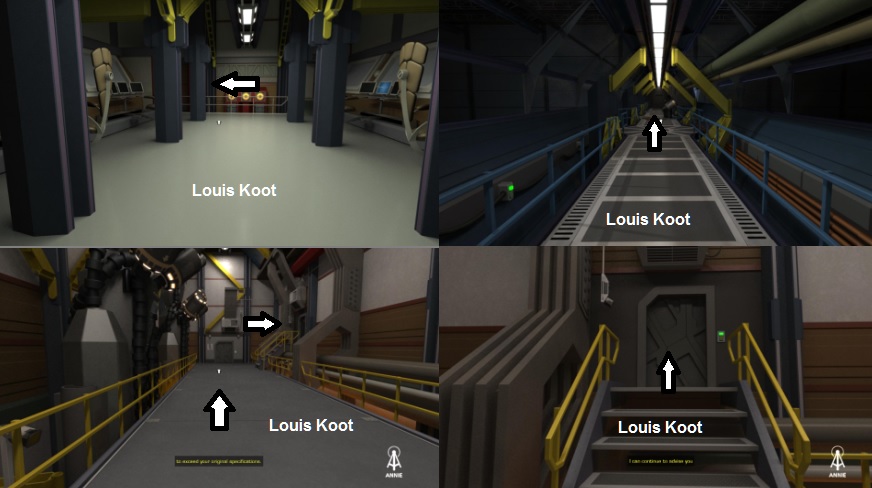
through the door and you are on the Bridge and standing in front of the console.
Turn around, a camera is right next to the door, download the recordings and
watch them.

Turn
back to the console, in the middle you see the screen that looks like the LCT.
Zoom in and read the messages. Just below that screen you see an orange key
card, click on it to grab it.
Leave
the bridge and when you are back on the corridor ANNIE says that you can make a
new shuttle at the factory. You now have to go to Power-Control
and from there
to propulsion control. Go with the elevator to L1, go to the other side of the
room and through the door. Walk across the walkway to the service corridor. Turn
to the right and walk in the direction of the elevator, on the right you will
see the Power-Control room.
Enter
this room and walk to the other side, there is also a camera, so download the
messages and listen to them again in your inventory
Then
go up the stairs to the door and use the orange key card,
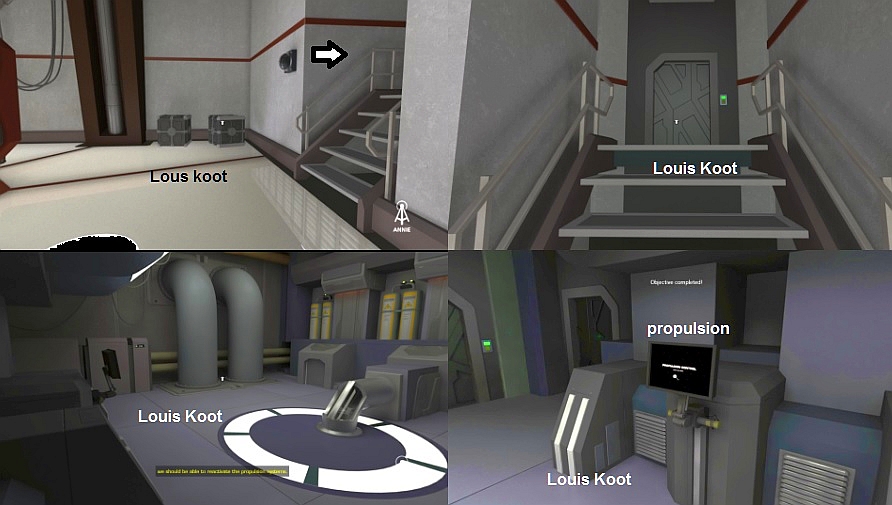
Propulsion
You
are now in the Propulsion. Right in front of you hangs an LCT and to the right
you see a closet with a Hazard Suit in it.
Read the messages
on the LCT and there you read that the combination for the cupboard is the date
of the birthday of
Raphe
Secarra
What
is the birthday of Raphe Secarra ??? For that you have to be at the security
console but you don’t have to go there now because it no longer works because
you have removed a G4L1 card to repair ANNIE. So you need another G4L1 card.
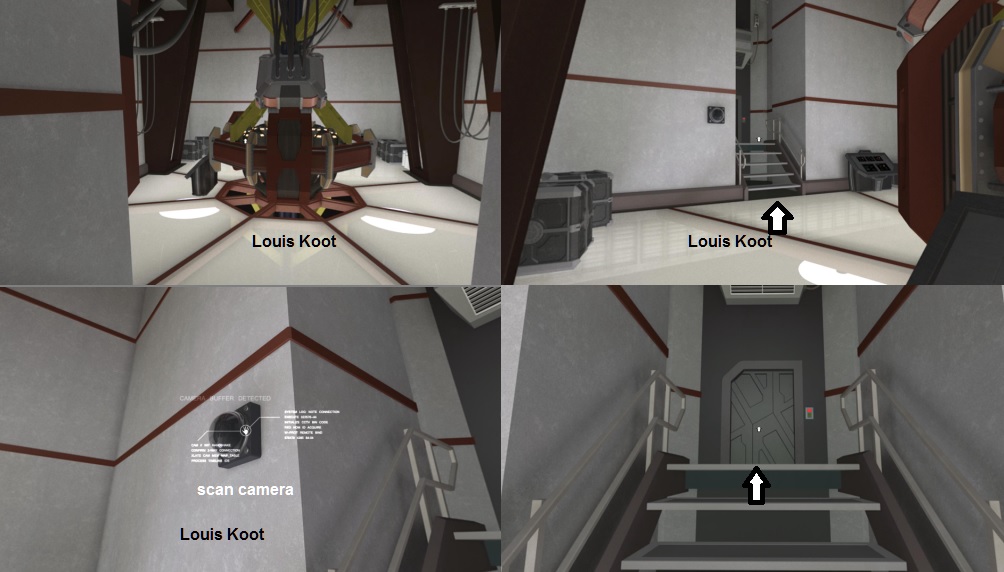
Turn around and you will see 2 doors in the corner, right in front of you is the
door you came through so go through the door on the left. What a mess, this is
or was the CORE CONTROL ROOM. On the right hand side of the wall there is
another camera, you know by now what you have to do with it.
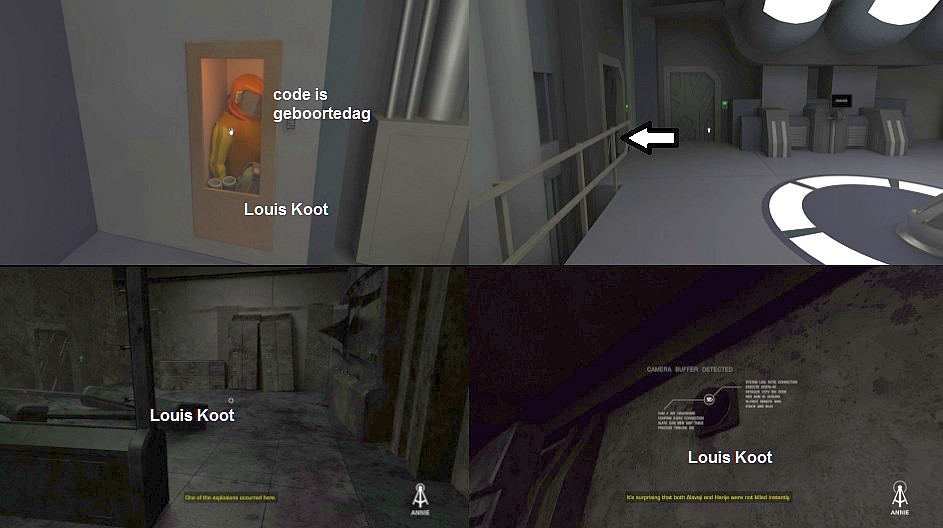
Go
to the door on the left in the corner, if you want to go through you will be
told that you need a Hazard Suit. Turn around and look at the
beam that lies on the ground, in the middle you can see something protrudes.
Take that thing, it turns out to be a G4L1 card.
Now
you can go back to Security to look up Raphe's birthday. So back to POWER
CONTROL via Propulsion, then to the Service Corridor. Turn to the right and
enter the elevator. Go to Level L3 and enter the side hall on the left and then
the room on the right. Walk to the console. Zoom in on the box to the left of
the console and click on it to open it. Take the G4L1 card and put it in this
box, the system is operational again.
Now
go to your inventory and go to the voicemails, there you will find a
patient-report of Secarra .... Read this email and ..... you read that the ID
number of R. Secarra is 92559

Zoom
in on the left screen of the console .....
Make
sure the screen is empty by passing the green keycard through the slider.
Then
enter the ID number 92559 and you will receive the data from R. Secarra on the
screen. The birth date of R. Secarra is 10.23.76.
Go
out of the room and take the elevator back to Level L1. At the service corridor
you immediately go left into the room and on the other side leave the room. You
are back in the room with closet containing the protective suit. Zoom in on the
number panel and enter the date of birth of R. Secarra 102376 and then click the
arrow at the bottom right.

The
cupboard is now open, so open the cupboard and take out the Hazard
Suit. Go to
your inventory and drag the Hazard Suit to the WEAR box,
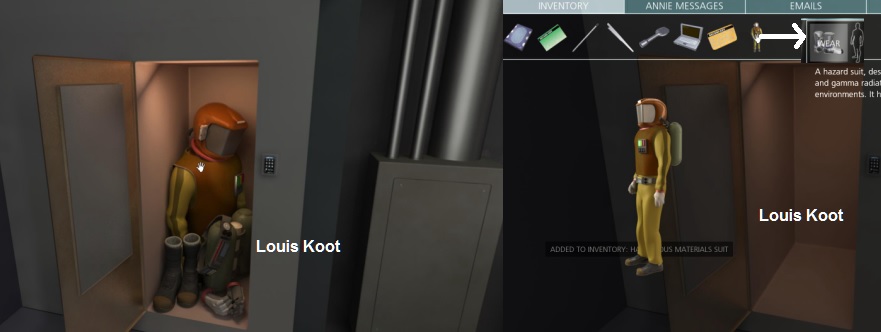
You
have now put on the Hazard Suit. Your view is limited. Turn around to the
entrance and walk towards it, turn to the left and go through that door. You
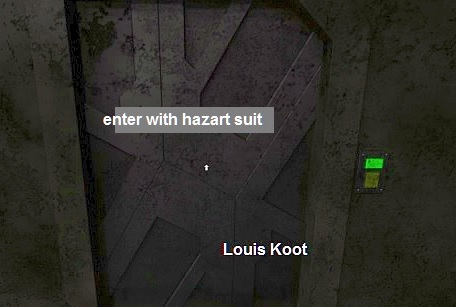
will receive a message from ANNIE that she will lead you. Go to the door on the
left in the corner and click on it, now you can do it because you have the suit
on.
If
you are through the door you see very little (You can turn on your night vision
via F2) ....... however follow the directions of ANNIE and if you do that
correctly then you will eventually end up at a control panel. When you click on the
console everything becomes clear again. You can view everything here now.
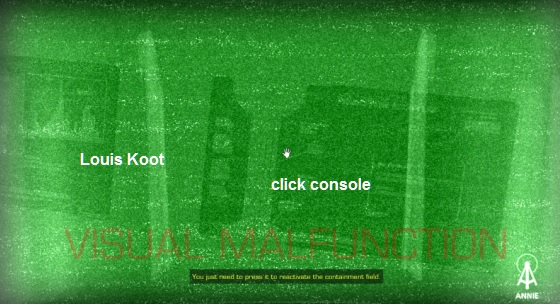
You
see normal again and because you have clicked the console, ANNIE is now almost
100% back. Look around here
Now
go back to the POWER CONTROL room, go down the stairs and turn left. Here you
will find the POWER ALLOCATION console
zoom
in and grab the orange key card from your inventory. Click on the slot on the
right.
Two
Endings
SAVE YOUR GAME HERE
To
explain a bit ....... There are 2 ends to this game and this is a good place to
make an extra Save game if you want to experience both endings without having to
go through the whole game again to this point. ATTENTION: it is also wise to go
back to Research to get the spare navigation
module. You need this navigation
module in both endings, otherwise you have to make this trip twice.
Ending
1
Here
you have to make choose now, there are 2 profiles: profile of ANNIE and a profile of
ALAVAJI.
ANNIE makes a shuttle and ALAVAJI repairs the ship, if you have chosen
you cannot change anymore.
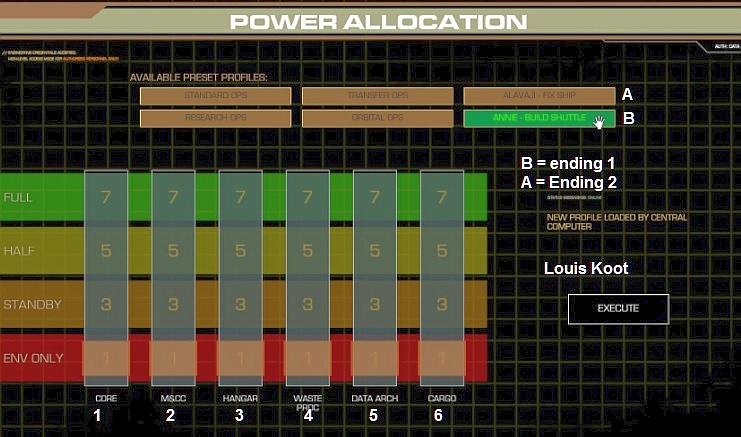
Here
is that extra Save game useful then you can play the other end later. Now choose
the profile of ANNIE and slide the 4 controls, 2-3-4-6,
to full and
then click
execute.
The
Factory now has enough power to build a Shuttle, but for that you have to get the
blueprints from the DATA archives. You need a new password: SPACECRAFT. Now go
back to the DATA archives. Go to the other side of the room and then to the
service corridor, go up the elevator to Level L2. Walk straight ahead and go
left into the door.
Connect the BELOS again to the console for cabinet 5.
Zoom
in on the screen and type: LOOKUP SPACECRAFT and click enter. You get a memory
location. Now type LOAD 4-112-10 and click enter. The data is now loaded. Type
QUIT and enter to zoom out.
Walk to the end of the room and dive into the archives.
You
have to find 3 blue prints and view them so that ANNIE can load them. 2 you find
on the bottom layer of the tower and the third on the top layer, you recognize
them by the name SCHEMATIC. Click on all 3 files so that ANNIE can also read
them. If you have found all 3 of them, ANNIE says she will forward them to the
Factory.
Go
down and back to the Data archive room. You have to go back to Manufacturing
now. Go to Level L1 with the elevator. Halfway through the service corridor you
go right on the footbridge to Manufacturing. Walk to the elevator and turn to
the left, zoom in on the screens there: Factory Master Control.
ANNIE
has already loaded the blue prints, at the top right, see the diagram for Part
1.
You
see 3 entrances on the left and the end point on the right at the green dot. At
1, 2 and 3 raw materials come in and they must arrive at the different stations
at the same time. A turn takes 1 second and a straight 2 seconds, the stations
indicate how long it takes: A and C 8 seconds, B 4 seconds and D 2 seconds. You
must now make the pipes so that the substances from 1 and 2 arrive at A
simultaneously and that the product from A and the substances from 3 also come
to B at the same time.
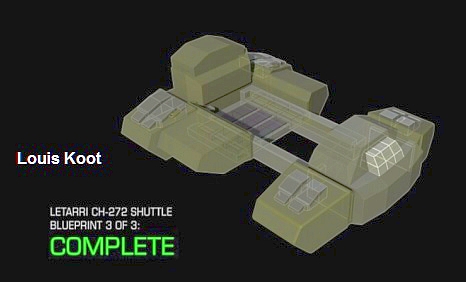
Shuttle
Part 1
There
are several possibilities, this is one of them.
If
you have built the pipes, click on start, then the manufacturing process starts.
Is it good then you see that the part is made and otherwise the pipes must be
adjust and try again.
After part 1 is made then you return to the screen and now
the blue print of part 2 is shown on the right.
Shuttle
Part 2:
This
is also one of the possibilities
Click
on start and you will see that part 2 is being made. Back to the screen for part
3.
Shuttle
Part 3:
The
shuttle is made and brought to the Shuttle Bay.
Go
with the elevator back to Level L2, the Shuttle Bay, and you will see the
shuttle, you will also receive a message from ANNIE that you have to take the
supplies to the settlers.
You
can use the crane for this, the controls can be found on the top platform. Walk
back to the elevator and go up the stairs, walk to the other side of the
platform.
There you will find the control panel of the crane. Zoom in and the
cargo is loaded.
It is time to fly so go down and enter the shuttle. Click on the console and
ANNIE reports that you need a new navigation module because it is burned out.
ANNIE
reports that there is still 1 in Research, you cannot go directly there because
of the explosion. She proposes to go to Research via Waste Processing and a space walk. Take the elevator to L1, go to the other side of the room and via the
walkway to the service corridor. Turn right and at the end go up the stairs and
into the room. Go down to the consoles.
The
right-hand console controls the dumping of waste. Zoom in on it and click ON,
you will now see how a tank is filled and then goes outside. Another tank is now
moving up.
If
you want to use that exit you have to stop the next tank by sabotage the
conveyor belt. Zoom out and go outside through the door to the walkway,
follow
it to the other side of the room until you are at the conveyor belt with tanks.
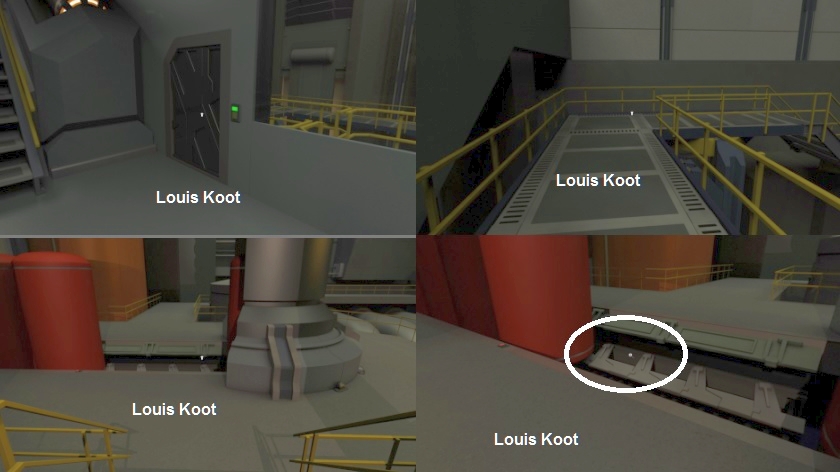
Zoom
in and you will see a cover plate above the conveyor belt and on the left a key
card reader. Take the orange master card out of your inventory and click it on
the card reader, the cover plate will open. Now take the
SHARD out of your
inventory and block the conveyor belt.
Go
back to the control room and zoom in on the right screen again, click ON again.
The tank is refilled and discharged again.
Now
no new tank can replace it, you can now enter the airlock through this opening.
You
have to put on your Hazard Suit again,
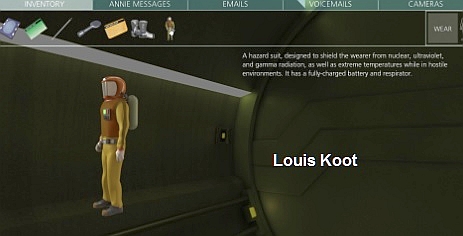
then
click on the button to enter the airlock. Now pull the red handle on the left,
the lock gate opens and you make a space walk.
You
come to the hole of the explosion, it is very dark here so press F2 for your
night vision. On the other side you can see a camera hanging, download the data.
You then hear that a probe is ready to be launched. You will also hear the
explosion before the probe is launched.
Turn around and walk back to the hole, turn to the left and walk backwards.
Click on the big tube on the right. You will then see the probe, click on it and
then take the navigation module.
Turn
around and walk to the hole, turn to the hole and click in it. You take another
walk and you come back into the airlock.

Turn
off your night vision. Click on the yellow button to leave the lock. Then click
in the opening upwards to return to WASTE PROCESSING space.
Pull
out your safety suit. Now go back to the shuttle via the service corridor, turn
left onto the walkway. Through Manufacturing to the elevator, go to L2 and
you're back in the hangar.
Climb
back into the shuttle and place the navigation module in the console.
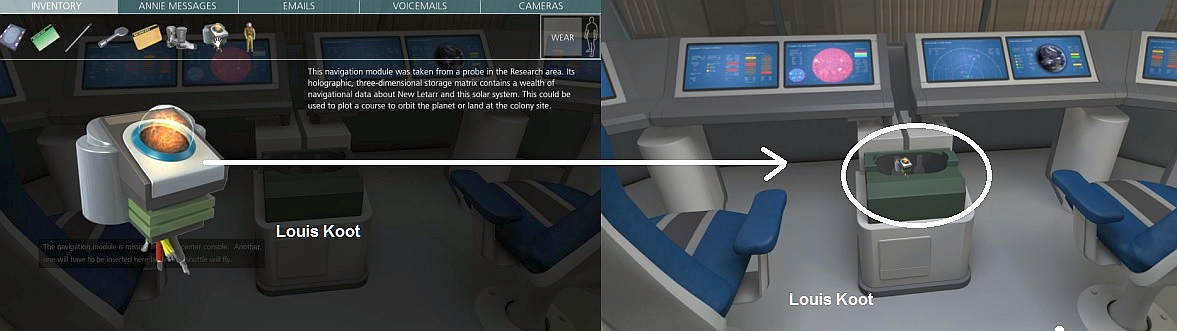
Click
on the console and you will see that the shuttle is turned and then launched.
The colony is saved with the stocks in the shuttle.

This
was the first ending, you can now play the other end.
ENDING
2
Now load the
extra save you made at the POWER ALLOCATION console and zoom in
again. Pick up your orange master key card again and click on the slot on the
right.
You
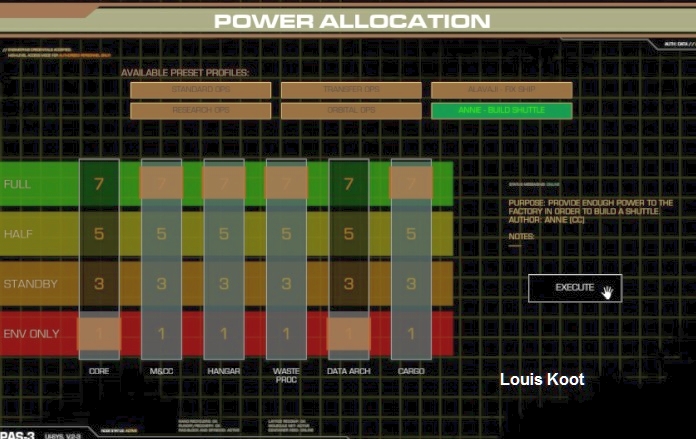
have to choose a profile here again, that will now be the ALAVAJI's
profile. Now
put slider 1 and 5 on Full and click on start,
ANNIE
does not agree but helps you anyway. She says that you now have enough power to
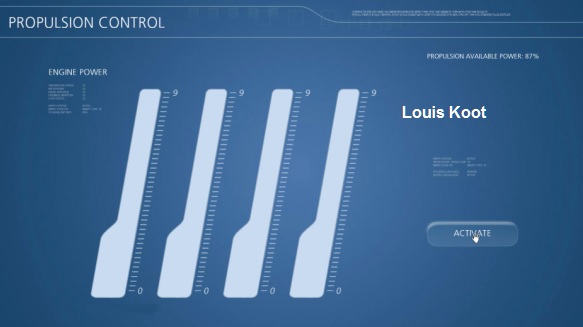
start the engines. Go back to the Propulsion Control, zoom in on the control
screen.
Set
everything to 9 and click ACTIVATE.
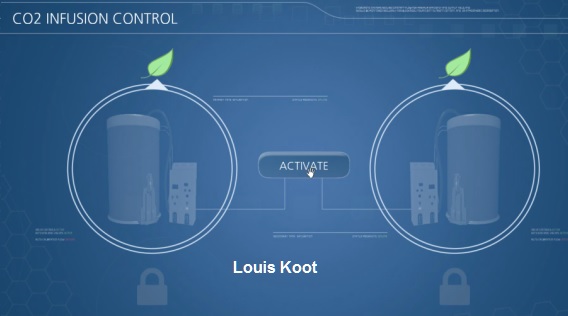
ANNIE now also says that you have to start the greenhouse again, that requires
CO2. Go through the service corridor and the elevator to L3, enter the side
corridor and then the room on the right. Behind the console is a container with
a red band against the wall, click on it and you will find a container with CO2.
Go
back to the hallway and walk to the fire door, just before that fire door hangs
another container CO2 Take this too.
Go
through the fire door to the greenhouse, walk straight ahead. Halfway on the
left is a monitor and two poles on the right and left of it. Here you have to
place those 2 cylinders with CO 2 gas.

Zoom
in on the screen and turn the arrows upwards, the leaves will turn green. Click
ACTIVATE.
Now
with the lift in the Cafeteria, return to the bridge on Level
L4, click on the
console and you will see that the navigation module is off-line.
Turn
around to the cupboard to the left of the door and click on the module. ANNIE
indicates that it is broken.

Navigation
module in RESEARCH
So
now you have to go and retrieve that Navigation module in Research and so you
have to do the whole thing with the Waste again, as you did at ENDING
So first here with the lift back to Level L1 and then back in the service to
Waste Processing.
Then
follow Waste Processing ENDING 1 until you are back with the new Navigation
module from RESEARCH.
After you have retrieved the module you go back to the bridge. Place the module,
but then something else appears to be wrong.
Below
the module you will see an inspection hatch, click on it. You then hear that HAC
chip is broken.
ANNIE
looks for another one but there is only one other and that is what you have.
Take the HAC chip from your inventory and place it in the machine.
The endgame starts now, sit back and watch.

THE
END
2017:
Walkthrough by Dick Leeuw en Louis
Koot
Text Dick Leeuw. Screenshots by Louis Koot