
2018: Walkthrough by: Dick
Leeuw and Louis Koot
Text by Dick Leeuw and screenshots by Louis Koot
If you have found this walkthrough via google search or via another site then you have probably not visited my site.
A lot more very detailed game walkthroughs can be found on my site at: www.pcgameswalkthroughs.nl
Part 1: The Village
Chapter 3: The Watchtower
Leave the Crystal Lab and turn right and walk to the gate white the iron fence door .
You can now open the fence door, because you have pulled the lever inside the Crystal lab down, so do that and go through it.

Just behind the fence door you see a sunken pillar, if you look down to the ground.
This is pillar 3 but you need to get it up from the ground.

You can also turn right here, but that path has a gap, but it leads to the swamp.
So go straight ahead to reach the 2 huts of the Watchtower. On top of the right hut stand the Telescope

Opposite the huts you will find pillar 1 with a round disc above it that has a lever

Pull the lever on the right of the disc down. The disc will slide open.....it's a lens

You have now found pillars 1 and 3. Now
go find pillars 2 and 4.
Follow the path further over a wooden jetty,

halfway through the jetty you will find pillar 4.

Follow the path further over the wooden jetty. You reach the South Passage and you will find pillar 2 on the right.
South Passage:

You are here now so you might as well first explore this side of the island. Follow the path further along the jetty
You go past the backdoor of the mine

Further on is a fork in the path. The right path goes to a Cave, but the cave entrance is blocked

Follow the path further to the left . You end up on a piece of sand.
On the right you see the Hanging Platform hanging against the rock.
Turn left to see the passage with the iron fence door, that fence door is unlocked now because you have pulled the lever in the Crystal lab down

Open this fence door now and go through it, You'll be back at the Maine Square

You must go back to the Watchtower now. You can do this by going over the main square and then along the Crystal Lab.
Or you turn around and go back over the South Passage.

So get your ass back at the
Watchtower:

The watchtower has two huts. On top of the right hut you will find a telescope. First go into the left hut and take a look there.
There are a few objects in the left hut where you get the gear cursor but you cannot do anything with it.
There's a scale and a pot with sand. Remember that those things are in this hut, because you need this later

When you have looked at everything in the left hut then go out and go to the outside stairs of the right hut.
Don't go up the stairs yet but first go into the right hut

You see a hanging cabinet against the back wall with in front of it a large crystal with a key in it. You cannot get this key yet.
To get this key you must "meltdown" the crystal, but you can't do this now

On the low table lies a Lens and a letter. Take the lens and take / read the letter.

There is also a drawing on the wall.
This drawing gives you the order in witch you have to push the 4 sunken pillars, when you have get them up from the ground
You must push the pillars 1, 2, 3 ,4 in order the get the sunken pillar 5, at the central tower, up

Leave the hut and go up the stairs to the:
Telescope:
The Pillars puzzle
At the top of the stairs you will find a telescope. Walk to the other side of the telescope. You see a holder and an looking glass on the telescope.

Place the orange crystal in the holder and zoom in on the looking glass.

You're looking through the looking glass of the telescope and you see a yellow light, from your yellow crystal torch.
Now move the telescope until you see pillar 1 with the disc/lens above it, witch stand before the Watchtower...

....it's a bet of
a search but eventually you'll see pillar 1
When you have found pillar 1, the beam should be aimed exactly at round disc /
lens above the pillar.

Pillar 1 will rise and the other 3 pillars have also risen.

Zoom out the telescope (left click) but leave the crystal in the holder.
Make sure that the beam remains well focused on the disc of pillar 1, because if there is no more light on the round disc then the pillars will sink back into the ground.

Go down the stairs, or jump down at the front of the telescope.
Above the gate where Pillar 3 stand hangs a flag and left of that flag you see the outer balcony of the Crystal lab

Go to the pillar 1 and press the button on top of the pillar, a light will come on.

Turn to the right and walk up the jetty, go past Pillar 4 to pillar 2 on the right of the jetty.
Press the button of pillar 2 and also a light comes on.

Quickly run back to pillar 1 and then
past it to go up to pillar 3 at the gate. Press the button of pillar 3...the
little light goes on

Now quickly run all the way back to pillar 4 and press the button....and.....

The light comes on and all 4 pillars fall back into the ground.
If you have done everything in the right order, the sunken pillar 5, at the
Central Tower, has now emerged out of the ground
So now go back to the Central Tower, on the main square.......

Zoom in on the now raised pillar
5. On top you see a lock plate hanging. Take this Lock
Plate

Walk back to the Watchtower and climb up to the telescope again. Zoom in on the looking glass again.

You should now look for the ring / lens you saw on the balcony of the Crystal Lab.
Found it? ....... then make sure that the beam is exactly on the ring.

Zoom out the telescope but leave the crystal in the holder. Jump down
again and go to the Crystal Lab and enter it again

Crystal Lab:
Walk back to the Crystal Lab and go to the balcony.
Put the lens / mirror, that you have taken from the left hut of the Watchtower, in the ring and see what happens.

The beam of light now falls on the big blue crystal in the middle of the room and now you see a table with symbols on the wall.
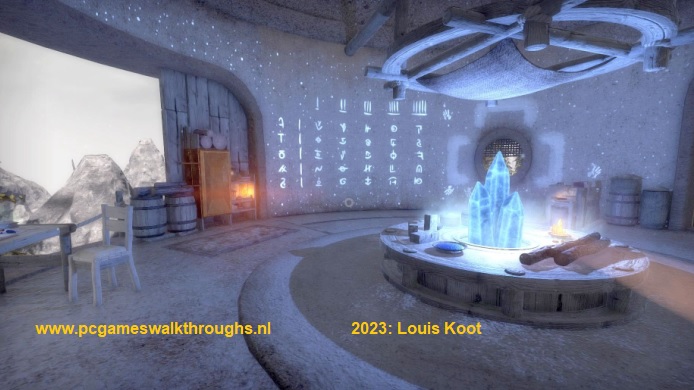
This table is written with paint that is visible in the light of the blue crystal.
Go to the wall and make a drawing of the table on the wall in your notebook
The Basement stairs puzzle
Go to the keyboard

You have previously found a paper with a drawing of a crystal on the low table along the wall. On this drawing you saw 5 strange signs and dashes. These sings and dashes are coordinates with which you can find the correct symbol in the table on the wall. The order in which you have to enter them on the keyboard is from A to E. Left along the table are the signs of the drawing and the dashes are at the top. Look for the sign at A on the left side of the table, then look at that column below the 4 dashes and you will find the symbol you need.

Search for the other symbols in the same way and zoom in on the keyboard with the 5 x 5 pushbuttons and push in the found symbols in the correct order.

If you have done this correctly, the floor under your feet slides away and you will see a staircase go down.

Go down the stairs to the basement.
down there you will find a glass jar with a handle on the left side of a bench. To the right is a blue crystal torch.
You also see a wooden door but it is locked and you do not have a key for it yet

Grab the blue torch and the glass jar

The blue crystal does not give light yet, you have to charge it.
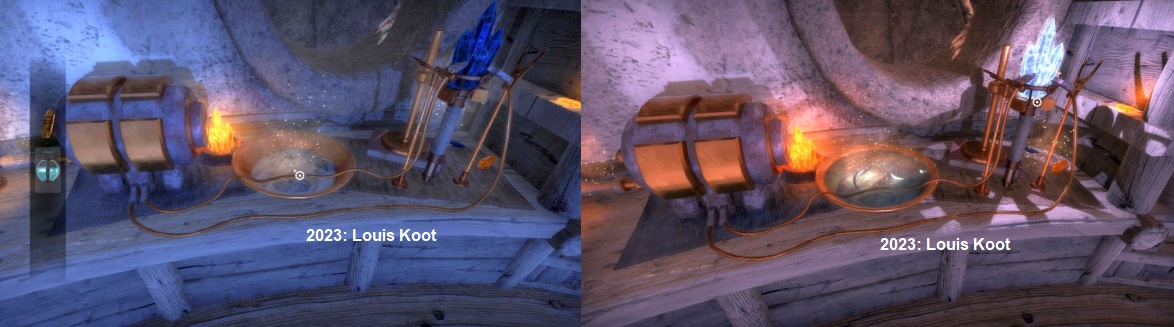
Go back up to the Crystal Lab and put the blue torch in the clamp at the generator, where you have also charged the yellow crystal.

Turn the handle on the generator and you see that the blue crystal gives light but it does not hold energy and goes out again.
You need something more. 1 of the cables runs through a tray. Here you can do something with it, but what. Leave the Blue Crystal in the holder
Catch an Electric Eel:
In the Lever Hut you saw a drawing of a electric eel that you can catch with pine cones. So you have to catch an electric eel, you have a pot with a handle and a bowl of pine cones. Leave the hut and go to the hanging platform and from there to the well. Walk to the well again via the Hanging Platform

Hang the glass jar on the hook and empty the plate of pine cones in the pot.

Lower the glass jar into the well by clicking the crank and then click the crank again to get the jar up again
There's now an eel in the jar, so take the jar with the eel

Go back to the Crystal Lab. You will now activate the blue crystal. Pour the Jar with the eel in the bowl. If you have left the blue crystal in the holder you can now operate the generator again. If not, put the blue crystal in the holder and turn the generator. The blue crystal is now activated and gives light. Take back the blue crystal.
Walk back to the Watchtower and go to the telescope, take the yellow crystal torch out of the holder and place the blue crystal torch in it.

Click on looking glass again. Now turn the telescope to the left or right. Look down the rocks.
On one of the rocks you'll find a drawing that you only see in the blue light but otherwise not.

It is a drawing of the 2e puzzle with stones ouside the Crystal Lab.
Click left to go out of the telescope, take back the blue crystal
and make sure that blue crystal remains selected in your inventory.

So the Blue Crystal torch must be selected in the inventory Go back to the Crystal Lab.
Walk to the stone puzzle in front of the hut. You will now see the symbols of the petroglyph on the stones Only not in the right order.

Tilt the tray again and stand on the platform,

You must now slide the stones with the symbols into the right place. That will not be a problem, you now have more room than before.
When you have it right a drawer opens with a key in it, take the key.

Enter the Crystal Lab hut again and walk down the stairs to the locked wooden door at the back.
Insert the key into the lock of the door and enter.

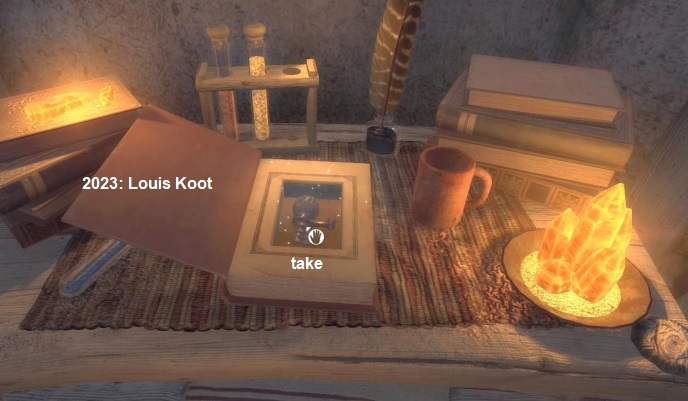
Against the back wall there is a table. In the middle of the table is a book with a letter on it, read this letter.
On the stack of books there is an object you can grab. Take that Object

Look at that object in your inventory, you see that it is a kind of key with a 5-angled bar.
You need it for the locked gate behind the Engine Hut on Main Square
Click on the book where the letter was on..... it opens and you will find a very strange key. Grab this key.
Go back upstairs and leave the Crystal lab. Now go over Main Square to the locked gate behin d the Engine room hut

Take the 5-angled key from your inventory and click on the lock in the door
you also have a lock plate with 2 half-round clams at the back, you have taken this lock plate fron pillar 5 at the Central Tower.

Take the lock plate from the inventory .... it fits perfectly on the 2 holes to the right of the door.
Put your blue crystal again in the selection tray of the inventory and....Through the blue light you will see an arrow drawing on that lock plate.

Zoom in on the lock plate now and.........

Follow the arrow drawing and click on points 1 to 13 and.....

The door opens so go through the gate to:
2018: Walkthrough by: Dick
Leeuw and Louis Koot
Text by Dick Leeuw and screenshots by Louis Koot