
2018: Walkthrough by: Dick
Leeuw and Louis Koot
Text by Dick Leeuw and screenshots by Louis Koot
If you have found this walkthrough via google search or via another site then you have probably not visited my site.
A lot more very detailed game walkthroughs can be found on my site at: www.pcgameswalkthroughs.nl
Chapter
5: Alchemy lab and the Garden

When you enter here first look around. On the right is a staircase that leads to a path.

Go
there and follow the path. You come to a closed door. So you need to find a key again.
Look through the window of the door and you see the drawbridge. This side has to be lowered. On the left is a cupboard with a vase in it, take the vase

Walk
back to the lab. You are going to make a round through the room here.

Immediately
to the left of the entrance you see 4 large glass bottles, 3 bottles has colored content and 1 bottle is empty.

To
the right of those bottles is a low table. In the middle of the low table is a
device with a
transparent crystal and a tube with a green liquid hanging above
it. To the right of that rack is a paper with a recipe to make that green
liquid. Only you do not know what that fluid is for, so click on the tube with
the green liquid. The tube runs empty and the white crystal dissolves.

You have seen a white crystal in the hut of the watchtower with a key in it, so you need that fluid to dissolve that crystal.
At the end of that table stand another vase, take that vase

Next
to it is a closet that has the right hand door open. The left hand door is
locked.... you cannot do anything with this now. Next to this closetit there is a low table with a number of
bowls and trays with different powders. Just in front of a wicker basket is a
dish with a measuring spoon on it. Take the measuring spoon.

Next to this table with powders stand a cupboard with all kinds of pots and bottles on it. In the last section, on the bottom shelf, is also another vase. Take the vase. Above this cupboard a drawing is made on the wall, The drawing has 6 horizontal lines and 5 points. Make a sketch of this in your notebook because this is the melody to open the garden door with the big horn.

Turn around to the round table in the middle of the lab. To the left of the chest stand another vase. Take the Vase

When you stand in front of the chest turn to the right and walk to the other side of the table.
There is a letter with measuring tube on it. Take the
measuring tube
and read the letter.

A
bit further is a cooking kettle but there is no fire underneath, you need a red
crystal for this.

You cannot do anything in this lab now because you'll need a few things from the garden and also a red crystal from a secret room.
You now have to solve the puzzle with the vases on turntable to open the garden door....that's the door with the big horn
Open
up the garden door:
The
Vases carousel
Walk back to the garden door.

On the other side of the turntable is also a vase. Take the vase .

At the garden door stand the last vase just before the bench. Take that vase also

You
now have 6 vases in your inventory now. You must place 5
of your vases on the turntable, 1 by 1 and then pull the lever next to the bellows. You'll hear the
sound of that vase as it passes under the spout of the bellows, so you can
determine which sound belongs to which vase. On the drawing on the wall in the
lab you can see in which order the tones should be and thus also how the order
of the vases should be.
Put
the 5 vases on the right pspot on the turntable andthen pull the handle and.....

........ if you have placed them correct, the garden door will open after the melody.
You
keep 1 pot / bottle left in your inventory. The door opens and you can walk
into the garden.

Garden:

You
don't enter the garden immediately. You see a wooden platform on the right and a few large
iron pipes with a lamp and a turning wheel at the front. This is the spraying
mechanisme for the flowers in the next part of the garden. Don’t touch it now
because you first have to make a liquid for this installation. Walk through the
curtain to enter the real garden. All plants seems to be dead here. On the right you see a wooden platform with on the left a small
cupboard and at the end a high cupboard, which is locked.

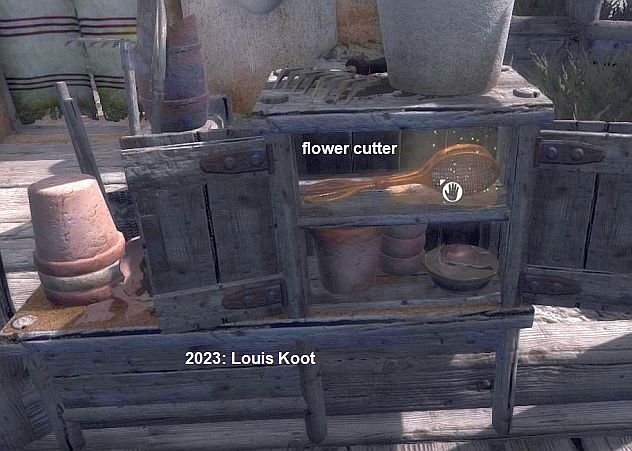
Walk
to the small closet and open the doors. Take the flower cutter that is in there.
Just
before the nextcurtain, turn left and then left again.

At
the end there is a tube on a table. Take this tube.

You
can roll this tube open in your inventory.

Walk back to the path and turn left and go through the curtain.
You will see a table on the
left with a few shelves above it, straight ahead is a cupboard and on the right
is a painting on an easel.

Walk
to the table and you'll see a key and a letter. Take the key and read the
letter.

On this letter are 5 symbols....you need those symbols on the keyboard in the Crystal Lab to open up the secret room

There are drawings of flowers and their names on the shelves and the cupboard door. There is also a flower seed press on the table.
Now go to the painting on the easel

Standing in front of the painting elect your blue crystal in your inventory and...
....through the blue light of your blue crystal you see the recipes for the 4 liquids in the chemistry lab on this painting

Back
to the Crystal lab for a moment:
You have seen that one of the big glass bottles, in the chemistry lab, is empty and that is the one you need, you have to make the liquid that belongs in that bottle. But to do that you have to go back to the Crystal Lab to get a red crystal. But you have not seen any red crystal there, but it is hidden in the Crystal Lab
Walk back to the chemistry lab and from there to the locked wooden door.
Take the
key, you found on the table in the backroom of the
garden, from your inventory and open the door with it.

Walk
to the drawbridge.You can't go straight ahead to cross over to the South
Passage because that bridge has collapsed.
Turn right and pull the lever to lower this side of the drawbridge also now

Now
you can go via this drawbridge and the hanging platform to the Main Square and from
there to the Crystal Lab.

Crystal
Lab
Walk
to the hemisphere, near the lens on the balcony, behind this is a hidden room.
How do you get this open?

Walk to the keyboard.

At the bottom of the letter from the garden there are 5
symbols that are also on the keyboard.

You see that the hemisphere opens up and you'll see a circle with 8 light in it

Walk to the circle with the 8 lights, number them from 1 to 8 clockwise.
Lights 4 and
6 are now on.

Now
click in this order on the lights: 6, 4, 1 and 5. All the lights are on, the
circle is turning and the lights go out.
The
hemisphere closes again and the secret door now slides up.

Walk
inside the room, under the window on the left is a red crystal. Take the red
crystal.

Go
back to the chemistry lab, via the drawbridge
Alchemy
lab
and Garden
Brew the JHES potion
The
ultimate goal here is to brew a liquid with which you can dissolve that crystal
in the room at the Watchtower, so that you can take the key that's inside that
crystal. The recipe
for this liquid is in the chemistry lab. To make this liquid you need the liquid
TAXS but the TAXS bottle is empty. So you have to make that TAXS Aliquid yourself. The recipe for the liquid TAXS is on the painting
in the garden, it is visible with the light of the blue crystal.
To
make the TAXS liquid you need
flowers, but the flowers in the garden are pretty withered,
so you first have to revitalize them with another liquid.
To
make the liquids you need a hot distilling kettle and that's what you're
going to take care of first. On the left in front of the kettle is a device
with a handle. Place the red crystal on the device and then click the
handle to flip the crystal under the kettle.
You can also first click the lever to flip the device and then place the red
crystal on it

do not forget to take the red crystal back, to prevent unnecessary running back and forth
You are now going to make the liquid to pep up the flowers. For this you need:
2 measuring tubes JHES, 1 measuring spoon orange
powder, 2 spoons red powder, 1 spoon purple and 2 spoons blue powder.

Put the measuring tube in the holder of the bottle with JHES and click on the tap and the tube gets filled
Take back the full measuring tube and empty it in the cooking pot.
Fill the measuring tube again with JHES and pour it into the pot again.

Then select
your measuring spoon and go to the powders. Use
your spoon on the powers to fill it with powder and after each spoon you have to
throw it empty in the pot.

Take the filled can and go to the garden
Go
to the first room of the garden to the
device with the large pipes with the turning wheel and the lamp.

Select
the can in your inventory and empty it into the grid in the left tube.

Then
turn
the wheel and....... the garden gets sprayed with the liquid and the flowers
in the garden get their
color back.
Chapter 6: Meld down the crystal in the Watchtower
2018: Walkthrough by: Dick
Leeuw and Louis Koot
Text by Dick Leeuw and screenshots by Louis Koot