
2019: Walkthrough by: Louis Koot
If you have found this walkthrough via google search or via another site then you have probably not visited my site.
A lot more very detailed game walkthroughs can be found on my site at: www.pcgameswalkthroughs.nl
Chapter 5: The Ring line of the Tram: Part 2
West Stop of the Tram:
The 2nd Golden Fragment:
Get out on the right side of the Tram and follow the path to a Hall. De Hal has 4 entrances

On the right wall is a number panel where you can enter 3 numbers. However, you do not yet know which numbers you have to fill in on the panel

Leave this building via the left exit / entrance and walk 1 step further.

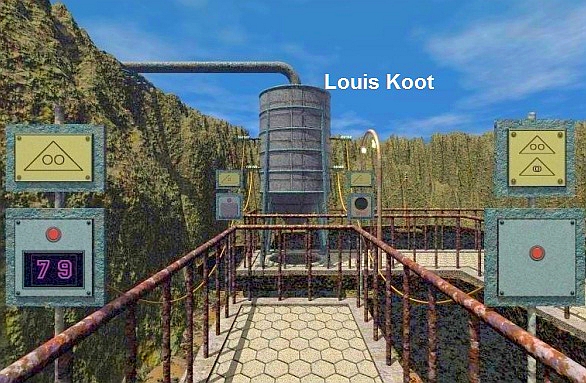
The path ends a bit further at a Silo. There are 4 panels along the path Above each panel there is a sign where you see a triangle with circles in it.
Name the 4 panels: Left Front, Left Rear, Right Front and Right Rear.

Get a Red Ball:
Let me explain it first:
You can enter 2 digits on the Left Front panel. If you click the red button on the Left Front panel, 2 digits will appear in the screen. These are random numbers. For example, it can be 01 or 79. The board above the Right Front Panel tells you that you have to add up the 2 numbers that appear on the Left Front panel. If you get 79 on the Left Front Panel then you should not see this as 79 but then you have to add the 7 and the 9 to 16. Then press the red button on the Right Front Panell and you will see that from the bottom of the Silo white balls will fall out and those balls fall into the round hole that is under the silo in the path.
Every 14th ball, falling from the Silo, is a Red Ball. When a Red Ball falls out of the Silo you will hear a sound and you will see the light on the Left Rear Panel light up red. The Right Rear Panel is the "Scoreboard" that keeps count with how many balls in total fell out the Silo.
Just try it, so do a trial run ...... Click on the red button of the Left Front panel.......2 digits appear in the display, for example 79
add up the 2 digits. So 7 + 9 = 16.
Press the red button in the Front right Panel and look at the Silo and....... 16 Balls come down the Silo and the 14th Ball is a red Ball. The balls fall into the round hole under the Silo and every time a red ball falls from the Silo you hear a sound and you see the light on the Left Rear Panel light up red. You need a Red Ball, but you can only take a red ball out of the round hole if it is the top ball of the pile of balls that have fallen into the hole.
Think back to the Red Ball that you saw in the tunnel of the East Stop of the Tram. When you placed the cursor on that Red Ball, a triangle appears in which you saw 14 dashes.

This was a hint for this Silo Puzzle. You have to make sure that exactly 14 Balls fall from the Silo so that the 14th Ball is a Red Ball, which you can then take out of the round hole. Of course you have already practiced a bit, so there are balls already falling out of the Silo, so on the Right Rear Panel you can see how many balls have already come out of the Silo. Now walk to the end of the path and press the orange button of the Right Rear Panel to set the counter to 0 again

Go back to the 2 front panels. Press the red button on the Left Front Panel until you get 2 numbers in the screen that add up 14 or more together. For example 89 = 8 + 9 = 17. But the best thing you can do is keep pressing the red button until you get 2 numbers which, if you add them together, gives 14. So if you get ,for example, 95 then that is: 9 + 5 = 14. You are then ready in one go because if you now press the button in the Right Front Panel, exactly 14 balls will fall from the Silo and the 14th Ball will be the Red Ball. If you had at least set the counter of the Right Rear Panel to 0 first.
However, it can also be done in 2 steps:
For example: You set the Left Front Panel 63, this counts up to 6 + 3 = 9. If you press the red button on the Right Front Panel then only 9 Balls will fall from the Silo.
So 5 more Balls have to come out of the Silo. Click again the red button of the Left Front Panel until you get 2 numbers that make 5 together, for example 14.

1+4 =5 and 9+5=14......Then click on the red button of the Right Front Panel and ..... there will be 5 balls falling from the silo and the last ball falling out will be a red ball. All this has the condition that you have first set the counter of the Right Rear Panel to 0. Anyway ..... As soon as you see that the last ball was a red ball, turn around and walk back into the hallway. Then turn left and go out through the middle exit and follow the right path to the Silo.

Look down at the Silo and .... In the round hole below the Silo there is now a Red Ball. Take the Red Ball.

Look up again and walk back to the entrance of the Hall. Keep standing in front of the entrance ....
On the right a green button which is connected to the panel on the left via the yellow tube.

The panel has 5 white pushbuttons that you can press. If you press the white buttons then appear There is a dash pattern on each white button. If you press a white button again, the dash pattern changes on that button. However, you have no idea which dash pattern you should put on these 5 white buttons. So this is a puzzle that you must solve later. Enter the hall again and go back to the 2 rear panels, at the Silo.
Generate a Random number:
|
You now have to pay close attention and count well ........ In the triangle above the Left Rear Panel is a circle that has been crossed out.
|
When you now witch ball was a Red Ball and you have note down this number, then turn around and go back into the Hall and then walk into the other room.

On the wall, opposite the entrance, is a number panel where, for me, the number 15 is now on. This number is randomly generated. Above the number panel there is another dice board that tells you that the panel generates random numbers. Below the number panel there is a picture with a Triangle. In that triangle there are 2 circles that overlap and that means you do not add the 2 numbers that you get in this number display.. For example, if you get 25 in this screen then it means 25. This numeral display is on a yellow line and if you press the red button you will get a different number in the display. Now put a number of your own taste in this "Dice number display", or leave the number that you got in it.
Turn left. You now see that there is a third room and in that room you see a gray metal door. The yellow pipe goes through the wall to that gray door.
Turn left again. You now look back into the Hall and see the Silo again.

To the left of the entrance is a triangle plate on the wall. There are 3 circles around the Triangle. Those three circles are therefore outside the triangle. This is a clue that you have to remember. A yellow pipe goes through the wall to the numeral panel in the Hall. Turn left again. In the left wall (or right wall if you entered through the hall) there is a gray wooden door. To the right of the door there is a green button in the yellow pipe and on the left a wooden box with a small green button underneath. This door is connected, via the box and the buttons and the yellow pipe, to the numerical code panel in the Hall.
Click on the green button beneath the box and ..... the box will open. In the box you see that you have to put in a Pentagon. In Chapter 2 you found a green Pentagon in the box of the Cone Rocks Courtyard. You can now place this green Pentagram here in this box. However.....To open up this wooden door a 3-digit code must also be entered on the panel in the hall and you do not now this code yet. But nevertheless.... place your green Pentagram here in this box now

Turn left again. You are again in front of the "Dice" display panel. Now look at the number in the screen and remember that number. For me this number is 15, but you can get a different number every time you press the red button. Put a random number of your chosen here in this display and remember that number.

Turn left again and walk into the 3rd room. You are then standing in front of the gray metal door. If you press the green button, this gray metal door will not open. Turn right. On the right wall is another number panel in the yellow pipe. In this number panel you have to set 4 digits. According to the 2 circles, in the triangle plate under the panel, these are separate numbers. The idea here is that you put in 4 numbers that add up to the number you have put in on the "Dice panel". For example, if you have set 32 in the "Dice panel", you can enter 9993 in this panel, because 9 + 9 + 9 + 3 = 32. I have 15 in the "Dice Panel", so I put in 5334 here because 5+3+3+4 add up to 15.

When you have done this, turn around to the right wall. On the right side of the window there is another numerical display where you can enter 1 digit. The triangle below this display is the same triangle as the one that's on the Left Rear Panel at the Silo. The display is in the yellow pipe. At the silo you have generated a Red Ball and you have note down the number of that Red Ball......Well .... In this display you now must fill in that number with that number ..... for me it is the number 4

When you have put in your number then turn clockwise to the metal door and click again on the green door button and ..... if you have put the right numbers on the two digit panels the door will now open. Behind the now opened door is a round Pillar with a Golden lever, just like the Bowl Column at the Bell Tower courtyard. Click on the Golden Lever and the upper compartment opens again. Then pick up your 2nd Golden Fragment from the top compartment.

Look in your items inventory and you read that this is the 6th Golden Fragment of the key
Close inventory and turn around to the entrance of the room ......You look back into at the room with the wooden door and ........ Right next to the entrance hangs a box on the wall. A green button is placed underneath the box. Click the green button to open the box .... In the box you then see a circle diagram with 7 little circles ....... If you click on the circles then they change color ..... You can change any circle in red, green, blue or yellow.

You can not solve this circle puzzle now, so close the box again and go back to the Tram because we need somewhere else to find a clue to open the wooden door here
Back to the House of Meneandes:

Step back into your Tram and drive the thing, in 3 times backwards, back into the East Station of the Ring line. Get off in the East Station and walk on to the Elevator Tower. Do not enter the elevator tower but turn left again and descend down the ladder to the bottom path. Follow the downstairs path and the tunnel to the Lower West Door. Open the Lower West Door in the tunnel and walk to the ladder under the West Station.

Climb up and open the door of the West Station and switch the Switch back on "Follow ring line".
Climb back down again and walk the route back to the east side of the Elevator Tower and climb up again.

Enter the elevator tower and exit via the North Door and go to the North Station in the Ring line. Open the station door and reset the switch in the North Station to "Leave the ring line". Go back to your Tram in the East Station. via the Elevator tower, and drive the Tram forwards to be delivered at :
The North Stop of the Tram:
Step out of the Tram and follow the path again to the 6 Statues gallery and then continue to door B at the pink boxes. Step out through door B again

Walk on to the round metal cylinder that sticks on the railing. Go stand straight in front of the Cylinder. Take your Red Ball out of inventory and place the ball in the cavity of the cylinder and ....... Between the house of Meneandes and the middle building a bridge now rises from the water and there is also a bridge going up between the middle building and the right building.

Go back to the Statue gallery and then enter the Meneandes Houses through the gray door A. You are then back in the front room of Meneandes and you can now, via the 2 bridges, go all the way straight to the red door that you see in the distance. Do not do that yet because .... first click on the green button again, next to the gate, to close the door in the back building. This will open another door there.

Then walk over the bridge to the middle building. The middle building has only one room. On the left wall there is a drawing of a square with a curved line through it.

This looks like the squares you saw on the panel in the East Station of the Tram. It may be a good idea to draw this square over. On the stool is a large square stone. Remember this too. Turn around to the right wall. On the right wall hangs a map of squares and 12 black dots. Those 12 black balls stand like a clock around the squares. He ...... Remember the Left Clock at the Studio of Kales ..... in Chapter 1 you saw that the flowers in front of the left clock changed every hour of color. Now carefully draw this drawing over

On the table is a vase with flowers and there is a photo. Look at the photo. The photo shows you the door button next to the gate through which you entered. There is a triangle above the door button and around that triangle there are 3 circles. This is the same triangle that you also saw in the 3rd room at the Silo. On the photo you can see that the connecting bridge to the front building is gone.

Put the photo back and turn left and walk across the 2nd bridge into the back building.
You are then standing in the back building for the now closed gray door, which you can open with the button at the rear gate of the front building.

Turn left. The door to Meneandes's bedroom is now open because the gray back door is now closed.
Turn around to the right wall. The outer door is locked with a green hook.

Put the green hook up and then click the green button to open the door.

Step outside. You are now back on the walkway. Walk across the walkway to the Cylinder, where you have put in the Red Ball.
Now take the Red Ball out of the Cylinder again and ..... the bridge between the front building and the middle building drops back under water.

Walk back to the back building and enter again through the door at the end of the walkway.
Go over the bridge back to the middle building and stand in front of the gate where the bridge to the front building should be. That bridge is now underwater again.

Now click on the green button, right next to the gate and ........
..... Beneath the gate on the other side you will see a plate light up and on that plate you see, for a moment, a triangle with circles and the number 448 .

Remember this number 448 because you need it at the Silo to open the wooden door, the door where you placed the Pentagram in the box. Return to the Cylinder on the walkway and put the red Ball back in the Cylinder to raise the bridge between the front and the middle building. Then enter the back building again, through the door at the end of the walkway. Then walk into the bedroom of Meneandes.
In the bedroom you stand in front of a table that stands against the long wall. There is a drawer in the table an alarm clock on the table and the alarm clock pointer remains on the 7. A cabinet is placed in the wall above the table. The cabinet is at the end of the light blue pipe. If you press the red button, the cabinet will not open. On the cover plate of the cabinet there are 2 red circles and a question mark. The 2 red circles must be added together and then the result is the question mark. So this is a clue, so remember it. Open the drawer of the table. There is a drawing in the drawer. Take the drawing out of the drawer. It appears to be a map of the Tram Ring Line with the 4 Stops. Make a copy of this map by clicking on your booklet icon

Zoom out to store the drawing back in the drawer and close the drawer again. Turn clockwise to the right wall. A sofa bed is placed against the right wall. On the left a small wooden cabinet hangs on the wall. Open the cabinet. In the cabinet stand a Device with a red button. Take the Device out of the cabinet to store the thing in your inventory

Pipe screen code
Close that cabinet again. On the sofa bed are three pillows ..... Click the middle pillow and it slide to the right and ........ between the left cushion and the middle cushion you see now again a pipe screen in the wall. Zoom in on the pipe screen and put your hand on it again ....... in this pipe you can see a 6-angle of which the bottom left line is red ...... in the circle the dash indicates 12 hours ...Draw it over again

Turn back to the entrance of the bedroom. You then look at the gray door. Right next to the gate is a table where you see the numbers 1 to 9 on
The numbers are made out of squares and each number shows of how many squares that number exists. Draw this over also

Turn right again and .... He..... another bridge and this bridge connects this bedroom with a second room in the middle building. The light blue pipe goes through the wall to that room

Walk across the bridge to the room across the street. You then stand in front of a panel on the long wall. In the panel you see colored squares where you can click in. Leave this panel alone for now. Turn left and. A Pendulum clock hangs on the left wall. This pendulum clock is at end of the light blue pipe of the wall cabinet in the bedroom. The pointer of the clock turns around. In the bedroom you saw that the pointer of the alarm clock remains on the 7. Wait until the pointer of this pendulum has is between the 6th and the 7th hour and then quickly click with your hand on the swinging pendulum to stop the pointer on this clock at 7 o'clock.

NB: It is not that easy to stop the pendulum at the right moment. It takes some practice because you just get a hand on the round part of the pendulum and well ..... the pendulum swings back and forth. I finally succeeded, so try to stay patient and try it over and over again is the only thing that helps you here.
When you have stopped this clock at 7 o'clock you go back to the bedroom.
Go again stand right in front of the table and press the red button of the wall cabinet again and ... The cabinet no opens up and in it is a golden key. Take the Golden Key.

When you have taken the Golden Key from the cabinet in the bedroom you go back to the room where you have stopped the clock. You are then standing in front of the panel with the colored squares again. This panel is connected via a light blue pipe to a wall cabinet that on the right wall.

That wall cabinet obviously does not open when you click on the red button. Go again stand straight in front of the square panel. In the other room of this middle building there is a drawing where you also saw this panel with squares. On that drawing you saw that there is a black dot at 12 of the squares. I told you then that the vase of flowers, which is on the stool under that drawing, was a clue that referred to the flowerbed at the Left Clock in Chapter 1 and that you should see the black dots on the drawing as a clock with the 12 hours. In Chapter 1 you have seen the left clock in the left inlet before the Black Crystal Room. You then saw that the flowers at that clock changed color every hour. I told you then that you had to note those colors with the hour. You need this knowledge here now

|
Now take your drawing of the squares and Number on your drawing the black dots, and thus the squares where those dots point to, as 1 to 12.
1 is the middle top dot and from that dot you count right. Number on the squares Panel then the squares also 1 to 12, according to the drawing.

Then take your note of the flowers of the left clock from Chapter 1 and then click in the 12 squares to changes them in the right color that belongs to every hour ....Thus:

Then turn clockwise back to the wall cabinet and click the red button again and .....
When you have given the 12 squares on the panel all the right color then the cabinet will now open.

In the cabinet is a paper roll where you see a few question marks. Take the Paper Roll out of the box.
Return to the bedroom and then back to the front room of the front building via the 2 bridges. Then turn around so that you look back through the gate to the gray back door in the back building. Now press the green button again and ..... In the back building the gray back door will open again and you will see that red door again.

The bedroom door is now closed again.
So walk over the two bridges to the front room in the back building and then go through the now opened back door to the hexagonal building where the red door is located.

The hexagonal building:
Your 3rd Golden Fragment:

The red door in this hexagonal building won't go open. On the left of the red door is a number panel where you must put in a 3 digit number. Turn left. On the left wall is a large disk with the + sign in it. This is the "Plus Disc" and it has 3 arrow pointers and 9 round screens that are empty and they will remain empty. Number the 9 round screens as A to I, like this

If you watch the disc for a few seconds, you will see that the 3 arrow pointers are going around through the disc, but they do this separately. Keep looking and count how long the pointers remain stationary in a position....this is the amount of time that you get to solve this puzzle in a minute. Then turn left again. To the right of the entrance you see a long panel on which you can read at which speed each pointer of the "Plus Disc" rotates.

Turn left again. On the right wall is a Disc with 9 round screens where you see numbers in it. There is a ring at the bottom of the disc. If you pull the ring, the numbers in the 9 screens of this disk changes to different numbers. This Number Disc also has 9 round screens and is actually a copy of the Plus Disc. Number here also the 9 screens as A to I

Open up the red Door and find your 3rd Golden Fragment:
Let me explain it first
It is the intention that you enter the sum of 3 numbers of the Number Disc on the numerical panel of the Red Door while the pointers of the "Plus Disc" then stand still on the same 3 round screens as on the Number Disc that has the 3 numbers of your total sum. You therefore need to have numbers in the Number Disc that you can add up quickly and easily. Pull the Ring, below the number disc, until you have nice easy to add up numbers in 3 of the round screens then add up those 3 numbers and write down the outcome.
I have chosen the following screens with the following numbers: in D = 7, in E = 13 and in H = 8 ......., this gives me 7 + 13 + 8 = 28. But you can choose other numbers. So choose 3 numbers on the Number Disc 3 and remember in which 3 screens these 3 numbers are. Add up those 3 numbers that you have selected and memorize the sum, or better yet....write it down. Then turn around to the Plus Disc and wait until each of the 3 Arrow Pointers points at the same 3 screen, where on the Number plate, the 3 numbers are in that you had selected. For me, these are the D, E and H screens

While the pointers of the Plus Disc stand still on those 3 screens you turn quickly to the red door and quickly fill in the sum of your 3 numbers on the numerical panel and then quickly click on the red door button and ......When you do this in time and correctly then the red door slides open. Behind the red Door is the metal column with the Golden Lever. Click that Golden Lever up again and take your 3rd Golden Fragment out of the column.

In your Items Inventory you can read that this is the 5th Fragment. Still 6 to be found.
NB: When you where to slow then the pointers of the Plus Disc will have turned on and your number will not be valid anymore.
So if this happens then you must do this bit all over again with different numbers
You're done here in North, so go back to your Tram through all buildings. Get in the Tram and drive back in the thing 4 times to the East Station of the Ring line.

Get out of the Tram in the East Station and walk to the Elevator Tower again but do not enter the Tower. Go down the ladder to the lower path and then follow the path and the tunnel to the Lower West Door. Open the Lower West Door and walk to the ladder under the West Station. Climb up the ladder and open the door of the West Station and then switch the switch of this station back to "Leave ring line" . Climb back down and go back down to the east side of the Elevator tower. Climb up, enter the Elevator Tower and go out on the North side and turn the switch in the North Station back on "Follow Ring Line". Back to the Tram in the East Station and drive the Tram in 3 times forwards to the West Stop of the Tram
West Stop
Your 4th Golden Fragment:
Get out of the Tram on the right and follow the path back to the hall

In the hall you immediately turn right and .... You are standing in front of the digit code panel where you have to enter 3 digits to open the wooden door in the right room. Well .... in the House of Meneandes you saw the triangle code 448 when you lowered the bridge between the middle and the front building. So enter this code 448 on this panel.

Walk back into the right room and turn right and ... you are standing in front of the narrow wooden door. In the wooden box, that hangs on the left of the door, you have already placed your green Pentagon, but if you had not already done so, you will do so now. You have now entered the code 448 on the panel in the hall, so ..... press the green door button again and ....... the door slides open and ....

.. .... another Column with the now well known golden lever. Click on the golden Lever and then take your 4th Golden Fragment. This is Fragment 3.
Here in West you are now ready for this moment, so back to the Tram and drive back to the South Station in the Ring line. Get off the tram in Station South and walk via the Elevator to East Station. Set the switch in Station East to "Leave ring line". Then descend via the ladder and follow the down route again to West Station and put the switch in West Station again on "Follow Ring Line". Back to South Station to take the Tram forward, back to the:
East Stop of the Tram:
Your 5th Golden Fragment:
We are back in East. Get right out of the tram and follow the path back to the tunnel. Walk through the tunnel and when you get out of the tunnel you immediately look to the left again. You are standing in front of the railing where the 2 arrow buttons are located. On the other side of the water you will find Tram and the building from which you can not reach the door from the tram. To get to that building, the tram has to be driven back a bit, but you can not do that in the Tram itself. Turn around and go back to the panel that sticks to the wall. Stand right in front of the panel.

|
The squares panel The panel has 4 screens and squares with a dash appear in the screens. If you press the orange buttons, the squares rotate 1 turn. In the right room of the middle building of Meneandes, you saw a drawing of such a square. On the chair there was also a stone and that stone comes from this wall. Take the drawing of that square at hand now.
You now have to turn the 4 squares in the panel so that the squares of the squares are the same as the 4 lines in the drawing. Together the 4 squares make the square on the drawing. Number the orange buttons, squares from left to right, 1 to 4.
The buttons / screens thus influence each other so that you can not just turn each square to the right direction. I can not offer you a ready-made solution for this puzzle so you'll have to figure out in which order you have to press the buttons to turn all 4 squares with their lines in the right direction. On the image below you can see how it should ultimately be.
Once you have set the 4 squares in the right direction, go back to the two arrow buttons on the railing. Click on the top arrow button and ..... The Tram now travels back a bit and you can now cross the rails to the door of the building. Turn left and walk back through the tunnel and to the tram rails and cross the rails to the brown door of the building. |

Press the orange door button and ...... Damn you Knutt Muller .... the door does not open.
Open the box hat hangs to the left of the door by pressing the green button under the box. An "Eye" must be placed in this box.

Turn around to the tram rails. You now see a square hole in the tram rails. Zoom in on the square hole. There is a Metal Triangle in the hole.

Take the Metal Triangle. In your Items Inventory you can read that this is "metal piece 3".
Get out of the hole and follow the path and tunnel back to the building on the other side of the tunnel. Enter the Clock Building again.
Clock building
The Paper Roll Puzzle:
You enter the middle room of the building. Enter the left room again and turn counter clockwise to the white clock. The first time you where here you have stopped this clock on the hour on witch you have stopped the Clock in Chapter 1, when you took the fuse out of the holder there. You already placed that fuse here in the holder. For me this is 1 o'clock

In the bedroom of the Studio of Kales you saw, behind the curtain, a drawing with 8 large circles. You have copied this Circle drawing and this copy is in your Documents Inventory. No take a closer look at this drawing. In each of the 8 large circles there are 7 small circles with a dash through them, just like in the 8 circles on the clock. The large circles are connected to each other via a line cross. Now look for the large circle in which one of the lines, of the line cross, indicates the hour on which you have stopped the clock. Number the large circles on the drawing A to H. Then look in which Circle the line, of the line cross, enters the circle at the position at which you have stopped the pointer of the clock. That Circle is valid for you....For me it is Circle F......

Then look in that circle how the lines are in the small circles. Put the drawing away and close your document inventory. If you click in the circles of the clock, you turn the dashes horizontally or vertically. Now place on the clock the dashes in the circles as you saw them on the circle drawing in the large circle corresponding to the hour that you have stopped the clock. I have stopped the clock at 1 o'clock, so for me Circle F is the circle where the thick line comes in at 1 o'clock. For me the clock must be like this......

When you have set the clock correctly then turn around to the other wall. You are again standing in front of the light bulb box. You have already placed the Light Bulb in the fitting in this box, if not then you do that now. There are 2 red buttons underneath the box. If you have set the dashes on the clock all right now, then the light bulb goes on in this box when you click on the left red button. The light bulb will stay on as long as you keep the left red button pressed. Now take the Paper Roll, which you have found in Meneandes' house, from inventory and place the paper roll here in this box.

The best thing to do now is to pick up paper and pencil again to draw the paper roll over. The paper roll is a rather difficult to understand "converter paper" and it explains how to renumber a code from 6 random numbers to a correct code. This is quite difficult and it is not easy to explain in a simple way.
At the top of the paper roll you see 6 question marks. Press the right red button. The paper roll now scrolls down and you see 2 scissors, dotted lines and a down arrow. Press the right red button again. The roll of paper scrolls down again and it stops on an empty space. You can now see brackets above and below. Now press the left red button. The light bulb gives light and you see red lines.

The red lines are connected with the brackets below and above. The red lines cross over each other. Follow the red lines from the top brackets to the bottom brackets. Press the right red button again. The Paper Roll scrolls down a bit again and you see again 6 question marks Ok ...... scroll now further and further down with the paper roll and for each empty space you see you press the left reed button to light up the light bulb for a moment. Draw it all over on a piece of paper and finally you'll have this drawing:

Now enter the numbers 1, 2, 3, 4, 5, 6 in your drawing for the top 6 question marks and then, from any number, follow the red lines down and enter the correct number next to the question marks. You'll notice that the positions of the numbers in the sequence change with each subsequent step.

When you have come all the way down, you have changed the original sequence 1, 2, 3, 4, 5, 6 into the sequence 4, 6, 1, 2, 3, 5.
Write this new series because this is your "Converter code".
Now go to the right-hand room, where the brown door is. So on the left wall there are 2 digit panels with above them the dice image. On the right wall there are 2 numerical panels where you have to enter the correct numerical code. Stand in front of the "Dice" panels. Push the red button under the dice board to get a random 6-digit sequence, for example 8, 5, 3, 6, 1, 9......but you can use any random numbers

|
The 6 numbers you get in these 2 panels are not in the right positions. Via the "Converter Code" 4, 6, 1, 2, 3, 5, which you have learned via the paper roll, you now have to put the numbers of this series of digits in the correct position. The paper roll has converted the series 1, 2, 3, 4, 5, 6 to the series 4, 6, 1, 2, 3, 5 and so you must do this with the 6 numbers you have now in the "Dice panels"..
So you have to change the positions of the 6 digits within that series. I am going to try to explain this on the basis of the number 8, 5, 3, 6, 1, 9, which I have in the "Dice" screens. But it works with every digit sequence of 6 numbers.
|
I do hope you can understand my explanation .... I really don't how to explain even more easily.
Anyway ..... if you feel that you have put your 6-digit sequence in the correct order, then enter that code f on the 2 panels of the right wall

Then turn around to the brown door and press the red button and ..... if your code is correct then the door will open and you will see the now well-known pillar with the golden handle. Click on the golden handle and then take the Golden Fragment out of the upper compartment. Your Items Inventory tells you that this is Fragment 8.

You have now found the Fragment here, but we come back here in East to open the building at the Tram, but for that we must first find an "Eye". There is still 1 Tram Stop that you have not investigated yet and that is the South Stop, where we have entered the Ring Line the first time via door 1 of the 9 doors hall. So now we must go back to the beginning ...... to the place where you entered the Tram for the first time, so to the South Stop.
Leave this building and go back to the arrow buttons on the railing. Now click on the bottom arrow button to return the Tram so that you can enter the Tram again.

Then go back through the tunnel and get back into the Tram and take the Tram 1 time backwards, back to the East Station in the Ring line. Get out of the Tram and enter the Elevator Tower. In the Elevator Tower, press the Yellow Button again to go down again with the elevator. When the elevator has brought you down, turn around and get out of the elevator. Follow the path over the water reservoir and then the tunnel to the ladder and climb up again.

We continue in:
Chapter 6: The Ring line of the Tram: Part 3
2019: Walkthrough by: Louis Koot


