Riddle of the Sphinx 2
The Omega Stone:
2021: Walkthrough by: Louis Koot
If you have found this walkthrough via google search or via another site then you have probably not visited my site.
A lot more very detailed game walkthroughs can be found on my site at: www.pcgameswalkthroughs.nl
Chapter 1: Egypt
The game starts with a short introduction that looks back on Riddle of the Sphinx 1. Then there is a Loading and then we see Sir Geoffrey Gil trying to wake you up from your unconscious state. Gil succeeds and he immediately starts explaining a few things to you. Sir Geoffrey has managed to decipher the 2nd Scroll. This 2nd Scroll tells of a "Terrible Event" that has been set in motion in the past and will now come to completion here in our present time. The "Ancients" knew the Date and Time of this disaster, but Sir Geoffrey has not yet been able to find out the correct date and time. Sir Geoffrey also talks about 6 Discs, The Omega Stones Discs.
Your task will be to find these 6 Omega Stone Discs. Sir Geoffrey will now take you to the "Chamber of Ages" in the Sphinx. So this is where Riddle of the Sphinx part 1 ended with your fallen unconsciousness when you opened the "Ark of the Covenant". Sir Geoffrey tells you about 2 exactly the same stones that are in the wall, 1 to the left and 1 to the right of the Ark. They managed to open the stone to the left of the Ark and the passage behind it leads to a room where the 1st of the 6 Omega Stones is located. However, Sir Geoffrey failed to get this Omega Stone. However, according to the texts on the 2nd Scroll, this is 1 of the 6 Omega Stones. So you also have to find the other 5. All these 6 Stones are connected to the "Winged Solar Disk" and all texts refer to The Stone:
Sir Geoffrey now disappears and now you are in control of the game. If you first open your Inventory with a click of your right mouse button, you will see that you now have 5 maps in your inventory. Each of these maps is your entrance to one of the 5 worlds you must travel to. To travel to one of these worlds, find the Red Helicopter and give the map of the area you want to go to Hump, the helicopter pilot. So there are 5 areas that you can travel to, and they are: the Giza Plateau in Egypt where we are now, Stonehenge, Easter Island, Devil's Triangle and Chichen Itza.
You are in front of the Ark of the Covenant, in the Chamber of Ages. You can zoom in on the Ark and then open it, but it is of no use, so never mind. Turn slightly to the left. To the left of the Ark you see a lamp on the floor. Go forward 1 time to this lamp. Then look down. Behind the lamp you see an opening in the wall. Click once in this opening and then look up. You are now in a narrow, low, crawl space. Crawl forward 1 time, then turn right and crawl forward 2 times again. In front of you is the:
Skull Pyramid Room:
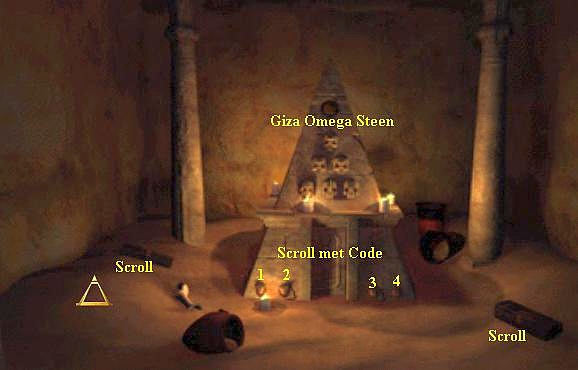
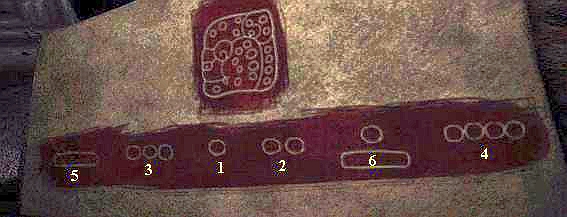
You see a stone pyramid. In the top of the pyramid you see a round stone. At the bottom of the pyramid you will see a niche in the middle and 2 "buttons" to the left and right of the niche. On the ground, to the right of the pyramid, is an elongated box and you can also see such a box to the left of the pyramid.
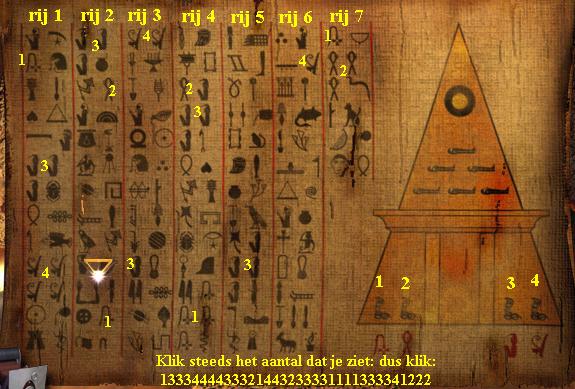
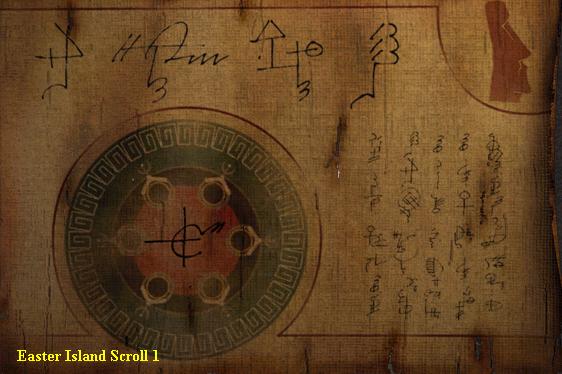
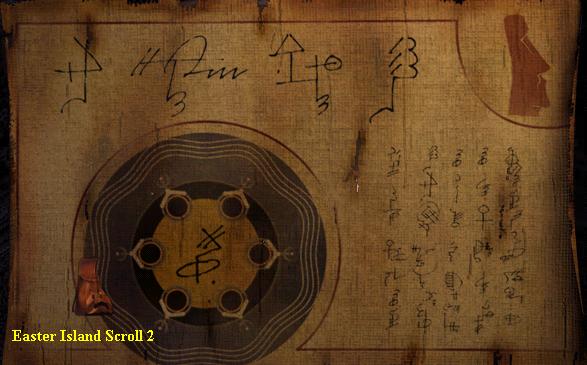
Go forward to the pyramid and then look up at the round stone that's in the top of the pyramid. This is the Giza Omega Stone but you can't take it. Zoom out and look down to the bottom of the pyramid and then zoom in on the Niche. You can now see the bottom of the pyramid up close. In the Niche you see a stone with hieroglyphs and both left and right of the niche you see 2 Cobra buttons. So there are 4 of these Cobra buttons. You can click on any of these 4 buttons, but don't do that now. Now click on the Stone that's in the Niche. This stone now folds down and you see a Scroll in it. Zoom in on this Scroll and it will be rolled out and comes enlarged in your screen. You can take a picture of it, but you will never get the entire scroll in one picture.
Take a good look at the scroll. You see 7 rows with Hieroglyphs on it and you see an scematic drawing of the pyramid. In this drawing of the pyramid you also see those 4 Cobra buttons and you see a hieroglyph for each of these 4 buttons. You will also find these 4 hieroglyphs in the 7 rows of the scroll. So you have to find a certain Code on this now. Now do the following:
Number the 4 Cobra heads Buttons on the pyramid, from left to right, as 1, 2, 3 and 4. Number the 7 rows of the scroll, also from left to right, as row 1, row 2, etc. Then search in the 7 rows with hieroglyphs always only the hyroglyph that refers to the 4 hieroglyphs of these 4 buttons. Read each row from top to bottom. So consider the 4 hieroglyphs of the 4 Cobra Buttons as the numbers 1, 2, 3 and 4 and you will arrive at the following sequence:
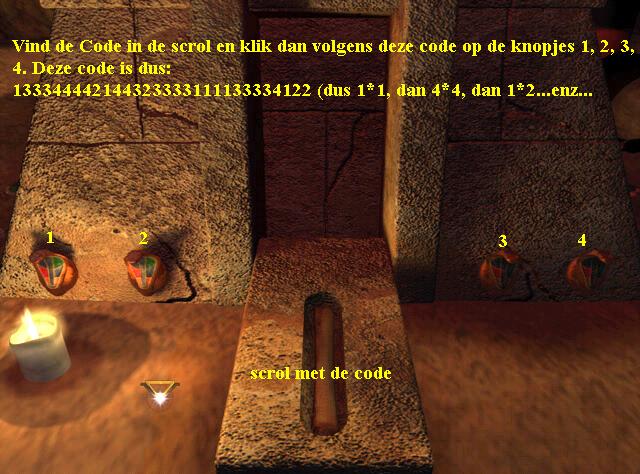
So the code would then become: 1333444433321443233331111333341222. If you have this, zoom away from the scroll and now click on the 4 Cobra buttons at the bottom of the stone pyramid according to this code.
|
If you do this correctly you will hear a click sound. Then zoom out and look up to the top and place your cursor on the Giza Omega stone. Now your cursor will become your Backpack. Click on the stone and it will disappear into your backpack. You have the first of the 6 Omega Stones. Zoom out and look at the ground and turn to the right and go to the oblong box that is on the ground in front of the pyramid to the right. Click twice on this box and then click on its lock to open the box. In this box lies the Giza Scroll 1.
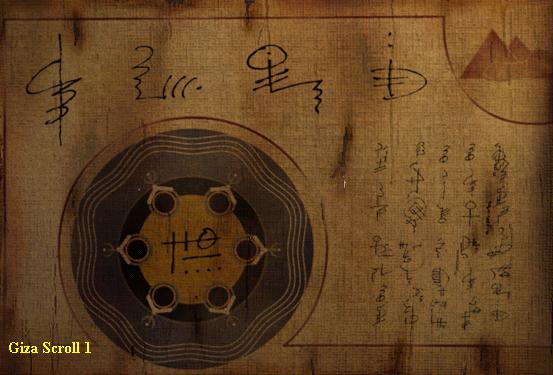
Click on the scroll and then click on it with your backpack and this box with scroll disappears to your inventory. Zoom out and turn left and walk 1x forward, along the pyramid, to the oblong box that is on the ground to the left of the pyramid. Zoom in on this box 2 times as well and then open the box. In this box you will find the Giza Sroll 2.
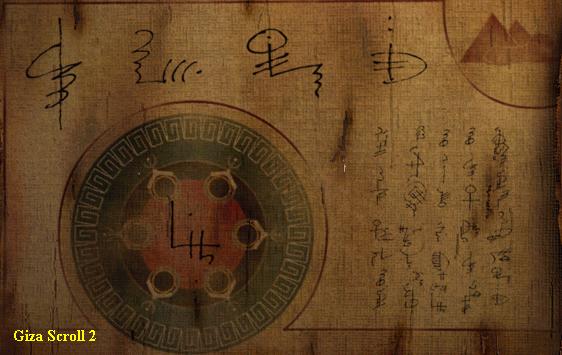
Well, put this box with scroll in your inventory too. Then zoom out again and turn right and go back via the stairs and the crawl space to the Ark. Then go through the circular opening to the right of the Ark and follow the circular corridor to the outside. Outside, turn right and go forward 7 times, under the scaffolding, and you will be at the front of the Sphinx. Turn right and go forward 1 time, turn right and click forward on the plank between the front legs of the sphinx. You're going up this plank. Then turn right and walk 5 times forward to the tent's. Turn right again and walk all the way to the red helicopter. Click on the door of the helicopter and step inside. Click on Hump, the pilot. He asks where you want to go now. Take the Easter Island map from your inventory and click on Hump and Hump will now take you to Easter Island.
Chapter 2: Easter Island:
Tent:
After a helicopter flight, followed by a short boat trip, you arrive at the beach of Easter Island. The dinghy brought you to the Anakena beach of Easter Island. Right in front of you you see a plateau with statues in the distance. Turn slightly to the right and you will see a tent in the distance. Now go forward 4 times to this tent and then enter the tent. To the left in the tent is a table and on this table is a small statue and 3 white envelopes on top of a large yellow card. Go to the table and zoom in on it.
Zoom in on each of the 3 white envelopes and then read the letter that comes out. 2 of these letters tell you about Gil's plans to use brute force to blow up those statues and that the authorities don't really appreciate that. The 3rd letter, that is the envelope with "Confidential" on it, contains a letter from Gil. In it Gil talks about satellite photos that show that below the Anakena beach a system of hollow Lava corridors forms an underground secret space. A Memory Card is stuck at the bottom of this letter. Click on this memory card with your backpack to put it in your inventory.
NB: If you go through this game in a different order then me, then you may have already been to Stonehenge and found the DVR-AGPS there. If you already have that thing, you can now insert this Memory Card into that DVR-AGPS and hear / see Gil's message about the Mask. I'm taking a different route through the game and don't have that DVR-AGPS at the moment. But if you want you can always go back to the dinghy first and then sail back to the sailboat (click on the outboard motor of the dinghy). Then give the Stonehenge card to HumpyDumphy and he will take you to Stonehenge. Then follow Chapter 4 Stonehenge of my walkthrough to find the Omni DVR-AGPS and travel back to Easter Island)
If you have read all three letters and you have the Memory card, click on the large yellow map and it will fill your entire screen. So it is a map of this Easter Island. The circle, at the top, is the Anakena area. To view the rest of the map, hold down the left mouse button to pan the map back and forth and up / down. If you consider it important, you can take a few photos of this map with your camera. But you don't get the entire map on1 photo. So you will then have to take multiple photos.
Zoom out of the map again and zoom out of the table. Turn to the left. In the corner, to the right of the tent entrance, is a block, I think a small rock. Go to it and zoom in on it. On this block is a Detonator with a Red Button and behind it is the white Plastic Explosive. If you really have enough of your computer life, then you should now press that Red Button, but I advice you to stay away from the button. Pick up the white Plastic Explosive with your backpack and zoom out. Turn left to the other corner. Here is the Mask on the ground. Zoom in and put the Mask in your backpack. Zoom out and turn slightly to the left again so that you can see the entire sleeping mat. There are 2 books, in front of the pillow, on this mat. Go there and zoom in on it. Open both books and read through both articles.
The article on pages 109 and 110 of the "Easter Island Forgotten Past" book tells you all kinds of interesting facts about Easter Island's past. You will learn something about the large statues that are scattered on this island. Those are Moai statues. The article also tells about "Talking Boards" with which the "Lost History" of the "Ancient People" was "recorded". The article in the "Angelic Archeology" book tells of several mythical figures about which scriptures have been found, such as the "Winged Angels" in Egypt, the "Birdman" here on Easter Island and a "Feathered Serpent" in the Maya. Note the picture of the "Birdman" on p. 73. Then click the books away and leave the tent.
When you are outside the tent under the awning of the tent, turn to the right. You then look ahead to the hills, to the right of that statue plateau. Go forward 4 times and you are then next to the plateau. Turn left and go forward 2 times and you are on the slope of the statue plateau and therefore actually behind the 5 statues. Stay here and look at these 5 statues from here so that you see all 5 in a row. So the statues "look" at the hills and not at the sea.
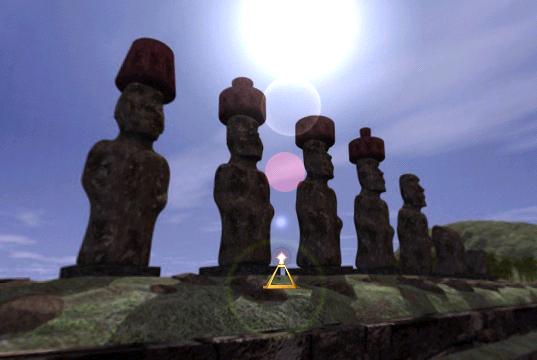
Now open your inventory and click on the Mask. You then put on the mask. Close your inventory bar. You now look through the eyes of the mask at the 5 Moai Statues. You can move back and forth and up and down by sliding your mouse. Look each of the 5 statues. You will see that light comes from the left through the Eyes of the 2nd statue
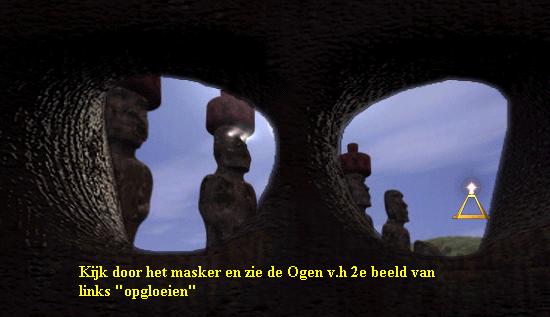
Have you seen this, open your inventory again and click on the mask again to turn it off. Close your inventory and now walk forward to the statues and stand in front of the 2nd statuefrom the left. Look down at the bottom of this statue and open your inventory again. Now take out the Plastic Explosive and click on the statue. The Explosive is placed in the "hole" in the bottom of the statue. Okay, now return to the tent, enter the tent and turn to the left and zoom in on the Detonator that is still on the boulder. Then press the Red Button and …… .. BOOM. You blew up that 2nd statue. Exit the tent and return to the 5 statues in the same way as the first time. Where that 2nd statue from the left was, the opening of a shaft is now visible in the ground. Click once in this hole and you are underground in the:
Underground Maze:
Go forward 2 times, then turn slightly left and go forward 1 time again. You are then at a left / right intersection in the corridor. Turn left, to the left corridor and follow it 1 time forward. You enter a small cave. There are 6 Moai statues here. 3 left and 3 right. Just stand still and take the mask from your inventory to put it back on. Look at the 6 statues through the eyes of the mask and you will see that from the following 3 statues light comes through the eyes:
Left = the Middle statue and the Rear statue. Right = the Front statue.
Note this down. Open your inventory again and click on the mask again, close inventory and turn around and walk back 1 time to the main corridor. Turn left and continue 1 time forward through the main corridor. Again you come to a left / right junction. Turn right and follow this right corridor 2 times forward and again you are at a left / right junction. Turn to the left corridor and follow it 2 times forward to the end. This is an end corridor and through a hole in the "ceiling" daylight enters. Look down. Behind the red bowl there is an elongated box on the ground. Zoom in twice on this box, then open the box by clicking on the lock and then click on the Scroll. This is the Easter Island Scroll 1. Place this scroll in your backpack.
Close your inventory and zoom out and turn around and walk back 2 times. Turn right and go forward 2 times, turn right and go forward 1 time, turn left and go forward 2 times and you are again at the end of another dead end corridor. Also look down here again, zoom in twice on the oblong box, open the box and then take the Easter Island Scroll 2 and place it in your backpack.
Close your inventory, zoom out, turn around and walk back 2 times, turn left.
Now follow the winding and descending main corridor further 5 times forward (you need to steer a bit now and then) and you will then enter the:
Lava Chamber:
A small, but deadly, lava lake in front of your feet. On the other side you see the Moai Death statue and in that statue is the Easter Island Omega Stone. Both left and right of the lava lake are also 3 Moai statues here. Just like in that first cave. Turn left to the rock wall. You see 3 buttons in the wall, one below the other. Turn around to the right wall and here too you see 3 buttons below each other. You "operate" those 6 Moai statues with these buttons. Do you remember which of the 6 Moai statues, in the first cave, showed light through their eyes? So press, left, on the Middle button and then the Bottom Button, then turn around to the right wall and press the Top Button there. Each button turns a whole turn and then the 3 Moai Statues fall over and cover the Lava lake as a bridge.
This falling over will only happen after you have pressed all 3 buttons. Then walk forward 3 times and you are in front of the Death Statue. Click your backpack on the Omega Stone and you have your 2nd stone, the Easter Island Omega stone. Turn around and go forward 5 times, then turn a little to the right and go forward 3 more times. Then turn slightly to the left and follow the main corridor back 5 times, then look up at the light, click in the light and you are outside and out of the underground maze. Turn right, 3 times forward, turn right and now go forward 7 times and you are standing with your feet in the sea. Turn right and go forward 2 times to the dinghy. Turn left and click on the outboard motor and you sail back to the sailing yacht. Hump welcomes you back and asks where you want to go now. Open your inventory and click on the Chichen Itza map and give it to Hump and you now travel to:
Chapter 3: Chichen Itza. Part 1
Base Camp
After a sailing trip and a jeep ride, you will arrive at the pyramid of Chichen Itza. Turn right and click in the window of the passenger door of the jeep to open this door. Then go forward 1 time and then turn left. Walk 1 time forward towards the back of the tent and turn left again. You will now see a thatched roof to the left of the jeep. Go forward 1 time and you are under that shelter. Stay away from the barbecue, it is nowhere near dinner time. Turn left and you will see an improvised table made of a shelf resting on two oil barrels. In front of the "table" is a large white sheet of paper held in place by a few stones. Zoom in on this paper. It turns out to be a map of the area. Hold down your left mouse button and then move your mouse back and forth and up and down to view the entire map. You will see the Base Camp and various marked spots.
You can take photos of the map, but you will never get the entire map on one photo. However, try to remember the spot of different marked locations and where these locations are, relative to the Base Camp. These area's the: Ruins at the very top right of the map, the Castello Pyramid and the buildings in front of it, the Temple of the Warrior to the right of the Castello and The Old Sacred Road. You will soon have to find all these places, so it is useful if you know a little bit where they are in relation to the Base Camp. If you have this, click the map away and turn around. You are now looking at the tents.
Tent:
There are 3 puppy tents and 1 larger tent. Go forward 1 time, then turn right and go 1 time forward into the large tent. On the left is a hammock and in the right corner you see a shelf on two stones. Zoom in completely on this shelf. There are 2 books on it and a "Confidential" envelope. Click on this envelope and then read Gil's letter. In this letter, Gil is talking about an Artifact hidden in the "Inner Temple". However, this temple cannot be reached via the Castello. Gil also mentions a "Sacred Cenote" to the North of the Castello. Read the letter further and then click it away again. Then open the "Cuckoolan" book and read the article on pages 56 and 57 for some background information on the Maya. Click the book away and then open the Mayan Astronomy and Mathematics Book:
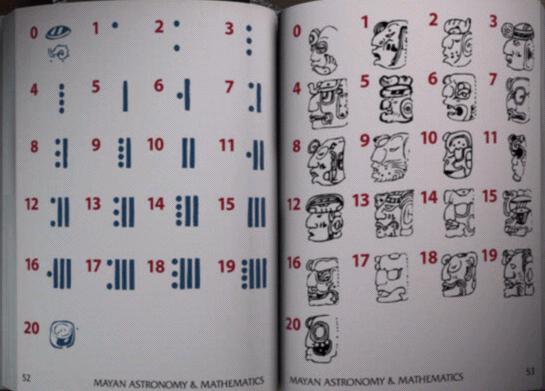
The book opens on pages 52 and 53 and you can browse through to pages 60 and 61. The information you read on these pages is of great importance for you to be able to solve various puzzles later on. So read these pages carefully. On pages 52 and 53 you will learn about the Number system of the Maya. Mayan numbers are represented by Dots and Bars and also by Gods. Page 52 shows you the Mayan numbers 0 to 20 and on page 53 you see these numbers represented by the 20 Mayan Gods. So every Maya god is also a number.
Page 54 explains how the Dots and Bars, from page 52, are combined with Maya Glyphs into numbers.
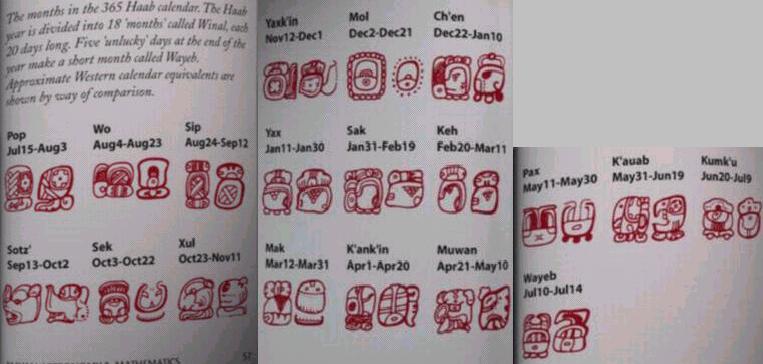
Page 55 to page 60 explains the Mayan Year Calendar. On pages 57, 58 and 59 you can see the month symbols translated into our months.
Page 60 tells about some important dates for the Maya in the Calendar and also something about the Observatory. These important dates are: March 21 and September 23, which are the days when the day and night are of equal length. June 23, being the longest day, so the first say of the Summer. December 22, being the shortest day, so Winter. Have you looked at all this, read through and made notes and / or photos, then put the book back on the shelf, zoom out and turn around and leave the tent again.
El Castello Piramide 1st time:
Outside the tent, turn left so that you are looking at the jeep. Then go forward 2 times, between the jeep and the thatched roof, and then turn left again. You are now behind the jeep and look at its tailgate. Click on the back of the jeep to open the tailgate and then zoom in on it. Take the Hook with Rope and the Crowbar from the cargo box. Both disappear to your inventory. Zoom out, close your inventory and turn right.
Behind the trees you can see the El Castello Piramide in the distance. You are looking at the west side of this pyramid. Go forward to it in 4 times. You run into the pyramid. There is a rope running up the "stairs". So you can now go up, but don't do that. Turn left and walk 1 time forward along the pyramid to the corner. Turn right. You now see the North side of El Castello. Here too a staircase goes up. Go forward 1 time, then turn slightly to the right and go forward 1 time to that iron door, at the bottom of the side of the stairs. Then turn left to this door. The door is locked with a padlock on a chain. Take the crowbar from your inventory and click on the padlock.
You pry open the lock and the door opens. Put your crowbar back in your backpack (right click and then click on your backpack) and close your inventory again. Go in 2 times forward, turn right, 2 times forward and you are, inside the pyramid, at the bottom of a narrow stone staircase that goes all the way up. Well, climb these stairs all the way up. At the top you are standing in front of an iron gate. Behind this gate is a small room.
However, the gate is locked. You don't have a key and your crowbar doesn't work here either......so you have climbed up for nothing. Okay, you can stay here and grumble now, but the pyramid closes at 5 a.m and won't open for the next 20 years, so turn around and descend the stairs again and follow the hallway back outside.
Outside you turn right and go forward 2 times, then turn right again so that you look again at the North side of El Castello and then go forward 1 time and click the North side of the pyramid completely. You will end up on top of the pyramid on the circulation and in front of you is again a gate. This gate will bring you absolutely nothing, so turn left, 1 time forward, turn right and go 2 times forward on the East side of the pyramid, turn right and 1 time forward on the South side. Turn right and you look into a Niche. You are now on the South side of the pyramid. In the niche you see a grid in the floor. Go forward 1 time and then look down at this grid. The grid is locked with a lock.
Take the crowbar from your inventory again and click on the lock. You wring open the grid with it. Put the crowbar back in your backpack and close your inventory. Now descend the ladder into the hole and at the bottom turn left and look down. Go forward 1 time through the crawl hole and then turn right and go forward 3 times through the dark crawl space. At the back of this hallway you come to another ladder hole. The ladder is on the left. Click on the ladder and you descend further down. Then turn to the right and go forward 1 time through the opening and you are now in that room behind the closed gate at the top of the inner stairs. Go forward 1 more time into the niche.
In this niche is a small solid square pillar. There is something on this pillar. So zoom in on the top and you will see that it is a kind of tripod. There is a very modern hammer on the tripod. Click on the hammer and it will disappear to your inventory. Zoom out …… and…. The hammer is automatically put back on the tripod and you are automatically out of the close-up of the pillar. Apparently you are not allowed to take the hammer with you. You have to do something with it here...but what? Now zoom in on the front of the pillar. You will see a drawing engraved in it.....you must remember this drawing, so take a good photo of it.
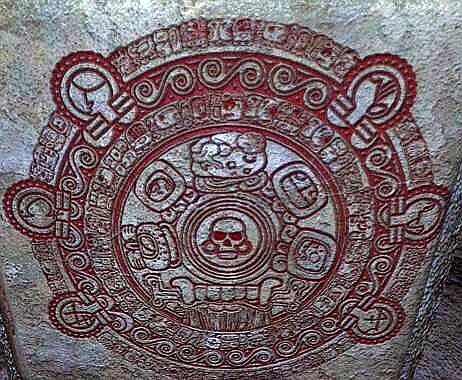
It is a round engraving with a skull in the middle around which Glyphs are depicted. On the outside of the circle are 6 "ears" and in each "ear" you see a symbol. Remember witch symbol is in which "ear". You will need this knowledge later for the last puzzle of this Maya world. Zoom out, turn around, 2 times forward, click on the ladder to climb back up. Turn left and follow the dark crawl tunnel back 3 times. Turn left and go back to the top ladder through the crawl hole. Look up along the ladder and click and you crawl out through the grate hole.
Walk left over the pyramid to the North side and descend the pyramid back to the ground. So from the grid that is 1 time forward, left, 1 time forward, left, 2 times forward, left, 1 time forward, right and descend to the ground. What now? Wasn't Gil talking about a "Sacred Cenode" in his "Confidential" letter and didn't you see some Ruins and an Old Sacred Road on the map? Let's see if we can't find that "cenode".
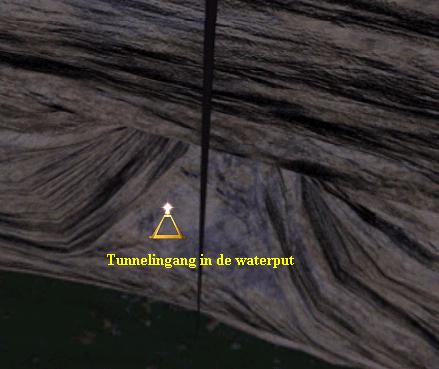
Straight ahead you see a low structure between the trees. Go forward 2 times and you are there. Then go forward 2 more times, to the right of this structure, and you are at the beginning of a wide, gray, path that goes through the jungle. This is the "Old Sacred Road" path. Now just follow this path 9 times ahead and you will come to the end and a ruin. Go forward 3 more times over the stones and then look down. So you are now at the edge of a deep, wide round well. The green smelly water in the well comes from the Yucatán River. Look at normal height again and turn around, so back to the path. You now see a stone wall in front of you. Open your inventory and take the Hook / Rope and click on the stone wall. The hook gets stuck around the wall and the rope is now hanging in the well.
Chapter 3: Chichen Itza (Maya) part 2
Underground. Part 1
Now hold your cursor to the left or right of the rope to get the Zoom Arrow and click. You now descend automatically, backwards and via the rope into the well.
It's even deeper than you thought and you come out just above the water surface. You now see the entrance of a Tunnel.
Just a word of warning now: You will now stay underground for a long time and because of the way this game has been made, everything here looks more or less very similar. The tunnels and corridors also bends. So it may well be that if I say that you have to go forward 10 times, or 9 times and that you end up in a room, that you have to take a step less or more. In some of these underground areas it is also not possible to really point you in the right direction.
Click 1 time forward in this tunnel entrance and you will go through the tunnel and come out above a very deep hole. Deep below you you see water. Click in this hole and you will turn around and you will descend automatically, backwards via a kind of ladder. It's a very long way down. You are now deep underground. It is now advisable to increase the brightness of your screen or to close the curtains and switch off the lights on your computer because otherwise you will not be able to distinguish things very well here underground.
Turn around and you will see the underground river tunnel in front of you. You can't just move forward now. Turn right and go forward 1 time, turn left and go forward 1 time again and you are standing on the rocks on the right side of the underground river. Now we go a long way through the water and through the tunnel. To start, you only go forward 8 times where you always have to look for the forward arrow. After 8 times you turn right and follow the tunnel 2 more times forward. Then turn left and go forward 1 more time and you are in a wider and higher part of the tunnel and again in the water. Turn left. You will see the square entrance of the:
Underwater Chamber:
Go forward 2 times through this entrance and then 1 more time and you are in the middle of this room. Turn left and go forward 2 times and you are on the left bank. Immediately go forward 1 time into the niche here and then turn right. You see a wall drawing on the back wall of this niche. Go forward 1 time and now look at this wall drawing in detail. Then turn slightly to the right and go forward 1 time through the crack to the right of the wall drawing and you are standing out of the niche again.
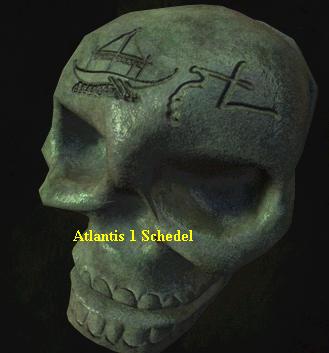
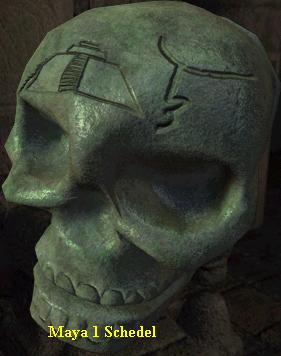
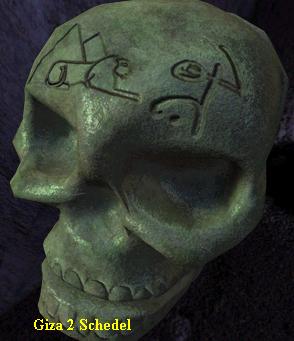
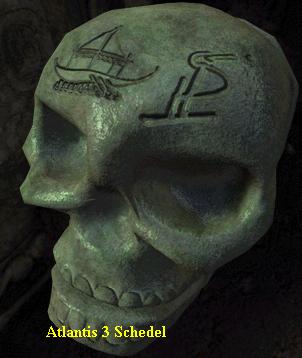
Turn right, 1 time forward, turn left and now step forward 2 times through the water to the center. Turn left. You are now in the middle of the room, in the water, and in front of a large chunk of stone sticking out of the water. Now go,on the right side of this stone, forward 1 time and then look down at the bottom under the water. There's something under the water here. Move your cursor over the center of your screen and you will get your backpack cursor. Then click and you have picked up that something that is here and this is now in your inventory. Open your inventory and look ... you have picked up a Skull. This is the Atlantis Skull 1, you know that it is an Atlantis Skull because of symbol that's on the skull
Look straight ahead again and go forward once on the bank. Here are 3 narrow niches and you are in front of the middle niche.
Go forward 1 time here, then look down and pick up the skull here as well. Also view these in your inventory.
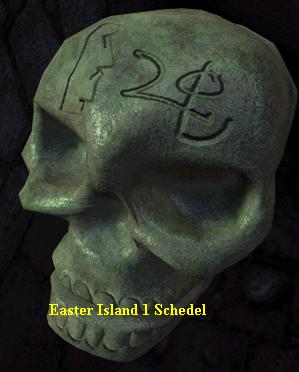
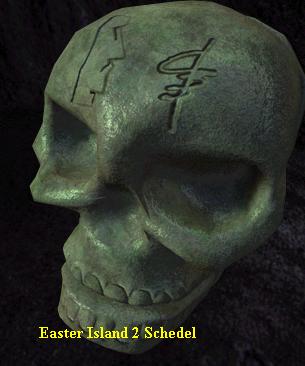
You will see a Moai and a Glyph on it. So this is an Easter Island Skull
Turn around and go forward 5 times and you are back in the tunnel. Turn left and now follow the tunnel 12 times ahead, keep turning around again to find the forward arrow. After going forward 12 times, turn right and follow the tunnel another 5 times forward and you will arrive at the entrance of a large hall, this is the:
Hall with side halls:
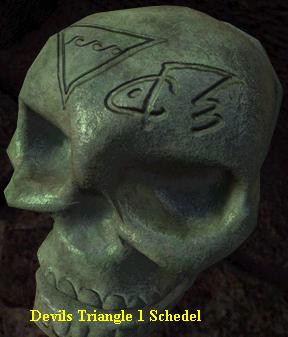
Go forward 1 time through the opening into the room and then pause. You see drawings on the walls. Check them out. Then walk through twice and you are in the middle of this room. On the left a passage, on the right a passage and in front of you the exit to the continuation of the tunnel. So if you are now in the middle of this room with the entrance through which you entered and right in front of you the exit, turn left and go forward 2 times and you are in front of the entrance to the narrow side tunnel that goes down . Follow this tunnel 7 times ahead to the end. This narrow tunnel is a dead end. At the end, look down at the floor. To the left is another Skull here. Pick it up with your backpack and view it in your inventory. You will see a triangle that is on its point and a Glyph. This is the Devil's Triangle 1 Skull (Bermuda)
Close your inventory and turn around and now walk back 3 times through the tunnel. After the 3rd time you look UP. You will now see a square shaft in the ceiling of the tunnel on the left of your screen. Look up through this shaft and then click 2 times forward and you are at the top of the shaft. Then look straight ahead and turn right and click 1 time forward and you are in the secret room. It is a kind of "attic room" with a bunch of drawings of men blowing a horn painted on the walls. Go to the left wall and then look down. There are some red bowls on the floor here. Zoom in on it. You are then in a close-up of the Red / White bowl and there is an item on it. Pick up this item with your backpack and view it in your inventory. It is a kind of iron / bronze bell and you see 3 dots on it. So the Maya number 3. This is Bell 3.
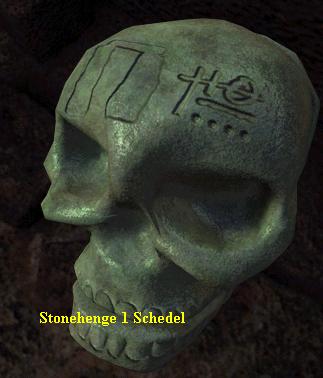
Close your inventory and zoom out and go back to the shaft hole, look down through the shaft and click 2 clicks forward and you are back in the tunnel. If necessary, turn around and follow the tunnel all the way back until you are again in the middle of the Hall with Side Halls. Then turn left so that the entrance through which you entered this room the first time is back in your back and you are looking at the entrance / exit on the other side. Then go forward 1 time and turn right and go forward 1 time to the right wall. Look down again. Here is another skull between the 4 stones. Pick it up with your backpack and look at it again in your inventory. This skull has an image of a stone gate and a Glyph. The stone gate represents Stonehenge. So this is the Stonehenge 1 Skull.
Close your inventory. Turn left and you look at the exit of the room. This is not the entrance through which you entered, but the exit on the other side. Go forward 1 time and you are at the beginning of the continuation of the main tunnel. It will be a long walk through the winding tunnel, so you will have to "turn around" again and again, left and right, to find the forward arrow. Take this into account.
Now go forward 15 times through the tunnel and you are at the entrance of a long cave. Go through the cave 2 more times and you are standing in front of a pointed boulder on the floor. The cave continues behind this rock. However, first turn to the right here. You will see a triangular opening in the rock wall. This is the entrance to a side tunnel. Remember this one is here. Turn left again to the pointed rock and now continue 2 times forward, then turn left at and continue 1 time forward and you are out of the cave and again in the continuation of the main tunnel. Now follow this further 8 times forward and you go through a gate and you are in the:
El Castello Inner Chamber:
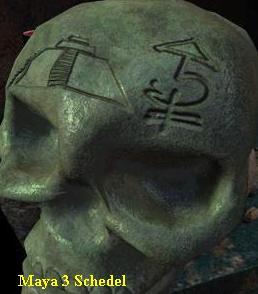
Stand still. This is a large, high and square room with a platform in the middle and 9 pillars on each of the 4 sides. If you look up you will see that the ceiling tapers and ends in a square hole, right above the center of the platform. Behind the platform you will see the next exit to the continuation of the main tunnel. First turn back to the entrance. In front of the pillars, left and right of the entrance, is a landscape statue. Look at the right picture. On top of this lies another skull. Pick it up with your backpack and view it in your inventory. You see a Maya Temple and a Glyph. This is the Mayan 1 Skull.
Close your inventory and now turn slightly to the right so that you are looking at the right corner of the room. That is the corner to the right of the entrance. Then go forward twice to this corner. You don't end up exactly in the corner, but at the wall. So turn left and then go forward 1 time to really be in the corner. Then turn around and look down. There is a rope here at your feet. Pick up the rope with your backpack. Look at normal height again and now go to the middle platform. Click to the top of the platform and look down.
In the middle of the platform is a beautiful engraved tile. You see 4 smaller tiles around this large tile. Zoom in on each of these 4 small tiles. Each tile has a Maya Glyph. Copy or take pictures of each glyph. Zoom out of the tiles. Now you have to leave the room, but not through the entrance / exit through which you entered. So you have to go through the other entrance / exit. Behind this entrance / exit a long "masonry" corridor begins. So go to this entrance / exit and then follow the long corridor 13 times ahead. The hall then ends and becomes a tunnel again. Then follow this 5 times ahead and stop. The tunnel rises slightly here. Stand still and turn right towards the wall and then look down. Right against the rock wall is another skull on the ground here. Take the skull with your backpack and view it in your inventory. The skull contains a Moai and a glyph. This is the Easter Island 2 Skull.
Close your inventory, look at normal height again and turn left and continue 1 time forward and then turn left. Against the left tunnel wall is a large gray stone and on this stone you see a lot of Maya Glyphs. Zoom in on it. Take photos or draw the glyphs, but make sure you keep the order of the glyphs correct on your photos or drawing. Name this for yourself the Number Stone
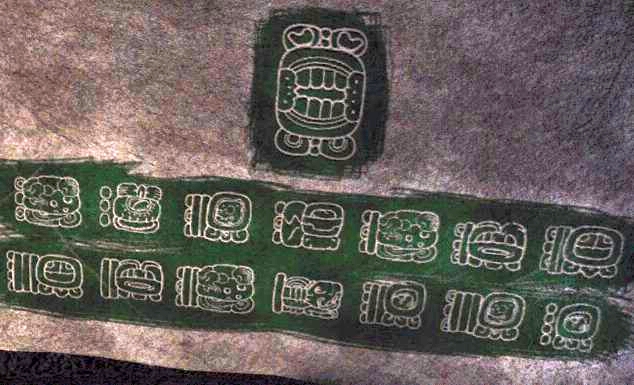
So these are Mayan numbers, as you learned from the "Mayan Astronomy and Mathematics" Book you found earlier in the Tent. So the numbers are the Open Dots / Bars combination that is always attached to the left side of the Glyphs. I suspect that it is some kind of code and that you should know which number each of these glyphs represents, later on in the game. Zoom out and turn right and continue 4 times forward through the tunnel and through a narrow gate you will find yourself in a small square room.
Small square room:
Stand still and turn to the right and look down. Another Skull. Pick it up and view it in your inventory.
You will see a sailing boat on it again and the Omega Symbol. So this is the Atlantis 2 Skull.
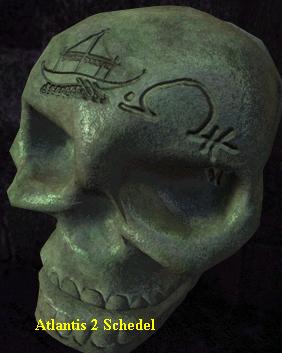
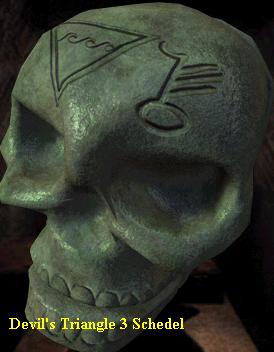
Close your inventory and turn left. Outside the gate through which you entered this room, there are 2 other entrances / exits. Right in front of the gate through which you entered is the other gate and it takes you back into a hallway. However, there is a large hole in the left wall of the room and that hole takes you into a tunnel. So now go to that hole in the wall and step forward 1 time and you are in that tunnel. This tunnel curves quite a bit. So first go forward 1 time, then turn right and go forward 2 times. Turn left and forward once again around the bend and stop. In front of you is another skull here. Pick him up. You will see an inverted triangle and a glyph on it again. This is the Devil's Triangle 2 Skull.

Close your inventory and turn slightly to the left and continue 2 times forward through the tunnel. Turn slightly left again and go forward 2 times and you will come to a gray stone that is on the right against the tunnel wall. You also see symbols on this stone. Zoom in on it. So you see the Mayan numbers: 5, 3, 1, 2, 6 and 4 on it. This is the Bell Code Stone so take a picture of it or copy the code.
Ook deze cijfers heb je kunnen leren uit het "Mayan Astronomy and Mathematics" Boek. Zoom uit en ga verder 4 maal vooruit door de tunnel en je bent dan in de:
You could also have learned these figures from the "Mayan Astronomy and Mathematics" Book.
Zoom out and continue 4 times forward through the tunnel and you are in the:
Illuminated Pool Cave:
Stop, stay put. This is a large round cave with a very deep water pool. The pool contains greenish water and daylight comes from a large hole in the ceiling. It is now becoming difficult to explain. The middle part of the pool is thus "illuminated" by the daylight that enters through the hole in the roof. That is also the deepest part of the pool. Somewhere on the right side of the pool, under water, is the entrance to an underwater cave. It is not convenient to go straight ahead to the lighter middle part of the pool.
I assume that you are at the edge of the pool cave with the tunnel you came out of in your back. Turn to the left. There is a narrow green ledge running along the wall here. Follow this 2 times ahead and you are on the left side in the pool, in the shallow part. Now turn to the right so that you are looking at the thick column of daylight that "illuminates" the center of the pool. Just to the right of the daylight column you can see a few pointed rocks protruding from the water on the other side.
I know it's very hard to see but they really are there. If you keep your cursor on these rocks you will get the forward arrow. Now click 2 times forward and you are past these rock points and on the other side of the daylight column. Move your cursor slightly to the right until you see the forward arrow again and then click to go forward 1 time again. Then move slightly to the right again and now you see, in the distance, a Triangular Slit in the rock wall with a bluish glow in it. That is the entrance to the underwater cave. Go forward 3 times to it and then 1 time forward through the crack and you are in the:
Underwater Cave:
In here you need to find 2 Bells. Aim down to the gray bottom and then advance 3 times to the bottom. Then look down and at the rock wall at the bottom left of your screen. You will get the "Magnifying Glass" here, so zoom in and you will see a bell at the bottom. Pick the Bell up with your backpack and in your inventory you will see the Mayan Number 2 on it (2 dots). So this is Bell 2.
Close your inventory and zoom out and look up and move your cursor until you see the forward arrow. Then go forward 1 time to the back of the cave and then look down and to the right again. You will see 2 larger round stones, against the right rock wall. You get your Magnifying Glass between both stones. So zoom in and you will see the Bell. Pick it up and in your inventory you will see the Mayan Number 6 on it (bar with 1 dot). So this is Bell 6. Close your inventory and zoom out and turn all the way around and find the Triangle Slit entrance / exit of the cave and then go there and through it back into the Pool cave.
Deep part of the Pool:
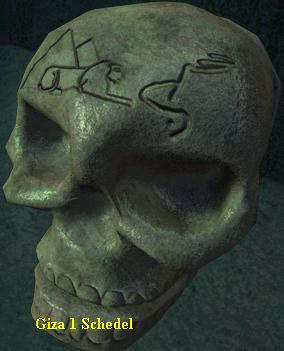
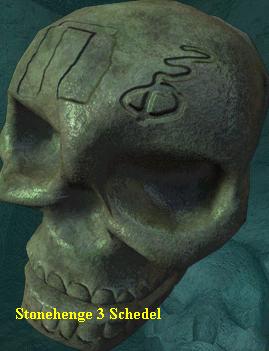
Now you have to dive all the way to the bottom of the deepest middle part of the pool. So the part that is "illuminated" by the daylight column. At the bottom you have to find 2 bells and 2 skulls. Those are the Bells 1 and 5 and the Giza 1 Skull and the Stonehenge 3 Skull. I can't really help you with this. All I can tell you is that you will find the Giza Skull somewhere near the rock face at the bottom and then Bell 1 to the left of this spot in a small cove.
Bell 5 and the Stonehenge Skull, are roughly centered in a shallow hole under a few sticks.
Bell 5 is there in the right eye of a half buried skull and to the left of it is the Stonehenge Skull.
When you have found these 4 items at the bottom of the pool, look up the daylight column and click forward once to swim up. Then find the Forward arrow again in the brightest part of the daylight and click forward once again and now you are above water again. You will probably see the triangle entrance to the tunnel, if not, turn around until you can see that tunnel entrance. Then go forward 3 times and then follow the entire tunnel back until you are back in the small square room, through the hole in the wall.
Chapter 3: Chichen Itza (Maya's) Part 3
Underground: part 2.
So you are back in the Small Square Room, after your escapades in the Illuminated Pool Cave. Now go to the exit here, left. So the gate opposite the gate through which you originally entered this room. Step forward 1 time through the gate and you are in the brick hallway. Now follow this corridor 7 times ahead and you cannot go any further. The hall is a dead end. Turn around and walk back 1 time and then turn right. You are standing in front of the entrance of a side corridor. Go forward 1 time through this entrance and then turn right and look down slightly. The hallway goes down. 2 times forward, turn left and go forward 1 time through the opening and you are in the
Death Chamber:
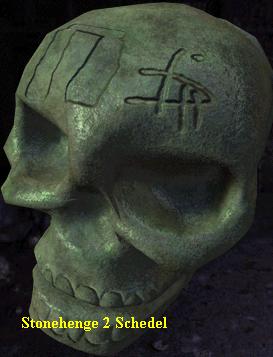
This is a small circular space with a circular platform from which a dangerous spear protrudes. There are still some skeletons impaled on the spear. In Maya times the prisoners were thrown down through the hole above the platform and pierced to death by the spear. Now go forward 1 time to the right of the platform and then look down to the ground and then slowly turn around until you see your backpack. Then click and you have picked up another Skull. View it in your inventory. This is the Stonehenge 2 Skull
Now it gets complicated again. You now have to go all the way back to the cave where I told you that there is a triangle opening to the right of the pointed rock and I told you to remember this opening. First go out of the Death Chamber and follow the side corridor back up to the dead end corridor. Follow it back to the Small Square Room. Walk through it and exit it through the other opening. Then follow the tunnel 9 times forward and then the masonry corridor 13 times forward and you are back in the El Castello Inner Chamber. Cross it over the middle platform and enter the tunnel again through the gate on the other side. Follow the tunnel 3 times forward, turn left and then follow the tunnel 4 times forward. You are back in the cave. Turn slightly to the right and continue 2 times forward. You are back to that pointed rock. Turn to the left and you will see that triangle crack in the wall. Go forward 1 time and STOP in front of the crack. Look down and turn to the right and pick up your 12th skull. This is the Giza 2 Skull
Turn back to the crack and go through it and follow the tunnel 1 time forward, turn slightly right, 1 time forward, slightly right and go 2 times forward and you are in the:
Brown Chamber:
The Skull Rotation Scroll
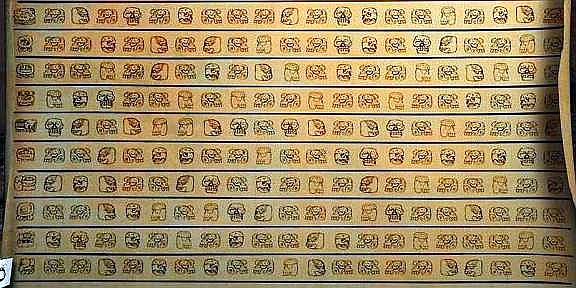
Turn around immediately and zoom in on the floor to the right of the entrance. To the left of the Skull is a Scroll. Zoom in on the scroll. There are rows full of Skulls that keep looking in different directions. The first skull in each row is always a Maya Glyph. You will need this scroll later to solve the "14 Skull Puzzle", but you cannot take it with you. So take consecutive photos of it. I know, it is not that easy, but as you can see I also managed to make it in one image.
Then click the scroll away again and turn around and leave it between space via the other gate and follow the tunnel 4 times ahead and you are in the:
Skull Room:
Immediately upon entering, turn to the right. On a ledge, next to the entrance, is an elongated scroll box behind the skull.
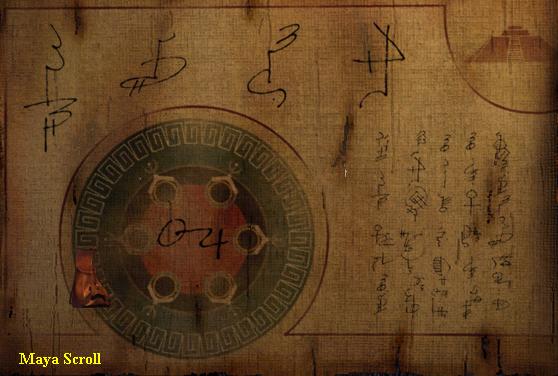
Zoom in twice, then open the box and click on the scroll. This is the Maya Scroll. Place the scroll in your inventory
Zoom out and turn left and go 1 time forward into the room and then turn left and go 1 time forward to the left wall.
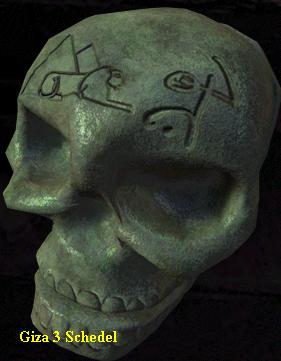
Look down and take the skull from the bottom shelf. This is the Giza 3 Skull
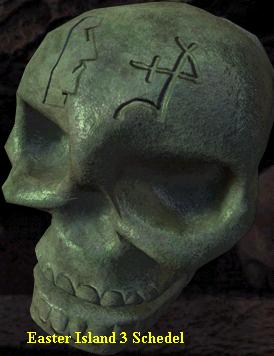
Then turn around and go forward 2 times to the opposite wall. On the top shelf you will find your 14th Skull here. It's the Easter Island 3 Skull.
Put the Skull in your backpack and turn left so that you are looking at the back wall of this room full of skulls.
At the bottom of this back wall you see an arc-shaped niche with skulls in it. Go forward 2 times and then zoom in on these skulls. You are now inthe:
14 Skulls Puzzle
So you see 2 rows of 7 skulls each, so there are a total of 14 skulls. You can click on each skull to make the skull look to the Left, Right or Forward, so you have to make the skulls look in a specific direction, each one for themselves. But how do you find out which skull should look to the left, right or forward? Start by numbering these skulls, from top left to bottom right as 1 to 14. Now you need the data of the Numbers Stone and kull Rotation Scroll. You now have to COMBINE the data of both scrolls. So grab both images, photos, that you made of it now.
the Numbers Stone.
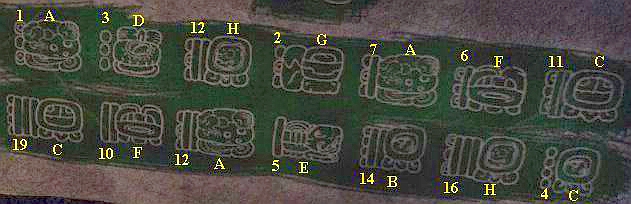
You have made a photo of this stone, did you? On this you also see 2 rows of 7 Maya Glyphs each and a Maya number "sticks" to each Glyph. So these 14 Glyphs correspond to the 14 Skulls of the puzzle, in the same order. Now you first have to figure out which numbers these Glyphs represent. You can do that with the data on pages 52 and 54 of the "Mayan Astronomy and Mathematics" Book that you studied in the Tent at Base Camp. So the numbers are the Open Dots / Bar combinations attached to each Glyph. You will then arrive at the following numbers (from left to right). Top row: 1; 3; 12; 2; 7; 6; 11. Bottom row: 19; 10; 12; 5; 14; 16; 4
The Skull Rotation Scroll
There are 10 rows with 20 skulls each and the first image in each row is a Maya Glyph. If you now compare these 10 Glyphs with the Glyphs on the Number Stone you will see that the Number Stone Glyphs are also on this Scroll. Number the Glyphs on the Skull Rotation Scroll, from top to bottom, A to J and then Number each columm with 10 skulls as 1 to 20.
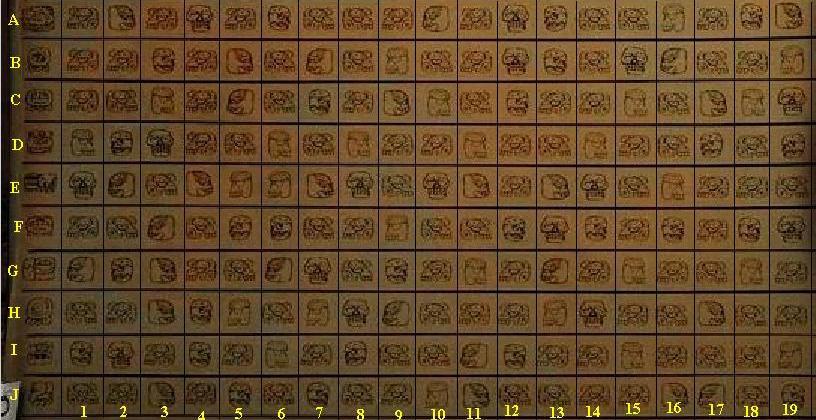
Then compare the Glyphs of the Number Stone with the Glyphs A to J on the Scroll.
You see that, for example, the Glyph of the number 1 on the Number Stone is equal to Glyph A on the Skull Rotation Scroll.
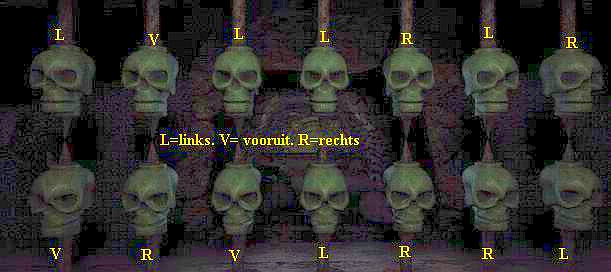
On the Skull Rotation Scroll you then look at the skull at the coordinates A1. This skull is looking to the LEFT. Skull A1 is therefore Skull 1 in the 14 SKULL PUZZLE. So you have to move this Skull to the LEFT. The Glyph of the number 3, on the Number Stone, is on the Scroll Glyph D. So look on the Scroll at the skull on D3. This one is looking FORWARD. So this is skull 2 in the Puzzle. You should let this one look Forwars. Now go on and determine the position of the other skulls in this way. You will then eventually arrive at the following scheme. L = left, R = right and F = forward
|
Number 1 Glyph A Skull A1 =L |
Number 3 Glyph D Skull D3=F |
Number 12 Glyph H Skull H12=L |
Number 2 Glyph G Skull G2=L |
Number 7 Glyph A Skull A7=R |
Number 6 Glyph F Skull F6=L |
Number 11 Glyph C Skull C11=R |
|
Number 19 Glyph C Skull C19=F |
Number 10 Glyph F Skull F10=R |
Number 12 Glyph A Skull A12=F |
Number 5 Glyph E Skull E5=L |
Number 14 Glyph B Skull B14=R |
Number 16 Glyph H Skull H16=R |
Number 4 Glyph C Skull C4=L |
Nu kun je de 14 Schedel Puzzel gaan oplossen. Zet de schedels als volgt
|
Top Row: L; F; L; L; R; L; R Bottom Row: F; R; F; L; R; R; L |
As soon as you have clicked the last skull, bottom right, to the left, the top row of skulls goes up and the bottom row goes down.
So the gap between the two rows of skulls has now widened. Go forward 1 time and you are in the:
Secret Space:
Go forward 3 times to the back wall. A large round wall engraving has been drawn on the back wall. You have seen this engraving before. It is the same engraving as you saw on the small square pillar in the niche of the storage room in the El Castello Pyramid. In the center of the circle you see a skull and around the circle are 6 "ears", 3 on the left and 3 on the right. You can zoom in on each of these 6 "ears". Do that, starting with the "earpiece" at the bottom left and then up and down to the "earpiece" at the bottom right.
In each "ear" you will now see an image of one of the 6 worlds in this game. Write down the order of these worlds, so: Stonehenge; Atlantis; Maya; Devil's Triangle; Giza (Egypt); Easter Island. In the "ears" of this engraving on the small square pillar you have seen OTHER Symbols. You need all this knowledge to soon be able to solve the Last puzzle of this Maya world. If you have this, look at the floor and then slightly to the right. Just in front of the back wall here is the 15th Skull on the ground. Pick it up with your backpack. It's the Atlantis 3 Skull.
Now you have to go all the way back to that "Hall with Side Halls". So crawl out of the secret room back to the skull room, walk through it and then follow the tunnel back to the brown room. Always keep a close eye on where the forward arrow is. Through the Brown Room and then through the tunnel and the Triangle Gap back into the Cave with the Pointed rock. Straight past the Pointed rock you go 3 times forward to the corner of the cave, then turn slightly to the right and enter the tunnel and follow it until you are back in the:
Hall with Side Halls:
Go to the center and then turn left so that you look into that side hall. Then take 1 step forward and then look down at the floor. You can see here that the floor is clean and you see a small crack in one of the floor tiles. Take your crowbar from your inventory and click on this crack. You pry open the tile and a staircase becomes visible. Click on the stairs and you will descend it automatically and you will enter the:
Cellar:
Just go and investigate this cellar first and don't do anything yet. In the center is a statue. It represents a Maya and he keeps his hands open. Both in the left wall and in the right wall are 3 niches and in each niche is a large engraved stone. Go all the way back. There is a low stone table against the back wall. On the table you see a number of dishes and, on the right, a box. Zoom in on the box. On the box is a jar with nuts in it and in this jar is Bell 4. Pick up the bell with your backpack. You know this is bell 4 because it has 4 dots on it, the Mayan number 4. To the left of the box is the 16th skull. So pick these up too. It's the Mayan 3 Skull
Then turn around and walk back 4 times past the statue. Then turn around and zoom in on the statue. So you are standing in front of the statue and his right hand is your left hand. Click on this hand. Well, the statue doesn't like that. It's sticking its tongue out to you now. Open your inventory and take the rope out and click it again on the right hand. The rope gets stuck to the hand and the sticking out tongue and pulls the tongue down and you can hear something opening. Zoom out and turn slightly to the left and go forward 1 time, turn slightly right and go 2 times forward and turn left. So you are now standing in front of the rear left niche and see… .. that large stone slab has now fallen over here and a staircase is now visible. Go forward 2 times down these stairs and you are then in front of the:
Sarcophagus:
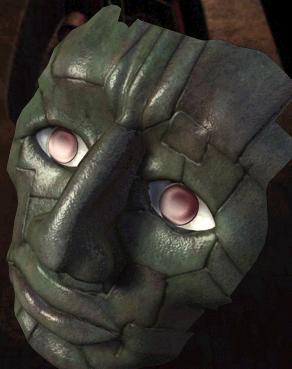
Click forward once and the lid of the coffin will open. Look down. There is a Mask in the front of the chest. Pick up the Mask with your backpack.
Then look at the back. There's a skull there. The 16th. Pick these up with your backpack too. It's the Devil's Triangle 3 Skull
Turn around and go back 2 times to the statue room. Turn right and go through the room to the exit and click on the stairs again.
You automatically go upstairs and are back in the Hall with Side Halls. Take 1 step forward and turn left.
Way back from the "underworld"
You now have to go all the way back to the Cave where you entered this underworld and then climb out of the well via the "jungle gym" and the rope. So go forward 3 * and you are back in the tunnel. Now first follow it forward 13 times and you are back in the water cave. Cross it forward 4 times and then forward 5 times through the continuation of the tunnel and you are back in the very first cave under the well. You can see that "climbing frame" in front of you. Go forward 2 times, then turn left and go forward 1 time. You are standing on the "bank". Turn slightly to the right and click 1 time forward, to the left of the "climbing frame". Then turn right and go forward 2 times to the climbing frame
Click on the climbing frame and you will automatically climb all the way to the top. At the top you have to turn around to find your rope. Then click on the rope and you climb to the top of the well. Do not zoom out because you will then go back down. Look at the Wall and click with your Backpack on the place where your Hook is attached to this wall and you have put your Hook / rope back in your inventory. Now just follow the long jungle path back and then go straight on to the North side of the El Castello Piramide.
Chapter 3: Chichen Itza: Part 4
El Castello Pyramid
Climb up the north side of El Castello and then follow the circulation to the left again to the grid in the niche on the south side. Climb down the ladder again, turn left and crawl through the crawl hole. Turn right and go forward 3 times through the hallway and in the back click, left, on the ladder to descend it. Turn around and walk forward 1 time and you are back in the storage room behind the gate.
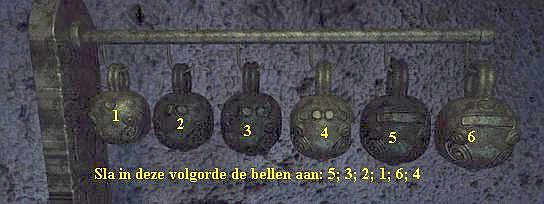
The 6 Bells Puzzle:
Save your game first. Walk back to the small square pillar in the niche and zoom in again on the standard that is on top. You now must hang your 6 Bells on the bar. So open your inventory and click, take 1 bell out and then click it on the bar. The Bell will automatically hang in the right place. Whenyou have all 6 bells hanging on the bar, click on the hammer and it will disappear to your inventory. Now you have to hit the bells with the hammer in a certain code. Remember that gray Bell Stone you found in the tunnels? On it you saw 6 Mayan glyphs. Well, that's the code. That code on the Bell stone was: 5; 3; 1; 2; 6; 4.
Take the hammer from your inventory and hit the bells according to this code and …….
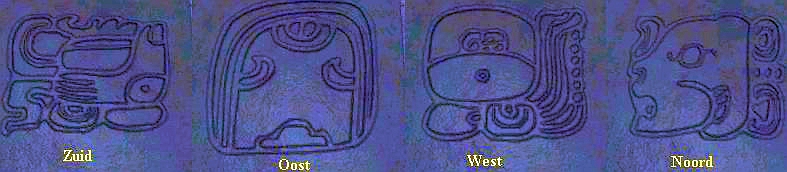
The hammer automatically falls back on the pillar and you turn around automatically and now you see, in the belly of the statue in front of the fence, one after the other, 4 Glyphs appear. Try to remember these 4 Glyphs and also the order in which they appear. So these are the 4 glyphs that you have already seen on those 4 small tiles, on top of the platform of the El Castello Inner Chamber underground. So they are Wind Direction Glyphs and you see successively the: South, East; West and North. So each of those 4 small tiles, on the platform in the middle of the El Castello Inner Chamber, represents a Wind direction. And this is the order in which you have to press these 4 tiles. You probably understand now… .you have to go all the way back underground to that El Castello Inner Chamber.
So go to the ladder and climb up, go through the hallway and the crawl hole and climb up the ladder in the grid hole and you are back on the outside passage. Follow it back to the North side and descend the pyramid again. Continue straight on to the Jungle path and follow it all the way back until you are on the edge of the well again. Turn around again and click your Hook / Rope on the wall again. Zoom out and you descend again. Click in the Cave opening and then Forward in the deep hole and you climb down again via the "Climbing frame". Now just follow the route through the water cave, the tunnel, the Chamber with Side Hall, the Cave and the further tunnel until you are back in the:
El Castello Inner Chamber.
The Platform Puzzle
Go up to the platform. You should have the Entrance / Exit through which you entered in your back and the other Entrance / Exit (to the brick corridor) is right in front of you. Look down at the 4 tiles surrounding the large tile. So the glyphs on these 4 tiles represent the 4 directions of the compass and you also saw them on the "belly" of the statue in the Storage Room after solving the Bubble Puzzle there. I then told you to remember the order in which these 4 glyphs appeared at the time. So this order was: South, East, West, North.
If you are now on the platform as described above then: the right tile is South, the Top tile is East, the Bottom tile is West and the Left tile is North. So zoom in, in this South, East, West, North order, on each tile and then click on it and zoom out again. As soon as you have zoomed out of the North tile, you automatically turn a quarter turn and the platform goes up and you go through the square hole above your head and you are in the:
Top room of El Castello.
It is dark. So look straight and turn around. You are in a "red" hallway and the walls are covered with drawings. This corridor goes all the way around the top room. Go forward 1 time, right, 2 times forward, right, 1 time forward and right and stop. You are now in front of the entrance of the top room. Left and right of the entrance a pillar with a jaguar statue in front of it. If you look through the entrance you will see a Round Golden Engraving in the back wall. So go forward twice and you are there.
The 6 Skulls Puzzle:
You have seen this engraving twice before. The 1st time was on the small pillar of the Bell Puzzle and the second time on the back wall of the room behind the 14 Skull Puzzle. On that Bell Puzzle engraving you saw a Glyph in each of the 6 "ears" and in the 6 "ears". You saw an image of the engraving behind the 14 Skulls puzzle. This Round Golden Engraving also has 6 "ears", but here you see a cross in each" ear ".
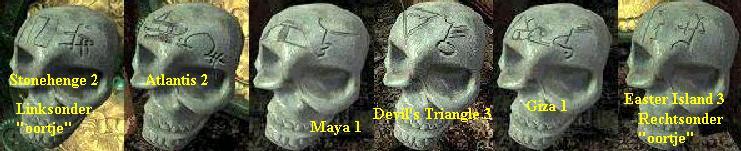
Open your inventory and then hover your cursor on any one of the 17 skulls you have collected during your tour in the underground. Each skull has 2 Symbols. On the left you see the location Symbol on the skull and on the right the number symbol. So you now have 3 skulls of each area and each of the 3 skulls of an area has a different "number" symbol. In the "ears" of the engraving on the pillar of the Bell Puzzle you have also seen 6 of these number symbols.
And in the 6 "ears" of the engraving on the back wall, after the 14 Skulls puzzle, you saw the 6 Location Symbols. I then told you to remember the order of these Location Symbols in the "ears". So this order was, from bottom left to bottom right: Stonehenge; Atlantis; Maya; Devil's Triangle; Giza; Easter Island. Now, from each of these areas, you need to find the skull that has the "Number" symbol that is also in the 6 "ears" of the Bell Puzzle pillar engraving. So these are the Skulls: Stonehenge 2; Atlantis 2; Maya 1; Devil's Triangle 3; Giza 1; Easter Island 3
|
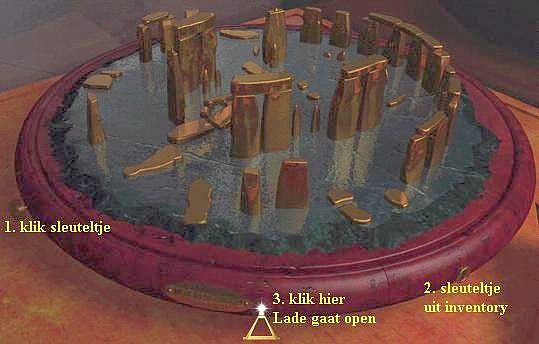
Do the following: Take the Stonehenge 2 skull from your inventory and click it on the bottom left "earpiece". |
Then take the Mask that you took from the Sarcophagus from your inventory and then click this mask on the Skull in the middle of the Golden Circle. You will hear "Click" and the middle part of the Golden Circle will now open. Click forward in the round opening. A small Golden Pyramid will come up and you will be outside the circular opening again. Click once again in the round opening and then click with your backpack on the top of the Golden Pyramid and you have the Maya Omega Stone in your inventory.
That was a lot of work and tugging and puzzling to get hold of this 3rd Omega Disk. Unfortunately, your ordeal is not over yet. You must now return to the jeep in Base Camp. So turn around and go back 1 time through the round golden opening and then forward 2 times again. Go right and 1 time forward, right, 2 times forward, right and 1 time forward and you are back on the "lift stone". Look down at the stone and click on it and you will drop back down to the El Castello Inner Chamber.
Find the correct exit, so the tunnel exit and follow the route through the tunnels, the cave, the Hall with Side Halls and the water cave back to the "Climbing Frame" under the Well. Click on the frame, then click in the hole above your head again and climb back out of the well using your rope. Don't forget to put your Hook / Rope back in your backpack and then follow the jungle path back to the pyramids and then to Base Camp. Go to the passenger side of the Jeep, open the passenger door and enter. Take the Stonehenge Card from your inventory and give it to Humpie Dumpie and you will travel to:
Chapter 4: Stonehenge:
Part 1: In the M.A.R.V.
After a jeep trip and, probably a plane trip, you arrive at Stonehenge with the Camper. Remain in your passenger seat for a while and turn to the right to the passenger window. Then look down. There are 2 white envelopes on the armrest of your passenger seat., …… .
NB: If these 2 envelopes are not there now, first travel back to an area where you have already been, for example Easter Island.
Then immediately return to Stonehenge and the 2 envelopes will be there.
So zoom in on these two envelopes and then read both letters that come out. There is a letter from "Sir Gil Geoffrey's Archaeological Institute" in which Gil mentions the M.A.R.V. That is the Camper you are in now. Gil also mentions in this letter one Christian, an archeology student, and one Cornelius Snelling, an antique dealer. This letter has 2 pages, so click the first page away to read the second sheet as well. A Key is stuck to the bottom of the second page of Gil's letter. Click on it with your backpack to place the key in your inventory. The second letter is from "Snelling Antiquities Trust", and this letter also consists of 2 pages. Read this letter as well and then zoom all the way out to put the letter back in the envelope and then zoom out again.
Turn to the left and then slightly past Hump and click 1 time forward between the backrests. Turn slightly to the left again. You are now in the "trunk" of the MARV and you see 2 doors in front of you. On the left is a kind of kitchen and on the right is a desk with shelves above it containing all kinds of technical equipment.
The desk:
Look at the desktop. There is a large brown envelope on it and you can see a letter and a videotape sticking out of the envelope. Zoom in and then zoom in on the piece of protruding letter. It's a short, typed note from one Pam Watson. Read it and click it away again and then zoom out of the desktop. Look further down. You can see the drawer cabinet at the bottom left of the desk. Zoom in on it and then open the top drawer
Top drawer: Open the top drawer and then zoom in on the yellow paper. It's a drawing of the Celtic Warrior. Take a picture of it. The drawing was made by Christian. Close the drawer and open the Middle drawer: There are 2 items in this tray. A rolled up paper and the manual for the "Omni DVR-AGPS". The rolled up paper turns out to be the schematic map of the Stonehenge monument. Check it out and also check out the manual. Close the drawer and open the Bottom drawer: Inside is a "Stone-In 2012" protest letter. Read it. Apparently they are planning to turn the Stonehenge monument into a kind of amusement park and this is a protest letter against these plans. Close the drawer and then zoom out completely from this drawer unit screen. Look at normal height and turn anti-clockwise towards the kitchen sink.
Kitchen:
To the left of the sink is some fruit and behind the fruit you see a bus. Zoom in on the spot between the fruit and the bus and you are zoomed in on the bus. It's a can of "Midnight Oil", "Mission Possible Coffee". Yummy. Zoom in on the can and the can turns around. Read the label. Then turn the can around again and then click the zoom out arrow, all the way to the right of your screen to zoom out of the can. There is a skull on the stove, behind the sink. Go there and zoom in on the skull. There is a round copper plate in the skull. Fine, zoom out and turn around. You are standing in front of the toilet door.
Toilet and Shower:
Open the toilet door and go in 1 time forward. Then turn slightly to the right and then zoom in twice on the newspaper that is on the sink. Read through the articles, especially the yellow article on Sir Gil Blythe Geoffrey and the article below the photo about a Chamber of Secrets under the Giza Sphinx. Then click away the newspaper and get your hands dirty by clicking on the paper in the toilet bowl. You read "Shelley's leg Abducted" on this piece of paper. Who is Shelley and why was she kidnapped?
Zoom out twice, turn left and click on the door of the shower cabin to open it. Enter the shower, turn slightly left and look at the shower taps. Click on the left tap to turn on the hot water. You now automatically turn back to the glass shower door and a message appears on the shower door due to the hot steam. Read this "The Stones Multiplied" you read on the door. Click on the shower door again to open it and step outside. Exit the toilet and you are back in front of the skull. Turn right and open the bedroom door.
Bedroom:
You are standing in front of the bed under the window. Look down at the bed and then zoom in on the book on the bed. The title of the book is "The Stonehenge Connection" and it is written by Patrick Sidney. Then zoom in again and click on it to read the book. The book is opened at Chapter 9. You can read it to the end of Chapter 13. You read about Shelley Carlyle. Yes, this is the Shelley from the note in the toilet bowl. Read the chapters. You learn that Shelley's favorite Stonehenge Stones, Trilithon's, are the most WESTERN Stones. Chapter 13 ends with "Shelley has been kidnapped". Close the book and zoom out of the bed.
Now turn to the left so that you see the cupboard to the left of the bed and then zoom in on the top compartment of the cupboard. There is a GGA hat in this cupboard. Click on the hat and it falls out of the cupboard and you now see a round can. Zoom in on it and the can will open. There are a few antique coins in it. Place the can in your inventory by clicking on it with your backpack. Zoom out and the hat is back in the cupboard. Then zoom in on the cupboardbelow. It contains two books and a miniature Stonehenge stone. This is a kind of "Paperweight" in the shape of the Stonehenge symbol.
Zoom out twice and then turn clockwise to the cupboard to the right of the bed and zoom in on the second top box. In this box you see some things. They are a beer bottle, 2 medicine jars, a glass and a necklace. You can view the medicine jar. It's the pills for Christian. Zoom out and turn clockwise to the desk. On the desk you see 3 items. At the back, by the window, is a round miniature of the Stonehenge monument. There is a brochure in front of it. Zoom in on this brochure and then click on it to view it. It is a brochure of the planned Pagan Playground theme park that they want to make of Stonehenge. Read it to know what a Trilithon is. Zoom out and you will see the other side of the brochure.
Zoom out again to put the brochure back on the desk and then stay in this screen. Click on the top drawer to open it with your forward arrow. There are a number of letters in this drawer. One of the letters is a handwritten letter from Christian's mother. Read it. The other letters are all from Cornelius Snelling and addressed to Christian. Snelling says in this that he is the official representative of Sir Geoffrey but he offers Christian 15,000 euros to darken and secretly sell antique items he found during the excavation to Snelling. Read all these letters and then close the drawer and zoom out. Now zoom in on the round miniature of Stonehenge at the back of the desktop
Stonehenge Music Box:
You can zoom in at 3 places in the red border..... Left, center and right. On the left is a small key, in the middle is a name plate and on the right is a keyhole. First zoom in on the key and click on it. The miniature turns out to be a music box and it starts spinning. Zoom out and zoom in on the keyhole to the right. Take the small key from your inventory and click it in this keyhole. The key turns and you get it right back, so put it back in your backpack. close your inventory and zoom out. Now keep your cursor to the right of the name plate and then click. The middle part of the red border slides open. It's a secret drawer. Take the "Omni DVR-AGPS" and also take a Memory card. Zoom out.
The Omni DVR-AGPS:
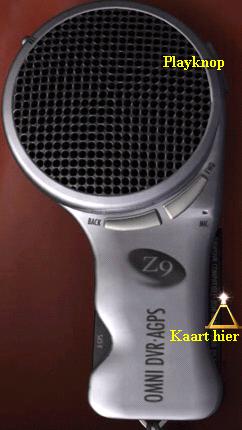
Open your inventory and click on the DVR-AGPS. This will now be placed in a separate screen. Take the Memory card, that took from the drawer with the DVR-AGP , from your inventory and click this card to the right of the handle of the DVR. Then, on top of the round part, click the right button and listen to Gil's message. So it's a message addressed to Christian and Gil warns him not to trust anyone. Gil also mentions "Cryptic Clues" that can help decipher the "Code". He also says that Christian is not yet "dry behind his ears" and that "Factoring Shelley's Stone" may turn out to be essential. After this message, click the back arrow at the top left to return to the game. Now go back to the desk opposite the kitchen, so the desk next to the toilet and now open the middle drawer again and zoom in again on the rolled up map of Stonehenge. Now take a closer look at this map than the first time.
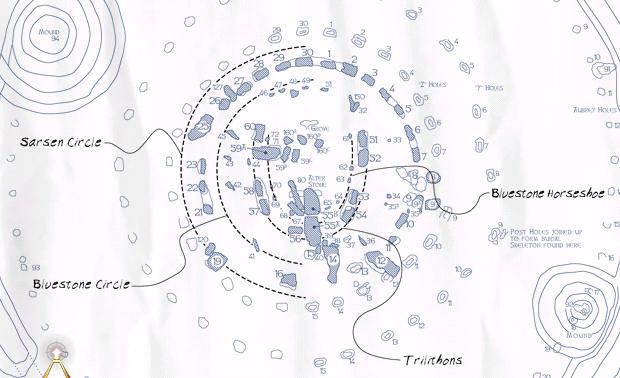
So you see, schematically, the Stonehenge monument and you see that it is made up of 2 outside circles around 2 "Horseshoe" shapes in the middle. You will also see that each Stone of the monument on the map has a number. The Stones in the Outer Ring are the "Sarsen" stones. The stones in the 2nd ring are the "Bleustone" stones. The stones of the Inner Horseshoe are the "Bleuhorse" stones and the stones of the Outer Horseshoe are the Trilithon Stones.
In the book you found on the bed you hace read about Shelley's favorite Trilithon Stones. It said these were themost Western Stones. The Message from Gil has told you it is important to go and see "Shelley's Stone". On the map the most Western Trilithon Stones are the stones with the numbers 57 and 58. These are "Shelley's Stones. Click away the map and zoom out 2 times and now turn completely around and click on the door to the left of the kitchen. This slides open. It is time to leave the M. A. R. V and go to the Stonehenge monument. So go forward 1 time outside.
Part 2: In and around the Stonehenge monument
Immediately turn clockwise. You then look at the back of the M.A.R.V. And you see a ladder on it. Go forward 1 time, turn right and click on the ladder. You will now automatically climb up and end up on the roof of the M.A.R..V. You will hear a "Bleep Bleep" sound. Look down at the roof. You see a small device in the middle of the roof. Click your forward arrow to zoom in on it. In the middle of the device you see a blinking green light and that makes that "Bleep Bleep" sound. What kind of device it is and what it does, you do not know at the moment. Click your forward arrow next to this device to zoom out and turn to the right. In the distance you can see the stones of the Stonehenge monument.
Look at the ladder and click forward and you descend, backwards, down the ladder again. Turn to the right and walk forward 1 time and then turn to the right. You will see a small wooden fence in the barbed wire fence. Go over there and take a look at the sign on this fence. Stonehenge is thus prohibited access to unauthorized persons on behalf of the Snelling corporation. Below this sign hangs another "Stone-In 2012" protest letter.
Open the gate by clicking on the lock on the right and then follow the narrow and winding road 11 times forward, all the way to the back. You come to the entrance of the underpass that goes under the main road to the other side to, I think, the cafeteria. Descend down and enter the tunnel. Oh… the tunnel is closed by a green iron door. Read the sign on the door and there is another protest letter on the right. Look down at the floor by the door. There are a few empty medicine jars, some empty beer bottles and a few yellow notes on the floor. Zoom in on it and then zoom in on the Yellow Notes. They are notes from Christian Troy. There are three of them. Read them all.
You find out that Troy has discovered something but that he cannot bring that "something" down. You also learn that Troy was being watched, so being spied on, and that he threw a shovel at his spies at the Hole stone. Troy gets pretty nervous about this spying. Read the rest and then zoom out completely, turn around and follow the route all the way back to the parking lot where the M.A.R.V is parked. Then go to the right here and walk 7 times forward and you are on the asphalted main road. To your right you will see the entrance to the underpass tunnel and on the other side of the road you will see the other entrance to the tunnel and a house.
Turn to the right and now follow the main road 8 times forward and then turn right. Behind the barbed wire is a large, lonely stone here. This is the Hole Stone. Turn around and go forward 1 time to the other side of the road. Look down and turn slightly left and you will see the shovel. So this is the shovel that Christian threw at his spies. Put the shovel in your backpack and now go back to the M.A.R.V.
Climb up the roof of the M.A.R again via the ladder and zoom back in on that "Bleep Bleep" device. Now click on the green light and… .. the light will turn orange, yellow, red and then off. So now you've switched the thing off. Zoom out and descend back down the ladder and go back to the small wooden gate, open it and now follow the narrow road 6 times forward, turn right and go forward 2 times and you are now in front of the:
Stonehenge Monument
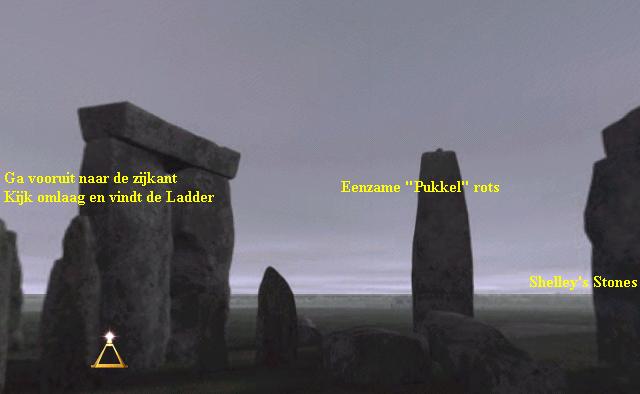
Go forward 5 times between the two stones and you are in the Center of Stonehenge. So we are looking for the "Shelley Stone". As you have seen on the map, Stonehenge is "made up" of an Outer Ring, an Inner Ring, an Outer Horseshoe and an Inner Horseshoe. In addition, there is of course a North, East, South and West side. So that "Shelley's Stone" is on the West side in the Outer Horseshoe shape. You should now see 4 stones of the Outer ring right in front of you. On top of these 4 stones you will see 3 transverse stones and if you look through the stones you will see the lonely Heel Stone in the distance. So you are now looking at the North side.
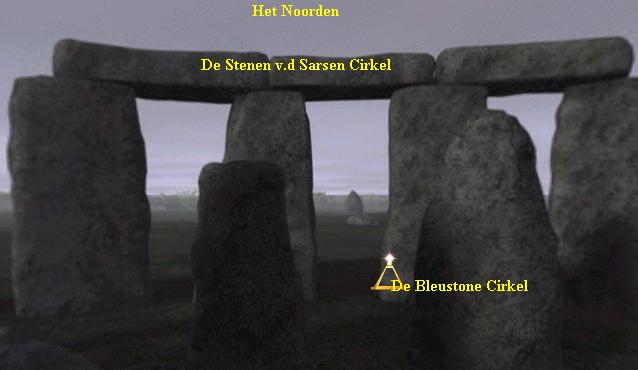
If you turn around completely, you will see that you have a large stone in your "back" with a small "pimple" on top. To the left and right of this lonely "pimple" rock is a "rock gate". The 2 stones of the rock gate, on the right, are stones 58 and 57, so the "Shelley Stones" and that is the West side. The 2 stones of the left gate are stones 53 and 54. That is the South side. Now go forward 2 times to the side of that left gate and then look down. You see a ladder, that's broken in two, on the ground.
Now go forward 1 more time and you are at the back of this gate. Turn around to the gate and look up. You can see that there is something on top of the cross stone of the gate. Open your inventory and take out the Hook / Rope and click on the Cross stone of the gate. You throw the hook up and it is then attached to the cross stone. Click Forward on the rope and you will automatically climb up and then stand on top of the cross stone. Nice view
NB: If you take a different order through the game and you haven't been to Chichen Itza yet, then you don't have the Hook / Rope now. So you will first have to travel to Chichen Itza now to get the Hook / Rope from the back of the Jeep.
Look down at your feet. There is a briefcase on top of the cross stone here. It's Troy's briefcase. Zoom in on it twice. There is a book in the bag and also a small key. First pick up the key with your backpack before you forget it. Then zoom in on the book. It's the Christian Troy Travel Journal. Click on it to open the book and sit back while reading the book.
Troy mentions in his journal that he wears that necklace he got from Gil. He talks about his meeting with Cornelius Snelling, about the soil scans he performed here and the action that Gil took on it. He tells about your inevitable arrival. About what he found on A3. He rattles on and suddenly he talks about having started excavations in another area around here. An area of which he only knows the location. You also read that he destroyed important clues he should have given you from Gil.
If you have had enough or have finished the book, close the book and zoom out of the briefcase completely. Look at normal eye level again and turn slightly to the left until you see that lonely Heel Stone again in the distance on the asphalt road. So to the left of it is that house where the underpass goes. Continue to the left and you will see the M.A.R.V. Turn further to the left and you will see another "Building" in the distance. You will see a high fence around this "Building". That's where we're going now, because that's Troy's Digsite. So look down and find your rope and then climb forward and you climb back down. Turn around and go forward 1 time between the stones. In the distance you will see that enclosed building. Just go forward 5 times and you are standing with your nose against the fence.
Troy's Digsite:
Be aware that It's a high voltage fence, so don't touch it or you'll be dead. You are standing in front of the door in this gate and on the right you see a small green box. Zoom in on this box. Take the small key from your inventory and click with it on the lock of the box and the box will open. A Keycard slot. You need a Swip Access Card. Open your inventory and take out the Stonehenge card. Close your inventory and click your Stoneheng card on the slot, to the left of the code box. You put the card through the slot. Put the Stonehenge map back in your backpack. The code lock will now ask you to enter a 4-digit code. Help...... CODE???? ... WHAT CODE????.
Could this be the information that Christian Troy should have given you and that he tried to destroy? You have found two clues for this 4-digit code. First, the "Shelley was Abducted" note in the toilet bowl and second, the "The Stones Multiplied" message on the inside of the shower door. Also, from the book on the bed and from the information on the Stonehenge Map, you know that Shelley's favorite stones are the Trilithon stones 57 and 58.
Well..........do the math. Multiply 57 by 58, so 57 X 58 = 3306 and enter this number with the number keys of the code box. So enter 3306 and… ..the door in the gate opens. The "building" turns out to be a big tent. Go forward twice into the tent and you are at an uncovered grave. In the grave you can see the remains of the "Celtic Warrior". Look at the left part of Troy's dig. You can see that Troy has divided the excavation into 6 sections. Now name these sections, from top left to bottom right, as Box 1, Box 2, Box 3, Box 4, Box 5 and Box 6 and then go 1 time forward into the grave.

Then turn left and you look at boxes 3 and 6. Go forward 1 time and you are in Box 3. Turn around and look down to the middle of Box 6. Take the Shovel from your inventory, close your inventory and click the shovel in the middle of Box 6. You dig a hole. Click on it with the shovel and you will make the hole bigger and deeper. You will then see another elongated Scroll box in it. Store your shovel and then zoom in on the box. Click on it with your backpack and then open the box and then take the Stonehenge Scroll out.
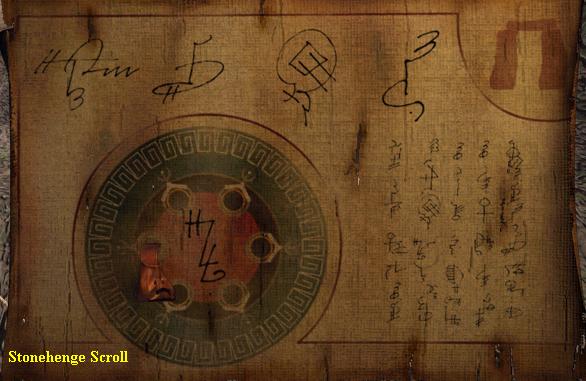
Now go back to the M.A.R.V, via Stonehenge, open the door and enter. Turn right and move forward to get into the passenger seat.
Take the Devil's Triangle map from your inventory and give it to Humpy. You travel to:
Chapter 5: Devil's Triangle:
A boat trip on the ocean and then the boat comes to a stop. So Devil's Triangle is somewhere on the Ocean in the Bermuda Triangle. You are standing in front of a brown wooden desk with a nautical chart and another Gil's "Confidential" envelope. Click forward to zoom in on the desktop and then zoom in on the envelope. Read Gil's letter again. At the bottom of the letter is another Memory card, so click on it with your backpack. zoom out of the letter. Open your inventory and take out the just-picked Memory card and then scroll through your inventory to the DVR-AGPS thing. Click on this and you are in the DVR-AGPS screen. Close your inventory and click the memory card in the DVR-AGPS (if there is another memory card in it, click it out first and place it back in your inventory first) and click the Play button and listen to Gil's message.
Gil tells about a very old shipwreck found at the bottom of the ocean. He also says that a number of items have been found there and that more or less form the shape of a ship's hull. He gives you the coordinates of this location, which are: 44 degrees North and 18 degrees West.
Close the DVR-AGPS screen via the "back" arrow and now zoom in completely on the sea chart. Your cursor is now a coordinate system with a "cross hair". You now have to look on the map for the coordinates that Gil has given you in his message. Move your coordinate system cursor over the map to the lower right corner and then look for Coordinates 64-44 / 32-18 and if you see under the "eye" click with your mouse.
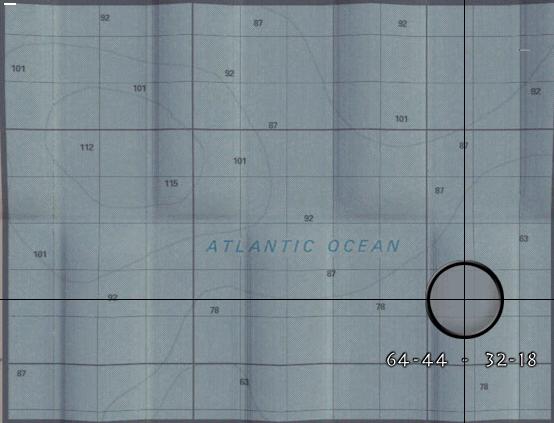
Hump now sails the boat to these coordinates and then you are staring at the desk again. Look at eye level and turn to the right and then go forward 3 times to the diving gear on the aft deck. Turn right and click on the diving equipment and you will put it on. You are now looking through the mask:
Underwater:
Turn left and now just go forward 3 times and you are underwater. If you had clicked the correct coordinates on the map earlier, you will now see a field in front of you with lot of vases from ancient times. (if you are at the wrong coordinates you will only see flat things in the sand of the bottom). Go forward there in 2 times and then turn to the right so that you get the forward arrow again long the border of the vase field. Go forward 1 time and

then turn slightly to the left. You now see 3 vases together.
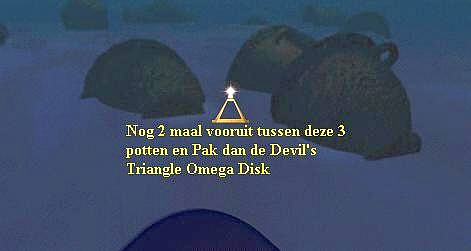
Go forward 2 times between these 3 vases and you will see the Devil's Triangle Omega Stone in a vase. Click on it with your backpack and you have the Devil's Triangle Omega Stone. Zoom out and turn around. Orientate yourself where you can see the shadow of the motor yacht and then go forward 1 time, turn slightly to the right and go forward 1 time and turn slightly left and you are now right behind the back of the motor yacht. So go forward 4 times and you are back on the aft deck. Go forward 3 more times into the cabin. You automatically take off the diving gear. Continue to Hump. Now take the Stonehenge Map from your inventory and give it to Humpy and you will now travel back to Stonehenge.
Stonehenge Revisitedt:
When you arrive, simply stay in your passenger seat and turn to the right again and look at the armrest of your seat again. There is a new envelope on it. zoom in on it and read the letters. The first letter is from Gil again and in it he is talking about his friend, Lord Lloyd Bathewaite II. This Lord might be able to help you. A map is attached to the letter. Gil tells you to give this letter and map to Humpy and he will take you to the Lord's house. You can also read the second letter. You will learn that Bathelwaite is also an acquaintance of Cornelius Snelling. This letter is signed Your SS Brother. Click with your backpack to place Gil's letter with Map in your inventory and zoom all the way out and turn around to Hump. Take the letter / map from your inventory and give it to Hump and he will now take you to:
Chapter 6: Lord Bathelwait's Manor
Find the Key
It was a fun and comfortable ride in the Mercedes Benz. Click to the right on the window of the passenger door and you get out. Walk to the front door of Lord Bathelwaite's house and click a few times with your forward arrow. Nothing…Nada… .no answer. Turn to the left and look slightly down and you will see the doorbell. Click on it twice and your Lord Bathelwaite will report via the intercom. Your arrival has already been announced. When the Lord has finished, turn back to the door and try out the door handle. Unfortunately… you still cannot enter. Click twice on the doorbell again.
The Lord really says you can come in so try the door handle again. No… you still can't go in. Click on the doorbell again. Lord Bathelwaite tells you that you must have the key to the door to enter and he dares you to find this key yourself. You can tell from the tone of his voice that he doubts that you will succeed. So it's a test he puts you through.
Turn left slightly and then move forward 4 times over the tiles in the grass to the left corner of the house. Turn right and continue 2 times forward and then turn right again and look down. A cellar hatch, but this is also securely locked with a padlock. Turn back to the left and go forward 3 times and turn right again. Go forward 2 times and turn right. You are now at the back of the Manor. Go forward twice, via the stone stairs and you are standing with your nose pressed against the glass back door. The back door is also securely locked. Turn around. You see the Heggen maze and you see a building. That building is the Conservatory. Go forward 4 times, via the stairs, and you are at the entrance of the maze.
Maze:
Maybe now is a good plan to save. It's a maze and in mazes I always have the annoying habit of getting lost.
The entrance to the maze is guarded by two spear-carrying warriors. Go forward 1 time and you are between the two spear carriers. Turn slightly to the left and you will see the path behind the left spear carrier. So go forward 1 time, turn left slightly and then follow the path 3 times forward, turn right and follow the path 10 times forward, right, 3 times forward, right, 1 time forward, right, 2 times forward, left, 1 times forward, left, 2 times forward, left, 1 time forward and then slightly right and 1 more time forward. You now see that building, it is the....
Conservatory: Go forward 3 times to the door and click on the door to open it. Enter 1 time forward and stop. The Conservatory is a greenhouse-like square building. In the center is a round fountain basin with a statue of a woman. There are 4 stone benches around the fountain. A snake is wound around the entire round fountain basin and you can see the "tail" of the snake protruding under the bench, right in front of you. Go forward 1 time to this bench and then go forward 2 times, to the right of this bench. Then turn left and look down at the round fountain basin. You see the Head of the snake. Zoom in on the Snakehead. You can't do anything with it now, but you now know this snake head is here. Zoom out, turn around and walk back to the entrance. Open the door and go back 4 times to the:
Maze: A right "corridor" and a left "corridor". You came out of the right "corridor" so now go forward 3 times through the left "corridor" and then, left, 3 times forward, left, 2 times forward, right, 1 time forward, right, 2 times forward, right, 6 forward, right, 1 forward, left, 7 forward, right, 3 forward, right, 2 forward, left, 3 forward, left, 1 forward, left, 2 forward, right, 1 forward , right, 2 times forward, right, 4 times forward, right and then 7 times forward along the "round" path, then turn left slightly and forward 1 more time and you are in the:
Center of the Maze: It's just a small place and there are 2 benches and a sundial pillar. Zoom in on the Sundial disc on top of this pillar and put this disc in your inventory with your backpack. A tap will be visible. Click on this tap to open it. You have opened the mouth of the snake in the Conservatory with this. So now you have to go back to the Conservatory.
Zoom out and turn around so that you see the entrance to the path on which you also reached the middle. The 3 other paths come to a dead end. Follow this path back 8 times forward and then left, 4 times forward, left, 2 times forward, left, 1 time forward, left, 2 times forward, right, 1 time forward, right, 3 times forward, right, 2 times forward, left, 3 times forward, left, 6 times forward, right, 1 time forward and then slightly left, 6 times forward, left, 2 times forward, left, 1 time forward, left, left, 2 times forward, right , 2 times forward, right, 3 times forward, right, 3 times forward and you are out of the maze at the:
Conservatory: So go back to the door of the Conservatory, open the door and go back inside and forward again to the right side of the fountain and zoom in again on the now opened mouth of the snake and take the small key off. This is the key for the padlock that locks the cellar hatch. So back to the:
Maze: Now go back into the right corridor and follow the route back to the entrance of the maze. So 2 times forward, right, 2 times forward, right, 1 times forward, right, 2 times forward, left, 1 times forward, left, 3 times forward, left, 10 times forward, left and 3 times forward, right and 1 times forward and you are outside the maze at the back of the big house.
Walk 2 times to the stairs, turn right and go 2 times forward, left and 3 times forward, left and look down at the cellar hatch. Take the small key that you took from the snake beak from your inventory, close your inventory and click the key on the padlock. The lock is opened. Click on the left part of the hatch and this will open. So go forward 1 time through the hatch down the stairs and you are in the:
Cellar:
Go forward 1 time to the center of the basement. To the left in front of you are 2 wooden barrels and to the right in the corner is the stairs to the top. Now turn to the left and walk up to the wall. Turn left again and look down at the large wooden crate in the corner between the two shelving units. On the crate you read "GGAI Artifacts". Take the crowbar from your inventory and click it on top of the crate. You pry open the crate. Zoom in on the now opened crate. In the crate is a Letter, an elongated Scroll box and, in the corner above the letter, an Omega Stone. First zoom in on the letter and read it. Remember… .the letter has 2 pages. Read the letter carefully. It is another letter from Gil and it is addressed to our Lord.
In this letter he talks about 2 new and secret digsites. One is in Santorini and there another "Case" has been found. The other siteis on the island of Crete and a Stone has been found there. You also read about a secret Brotherhood and you experience that Gil is a member of "The Sacred Seven Sekt", an offshoot of the Templar sect. Read the letter quietly and then zoom out.
Then zoom in on the Scroll box and open it and then take the "Red" Atlantis Scroll out with your backpack.
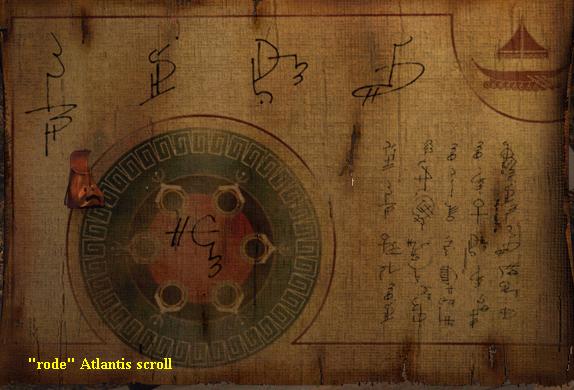
Then pick up the Atlantis Omega Stone located in the corner above the letter. Click on it with your backpack to also place it in your inventory. Then zoom all the way out of the crate and turn to the left and walk 3 times forward to the wall at the stairs. Turn left, 1 time forward and turn left. You are now under the stairs in front of a shelving unit. There is a thick red book in the stand and a large piece of white cloth. zoom in. The red cover of the book shows a picture of a Snake. So call this book the "Snake Book". There is something on the piece of white fabric. Pick this up with your backpack and then view it in your inventory. It's kind of like a spoon, but what a strange thing. You see 3.I on it.
Close your inventory and zoom in on the red "Snake book" and browse through this book. On each right page you will always see the same round drawing, but on each page you will see different symbols. You will need all these drawings later. You can now draw them or take pictures of them, but you can also wait with this. We will come back to this book later on after getting more information about it elsewhere. So it makes more sense to wait. Close the book and zoom out completely and turn left and go forward 2 times. Turn around to the stairs and go forward 3 * up the stairs. The door at the top of the stairs opens. Go forward 2 times through the hall, turn left and go forward 2 times and you are in the middle of the:
Living room:
You are now in the living room and right in front of the "garden doors". Turn left and go forward 1 time to the right of the coffee table and then turn right again. Look down at the small round table that stands in front of the patio doors here, between the 2 chairs. There is a book on it. zoom in twice on the book and it will be unfolded in your screen. It's Lord Bathewait's Journal. Read it carefully.
Lord Bathelwaite writes about Gil and the history of the Ark of the Covenant and that it was placed in King Solomon's mines by the Knights Templar in 955 BC. He also tells about a mysterious appearance of this Ark in the Sphinx in 2500 BC. You read about Atlantis and that the Atlantheans built the "Chamber of Ages" and about the Omega Disk which is able to unlock the "Power of the Omega Stone". The Omega Stone, the Stone That Will End All Times.
There is a card inserted between the last two pages that you can read. Take this card with your backpack from the book and view it in your inventory. It is an SS membership card and you have seen this monogram / logo before. On that "bleep Bleep" thing, on top of the roof of the M.A.R.V. The logo consist of 6 birds around the SS.
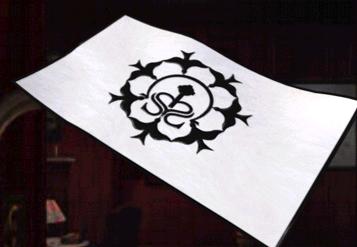
Close your inventory and also the book and zoom out of the table. Turn to the right and walk back 1 time. Turn right and go forward 1 time and turn right to the stairs that go up to the floor. Go forward 1 time to the stairs and then click on the stairs. You automatically walk up the stairs and at the top you turn left and go forward twice. Go right and then forward twice through the narrow corridor and then turn left. On the wall here is a map of the hedge maze in the garden. You will have to re-enter the maze later so take some pictures of it. Turn around and walk back to the stairs and descend it again. Down again you see straight out a double door with a "clover leaf" ornament on it. Go forward 2 times to this double door and then click on the doors and they will slide open. Go forward 1 time and you are in
Lord Bathewait's Study Room:
So go in and turn left. Lord Bathelwaite is sitting at his desk. So go to him and click on him with your forward arrow. After some thought, the Lord will start talking to you.
The Lord tells a whole story about Stonehenge and the interconnections between Chichen Itza, the Giza, Stonehenge and Aegon. He talks about the significance of this current year, 2012. It seems that the builders of Stonehenge, not the Druids, made a small mistake. They have misplaced the stones, but the stones of the inner circle will be this year, so 2012, Alignment, and so that is the great disaster that awaits our world. He tells you more and ends by telling you that you can examine his study.
When the Lord is finished, turn to the left and click on the ladder of the bookcase and you will climb up. Upstairs you can open and read 2 books. These are the books "Crossing Over: Celtic Christianity" and the book "The World of Alchemy". Read them both. In the Alchemy book you will find 4 pages full of Alchemy symbols. On the first page of these 4 you also see the symbol 3.I, which is also on the device that you took from under the cellar stairs from the scaffolding. This symbol is the "One Dram" symbol.
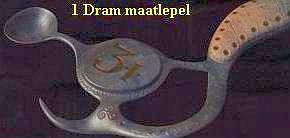
On the last page of this book you can see all kinds of sizes and quantities. This is important information, so write it down or take pictures of it
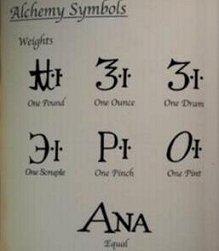
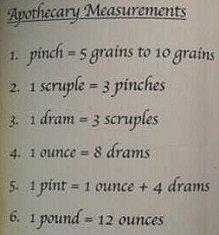
Zoom out to climb down the ladder again and then turn left and go forward 2 times to the table on the other side of the room. Look down at this table. You will see 5 rolled up maps on it. 1 of these maps is the correct one and you must take it. You can click on any of the 5 maps and if you do you will automatically turn to Bathelwaite and he will tell you if this is the map. So with 4 of the maps he says that it is not the right one and that you are wasting time. If you have the right map, he will say this and then you click this map into your inventory with your backpack.
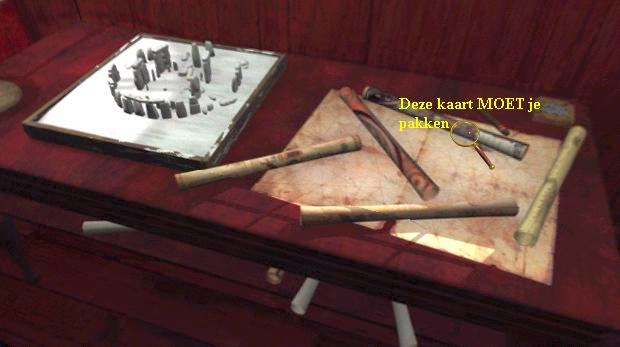
When you have the correct map, turn left and go forward 1 time towards the large standing clock
You automatically turn back to Bathelwaite and he now tells you that Gil has told him that you have found the Ark (Riddle of the Sphinx part 1) and that Gil has instructed him to give you a clue now. He tells you that a very important date is the year the Knights Templar placed the "Ark of Covenant" in Solomon's mines. Well, you know this date by now. That is the year 955 BC.
The Clock Puzzle
Turn back to the grandfather clock and now click on the dial. The hands are now at 5 past 12. The small hand is the hour hand and the big hand is the minute hand. So you have to set the clock at 9:55 now. Click / holdhe big hand, and then drag the big hand to the 11 and click to release. Then click / hold on the small hand and drag the small hand to the 10th. Click to let go and… .
The clock turns away and you see a secret passage behind the clock. Click 1 time forward, on the narrow gray part, and you are behind the clock and in front of an iron spiral staircase. You cannot go up, so look down and click on the steps of the stairs and you descend down. Downstairs you turn slightly to the right and go forward 2 times through the corridor. You will enter a small storage room. On the left are 2 boxes and on top of these 2 boxes are an ITEM that you MUST pick up. So click on it with your backpack and view this thing in your inventory. It's a so called "Skullbreaker ".
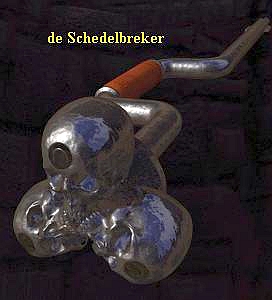
Close your inventory and turn to the right and walk forward to the barrel in the right corner. On this barrel is another elongated Scroll box.
Zoom in on the box and then open it and take the Stonehenge Scroll out and click it to your inventory
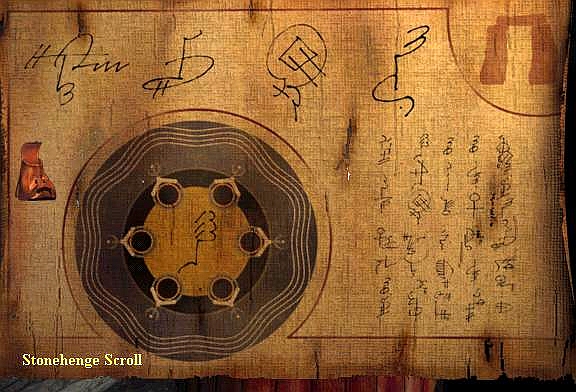
Zoom out, turn around and walk back to the spiral staircase and go up again via the spiral staircase. Then turn slightly to the left and go through the secret passage back into the study. Continue to the double doors, open them and walk forward twice to the stairs. Turn left and go to the front door, open the front door and step outside and walk to the Mercedes. Open the passenger door and enter the car.
You're back in the Mercedes behind Hump. Open your inventory and take the Map you took from the table in the study. Give this map to Hump. Hmmm…. Nice map says Hump, but… um… what about your membership? Put the map back in your backpack and take out that SS Card you found in Bathewait's journal. Give this card to Hump and he will take you to the Celts.
NB: if you don't give the Map to Hump first, but only the SS card, Hump will refuse to advance. You MUST give him the Map first and then the SS card.
Chapter 7: The Celts: Part 1
After a ride in the Mercedes and a flight by helicopter, you are at the entrance of a cemetery.
Cemetery
Go forward to the gate. The gate will not open. Turn to the left and look at the lamp. On the lamp you see a white circle with a spiral in it. The light from the lamp casts a reflection of the spiral on the stone pillar to which the gate is attached. Turn back to the gate. In the gate is a large open circle with a smaller closed circle inside. This looks like a Stone Disc. Open your inventory and take out the Sun Disc that you took from the pillar in the Maze, behind Lord Bathewait's house. Click the Sun disc on the small closed circle of the gate and the right part of the gate will now open.
Go forward 1 time and then turn left. You see the full moon in the sky and to the left of the tree you see a tent-shaped structure. Look at the moon again. Under the moon you can see the tip of an Obelisk. Go forward 3 times towards the moon and then turn to the left. Go forward 1 time and turn to the right. You see a faint glow of light. Go forward 1 time and you will see that this light comes from a lamp that hangs above a stone gate.
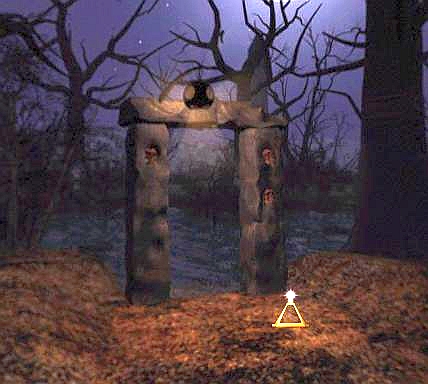
On the pillars of the gate you see 3 skulls, 1 on the left pillar and 2 on the right pillar. Behind this gate is a pond and around this pond are 6 large trees.
The Pond with the 6 trees
Now go forward 1 time and you are in front of the gate. Go forward 1 more time and you are through the gate and you stand in the pond. So there are 6 large trees around the pond. There is a large plaque in each tree. You now have the Gate in your back. Turn to the right and you will see the first tree. Go forward 1 to this tree and then turn right. You are now standing in front of this tree and you see the large plaque.
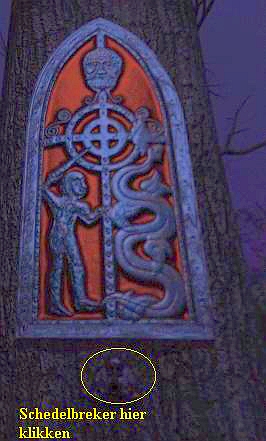
The picture represents St. George defeating the Dragon. The cross is the Celtic Cross. Look up the plaque. There is a "cigar band" around the tree and in the circle you see an image. zoom in on it and the image turns out to be a bird. So this is the "Bird Tree". zoom out and now look UNDER the plaque. You see a kind of Knob in the tree,,,,,,,,,,zoom in on it. The Knob turns out to be the spitting image of that Skull Crusher you found in the secret room behind the clock in Lord Bathewait's study. Open your inventory and take out that Skull Breaker and now click it on its image in the tree and …… The Plaque falls from the tree. The tree is hollow and a Skeleton hangs in the tree. Go forward 1 time into the tree and take the skull from the tree with your backpack. View the skull in your inventory. On the skull is a round plate with the image of a bird.
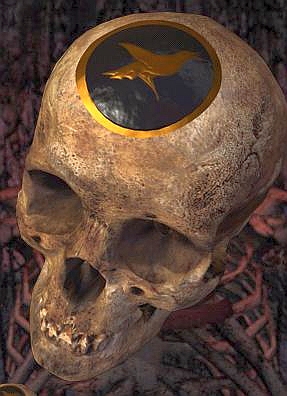
Now go to each of the other 5 trees and always look above the plaque at the image in the "cigar band". Open each plaque with the Skull Breaker and then always take the Skull from the tree. So you get the Fish skull, the Horse skull, the Swan skull and the Boar skull in succession. In the last tree, the Snake tree, however, there is no skull, but at least you know, through the image in the "cigar band", that this 6th skull must be the Snake skull.
|
So take the Bird Skull from the 1st tree. |
You are now in the pond and right in front of the gate. It's getting tough now. Turn around so that you have the gate in your back and you are looking at the Moon, between Tree 3 and 4. Between every 2 trees a path goes further into the area and you will have to go over all these paths. First go forward 1 time to the middle of the pond and then turn to the left so that you look at the over between trees 4 and 5. Go to this bank and then follow this path 7 times forward and you will reach a sod hut.
So you are at a fork in the path, in front of the hut. There is a path to the right and to the left. Go forward 1 time on the path that runs to the left in front of the hut. Then turn to the right and you will see the entrance to the hut. Through the entrance you look into the hut and you see a pleasant fire burning. However, we are not entering the hut now. That only makes sense if you have also found the 6th skull, the Snake skull.
Turn back to the left and follow the path 2 times forward and then turn slightly to the left and follow the path 4 times forward. You will see an open space with a circle of 4 upright stones. Go forward 1 more time and you are in the middle of the circle. You will see line markings on each stone. Look down at the ground. In front of each stone is a small round stone with a round hole in it. Name this place "Place 1" and follow the path back to the entrance of the hut.
When you are back at the entrance of the hut go forward 1 more time and turn left and then follow the path 2 times forward, right and 2 times forward. Another clearing. Now with 7 upright stones with Line marks on them. There is always a small round stone on the ground between the stones. Call this "Place 2".
Go back to the fork in front of the hut. There is an old stone oven at the fork. To the left of the oven, the path leads back to the pond. So follow this path back to the pond and go to the middle of the pond. Look at the gate and then turn to the left so that you are looking at the bank between trees 1 and 2. Go forward 1 time and you are there. Follow this path 7 times ahead to the next clearing. Here are again 7 upright stones in a circle and in front of each stone there is another small round stone. Name this "Place 3" and go back to the pond.
Now go to the bank between tree 5 and 6 and follow this path 5 times ahead. Another clearing and here are 3 upright stones and a small round stone in front of each stone. Call this "Place 4" and go back to the pond. Now go to the bank between trees 2 and 3 and follow this path 5 times forward to the clearing where 5 upright stones are in a circle. Here are a whole bunch of those little round stones with holes on the ground. Call this "Place 5"
Back to the pond and now go to the bank between trees 3 and 4. Now follow this path 8 times forward and you will see the "Obelisk". Well, this is not an Obelisk but a Tower and you are standing in front of the footbridge. Do not go over the bridge to the tower yet, but turn to the left and go forward 1 time to the wall and then turn right. You are now in front of a closed gate and behind this gate you see a small cemetery. You cannot open the gate. Turn left and walk 1 time forward along the wall, then turn slightly to the left and follow the path 2 times forward and you are back in front of the path that goes left to the tower and right back to the pond. Go forward 2 times to the right. There is now a Y-junction in front of you. The left side goes back to the pond. So go up the right side and forward 4 times and you are again in an open place and here are again 3 upright stones with 4 small round stones on the ground. So call this "Place 6". Now follow the paths back to the footbridge of the tower.
Tower: 1st time
Go forward 2 times over the bridge and then click on the ladder and you climb up to the door of the tower.
Look down and click on the door handle to open the door and go in 1 time. You are on the:
1st floor:
Turn slightly to the right. You see a niche with a burning candle and a red-rimmed circle in which you see a cross. Go forward 1 time and look at this red-rimmed circle. In the red border you see 6 birds. Just like on that logo on your SS card and on that "Bleep Bleep" device on top of the roof of the M.A.R.V. Turn around and look at the floor. You can see light shining through the cracks between the planks. Apparently there is another floor under your feet. But how to get there ?. Look straight ahead and go forward 1 time to the stairs. Turn right and click on the steps and you climb up to the:
2nd floor:
It's a bit dark in here. This is a storage space. Turn around and you will now see a ladder.
Look up along the ladder and then click your forward arrow and you climb up the ladder and come to the:
3th floor:
This is the "prayer room". You are standing in front of a window niche and there is a Celtic Cross hanging in front of this window. On the left are 3 burning candles and on the right 2. Look down. There is a red book on the floor and another cross on the cover. You can't do anything with it, so turn around and click on the next ladder and you climb to the:
4th floor:
This is another storage space. Turn around and look up the next ladder and climb it up to the:
5th floor:
This is the "dining room". Turn left. A window and under the window is the dining table. Go forward 1 time and look down again and you are zoomed in on the table. There is a chalice filled with red wine on the table and in front of this chalice you see 3 spiral circles. These circles include a rolled up Scroll. Zoom in on this scroll and it will appear on your screen.
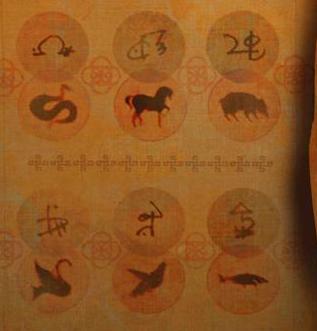
On the left side of the scroll see that SS logo again, but you're interest lies on the right part of the scroll...Take pictures of it. On the right part of the scroll you see the 6 animal images of the skulls from the trees around the pond. Above each animal you see a symbol. You have seen all of these symbols before. Each animal therefore has its own symbol and you need to know these symbols. You cannot take this scroll with you but you need to know which symbol belongs to which animal, so take pictures of it. Click the forward arrow to place the scroll back on the table and then turn left and go to the ladder. Also climb this ladder and you will get to the:
6th floor: The Alchemy room:
Go forward to the semicircular workbench and look down. There are 7 stands on the table, 5 on the left and 2 on the right. On each stand you see a symbol and on 4 stands there is a bowl with a powder in it. There is also a bottle on the table, a box with a skull on top and two loose piles of powder on top. There is also such a MEASURING SPOON on the table. Pick it up with your backpack and view it in your inventory. It turns out you picked up two of them and on one you see the "One Ounce" symbol and on the other the "One Scruple" symbol. (you know this from that one page of the book in the bookcase of Lord Bathewait's study).
Je hebt nu dus 3 van deze lepeltjes want je had al het "One Dram" lepeltje. Draai je om en klik nu op de laatste ladder om deze ook nog op te klimmen. Bovenaan de ladder stoot je je hoofd tegen het dichte luik van de:
You now have 3 of these spoons because you already had the "One Dram" spoon. Turn around and click on the last ladder to climb it as well.
At the top of the ladder you bump your head against the closed hatch of the:
7th floor:
Click on the hatch a few times. The hatch is then opened and the priest puts his ugly head through the hatch and he screams at you that you have to fuck off and slams the hatch again. Knock on the hatch again a few times and again the priest opens it and again tells you to fuck off. He doesn't let you go up on the 6th floor.
What now? You will have to come up with a ruse and this ruse is to travel back to the house of Lord Bathelwaite first. So descend all the ladders again to the 2nd floor and then descend, in the left corner, down the stone stairs to the 1st floor and go to the still open door. Look down at the footbridge and click the forward arrow and you will descend again down the outside ladder.
Turn around and walk over the footbridge and follow the path back to the Pond. Cross the pond to the gate on the other side and then follow the path back to the outside gate of the Cemetery. Walk through the gate and then click the forward arrow again. You hear the gate close behind you and Hump is on his way in the helicopter. The helicopter will pick you up and you will fly back and you will arrive back at Lord Bathelwaite's house in the Mercedes.
Get out of the Mercedes and then turn right back around and get back into the Mercedes. First give Hump the map you took from Lord Bathewait's study, then place it back in your inventory and then give the SS card to Hump again and he will take you right back to the Cemetery.
Chapter 7: The Celts: part 2:
Finding the Snake Skull
Walk to the gate again and open it again with your Sun disc.
Follow the path to the pond again and cross the pond to the bank between trees 3 and 4 and follow the path to the Tower again.
Tower 2nd time
Go over the footbridge, climb the outer ladder, open the door and enter.
Climb all the way up again to the 5th floor and then look up again at the hatch of the 6th floor and see ......
...... the hatch is now open, so climb up and you will reach the:
7th floor: Bedroom.
There is a telescope in the window niche. Go forward to the telescope and then click on the back (the eyepiece) of the telescope. You now look through the telescope and suddenly you see the Priest appear. He is hiding behind tree 5 by the pond and he is now on the path that leads from the pond to the hut. Then the priest hides behind tree 5 again. You will automatically be out of the telescope. Turn left. You now look at the back of the bed and you see a rope hanging from the bed post. Look down. There is a key on the rope. Click on it with your backpack to place this key in your inventory. Then turn to the left and go forward 1 time to the table, turn slightly to the left and zoom in on the table. Open the drawer in this table and take out the measuring spoon. In your inventory you can see that this is the "One Pinch" measuring spoon.
Close the drawer and now click on the big Red book that is on the table. Browse this book. If I counted correctly, it contains 34 right-hand pages and on all these pages you see a number of symbols. There are two symbols in the red part of the page and you also see a symbol at the top right. At the bottom left you always see an image of a stone with line markings on it. You have also seen this kind of stones on the 6 open places that I let you call "Place 1 to Place 6"
NB: As mentioned, there are 34 of these pages and only 6 of them are important. After all, there are 6 Animal Skulls. But you don't know at the moment which 6 pages are important to you. You need to get more information about this first and then come back here later. To avoid problems later, it is best to make a SAVE AS save now. Call this Save As game something like "Tower Red Book" and NEVER OVERWRITE THIS SAVE. It may be that you will soon not be able to get that priest out of this room and because you have to study this book well, you can just save at that moment and then load this SAVE AS "Tower Red Book" so that you can read it again.
Zoom out of the book and then out of the table. Turn clockwise. You now see the other window. Look up. The tower bell hangs above your head and the bell cord hangs in front of you. A round metal disc hangs from the bell cord. Click on this disc and ring the bell. The bell strikes once. Turn around and walk back to the telescope and look through it again. Again you see the priest appear and again he looks at you and then he hides behind the tree again and you are out of the telescope again. Turn around and walk to the ladder hatch and then click in the hatch and you descend to the 6th floor.
Now descend further to the 1st floor and go back to the doorway there and look down and click forward again to the footbridge and you will descend the outer ladder again. Turn around and walk 2 times forward over the footbridge and turn to the right. Go forward 1 time to the wall and turn to the right. Again you are now in front of that closed gate of the small cemetery. Take a good look at this fence. The lock is on the left.
Open your inventory and take out the key you found on the bed in the tower bedroom. Click this key on the lock of the gate and the gate will open. Enter 1 time forward. There are about 10 gravestones in this cemetery and at the very back is a lonely high tombstone with the Golden Celtic Cross on it. You can view every gravestone and each tombstone has a name. These names are a joke from the creators of this game. They are their names. Walk to the back tombstone, look up at the cross and zoom in on it. Grab the Golden Celtic Cross with your backpack. Turn around and now go back to the Tower and go over the footbridge again and climb the outer ladder again and open the outer door. Go inside.
Tower 3rd time:
1st floor:
Go to the niche on the right with the burning candle and the red / white circle with the cross in it. zoom in on the red / white circle and take the Golden Celtic Cross from your inventory and click it on the cross in the circle. This turns out to be a keyhole and the Golden Cross the key. The bottom steps of the stone staircase now slide in and a hatch hole becomes visible with a ladder to the bottom tower room. Click in the ladder hole and you descend to
Chamber of Secrets:
Look around. There are 6 large stone slabs on the wall and a shelf on each slab. There is a Red Book on 5 of the shelves. On each of the 6 stones a large Sword hangs above the shelf. There is no red book on 1 shelf, but a Sword. Zoom in on each book. There is an Animal on the cover of each book. So they are the animals of the Animal Trees and Animal Skulls. So every book is related to an animal skull. You will find: the Fishing book, the Horse book, The Swan book, The Bird book and the Hog book. The Snake book isn't here. However, there is a Sword on that shelf. What should you do now:
Open each of the 5 books. In each book you see a lot of right-hand pages and on each of these pages you see a drawing. All these drawings represent the 6 OPEN SPACES around the pond. You know that in each of these open spaces there are upright stones that form a formation there. In these drawings you see these upright stones as circles. Each circle (stone) has a symbol. You don't recognize most of the symbols, but in each book you will always see 1 drawing in which you recognize in EACH circles (stones) the animal symbols that you saw on the Scroll that you found on the dining table on the 5th floor of the tower.

Draw these drawing from each book. This open space belongs to the animal of the book. You need to recognize that open space. So name this clearing. So for the fishing book that is FISH = PLACE 4. That should work with my description of the 6 open spaces there (seeChapter 7 part 1). So you get 5 drawings, of each open space, and you have thus linked an open space to each animal. Then take a good look at each of these 5 drawings. On these drawings, always look for the circle (stone) in which the SYMBOL of the animal of the animal book from which the drawing comes. That circle (stone) in that open space is the Stone for that animal. MARK THIS STONE ON YOUR DRAWINGS. You will soon have to go to these stones to take a closer look
|
|
|
|
|
|
The Snake book is not here. So you don't get a Snake Open space drawing.
|
|
Have you done all this then go to the Shelf that has NO Book on it. So this is actually where the Snake book should be. Stand in front of the shelf but do not zoom in on it. Look up and zoom in on the Sword. Take this Sword with you, so click on it with your backpack, find the ladder and climb back to the 1st floor. Exit the tower via the outer ladder.
We now know for 5 of the animal skulls which Open space (Places 1 to 6) belongs to the skull, but for the Snake we do not know yet. Where have you seen a SNAKE BOOK before? Right, in Lord Bathelwaite's basement. So now you have to go back to Lord Bathewait's house. So go to the pond, cross the pond to the gate, go through the gate and follow the path back to the outside gate. Step out through the gate and then click your forward arrow again and you will be picked up again by Hump with the Helicopter and Hump will deliver you back to the:
Lord Bathelwaite's House:
The Snake Skull:
Get out of the Mercedes and go to the front door. Click on the front door to open it and step inside. Go forward 1 time and turn left and go to the cellar door behind the stairs. Open the cellar door and go down the cellar stairs twice forward. Turn left, 1 time forward, left and 1 time forward, left and… .. you are again in front of the scaffolding under the cellar stairs and there it is… the Snake Book. Zoom in twice on it and look in this book so the drawing of the Open Place 1 on which you see the Animal symbols in all the circles (stones). Copy this drawing and mark the Snake Stone on the drawing
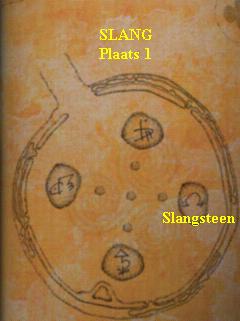
Zoom out twice. Now it's time to find the Snake Skull. Do you remember going through the maze here? I did not tell you then, but you may have been so observant that you saw that there are statues in various places between the hedges. Some of these statues represent a Warrior with a Sword in his hand. However, there is 1 Warrior statue without a sword in the maze. So you have to find that sword less warrior now. So you have to go back into the maze. You can go out through the front door and then go left around the house to the maze, or you can go out through the basement hatch. So go to the entrance of the maze.
Maze. The Warrior without Sword:
First follow the route to the Conservatory. When you come out of the maze, turn right back to the maze and enter the left corridor. Then follow this route: 2 times forward, left, 3 times forward, left, 2 times forward, left, 2 times forward, right, 1 time forward, right, 2 times forward, right, 2 times forward, left and you are standing in front of the Warrior without a sword.
Open your inventory, take out the Sword and give it to the warrior (Right hand, that's for you on the left). You pierce the Warrior and it slides back. Go forward 1 step to the right of the warrior. You are now in a wide grass alley which is enclosed on all sides by high hedges. Go forward 6 times and you are at a large rock with a wooden door in it. Click on the door handle and the door will open. Go in and all the way back and… .. There it is…. The Snake Skull. Zoom in on the skull and place it in your inventory. Then click on the rolled up scroll. On the scroll you see an explanation of the "oven" in the Hut behind the pond in the Cemetery. You also read the name of a distant ancestor of the Lord.
Zoom out a few times and turn around and walk out of this dark cellar and go back to the Warrior. Step back into the Maze. You will now automatically get the Sword back and the warrior will slide back into place. Put the Sword back in your inventory and close your inventory. Turn left and follow the route all the way back to the entrance of the maze and then go back to the Mercedes in front of the house. Enter the car and give Humpy Dumpy first the map again and then the SS card and he will take you back to the Celts.
The Celts: part 3: The Alchemie Puzzle
When you arrive, go back to the gate and open the gate again with your Sun Disc. Go to the pond and then to the bank between trees 4 and 5. Follow the path to the Entrance of the Hut and go forward 1 time into the hut. You are then in front of the fire. Behind the fire you see a large tree stump. To the right of the fire, go forward 2 times, then turn slightly left and look down and zoom in the tree stump. Take a look at it at your leisure.
On the stump you see a large, round, metal plate. Behind this large round metal plate are 6 Skull Holders on each of these holders see an animal symbol. In the middle of the large round metal plate is a round grid. You can zoom in on it and you will also see a slider that you can click back and forth. Zoom out again. Now take the 6 animal skulls from your inventory, one by one, and then click them on the correct Skull holder. If you number this 6 holder, from left to right, 1, 2, 3, 4, 5, 6, then place in:
When you have placed all six skulls, zoom in on the skulls one by one and then click on the round metal animal plate of each skull to open it. Each skull, except the Horse Skull, contains a colored powder.
I know, I am getting ahead of myself with this. You don't know what each powder is yet. I'll explain how I know this later. The symbols for these substances can be found in the Book of Alchemy in the bookcase in Lord Bathelwaite's study. |
The intention is that you will make the Stonehenge Omega Stone with the correct amounts of each powder. What amounts of which powder then? To find out, you must first go to each of the 6 open spaces, so to each of the "Space 1 to Space 6". In order to look at the Animal Stone there and then draw it over accurately, with all the lines in the right place. You will then see a number of dashes on each of the 6 animal stones. You then need this knowledge to find the correct quantities in the Red Book on the 7th floor of the tower. For the routes to these 6 open spaces, I refer you to Chapter 7 part 1
|
So now zoom out completely and turn around and leave the hut (the skulls will now be left here). As soon as you leave the hut you will hear the Tower bell strike 3 times.
Go to Place 1. Find the Snake stone here (look on your drawing where it is located) and draw the stone carefully and call the drawing the Snake stone. So draw all the dashes and place them in the right place |
When you have carefully drawn all 6 animal stones, you go back to the tower. Climb up the outer ladder, open the door and enter the 1st floor. Go to the niche to the right and take the Golden Celtic Cross from the red / white circle. This will bring those bottom steps out again. Now climb to the 6th floor. Look up the ladder that leads to the 7th floor. Shit .... the hatch is closed again. Climb up and knock on the hatch again a few times. The priest is back in his bedroom and tells you to fuck off again. However, you have to go to that Red Book on the table in his room. So now you have to pull that trick again. So leave the tower and travel back to Lord Bathelwaite's house for a moment.
Again at Lord Bathewait's House:
Now that you are back here, it is best to refresh your memory. Enter through the front door and enter the Lord's study (double doors with the clover leaf on them). In the study, go left to the desk and then turn left and click on the ladder. You climb back up against the bookcase. Then click on the standing Alchemy Book and look at those 4 pages with the symbols again. Check out the 3 pages with the Materials Symbols on them. Draw all these symbols or take pictures of these 3 pages. You must be able to recognize 6 of those symbolsto in the Red Book later on. If you have this, leave the house and re-enter the Mercedes and let Hump take you back to the Celts.
Again in the Tower: 7th floor
Go back to the 6th floor of the Tower and look up and ..... The hatch is now open again and you can enter the bedroom..
NB: You may not be able to chase the priest out of his sleeping quarters the second time. If you've returned to the 6th floor after doing that "ruse" and the hatch is still closed, you're out of luck. The only thing you can do then is to save and then load that previous SAVE AS save. You know, that SAVE AS I recommended you the first time you were in the sleeping quarters. You then can still study that Red Book.
Go to the table and open the Red Book again. On every page in this book, at the bottom left, is an image of an upright stone and on this stone you always see the number of lines. These are the upright stones in the 6 open spaces around the pond. You will also see a symbol on each page, in the top right corner. These are the Materials Symbols and they therefore stand for a certain Chemical Element. You have also seen these symbols in the Alchemy book in the bookcase of Lord Bathelwaite, on the 3 Materials pages of the Alchemy book.
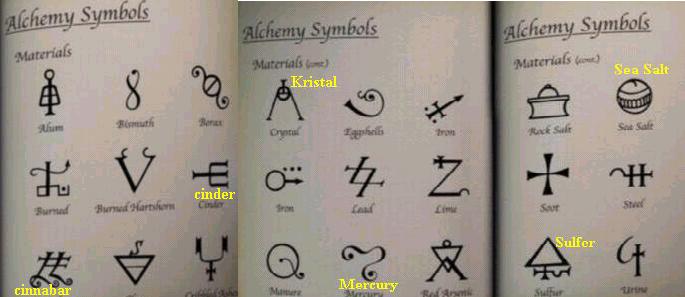
In the red area, of each page, you always see 2 thick symbols. These two symbols indicate the QUANTITY you need of the Chemical Element. These Symbols are the Weight Symbols from the Alchemy Book. And you will recognize 4 of these Symbols, because they are also on the 4 measuring spoons that you have in your inventory. So you have the "One Ounce Spoon", the "One Dram Spoon", the "One Scruple Spoon" and the "One Pinch Spoon". On the Apothecary Measurments page of that Alchemy book you can read how to make "One Pound" or "One Pint" with these 4 spoons.
Goed wat moet je nu hiermee:
Take your drawings of the 6 Animal stones from the 6 open spaces. Now search in this book for the pages on which you see these stones, bottom left. So you always look for the page on which you see the Fishstone, the Snake Stone, the Swan Stone, the Bird Stone, the
Boar Stone and the Horse Stone in the lower left corner. You must therefore always carefully compare the number and location of the STRIPES on the stones with your own drawings of these 6 stones. Then see which Element Symbol is in the top right corner and see which Amount Symbols are on that page.
Put all this information in a graph. You then come to this conclusion
|
If this is not yet clear to you, the following series of images may help you to clarify it:
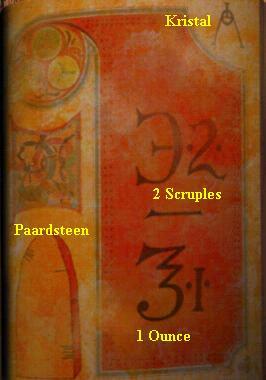 |
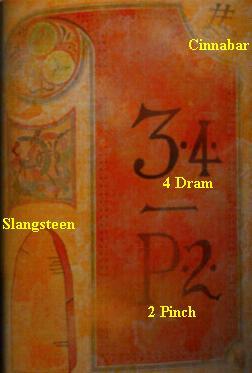 |
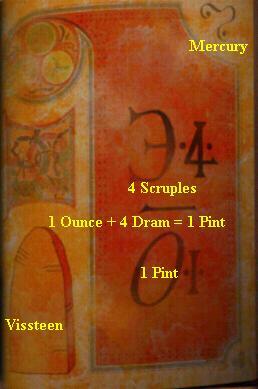 |
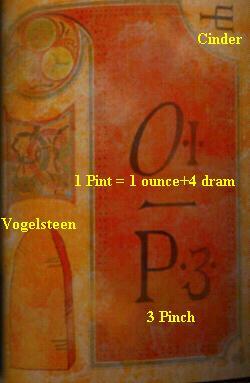 |
 |
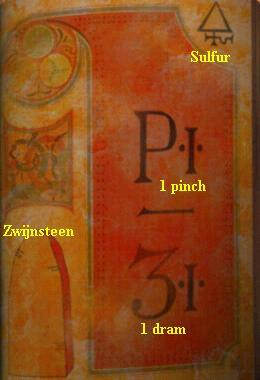 |
Now if you've deduced all of this from the Red Book and wrote everything down, so which powder is in which skull and what amounts of each powder you need to get from the skulls, zoom out all the way and go down the ladder back to the:
"Baking" The Stonehenge Omega Stone:
6th Floor:
Zoom in again on the semicircular work table. So you already know that there is no white Crystal in the Horse Skull at all. The Horse Skull is empty. On this work table are 7 holders and 5 of them have a dish. On every holder you see such a Chemical Element symbol and you can recognize some of them. On the left side of the table are 5 holders and on the 3rd holder, from the left, there is no container but it does have the Crystal Symbol on it. In front of this holder is a bowl with white powder in it. That white powder is therefore the Crystal that should have been in the Horse's skull. Zoom in on this dish.
You know you must have 2 Scruples + 1 Ounce of this crystal. However, you can now only take 1 Scruple and 1 Ounce. So you will have to come back here again for 1 more Scruple. So take the 1 Scruple Spoon from your inventory and fill it with the Crystal and place the full spoon back in your inventory. Then take the 1 Ounce Spoon and fill it with the Crystal and place the full spoon back in your inventory. Zoom out
Hut:
Descend to the 1st floor and then via the outer ladder to the footbridge and follow the path back to the pond. Go through the path between trees 4 and 5 to the hut and enter the hut and to the skulls behind the fire on the tree stump. Zoom in on the grid in the large round plate. Take the full 1 Schruple spoon from your inventory and click it on the grid. Make sure the spoon is empty and put it back in your inventory. Take the full 1 Ounce spoon and empty it on the grid as well. Do not use the Slide because if you do then you can start all over again
Zoom out of the grate and out of the stump. However, you still need 1 Scruple with Crystal. So go back to the 6th floor of the tower, refill your 1 Scruple Spoon with the crystal and return to the hut. Zoom in again on the grid and empty your 1 Scruple Spoon again and zoom out of the grid. So you now have tossed 2 Scruple + 1 Ounce Crystal through the grid. The Horse Skull is finished with this.
You have to do this now with the powders from the other 5 skulls. You have seen this entire procedure explained on that scroll that is in the shed where you also found the Snake Skull. So this is really a very accurate job and you should ABSOLUTELY make no mistakes Also make sure you never click on that slider of the grid, because if you do you can start all over again and you also have to go back and forth to the tower for the crystal twice. And also remember that the Dram Spoon and the Scruple Spoon are very similar. So make no mistake about this.
I will explain the procedure for you on the basis of the Bird Skull. I am telling you again that the Dram Spoon and the Scruple Spoon are very similar. It is very easy to mix up these 2 spoons. So you need to take 1 ounce + 4 drams + 3 pinches of the powder from the Bird Skull and pour it through the grid. You do this as follows:
After you have poured 4 dram through the grid, store the dram spoon and take the 1 pinch spoon and repeat this process until you have also poured 3 pinch through the grid. Put your spoon back away and zoom out of the grid. You have now poured 1 ounce + 4 dram + 3 pinches of powder from the Bird Skull through the grid.Now do this also with the other 4 skulls. So take from the other 4 skul: Snake skull: 4 dram + 2 pinch; Boar skull: 1 pinch + 1 dram; Swan skull: 14 ounces; Fish skull: 4 scruples + 1 ounce + 4 dram Again, it is an accurate job. Always count the number of spoons you need and make sure you are always using the correct spoon. So for the Swan skull, you only have to take 14 times 1 ounce from the skull because 14 ounce = 1 pound + 2 ounce. When you have finally thrown the very last spoonful of powder through the grate, store the spoon you still have in your hand at that moment, zoom out of the grate and then out of the tree stump and turn left towards the fire. Click on the fire with your forward arrow and you will take a Burning Branch from the fire. Hold this burning branch and turn back to the stump and zoom in on the grate again. Click the burning branch on the grid and ……… .. .......If you have now done everything correctly and you have thrown the correct amounts of each powder through the grid, the STONEHENGE OMEGA STONE will now be baked and you will get it in your inventory. If you made mistakes with the powders then you die. You can believe me or you can not believe me, but the amounts of each powder that you have to extract from the skulls stated by me are really correct. So if you are going to die here then you have probably used the 1 Dram once when you should have used the 1 Scruple. |
If you succeeded, you have the Stonehenge Omega Stone and you are done here. Exit the Hut, go to the pond and through the pond to the stone gate, then follow the path back to the exit and look for the Helicopter. The Heli will pick you up again and you will return to the House of Lord Bathelwaite. Do not get out, but now give your Stonehenge map to Humpy and he will take you back to Stonehenge with the M.A.R.V.
NB: if you first give the Giza map to Hump in the Mercedes, he will tell you that you cannot go directly to Giza from Lord Bathewaite's Manor. You can go to Stonehenge. When you arrive in Stonehenge you do not get out, but you immediately give the Giza card to Hump and he will deliver you to:
Giza
Walk forward 7 times and you are in the Tent. Turn left and look at the desk. Zoom in on the desk and immediately pick up the Santorini map with your backpack. Then read Gil's "Confidential" letter. Gil knows that you now own all 6 Omega Stones and he now reveals the last location you need to go to now. That is the Island of Santorini. He closes the letter with the message that you have to hurry because the OMEGA STONE has you covered. Zoom out and go back to the helicopter, get in and give the Santorini Map to Hump and you will go to your final destination.
Chapter 8: Santorini
Endgame
You float in a seaplane on the ocean. You are in the co-pilot's seat. Turn left and then go forward 2 times, between the pilot seats. Then turn to the left and look down at the fold-out table. It has another one of Gil's "Confedential" letter on it. So zoom in and read the letter. Gil is talking about a small pyramid and the "Great Pyramid" in this letter.
Zoom out completely and turn around to the position. Look down. Click on the box at the bottom left and you have the diving gear hanging on your back again and you look through the mask again. Turn left and go forward 1 time, turn right and open the hatch next to the fire extinguisher. Go forward 1 time through the hatch and you are in the water. Click 2 more times your forward arrow and you are under water.
Look slightly down and to the right. You can see the "Great Pyramid" under water. Turn back to the left. In front of the pyramid you see a large round thing on the bottom. It looks a bit like a big "car tire". Now go forward 3 times, between the pyramid and the "car tire" and make sure you also go down. Then turn to the left and you are right in front of that "car tire" and the pyramid is in your back. Go forward 2 times and "swim" before the opening of the "car tire". So it is not a "car tire" but it is a very large barrel. Go inside. In the barrel there is another barrel and this one is packed with white crystal. Look up. There is no "lid" on the large barrel. Turn around and look outside through the entrance. Right in front of you is the pyramid.
Now go forward 5 times and you are almost at the top of the pyramid. Look up and go forward 1 more time and you are upstairs in front of the entrance to the Sun Disc room. Enter 1 time forward. Right in front of you is a large white map on the wall and on this map you see two circles. In the inner circle is the OMEGA symbol and in the outer circle you see 6 other symbols. Look down at the floor.
The Sun Disc Puzzle:
You will see a large circle with 6 smaller circles. Zoom in. Each of the 6 smaller circles has a symbol. They are the same symbols as in the outer circle on the wall map, so in the middle of the 6 small circles is the SUNDISK and you have to take it. What do you do. You now have to place each of your Omega Disks in the correct circle. How do you find out which Omega Disk to click on which circle. During your voyage of discovery through this game you have found 6 elongated scroll boxes containing a scroll.
So these are the Atlantis Scroll, the Stonehenge Scroll, the Easter Scroll, the Giza Scroll, the Devil's Triangle Scroll and the Chichen Itza Scroll. Now compare the symbols in the 6 circles with the symbols on these 6 scrolls and you will find out which Disk to click on which circle. I want to save you this work. So if you now look at the entire floor circle as a clock then there are circles on: 1 o'clock, 3 o'clock, 5 o'clock, 7 o'clock, 9 o'clock and 11 o'clock. Now place the:
|
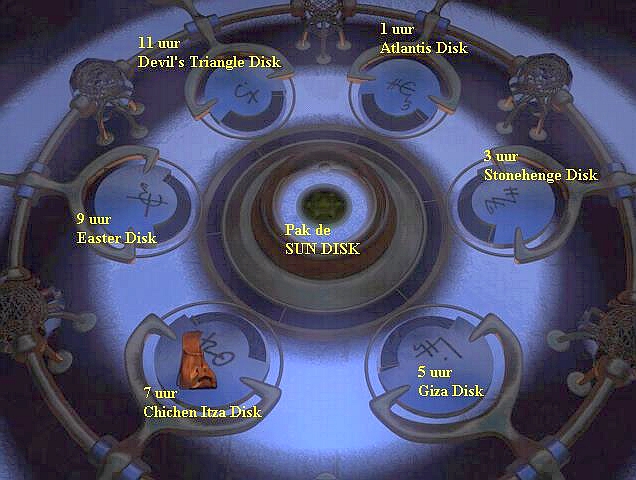
Each time the circle concerned goes down and if you have placed all 6 discs correctly, the middle circle will open. Herein lies the Sun Disc.....Pick it up with your backpack and zoom out completely. Look at the wall map again and then turn around and exit the pyramid and swim back to the entrance of the barrel at the bottom in front of the pyramid. Re-enter the barrel and look down at the front of the Crystal Vessel. Here you now also see a "circle". Well, take the Sun Disc out of your inventory and click it in this "Circle and ………
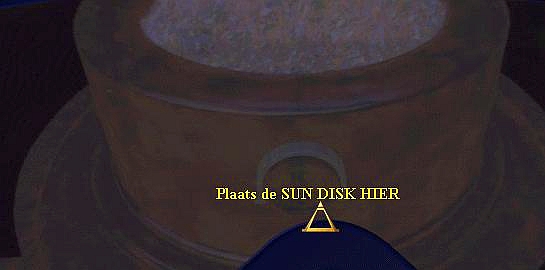
The Crystals in the vessel light up but then go out. You hear Gil say that it needs a Power Boost from the Ultimate Power Source. The helicopter is coming and underneath the helicopter hangs "Ark of the Covenant". The Heli throws the Ark into the vessel and a thick beam of light then radiates out of the vessel and we see the Earth for a moment from the universe and the Light hits the Earth globe.
Then we are back in the "Chamber of Ages" of the Sphinx in Giza and Sir Gil now sets off a long monologue in which he tells you all about Atlantis and how it influenced the ancient civilizations. Gil ends his story by saying that there is no one particular place to be referred to as Atlantis and that the "Work is not finished yet". The Srolls also talk about other ancient civilizations in the East. So the wait is for part 3 of Riddle of the Sphinx. Following are the credits and this beautiful game is again:
THE END
2021: Louis Koot