
Röki
2020: Walkthrough by: Louis Koot
If you have found this walkthrough via google search or via another site then you have probably not visited my site.
A lot more very detailed game walkthroughs can be found on my site at: www.pcgameswalkthroughs.nl
Text and Screenshots by Louis Koot
You can buy Röki on Steam but also on gog.com I have version 1.07 and have had no problems with the game
NB: Tove has a lot to do and she has to do it in various areas. She will also have to go back and forth between the different areas here in the Deep Forest. As a player you now have a lot of freedom to do things. There is no set order in which to do things. My walkthrough tells you how I did it but this is not the only way you can do it all. You can do things in a different order if you want
Chapter 4: The Deep Forrest: Part 3
A: Wolves Ruins Part 1
Tove has "freed" Gate B from the stems so walk through gate B
Tove is then at the bottom of a long stairway that goes up into the mountains. You can still go a bit to the left here, but there is only a petrified troll that does not matter
So climb up the stairway and ....

...... Tove ends up in a cave with 4 Wolf statues. We have arrived in the
Wolves Ruins

Puzzle 1: The Wolf's Shadow puzzle
The large door on the other side of the cave will not open. There are 4 wolves howling in the cave. The 2 wolves in the front are bigger than the 2 wolves in the back.
All 4 wolves cast their shadow on the wall with the large door. For the 4 wolf statues there is a round Eye tile in the floor

Look at the Eye tile with your eye and also view the wolf statues with your eye. The 4 wolf images are each in a slot. You have to align the wolf statues with there shadows so that when you stand on the eye tile, the light wolf statues completely obscure the dark wolves on the back wall. Then the big door will then open. This will take some "Trail and Error" as you push the wolves back and forth, but it's a fairly simple puzzle.

You slide a wolf towards the back wall via the up arrow and off the back wall via the down arrow.
So you must stand on the right spot at a wolf to get the up or down arrow

I have plaved the 2 wolves A and B on the right spot first, which are on the left, as you can see on this screenshot ...

Then I have pushed the wolves C and D, which are on the right, to their right places, as you can see in this screenshot.

When you have put all 4 wolves in the right places, Tove screams that she's done it and .......

........ the huge door opens ....... I did not have to stand back on the Eye tile for this

Once you have solved the wolf puzzle, run through the now opened door and then continue until Tove is on the circle platform. You are then at
Puzzle 2: Restore the Star Constellation

In the middle of the plateau is a circle consisting of 3 rings. The circle has a line drawing but the drawing is messed up and Tove has to fix the drawing to open the next big door. Around the middle circle are 3 turning wheels, A, B and C. With those turning wheels A, B, C you can turn the rings in the middle circle.

Around the platform also 4 rock pillars 1, 2, 3, 4. On 3 of the 4 pillars you see a constellation drawing.
However, the drawing on the 4th pillar, front left, has disappeared.

The center circle has several concentric rings (and a central disk), which must be aligned so that they form one of the constellations on the pillars around you.
The constellation that you have to recreate on the middle circle is the drawing on the right back pillar, witch is pillar 3.

First look at everything with your eye. So take a look at the 4 columns, the center circle and the wheels A, B, C ...... listen carefully to Tove .....

|
As Tove suggests, the correct ring 1 is a good way to start this puzzle. The center circle has 4 rings, 1, 2, 3, 4, and you can turn them through the wheels A, B, C You can turn the outer ring with the
wheel C.
Start by turning C until in the outer ring the until the "arm" of the constellation is pointing down and placed on the left. You can then use wheel A to turn the larger 'dark' ring 2 until it lines up with the outer ring. But the difficulty is that the 2 inner rings, 2 and 3, rotate together through wheel B, but ring 2 also rotates with wheel A. So you have to be able to predict a bit how each ring will end up if you turn them via A, B, C. This is quite complicated so I solved it via "Trail and Error". So I will not give you a step-by-step solution to this puzzle here because that will be too complicated In this screenshot you can see what it should look like in the end
|
When you have solved the puzzle, the large door will open, so run up the stairs and step through the opened door and .......
Wolves Gorge

... Tove ends up on a large outdoor platform. You can see the gorge straight ahead. Tove cannot go across the gorge because the bridge has disappeared. On this side there are 2 columns with a wolf on top and also on the other side are 2 columns with a wolf on it. So we will call this gap the Wolves Gorge. The 2 wolves standing on the pillars on the other side are facing each other. The 2 wolves standing on the columns on this side are facing away from each other. The left wolf looks to the left and the right wolf looks at you. In front of these 2 columns is a yellow Wolf Staff on the left, but the Wolf staff on the right is missing.

Look at the left staff and also look at the place where the right staff should be. Tove then knows that the right staff is missing. With the left staff Tove can turn the left wolf, but because the right staff is missing she cannot turn the right wolf now. Walk to the right and ....... We have found the Waytree of this area.

Of course there are ravens that you have to chase away and then you chop the stems away with the dagger and ..... This Waytree also comes back to life

From now on, Tove can quickly travel here via the Mother Tree and back to the Mother Tree
Now walk to the left ...... the wolf gorge runs around the plateau and from the gorge 2 huge ice hands are rising. To the right you see stones that protrude from the rock and form a ladder that allows Tove to climb up there to a higher plateau where you see the entrance to a tunnel. The tunnel descends and ends at a lower plateau with a bird's nest. If you look at that bird's nest you'll see that it contains a Ram Skull
Stay away from those 2 huge ice hands for a while and now first climb up that ladder
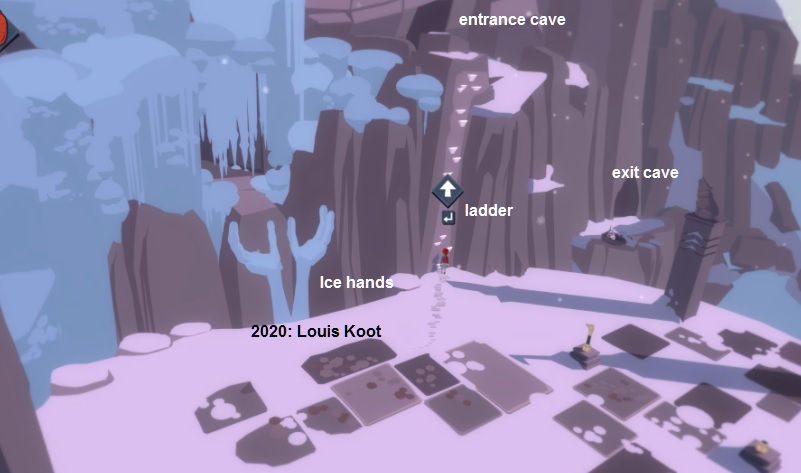
At the top, move Tove to the cave tunnel. The tunnel is too dark so Tove does not dare to enter it. Tove must first have a burning torch before she dares to enter this tunnel. On the left, however, a beautiful white Valerian Flower grows and Tove needs that flower to brew the sleep tea drink for Trollhilde. Take the Valerian Flower

Descend back down the ladder and then walk to the 2 huge ice hands. Look at the ice hands with your eye and ...

........ the ice hands separate and form an icy bridge over which Tove now can go to the other side. You also earned another Badge

Walk over the ice hands to the other side and then climb further up to the left and .......

... Tove then ends up in the cave of Fossegrim, the Water Spirit
B: Fossegrim:
Look at 1 of the spheres that hang here and there and ...... You will hear Fossegrim but you do not see him yet

Listen to what Fossegrim says ....
Fossegrim tells about the water and how you can control / command the water. Fossegrim can help Tove to control the water, but to do this Tove needs to give Fossegrim a musical instrument and something to eat. Fossegrim also gives Tove 3 "Thirsty Stones" that Tove has to dip into 3 ponds and he also tells something about these 3 ponds ..... 1 pond was large at first but is now smaller, 1 pond was clean at first but is now polluted and the last pond hides a long forgotten tragic secret
When this conversation with the previously not visible Fossegrim is over, you walk to the round pond and .........
Fossegrim now appears and the conversation continues.

Fossegrim demands a sacrifice and a musical instrument for his help to Tove. Tove now asks if Fossegrim knows where to find that missing Staff. Fossegrim says that a Troll has offered that staff to him. That troll was Trollhilde, and she wanted Fossegrim to cast a spell on her flute so that she could command the water with the flute.
So Trollhilde has that missing staff. We will ask her later.
When Tove has discussed everything with Fossegrim, you can pick up another Loot Item on the right side

NB: Check in inventory if you now have those 3 "Thirsty Stones". If not then you must talk to Fossegrim again to get those 3 "Thirsty Stones"
Return to the Ice Hands and cross back across the canyon and continue to the Waytree. Travel back to the Mother Tree via the Waytree

In the Mother Tree you go through portal B again to end up on the cemetery

C: Church and Mausoleum part 2
Walk to the church and enter again and then walk back through the church hall and then climb up the ladder to the church bell

Then climb further up to the beam where the church bell hangs. Now cut the church bell loose with the dagger and .....

The clock thunders down and punches a hole in the floor of the hall. You also earned another Badge

Climb back down both ladders and then jump down the hole in the floor to the basement of the church.

Bear puzzle 1: 1st time
The bell is on the floor here. Behind the clock you see a Bear statue. Under the bear you see a half moon and between the half moon and the bear you see 4 holes.
A stone tile sticks in 2 of the holes.

Take a closer look at the bear wall in close-up. There is a stone tile in the 2nd and 4th hole. The tile in the 2nd hole has 3 dots and the tile in the 4th hole has 2 dots.
Tove has yet to find the missing 2 tiles so she cannot solve this puzzle yet

You can now take the 2 tiles out of their hole to store them in Tove's backpack, but you can also leave them here. We will come back here later to solve this puzzle when we have found the 2 missing tiles. You will find 1 of those 2 tiles here in the basement, but the 4th tile you will only find in the hollow of the Nokken
You are here in the middle part of the basement and you can go left and right.
Now first go to the left and then continue until you reach the second altar, which is completely overgrown by spider webs.
Chop away the spider webs with your dagger and .....

The 3rd stone is on the altar and this is the stone with 1 dot. Take the stone

Then walk to the left because you can pick up a Loot Item immediately behind the pillar.

Walk back to the bell and the tile wall. You can now place the tile with 1 dot that you just found in 1 of the 2 empty holes or you can keep the tile in your inventory. I just carry the tile with me until I come back here later to solve this tile puzzle, when I also have found the 4th tile.
Now go to the right and .... against the altar leans a stone Disc with a drawing on it. Take the disc because you need it to solve the 2nd Bear puzzle

Back to the bell and climb back to the church hall via the bell and then exit the church

Back outside you walk to the Mausoleum building and enter it again

The ground has been turned over in front of the right stone, as if something is buried there. Tove now has the trowel so use the trowel, on the soil and ...

.... There is a 2nd stone Disc buried here. Take the stone disc .... this disk also has a drawing

Walk to the entrance. The turn wheel still hangs to the left of the entrance. This disc keeps that horse's head in place outside.
Ram the turn wheel out of the way with the mallet

Walk outside and then to the right and see ... the horse's head is now on the ground. Take the horse's head

Exit the cemetery through the entrance gate and then follow the path to the left, to the stone bridge. Go down at the bridge.
D: Trollhilde, Mamma Kroke, Trollhulde:
A wide river should flow under the bridge, but only a small puddle remains. Check out the pool of water under the bridge

Remember what Fossegrim said about the 3 "Thirsty Stones" he gave to Tove?
Tove has to dip the 3 stones each in a pond and 1 of those ponds used to be large but is now small.
So take the 3 "Thirsty Stones" from Tove's backpack and dip them here in the pool of water and .....

..... 1 of the 3 stones absorbs itself with water. Still 2 stones to go but for this Tove has to find 2 other ponds.
Walk into Trollhilde's cave and go talk to her and ask Trollhilde about that missing Wolf Staff. Trollhilde says that she gave the Wolf Staff to her sister Trollhulde.

Now go back to the bridge at the Watermill. You can do this on foot or via the Mother Tree.
Put Tove on the bridge and then descend again via the ladder rungs to the river.

Tove has already seen here that people are in the habit of throwing coins in the water and she now has coins in her backpack.
Tove dug up those coins by the sign in the porch of the "Poisonous Forest. Now throw those coins into the water and ....... Mamma Kroke emerges from the water.

There is a conversation with Mamma Kroke, who would actually like to eat Tove. But Tove makes a deal with mamma . If Tove brings back Mamma's 3 children, Mamma will not only save her life but Tove will also get some beard hair from Mamma Kroke.Tove now knows where to find those 3 young Krokelings. 1 is trapped in the cave of Trollhulde, the 2nd is hiding in the barrel in the snow hut and the 3rd is hiding in the pond in the "Poisonous Forest".
To free the Krokeling at Trollhulde, Krunk, Tove needs a decoy and that could be the horse's head. To catch the Krokeling in the snow hut, Tove has to give that Krokeling a snack and that could be the slug. First travel back to the "Poisonous Forest". You can do this again on foot, via the Mill and Gate B, or you can do this via the Waytree and the Mother Tree. Back in the "Poisonous Forest" you walk to the pond. Talk to the Krokeling but he absolutely doesn't want to go back to Mommy.

To catch this Krokeling Tove needs a Lobster Trap but she doesn't have one yet. You will soon find the Lobster Trap in the cave of the Nokken. This pond is poisoned and is therefore one of the ponds that Fossegrim has told about. So dip your 2 remaining "Thirsty Stones" here in the pond and 1 of the 2 stones will suck up with water

Tove now has 2 stones full of water and 1 more "Thirsty Stone". So 1 pond to be found. Go to the Waytree, in the far left corner, dive through the Waytree back to the Mother Tree and via the Mother Tree to the cemetery. Exit the cemetery through the entrance gate and then follow the path, through the stone bridge, back to the
Snow Hut

Dive back into the Snow Hut and go down the ladder again. Then walk down to that barrel again. Drag the Slug to the barrel and ......

.... the animal that is hidden in the barrel eats the slug and it now appears. It is Kronk, Krunk's brother and one of Mammie Kroke's descendants. Kronk feels lonely and wants to go back home to his mommy, but he doesn't know the way back. Tove promises to bring Kronk home and Kronk goes into Tove's backpack.

Now to"liberate" Krunk. So now go all the way back to the cave of Trollhulde. You can of course do this all the way on foot or via the Tree of Many and the Mother Tree. Or you do this via the Waytree in the cemetery to end up in the Mother Tree. Well you might as well walk the entire route.
Trollhulde
Dive back into Trollhulde's cave. Then take the horse head from Tove's backpack and click the thing on Troll Tribute, ...
..... but Krunk doesn't think this is a good idea and says that Tove should give the horse's head to him

So now give the horse's head to Krunk and ......

........ Krunk now also disappear in Tove's backpack. Talk to Trollhulde a few times now.
Trollhulde knows that Krunk has disappeared, but she is actually quite happy that she got rid of that croquette and that she looked back the horse's head for it.
Keep talking to Trollhulde until Tove asks her about the missing Wolf Staff .........

..... Trollhulde then tells that she threw the Wolf's staff into the pond on the other side of the ravine because the thing did not meet her expectations.
Tove says she needs the Wolf Staff but cannot cross the ravine. Troll Tribute will now help Tove cross the ravine

... We then leave Trollhulde's cave and end up at the ravine and Trollhulde then pushes that weak tree trunk over the ravine.

E: The Nokken
At the other side of the ravine, move Tove further to the right and .... We arrive at a large pond and here we also find the last Waytree.

Free the Waytree from 4 or 5 ravens and the stems and this Waytree is also connected to the Mother Tree. You have earned another Badge

The scent Tove smells comes from the water lilies floating in the pond.
BEWARE ...... Do not take such a water lily from the pond yet. Walk around the pond to the right behind the pond. There is a cave there

Enter the cave and continue to the right. There is a small water hole in the cave. Dip the last "Thirsty Stone" in the pool here

The 3 "Thirsty Stones" are now all 3 saturated with water.
here are bones on the ground. Tove can pick up 1 of the bones. Pick up that bone because Tove can make a torch with it

On the right you can then pick up another Loot Item

Go back outside and then walk to the water lily that floats in the front of the pond.
This is a Sopor Lilly and it is the 3rd flower that Tove needs for Trollhilde's sleep tea drink.
Take the Sopor Lilly and .........
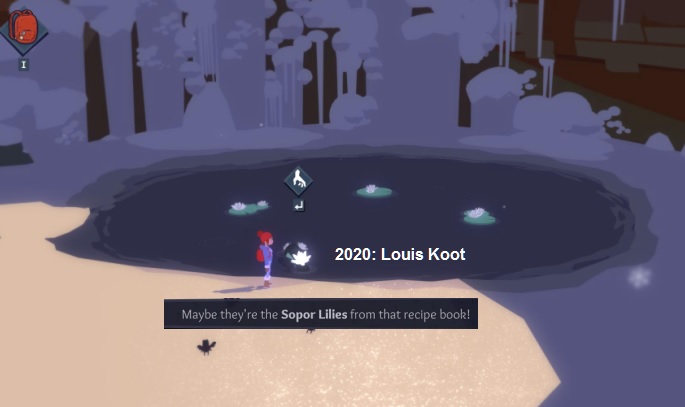
Oh ..... Tove should not have done that because the Nokken appears and drags Tove into the pond and .....

...... we switch to ....
Utangard

Rörka is performing the ritual to turn her son Röki into a human child at the expense of Lars, but the ritual takes too much of her strength, so she takes a break. While Rörka is resting, you need to help Lars pull an ice splinter out of Rörka's hand.
When the game is zoomed in on Lars and you get the hand cursor you have to click a few times until Lars has opened Röki's hand completely

Lars then sees the ice splinter in Röki's hand and you get the gripping hand, so click and .......

..... Lars pulls the ice splinter from Röki's hand and he is happy with it.
A raven comes to inform Rörka of Tove's encounter with the Nokken and then Rörka starts the ritual again and we switch back to Tove.

Escape the Nokken
We are in the Nokken cave, deep under the pond and Tove is tied to a chair
You get the hand. You now have to click the hand a few times to move Tove back and forth with the chair.

After a few clicks, Tove has freed herself and is standing upright next to the chair.
Walk to the right and ........ Tove then sees the missing Wolf Staff but she cannot go to it from where she is

The Nokken has decorated its den very nicely as a living room, with tables, chairs, benches and cupboards. It's like the Nokken wants to be a human.
There is a Teddy Bear on the bench. Take the Teddy Bear

Drag the Teddy Bear immediately from inventory to the water and then click and ........

...... Tove throws the teddy into the water and the Nokken chases it and because of this the Nokken no longer pays attention to Tove ......

Now run to the left and continue, also through the water until Tove is on the left at the rocking chair
There is a doll on the rocking chair. Take the doll

Continue to the cupboard. Open the cupboard and then take the Loot Item

To the left of the cupboard is the 4th stone that Tove needs for the puzzle in the basement of the church. Take the stone, it has 6 dots.

There is a pair of yellow boots on the chest. Take the boots

The chest of drawers has 2 drawers. First, open the top drawer and look inside. The top drawer is empty, but now you can slide open the bottom drawer.
Do that and Tove takes a small red bowl from the bottom drawer

In the crate, to the left of the chest of drawers, is a Lobster Trap. Take the Lobster trap

On the last box is a model ship. The sail of the boat is a blue shirt. Take the blue shirt (sail from the boat)

In inventory, combine the blue shirt with the doll, the yellow boots with the doll and then the red bowl with the doll

Tove then has a dressed doll. Walk to the right and ....... Oops ....... The Nokken clearly does not want Tove to leave his / her lair and .....

..... The Nokken has put Tove back on a box and it wants to drink a cup of tea with Tove.

Tove doesn't want to drink tea ... she wants to get out of here. Take the dressed doll from inventory and put the doll on the chest and .....

......... The Nokken actually likes the doll more than Tove .....

...... So walk to the right and exit the cave and follow the tunnel up to the end. You earn another Badge

At the end of the tunnel you click the hand and ....... Tove ends up back in the cave of Trollhilde.

... some water flows in from the Nokken cave and this extinguishes Trollhilde's fire.
When the water has disappeared, black Ash is on the ground. Check out the black Ash spots

Hmmmmmm ..... isn't there a big gray Yule Cat that would like to have his black fur back?
Drag the glass jar to the ash spots and then click to scoop the ashes into the jar

So Tove still doesn't have that Wolf Staff because she couldn't reach it in the Nokken cave. So she has to go back to the Nokken cave, but how does she get the Nokken out of there. Exit Trollhilde's cave and get back to the Tree of Many. Talk to the Tree of Many and ask the tree how to get rid of those Nokken

The Tree of Many tells Tove all about the Nokken. The Nokken is apparently related to Fossegrim. The tree says that Tove must tell the Nokken its real NAME. Tove already knows the name of the Nokken because she read it in the Parish Register when she clicked it on the tombstone that is to the right of the Mausoleum. The real name of the Nokken is thus Ignes Jolhaffsson Markesson and this name is marked in red in that book
Go back to the Mother Tree via the Tree of Many and in the Mother Tree you step through portal F to return to the Nokken Pond.
The head of the Nokken is now half above water. Click with the Parish Register book on the Nokken's Head and see what happens .

...... Tove pronounces the name Ignes Jolhaffsson Markesson and .......

..... The Nokken disappears but now the pond is frozen solid.

The pond is now frozen solid, but how can Tove get the Wolf Staff?
Tove has to do that through the small pool in the cave here, but for that she needs Trollhilde's flute
Go back via the Waytree to the Mother Tree
Chapter 5: The Deep Forest: Part 4: How to get the Wolf Staff
2020: Walkthrough by: Louis Koot
Text and Screenshots by Louis Koot
