
2017: Original Dutch Walkthrough by: Louis Koot
2019: This English translation
by: Dick Leeuw
If
you have found this walkthrough via google search or via another site then you
have probably not visited my site.
A
lot more very detailed
game walkthroughs can be found on my site at: www.pcgameswalkthroughs.nl
Chapter 9: Matia Island
Sam:
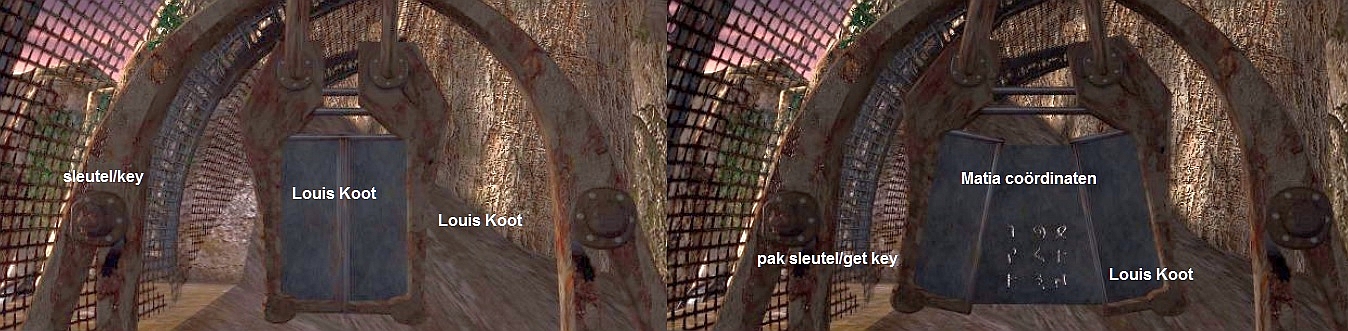
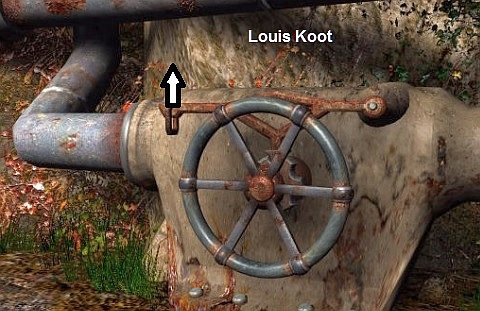
So Sam is still standing in front of that fence after he has come out of the Fish Air Ship. Turn to the right and you will see a kind of hatch in front of you. On the left you see a small key on the
iron arch. Click on this and that hatch will open before you. On the panel behind the hatch you now see the correct Coordination symbols for the airship to sail to Matia Island. That information comes too late, you already have the coordinates. Then click on
that key on the left again and it will end up in Sam's inventory.
Turn left and click on the gate. This will open. Click 1x forward and in a movie you see the elevator going up in a tower.

Sam has landed at the top of this elevator tower with his Fish Airship. There are several floors below him.
In front of you is a large button in the middle of the elevator. Click on the button and now pull this button down 1 time.
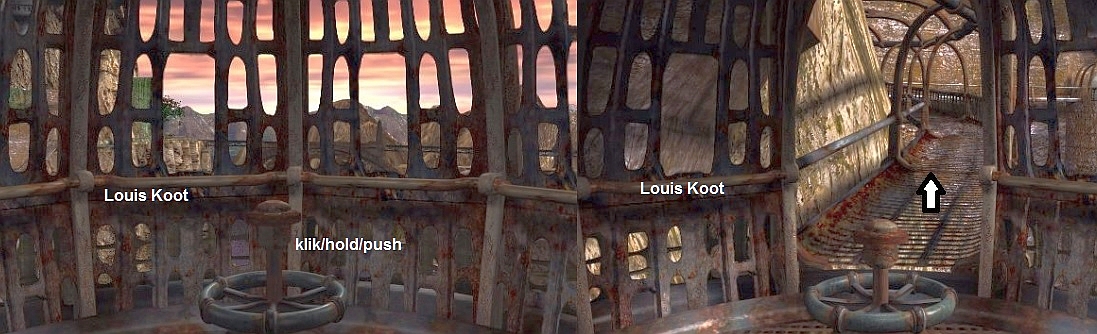
The elevator then drops 1 floor. When the lift has stopped, turn around and click forward 1x to exit the lift. You are now on an iron walkway that winds along the rock wall. Click 2x forward ,. Then turn to the right and click
again 1x forward on the path. You arrive on an iron platform. The path continues straight ahead
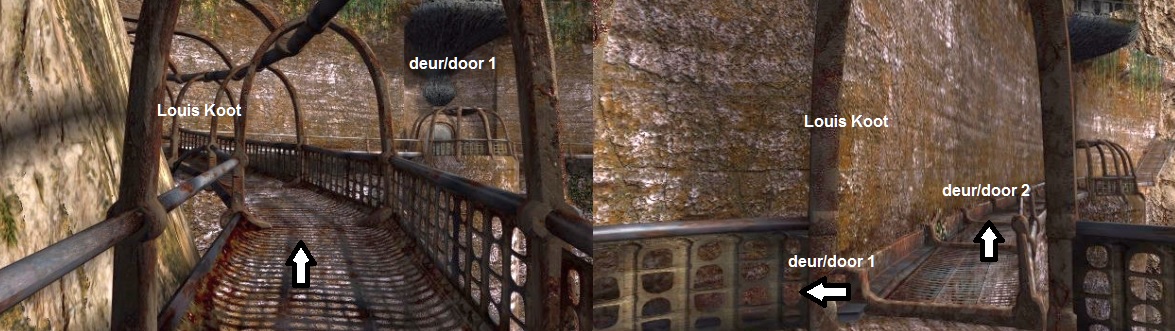
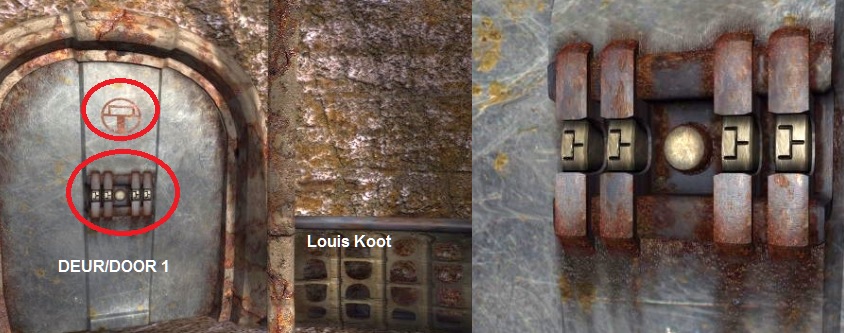
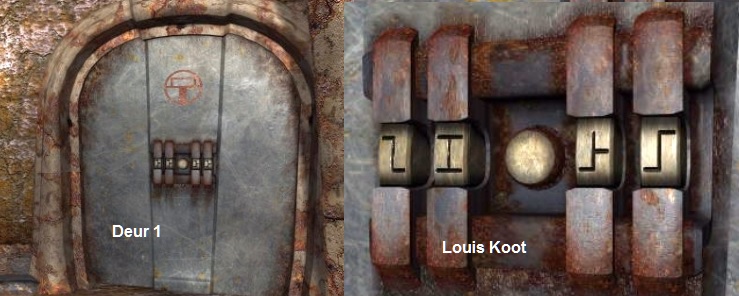
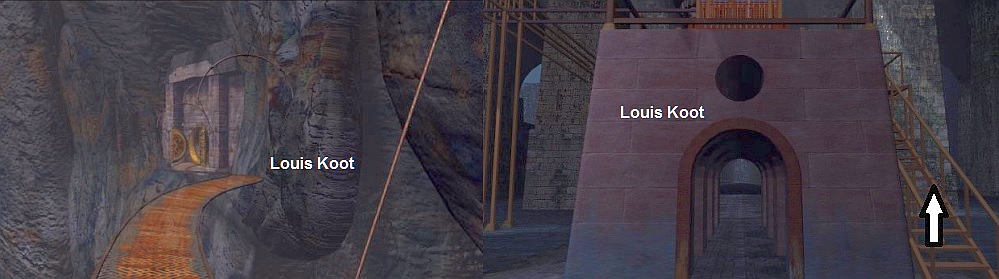
Turn first to the left and you will see an iron door with a mechanism in the centre and above it a Red Circle with a Symbol in it.
This is the same symbol that also appears on the Metal Plate that Hannah has held since her first visit to the Cathedral. Name this door: the Iron Door 1. Zoom in on the door mechanism. You see 4 buttons, left 2 and right 2 with a
round button in between. There are symbols on the buttons and you can move each button up or down and then you will see different symbols on each button. Well you can't do anything with it now so zoom out.
Turn to the right and follow the iron path twice forward. You arrive at a second platform and again the path goes straight ahead and then up a staircase. However,
turn to the left here and you will see another iron door with another Red Circle with a Symbol in it. Call this door the Iron Door 2. Then zoom in on the mechanism in the middle of this door and note
the symbols that you now see on the 4 buttons. Then press the button in the middle and the door will open.

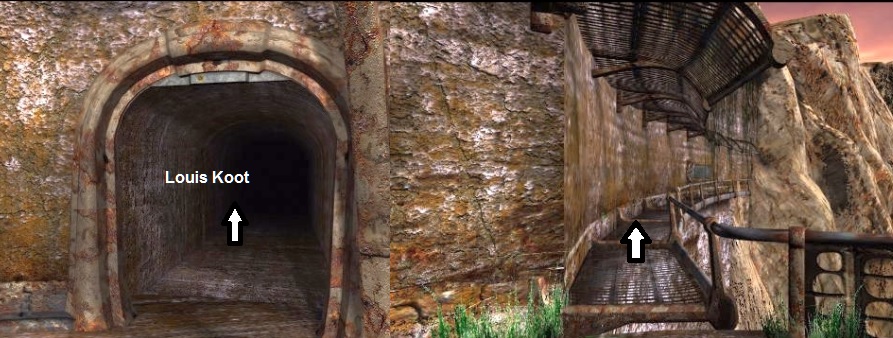
Click Forward and you will go through the tunnel and reappear on the other side of the rock. There is a lake in front of you and at the very back you see an egg-shaped structure and on the right you
can see the railway that goes there. Turn right and click 1 forward and ........
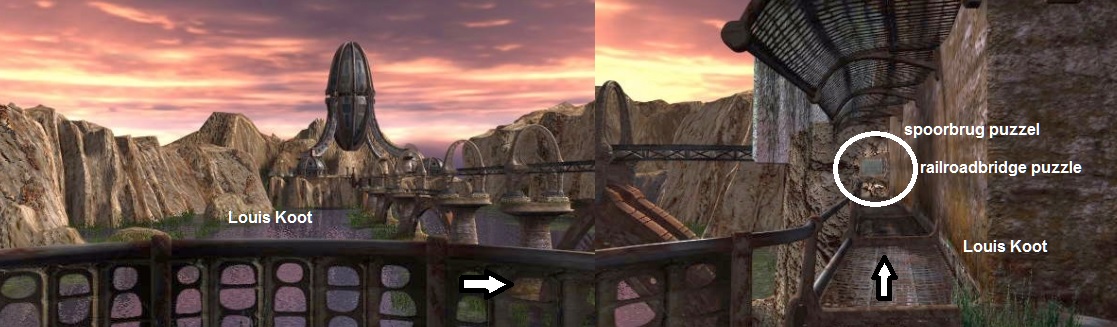
........ you arrive at a gray panel and you cannot continue. SAVE your game here:
Railway Bridge puzzle: 1st time
You have now arrived at one of the worst puzzles in this game. You play this against your own computer. Zoom in on the gray panel.
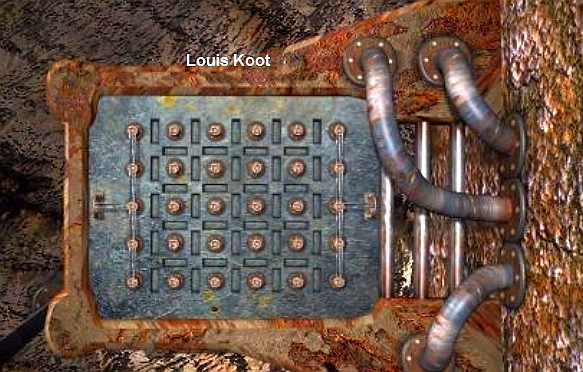
It is in fact very simple. You must make a horizontal connection, from left to right, or from right to left. The connection does not have to be a straight line, as long as you manage to connect the left side with the right
side. However, the computer will try to prevent this by making a vertical connection to break your connection.
You have to win this game twice in a row and you can't save in between. If you have won 1 time and then you lose the 2nd game, your first game won will no longer
count and you must win twice in succession. Do not think that you can save after 1 win because then your won game will not be recognized as a win game. The intention is to raise the 1st Railway Bridge element. And that must be done in 2 times.
If you win the first game you will see how the railway bridge rises 1 time. You must then immediately play the second game and win because the rail bridge section
will be even higher and then will be level with the rest of the rail. However, if you lose the 2nd game, the bridge section drops all the way down and you have to start all over again to win twice in a row.
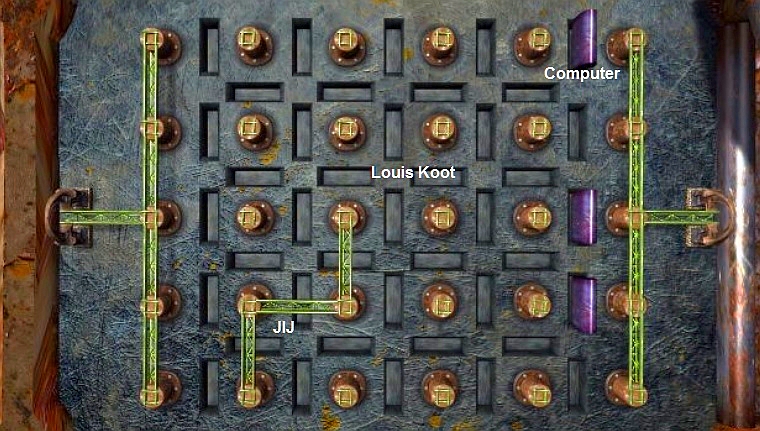
There is no real conclusive solution for this puzzle. The only thing I can recommend is that you do not focus so much on making your horizontal
connection, but focus more on preventing the computer from closing its vertical connection. If you also ensure that you still have 2 options for closing your horizontal connection, this game is actually quite easy to win. Also 2 times in a row.
If you can't do this puzzle then you can use Louis's SAVED GAMES, that you can download
HERE.
Louis has also put in an explanation that tell you how to use those
If you have won this puzzle 2 x in a row, turn around and walk back and go back through the tunnel on the left. Then turn to the left and click 1x forward on the iron
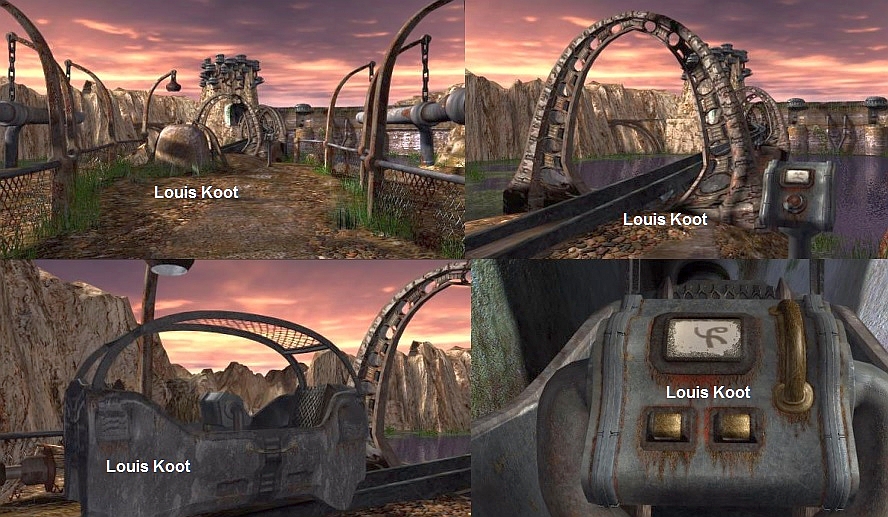
walkway and you stand at the bottom of that staircase. Click 1x forward and you walk up the stairs. At the top, turn left and click forward 2x. You arrive at the railroad tracks and to the left of you is the rail tunnel that you cannot enter. So turn to the
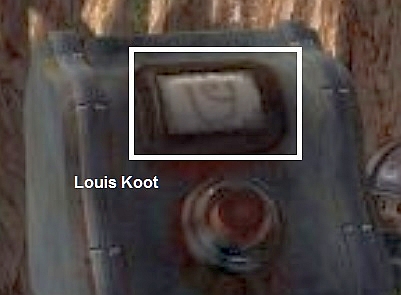
right and you will see the railway bridge. To the right of it you will see a Box in front of you and you will see a Symbol on it
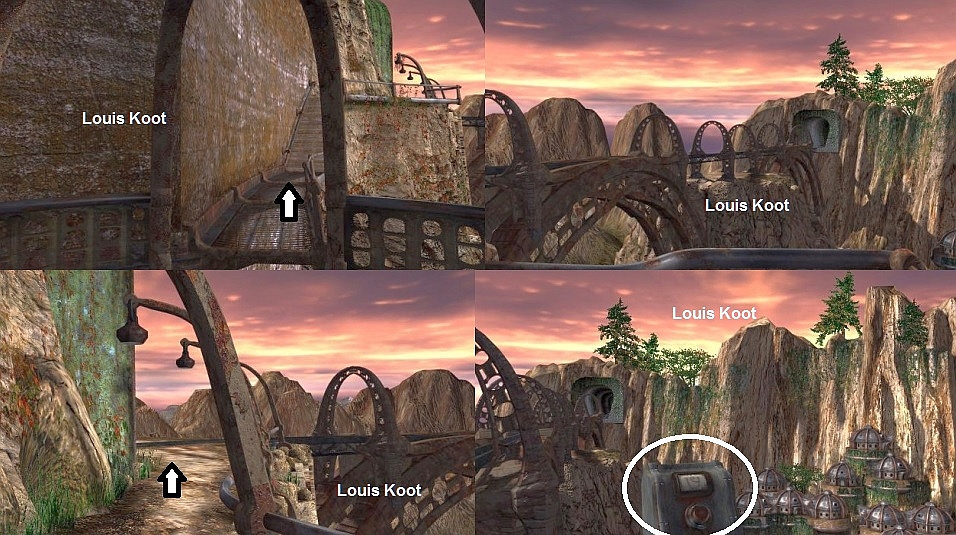
Copy the symbol that you see in the display of the box. It is the symbol that Hannah must set in her train to be able to start it.
Save your game and leave Sam here and switch back to Hannah:
Hannah:
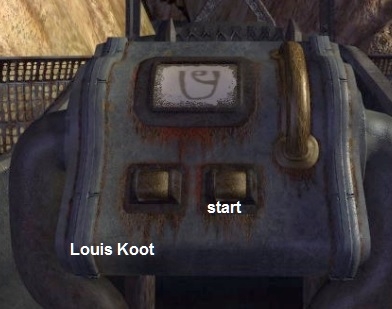
Hannah stands in front of the railcar. Step in again and turn the console over again if necessary.
Using the lever to the right of the screen, now place the Symbol found by Sam in the screen and then press the right
button below the screen.
The train cart will start driving and then stops in front of the Rail Tunnel, Sam is also at the Rail Tunnel. Get Hannah out the railcar.
Now you have to take Hannah and Sam all the way back, along the Iron walkway, to the Elevator in the elevator tower and then bring them both all the way down with the
elevator
You are still Hannah, so go all the way back on the iron path to the elevator tower. The elevator is below but click forward and you will see the elevator coming up. Get in the elevator and press
the elevator button and ...... Hannah sinks to the floor with the elevator. Switch to Sam and go back with him along the iron path to the elevator tower. Get in the elevator and also bring Sam down with the elevator.
So if you have brought both Hannah and Sam all the way down with this lift, we will first continue with Sam.
Sam:
Standing in the elevator there are 3 exits: Right in front of you, right of you and behind you.
Turn to the right and then click 1x forward towards that dark tunnel entrance.
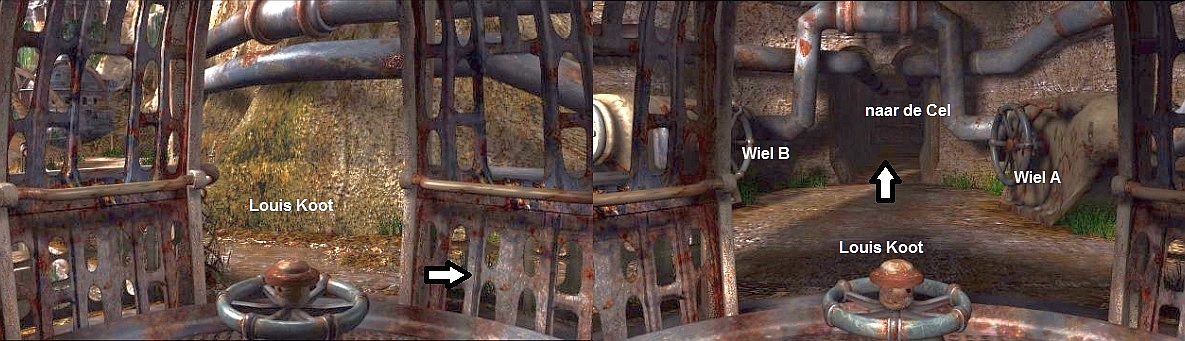
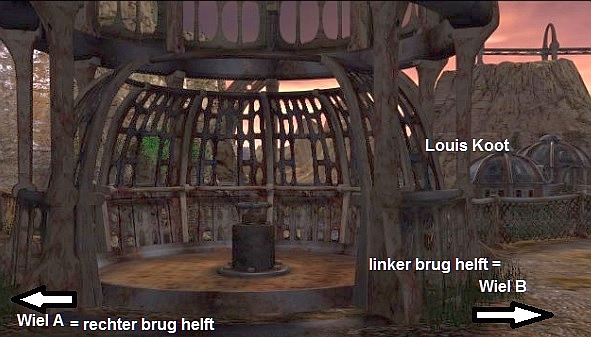
You are then just in front of the tunnel entrance. From the elevator you have already seen that there is a wheel on the wall, left and right. You now have wheel A on
the right and wheel B on the left. You can take a look at the two turning wheels but don't do anything with them now ....... It is not Sam's job to operate these 2 turning wheels, Hannah will have to do that soon.
Cell:
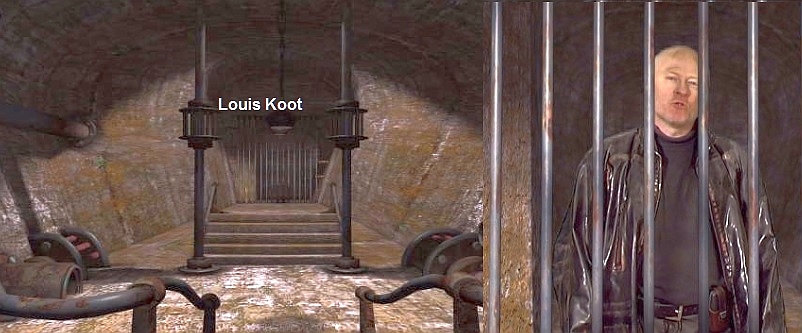
Turn back so that you can see the tunnel entrance again and click 1x forward to go through the tunnel. Sam enters a cave and he cannot go any further because the
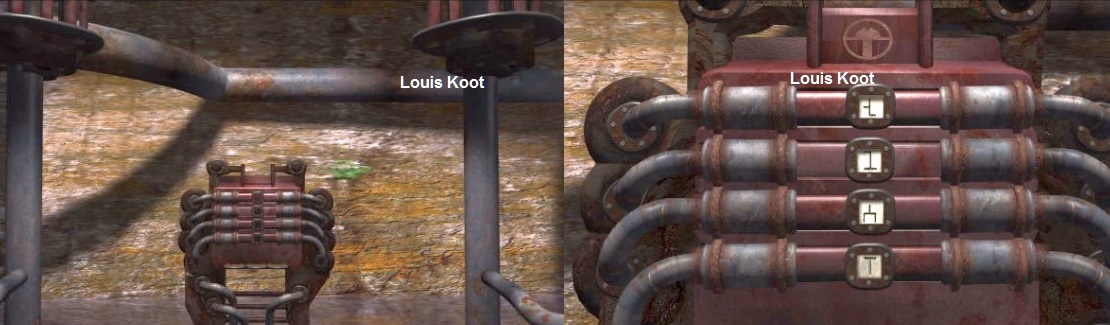
space in front of him is flooded with water flowing from a pipe from the right. At the back, so on the other side of the water, you see a CEL and one of the scientists is being held captive. So Sam can't go there because of the water. Turn to the left and you
will see a cupboard.
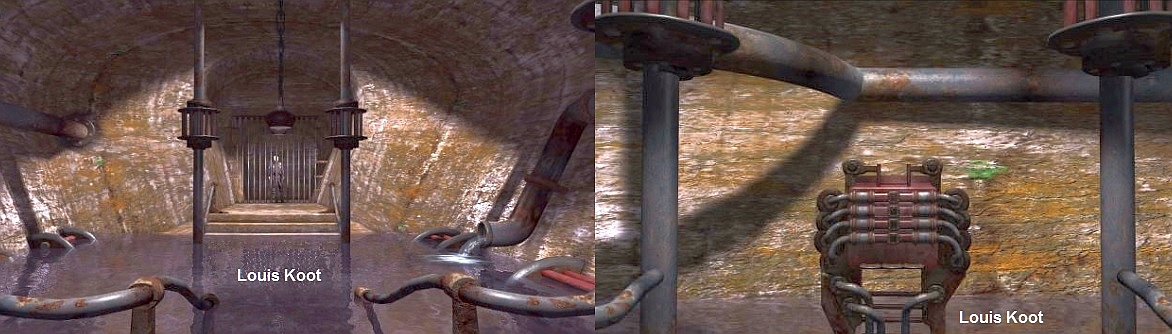
Zoom in on this box to view it. You can see that this box has 8 pipes, 4 below each other on the left and 4 below each other on the right. There is a screen between
each set of pipes, so there are 4 screens below each other. The top screen is closed but the other three are "open". You can move each of these 4 screens from their centre position 2x to the left and 2x to the right, so you can put each screen in 4
places. You don't know what to do with this, so just zoom out again, turn left and go outside through the tunnel.
Then click 1x forward to get back into the elevator and then turn left in the elevator and click 2x forward to exit the elevator through the Back exit
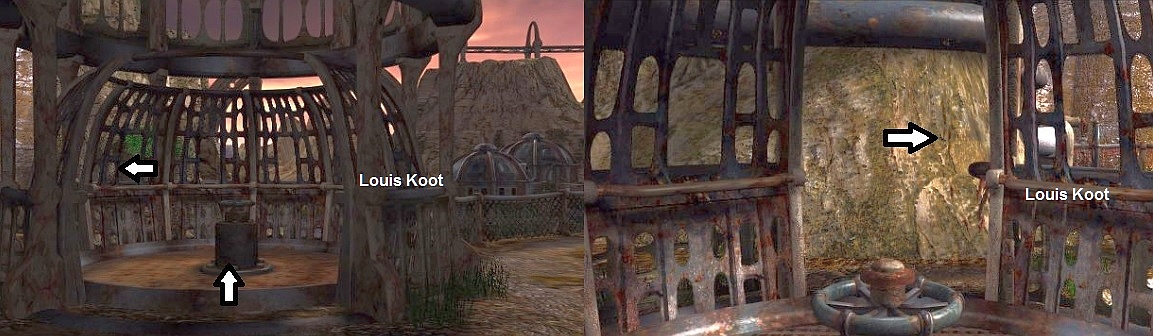
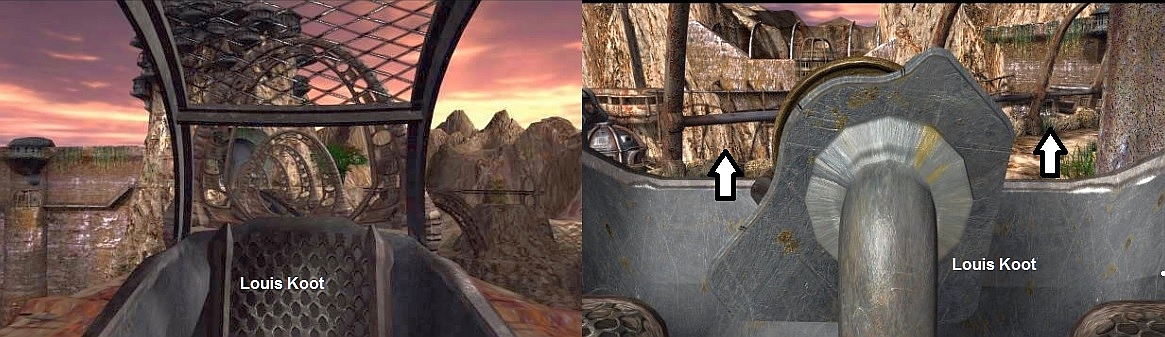
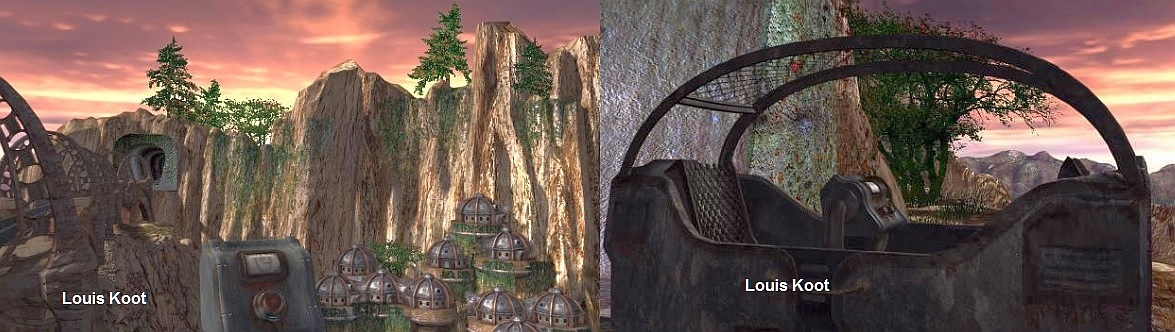
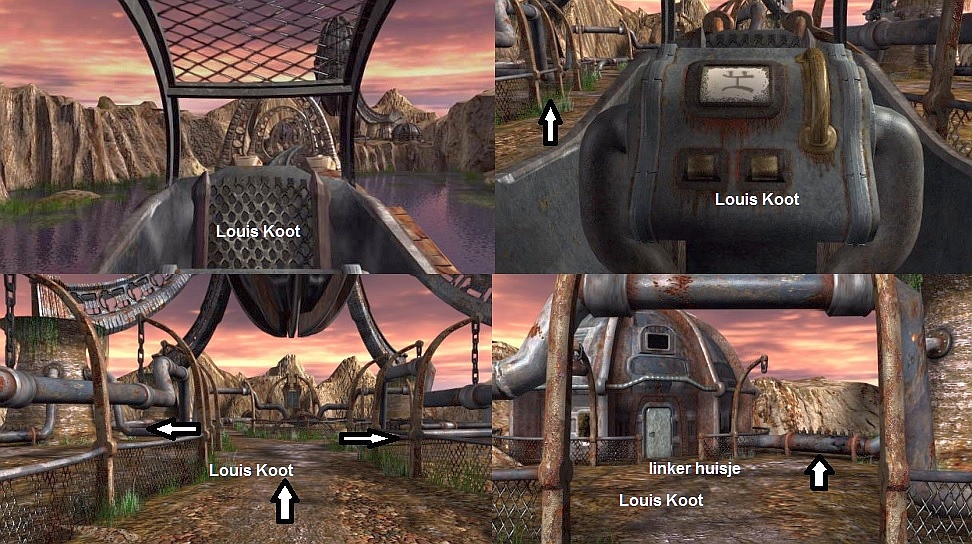
Sam is now on a path, carved along the rock face, and this is a dead end path. In front of you is the rock face in which you see a pipe that goes to a small
"waterfall". If you turn to the right you will see the 2 railway bridges over the river and to the right a village of a few dome-shaped houses.
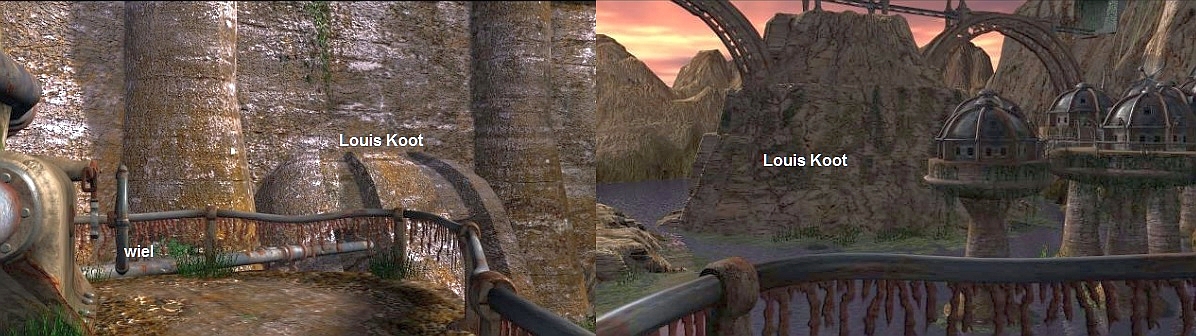
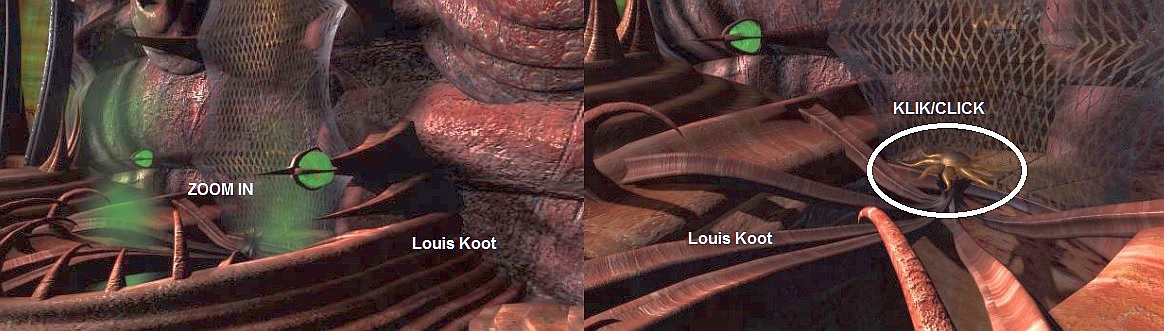
Turn back to the "waterfall" and then turn left and you will see another large wheel placed in the water pipe.
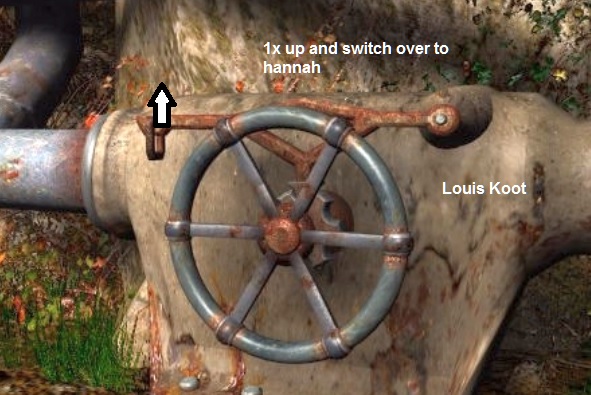
Click on the left side of this wheel and then pull your arrow cursor up 1x to make the wheel spin 1 x. Immediately you hear that the murmur
of water in the tube stops. Sam has now "drained" the prison. If you now plan to go back to prison with Sam, this is not possible because if you turn to the left, towards the elevator, the wheel will turn back and you will have opened the "Water
tap" again, leaving the prison flooded again. So you have to call in Hannah's help now. So switch to Hannah.
Hannah:
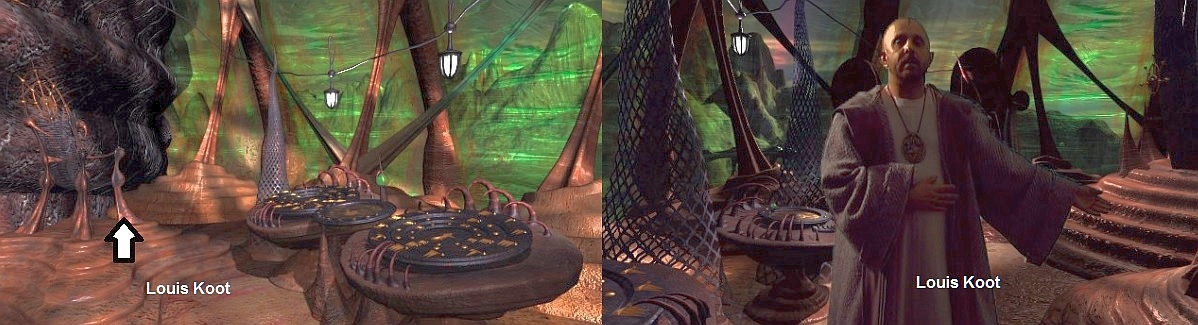
Hannah is still in the elevator, so turn to the right and take her through the tunnel into the prison and see ... .. this one is now dry.
So go to the bar of the cell in the back and the captive scientist, Charles Santo, now tells Hannah a long story
I'm not going to write all this down. Listen carefully and make your own notes
of this conversation. The most important thing that Santo says about the Houses ...... Santo says about the houses: "Enter Twice but Exit Once". So ... "enter 2 times but only exit 1".
After this you bring Hannah outside again and let her stand in front of the prison entrance, so that she
stands between the two wheels in the rock walls and looks at the elevator. . Switch back to Sam.
Sam:
So Sam is still with that one wheel. Turn to the left, the wheel turns back and the prison is now under water again.
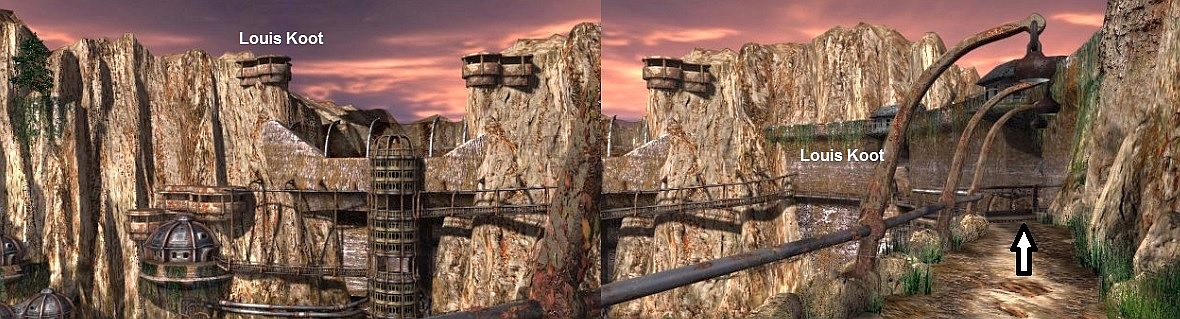
Click 2x forward and Sam is in the elevator again. Exit the elevator through the exit directly in front of you and then click forward 2x towards the drawbridge.
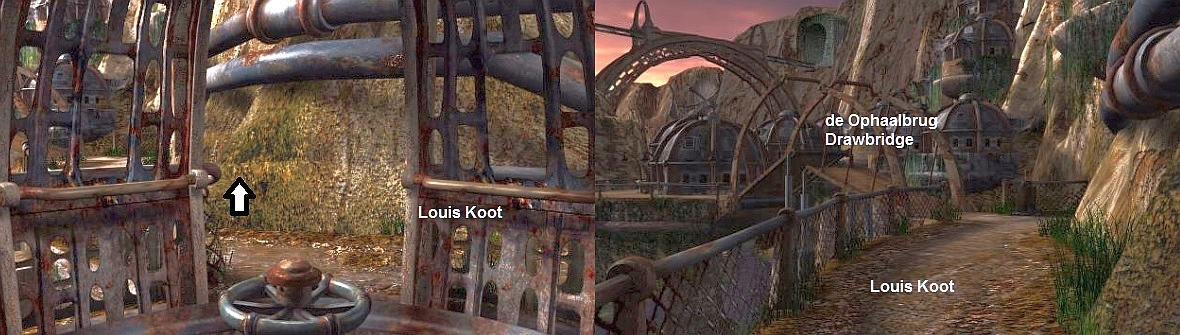
Sam runs into a button here. On the left is the bridge that goes to those dome houses. Unfortunately the bridge is open and not only that
but the two bridge halves are also not at the same height. Press the button and you will see that the bridge now drops a little bit down but immediately goes up again.
Switch to Hannah.
Hannah / Sam:
Draw Bridge puzzle
Now it is a matter of cooperation between Hannah and Sam to get that rotten lift bridge down so that Sam can cross it.
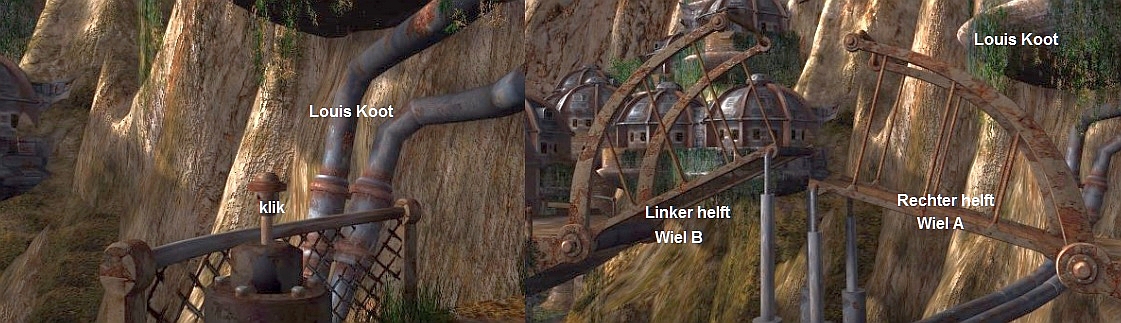
Hannah is standing with her face to the elevator between the two turning wheels in front of the prison entrance. On the wall on the left there is a turning wheel A. On the wall on the left there is a turning wheel B.
Turn to the left and ...... Hannah is in front of the Turn wheel A. Click on the wheel and then pull it up once so that the wheel turns once.
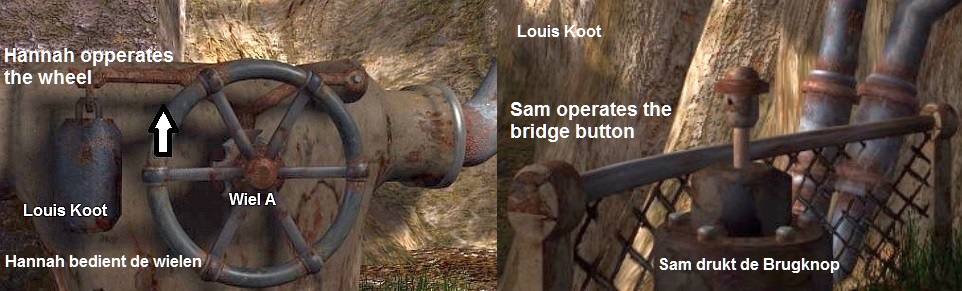
If have you turned Wheel A 1x as Hannah then you switch back to Sam. As Sam, you press the Bridge button and see what happens to the bridge ..... Both bridge halves drop again, but the
left half does not come closer to the right half. The bridge halves then go up again.
Switch back to Hannah. By turning Wheel A as Hannah and then pressing the bridge button as Sam, you must first ensure that the right bridge half drops all the way
down ..... The right bridge half is then completely horizontal. So you have to do this by turning Wheel A 1x as Hannahonce and then pressing the bridge button as Sam ..... You have to keep doing this until you see that the right-hand bridge half has come
completely horizontal.
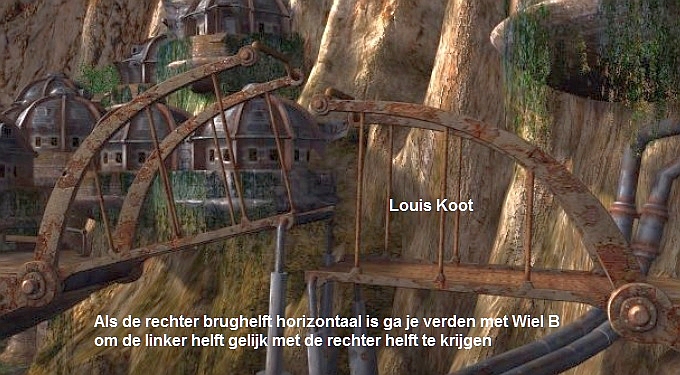
Have you got the right hand bridge half horizontal then you continue with Wheel B. Go straight again in front of the elevator and then turn clockwise to Wheel B. If
Hannah now also turn Wheel B 1x, then always switch to Sam and then keep pressing again on the Bridge button. Continue to do this until the two bridge halves are equal and do not rise again
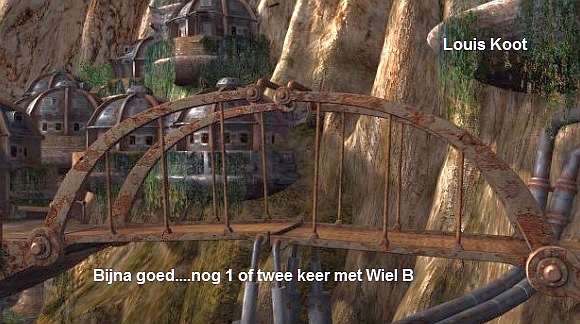
If the two bridge sections are level, the bridge stays down and you can no longer press the lift button. The Draw Bridge is then closed and Sam can now cross it to the Village
Sam in the Village:
The Cottages puzzle
When the bridge is closed, turn Sam to the left and go forward once across the bridge.
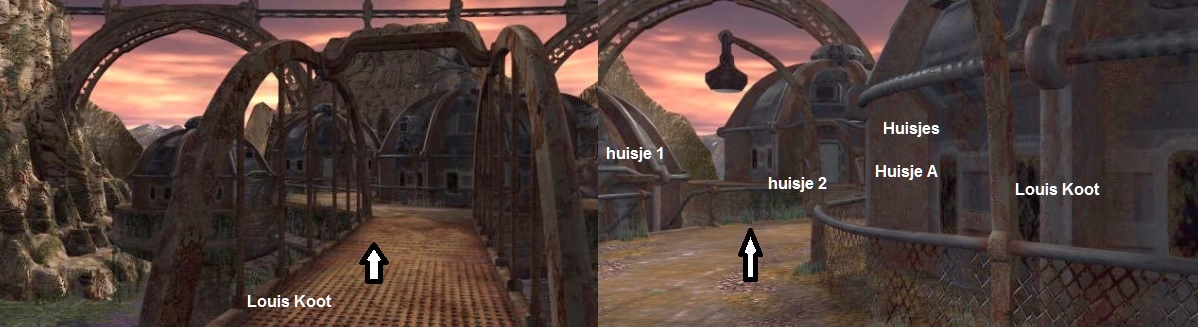
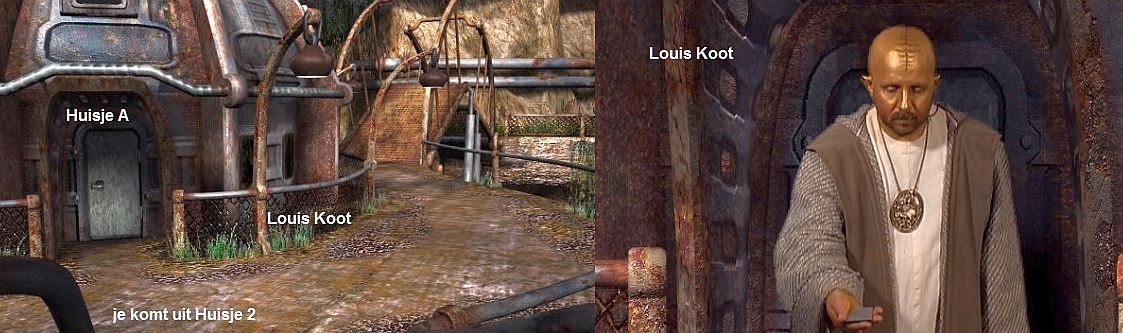
Sam is now in the village with the dome houses and you are right in front of one of these houses. This house is actually in the middle and left of it there are in a
semicircle 4 of these houses around it. Go left and then go forward 2x, then turn right and you are standing in front of the door of the house in the middle, so that house that you encounter when you cross the bridge ... Call this house in the
middle House A
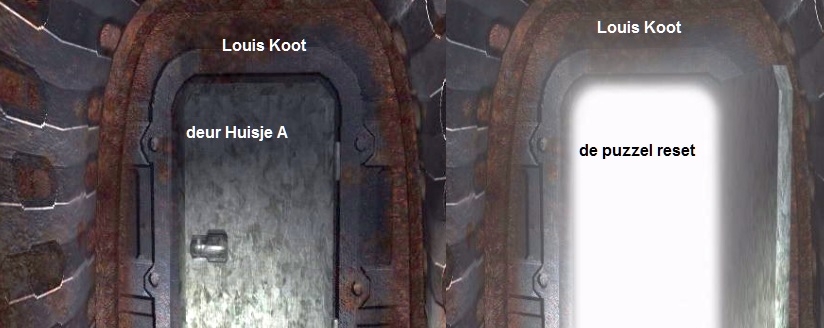
Open the door of House A and ...... There is now a bright white flash of light in this door and then the door closes again.
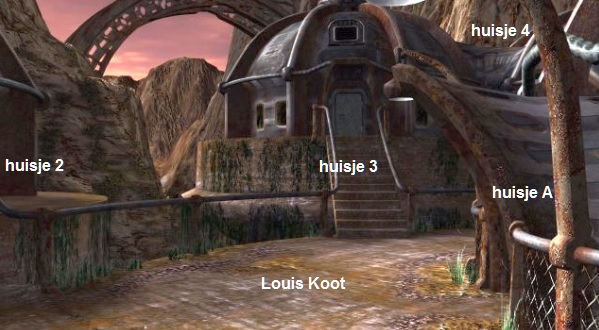
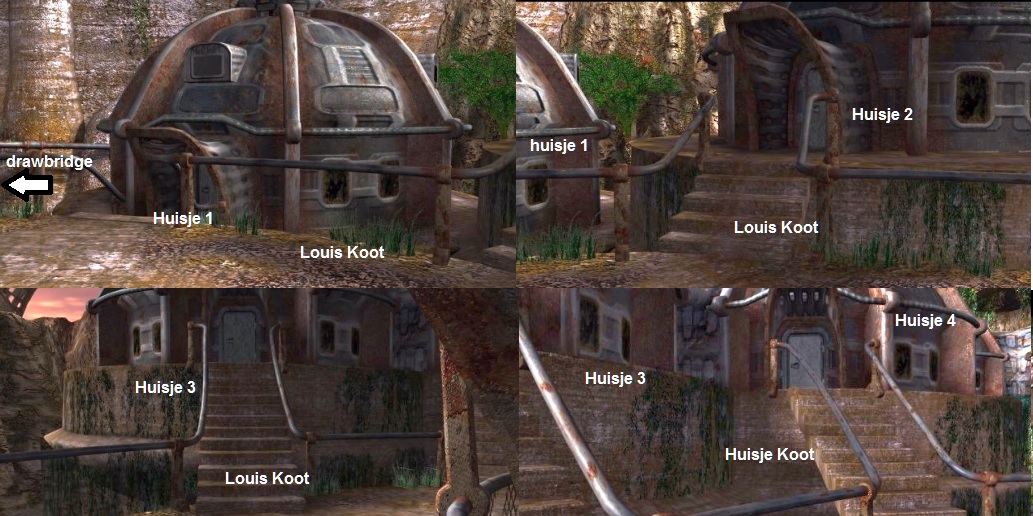
So call this House A and turn around. As mentioned, there are, opposite HOUSE A 4 of these houses in a semicircle around House A. Number those 4 houses, from left to
right. House 1, House 2, House 3 and House 4. House 1 is therefore the house that is closest to the drawbridge.
If you open the doors of these 4 houses, you will enter the relevant house, but you will either come out through the same house again OR through one of theother houses OR through House A out again.
First turn to the right and click 2x forward to House 4 and enter it now. You then come out of House 2 and right in front of you is the door of House A. Go again to
the door of House A and ...... The Priest from the Temple appears and gives Sam just the same Metal Card like Hannah only has a different symbol on it.
When the priest is gone you open the door of House A and ....... the lightning flash will put the Houses puzzle back in the starting position.
What is the intention now? Remember what that trapped scientist, Charles Santos,
told Hannah from his cell: "You have to enter each house twice, but you can only leave each house once." You have to enter each house
twice in an certain order and leave each house once. I hope you have now numbered the 4 houses that are opposite to House A as 1, 2, 3 and 4. If so, go through the houses in the following order:
-
Go into HOUSE 2 and you will come out of HOUSE A
-
Go into HOUSE 4 and you will come out of HOUSE 1
-
Go into HOUSE 1 and you will come out of HOUSE A
.
-
Go into HOUSE 1 and you will come out of HOUSE 3
-
Go into HOUSE 3 and you will come out of HOUSE A
-
Go into HOUSE 3 and you will come out of HOUSE 2
-
Go into HOUSE 4 and you will come out of HOUSE 4
-
Go into HOUSE 2 and you will come out of HOUSE A
|
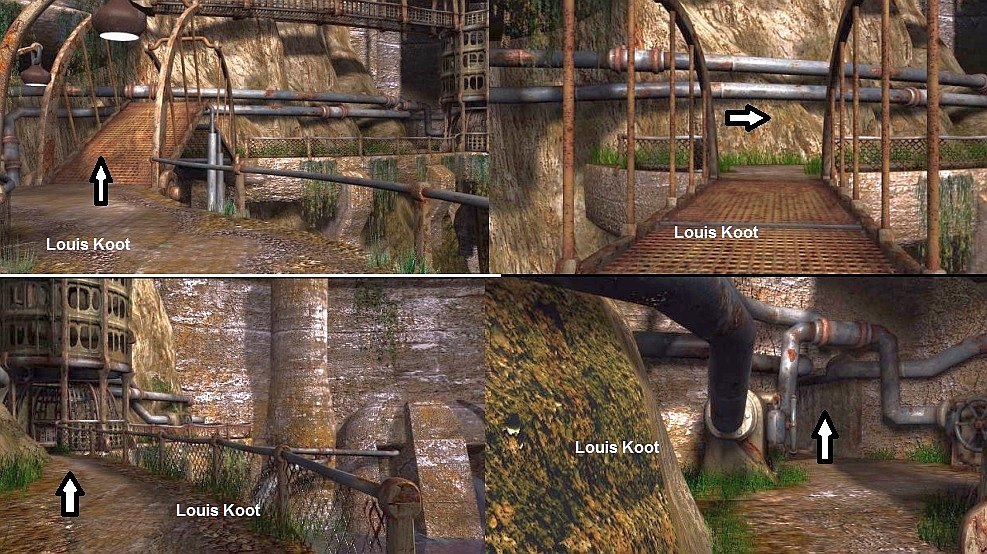
When Sam comes out of House A for the last time, he is still in the same village, but there is something else. It is dark now and Sam no longer has radio contact with
Hannah. Sam's dimension has now changed slightly. Turn left and go forward twice to the bridge. At the bridge you turn to the right and you see an appearance.
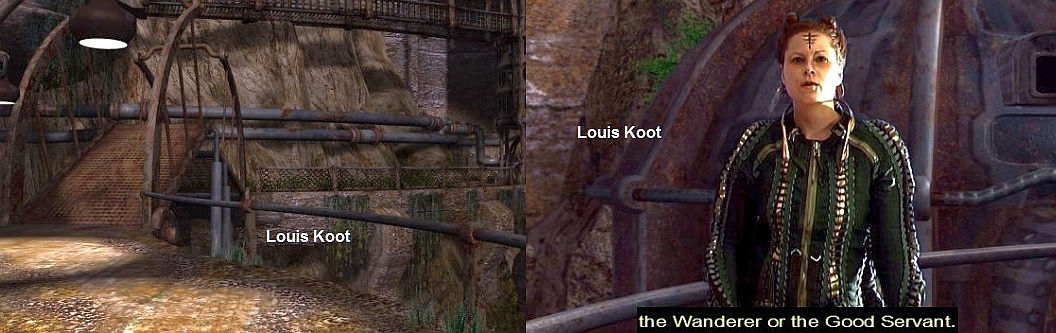
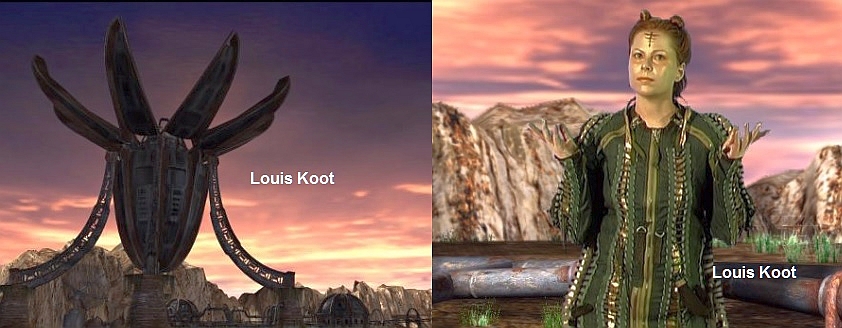
It is a female inhabitant of this village and she talks to Sam. It becomes clear that she thinks Sam should make a choice between good and evil.
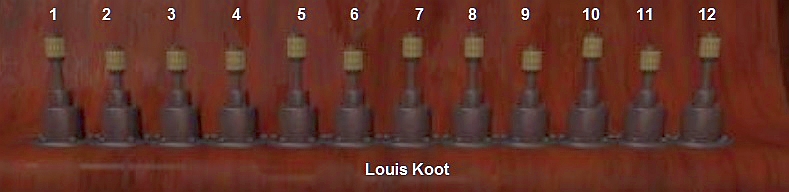
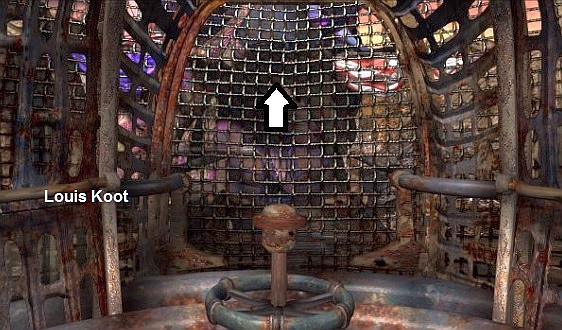
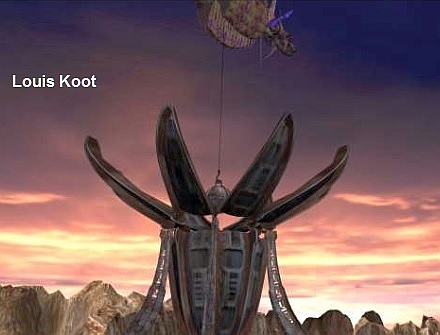
When the appearance is gone again, stand still and look up and you will see the sheet pile wall and on top of the dam you will see 12
"bottles" each with an illuminated "cap" on it.
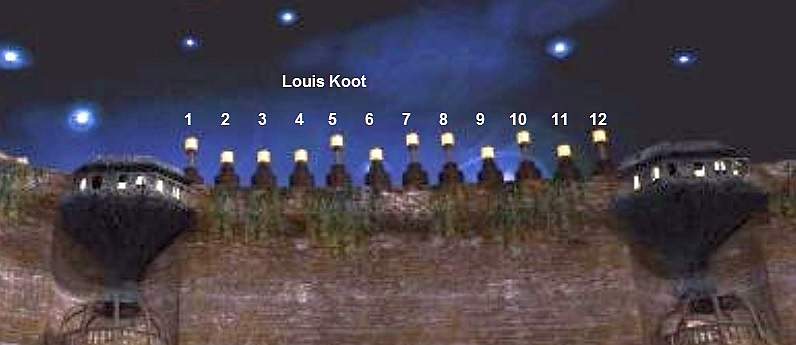
This row of 12 "Bottles" reminds you of that "Church Organ" in the Cathedral and indeed this row of 12 "Bottles" is
therefore the code on which you will soon have to press those keys on top of that "church organ". So copy this row of 12 "bottles" exactly as you see it here
Did you do that then go back through House A and Sam is back in his "Old" dimension where it is still daylight and now has contact with Hannah again.
Now go back over the Draw Bridge and then through the prison tunnel to the Cell.
When Sam is back in the Cell cave, you switch to Hannah. Hannah is still at the 2 turning wheels, so turn around and bring Hannah into the
Cell Cave again. Then switch back to Sam and turn left. Zoom in on the 4 Screens device and place Sam's Metal Card on top of this thing.
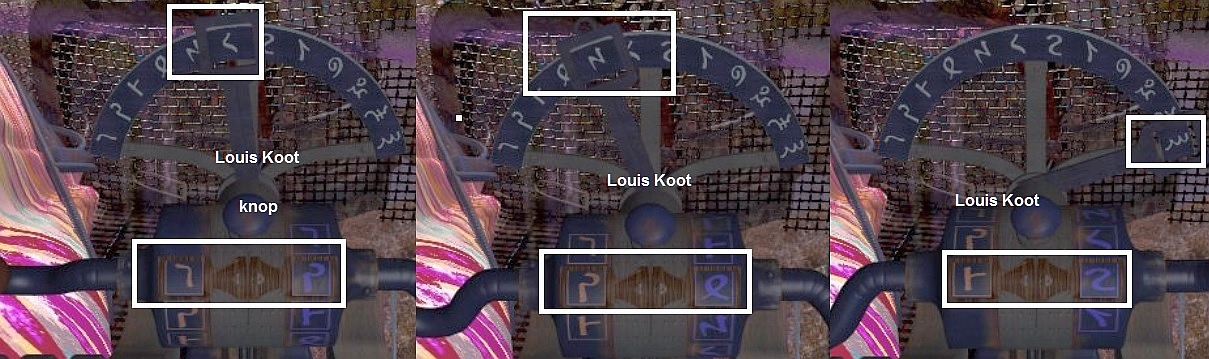
Characters now appear in the 4 screens, just like the characters you saw on the 2 metal doors when you went to the 1st Railway Bridge Tunnel.
Now number these 4 screens from top to bottom as 1 to 4 and move the screens now as follows:
· Move
screen 1 1 x to the LEFT
· Move
screen 2 2 x to the RIGHT
· Move
screen 3 1 x to the LEFT
· Move
screen 4 1 x to the RIGHT.
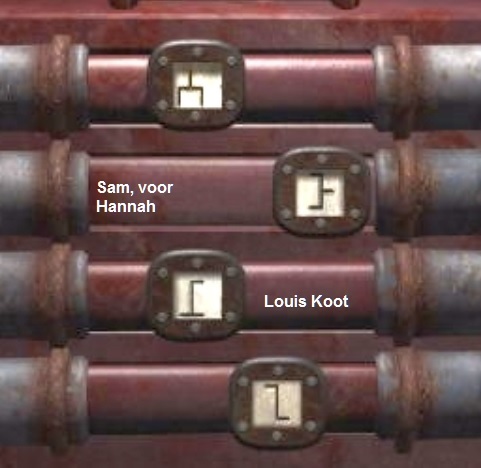
Remember these characters and in which screen they are. Then take Sam's card back from the device. Zoom out and switch to Hannah.
Zoom in as Hannah on the 4-screen device. Now place Hannah's Metal Card on top. Then move the 4 screens in exactly the same way as you did with Sam and then draw the new characters that appear in the screens.
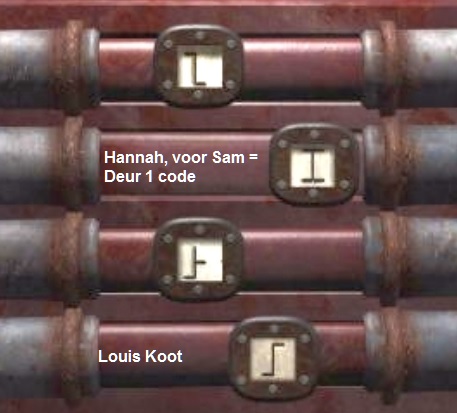
This is the Code for Iron Door 1. Zoom out. We now leave Hannah here in prison and continue with Sam:
Sam:
Take Sam up 2 floors with the elevator and then over the iron path to that 1st iron door. Now take Sam to the iron door 1.
Zoom in on the door mechanism and turn the knobs so that from left to right you have on the 4 knobs the 4 characters that Hannah has just found in prison on the 4 screen
device. Then press the button in the middle and this door will also open.
Go through it and on the other side of the tunnel you go left over the metal path and you come to the gray panel of the 2nd Railway Bridge Puzzle.
Sam and the 2nd Rail Bridge puzzle:
This time the computer always starts to move. This makes the puzzle easier to win this time than the first because you can now react at
ease to the moves of the computer. Again you have to win 2 game one after the other and again that if you win the 1st game but lose the 2nd you have to start all over again. It is not really difficult this time.
There is a saved game for this puzzle also.
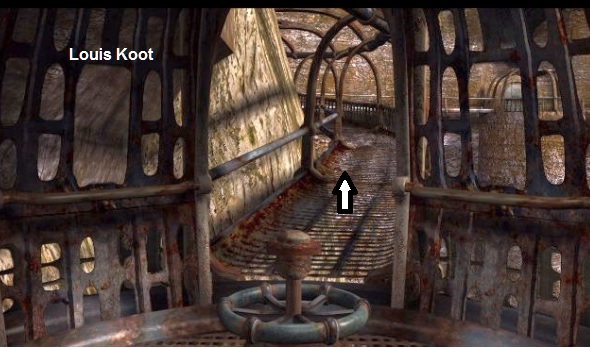
After you solve this 2nd railway bridge puzzle you go back through the tunnel and then turn left and follow the iron walkway all the way to the end, up the stairs,
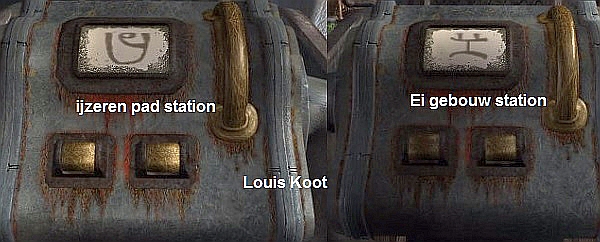
and then to the railroad tracks. Turn right here and press the button below the symbol on the symbol box to have the railcar come from the landing place of the Island Ship. Then get in the railcar.
Sam must now go in the railcar through the train tunnel and over the railway bridges to the Egg building complex. Remember the symbol in the screen, with
this symbol you can return here. You didn’t found the symbol to get the railcar through the tunnel, so trial and error. Now put a symbol in the screen and then press the right button below the screen, if it is the right symbol then the car will go through
the tunnel.
Otherwise try another symbol until you got the right symbol and the railcar goes through the tunnel.
But remember, there is also a symbol with which you let the cart drive back to the Island Ship, you don't need this one now.
Sam has to go through the tunnel with the cart. It is not that difficult, but remember the correct symbol.
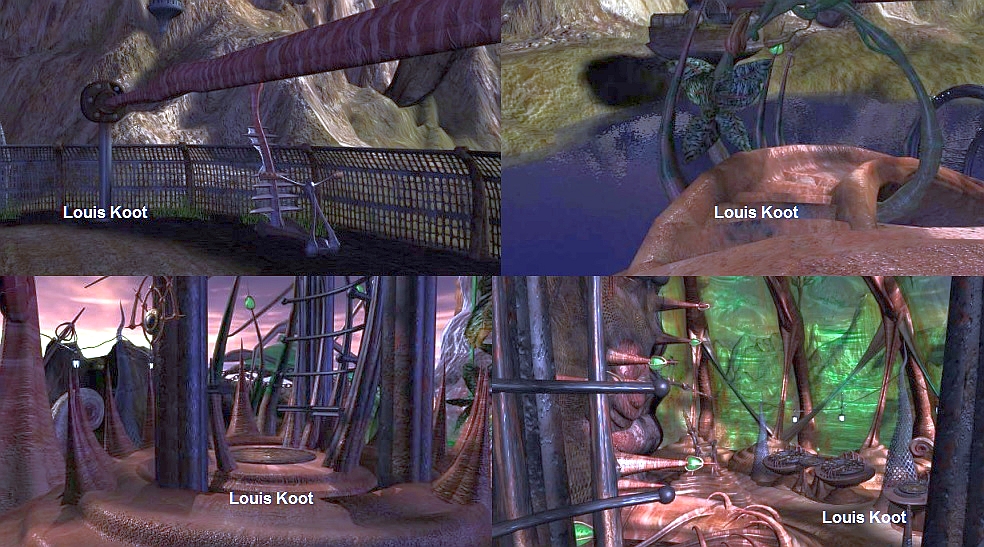
The Egg building complex:
Once through the tunnel and over the railway bridges, the train stops at that large egg-shaped structure. Get out and Sam is on a path.
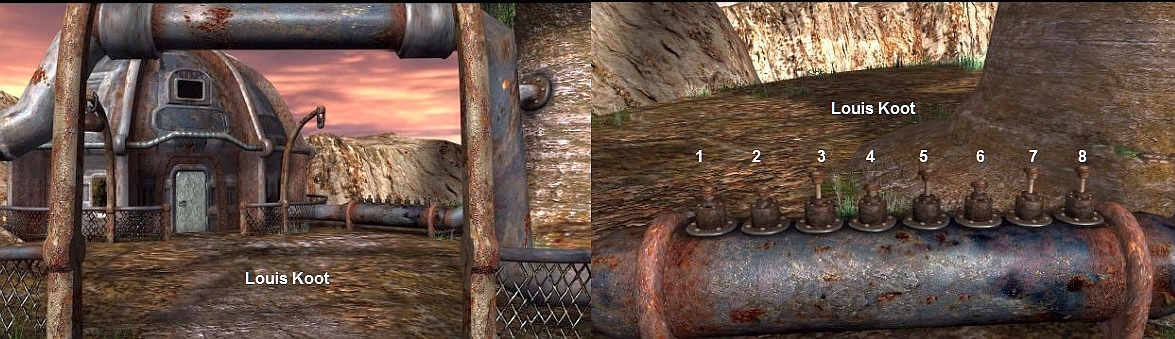
Follow this path 1 x forward. Then there is a dome-shaped house on the left and on the right,from
which a thick pipe emerges.
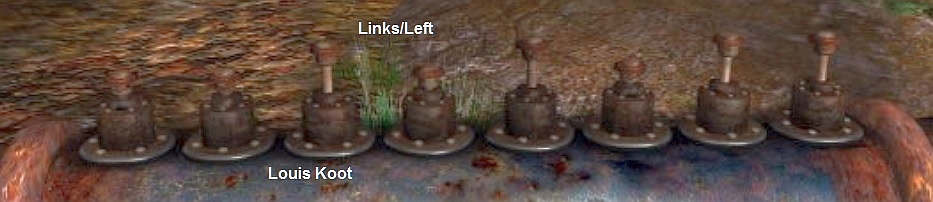
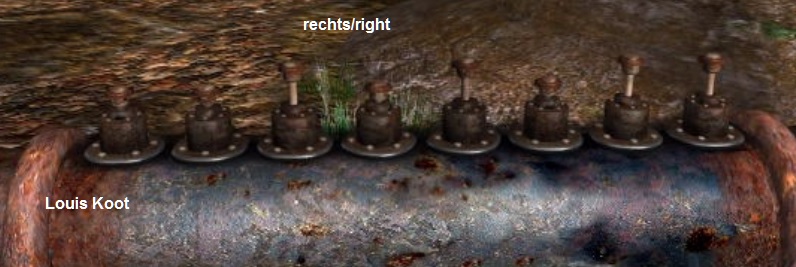
Go to both houses and view the thick pipe. You will see 8 pins on both the pipe that comes out of the left house and the pipe that comes out of the right house. You
can zoom in on it and you'll notice that all of these 16 pins are pressed. You can pull out the pins but do not do this now. Also go to the right-hand house because the right-hand house also has such a pipe with 8 pins.
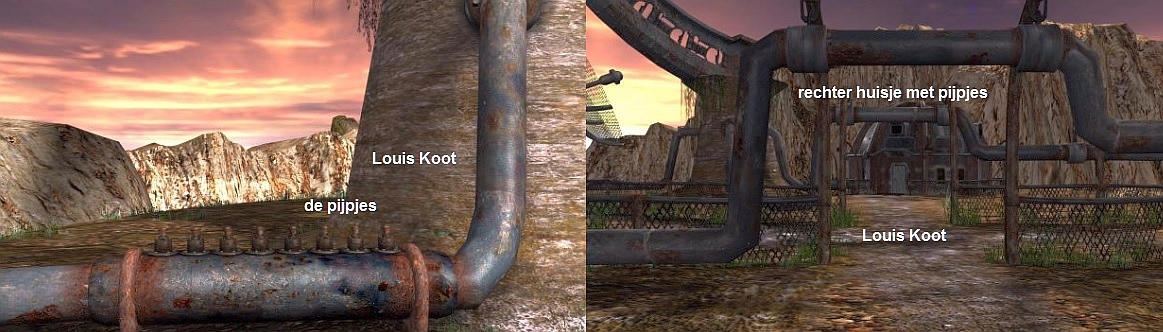
Where have you seen series of 8 pins on the left and 8 pins on the right? On that "Church organ" in the Cathedral under the keyboard you could see 8 pins on
the left and right. Do nothing, so keep these 16 pins pressed. Go back to the path and now follow it towards the Egg. You can then go left and right. If you go to the right and then turn to the right, you will see a large Antenna dish. This dish is for the
satellite connection and was placed here by the missing science team.

Standing in front of the satellite dish, turn all the way around and click once forward and you are on the "Roundabout" more or less under the Egg. Then
turn to the left and you will see a knob above the point where the left and right pipes meet. Press the button and you will see that Egg building and it seems as if something is moving in there, but also if something is not going well.

Turn around completely and you will see a Large Metal Arch with a gray panel inside. On the left leg of this metal arch you see a large screw.
Place the key from Sam's inventory and click on it. The gray panel hanging under the arch will open
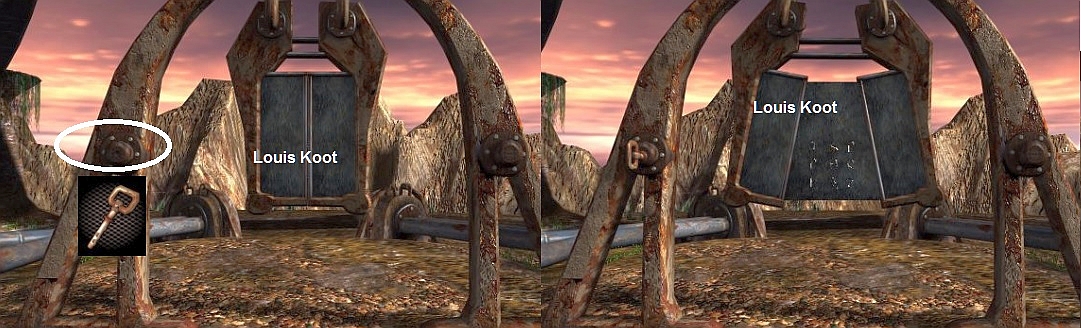
Zoom in on it and you'll see a new set of Coordination symbols for the Fish Airship. Copy these symbols.

Sam can't do anything else here, so return to the path and walk back to the railcar. The railcar has now probably been driven back, so press the button to call the cart.
Step back into the railcar and enter in the screen the symbol with which the cart returns through the tunnel to the "intermediate station" at the iron walkway to the Tower lift.
So get off at the iron path and follow the path all the way back to the Tower Lift and take the elevator back down again. Then go behind the elevator to that rotary wheel with which you can let the water out of the prison and
click this wheel up once again to pump the water out of the cell cave.
Then switch over to Hannah and bring her to the cell.
Santo reappears and says the following to Hannah: "in the Bosch tunnels you have to perform 2 operations, namely: Ossa
and Dissa."
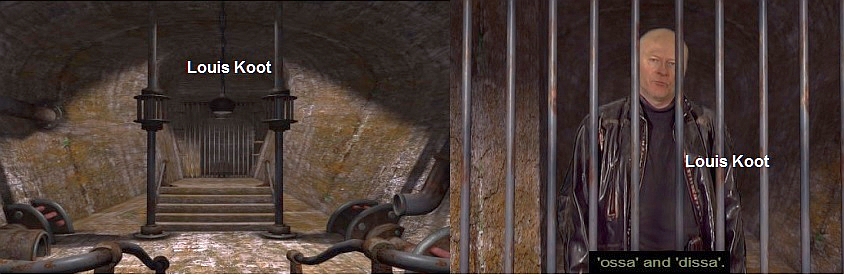
Do these two words still seem familiar? As Sam you have met them before. These are the native words for 2 wind directions .... Ossa = West and Dissa = Northeast
What have we actually achieved here on this Matia Island so far? Well, Sam has found the Code of the 12 "Bottles" on the Sheet Piling in the Dome houses village.
These 12 "Bottles" therefore represent the 12 pins that stand on top of the "Church Organ" in the cathedral of Bosch.
Furthermore, you have found 2 x 8 pins at the Egg, on the 2 pipes of the Left and Right House. These 16 pins stand for the left and right row of 8 pins that are under the keyboard of the "Church Organ". Finally, you were given the wind direction
indicator from the captive scientist and you probably remember that 8 of the keys of that "Church Organ" keyboard have a symbol and that therefore the same wind direction symbols are that you also had at the start of the game, as Sam, on the various
compasses and whose words you then determined. All this brings you to the conclusion that you now have to go back to that "Church Organ" in the Bosch Cathedral and because you can only get there with the Island Ship, we now leave Sam here and we
continue with Hannah:
Hannah:
Take Hannah 2 floors up with the elevator and then follow the iron walkway back to the train tracks. Press the button there to call the railcar. Get in the railcar and enter the symbol that returns the train to the landing
place of the Island Ship. Get out the railcart, turn slightly left and click forward to the Chair lift. Hannah "slides" back to the Island Ship and here you go, via the down path and the elevator to the Hand Scanner.
Zoom in again on the hand scanner and then press the middle of the 3 green buttons and then click on the Hand and .......
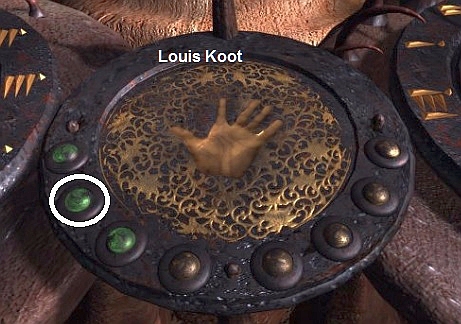
The Island Ship now sails back to the landing place for the Bosch Cathedral.
Go via the Chair lift to the entrance and inside the cathedral you go to the Church organ stage.
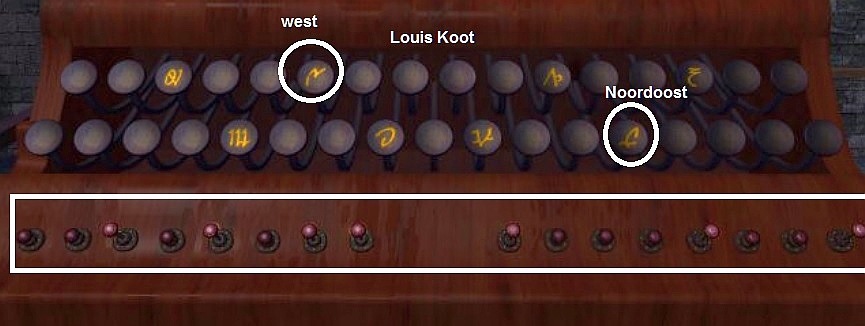
Go up the stairs and zoom in on the "church organ".

So the "church organ" is actually a calculator that works with Zeros and Ones.
You can now set the 12 top pins according to the Code that you saw on the damm
From left to right you click on the 1st, 5th, 7th, 8th, 10th, 12th pin so that these pins are pulled out
Then click on the keyboard on the Symbol for Ossa = West and then on the Symbol for Dissa = Northeast. Look for these symbols on the compass in Sam 1. Or, number the 8
keys that have a Symbol on it from top left to bottom right as 1 to 8 then Ossa is the key with the 2nd symbol and Dissa is the key with the 8th symbol.
If you have done this correctly, the machine will start calculating and you will see the result on the 2 sets of 8 pins under the keyboard.
This means that a pressed pin is a 0 (zero) and a pulled out pin is a 1.......... So the result is as follows:
Left = 00101011 and this is for the pins on the tube of the left house at the Egg.
Right = 10001001 and
this is for the pins on the tube of the right house at the Egg.
Copy this code accurately. Go back on the Island Ship and on the Hand Scanner press the front Green button and the Island Ship sails back to Matia Island. Here you
enter the train cart and on the screen you set the Symbol for the Egg station so that Hannah goes in the Cart all the way to the End station at the Egg.
Egg building complex
First go to the tube of the left house and zoom in on it and number the 8 pins on the tube, from left to right, 1 to 8.
Then click on the pins: 3, 5, 7, 8 to pull them out.
Zoom out and turn right and go forward 2x to the tube of the right house. Zoom in again on the tube with the 8 pins.
Number the pins here also from left to right as 1 to 8, and then click on the pins: 1, 5, 8 to pull them out
Then zoom out again, turn left and go forward to the path. Turn right to the Egg and go right again 1x forward to the satellite dish. Turn left and go
forward 1x until you reach the roundabout under the Egg. Turn left and then click again on the button where the 2 tubes meet. Once you've done that, you'll see how the upper part of the Egg opens and closes again. Immediately after this you are turned to the
right and you see another appearance that says to Hannah: "So this is your decision, so be it !!! Now go to the Balloon .... there is still time to save your friends .. ... Matia must do what it must do ".
After this there is contact between Hannah and Sam: "There must be something here with which we can help the Argilans, with which we can help us all, something
of a ritual". Because this last appearance also spoke about the Balloon, you now have to go with Sam to his Fish Airship. You can leave Hannah here now, but because she will have to talk to Santo again in prison, I first brought Hannah back to the
entrance of the prison, via the train and the tower lift. Then switch to Sam.
Sam:
Take Sam all the way up with the tower lift. Go through the gate of the elevator and then into the Fish Airship.
Go to the right-hand seat in the cockpit, zoom in on the controls and now enter the set of coordinates Symbols that you saw on that Gray Panel below the Egg.
Like this
If you do this well, the Airship will now fly to the Egg. The Egg opens and the Airship pulls out a kind of Bullet with its Hook.
After this, the Airship will fly to Hannah's Island Ship and drop this bullet into the Island Ship where it will end up in that "Flower" next to the large chair at the Hand scanner.
The Airship then flies back to the tower lift. Take Sam back down and then behind the elevator to that water wheel.
Pump the water out of the prison again and switch to Hannah.
Final
Hannah:
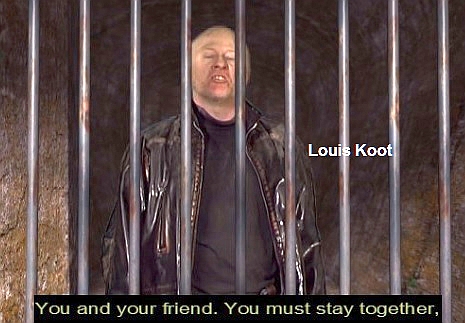
Take Hannah to the jail and Santo reappears.
Santo is delighted that you will come to "free" him and say that Hannah and Sam must stay together. After this Santo
disappears. Was this a Spirit?
So now you have to hold Hannah and Sam together, but you can still only control them separately. Now bring both Hannah and Sam, via the elevator and the train and
then the Chair to the Chair at the Hand Scanner on the Island Ship. As soon as you have them both there you turn to the right and the Priest appears. He points with his hand to the right, to the "Flower" next to the big chair, he mumbles a little and
disappears.
Once the guy is gone, turn right and zoom in on that "FLOWER" next to the seat. Here you can now see the bullet in it ..... Click on the bullet and ........
Watch the ENDING now
Here you can see that the Island Ship is turning into a spaceship and Sam and Hannah are now turning in circles around the planet Argilanus.
The real Angela Davis appears and explains everything to you.

Sam and Hannah are now ready for their next assignment so we are anxiously awaiting what the next game of the boys from Avalon will be.
THE END.
2017: Original Dutch Walkthrough by: Louis Koot
2019: This English translation
by: Dick Leeuw