Schizm 2: Mysterious Journey II
2020: Walkthrough by: Louis Koot
If you have found this walkthrough via google search or via another site then you have probably not visited my site.
A lot more very detailed game walkthroughs can be found on my site at: www.pcgameswalkthroughs.nl
NB: When I played this game, back in 2003, I had great problems with the blue and red "Doors" of the Grand Tower in Chapter 5. The game had a video bug there that "kicked" in with certain video cards that the game didn't support. So I never could solve that Grand Tower puzzle correctly and had to get help from other players who didn't had that bug. Because of the way this game has been made it's very complicated to use someone else's Saved Games in your game. It's almost impossible to do so. I no longer have this game, so I do not know whether this bug is still in there.
Chapter 1:
The game:
Once installed, the game no longer needs a CD. Mysterious Journey II can be controlled by both keyboard and mouse. In the main menu you have the choices New Game, Continue Game, Load, Settings, Credits and Quit. The navigation via the keyboard is done with the W, A, S and D keys. The arrow keys move the focus of the screen up or down. When navigating with the mouse, the left mouse button indicates the direction and holding down the right mouse button activates the movement.
By pressing the space bar or ESC you leave a cut scene. The F1 key shows the subtitles of the dialogs. There are 3 cursors: a white circle is for navigation and no action, a curved cursor (circles in circles) moves to the next area of the game and the black circle means to perform an action is.
The inventory is in the bar at the bottom and automatically appears when an item has been picked up or when an item from the inventory can be used in that place. When saving, a graphical representation and the location of the save moment is displayed. The title of the saved game can be changed. Press save to go to a saved game. If you press return without pressing save, the game will not be saved and you will return to the game. The number of save moments is unlimited. A save is automatically made at the beginning of each new location in the game. To load a game, select the particular saved game and press enter. If you press return without loading a saved game, you will return to the game.
Space station
The fate of a traitor:
Sen Gelder awakens from a cryogenic sleep through a hologram of his supposed old friend Tensa. Tensa reports that Sen was responsible for destroying the planet Sarpendon 200 years ago. Sarpendon is located below the space station. Only in a single valley is life possible on the planet. The space station will fall on the planet in 16 days, and Sen is locked up here. It is the first part of his sentence. All non-essential machines have been destroyed. Before the second part of his sentence can be determined, the hologram is destroyed by a laser beam from outside the hallway. Sen does not remember his past.
Repair Talen:
Go to the door and exit the room. Go forward to the large metal object, a Companion, in the hallway. The companion asks to be repaired. Go forward to the end of the hallway. As you do that you will pass 2 destroyed large spiders that are attached to the wall, like machines, and a side corridor that you cannot enter now. At the very back of the long corridor you come to the large closed door that is the entrance to the Shuttle bay. To the left is another broken Companion lying on its side. When you click on this Companion, you will see the "USE" cursor. So press your ENTER key and a Card will appear in the inventory.
Go back down the hall to the first Companion. Face the front of the Companion and use the Card on it. This card turns out to be a so-called Prion Generator and these things are a kind of "food" for this Companion. The companion says that the top corridor is now open. The Companion wants even more of those Prion Generators.
Continue down the hall to the side corridor. It is now open, so follow this corridor. You can then go left and right. Look to the left while standing on the bridge and you will see another Companion and a stall at the far slope. The right path is blocked by a jagged laser beam. Go forward and left across the slope. Take the open passage you see on the right. The passage has 2 walkways on both sides that end at the top of the slope. Go up this slope and you will come to:
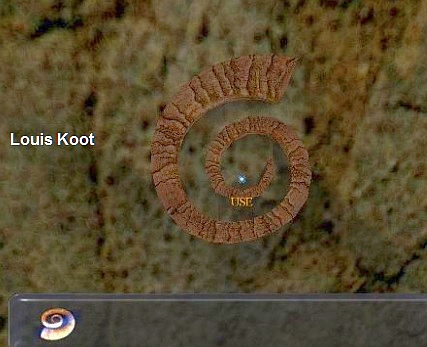
Puzzle 1: Main Promenade: the Spinning Corridor puzzle:
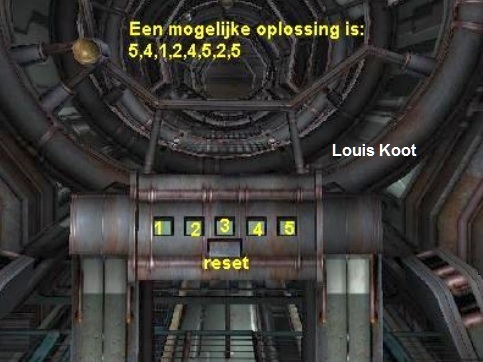
You are at a button box with 5 buttons. The corridor behind this button box is closed by 5 rotating rings. With the 5 buttons on the button box you now have to make sure that all 5 rings are rotated in the hallway so that you can continue through the hallway. Save your game before you start the puzzle.
Place your cursor on the button box. You will see "Use" appear. Press your ENTER key to get into the puzzle screen. Number the 5 buttons, from left to right, as 1, 2, 3, 4, 5. The button below the 5 buttons is the RESET button with which you restore the puzzle to the starting position. Each of the 5 buttons is connected to one of the 5 rings in the hallway. You must first find out which button is connected to which ring. To press a button, place the arrow on a button. The arrow will turn WHITE. Then press your ENTER key to press the button. Unfortunately you are out of the puzzle screen after that, so you have to go back to the puzzle screen ("USE", ENTER) to press the next button with your ENTER button. You repeat this until you have solved the puzzle.
Several solutions are possible. But here's the solution that worked for me:
This solution assumes that you have not yet pressed any buttons yourself. So press the buttons in this order: 5, 4, 1, 2, 4, 5, 2, 5.
If this does not work for you, load your save game and try another combination, for example: 1, 1, 2 , 2, 4.
Once the puzzle has been solved, continue down that corridor. Go to the stall on the right ramp and lift the right bar up to turn off the power of the laser beam, blocking the middle level passage. Go to the other side, look at the Companion. You will get "USE" again, so press ENTER. A cut scene appears. Then return to the main corridor and to the large Shuttle Bay door.
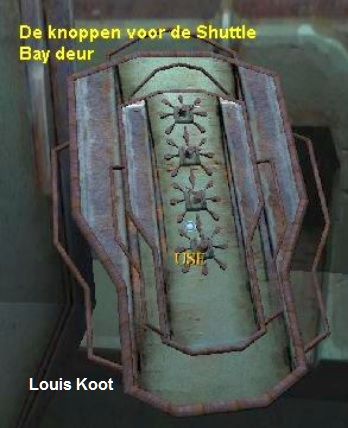
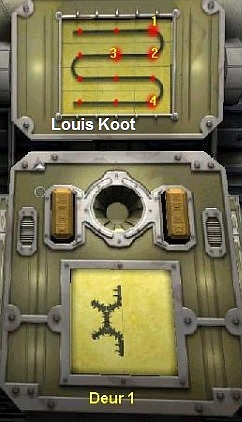
Puzzle 2: Main Promenade: Opening the Shuttle bay door:
At the very back of the main corridor is the large door to the Shuttle bay. This door is closed and must therefore be opened.
On the right you see a console with 4 rotary knobs. Stay away from it for now.
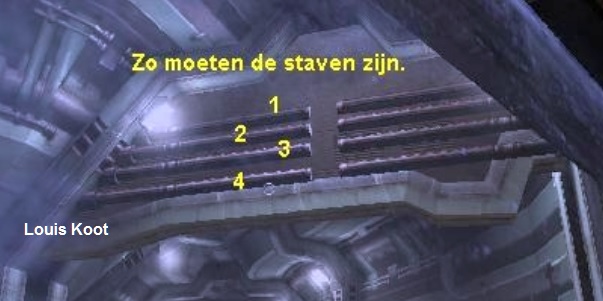
Go back through the cross passage and when you come out again go further to the right and down. Here the passage to the right was previously blocked by an Electric beam but it is now out of your way. So now go further to the right and then up through the ramp and you will come to a large window. Look through this window. You then look into the Shuttle bay corridor. Look through the window to the right. You will now see the other side of the large Shuttle bay door and you will see that the door is blocked by 4 large iron bars.
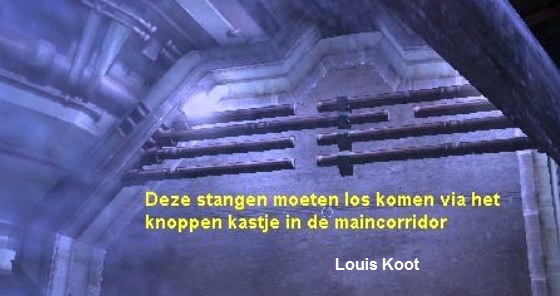
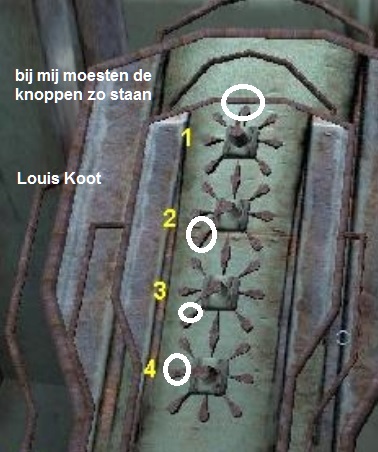
These 4 bars each consist of a left part and a right part, so these parts come together in the middle in a bracket. The initial situation of this puzzle is different each time. What you need to do is to get each of the 4 bars out of the brackets by using the console in the main corridor. Number the bars, from top to bottom, as 1, 2, 3, 4 and return to the console in the main corridor.
Enter, via "Use", ENTER in the puzzle screen. Number the 4 rotary knobs, from top to bottom, also as 1, 2, 3, 4. These 4 buttons each "operate" a Bar with which the Shuttle bay door is blocked. Knob 1 is for Bar 1, Knob 2 is for Bar 2, Knob 3 is for Bar 3 and Knob 4 is for Bar 4
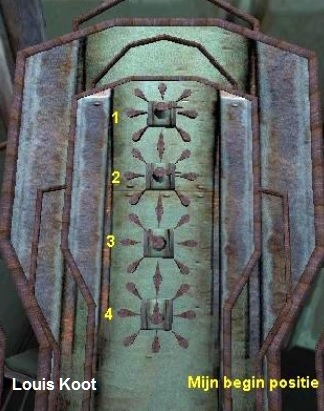
You should just try it out now. Turn Knob 1 one click. Run back to the Shuttle bay window and look through the window at the bars again. You should now have shifted Bar 1 one position. That could be the right way or the wrong way, but this is what you need to do now, so you have to "click" the 4 buttons until you have get all the 4 bars out of the 4 brackets and then the Shuttle bay door will open. It is best to do this "Click by Click" and Knob by Knob. So always push a knob 1 "click" and then go back to look through the window to see what has changed in the position of the bars. When you have correctly positioned the top bar with the top knob first, then continue with Bar 2 via knob 2, then Bar 3 via knob 3 and then Bar 4 via knob 4.
In the end it must look like this
Shuttle bay :
Puzzle 3: Shuttle bay: The Laser Cocoons puzzle:
Go through the now open entrance door and go forward. A curved cursor will take you to the shuttle platform. Go forward, there is an exit to the left. Ignore this turn first and continue forward. You will come to a force field that blocks access to the shuttle. Go back to the side corridor and go through it now and you will enter a room full with rows of Cocoons. You can go to a Catwalk via an elevator. Do that. At the top, walk forward on the Catwalk and look at the right wall. You will see a large "EYE" on the right wall.
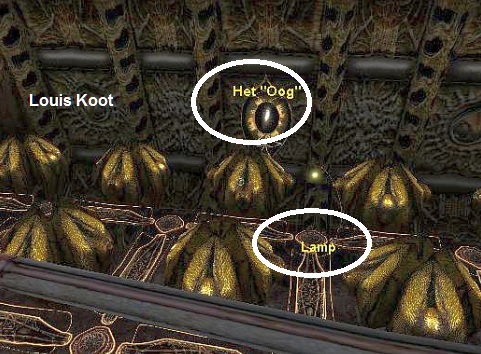
Obliquely to the eye you can also see a Lamp. Go down again with the elevator and go down to the 3rd row of cocoons and follow the path between the cocoons to the right, to that lamp. You will then be right in front of that "Eye" in the right wall. There is a button at the bottom of the lamp. via "Use" and then ENTER press the button. There is now a Laser beam from the Cocoon where the lamp stands and this beam goes to the Cocoon in front of it.
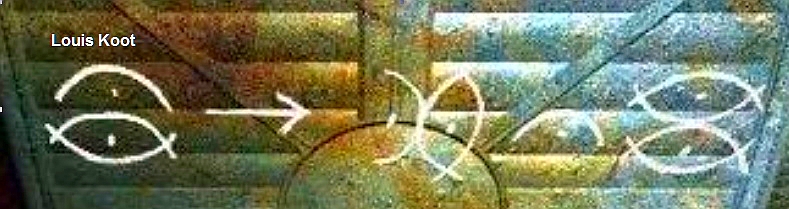
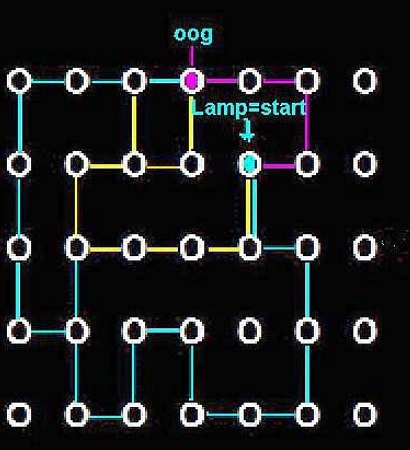
The idea is that you create a continuous laser beam that goes through the cocoons and to the "Eye" in the wall. If you do this, the Force Field that is still in the Gate to the shuttle will disappear. Remember that you have to make two different laser beams, one long and one short. You can turn each cocoon 4 times. Each Cocoon has an Protruding Opening and a Round Hole. The Laser Beam must always go from one Cocoon to the Round Hole of the other Cocoon through the protruding Opening. You turn the cocoons via "Use" and then ENTER. The image below shows how it should be and this is all the help I can give you with this cocoon puzzle
The Forcefield that shields the passage to the shuttle disappears when you have solved this cocoon / laser beam puzzle.
Look at the door of the shuttle platform that opens and hear Talen calling Sen. There are 2 tribes: Transai and Ansala. The Transai believe in the old technology, they believe that science is the only answer for survival, while the Ansala believe in the love of nature and in natural methods. Talen provides Sen with additional training in his skills and chameleon techniques, so that Sen can be disguised as a nomad. Watch the shuttle fly away and crash on the planet.
Chapter 2: On the planet Sarpendon
The valley
Companions Beach:
You get "USE" on the Danoosha, a Companion on the beach. You will see the remains of the shuttle and a non-working companion on the left path. Go up the path on either side of the mountain wall. You see two bridges that have to be made good to cross them. One is a "technical" bridge, the other is a "Natural" bridge. The left bridge is the "Technical Bridge" and the right bridge is the "Natural Bridge".
|
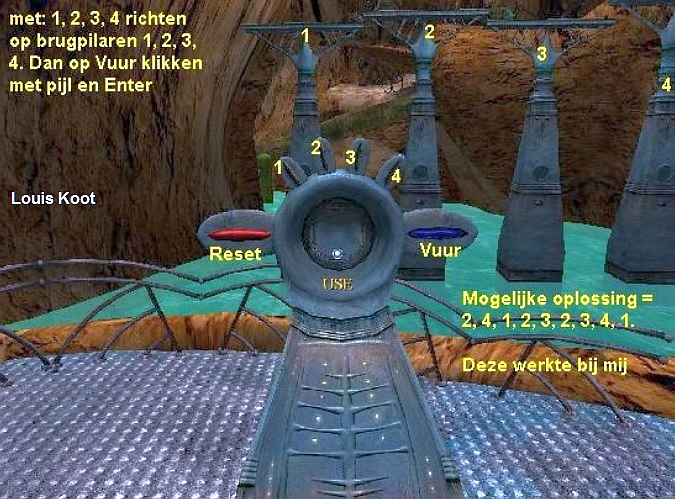
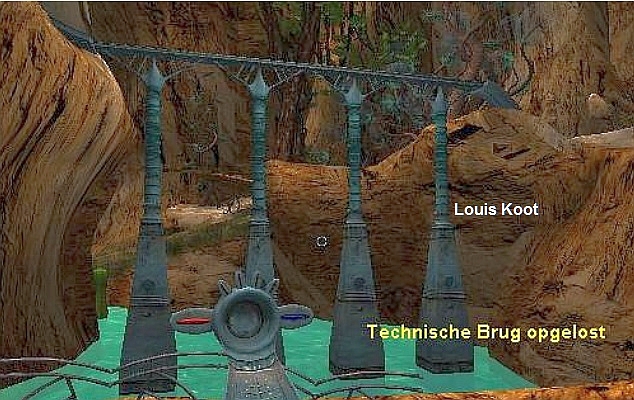
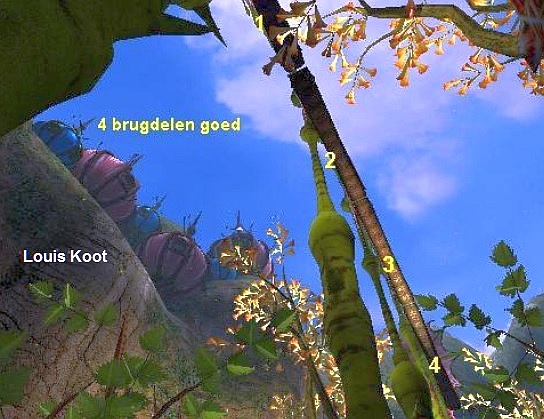
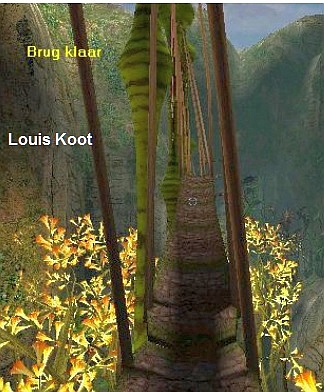
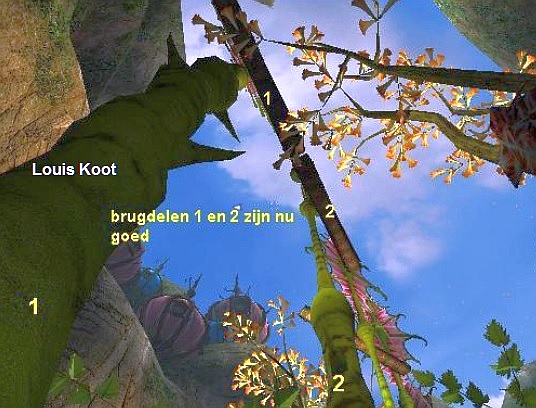
The Transai Puzzle 4: Neutral Zone: The Technical Bridge puzzle This bridge consists of 4 pillars. On top of each pillar is a bridge part. Above the bridge hangs a cable. The intention is that you raise each of the 4 bridge parts until the bridge parts touch the cable. Then the bridge is ready and you can cross it to the other side. If you are standing in front of the "ramp" of the bridge, follow the path to the left and all the way down. You will then reach the control console of the bridge.
The console has 4 buttons on top and a red button on the left and a blue button on the right. With the 4 buttons on top of the console, you aim the console at one of the 4 bridge parts. With the blue "Fire" button you shoot a blue energy ball at that bridge part and this bridge part goes up. With the Red button you reset the puzzle to the starting position. You must therefore always direct the console to one of the 4 bridge sections. You do that with the 4 buttons on top of the console. Number these 4 buttons, from left to right, as 1, 2, 3, 4 and number the 4 bridge parts, from left to right, as 1, 2, 3, 4. With button 1 you aim the console at bridge part 1, with button 2 at bridge part 2, with button 3 at bridge part 3 and with button 4 at bridge part 4. If you have aimed the console at a bridge part, then you fire with the Blue button a Blue Energy Ball on it, that hits the pillar and the bridge section goes up. How high a bridge section goes up after a shot of Blue Energy is different every time and every game. This also differs per bridge section, so you first have to find out how often you have to fire PER BRIDGE PART to let that bridge section rise to the cable. A POSSIBLE solution is: shoot blue energy at the bridge parts in this order: 2, 4, 1, 2, 3, 2, 3, 4, 1. Another POSSIBLE solution is: 4, 1, 1, 3, 2, 2, 1, 3, 4.
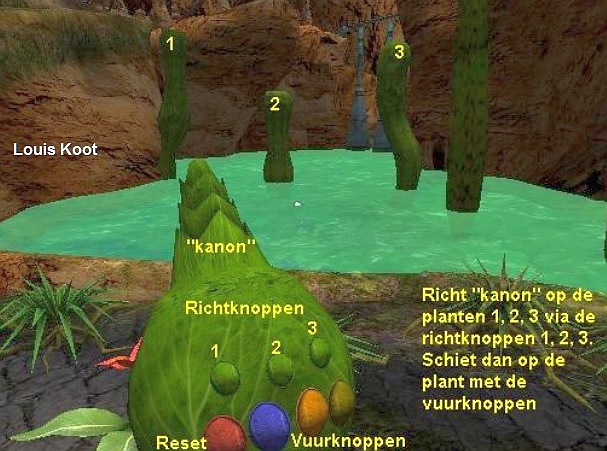
Cross the technical bridge and meet some Transai. Jimi, a newly appointed team leader, talks to Sen and he talk about Jano, a technician who had been missing for 2 years. They will secure the shuttle and meet you at Touchstone. When they leave, try to enter the force field but the sentinel gate recognizes your disguise and will not let you through. Go back over the technical bridge. The Ansala: Back over the Technical Bridge, go left and down the stairs below the giant leaf. You see a plant that has 3 buds in the top and 4 colored buds at the bottom. There are 3 plants on the water. This is : Puzzle 5: Neutral Zone: The Natural Bridge puzzle
The Natural Bridge consists of 3 Plant Stems. The idea is that you put SEGMENTS on top of the 3 plant stems and that you ensure that from the TOP SEGMENT leaves sticking out that then will form the BRIDGE. You play this puzzle against your own computer. Every time you have added segments on a stem the computer will also add segments to it. The Console is the "Cannon" with which you can fire Blue, Yellow or Green Energy balls at a stem. With the top 3 green buttons you aim the console on one of the 3 stems. Number these 3 buttons, from left to right, 1, 2, 3. Also number the 3 stems of the bridge, from left to right, 1, 2, 3. With green button 1 you aim the cannon at stem 1. With green button 2 you aim the cannon at stem 3. With green button 3 you aim the cannon at stem 3. With the RED button you reset the puzzle
So after each of your shots, your computer places 1, 2 or 3 segments on top. Since you never know how many segments the computer will add after each "shot", it is not possible to give a FIXED solution for this puzzle. I can only explain how it works. You should always make sure you have the last shot that will allow you to reach the correct number of Segments on a stem. If the computer has the last "shot" then this puzzle cannot be solved STEM 1: This Stem needs 9 SEGMENTS placed on it.
STEM 2 (the middle one) needs 13 segments
STEM 3 needs 10 segments
This is how it should ultimately be:
|
Cross the natural bridge and meet Saku. She's glad you came back as investigator Troga. They want to meet you at Brada Coe.
Try to go through the sentry totem and notice that this is not possible. Return to the companion beach.
Companion Beach:
Look at the fight between the Ansala and the Transai. They destroyed the ship to prevent the enemy from taking it. Click on Danoosha and she says she did it all ... Sen looks at the Gelleas, the floating islands, and thinks that they have turned slightly. Go to the other companion, Wookash. He steps aside to show you a path in the mountain. Danoosha has given Sen a renewal of his camouflage, taking advantage of the missing members of the troops. Enter the cave and enter an area with cables and fans blocking the road.
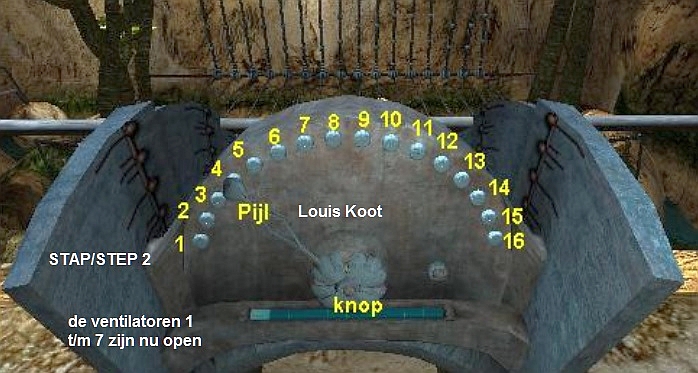
Puzzle 6: Companion Beach: The 16 Fans puzzle
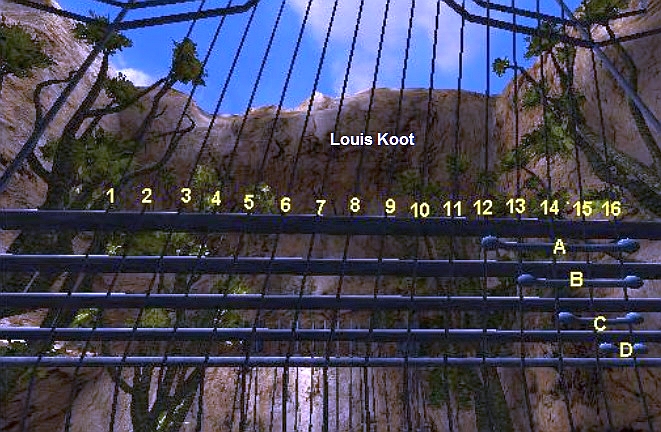
You are in the Secret Area, reached through the Secret Cave from Companion Beach. This Cave was hidden by Wookash the Companion. This secret area is a large and more or less square pit between the rocks. There is a path around the pit. If you follow this path counter clockwise, you will suddenly be blocked by a long row of 16 large fans standing behind each other. Behind these fans is the exit to the next area. In order to reach that exit, you need to bring down all these fans so that they no longer block the path. However, if you look closely at the fans you will see that some of them are already down and thus no longer block the path. The fans that are already down are fans 3, 6, 9, 10, 14, 15. 10 fans still block the path.
If you enter this area through the secret cave, follow the path straight ahead. You will then arrive at a console. This console is therefore directly opposite those 16 fans that block the path on the other side. The 16 fans are each cable-connected to a "Panel of 5 long bars" located directly below this console, and then the 16 cables continue to this console. To the left of the console, a worn pad goes down to those 4 long bars.
Go down that path to the 5 long bars. You get "Use" on this bar "panel", so hit your enter key to get to the puzzle screen. You see the 16 cables from the 16 fans, each going over the 5 bars and then on to the console, which is now behind you on the top path. On the right side you see 4 smaller bars between the big long bars. These smaller bars have round ends. You can move these 4 smaller bars all the way to the left and back again to the right. These 4 bars are different in size. Now do the following first:
|
Number the 16 cables, from left to right, as 1 to 16. Number the 4 small bars, from top to bottom, as A, B, C, D, E. Now look at those 4 small bars.
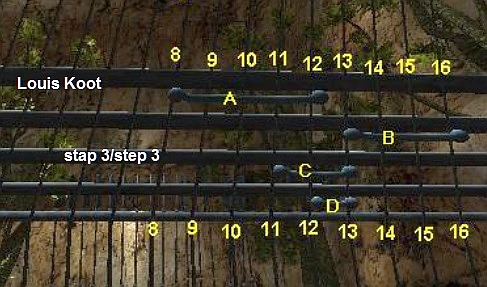
You know that of the 16 fans, 6 are already down, so you now have to get the fans 1, 2, 4, 5, 7, 8, 11, 12, 13 and 16 down. You have to do this by connecting the cables of those fans with the 4 sliding bars A, B, C, D, E. But you can only connect up to 7 cables at a time. So we have to do it in two phases and each of these two phases consists of two steps. You move Bars A, B, C, D to the right by hovering over them with your Arrow and then pressing your ENTER key. The Bar will then always slide 1 cable to the right.
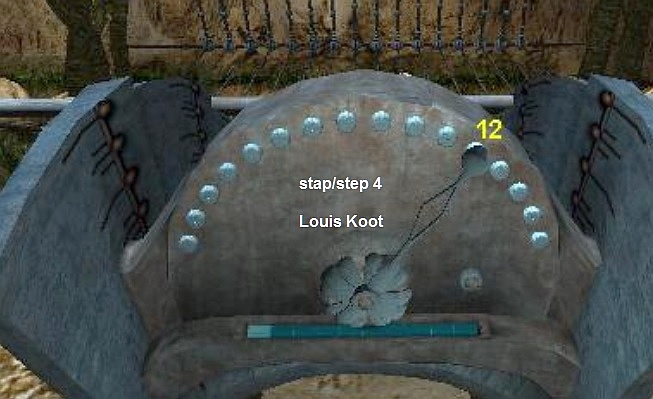
STEP 2: Now the cables of the fans 1, 2, 3, 4, 5, 6 and 7 are connected. Now go back to the console and press ENTER on the console. On the console you see an arrow and 16 buttons. The 16 buttons "operate" the 16 cables and thus the 16 fans. The ARROW is attached to a thick "Rosette" and in the middle of the "Rosette" is a button. You can place the Arrow on any of the 16 buttons by sliding the arrow with ENTER. Now put the Arrow on one of the buttons 1 to 7, but NOT on button 3 or 6 because these two fans are already down. So put the arrow on button 1, 2, 4, 5. By this I mean that you only have to put the arrow on one of these buttons. As you can see I put the arrow on button 4. Then press the button of the "Rosette" and ...... the fans 1 to 7 are then all down
STEP 4 Now go back to the Console and put the ARROW on one of the buttons 8 to 16 BUT NOT on the buttons 9, 10, 14 or 15. So put the arrow on for example button 12 and then press the Button of the Rosette. And ..... now all 16 fans are down
Now go all the way down the path. You can now go past the fans and into the tunnel and you will end up in the next area. |
Shelter of Arko:
Arko announces that Gelleas, the floating island, has been turned by the Ansalas. Arko tells the story of what happened to the planet and the story of Sen Gelder. Sen is said to have a scientific companion. They were the ones who came into contact with the alien ship. The alien machines are the companions held by the Transais. Sen is shown a door that has an old-fashioned lock. Arko gives an old-fashioned energy number - 36. Sen wants to go back to the space station to pick up some things and find his companion, Chemay. Sens disguise is now stronger through Wookash and Daneesha. Sen talks to Wookash and the companion advises him to check the Transai area first, because they have better shuttles and stronger companions.
Transai Domain
Transai Gate:
Go to the sentry gate of the Transai, over the technical bridge.
Sen is recognized by the sentry gate as Jano and is given permission to go through it. The force field of the sentry gate has been removed.
Puzzle 7: Transai: The Spinning Bridge with Force Fields puzzle
You have crossed the Technical Bridge again and went to the gate with the Force Field in it. Sen has now been recognized by "Sentry Post" and the force field in the gate is now gone. So you are in front of a bridge, but you cannot cross this bridge. Follow the path to the left to the Bridge Console. The Bridge consists of 6 pillars with a bridge section. There is also a Force Field gate on each bridge section. Not every gate has an activated Force Field. You now have to rotate the 6 bridge sections so that they are connected and you can cross the bridge. And you have to deactivate the force field that is in some of the ports. The console has 12 buttons. With the top 6 buttons you can rotate the bridge parts. With the bottom 6 buttons you let the force fields appear or disappear in the gates.
|
Before start this puzzle SAVE YOUR GAME First do the following: Number the top 6 buttons, from left to right, as 1 to 6. Number the bottom 6 buttons, from left to right, as A, B, C, D, E, F. Number the bridge parts, from left to right. , as A, B, C, D, E, F. You should now experiment with the top 6 buttons. Each of these 6 buttons rotates 2 bridge sections. You have to find out with which button you turn which bridge part. However, there is 1 button that only rotates 1 bridge section. The bottom 6 buttons are for the force fields gates on the bridge parts and are connected to the bridge parts as follows: A = A, B = B, C = C, D = D, E = E and F = F.
The solution: This puzzle is always different with regard to the top 6 buttons, so there is no one solution to give you. For me it worked like this:
So you must first find out which bridge parts turn with the buttons 1 to 6. Once you have figured that out, load your save game and enter the puzzle with "Use" and ENTER again. Then first press the button that only rotates 1 bridge segment so that this bridge segment is in the right position. Do not touch this button again. Make the bridge completely good with the other buttons. If you have aligned the bridge properly and remove the force fields within the gates with buttons A to F then go over the bridge and you will end up in the Halcon Forest. |
Halcon Forest:
Cross the bridge to an area with forests. The force field behind you has been activated. Straight ahead is a round floating companion.
The right path ends at a door with a puzzle. Return to the other 2 paths to the left of the force field.
Touchstone:
Enter the door and Jano's friend greets Sen. Sen meets Mokri and Usef, members of the council. The Oracle checks Sen and he passes.
Puzzle 8: Touchstone: Gondola Console
After meeting Jano, Mokri and Usef and the Oracle, you are back on the platform. You are in a large and long canyon and you have to take the Gondola through the canyon to one of the other platforms. There is a console in front of the gondola. Do "Use" and ENTER on this console
The console has 7 buttons. Number the buttons, from top right to top left, as 1, 2, 3, 4, 5, 6, 7. Button 6 is now green. Here you are now. By pressing one of the other buttons you go with the gondola through the canyon to the platform with which that button corresponds. You can do this and then go to all platforms (the "stations") in the canyon this way. You will find out that you can only continue on one platform. So now press Button 2 to go to that platform. You can drop off the Gondola on this platform. Go through the door there and you will enter the Transai Air Gate and the Fog Platform Maze.
|
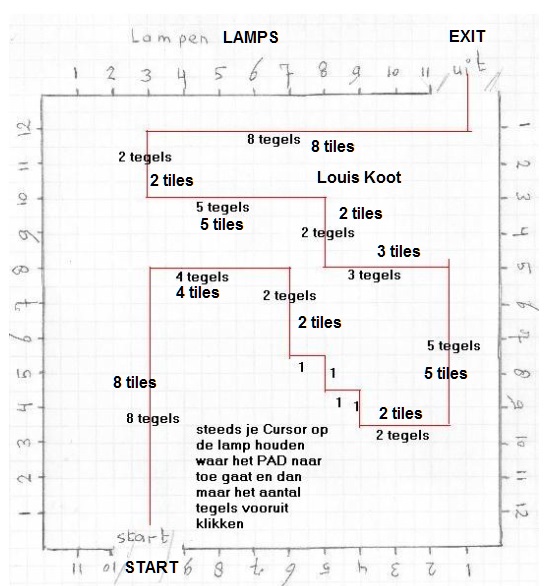
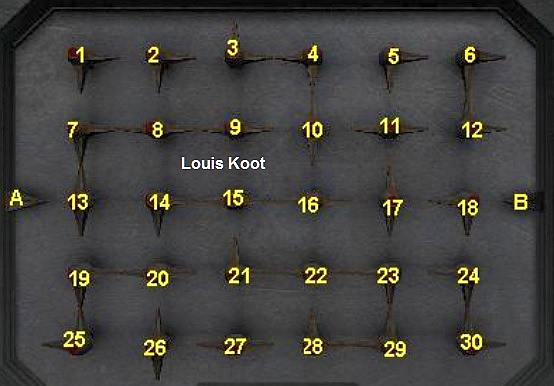
Transai Air Gate: You will see a platform covered with fog on the left and a slope on the right. Puzzle 9: Transai Air Gate: The Fog Platform Maze SAVE GAME immediately upon arrival. This puzzle is always different and this is determined by your own computer. I must warn you......this maze is almost impossible to solve.....So I cannot give you any solution. All I can do for you is to try to explain this as best I can. By SAVING now you achieve that you can keep doing the same maze over and over when things go wrong for you. To properly solve this maze puzzle you have to make a drawing of it yourself. So keep paper and pencil handy. The fog platform maze consists of an upper part and a lower part. The top part is the actual Fog maze platform, where you have to go over to the other side. But you don't see a path in the fog at all. To find out how the path passes through the fog you must first go down until you are below the FOG. So follow the path, from your arrival, to the right and down and you are then below the Fog. Look up ...... You will now see the tile path appear above your head. There are lamps around the platform. These lamps are here both below the fog and above the fog. What you need to do now is to draw the tile path, as YOU see it now in your game, from the Entrance of the fog platform to the EXIT. So draw the platform and draw ALL the lights on it. On the side with the Entrance and the Exit are 11 lamps and on the two side sides are 12 lamps Number the lamps and then draw the PATH, as YOU see it and do this accurately, so always with the correct number of TILES. Note down to WHICH LAMP the path GOES and also note when the path turns right or left. It was like that with me, but remember ... the path can be very different in your game so this drawing is just an example
Draw the TILE PATH exactly as YOU see it in YOUR GAME, and always NOTE on which LAMP the path Is "TARGETED". So if, for example, from the START the path first advances 8 tiles, look at which lamp these first 8 tiles go to the other side. Write down the number of this lamp. For each side that goes up the tile path. So always write down how many tiles you have to move forward, and whether you have to turn right or left and always write in your drawing to which lamp you should go. When you have made the drawing very precisely, you go back upstairs and to the entrance of the FOG PLATFORM. You now have to follow the path through the fog tile by tile while you cannot see the tiles through the Fog now. To do this, always point the circle of your cursor on the lamp where the path goes to and then click with your left mouse button. 1 click will take you 1 tile further. So you have to do this "click by click". If you have to move 8 tiles forward, you have to click 8 times. Keep pointing your "circle" at the lamp while you click with your mouse. You will hear a sound every time you land on a tile. So count the "Sounds". So many tiles ahead is also so many sounds. If you first have to move 8 tiles from the entrance to the 3rd lamp on the other side, you have to keep your cursor on that 3rd lamp and then click and count 8 times with your mouse. After the 8th sound you are on the 8th tile. If you manage to go through the exit in this way, the FOG disappears and the tile path will then remain visible from then on. Follow the path further down and you will meet Dari and she will take you with her shuttle to Lyra. If you make a mistake on the FOG PLATFORM you will fall through the FOG and then the tile path will reset itself and will be completely different. Then load your Save Game and try again. Good luck with it ..... you will need all the luck you get because this is Fog Maze is almost impossible to solve |
Lyra:
You see a snow-covered landscape with a neglected spaceship. In the companion ship, go to the other side and enter the hallway. Go forward, turn right, forward and left to the next corridor. Enter the room with plants. Dari and Carluen arrive to talk to Sen. Carluen introduces Sen to Matsheck, a companion. When Carluen leaves, you also leave the room. Take the hallway to the left and you will see a closed door with a complicated puzzle.
|
Puzzle 10: Lyra: The Door with the 30 Electric Circuits puzzle The solution to this puzzle that I am giving you here will only work if you have not yet "clicked" any of the circuits yourself. The panel contains 30 circuits that you can rotate. Number these circuits, from top left to bottom right, as 1 to 30. If you "click" on a circuit, you will rotate this circuit, but also the circuits that are FOLLOWED. The intention is to make a continuous flow from left (A) to right (B).
There are several ways to solve this puzzle. One way that worked for me is the following:
The door opens. |
Enter the room and look around. Go up the stairs to the central platform. Sen sees a drawing on the floor that is the same as Arko's old-fashioned door. Look around at the different machines until Carluen comes in and greets you. He will leave later. Return to the room with the plants and the companion. There should be a Cut scene and Carluen may come in. If you don't see a Cut scene, examine both corridors and the closed room a little before the last Cut scene starts. Carluen talks about the history of the planet and the Ansalas who imprisoned Sen and Chenay. Dari calls Sen back to the shuttle and they fly back to the air gate.
Transai air port:
Sen ponders what he will say to the Oracle, who he says is an ally of the companions. Exit the airship and press the second top left button.
Puzzle 11: Transai Air gate: Back through the gondola canyon
After the hassle in Lyra, Dari dropped you back on the platform of the Transai air gate. Turn around to find the ascending path and go back up this path to the Fog platform. The tile path is now simply visible and the fog has disappeared. So just follow the path back to the other side and go through the Round Gate. After loading you are therefore on platform no 2. The gondola is still hanging here.
Go back into the gondola console with "Use" and ENTER, then press button 6 with ENTER to return to the platform where the council chamber with the Oracle is on.
Touchstone:
Enter the council chambers through the gate and talk to the Oracle. Sen believes there is an Oracle in the Ansala area that is hiding and is helping the Ansala. The councilors arrive and advise Jannno-Sen to wait a while before he can start exploring. Exit through the door and try to enter the gate with the force field. The sentry gate does not let Jano pass through. Turn around and talk to Thierry, the floating Companion. He recommends that you try again through the gate.
Ansala domain
Once through the gate, go to the neutral zone and across the Ansala flower bridge. You can see that the Sentinels Totem is inactive. Go forward to the flower bridge.
Flower Bridge:
You can see the petals wither away. Turn left to the rock side. You see the control standard for the flower bridge.
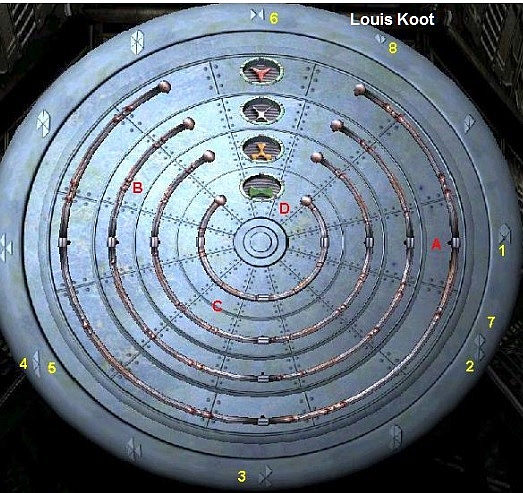
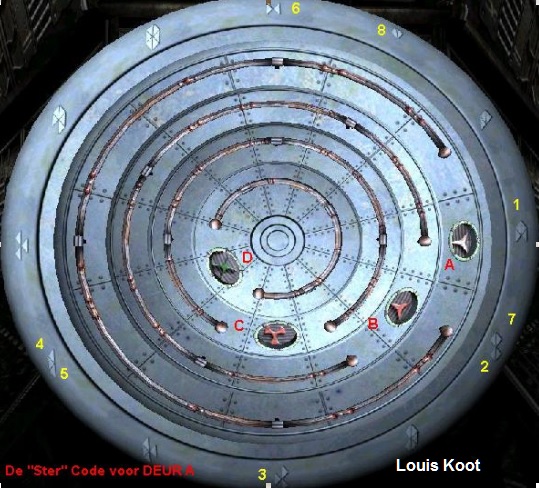
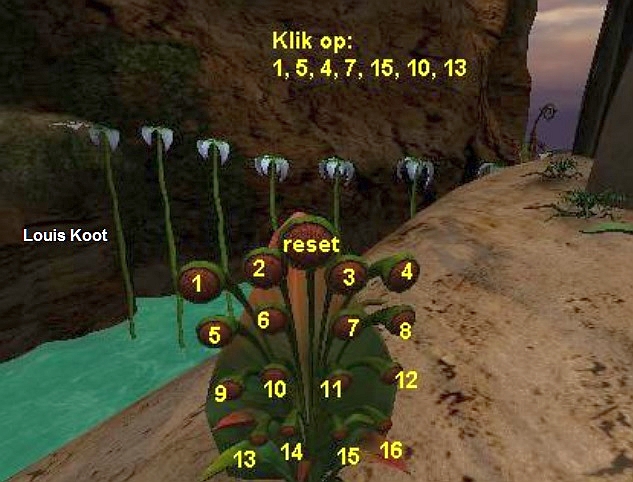
Puzzle 12: Neutral Zone: The Flower Bridge
The Flower Bridge consists of 9 long "palm trees". Only the first and the rear "Palm" have their leaves stretched out. The leaves of the other 7 "Palms" hang down desolately. You must now ensure that all 9 "Palms" extend their leaves. Go to "Console" with "Use" and ENTER. The console has 17 buttons. 6 left and 6 right, and a large button in the middle that protrudes above all other buttons. Number the buttons, from top left to bottom right, as 1 to 16, but don't number that big button in the middle. That is the RESET button with which you can reset the puzzle.
Now just go click on each of the 16 buttons and see what happens next. Write down what each button does. However, some buttons do nothing. Make a note of these buttons that do nothing, then ignore them further. So you have to figure out which of the 16 buttons you can use to extend the leaves of the "palms" and then reset the puzzle and then press those buttons in a certain order to move the Palms from left to right. leaves to stretch. This puzzle is not too difficult. I am not sure if this puzzle is always different, but the buttons I had to use were the buttons 1, 4, 5, 7, 10, 13, 15 and I had to press these buttons in the following order: 1, 5 , 4, 7, 15, 10, 13.
Brada Coe:
Cross the flower bridge and go through the cave. The entrance is now gone. Turn left and meet Saku and 2 children. The child wants Triga to make amblates. So Amblates turn out to be Spirits. After this cut scene, turn far left on the main road. At the end, close to a glowing plant tree on the right, turn around and you will see a path going up. Take the top path and meet Rebus, Losan and Loreann. They excuse Triga from the meeting and have a place for him to rest. After a Cut scene, turn right and head back to the Great Pavilion.
Puzzle 13: Brada Coe: The transport cocoon puzzle:
You are in Brada Coe and you have just met Rebus, Losan and Loreann in the "Pavilion". Brada Coe is a larger area consisting of 3 levels. There is the Lower Level, the Middle Level and the Upper Level. You arrived here at the Middle Level after crossing the Flower Bridge. All these 3 levels can be reached via paths. The "Pavilion" is on the Upper Level.
The idea is to find the Transport cocoon and open this cocoon so that you can reach the shuttles of the Brada Coe people. To do this you need to find some things here in Brada Co first. These things are the Transport Cocoon, a Plant Console with which you have to solve the puzzle, a Plant with a number of Symbols, 4 Symbols, 4 Colors and 4 Sounds. You will need to combine the Symbols with the Colors and with the Sounds.
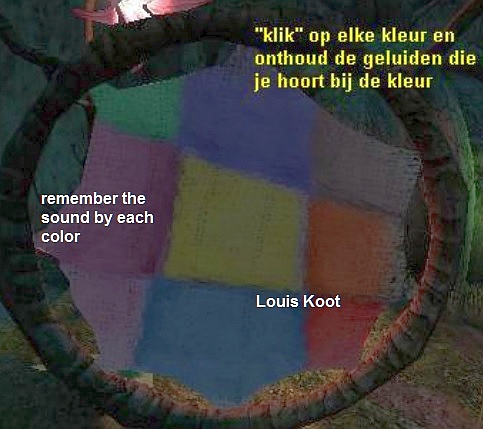
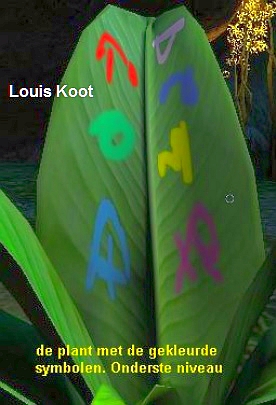
First let's find everything. After meeting Rebus, Losan and Loreann in the "Pavilion" you are still on the Upper Level, but no longer in the "Pavilion". This "Pavilion" is actually the large round Central Square of the Upper Level. Enter that Square again. On the left side of this square you will find a round Animal Skin stretched between two trees. This animal skin is divided into 9 color segments. Zoom in completely on this animal skin via "use" and Enter. You can now click with each Arrow and ENTER on each of the 9 colors. You will always hear a sound. You will soon have to recognize the sound of 4 of these colors. So "play" with this skin a bit. We'll be back here soon.
When you have had enough of the sounds, make sure you leave this screen and turn around. You see a path going up. So this path is directly opposite that animal skin. Go up this ascending path. It is a dead end but about halfway there is a Sign with Symbols on the left side of this path. Look at the symbols on this board. You will see the same symbol 9 times. Copy this symbol. You will need it later in a next puzzle.
Once you have copied this symbol, you go back down to the pavilion square and then go down to the Middle Level via the left path, the long descending path. Almost at the bottom of this path, which connect the Upper Level with the Middle Level, there is another Sign with Symbols along this path. You will see the same symbol 16 times on this sign. Draw the symbol again. You will need it later in a puzzle. Then go down the last bit and you are on the Middle Level. Now follow the path to the left here. The path ends at the rock wall. On the rock wall you see a Symbol. It looks like a Shell.

Then turn around and follow the path of this Middle Level straight on. Ignore the turns to the right that you first encounter from the "shell". The path then goes between two rocks and past these two rocks the path splits again. Here follow the path to the right. The path then turns sharply to the left (a short path on the right goes to a platform) and down to the Lower Level. Follow this path down.
The descending path continues through a short tunnel and then, almost coming down, you see o a Sign with Symbols again. This sign has the same symbol 15 times. So draw this symbol again. You will need it later in a puzzle. Then go down the last part of the path and you are at the Lower Level. Follow the path to the left here. The path ends in a hut. Just before this hut there is, on the right side of the path, a large green Plant. Take a closer look at this plant. You will see 6 symbols, each of which has a different color.
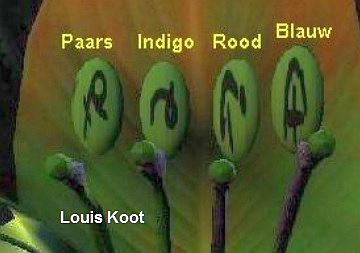
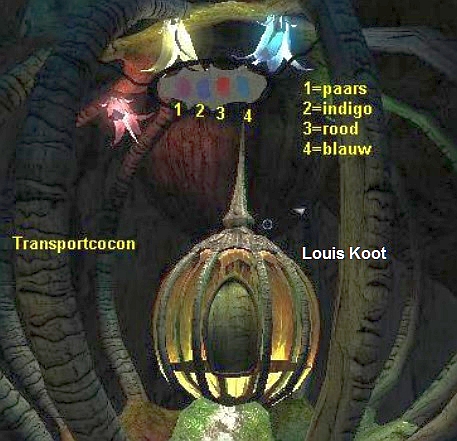
Then go back up through the tunnel path to the Middle Level. When you have come through the tunnel and come back at the top of this path, follow the path further to the right, then immediately to the left and forward and then take the first left. You are now in front of an Illuminated Gate and behind this gate you see the Transport Cocoon. Walk all the way through, under the gate, until you stand against the door of the cocoon. The cocoon is closed. Sen says to go to the Ansala Shuttle. Walk back until you can see the entire cocoon again and also the gate. Above the Gate you see 4 colors. Make a note of these 4 colors in the correct left / right order. They are the colors: Purple, Indigo, Red and Blue.
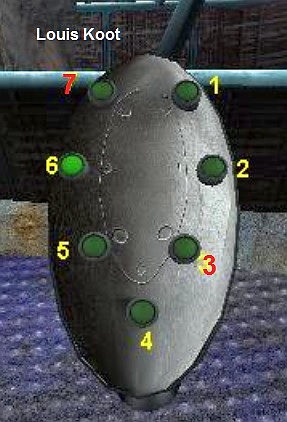
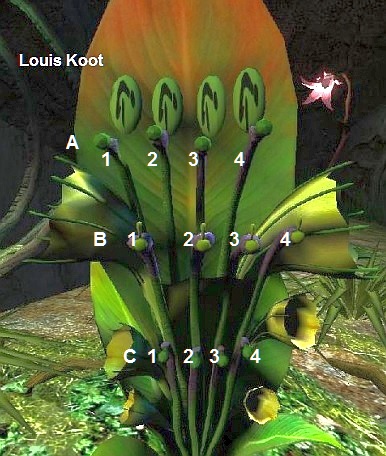
Go a little further back. On the right side of the path, leading to the Cocoon, is a large green Plant. Take a closer look at this plant via "Use" and Enter. With this Plant you will soon open the door of that Cocoon. Do nothing now, so don't click on anything. Just look at the plant. The plant has 4 stems and there are 3 buds on each stem. Each stem has an Upper Bud, a Middle Bud and a Lower Bud. On the LEAF of the plant you see 4 "circles" with on each "circle" a Symbol. In each of the 4 "circles" you now see the same symbol. Do nothing now.
|
You have now found all relevant information to solve the Cocoon puzzle. You have found the Symbols, the Colors and the Sounds. You now only need to combine these 3 things. Above the Gate of the Transport cocoon you have seen the 4 colors, Purple, Indigo, Red, Blue. These 4 colors are therefore the colors that matter. First go back to the Upper Level and to that Animal Skin which is stretched between the two trees on the square. Look closely at the skin again and listen to the sounds that the colors Purple, Indigo, Red and Blue make when you "click" on these colors. Remember these 4 sounds the sounds
Now go back to the Lower Level and to the plant that contains those 6 colored symbols. Then draw the Purple, Indigo, Red and Blue symbols.
Return to the Transport cocoon and return to the screen of the plant. Name the Top Buttons A and then from left to right 1, 2, 3, 4. Name the Middle Buttons B and then from left to right 1, 2, 3, 4. Name the Bottom Buttons C and from left to right 1, 2, 3, 4.
You must now set the correct symbol in the "circles" of the leave in the order, from left to right, Purple, Indigo, Red and Blue and after that you must set the correct sound for each of the 4 symbols. The Symbols are set with the buttons A and the sounds are set with the buttons B. with the buttons C you can then play the sounds. Step 1: So take your drawings of the symbols and set the correct symbols with the buttons A on the 4 circles of the sheet. It must be like this
Step 2: Now you have to set the correct sound for each symbol with the 4 B buttons and then press the C button to let the sound be heard. You do this as follows:
If you do this correctly, you will automatically leave the puzzle screen. Then turn to the left and see ...... the Transport cocoon is now open. Enter the Transport Cocoon and you will end up Underwater at the Ansala Soapear. |
Ansala Sea Gate:
Puzzle 14: Ansala Sea Gate: Raise the cocoon
After opening the Transport cocoon in Puzzle 13 and entering it, the cocoon has brought you underwater into the "Ansala Sea Gate". This is a large "transparent" Bubble". After the movie, the cocoon opens. So go forward out of the cocoon and then turn left. You will see a "Green Pod ", standing against the transparent wall of the" Bubble ". Go to this Pod and then go with "use" and Enter in its close-up.
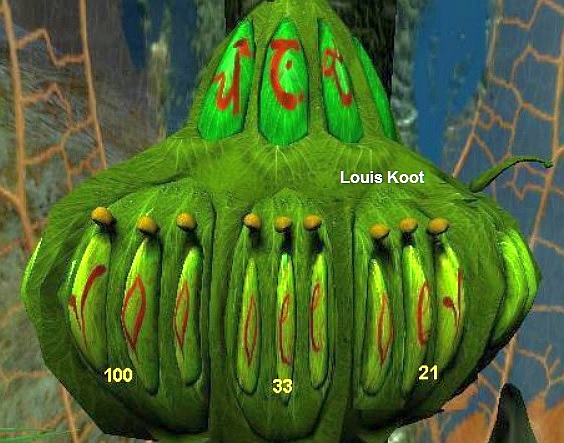
At the top of the "point" of the Pod you will see 3 red symbols. You have seen these 3 symbols before on the paths of Brada Coe. The left symbol was seen 16 times on the sign at the bottom of the path connecting the Middle Level to the Upper Level of Brada Coe. You have seen the Middle Symbol 15 times on the sign of the path connecting the Middle Level with the Lower Level (the tunnel path). The right symbol was seen 9 times on the sign of the path on the Upper Level.
Below the 3 symbols you see 9 buttons and 9 locks. So under each of the 3 symbols is a screen with 3 buttons and 3 locks. In each of the 9 locks you now see the Number symbol for the number 0. You can click on each of the 9 buttons and if you do that then you find out that you can get 4 different symbols in each of the 9 slots. These are the numeral symbols of the Ansala "4-digit numerical system". Now number the 9 buttons, from left to right, as 1 to 9.

What you need to do is to enter the correct number for that symbol in the 3 screens below the 3 symbols. So what you have to do is to convert the numbers 16, 15 and 9 to their corresponding number in the 4-digit numerical system of the Ansala and then enter these numbers in the 3 screens using the buttons.
|
First I will give you an explanation of our 10-Digit Numerical System versus the 4-Digit Numerical System The 10-Digit Numerical system versus the 4-Digit Numerical System This Explanation has been done by my spouse: Marietje Spijker 10-Digit system In our 10-digit system we have 10 digits, namely 0, 1, 2, 3, 4, 5, 6, 7, 8 and 9. With these digits we can make what ever number we want
The 4-digit system This is done in the same way in the 4-member system.
Perhaps this is not a good mathematical explanation, but hopefully an understandable one. |
|
4-digit system |
0 |
1 |
2 |
3 |
10 |
11 |
12 |
13 |
20 |
21 |
22 |
23 |
30 |
31 |
32 |
33 |
100 |
101 |
102 |
103 |
110 |
|
10-digit system |
0 |
1 |
2 |
3 |
4 |
5 |
6 |
7 |
8 |
9 |
10 |
11 |
12 |
13 |
14 |
15 |
16 |
17 |
18 |
19 |
20 |
|
So now the implementation of this theory: For our number 16 you have to make the 4-digit number 100. For our number 15 you have to make the 4-digit number 33. For our number 9 you have to make the 4-digit number 21. You do this as follows:
You will now automatically exit this puzzle. A Cut scene shows Loreann and Barrack coming down on the cocoon. Loreann invites Sen to take them to the wrecks of the Gelleas. |
The wreck of Gelleas:
Puzzle 15: The Wreck of the Gelleas: The Pillar Floor puzzle
The transport cocoon has brought you deeper underwater in a large round space. After Loreann and Barrack have left, you can walk around this room via the iron walkway. There are 5 corridors behind the cocoon. 4 of the corridors are dead ends but the middle corridor takes you to the 2nd room. The floor of this 2nd room consists of hexagonal pillars. Some pillars are higher than other pillars.
On the other side of this 2nd room is the exit you have to go through. Unfortunately you cannot reach that exit because the pillars block your way. If you turn left, from the cocoon, then number the 5 corridors as 1, 2, 3, 4, 5. The corridors 1 and 5 are long corridors and at the end of these corridors you have a complete view through the Pillar floor room. The picture below gives you an overview of the pillar floor from corridor 1.
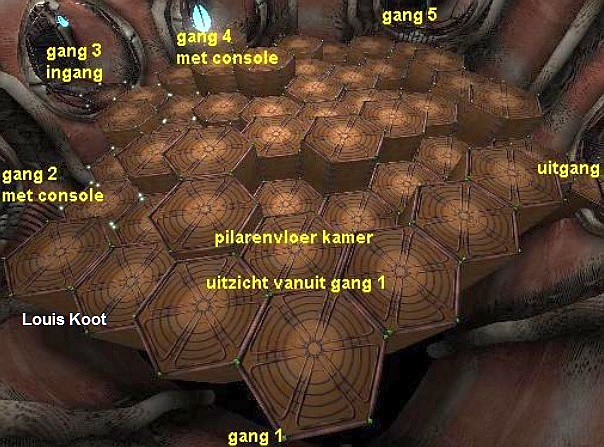
Corridors 2 and 4 are shorter and also give you a view over the pillars floor. But at the end of corridors 2 and 4 there is also a console with 6 buttons. Corridor 3 is the entrance to the Pillar Floor room. What needs to be done now? With the console in corridor 2 or with the console in corridor 4, you have to make sure that you raise and lower pillars so that you then have a free path over then which you then can walk through the column floor room to the exit. You only need to use 1 of the 2 consoles for this.
Go to the console in corridor 2 or hall 3 and go via "Use" and "Enter" in the console screen. The console has 6 buttons, 3 on the left and 3 on the right and a thick button in the middle. Number the 6 buttons, from left to right, as 1, 2, 3, 4, 5, 6. The thick button in the middle is the RESET button with which you can return the pillars to the original position if you go wrong. With the 6 buttons you can raise or lower pillars.
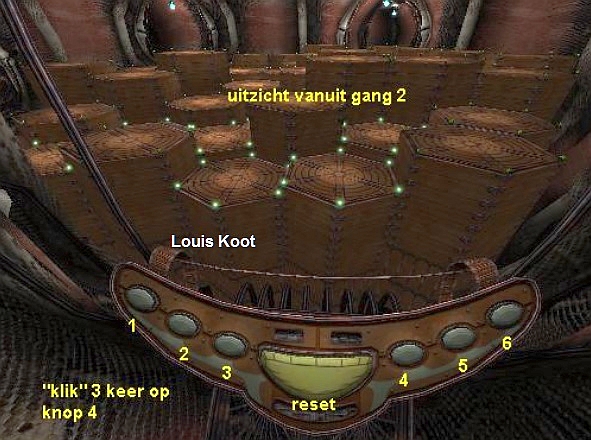
My solution was: Click once on button 1, click once on button 2, click once on button 3, click 3 times on button 4.
I don't know if this puzzle is always different, but I really only had to click 3 times on button 4. Again, you only have to do this on one of the consoles. You know you did a good job because you automatically get out of the console and you no longer get "USE" on the console. So now there is a good path in the pillar floor room that you can now follow.
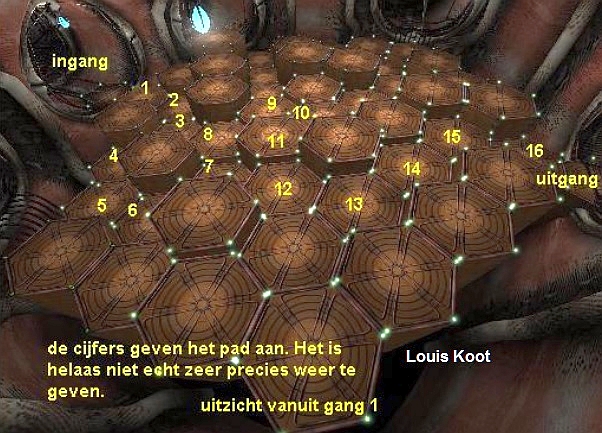
So go through corridor 3 into the pillared floor room and follow the now created path through the room to the exit on the other side and enter that tunnel. Follow the tunnel to the next room. You enter an end room. Continue until you see "USE" on your screen. Then press ENTER. So there is a Companion hanging here and Sen starts a conversation with the Companion whose name is Mistertuoa. Two ghosts will appear and they will stop Mistertuoa from talking to Sen. Loreann arrives and tells you that Triga is needed upstairs. A video now follows, after which Sen is locked up in a Cell.
Brada Coe:
The real Triga has returned and Sen is charged with being a traitor. He will be scanned and then later sent to a retaliation room to be prosecuted for the good of the tribe.
Cell:
Sen discovers that he is invisible because of his camouflage. Saku and the guard could not see him and thought he had escaped. Loreann announces that the main lock has been opened to save energy, but the internal synchronization lock has been left behind. Loreann gives Sen 2 rhymes to help him escape. Note that Loreann named Sen as Sen and not as Triga.
Puzzle 16: Brada Coe: Cell: The Ropes puzzle
Sen is locked up in a Cell. It is a round room. Walk through the cell a little and find the "ramp" that goes to the door of the cell. Go up this "ramp" to the door of the cell. You can hear Saku and a guard talking to each other outside the cell. Sen appears to be invisible and the security guard seems to think Sen has escaped. After a few moments you will hear Loreann. She speaks to Sen and says that the main lock has been opened but the internal synchronization lock is still closed. In order to escape from the cell, Sen must also open that internal synchronization lock. To this end, Loreann gives Sen up two riddles that can help him with this.
Synchronization security riddle: A museum is the place to be Where doors can hear and walls can see. If all your gates are closed together The path is clear and sure forever
Transportation riddle: The time you take must be in mind. For lofty journeys that you find Some waiting, counting must be done For lofty ways to work as one.
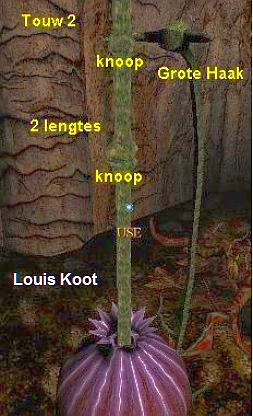
In the cell you will find 3 purple "flower bulbs". From each of the 3 purple "flower bulbs" a rope emerges and then goes up through the roof. Each rope is divided into different segments via KNOTS in the rope and in each rope there are 2 colored CLAMPS. These Clamps you can not see. Behind each of the 3 ropes is a large curved hook. First go find these 3 Purple "Flower Bulbs" with the ropes. I just call them Rope 1, Rope 2 and Rope 3. Rope 1 can be found to the left of the cell door if you look at the cell door.
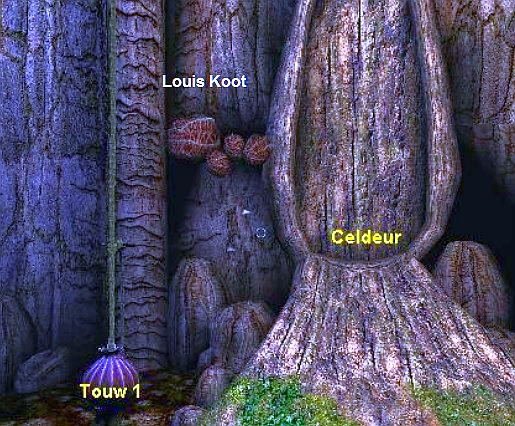
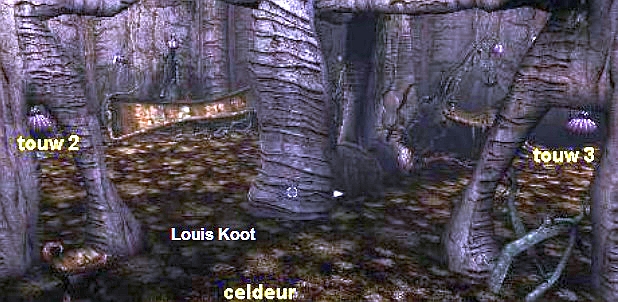
To find Rope 2 and 3 go to the Cell Door and then turn around. You then look back into the cell and then have the cell door in your back. You see two passages. A Left passage and a Right passage. Rope 2 is behind the left passage in the corner and Rope 3 is behind the right passage in the corner
Before you start doing anything with those ropes, you should first SAVE THE GAME. If things go wrong you can always start again from the starting position via this SAVE. What has to happen. Well, you have to make sure that you get all 3 ropes attached to that big hook behind the ropes. There are 2 colored clamps in the ropes and you have to make sure that you pull each rope down until the rope is attached to the big hook with the clamps. Unfortunately, you cannot just randomly pull those 3 ropes because they influence each other. When you pull a rope you pull the rope a little down. You must then pay attention to the KNOTS that are in the ropes.
So you have to figure out how many knots you have to pull down each rope so that all 3 ropes are attached to the hooks with their clips. We are going to do this step by step: Step 1: Go to Rope 2 and pull it down 1 knot. There are then 2 knots between the "Purple Flower Bulb" and the big hook.
Step 2: Now go to Rope 3 and pull it down 2 times. There should be 4 knots between the "Purple Flower Bulb" and the big hook. Step 3: Go to Rope 1 and now pull it down 8 times. Rope 1 will then be attached to the large hook with the clamps.
Step 4: Go back to Rope 2 and pull it down 5 more times. Rope 2 gets stuck on the hook and also Rope 3 and you now get the movie and then the Loading. After this you are out of the Cell and at the Lower Level of Brada Coe. Follow the path to the left to the Cable Car. Go on the left side of the funicular platform and go up there and go in the funicular and it will take you to the Heroes Gallery and the Path Maze. |
Chapter 3:
Heroes gallery:
You will see several paths that run to the center around the perimeter of the park.
the Paths Puzzle:
The aim of the puzzle is to go across all paths once and not be blocked by a force field or to retreat.
When necessary, a force field can be turned off by button switches on the window of the force field.
Puzzle 17: Heroes Gallery: The Wooden Bridge Paths Maze
There are 6 platforms, all connected by wooden walkways. They are bridges because you are above the water here. If you consider this path area as a circle, the center of the circle is a very large Green "Pumpkin". That "Pumpkin" is the actual Heroes Gallery. The paths actually run in a number of circles around this large "Pumpkin". So there is an Outer Circle of paths and there are 2 inner circles. All these "circles" are connected via the platforms.
There are gates on the paths. If you go through such a gate, a Force Field will enter the gate. The intention is that you follow the paths via a certain route so that you can close all gates, except one. You have to do that in a certain order by following the correct route on the paths. If you do this correctly, you will then see a video in which you will see the next gondola with which you can then go to the Oracle Platform.
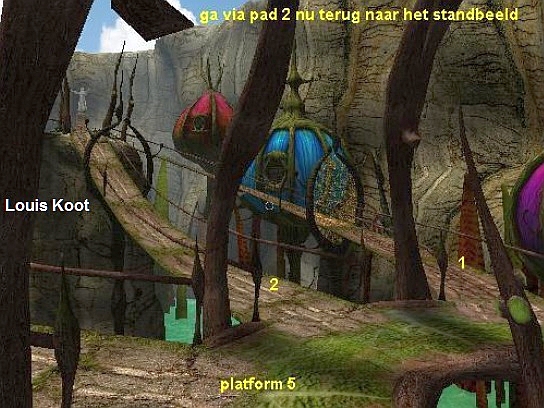
The funicular has brought you to the 1st platform of the Wooden Bridge Path maze. The cable car cage is behind you. Stand still. Straight ahead, the path leads to a rocky peak with a statue. Do NOT go there now. The rock on which the statue stands is Platform 6 and you will have to go there a few times, but not via the path that's now in front of you. Walk a little ahead of the path and then turn around.
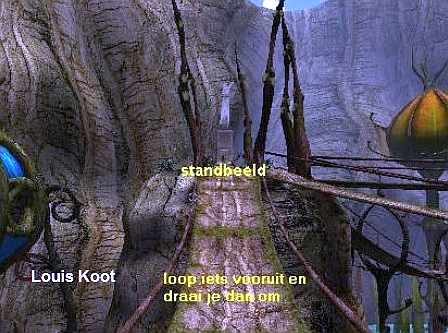
You look back at Platform 1 where the Cable Car Cage is located. To the left of the cage, the path goes to platform 2. That is your starting point.
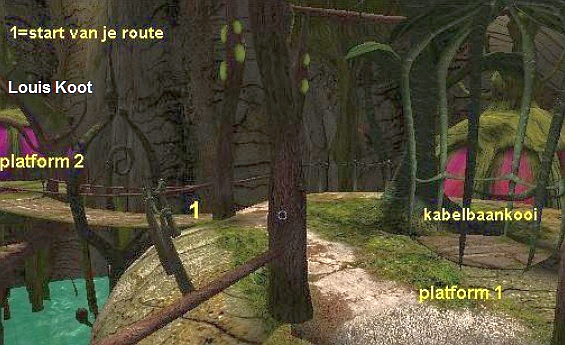
So follow path 1 to Platform 2. The gate in path 1 is closed with a force field. From platform 2 there are 4 other paths. You came from path 5.
Follow Path 1 to Platform 3. Also from Platform 3 there are different paths. Follow Path 1 to Platform 4

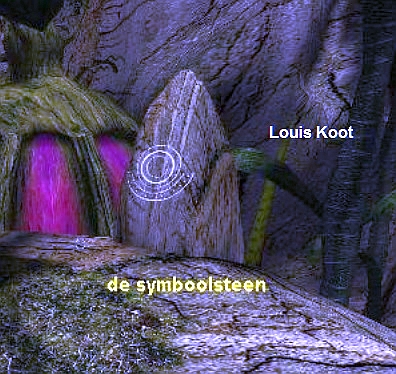
You arrive on platform 4 and here Sen sees a large stone with a symbol on it. Walk to this stone. Movie.
After the movie you go to the left. You will then see the path that goes to Platform 5 and then on to Platform 6, the Statue platform
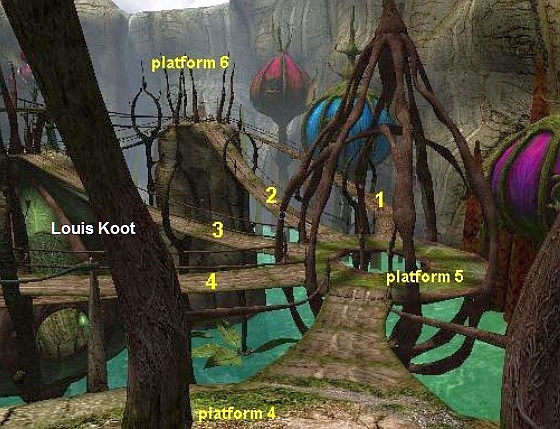
So follow the path to platform 5 and then continue via path 1 to the Statue on platform 6. You have made a round on the outer paths of the Circle. All the gates you passed through now contain a yellowish Force Field. On platform 6, stand to the left of the statue so that in the distance you can see the path that goes to Platform 1, which is where the cable car is.
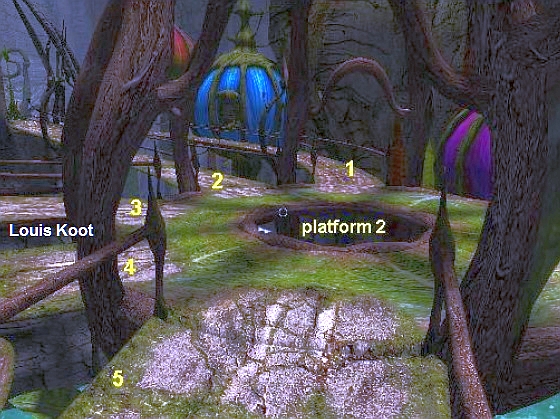
To the left of that path you can see the path that goes from the statue to platform 2. Call this Path 1. Turn left and you will see Path 2 going up to the top of the "Pumpkin". Then turn further left and you will see path 3 going back to Platform 5 and further left again than the outer path you have just passed. Turn back to the right en now go back to Platform 2 via Path 1
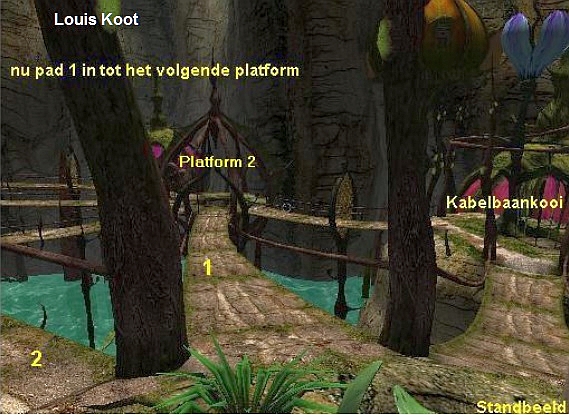
Back on Platform 2. You had previously gone via Path 1 (the outer path) to Platform 3. Now you go via Platform 2 to Platform 3.
Coming back to Platform 3 you cannot go to Platform 4 because the gate to it is now closed by a force field. So now go via Path 2 to Platform 5.
Back on Platform 5, take Path 2 back to Platform 6 with the Statue.
On platform 6 you walk back to the statue and turn left again. You came from platform 5 via path 1.
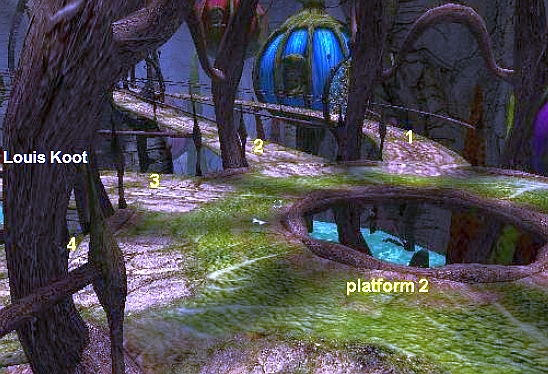
Now take Path 2 up to the point of the Green "Pumpkin", which is point 3 in the image below.
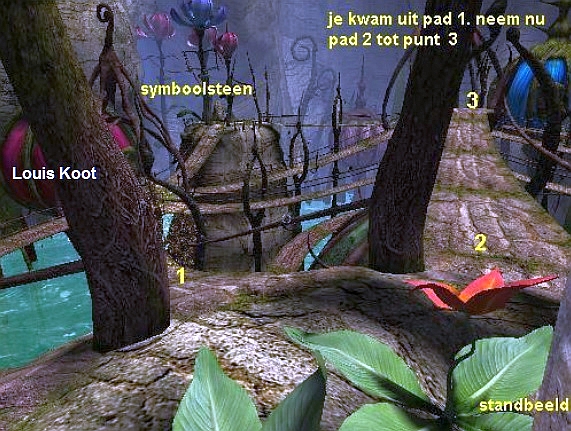
When you have reached Point 3, turn clockwise so that from Point 3 you look at Platform 2. Right below you is the path connecting Platform 2 to Platform 5. This path continues underneath you. From that path, another path goes left and down. Now just walk over the edge here and you "fall" down and end up on that path.
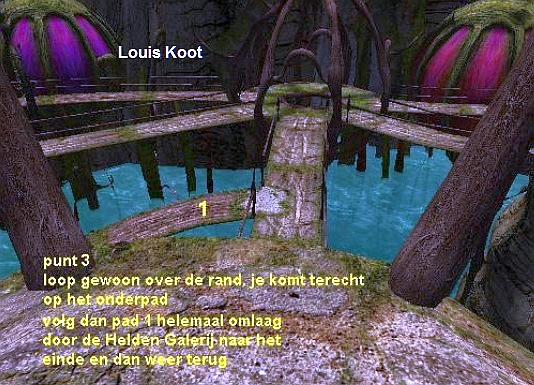
Continue to Path 1 and follow it all the way to the end. This path goes down through a number of bends and goes through the large Green "Pumpkin" twice. Inside this "Pumpkin" you see a number of God images. So this is the Heroes Gallery. Continue all the way to the end of this path. Then turn around and follow the path back up until you are back up and on the path that connects Platform 2 to Platform 5.
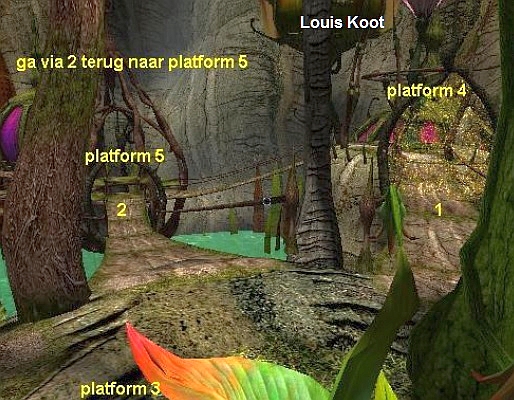
So follow this path to the right, to Platform 5. When you return to Platform 5 you will see in a MOVIE a Gondola of a cableway that slides and this gondola goes to Platform 4. After this movie, turn to the right and go to Platform 4 via the outer path. Walk to the Symbol stone and then turn right. You will see the Gondola.
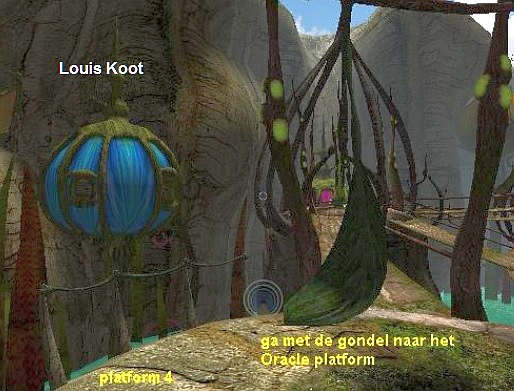
Go to and in the gondola and after the Loading the Gondola has dropped you off on the Oracle Platform.
Oracle platform:
Go up the stairs to the platform. An Amblate (there is the unknown word again), Janoosh arrives. He advises visiting the water garden to make the main journey and gives a seashell. You can look around and go down the stairs to take a look at the ocean. Climb up again and exit the side of the wall to the gondola. You will return to the Heroes Gallery. Take the other gondola at the junction close to the statue. It will take you back to the bottom level at Brada Coe.
Brada Coe:
Climb the right slope of the bottom level. Go to the sea shell on the wall at the end of the middle level path of the village.
The sea shell in the inventory rises when you look at the seashell on the wall. Use the sea shell and.....
....... then you enter the tunnel to go to
Puzzle 18, the Windmill Bridge.
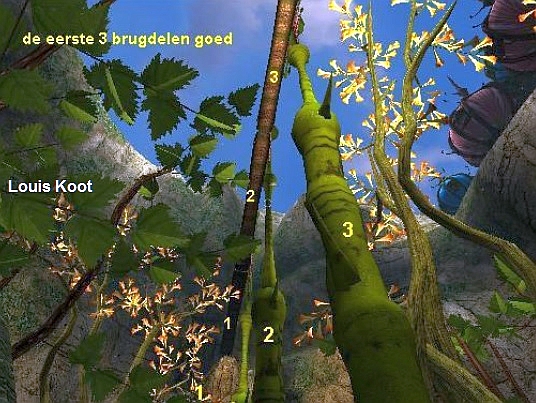
You see all 5 segments of a bridge that all rotate separately. Take the right path to get to the base of the bridge pillar-tree stump.
You are in a long and deep gorge and you have to go across. Fortunately, there is a bridge. The annoying thing is that you cannot cross this bridge now because the 5 parts of the bridge are rotating. So there are 5 bridge pillars and a bridge section rotates on each pillar. The 5 bridge pillars are directly behind each other. The bridge sections on the pillars rotate and they all do this at the same speed. Only they do not rotate synchronously. In other words ...... The bridge sections do not rotate in the same way. You must ensure that each of the 5 bridge sections starts to rotate in exactly the same way so that when you stop them turning, each bridge section will get stuck together and you can then cross the bridge to the other side of the gorge. For this you must first go down to the bottom of the gorge.
So turn to the right and follow the gray rock path down and then further to the end. The gray rock path turns into a wooden path. You are now at the bottom of the gorge but on the other side. Walk forward to the bridge pillar. This is the rear bridge pillar and is therefore bridge pillar 5. On the right side of the pillar there is a thick bump and a curved purple Thorn protrudes from this bump. The Thorn is now up. You can move the Thorn down and up again with "USE" and then ENTER. Look up. You can see the bridge section rotating on top of the pillar. While you are now looking up, you are also looking to the left.
You can also see the other bridge parts turning and now you can see that they all rotate differently. Look down again and now lower the Thorn of Pillar 5. Then look up again. The bridge section on Pillar 5 now rotates more slowly than the other bridge sections. With the Thorns on pillar 2, 3, 4 and 5 you ensure that the bridge parts on these pillars rotate slower when you lower the thorns. If you put the thorns of these pillars up again, the bridge parts will rotate faster. Now raise the Thorn of pillar 5 again.
Then follow the wooden path further back and you are at Bridge Pillar 1. The thorn of this pillar is on the left and the thorn is DOWN. Now raise the Thorn of Pillar 1 UP and then look up at the rotating Bridge sections. You will see that now all bridge parts start to slow down and eventually all come to a stop and then all bridge parts are in a different position. Bridge section 1 is then correct. So with the Thorn of Pillar 1 you turn all 5 Bridge parts on or off.
|
This is going to be a bit difficult. You have to make sure that all bridge parts rotate in exactly the same way and speed as Bridge part 1, so that they all rotate SYNCHRONOUS with each other. If you then stop the whole thing with the Thorn of Pillar 1, all bridge parts will be stuck together. There are two ways to achieve this. You can first synchronize the bridge parts 2, 3, 4 and 5 to bridge part 1 and then stop the bridge parts, or you can do the bridge part by bridge part while you always make a save game if you have a part of the bridge right I chose this second option and I did it like this: Lower the Thorn of Pillar 1 so that all bridge sections turn again. Go to Pillar 2. Look up. Bridge parts 1 and 2 now rotate at the same speed but not synchronously. Lower the Thorn of Bridge pillar 2 and look up again. Bridge part 2 now rotates slower than bridge part 1. Keep a close look and if you see that the two bridge parts are almost synchronous with each other, quickly raise the thorn of pillar 2 again. Go back to pillar 1 and lower its Thorn. Look up. Slowly all bridge parts come to a stop and if you had put Bridge part 2 in good sync with Bridge part 1, bridge part 2 will now be attached to bridge part 1. If not, your bridge part 2 would not have been "set" properly and you will have to try again. If it is good, save it and then continue to get Bridge part 3 Synchronized and then stop everything using the thorn from pillar 1. Continue like this for bridge sections 4 and then 5.
I'm sorry, but I really don't know a better way to explain this to you. You just have to make sure that all bridge parts rotate exactly the same.
You can first try whether you can rotate all 5 bridge parts equally and only then stop the whole thing through the thorn on pillar 1.
I found it easier to do the bridge part by part. So first make bridge part 2 so that it connects to bridge part 1, then bridge part 3 with parts 1 and 2, then bridge part 4 with parts 1, 2, 3 and then bridge part 5 with parts 1, 2, 3, 4.
When you've done it, go across the bridge to the other side of the gorge and dive into the tunnel. After the Loading you will come to the: |
Water garden:
Go forward and you will see 4 heads, a harbor and a pond full of flowers. Go back and take the elevator up.
You can see that the flowers form a maze and there is a boat at the left head.
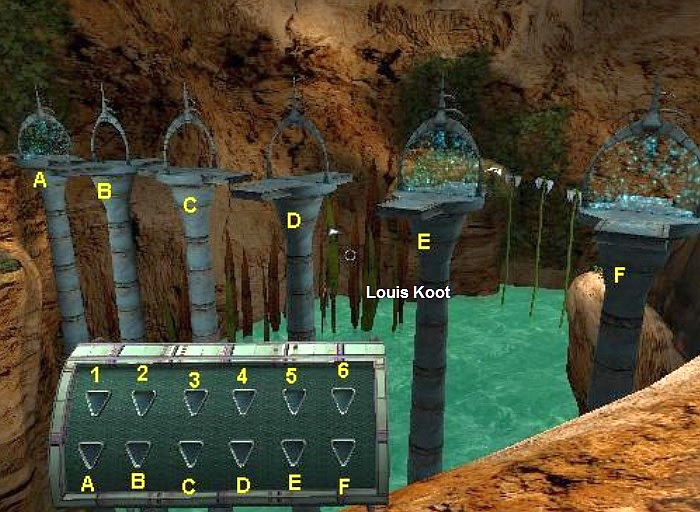
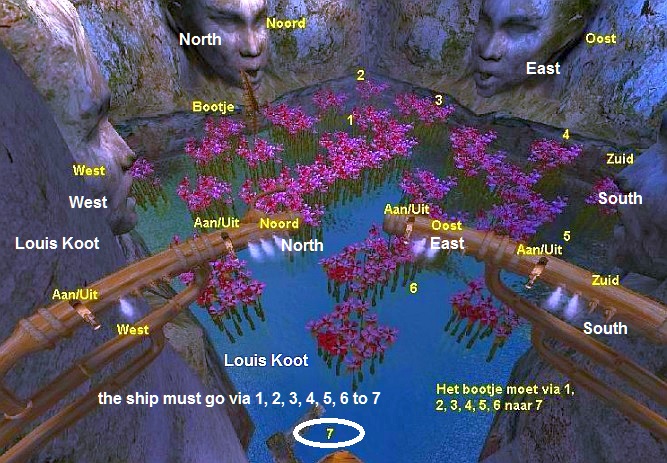
Puzzle 19: The Water Garden Maze Puzzle. The Winds Puzzle
You have reached the water garden via the Windmill bridge. Cross the path until you can go no further. You arrive at the harbor and you cannot go any further. Turn around and walk back and then go into the elevator. The elevator takes you up. Turn around in the elevator until you see the narrow iron path and you go over this path to the end.
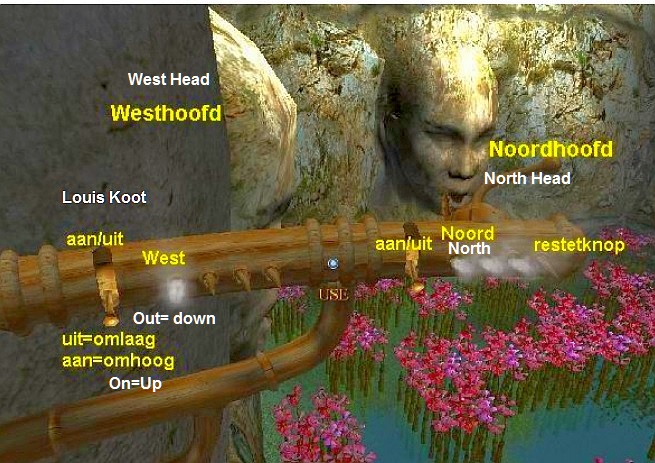
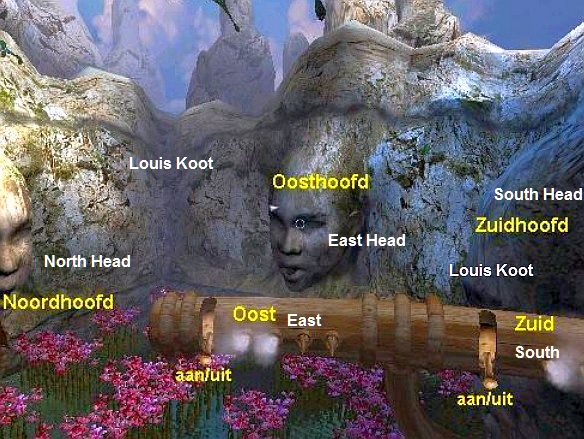
You are above a mountain lake. On 4 sides the lake is surrounded by rocks and a large head protrudes from each of the 4 rocks. You also face two bars. A Left Bar and a Right Bar. On each of these two Bars there are two Copper Handles and next to each Copper Handle you see "steam" coming out of small openings. The Water Garden floats in the water. It is a kind of maze where you have to move an Airship through to the harbor right below you by using the WIND that you can blow through the 4 Heads to the Airship. You can blow the wind with the 4 levers on the two Bars. I hope you know the 4 Wind Directions? North, East, South and West? Well, the head that the Air Ship is now floating under is North, The head to the right of that is East, then South and then West.
|
Now look at the Left Bar first.
The left lever on this rod is for the WEST HEAD, steam only comes out once. The right lever is for the NORTH HEAD and steam comes out 3 times. Then look at the Right Bar
On the right bar is the Front Lever for the East Head and steam comes out twice. The Rear Lever is for the South Head and here too steam comes out twice. All 4 levers are now down to indicate that all 4 heads are now off. By clicking on a lever you can move it up or down. Up is ON and Down is OFF. We will do this again in a number of steps.
STEP 1: Turn on WEST and turn on NORTH. The boat is now sailing to position 1. Go back down the elevator and follow the path to the end and board the airship. Movie. The airship will deliver you to Transai Airport. |
Chapter 4: Transai Domain
Transai Airport:
Leave the area and drive the airship.
Tour on Transai Domain:
Puzzle 20: Transai gap. The 3 Bars puzzle. Or how to open the elevator
The airship has brought Sen back from the water garden to the Transai Air Gate. Sen doesn't understand this at all. Go up again via the path and then across the path of the Fog Platform to the other side and then go out through the round tunnel. After Loading you are on platform 6 where the gondola is still hanging. Go into the gondola console and press button 1 on this console (top right)
The gondola now takes you through the Transai gorge to another platform. This platform is connected to a number of other platforms via various walkways. From the gondola, take the path up to the next platform. Then turn right and go down to the next platform and then further up to the next platform and then further down and up again. Then turn right.
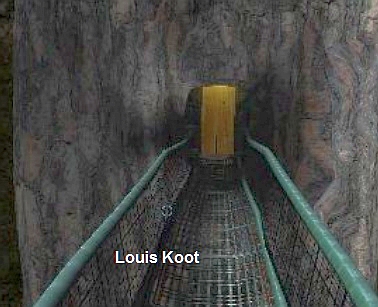
The path then goes to a large gray rock in which you see a doorway. Go there. However, the doorway in the rock is blocked by three thick iron bars. That doorway is the opening of a lift with which you have to go down through the rock. But that is not possible now because those three bars block the lift. So those 3 bars have to be taken out of the way.
|
This puzzle goes on TIME. A TIMER will start running. In the Transai Gorge there are 3 platforms on which a Big Shell stands.
By doing "Use" and ENTER on each of those three large Shells you remove the three iron bars from this lift. However, this must be done in the correct order and before the TIMER is fully rotated.
From the lift with the 3 bars, follow the route back to your gondola. Enter the console screen and press Button 5. The gondola takes you to the 1st Shell Platform. Run up to the shell and use "Use" and ENTER to remove the Top Bar. You can see this in a short video. The TIMER starts running. So turn around and quickly press Button 4 on the gondola console. The gondola takes you to the 2nd Shell. Turn off the Middle Bar and quickly press Button 7 on the Gondola Console. The gondola will deliver you to Shell 3. Quickly press the Shell to take out the Lower Bar. Once you have disabled all 3 bars, the TIMER stops. However, if you have been too slow, the bars that have already been switched off will return and you will have to start over. If you have disabled all 3 bars at the lift, go back to the platform via button 1 on the gondola console and follow the route over the bridges back to the lift.
|
Get in the lift and it will bring you down. Walk forward through the tunnel and then turn left. There is a Companion on the floor here. "Use" and Enter on this companion. His name is Sargash and he gives you two filters for the tower security system, listen to what he tells you about this. "One shows the right colors and the other shows them the other way around. Observe all the gates and go through the red half"
Go back up with the elevator and go back to your gondola and go back to the platform where the Council Chamber is with button 7. Enter through the large door here and after Loading you will be back in the Halcyon Forests. Follow the path down to the lamp and then all the way to the left and back. Go up the stairs and at the top of the stairs you will be at the door. This is the entrance to the tunnel that will take you to the Grand Tower. On the door is Puzzle 21.
Halcyon forests:
Tower door puzzle:
Go to the path to the left of the force field and you will see the closed door of the tower. The aim of the puzzle is to make a constant energy connection from left to right, starting from the top button. When you click on it, each button turns some buttons next to it. Make the adjustments per row. Click on the buttons as shown in the pictures. The door opens.
|
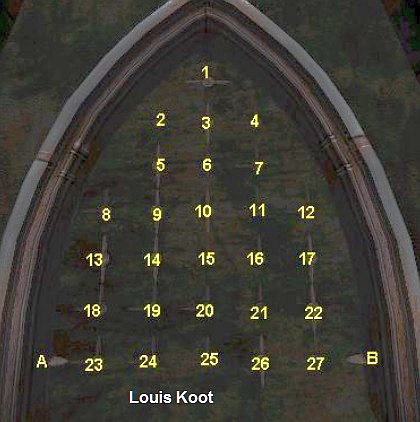
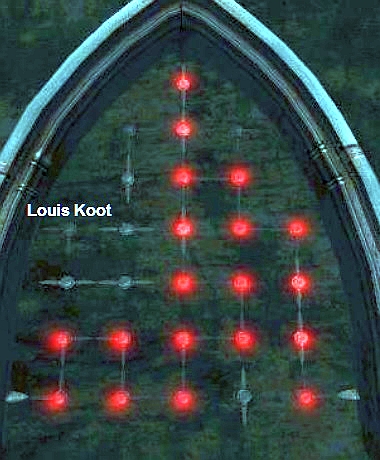
Puzzle 21: Halcyon Forests: Opening the Door to the Grand Tower This is basically the same puzzle as on the door in Lyra. There are now 27 rotary circuits that you have to turn in a certain way to get an uninterrupted current from A (bottom left) to B (bottom right). Number the circuits, from top to bottom right, as 1 to 27 Then solve this puzzle in the following way:
The door opens. Enter the tunnel. Loading |
Chapter 5: The Grand Tower:
Go forward and you will see a tower with a round slope at the top
SAVE YOUR GAME HERE
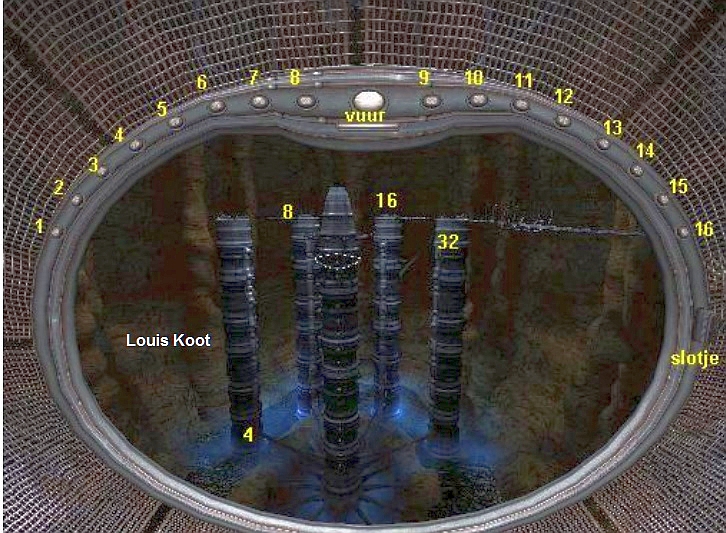
Puzzle 22: The Grand Tower: How to get to the 6th floor
Through puzzle 21 you went through the door and the tunnel. Right in front of you is the GRAND TOWER.
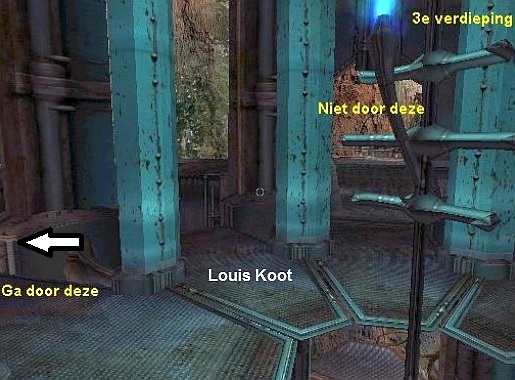
This Tower has 6 floors and the intention is that you end up at the top of the 6th floor and then do Puzzle 23 the Telescopes puzzle there. Of course you cannot just reach that 6th floor. It requires solving a puzzle. In the tower you can see on which floor you are by the number of bars that are in the middle of the platform. You start on the "Ground Floor" of the tower. There are multiple exits on each floor in the tower. It is important that you always go out through the Right exit and then immediately go back in. The platform in the tower is an elevator and it will automatically raise or lower you as soon as you stand on that platform.
|
It may be that this puzzle works slightly different for you. I'm not sure about this. For me it worked like this: Walk forward into the tower. The elevator then takes you up to the THIRD floor. You see this because there are 3 bars. Standing in front of these 3 bars, turn counter clockwise and go through the SECOND exit that you will see, out to the platform.
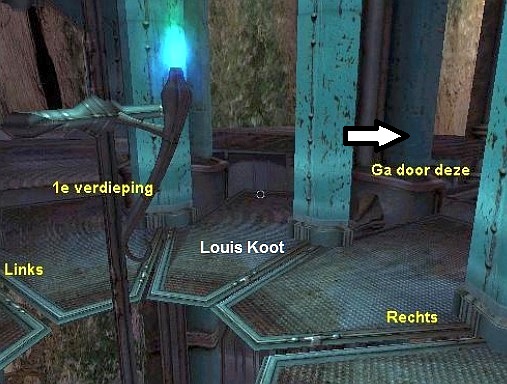
Immediately turn around and enter the tower again. The elevator now takes you down to the FIRST floor. Turn right and go out through the FIRST exit to the platform and then back into the tower.
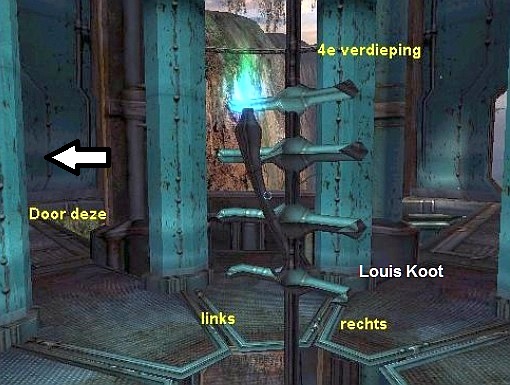
The Elevator now takes you to the FOURTH floor. Turn left and go out through the FIRST exit on the left side and then back into the tower.
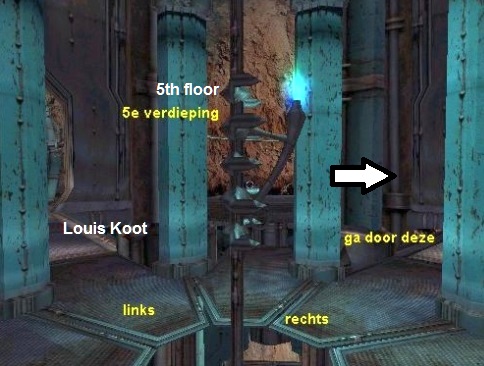
The elevator now takes you to the FIFTH floor. Turn right and go out through the FIRST exit on the right side and back in.
The elevator will now deliver you to the SIXTH floor. SAVE YOUR GAME AGAIN HERE |
Grand Tower 6th Floor
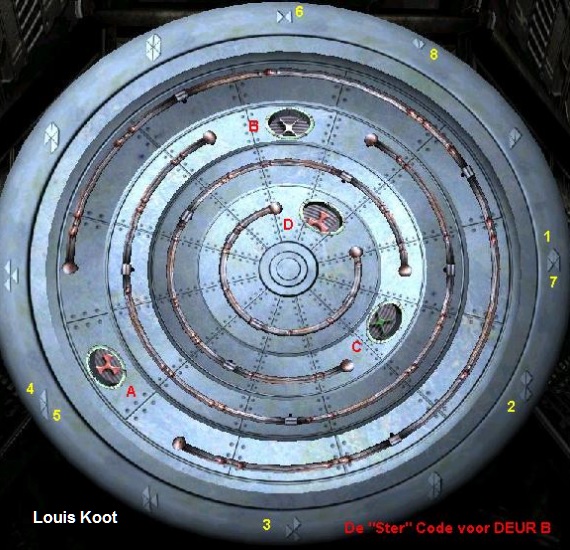
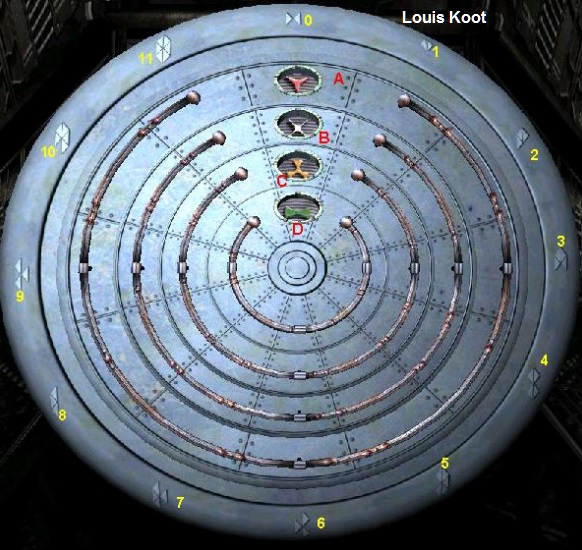
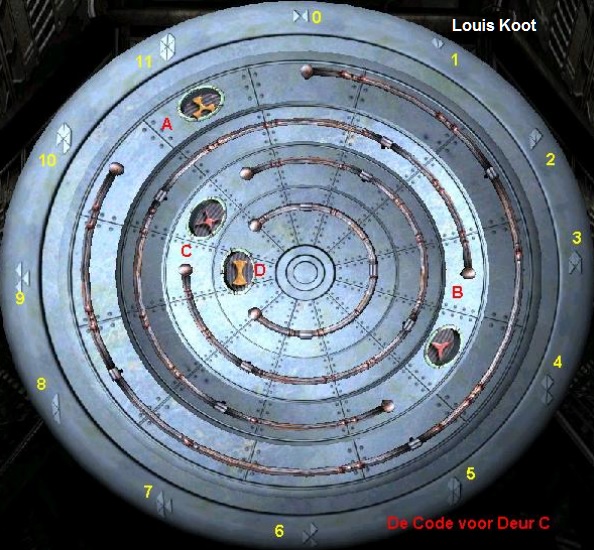
Puzzle 23: The Grand Tower: The Telescopes Puzzle:
explanation
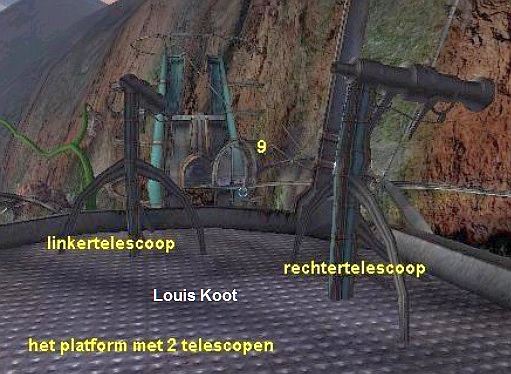
You have arrived on the 6th floor of the Grand Tower. So you are on top of the Grand Tower. Walk around and observe the things you see. There are 8 platforms around the 6th floor. Each of these 8 platforms has a telescope, but one of the platforms has 2 telescopes. So in total there are 9 Telescopes. If you stand on these platforms you will see a long iron walkway. This walkway goes all the way around the Grand Tower and ends in a short tunnel where the big round door leads to the next level. You can see the end of this walkway when you stand on the platform with 2 telescopes on it.
There are 9 gates on the walkway. Each gate has 2 halves and in each gate you see a transparent screen in both halves. Each of the 9 Telescopes is aimed at one of the 9 gates of the walkway. You can reach that walkway with the 9 gates via the 5th floor. You can then go all the way across the walkway, so through all 9 gates. You then enter that short tunnel through the large round door at the back. However, that door won't open, so you can't go any further. If you walk over the iron walkway you will notice that you can only go through the gates on one side. So you walk through the RIGHT side, so through the OUTSIDE of the gates. The LEFT SIDE, so the INSIDE, of the gates is closed. So you always walk through the OUTSIDE half through the gates.
NB: If you use the terms Right side and Left side for the gates, you should remember that you see the gates from the 8 platforms from the OTHER SIDE (Mirror Image) than when you walk across the path through the gates. Looking from the platforms (and therefore through the telescopes), Left and Right is reversed compared to when you actually walk on the walkway from the tower. It is therefore better to use the terms OUTSIDE and INSIDE for the gates.
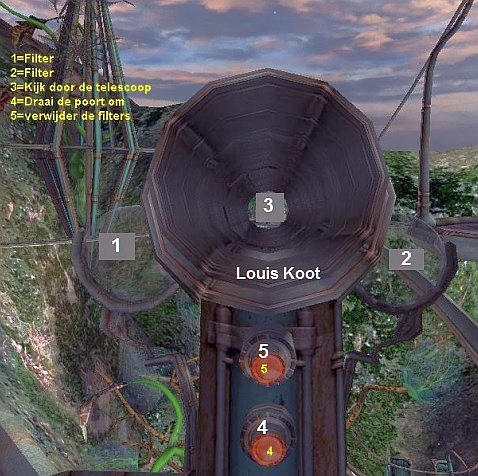
Back on the 6th floor, go to the platform with TWO telescopes. Sargash has given you two filters for the tower security system. So those are those 9 gates on the path. Sargash has told you the following about this. "One shows the right colors and the other shows them the other way around. Observe all the gates and go through the red half"
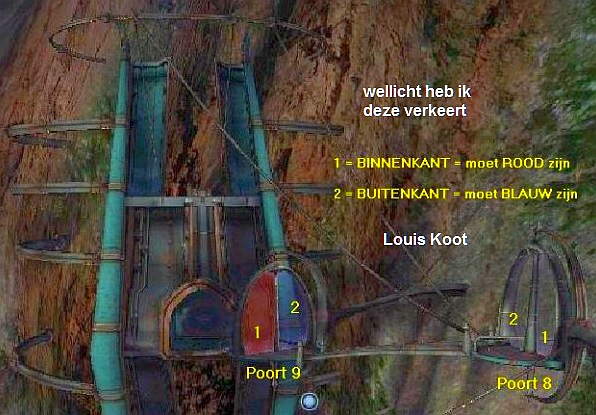
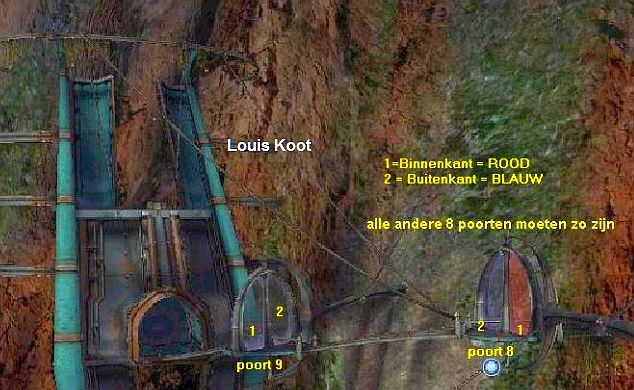
So what needs to be done is that you look through each Telescope while you have placed both filters in front of the telescope at the same time. Then you look through the telescope. You will then see a BLUE HALF and a RED HALF in the gate on which the telescope is aimed, but you will see the colors FALSE. BLUE is actually RED and RED is actually BLUE. Sargash told you to go through the RED HALF so you have to make sure that all 9 gates get the BLUE COLOR in the OUTSIDE half. After all, you go through the OUTSIDE of the gates when you walk over the walkway. If you have placed Both Filters on a Telescope and you look through the telescope and you see the Blue color in the OUTER HALF of the gate, then it is good. However, if you see RED in the Outer Half, you have to REVERSE the gate via the bottom button on the telescope.
|
THE SOLUTION: Start with the platform that has TWO telescopes. This is Platform 1. If you keep going clockwise from this platform, the next platform is platform 2, then platform 3, etc.
Remember that you see gates 1 through 8 through the telescopes FROM THE OTHER side than when you walk the walkway through the gates. You see gate 9 as you go through it on the walkway. Let's start solving this puzzle. So it is best to start with the two telescopes on Platform 1.
Go to the left telescope of platform 1 with "Use" and "Enter". You will enter the Telescope screen. On the left and right you see the two glass filters in the holders. Click on one of the filters and it will be in front of the telescope lens. Now place the other Filter in front of the lens so that BOTH filters are in front of the lens. Look through the telescope. You now see Gate 9. You now see a Blue Half and a Red Half.
NB: Here is where the BUG came to spoil this game for me. I never could get both Filters in the telescopes so I could not solve this Telescope puzzle Remember to see this Gate 9 from the OTHER SIDE than all other 8 gates. Is the BLUE color on the OUTSIDE and the RED Color on the INSIDE then this gate is good. If not, turn the gate the other way by clicking on the bottom button.
Then go to all the other 8 telescopes and make sure to put the BLUE COLOR on the OUTSIDE of the gates in these gates as well.
When you have done all 9 gates, you go back into the tower and you automatically drop back to the 5th floor. Find the exit here where the Iron Walkway begins and follow the path, through all 9 gates, to the tunnel. If you have correctly set the 9 gates with the blue color on all outside halves of the gates, the large round door opens. You will meet ORACLE, but this is a false one. The Oracle will give you an Energy number witch is Number 28. Sen will return in Lyra. NB: When you have turned all the gates properly but you still can't get into the tunnel then you have encountered an other bug. Then you can try this to overcome this bug: Remove any saved games you made while working with the telescopes. Load your Save Game from when you first reached the 6th Floor of the Tower. Then do the whole Telescope Puzzle in one go without saving. Now you can enter! |
Chapter 6: Lyra:
Puzzle 24: Lyra: the Balls puzzle:
After solving the telescope puzzle of The Grand Tower you have returned to Lyra. You are in a hallway. Go forward down the hall. The corridor goes up and then, against the right wall, you see a "Green" ball. Pick up this ball via "Use" and "Enter". Then continue forward through the corridor and you will come to the roundabout. In front of the Roundabout a "Red" Ball is on the ground. Also pick up this ball via "Use" and "Enter".
The corridor continues behind the roundabout and to the left and right of the roundabout is a niche with an elevator. Now go to the left of the roundabout and into the elevator. The elevator takes you up to the 1st floor. When the elevator has come up you will see the 3rd ball in front of you. Pick up this "red / green" ball via "Use" and "Enter". Then turn around and go left into the hallway. It is a short corridor with a door at the end. This door will not open.
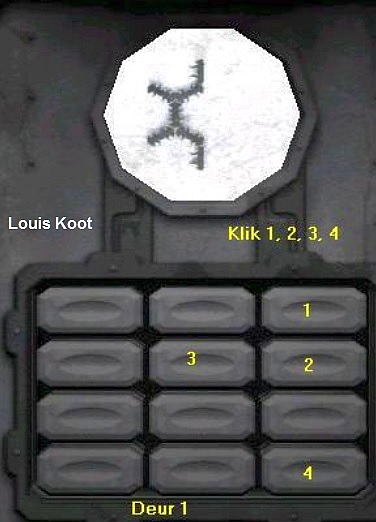
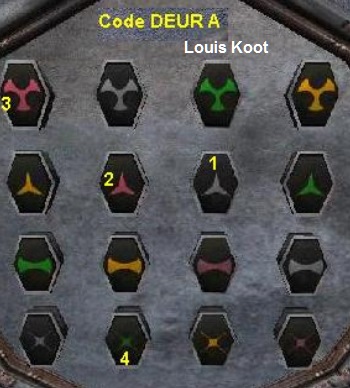
On the door you see a white circle with a drawing inside. Below the circle you will see 4 rows of 3 buttons each. You can click on all these 12 buttons with "Use" and "Enter", but you don't know the right combination. So you can't open the door. Remember the drawing you see in the white circle.......draw it over if necessary. call this Door 1.
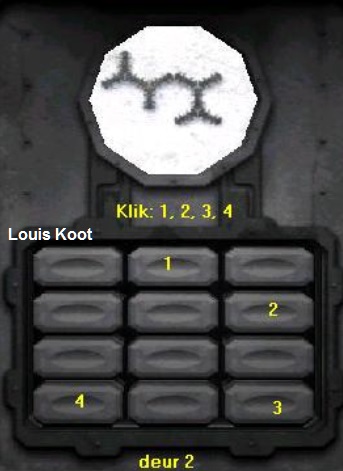
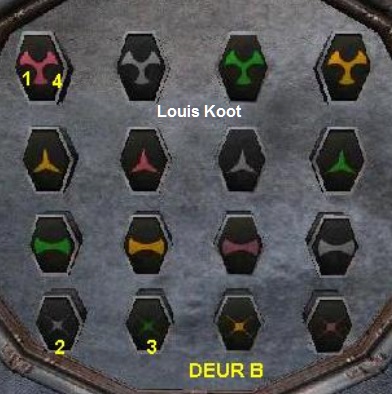
Turn around and walk back through the corridor and then, left, take the elevator back down to the Roundabout. Now enter the corridor to the left of the roundabout. In fact, this is just the continuation of the corridor in which you started this level. At the back of this corridor you will also come to a door that does not open. You also see a white circle on this door, it's a drawing in two parts. This door also has 4 rows of 3 buttons each under the white circle. Draw the drawing in the white circle and over and call this Door 2. Turn around and go back to the roundabout and go left and up with the elevator. You will return to the 1st floor, but now on another side. You see a machine in front of you. Walk forward towards it. This is the:
Ball machine:
This machine consists of a Top screen, a Middle screen and a Bottom screen. The top screen is divided into 4 rows of 3 compartments each, just as on the Doors 1 and 2. In this screen there is a zigzag line. This line goes from top left and then zigzagging to bottom left. So: from left to right, then from right to left, then from left to right and then again from right to left. The center screen has a round hole with a yellow button on the left and right of it. The bottom screen consists of a left half and a right half.
The intention of this machine is that you put the Red and Green Ball in the round hole, and then click on the two yellow buttons so that in the Bottom screen the drawings appear that you saw in the white circle of door 1 and door 2. In the Top Screen, bold Red Dots will appear on the zigzag line. The position of these bold red dots then indicate the buttons that you must press on doors 1 and 2. With only the Red Ball you make the drawing for door 1. For door 2 you need both the Red and the Green ball. By clicking on the ball that you put it in the round hole, this ball goes out again and the next ball goes in.
Go into the puzzle via "Use" and "Enter". The Red Ball will be placed in the round hole. We are now going to do door 1 first. Now click on the two yellow buttons until you see the drawing of door 1 in the left half of the bottom screen. You will have to go to the puzzle screen with "Use" and "Enter" every time you have "clicked" a yellow button. The drawing of door 1 should then be at the top left half of the bottom screen. Look at the Top Screen and note the position of the 4 bold red Dots on the zigzag line.
This is: Top row = Right button. 2nd row = Right button and Center button. Bottom row = Right button.
You have now determined the code for door 1.
Now the code for door 2. The drawing of door 2 consists of a right half and a left half. You must now first make the left part of the drawing with the Red Ball in the left half of the Lower Screen. So get the Red Ball back in the hole and then click the yellow buttons until you have that drawing in the left part of the bottom screen. Then look at the zigzag line again and note the position of the bold Red Dots on the line. Click on the Red Ball and the Green Ball will be in the round hole. Use the yellow buttons to make the right part of the drawing in the right half of the Lower Screen and again note the position of the bold Red Dots on the zigzag line.
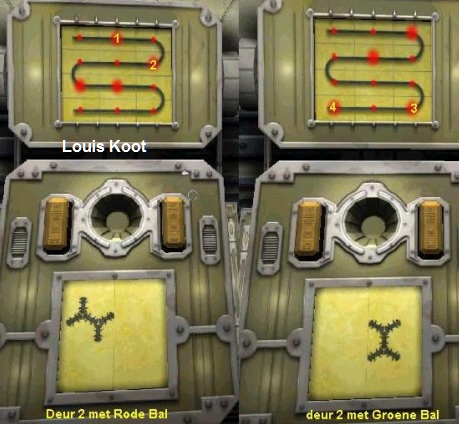
Note: If you are unable to make the right drawing with the Green Ball in the screen, because every time you press Enter the Red Ball will pop back into the hole, you will experience an annoying bug in the game. What you can do then is to play this whole piece all over again and then first pick up only the Green Ball and NOT pick up the other two balls. Then only go to the ball machine with the Green Ball and you can make the pattern. However, you can also just skip this whole ball machine because you can then simply press the buttons on the two doors. After all, you now know the code because you use my explanation.
Because the drawing of door 2 consists of two parts, you now have 2 times the position of the bold Red Dots on the zigzag line. The code is then the first two bold dots of the Top two lines at the Red Ball and the two bold dots on the bottom line at the Green Ball. Once you have done all this, take the elevator back down to the Roundabout. Go up with the elevator in the other niche and down the hall to door 1
|
OPENING DOOR 1: Go via "Use" and "Enter" in the door. Name the 4 rows, from top to bottom A, B, C, D and then press the following buttons: Row A = Right button. Row B = Right button.
The door opens, but you cannot go any further because of a collapse in the space behind this door. So turn around and take the elevator back down and then go left of the roundabout into the hallway and to door 2: OPENING DOOR 2: Go via "Use" and "Enter" again in the door screen. Name the 4 rows again, from top to bottom: A, B, C, D and then press the following buttons. Row A = Middle Button. Row B = Right button.
The door opens. Go forward and there is a video in which Sen meets the real Transai Oracle and he gives him an old energy number and that is number 12. The Oracle now sends Sen back to the: |
Transai Air Gate.
On the bench in front of you is a White Stone. Go there and check out this white stone.
There are symbols on it. Copy them. They are 4 characters from the 4-digit number system and together they make up the number 3120.
Then turn left and go to the airship that hangs between the crates. Enter the airship and then turn left. You will see the airship control console. "Use" and "Enter" this console. Well, there are 3 windows with a button under each window. With the buttons you can make 12 different symbols appear in each window. So this is the 12-digit number system. You now have to convert the 4-digit number 3120, of the white stone, to the same number but in the 12-digit system. This time I will spare you the mathematical calculation and explanation and tell you right away that this must be the number 160. You must now put this number in the 3 screens, from left to right. And do this in the following way:
Click the Left button once and then click the Center button 6 times.
Do NOT click on the right button because it already contains the 0 zero
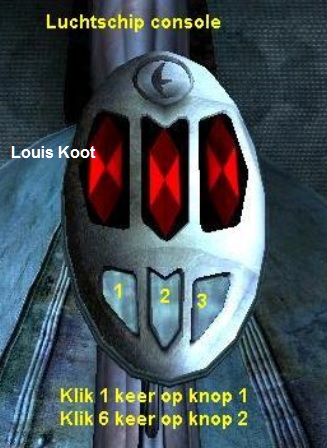
The airship takes Sen to the top of Gelleas. Enjoy this movie.
Chapter 7: Gelleas
Puzzle 25: Gelleas: above water: The Doors with Lines puzzle
The airship dropped Sen on the Gelleas. Go forward and enter through the round doorway. You enter a corridor and straight ahead you see a gate. Go into this Gate. This is the main gate. However, you can not go through the gate because there is some kind of fence. You get "Use", so this is a puzzle. Press "Enter" to enter the puzzle. The "fence" is a kind of grid consisting of 5 vertical lines and 5 horizontal lines. So these lines actually form 36 "squares". You definitely don't know what the purpose of this grid is, but draw it over on a piece of paper.
On your drawing, number the vertical lines, from left to right, 1, 2, 3, 4, 5 and number the horizontal lines (from top to bottom) A, B, C, D, E
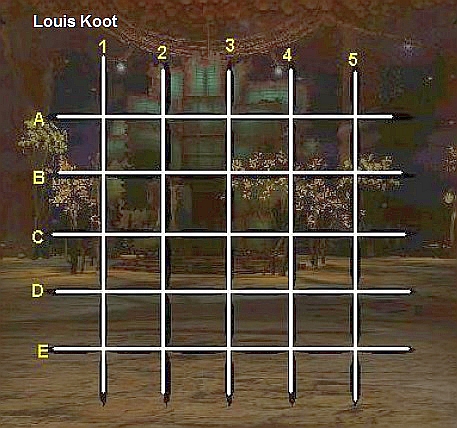
NB: For clarity sake, I made the lines white on the screenshot. Otherwise it they are hardly visible in the screenshot
So you cannot go through this gate. Now go right into the hallway and walk all the way to the end. You come to glass door.
On this glass door you see a green area with also such a lines grid. The door does not open.
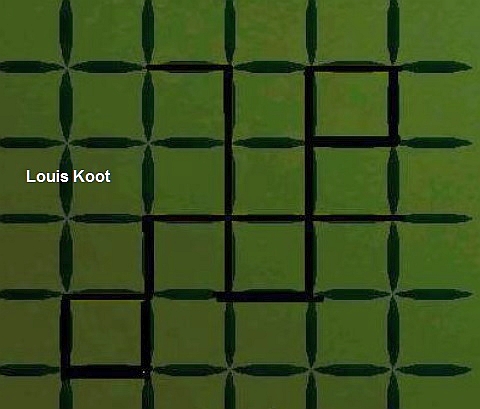
Walk a bit back through the hall and then enter the room on the left. In this room are 2 "Rugs". A Blue "Rug" and a Yellow "Rug".
On both" Rugs "you see a line pattern
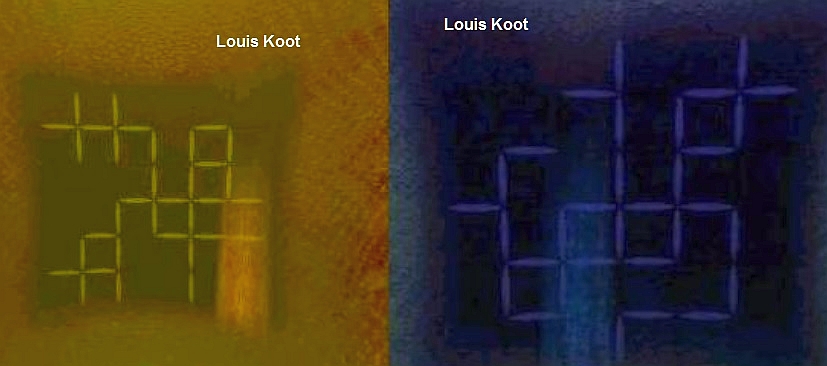
The lines on both of these "rugs" are the lines of the grid that are in the Main Gate and on the Green Door. Study the lines on both "rugs" carefully and compare the lines on the "rugs" with your drawing of the grid. You will notice that both "rugs" have common lines. Draw the common lines on your drawing of the grid. When you have done that, go back to the Green Glass Door.
Opening the Green Glass Door:
"Use" and "Enter" the door to get in this door puzzle. You are then in the line grid. Take your drawing of this grid and make the lines that the Yellow "rug" and the Blue "rug" have in common light green (Yellow mixed with Blue makes Green). You do this by standing with your arrow on a line and then pressing "Enter: . You really have to place your arrow exactly on the line. If you do this correctly, this door will open.
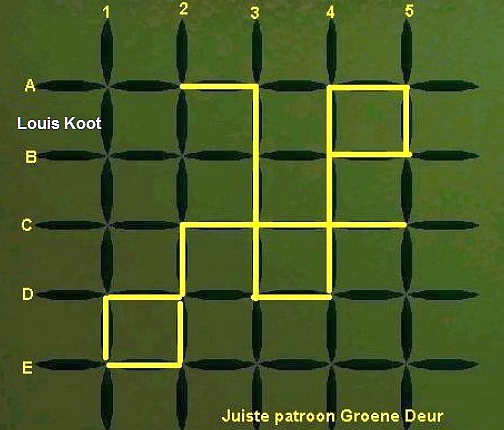
NB: In the screenshot I have made the correct line segments yellow because this is easier to see in the picture
Enter the room. In this room hangs a Red "Dress" on which you will find another line pattern. Draw this lines pattern again.
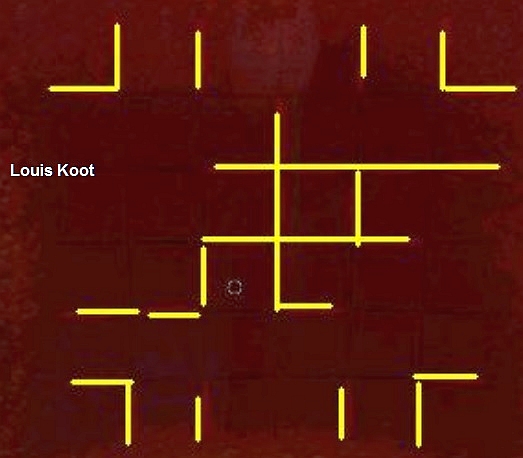
NB: for clarity I made the lines yellow. Otherwise it is hardly visible in the picture
These are also lines of the grid. Take your drawing of the pattern for the Green Door and compare this pattern with the lines on the Red "Dress". Again you discover common lines. Draw these common lines again on your drawing of the grid. Leave this room and go back down the hall to the Main Gate:
To open the Main Gate:
You can return to the grid puzzle via "Use" and "Enter". Well here you make the common lines of the Red "Dress" and the Green Door light brown. Again you have to be exactly with your arrow on a line and then press Enter. Repeat until you have all the line pieces of the correct pattern.
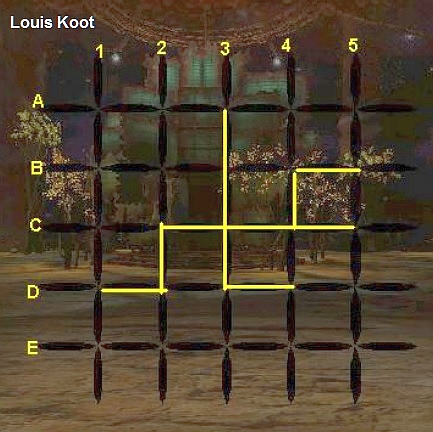
NB: I made the right line pieces in the picture yellow. This is easier to see in the screenshot
The Gate opens and a long scene follows in which the history of Sarpedon is told
The Secret of Sarpedon:
Sen meets the Ansala Oracle, Arko. Carluen and Loreann come and tell Sen the real history of Sarpedon. The Oracles are the central equivalent units for the colonization of the planet. Companions are the machines of the planet and serve to process nitrogen produced by greenhouse gases and soil change. The watch crew of the colonization ship that was going to colonize the planet formed 2 parties, based on their ideas of land formation of the planet. These 2 parties were therefore the beginning of the Ansala and Transai group. The Ansalas took an Oracle from the network and took it to the valley. A fight between the two sides followed and this resulted in the destruction of the colonization ship, the Lyra. The Oracles decided to erase the population's memory and gave them the impression that a "World War" had taken place.
Sen needs the space station maps and the space station access codes. Sen and Chemay are Ansala sleepers, so they are double agents. Sen must restore the Oracle companion land formation network to the "Overide" room on the space station. Carluen and Loreann can't help Sen because the Oracle needs to be sorted out manually. Arko will manually open and close the security field at the appropriate time for network reactivation. Ansala Oracle has prepared a ship for Sen to go to the station. She gives the old energy number - 52. Sen goes back to the spaceship with the shuttle.
Chapter 8: Space station
Find Chemay:
Puzzle 26: Space Station: Chemay: The Doors Puzzle:
Sen is back in the space station where you started this game. Only now he is in another part. You are in a long and narrow hallway. On the left and right there are crates in the hallway. Walk forward down the hall. You come to a corridor that goes to the right. Stand still and turn to the left. You are standing in front of a large crate and on this crate you see a number of symbols. There are two rows of 5 symbols each that you see on this crate. You saw these symbols on the console of the airship that brought you to Gelleas Above. So they are numeral symbols of the 12-digit numerical system. It is a good idea to copy these symbols exactly as you see them.
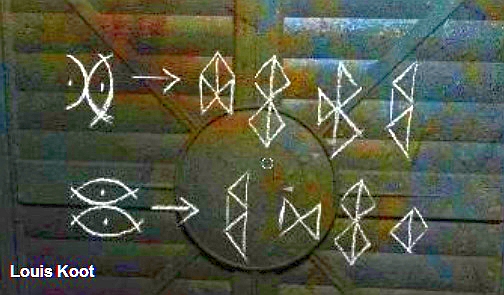
When you have done that, go through the right corridor to the door in the back. The door does not open. The door is divided into 3 segments and on the top segment you see a symbol. Look at your drawing of the crate symbols and you will notice that the symbol on this door is the 1st symbol of the top row of symbols on the crate.
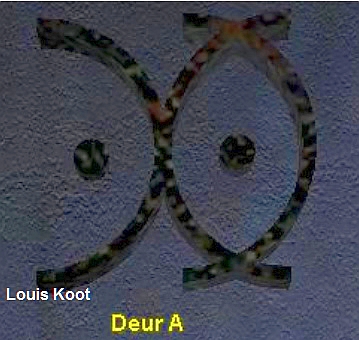
Name this door as Door A and name the top row of symbols on the crate as Door A Symbols. There is also a large circle on the door and in this circle you will see 4 rows of 4 "Star" Symbols each. So in total 16 symbols. In each row you see the same symbols, but they always have a different color.
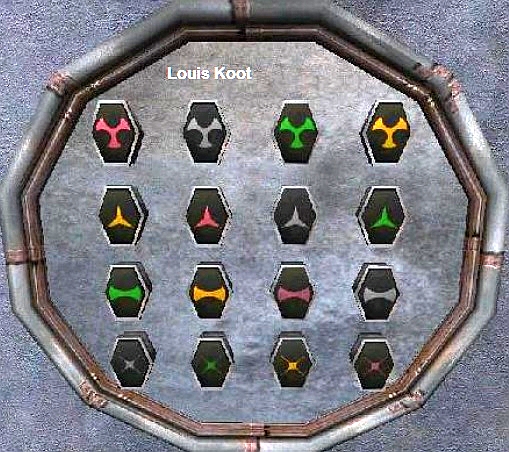
Turn around and walk to the crate, halfway down this corridor. On the crate is a large round metal disc. Pick up this disk with "Use" and "Enter". Continue to the main corridor and follow it further to the right. You will come to a turn to the left. In one corner of the hallway you will see a very large Round Metal Disc. Stay away from it for now. Continue to the end of the main corridor. Another door and you see the first symbol of the second row of symbols of the crate. So call this door Door B and the second row of crate symbols you name as Door B Symbols.
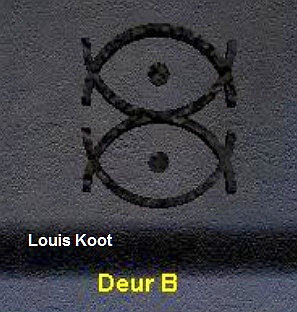
This door also has such a circle with 16 colored "star" symbols and this door does not open either. Turn around and walk back to the side corridor with the large Round Metal Disc in one corner. In the other corner you now see a smaller disc with buttons. Do not touch that. You won't be using this disc until much later. Go back in this transverse passage and you will come to Door C. This also does not open but also has a symbol and another circle with the 16 "star" symbols.
You have now found all the relevant information to get started. The intention is of course to open the doors A, B and C. Grab your drawing of the Crate Symbols now. So the Top row of symbols are for Door A and the Bottom row for Door B. You should think of these two rows as a formula. Number the 4 symbols of DOOR A, from left to right, as 1, 2, 3, 4 and the 4 symbols of DOOR B: 5, 6, 7, 8
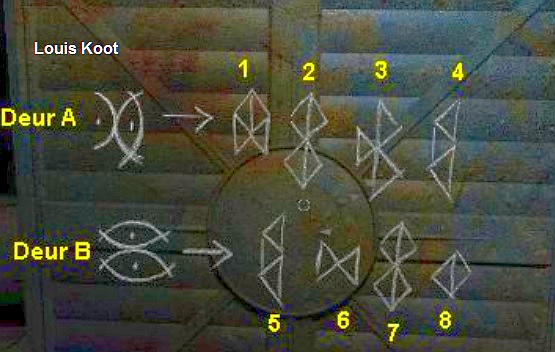
Now go to the large round metal disc, in the corner of the main corridor with the corridor going to Door C. Go via use and Enter in this disc. The Metal Disc that you took from the crate at Door A is automatically placed on this large disc. The disc has a thick outer edge and 4 inner circles. The 4 inner circles are divided into segments. In the thick outer edge of the disc you see 12 symbols. Each of these 12 symbols represents one of the 12 segments into which the inner circles of the disc is divided.
|
At the top of the disc you see 4 round "squares". In each of these squares you will now see a colored "Star" symbol, as you have seen in the circles on doors A, B and C. Take your drawing of the Crate Symbols and compare the symbols of the crate with the 12 symbols on the outer edge of this disc. You will discover that all 8 door symbols are also on this disc. Now number these symbols on the disc exactly as you have numbered them on your crate drawing. So for Door A: 1, 2, 3, 4 and for Door B: 5, 6, 7, 8. Name the Inner Circles of the disk, from the outside in: A, B, C. D
What you need to do now is to select the correct "STAR" in the circle segment for the door symbols. So the 4 inner circles of the disc determine the order.
You always have to click on the segments of the circles, with "Use" and "Enter", at the symbols on the outer edge, until you have one of the 4 Star symbols in the correct circle next to the symbol. You then get the "Star Code" for Door A ..like this
So the order to open Door A is: White 3 point star, Pink 3 point star, Pink 3 bump star, Green 4 point star. Now repeat this whole thing for Door B and you will come to the following code:
So the Code for Door B is: Pink 3 bump star, White 4 point star, Green 4 point star, Pink 3 bump star. If you have both codes for Door A and Door B, go back to Door A and enter the star code for Door A on the door by pressing the appropriate stars via "Use" and "Enter". Opening DOOR A: Go through "Use" and "Enter" in the circle on the door and then press, always with your arrow on the right star, on the 4 stars according to the code that you have identified on the large disc. So: White 3 point star, Pink 3 point star, Pink 3 cusp star, Green 4 point star.
Door A now opens. Enter the room through the opened door and search this room. You will not find there. Just look around here and then leave this room and go to Door B. Opening DOOR B: Well, enter again with "use" and Enter in the circle and enter the code, So: Pink 3 bump star, White 4 point star, Green 4 point star, Pink 3 bump star
|
Door B opens. Go through the opened door. Follow the corridor until the left / right fork. At this split there is another crate on the right where you see symbols again. Copy these symbols. You need them to open Door C. You can see that the CODE for door C is the addition of the Code for Door A and B.
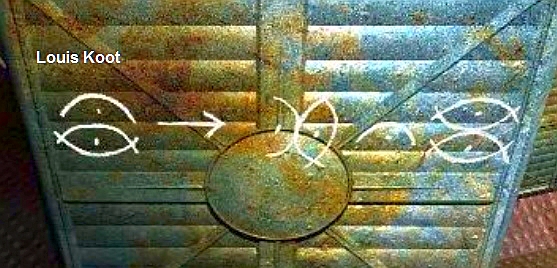
Then follow the right corridor to the end and then turn left through the corridor and then through the door. You enter a large high and deep space and are on a metal walkway. This walkway goes over the top of 4 large towers and there is also a higher tower in the middle. Follow the walkway. You will see symbols on top of each of the 4 towers. These are again numeral symbols of the 12-digit numerical system. Draw them over in the order you see them.
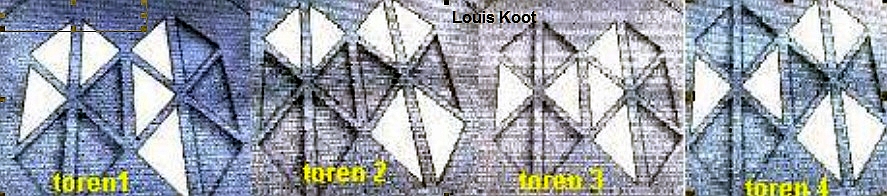
When you have reached the end of the path, take a look around. There are a number of round windows in the wall and you will notice that one of these windows is OPEN. Turn around and follow the route back through the corridors to the crate where you saw the symbols for DOOR C. Now go down the other corridor and through the door at the end. You enter a room. Walk across the room to the OPEN WINDOW. This is the window you saw from the towers and through this window you now see those 5 towers. Above the window you see 16 small round buttons. Each of these buttons has a symbol. We are going to play the END GAME here, but DOOR C must still be opened first. So go all the way back to the hallways where doors A, B and C are.
The Calculator
In the corner opposite the large round Metal Disc on which you have determined the code for Door A and Door B is a Calculator
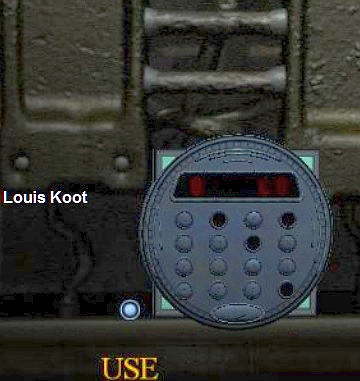
"Use" and Enter this calculator. This Calculator shows the symbols for the 12-digit number system. You will see the symbols that you have also seen on top of the 4 towers and that are also on the outer edge of the large Disc. The bottom row of buttons contain the symbols you saw on the crate and on the doors. The symbols on the top 3 rows of buttons are therefore the numbers in the 12-digit system. On the top row of buttons (from left to right) are the symbols for the numbers 0, 1, 2, 3, but the symbols for 1 and 3 are missing. In the second row are the symbols for the numbers 4, 5, 6, 7 but 6 is missing. In the third row are the symbols for the numbers 8, 9, 10, 11.
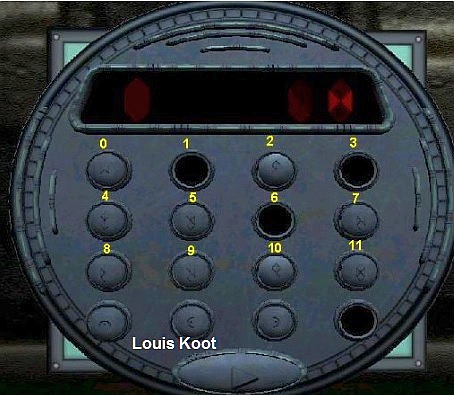
Look at the symbols you have seen on the Towers. You now have to add these symbols together using the calculator. You do this by pressing the corresponding button and then the arrow and then the second button. The result will then appear in the display. So you do this for all four towers. You "add" the left symbol and the right symbol for each of the 4 towers.
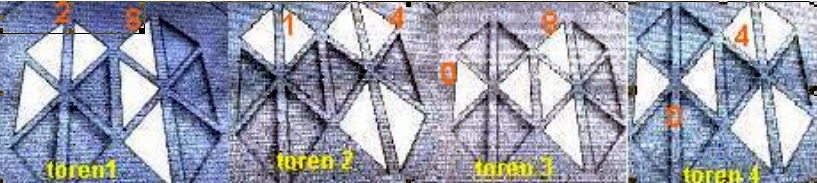
You will find out in this way that the numbers on the towers are: 28, 14, 08 and 04. You will need these numbers in the END GAME
|
We are now going to open DOOR C: Go back to the Big Disc, on the other corner and again via "USE" and Enter in the disc. As you can see on the crate, behind door B, the Code for door C is the ADDITION of the code for Door A and Door B.
But what is that addition. The symbols in the outer border are the numbers in the 12-digit number system. Start with number these symbols on the outer border from 0 to 11 (so the first 12 digits of the 12-digit system) where 0 is the symbol at the top.
If you now look at the Code for DOOR A again, you will see that this Code was in the 4 inner circles as follows:
Go to Door C and click on the buttons of the newly determined Code:
The door opens. MOVIE. Sen and Chemay are reunited. Sen receives a Prior Generator from Chemay. Puzzle 27: END OF GAME: The Towers puzzle After the movie with Chemay you are back in the hallway behind DOOR B. Go through the left hallway to the room with the open window. Make sure you are ALL IN this window and then turn to the right. There is a lock at the bottom right of this window. Via "Use" and Enter you now place the Prion Generator, which you received from Chemay, in this lock. Then turn back so that you look in the window and via "Use" and Enter you will enter this puzzle. Above the window you see 16 small buttons. 8 left and 8 right with a bigger big button in between. Number the small buttons, from left to right, as 1 to 16. The larger button in the middle is a Fire button.
Through the window you can see the 5 Towers. Each of the 16 buttons above the window has a symbol. Each symbol represents an old energy number. Sen received 4 old Energy numbers during his trip. Those were the numbers: 12, 28, 36, 32. Via the Calculator you got 4 more numbers, namely 28, 14, 08 and 04. The goal now is to provide each of the 5 towers with an old number. The 5 towers must be connected to each other via laser beams, but this must be done in the correct order. The symbols you saw on the towers were numbers from the 12-digit system, namely the numbers: 4, 8, 14 and 28. You now have to convert these numbers to our 10-member system and you will get: 4, 8, 16, 32. The 16 buttons above the window each shoot one, different, combination of laser beams at the towers. You do this by clicking a button and then the Fire button. Now first shoot laser beams at the towers with each of the 16 buttons and then write down which button connects which towers. So you have to find out with which button you connect tower 4 and 8.
With which button tower 4, 8 and 16 are connected to each other. Once you know that, you will turn off all laser beams by clicking on each button and the fire button again. The solution:
Click on button 15 and then on the fire button. The laser beam connects towers 4 and 8.
If you do this correctly you will see the: END MOVIE Watch the space station shaking. The shield on the planet has been removed. Carluen and Loreann manually adjust the Oracle. You can see that the Oracle tells the Transais and Ansalas that they are now a group - the Transalas. Sen is grateful for languages. THE END Translating my old Dutch walkthrough from 2003 was a kind of a trip down Memory Lane for me. It's as if I play the game again in my head, from memory. Now in 2020 we can read that they will do a Schizm 3 game. Let's hope that this Schizm 3 game will not have such difficult puzzles as they were in Schizm 1 and 2 I also must admit that this is not one of my best walkthroughs that I have ever made. But then again, I made this one almost 20 years ago and since then I have been getting better and better in doing this walkthrough writing shit 2020: Walkthrough by: Louis Koot |