
2021:Walkthrough by Dick Leeuw and Louis Koot
If you have found this walkthrough via google search or via another site then you have probably not visited my site.
A lot more very detailed game walkthroughs can be found on my site at: www.pcgameswalkthroughs.nl
The Puzzles on HARD DIFFICULTY
If you play the game on Hard Difficulty then the puzzles and solutions are different from NORMAL difficulty. The story is the same and also how you go through the game is the same, but you can't use the solutions from NORMAL difficulty when you play on HARD difficulty. This document is intended to give you solutions for the puzzles on HARD Difficulty. We are not going to do a full walkthrough here because you can use our NORMAL Difficulty walkthrough to lead you through the game, but here you will find our solutions for the puzzles on HARD Difficulty in screenshots.
Part One: Amia: The Elevator Wheels Puzzle
Done by: Louis Koot
Move through the level and activate the tablets and score the postcards while you go.
The Wheels are different because they do not have dots but they have stripes now, so the solution is different. Here you have the solution

The puzzle at the pond, to turn the elevator is the same as on NORMAL difficulty, so you can use our solutions, just look it up in our NORMAL difficulty walkthrough
Part Two: Bogard:
A: The Discs puzzle
This discs puzzle to open up the energy gate is also different on Hard Difficulty.
It is also possible that the solution various each new game, so here it is how it was in my game. Don't blame me if this doesn't work for you in your game


Again......It could be that in your game the solution is different.


Go through the now open energy gate, set the two altars right and solve the roof puzzle to go to the revolving hut puzzle.
|
B: Revolving Huts puzzle This one is different to, but it's the same as in the demo of the game So here is a simple explanation of this puzzle made by Dick Leeuw step 1: rotate hut C and hut B so that the openings are as shown on the map. The red stripes are the openings.
In the middle of hut E is a pole with a round disc, with this disc you can turn hut D. The openings in hut D should be positioned as shown in the drawing. Step 2: Go back out through B and C. Turn hut C 1x to the left, you can then see part of hut F through the openings. Turn hut F counterclockwise then you will see a light spot when you see the opening, you have to turn furtherIf you turn to the left you will see a light spot, then a dark spot and again a light spot. Then hut F is good. Then rotate huts A and B so that the openings are as shown on the map.
You can then walk to hut D via C, B and A. In the middle of hut D is a pole with a disc, with that disc you can turn hut E. Now you can go via hut C and B to hut A and then via hut E to F and then outside. You are then at the rainbow gate If this simple explanation didn't worked for you then here is a more detailed step by step solution Name the huts from front left to rear right, A to F
Stand in front of the huts, you see on the left hut A and to the right hut C.
Turn hut C, so that there is an opening on the left and right. Turn hut B, so that there is an opening to the front right and an opening to hut E. From the outside you can look through to hut E.
Walk through hut C and B.
In hut B go to the right to hut E.
In the middle of hut E is a pole with a disc, with this disc you can turn hut D. Turn hut D so that there is an opening towards hut A and hut E. You can look through the fence to see if hut D is in the right position.
Go back through hut B and C to the turning discs. Now click on the right side of the disc to turn hut F to the left. Click again and you see a dark part of the wall of hut F, click again and then you see another light part of
the wall of hut F.
Now go to the turning discs on the left to turn hut A and B in the correct position.
If the huts are in the correct position, then you can walk from hut C through hut B and A to hut D.
In the middle of hut D stands a pole with a turning disc, with this disc you can turn hut E so you can go from hut D through hut E to hut F.
And if all is well hut F is in the right position and you can walk outside to the Rainbow gate.
The next part, the opening of the Rainbow gate is the same as in the normal mode. All the colours are the
same. So for the second part of the Rainbow gate you first need to solve the Bridge puzzle again
|
Part 3: Amia: Towers
The route through the towers to get the lighting patterns on the towers and to reach the capsule on top of the central tower is the same as in the normal mode. The elevators behave a little different, most of the times you have to go via another floor to get to the floor where you need to be. You can get to the first or second floor and from there you can go to the third floor.

When you reach the capsule, you see that they have turned the rings.
You have to make sure that you start on the right spot (red dot) to fill in the light pattern.
The red dot is the spot without a lamp.


Part 4: Bogard: Caves: Magnetic Balls puzzle
This pattern works for me at the first gate.
The solution for the magnetis ballpuzzle is the same as in the normal mode. The only difference is,
there are no yellow cirkels.
You have to listen, you hear a sound when a ball goes in the right spot.

This pattern works for me at the second gate.

The rest of this level is the same as in the normal mode.
Part 5: Amia: Islands In The Sky
For the first part you can use walkthrough for normal mode.
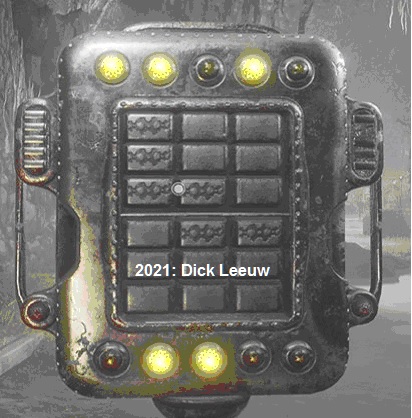
When all the locks are open and you are in the building, you are in front of the 4 stacked power modules.

You can try the solution for normal mode but it doesn't work now.
Go to the lower power module, you will see a round tube around the module in the middle.
You see 1 round opening in the tube and there you see a button; this button moves when you click on an arrow.
You just don't see how far the button is being moved.

On the round tube you will see 27 stripes and somewhere on the tube you will find a button, you cannot move this button.
You now need to move the button behind the viewing glass so that this button gets under the button on the tube.
Go back outside, right to the green power module.
You now need to test how many stripes the button is moving, do that for the top arrows and for the lower arrows.
For the green power module, you will find that the button is moved by the top arrows 3 stripes and by the lower arrows 5 stripes.

Do this also for the red, blue and orange power module.
For the red power module: top arrows move the button 6 stripes, and the lower arrows move the button 7 stripes.

The Blue power module: top 5 stripes and bottom 2 stripes.

The orange power module: above 7 stripes and below 4 stripes.

Go back inside and go to the bottom, the green, power module.

You can see that the button has to move 2 stripes to the left.
You have found with the green power module outside that the bottom arrows move the button 5 stripes, and the top arrows move the
button 3 stripes.
Now click 1x on the arrow leftbottom and then 1x on the arrow at the top right, you cannot see it, but the button is now in the
right place.

Turn right and click on the second button on the pole.
You'll be at the red power module.

You can see that the button has to move 2 stripes to the right.
Click 2x on the arrow at the bottom right and then 2x on the arrow at the top left, the button is now in the right place

Now click on the third button on the pole and you are in front of the blue power module.

You now have to walk around the module to count how many stripes the button needs to be moved; you then count 24 stripes.
Click 4x on the arrow at the top left and then 2x on the arrow at the bottom left, the arrow is then moved 4 x 5 + 2 x 2 = 24
stripes.
The button is now in the right place.

Now click on the top button on the pole and you will be at the orange power module.

You can see that the button has to move 2 stripes to the right.
Now click 2x on the arrow at the top right and then 3x on the arrow at the bottom left, the button is in the right place

You can see the lock opens and the doors are sliding open.

Then continue to the teleporter.
Part 6: Water City
The code for the windmill has changed, the new code can be seen on the screenshots

Something else has changed.
The beam of light coming from the windmill must now be sent via the receivers and transmitters as in normal mode.
If you have set the second to last mast with receiver and transmitter correctly, the beam cannot reach the last mast.
The round hole is now blocked.

You now have to go over the walkway to a switch to open the round hole.

Behind the first mast is a staircase to a terrace, go up those stairs and go to the right

There you see the walkway, if you have not yet pointed the rays then the walkway is closed with a fence.
If you have aimed the beams correctly, you can go up the walkway

At the end you will find a switch, click on the switch and you will see the round hole open
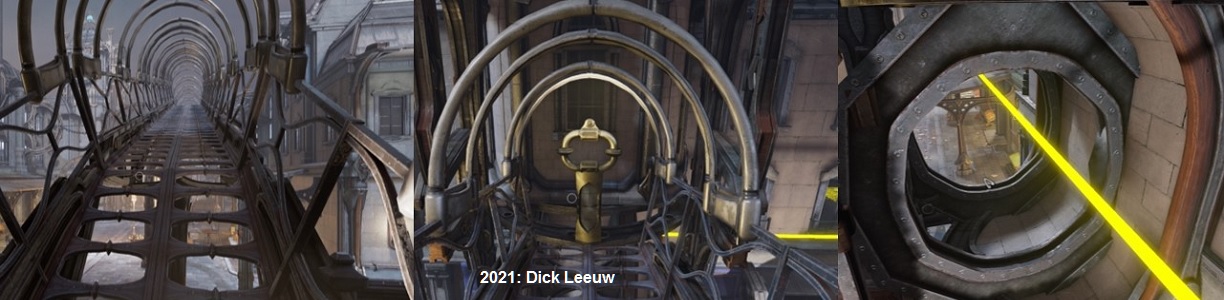
You can see the beam's going to the next mast

Go back over the walkway and the terrace and go to the last mast with a transmitter.
Put the mast in the correct position and the tunnel opens.
Part 7: End in the City.
You have to open 3 doors in this part.
All doors have 3 rows with 8 buttons, on all doors the code in rows B and C is the same as in normal mode.
The code for row A at doors 2 and 3 is different.

Door 1 is the door for column B

Go to the door for column D

Zoom in on the 3 rows with 8 buttons, above row A you can see what you need to do.
You just need to use those buttons that are in the same place in rows B and C.

The door opens and examine the column. Go to the door for column E.

Zoom in on the 3 rows with 8 buttons, above the rows you will see what you need to do.
You need to use the buttons that are only in row B or row C.
You have to skip illuminated buttons that are on both rows.

The rest is the same as normal mode.
2021:Walkthrough by Dick Leeuw and Louis Koot


