Sherlock Holmes: The Secret
of the Silver Earring:
gog.com edition 2016 and I have played it
without any trouble with Windows 8.1
If you have found this walkthrough via google search or via another site then you have probably not visited my site.
A lot more very detailed game walkthroughs can be found on my site at: www.pcgameswalkthroughs.nl
2020: walkthrough by
Louis Koot
Chapter 2: Day 2: October 15,
1897:
221b Baker Street
The day starts
with a movie. We see Inspector Lestrade entering Holmes's house.
Holmes, Watson and
Lestrade then enjoy a tasty English breakfast and discuss Lestrade's murder and
notes.

You start Day 2 as:
Watson:
Watson
is at the door and we see Lestrade sitting at the breakfast table. In inventory
you now have the Test Tube, the Magnifying Glass, the Tape Measure and the
"Photo Pretty Young Woman". Watson has informed you that he should
actually read Lestrade's notes. So open the Inventory book and click on TAB C to open the "Documents page". Here
you will find the notes of Lestrade and these are: "The
Crime", "Instrument of Crime", "The Motive", "The
development of the crime", "Scotland report" and "Melvyn
Bromsby". Read all these reports, I am not going to spell it out
for you so read them yourself or if you do not want to then make sure that you
have at least clicked on all these topics. Also remember to use the scroll down buttons as
some of these documents are multi-page.
Once
you have read through these topics, or at least have opened them all, you close
the inventory book. Watson then gives some comments on what he just read, he
says: "The shooter was not in the ballroom or
in the hallway. Where was the shooter then?" The great guru
Sherlock Holmes will interfere because he feels it is time to return to Sherringford
Hall. The environment map appears, so who are you to contradict the great
Sherlock Holmes? On the environment map, click on:
Sherringford Hall:
Holmes:
Holmes,
Watson and Lestrade take a "taxi" and arrive back at Sherringford
Hall where they are met by Miss Lambert who is standing outside the front door
on the landing. Click on Miss Lambert. She takes the 3 gentlemen inside the
Ballroom and then disappears to see if Miss Lavinia is already awake.

Ballroom:
Mr. Grimble also reported early to Sherringford
Hall and joined our 3 astute investigators. Talk to Grimble.
Grimble would like to be kept informed of the progress of the
"investigation" and hopes that the murder of his business partner can
be solved quickly. Such a murder is bad for "business". Grimble also
tells something about the relationship between Lavinia and her father. To
illustrate, Grimble talks about a scene that took place between a friend of
Lavinia and her father. That friend got a big beat from daddy.
The 4
men therefore stand in front of the double exterior doors of the Ballroom. Click
on the door in the right wall. Holmes says goodbye to Lestrade, Watson and
Grimble and leaves the Ballroom and the 3 gentlemen will continue there
conversation about the noble Polo sport. Oh so English. Meanwhile Holmes
has ended up in the "Harness hallway". Go through the left door to
the:
Kitchen:
Carl Pennington, the chef, is at the work table
celebrating his aggression on a piece of meat. Talk to the cook, who has lost 2 bottles of 18
year old whiskey.

Say goodbye again and go through the door back
into the hallway and then through the middle door into the next hallway. Here
you go through the door on the right to the:
Men's Smoking
Room:
There is now a pair of white gloves on the
coffee table. Click on the white gloves and
Holmes examines them. In the close-up you grab the
white Gloves.

Close the close-up and head back into the
hallway. Walk through the hallway via the middle bottom twice and then go to
the left door again to the:
Ladies Salon:
Here is now a red handbag on the round table. Click
here. Holmes tells you this is Lavinia's purse. Grab the purse.

In
your inventory click "Unpack" on
the red purse. 2 letters come out. Click "Read" on both letters. The
"Program of London Opera" simply disappears, but the
"Herrington's Letter" disappears into your inventory book. So open
the book and click on TAB C and read the "Letter from Herrington". Herrington
has moved into the "Queen's Arm", a pub close to Sherringford
Hall. He also deliberately left his gloves in Sherringford Hall to have a valid
excuse to visit Lavinia. Close the book and your inventory. Exit the salon back
to the hallway and then go back through the right door to the:
Ballroom:
Lavina is awake and dressed and has joined the
gentlemen in the ballroom. Click on Lavinia. Holmes walks over to her and talks
to her.

Lavinia now wants to answer all questions from
Holmes. So use all conversation option with Lavinia.
After this conversation, Lestrade tells us to investigate
Bromsby's office and we end up in:
Bromsby's office:
Lestrade walks to
the desk and tries to open a drawer. BOOM ... does the drawer. Grimble says
this was apparently one of Fowlett's booby traps.

Holmes is then at the desk. Click with your hand
on the desk to get into the close-up

There
are 2 photos on the desk. Click on the left photo.
Holmes informs you that this photo shows Bromsby with his little daughter
Lavinia. You can now also view this photo under TAB C in your inventory book. Click
on the right photo. This will appear on your
screen in close-up. This photo shows Bromsby and Grimble in Africa. However,
you can also see that a part of the photo has been torn off. There should be a
3rd person in this photo. Of this 3rd person you can just see the left hand on
Bromsby's right shoulder and on that hand is a thick ring. Take the magnifying glass from your inventory and click on
that ring in the photo. Holmes tells you
that it is a "Masonic Symbol" ... a symbol of the Free Masons ....

Close
this close-up. There is a letter in front of the photo. Click on the letter. You can read this "Letter from Fowlett to Bromsby" again under TAB C of
the inventory book. Have a look at the "Young
Lavinia Bromsby" photo. So this is the left picture you just
clicked on. You see father Bromsby with his young daughter Lavinia. Bromsby
teaches Lavinia how to handle a gun. Close the book and your inventory.
There
is also a dark brown book on the desk. Click on that dark
brown book. Holmes informs you that 1 page in this book is marked and
this page will also disappear to TAB C of the inventory book. Before viewing
this page, first open the top drawer of the
drawer unit, bottom right of the desk. It contains a number of burnt papers. 3
pieces to be precise. They were burned by the "Boom" that Lestrade
caused.

Take all burnt pieces out of the drawer. Then open your
inventory again and click "Read"
on all 3 sets of burnt papers. Then open TAB C of the inventory book again and
click on: "Medieval French Art",
that is the page from the dark brown book. Read it through. The article is
about the ability to hide images within another image. This art is called
"Crude Colour Woodcuts". Check out those 3
sets of burnt letters, which are: "Burnt paper with a code",
"Pieces of Newspaper" and "Piece of Book". In the 2nd part
of the "Burnt paper with a code" you can read that in a certain code
the number 55 must be added.

Close
the inventory book and inventory and then close the desk close-up. A number of
photos or paintings hang on the wall behind the desk. You can click on one of
them with your hand. It is the middle of the 3
bottom pictures. Do that. Holmes tells what is in this photo and you can
view the photo via TAB C of the inventory book if you click on this "Sir Bromsby in front of Kalidassa Abyss".
Close the book and inventory and walk back a screen via middle below.
We
then see Holmes, Watson and Lestrade talking to each other. Lestrade says that
the Fowlett guy seems to live in Flatham and a neighbour of that Fowlett has
something to say. Holmes then decides that he and Watson will go to
Flatham. The area map will appear on your screen and you will see the location "Flatham's Station" on it. DO NOT click
on it yet, but close the book so that you are back in the normal game
screen.
You
see a double purple door and on the right a life-size portrait of Sir Bromsby. Click
on the life-size Bromsby portrait. Holmes
walks towards it, takes a deep look at it and ..... he discovers Bromsby's Safe behind this painting. Click on the
Save, but Holmes doesn't even start trying to open the Safe without knowing the
combination.

Click on the double Purple Doors to bring the Area
map back into your screen and then click on the Flatman
Station location:
Flatman Station:
Holmes and Watson
take a taxi and then the train and arrive at the platform of Flatham Station
where they are greeted by Constable Fletcher, who has been telegrammed by
Lestrade of Holmes' arrival.

Use the "Help"
topic and then the "Neighbours"
topic and Fletcher takes Holmes and Watson to Fowlett's neighbour:
Graham, Fowlett's neighbour:
We are
standing in front of a fence of a garden and a guy is digging in the garden. I
would personally not do this job, so late at night and in this dog weather. The
garden belongs to Fowlett's neighbour, whose house we see. Talk to that
burrowing neighbour. His name is Graham, as you learn from Fletcher who appeals
to him.

Use
whatever subject you get and eventually Holmes will get the key to Graham's Fowlett's house. When you're done
with Graham, talk to Fletcher to ask for permission to enter the house alone. That
is allowed. Then use the following option and Holmes sends Watson back to the
station to interrogate the station master. Say "Goodbye". Look at Fowlett's house. You
can see the front door and the open gate in the wall. Click with your feet in
the open gate and Holmes walks towards it. Then click on the front door and
Holmes walks towards it. Of course the door locked.

Take the newly obtained
"Key of Fowlett's House" from your inventory and click on the
front door and we end up in:
Fowlett's House:
Living room:
Holmes
sees nothing. No no ....... Holmes has not suddenly become very blind ...... it
is just very dark in here. Because there is no light, which is not surprising. I
always turn off the light when I leave my home. To the left of Holmes is a
small box. On the box is a Dragon statue. There is something between the front
legs of the Dragon. Click with your hand on the
front legs of the Dragon.

The
Dragon spits fire and what was between his front legs is now in your inventory.
It is a "Matchbox", so a box with
matches. In the foreground you see a table lamp. The lamp is on a table, but it
is therefore quite dark. Click on the table lamp.
Holmes walks over and says he "needs something". So take that "Matchbox" from your inventory and click
on the table lamp again. Holmes lights the lamp and we have light.

Holmes
cautions you to be especially careful and to be alert to booby traps like that
"Boom" thing in Bromsby's office. Behind Holmes, so in front of the
dragon box, there are 2 pairs of shoes. Click on the
shoes. They are size 6. At the shoes you can see, faintly, a few
footprints on the wooden floor. Click on those
footprints with your Tape Measure. They have Size 7.

Now
walk further into the room via the bottom centre of the screen. On the next
screen you will see the large sideboard, a green table in front of the
sideboard, a sofa and the table with the table lamp. You also see a Clown in
the corner and there are also 4 paintings on the wall. Walk on to the Clown.

When
you reach the Clown, click on each of the 4
paintings hanging on the wall here. Holmes says that all 4 show a
landscape near Epinal. Holmes also tells you to pay attention to Hidden Images
in these 4 paintings. Number the 4 paintings, from left to right, as 1, 2, 3 and 4. Then click again, one by one, on
each of the 4 paintings and look at them carefully and carefully and look for
Hidden Pictures. You will find that:
|
In
Painting 1 you see the head of a deer in the bare tree. |
Close
the close-up of the last painting you viewed and then click with your hand on
the Clown. You enter the close-up of the
Clown Automaton. So it is a mechanical card game but a coin is required to play
it. And Holmes doesn't have coins. So close the close-up and walk back a
screen. You will see the large sideboard and the table in front of it again. On
the right side is a yellow toy under the table. Grab that yellow toy. In your inventory you will experience
that it is a "Wood Toy".

Go through the slanting feet at the bottom left,
a screen to the left. Holmes then stands in front of the large bookcase.
Click in the bottom
shelf of the bookcase. Holmes takes out a
book.

It is
a poetry book. You can read this "Poetry" page via TAB C of the
inventory book. It is 2 pages 44 and 45. You read the poem: "The Villager and the Serpent". Take note
of the last paragraph circled in red. Close the inventory book and your
inventory. Holmes makes some comments on what he just read. To the left of the
bookcase you see a double door. Enter through this door to the:
Kitchen:
Right in the kitchen you see an ashtray on the
kitchen cabinet, to the left of the large white stove.
Zoom in on the ashtray with your magnifying
glass. There is ash in the ashtray. Grab the ash
from the ashtray. It is "Flaky Ash".

Close the close-up. You can see a bottle of
drink on the kitchen table. Click on it with your hand.
In the close-up you can see that the bottle is a
gin bottle. Next to the bottle is the cap and a broken drinking glass.

Click on the bottle,
the cap and the bloodied
broken drinking glass. Holmes does not dare to pick up these
things.
Close
the close-up and walk back a screen and return through the double doors to the
living room. In the living room you now click with your hand in the arch
passage, to the right of the bookcase. There's a door there and Holmes goes
through that door and ends up in the:
Corridor:
It is
rather dark in the corridor and, as befits a good detective, Holmes deduces
that light is needed to be able to see anything in this darkness. So look
carefully at what is in the hallway. First, you notice that outside the door
through which Holmes entered the hallway, there are two doors. However, the
front door, i.e. the one closest to Holmes, is locked. Furthermore, you can
faintly see a box between the 2 doors. A wet mop is draped over that box. In
front of the box you see.....Hallelujah, a lantern. So take the "Matchbox" from your inventory again and
click on the lantern. Holmes lights the
lantern and we have light.

Click on the mop on the chest. According to
Holmes, this mop was used to mop up the bloody mess in the kitchen.
Click on the door in the foreground, so the door
before the chest, and Holmes ends up in the:
Bedroom:

Stop
and look around the screen first. On the left is a large closet. There is a
mirror next to the closet on the wall and below this mirror is an automaton
that you can click on. It turns out to be a shoe polish machine. Also an
invention of that Fowlett. At the bottom right of the screen we look at the
table. The room lamp hangs above the table. On the table is a Checkerboard with a bunch of numbers on it. Click
on that Checkerboard and you will get a close-up of the:
|
Checkerboard Puzzle: Hallelujah
.... Finally a real puzzle to solve. Well, it is not difficult and that is a
pity. The board is full of number coins, but 1 coin is missing in each line /
row and in some rows there are more coins missing. These missing coins are
lying loose around the board. There are white and brown coins.
The
idea is that you put those loose coins in the right place in the empty
places, so that if you add horizontally, vertically and diagonally you will
always get 55 as a result. As said, it is
not really difficult, but to save you this calculation the solution is
here. Number
the rows, from top to bottom, as: A, B, C, D, E, F, G, H, I, J and the
columns, from left to right, as 1, 2, 3, 4, 5, 6, 7, 8, 9, 10 and then place:
A coin will now appear at
the bottom of the board. Grab this coin
and close the Close-up.
|


You
are immediately on the next screen in front of the table on which the puzzle
board is located. That thing hanging above the table turns out not to be a lamp
but some kind of drill. You can click on it to hear Holmes comment on it. On
the right you see a screwdriver stuck to the window and there you also see the
large safe. The safe says "Noah's Ark". On the wall hang 3 "diplomas".
You can click on all these things but you don't pick up anything. Our detective
finds these screwdrivers very interesting. Through the 3 diplomas you will
experience that Fowlett has been frequently in South America. The safe will not
open. Walk a screen to the right, through the slanting feet at the bottom
right. You will then see the bed and the sink in the corner. Click on the bed. Holmes
remarks very sharply that there is no pillow on the bed. Click on the sink. You come into the close-up and see a
yellowish substance on the sink. Grab that yellowish
substance.

In
your inventory you will find out that this substance are "Greasy Balls". Close the close-up. Click
on the picture hanging on the wall to the right of the clock. We see Fowlett on
it. Close the close-up. Go back via the bottom middle to the 1st screen where
you also see the large closet, the mirror and the room door. Click on the room
door to return to the hallway. Click on the door in the back of the hallway and
you are back in the living room.
Living room:
Walk through the living room to the corner where
the Clown machine is.
Click your hand on the Clown again to get back
in the close-up. You are now going to do the Card Puzzle:
|
Card Puzzle in the Clown: You
obtained a coin through the board puzzle in the bedroom. Now grab this Coin from your inventory and click it into the coin slot of the Clown. The machine turns on and
16 playing cards appear in the top left of the screen. The clown has a Right
Hand and a Left Hand. Because you are facing the clown, the left hand in
front of you is therefore the clowns right hand.
So
the raised arm / hand is the Clown's Left Hand and the lowered Arm / hand is
the Clown's Right Hand. You get 3 turns and in each click you click the Left Hand of the Clown. In the 3 boxes, in the
chest of the clown, 3 cards will appear
that belong together. The idea is that you always take the 4th card out of the 16 cards and then put this
card on the right hand of the Clown. Turn
1: Click
on the left hand of the Clown. The screens show the Hart of Ace, Diamond Ace
and the Ace of Clubs.
Which
4th card belongs to this? Take the Ace of Spades
from your 16 cards and click it on the Clown's Right Hand. Turn
2: Click
on the Left Hand again. The screens show: Hearts 3, Jack of Spades and the
Clubs 7. Which 4th card belongs to this? Take the 4
of Diamonds from your 16 cards and place them on the Right Hand. Turn
3: Click
on the Left Hand again. The: Har2, Clubs 7 and the Queen of Hearts. Take the 4 of Clubs from your 16 cards and place them on
the right hand. You WIN and the Clown
"spits" a piece of paper. Grab the
piece of paper
Open
your Inventory and click "Read" on this "Piece
of Paper". Then open your inventory book and then TAB C and click
on the "Text about Noah". Read
this text. You read about 4 animals that Noah took on board his ark. You read
that The
first animal went ashore because it was afraid of the high waves. Close
the clown's book, inventory, and close-up. Now go back through the living
room to the bookcase and through the arched passage back into the hallway and
then back into the bedroom. Bedroom: Walk through the slanted
feet at the bottom left to the screen with the safe. Click on the safe again.
You are now in the Close-up
of Noah's Ark that is on top of the safe. You are in: Noah's Ark puzzle: The
intention is to open up the safe. On top of the rock is the "Noah's
Ark". Below, at the foot of the rock, are 8 animals. They must all enter
the Ark, but 4 of these animals must do so in the Correct Order. The
note you won in the Clown shows the order of the 4 animals. From that text
you can see what kind of animals they are and you have seen these animals, as
a Hidden image, in the 4 paintings that hang next to the Clown on the wall. It
is very simple. Number the animals, from left to right, as 1 to 8.
The
1st animal in the "Text about Noah" is the Crab and that is animal
number 6. The 2nd animal in the "Text about Noah" is the deer, and
that is animal number 5. The 3rd animal in the "Text about Noah "is
the Bear, which is animal number 4. The 4th animal in the" Text about
Noah "is the Eagle, which is animal number 3. Do the following: Click
on the Crab (6). The crab climbs up the ladder and disappears into the Ark.
Holmes
says someone tried to break open the safe. There are a number of papers in
the safe. Grab all papers from the safe. They
all disappear to your Inventory book, except 1 paper. Open your inventory and
scroll to the "Piece of Paper". Click
on "Read" to also move this
paper to your inventory book. Open your inventory book and click again on TAB
C. Scroll to all new topics and read them all. So these are the following
topics: "Letter from Bromsby to Fowlett": Read about
Bromsby's cousin, one Wyatt Collins. There seem to be problems between this
cousin and Grimble. Bromsby plans to send his young cousin to work in South
America to get him out of London. The "Audience Text": Here you read about the
conviction of Miller and Kirby. They have been sentenced to 3 years of hard labour
for their part in the death of one Louis Pastiglietti, during a bar fight. Miller,
Simpson, Kirby and Pollins have also been convicted of robberies. The "Letter of Caracas" tells you that Wyatt
Collins arrived at work in Caracas Venezuela and was put to work there by the
foreman. In
the "British Embassy 13/08/1894"
you read that Wyatt Collins has been arrested by the Brazilian police and put
in prison. In
the "British Embassy 02/02/1897"
you read that this Wyatt Collins has been released. The "Draft of Sir Bromsby's Will" says
that Hermann Grimble will be Bromsby's heir, but it is only a draft will and not
legally valid. The "Letter from Bromsby to Fowlett 11/12/1896"
tells of an accusation against Grimble made by Bromsby's cousin Wayt Collins.
There seem to be problems with the tax authorities. The "Series of numbers: is it a code" finally
gives you a series of "ones and twos".
|


If you have read all this carefully, close the
inventory book, the inventory and the close-up of the safe. We then hear Watson calling. That Graham Murray found a key in
the yard. So go back to the room door via the bottom centre and go back up the
hall. Go through the door at the back of the hallway into the living room and
then walk through the lower left door to the front door. Go out the front door
and Holmes walks to Watson and receives the key found
by Murray from Watson. Click on Fowlett's front door again and open it again
with the "Key of Fowlett's house" and
Holmes will enter Fowlett's living room again. Continue through the arch right next to the bookcase,
to the corridor. In the corridor, take the "Key"
you just received from your inventory and click on the door to the left of
Holmes.

Holmes ends up in the:
Basement:
In the middle of the basement floor is a lot of potatoes and under the potatoes is a corpse. Only the feet of the corpse protrude from the pile of potatoes. Holmes calls Watson and they argue a little bit at the body. Holmes sends Watson away to get the constable. Take the Tape Measure from your inventory and then click on the feet of the corpse. Size 6.

To the left of the heap of potatoes you see a
white paper on the floor. Grab that white paper

Holmes thinks he recognizes the manuscript. In
your inventory click "Read" again on this
"Visit Card" and then dive TAB C of the inventory book again
to read this "Antiques Dealer" card.
The handwriting of this De La Vega is the same as that of Louis Phillipe de la
Musardiere. Close the book and inventory. There is nothing more to do here in
the basement, so click with your hand on the basement stairs and Holmes ends up
outside the front door.
Outside of Fowlett's house:
Via the feet in the middle left, go forward
twice to the back of Fowlett's house. You will then see a wooden barrel in the
bottom centre of the screen.
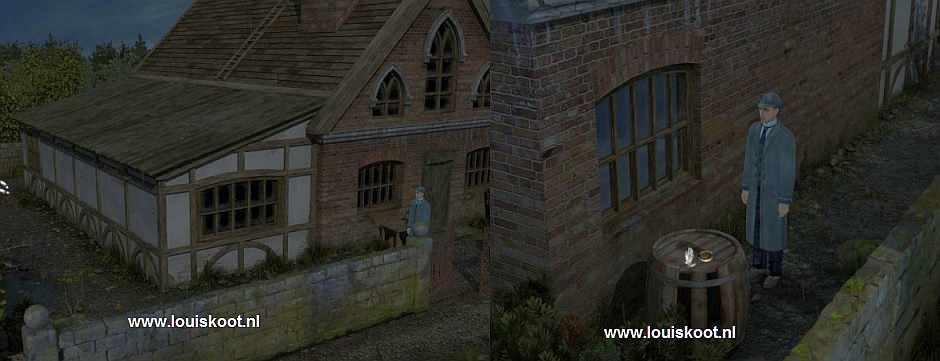
There is a footprint on top of the barrel. Click
with your hand on the barrel. Holmes walks over and makes his usual astute
comment. So take the Tape Measure again and
then click on the barrel to measure the footprint. Size 10. Now walk back to
the front of the house and then go down the middle to Constable Fletcher and
Watson, who are still standing in front of the garden of that burrowing Graham
Murray. Click on Fletcher or Watson. Holmes talks to Watson and he tells what
he heard from the station manager and we automatically end up in:
221b Baker Street:
|
QUIZ: It
is the end of day 2 and our 2 investigators are tired. But before they can go
to bed Holmes wants to check the proof of day 2. So we end up in the Quiz
again. This time it is 6 questions that you have to answer with "Yes" or with "No"
and then you argue your answer with an item from TAB A, B or C. Well
you now know how this works, so I will not explain that again . Question
1: Did
Horace Fowlett receive a caller the evening he was supposed to leave ?. Answer:
"Yes". Accountability: TAB A: Murray-Fowlett House. Question
2: Were
all of the guest in the ballroom at the time of the shooting? Answer:
"Yes". Accountability: TAB C: The development of the crime. Question
3: Did
Sir Bromsby and his daughter have a good relationship? Answer:
"No". Accountability: TAB A: Hermann Grimble October 15, 1897. Question
4: Was
Horace Fowlett aware of the problems between Hermann Grimble and Sir Bromsby?
Answer: "Yes". Accountability: TAB C: Letter from Bromsby to
Fowlett 11/12/1896. Question
5: Was
there anything missing from Fowlett's house? Answer: "Yes".
Accountability: TAB B: Fowlett's house October 15, 1897: Bedroom: Bed is not
made, pillow is missing. Question
6: Did
someone enter through the window at Fowlett's house? Answer: "Yes".
Accountability: TAB B: Fowlett's house October 1897: Bedroom: outside window
have no bars and is kept closed with a screwdriver. Fowlett's house October
15, 1897: Garden: Footprints with traces of soil of size 10 on the barrel
under the window. When
you have answered all these 6 questions again, right click to open the
inventory and then click the inventory book to close it. If you have answered
the 6 questions to Holmes's satisfaction, he will say how simple it was. If
not, go through the questions and your answers again to make the correct
improvements. Quiz well completed then we end up in: Chapter 3: Day 3: October 16, 1897: 2020: English walkthrough
by: Louis Koot
|