
2019 Walkthrough by: Louis Koot
If you have found this walkthrough via google search or via another site then you have probably not visited my site.
A lot more very detailed game walkthroughs can be found on my site at: www.pcgameswalkthroughs.nl
You are Clodomir and you fall into a hole in which garbage is dumped. You land in a underground world at a garbage belt.
The first time that you start the game you must choose a New Save Slot in witch your progress will be saved. There are 3 Save Slots witch means you can play 3 New Games. In the Options you can change resolution, language (English or French), sound and brightness. With Quit you close the game and it is automatically saved. You can not save and load yourself in this game Select New Save and the game starts. Choose whether you want to use hints (Jhom Wadson) or not (Shernock Folmes). You can change your choice at any time while you play the game.
Choose the hints. These Hints don't provide solutions for puzzles. The hint function only shows whether there is something to be done on a screen, but not whether you can find something. There are so many objects to look at in the game that it could be useful to click this function on.
Then you can choose for manual or automatic text flow. This can also be changed during the game via the menu button at the top right of the screen. Left clicking on Clodomir or on objects brings up the Action Screen in witch you also have the inventory. With the Icons in the Action Screen you Look at things, Talk to people and Take objects.
You also must open up the Action Screen to use items from inventory with other objects in the game screen, or to give an inventory item to other people Well.......Click one of the 3 New Save Slot to start a New Game and.....we start with the |
Intro / Tutorial

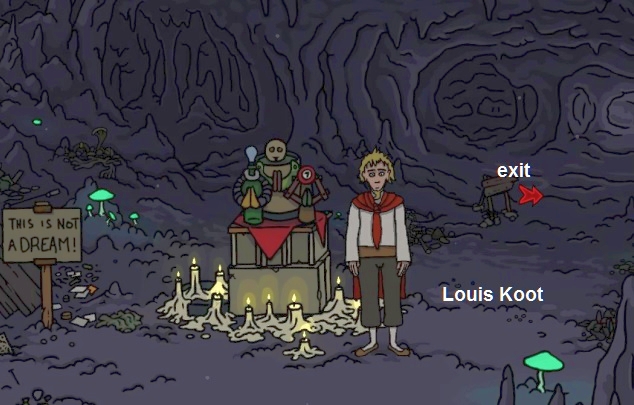
In the dotted circle on the screen, you can see Clodomir lying on a mattress on top of the dirt from the upper world that has been dumped there. Left click 3x and you activate Clodomir. Clodomir then ask whether you want to hear about his dream. Choose yes and then click the red arrow, so Clodomir comes down.

When Clodomir has come down from the junk pile he will tell you about his dream. Behind Clodomir stand a sign and an altar.

Left click on that dusty sign to open up the action screen and then click the eye icon and listen to what Clodomir has to tell about the sign

An old Rag is hanging on the sign

Left click on that Rag to open up the action screen on it and then click the Take Icon to take the Rag

Left click the Sign again to open up the action screen on it again and now click the Rag icon to use the rag on the dusty sign

Clodomir wipes the sign clean with the rag
When Clodomir has wiped the sign clean he tells that there's something missing.......There's no Music....But now the in-game music starts and your tutorial is over. Bottom left in your screen stands a barrel and on that barrel lies a book....it's Clodomir's JokeMag book

Go to the barrel and open up the Action Screen on the JokeMag book and then take it via the Take icon.

Now go to the little altar.

Open up the action screen on the little statue that stand on the altar and then view it via the eye icon.

On top of the statues head stand an Almost-Gear. Take at that Almost-Gear via the Take icon in the action Screen.

On the right side of the altar lies a Felt Tip Pen on the ground. Open up the Action Screen on the Felt Tip Pen and then take the Pen.

Find the red arrow, behind Clodomir, that points to the right and then click that arrow to go a screen to the right
Clodomir goes to the next part of the cave and he sees the Village, below the stairs.

Behind Clodomir is a Bug Zone, but it's been closed off with a ribbon fence. Under the ribbon stand a Note. In the middle of the path lies a Tin Can on the ground and on the stairs lies an Old Sealed Book Scroll. Click on the Ribbon of the Bug Zone and then click the Eye icon or the Hand icon and.....

The game developer appears, who promise to remove the ribbon soon.

Open up the action screen on the Note and then read the Note via the Eye icon

Clodomir reads that Horace is the mayor of the village below the stairs and that Horace has declared the Bug Zone as a "No Go Area" for the villagers.
Take the Note via the Hand icon of the action screen

See that you can find pure water in the little water pool on the rock. Pick up he Tin Can, that lies in the middle of the path, via the Hand icon of the Action screen

Finally pick up the old sealed scroll that lies on left side of the stairs.

Clodomir reads the scroll and the player gets the hint that by right-clicking the hotspots can be seen. The scroll crumbles and disappears from the inventory.
Now go down to the village, via the red arrow on the stairs
Village:
A: Get your ID Tankard
You now have had enough practice with the action screen, so you now must know that you must left click on things to open up the action screen and then click the icons in the action screen to talk with others, to look at things, to take things and to use an inventory item. So from here on I'm not going to tell you this anymore.
Clodomir has arrives at the square of the village. Look at everything first via the eye of the action screen

In front of the left house sits a guard in a chair. On the guard house is a large golden Gear. In front of the house stand a sign pole an at that sign post stand a Brazier and an oven. The sign post points to "Offerings" sacred site, where Clodomir came from......Around that sign post are rocks and one of those rocks is a "Perfectly cube-shaped rock. The Brazier is full with a kind of luminescent powder that smells like lemon
At the water well stand a barrel and a bucket. The barrel is full with water and the bucket is half full with water. In the brick wall of the water well is a Toaster imbedded and on the wooden beam of the well sticks a Crank and a Pulley. Behind the well is the Tavern "The Beauty and the Beer".

Do not enter the Tavern yet. On the left side of the Tavern door hangs a poster, above a chest that's on some crates.
Read that poster...you read about Klang, the best blacksmith of the region.

Blacksmith Klang makes Personal Drinking tankard's.
The path between the Tavern and the guard house goes to the Church and the graveyard. Between the water well and the left house is a big hole in the ground...the hole is covered of with planks. If you go down from the hole with your cursor you'll find a Golden Coin on the ground. But if you try to pick up the Golden Coin then the Guard won't permit it. When you have looked at everything go talk with the guard, his name is Garcia.

Use all talk options that you get

It's Garcia job to checks the identity of everyone who enters the Tavern. Garcia has no idea of the upper world, where Clodomir came from, and that his underground world is a rubbish dump. Garcia points Clodomir to the mayor of the village, who is in the Tavern.
When the conversation with guard Garcia has ended then take that "Perfectly cube-shaped rock", that is standing at the right site of the sign post

Now try to enter the Tavern.......but....Garcia yells that Clodomir must show him an ID...So Clodomir can't enter the Tavern. Go talk with Garcia again and say "I'd like to enter the tavern" and......Garcia tells Clodomir that he need a personal Tankard with his name on it to enter the cafe. But Blacksmith Klang, who makes those tankard's is in the tavern and Clodomir can't enter there because he has no tankard......There's nothing else to do here at this moment.......Clodomir must firs get a personal tankard with his name on it because without it he may not enter the tavern.
Go a screen to the right, via the red arrow you get on the right side of the water well, and........
Clodomir then is at the right side of the village and at the smithy of blacksmith Klang.

A thing protrudes from the ground. In the smithy stand a grind stone and a crafting table at the worktable. On the worktable are tool heads and at the hearth stand an large anvil. You can go back to the water well via bottom left. 2 giant cartwheels are leaning against the left house. On the post of the stairs, left of the smithy, sticks a Notice....go read that Notice....it says something g about an archive key......

So that house with the stairs would be the Archive of the village. Look at everything that you can look at in the smithy. In the barrel are a blunt pickaxe and a blunt shovel. The crafting table can be used to combine objects from inventory together. Lets try this now....... Open up the action screen on the crafting table and then click the gear icon and.....

.........you go into a close-up of the crafting table and see that you can combine items from inventory together on the crafting table.

We don't have items to combine yet, so go out this close-up via the red arrow that you get beneath this close-up screen. On the worktable are pickaxe, shovel and hammer heads. At the right side of the smithy stand a sign post go read where that sign post points at....it points to the "Cursed Garbage pile".....Click the read arrow to go to that garbage pile
At front left of this huge mountain of garbage lies a Lettuce Leaf. At front right lies a green Apple.

Pick up the Lettuce Leaf and pick up the green Apple.
Go back to the smithy via bottom left and then back to the well and the tavern.
Back at the well and the tavern you click the red arrow on the path left of the tavern and.....Clodomir ends up at
The Church

A girl reading a book sits on the bench. On the church wall are a few notes and there's some Saltpeter on the wall, left of the doors of the church . The left side of the church is a dead end. On the right side of the church it goes to the gravedigger and the graveyard. First read all the notes that are on the church wall and look at the Saltpeter......Clodomir can't take the salt pepper yet because he needs a tool for it. Then go talk with the girl on the bench, her name is to Peige, and ask all questions.
Peige tell that Horace is the mayor of the village. Peige may have a tankard but she doesn't want to give it to Clodomir. When you ask Peige about the book that she's reading she tells about it.....Every time you go talk with Peige and ask her about her book she will tell you the next story from her reading book. That story will be similar to the problem that Clodomir is facing, but Peige does not give the solution to the problem because that is always on the next page. But the book that Peige is reading can give Clodomir a hint to solve his problem.
Enter the church when you've talked with Peige. Take the Holy Candle, that lies on the pew to the right.

The altar has 4 tablets with inscriptions......Look at each of those 4 inscriptions via the eye icon and listen to what Clodomir tell about them

Then go talk to priestess (Faith keeper) Aoum and ask her all questions. Aoum can not help Clodomir with finding a tankard and she also does not know the way to the surface.
Leave the church when you're done taking with Aoum and then take the path on the right side of the church and.....Clodomir ends up at
Gravedigger Crok and the Graveyard:

Talk with the gravedigger, who's name is Crok. Ask all questions. Crock doesn't have a tankard anymore.
After this weird conversation take the Bottle of detergent, that stand on the shelve behind Crok

The Detergent bottle is almost empty. Now go to the Graveyard:
The first tombstone on the right is Bram Stoker's. At Bram Stokers tombstone lies a little wooden Moon.....Pick up the Wooden Moon.

At the 3e tombstone on the left stand an Ordinary tankard......Look at that Ordinary tankard and the take this Ordinary tankard....

Go back to Crock and.....Crok does not like it that Clodomir has taken the tankard from the grave,.....

Crok sends Clodomir back to the cemetery where Clodomir puts the tankard back at the grave.......Clodomir has to get rid of that weird gravedigger Crok so he can take that Ordinary Tankard of the graveyard.. Without the tankard go back to Crock and then back to the church. Talk with Peige again and ask her about her book again via "What's new in Richardor's world?" and.......

Peige reads on the next page of her book about a similar problem as Clodomir has with Crock and in fact she gives Clodomir a hint how to get rid of Crok....
The hint is clear.....Clodomir must have on order from the mayor to get Crok out of the way. Clodomir has that Note of the mayor, from the ribbon fence at the beginning, in inventory. Maybe it can be used to sent Crok away. Go back to Crok and give him that Note from the Mayor and......Crok goes away because he's a law-abiding citizen

Go back to the graveyard and pick up that Ordinary tankard again

Go back to the Village
Village:
|
Combine Items in inventory: Go to the Smithy again and open up the action screen on the Crafting Table and click the gear icon to get in the close-up.
You are now going to combine some inventory items together on the Crafting table. The left screen is the crafting table and the right screen is Clodomir's inventory. Click in inventory on the Rag. The rag will be put on the table. In inventory click the Detergent bottle to put it on the table also.....
Now click the Hammer / Saw button to combine the detergent with the rag and.....you'll have a Rag soaked with detergent in inventory. You now know how to combine items from inventory on the crafting table. Now combine the Ordinary Tankard with the Soaked Rag to clean the tankard......
The name on the tankard is Domir and that has to change. So combine the Tankard with the Felt Tip Pen and....
Clodomir write his name on the tankard and he now has his own personal ID Tankard . Go out the close-up and go to the Tavern.......Try to Enter the Tavern again and......Guard Garcia yells again about showing him your ID. So open up the action screen on guard Garcia and then click the tankard and......
Clodomir shows Garcia his tankard....
.Clodomir may now enter the Tavern so.......enter the Tavern now.... |
Tavern:
Mayor Horace sits behind his desk, with a pile of files around him. Go talk with the Mayor

.......Mayor Horace does not understand Clodomir's story about the world above and he refers Clodomir to Aoum for spiritual questions.
A grounded child sits at the table, left of the mayor. Look at the child.....The child refuses to eat its soup and therefore it's grounded here as punishment. On the left side of the bar stand a bowl of fruits and a bowl with lemons.......Look at both bowls.....Try to take a Lemon from the lemon bowl.....but Clodomir doesn't want to take a lemon now because he doesn't need one right now. Go talk to with Innkeeper Cervoise, who also knows nothing about the outside world of Clodomir. A man is sitting at the bar.....go talk with him.....his name is Atlas. Atlas tells a joke
On the table with the 2 sleeping guys stand a Salt Shaker full with salt......Take the Salt Shaker.

Exit the cafe. Let's take the mayor's advice to go talk with Aoum again, so go back to the church and enter. Talk with Aoum again and say "The mayor said you could help me"...... Aoum wants to help Clodomir, but only if Clodomir proves that he really comes from above. Aoum wants an LR3 battery as proof.

B: Find LR3 battery
Exit he church and go talk to Peige again and ask her "Do you know where I can find an LR3 battery?".......
At first Peige says that she don't know anything about such a battery but if you ask again she says that the gods might help to find the battery. Ask Peige about her new book that she's reading and.......She tells what her book is about and this a hint about where Clodomir could find a battery..... Clodomir must go to the holiest place of the gods.
Go back to the village and then to the Smithy. Blacksmith Klang is at work in his smithy now......Go talk to Klang, but has nothing important to say .
Go back to the left, to water well and Garcia house. Take the EXIT on the left side of the Garcia house, to end up at the top of the stairs.....

Look......the ribbon fence is gone now but don't go in that tunnel. Click the red arrow at bottom left and........ Clodomir is back at the altar in the starting cave.

Open up the action screen on the statue that stand on the altar and then use the Holy Candle with the statue and......

Clodomir places the candle on the ground and then ask the statue for help and....

The Holy candle gets lit and of the candle falls over and there's now a Remote Control on the ground....Pick up the remote control

Go back to the right and now enter the cave, that was earlier closed off with the ribbon fence.

In the cave sticks a Pocket Knife in a triangle "Skull" stone.....Take the Pocket Knife that sticks in the skull stone.

The tunnels here are the Maze. If you go any further into these caves now then Clodomir will get lost but he will eventually automatically ends up at the church. Save yourself the hassle and go right back to the Village now via bottom right and then down the stairs. Go back to the Smithy and use the Crafting table again.
On the crafting table you combine the Pocket Knife with the Remote to take two LR3 batteries from the remote

Then combine the Pocket Knife with the Almost-Gear to repair the Gear.

Clodomir now has 2 LR3 batteries and a Perfectly perfect gear. Zoom out and run back to the Church and give the 2 LR3 batteries to Aoum and....

Well.....Aoum is also from the surface but she doesn't know a way back up. Hyssein is the only one who knows the way to the surface and Crok is the only one who knows where Hyssein lives
So leave the church. Outside use the pocket knife on the Saltpeter to scrape some of it off the wall.

Talk to Peige again about her book to get a hint about the maze. Then go to Crok, who has returned, and ask him about the Maze...

Crok tells about a Head that guide him through the maze and that he got that head from Hyssein. Crok doesn't want to lend the Head to Clodomir because it tells him stories.
C: Find Hyssein:
Say goodbye but don't leave Crok...Left click Crok again to open up the action screen again and now use the JokeMag book on Crok and Clodomir may take the Head in exchange of the Joke book. Crok has put the Head on the barrel, so take the Head, witch is a compass that can guide Clodomir through the maze

Go back to the cave where you have found the pocket knife
Through the Maze
Back in the cave, where Clodomir found the Pocket Knife, the Head comes out the inventory and will float in the air. Listen to the Head and talk to it......
The Head knows the way through this maze to that Hyssein guy so Clodomir must now follow the Head through this cave maze.

The Head will "fly" through the caves and you must follow the Head by clicking the red directional arrows. The Head won't wait for Clodomir to follow him, so pay attention to witch direction the Head goes. The Head goes left, so follow the head to the next screen. The goes left again so follow the head.

Now the Head goes right, so go right to the next screen. The Head goes up the stairs in the tunnel, so follow the Head up the stairs.

The Head goes right again but wait a minute before you follow the Head again. You can pick up a Scroll here, Open up the Action Screen on that Scroll and pick it up...The scroll gives the tip to double click to go faster. After reading the scroll Clodomir destroys it. No follow the Head to the right and......You see the Head at top right and it's going to the right again, so double click the right red arrow to follow the head a screen to the right and.....

The Head is stationary now......Clodomir think that the Head is lost but the Head says that his body is laying on the ground here. Talk with the Head and ask it all questions...The Head tells about a bubblegum that is in his pouch. Go to the "Dressed up skeleton"....it's the body of the Head, so this skeleton is headless. The skeleton has a "Plump leather satchel"......

Open up the action screen on that satchel and then Use the satchel via the gear icon and.......
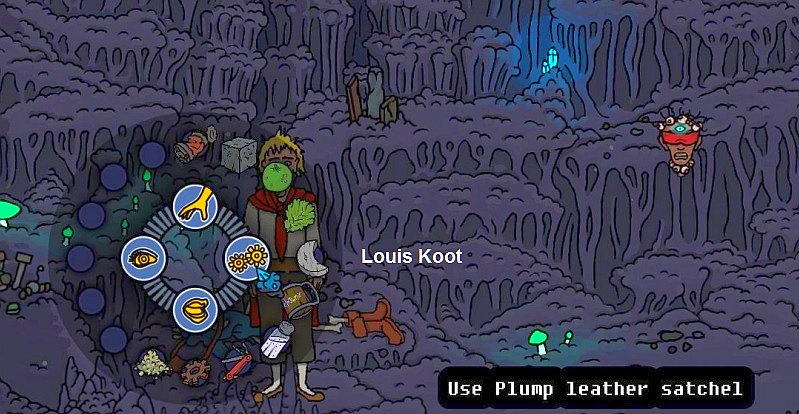
Clodomir takes several things from the satchel such as a bubblegum and a Map of this Maze and a Taffy
That Maze Map goes to the top of your screen. Left click the Map, witch is called "Babyrinthe" to open the Map.......

You can't travel through the map, so close it via the red arrow, above or below the map
Open up the Action Screen on the Head and then give the Bubblegum to the Head and........

The Head will stay here but says in a vague way where Hyssein can be found, so Clodomir must find that Hyssein on his own now....
Use the Exit at bottom right to end up on the next screen.... On a pile of wood lies a Star Shape...Take that Star Shape......

Go back a screen left, via bottom left corner .....you will not come back at the Head but on the screen withy the Stair tunnel.
Near Clodomir stand a red Disturbing Mushroom.....

If you try to take the mushroom than Clodomir does not want to touch it with his bare hands.....
So use the Empty Can on the mushroom to pick it up

You see in the maze an occasional kind of leprechaun, which disappears when you look at it. To get to that Hyssein, you have to get back to the head. Go back right via bottom right corner..... You see a crushed fez in the upper left corner, which you can not catch. Go right. You are now back where the mushroom was, but then on the middle path. Go up the stairs in the cave. There is, among other things, a pair of pants at the top left, but there is nothing to do at this place. Go to the right and you are again where the mushroom was, but on the upper path. Walk to the right and you are back at the head.
Now go to the right and...your back on the screen were you took the Star Shape......Now go into the cave, that is now open in the middle the screen.

Clodomir arrives at a house in a lake and the map is gone.

We continue in
2019 Walkthrough by: Louis Koot


