The
House of Da Vinci
2018:
Walkthrough by Dick Leeuw
Text
and screenshots by Dick Leeuw. Lay-out and web design by Louis Koot
If you found this walkthrough via google search then you have not visited my site. More game walkthroughs can be found on my site www.pcgameswalkthroughs.nl
Chapter
One: The Street
|
When you start the
game do not start a "New Game" immediately.... the first thing you must
do is to click on Profile and then type in a name and click on enter. If you don't make a
Profile first then you can't start a "New game"..

After you've made a
Profile you can Start a "New game"....You play that game under the
Profile name you've first had to make.
The first part of the game is a tutorial.
Zooming in or moving
forward is done by double clicking with the left mouse button.
Zoom out or back out
by clicking with the right mouse button.
|
You'll see a number of
white arrow heads flying past, after 3 times the arrow remains on the soldier,
this arrow head is your mouse pointer.

Double click on the soldier to zoom in. The
soldier has a roll of paper in his hand. Click on the paper roll.
The paper roll is now in your inventory, on the left
side of the screen. You'll also see an
icon with an X at the top right corner and that X will take you to a menu. The items
on that menu speaks
for themselves.
If you have played "The Room"
games before, you will recognize this, including the top left button, witch indicates that
there are hints. There is also a lens on the right side.
With that lens you can see
hidden things, often that is text but also hidden mechanisms.
Click on the letter
in your inventory, which will now appear in the picture. Slide off the ribbon
and read the letter.

Click the letter
away, you are back at the soldier. Click right to zoom out.
Then double click on the door to zoom in,
then double click on the bell with the mailbox below it.

You see an arrow,
spinning around the upper part of the bell, turn that part to the right with
pressed LMK (left mouse button).
Now a ring appears under the bell.
Turn the bottom ring to the left, until
you cannot turn it further, 2 arms rise.

Pull the chain, the
weight on the other side hits the bell.
Now a part of a key
falls in the dish under the bell, pick up this part.
This piece is now in
your inventory, you will also see a + sign at the bottom right of the key.
This means that
something has to be added.
Double click on the
mailbox, zoom in on the button on top of the mailbox.
Pull the upper part to the right and you
will find the other part of the key.

Click on the first
part, this will now appear in the screen.
Now drag the second
part to the first part and slide them together, then twist them together.
The tutorial shows this.
You have to use
the key somewhere, right click to zoom out.
You'll see a slide
under the edge of the mailbox, zoom in on it.
Slide the slide to
the left and you will find a keyhole.
Drag the key there and turn the key
counterclockwise, the door of the mailbox will open.

Pull this mailbox door open
further, inside you will find a magic lens, the Oculus Infinity, take this magic
lens. Turn to the left and zoom in on the center of the door.

The magic eye is now
in the middle right, drag the eye upwards to activate it.
If you click on it,
it becomes inactive again.
You now see a hidden
mechanism in the door.

You now have to turn
the 3 discs so that the openings in all 3 discs point to the center.
The door then unlocks
and pops open.
and
you'll see a movie
in which there is an explosion in a tower.
Then push the door
open and go inside, go to the door at the top of the stairs.

Chapter
Two: The Library
There is a lamp in
the middle of the room. On that lamp is another letter.

Zoom in 2x and slide
the seal off, this is now in your inventory.
Then read the letter,
there is talk of a hidden passage and another invention.
Then click on the seal, it comes in the
middle of the screen.
You can see that you
can rotate the middle disc, put the 2 points together and 3 spokes pop out.

Zoom out and turn
left and zoom in on the bust, zoom in on the box below.
Slide the plate in
the middle to the side, there you will find an opening for the seal.

Drag the seal there
and then turn it around, you automatically zoom in on the bust.
Click on both eyes
and the helmet will pop open.

Pull the helmet all
the way back and you automatically zoom in on the inside.
It is a twist and slide puzzle. You have to
put the larger colored stones between the stones of the same color.
Puzzle solved then you automatically zoom
in on the front of the box.
There is now a handle
on the place of the seal, pull it forward, in the drawer you will find a magic
glove.

You see that you put
the glove on.
Zoom out and then
zoom in on the other half of the helmet. Pull up your magic lens.
You see a hidden
mechanism again, slide the left gear down and turn it clockwise.

Slide the right
sprocket down and turn it anticlockwise, you will see a wooden rose in the space
below it.
Grab the rose,You
see that you still need something with the rose.
In the same space you
will also find a curved piece of wire, also take this one.

Zoom out and zoom in
on the bottom of the turret below the box.
Then pull the magic
lens up and you will see a cross at the bottom of the tower.
Zoom 2x in on that
cross and slide that piece to the left, you will see a slot there.
Drag the piece of
wire to the slot, turn it to the left.

You can then pull out
a drawer just above the slot. In the drawer you will find a piece of an
ornament.

Take this ornament
piece and zoom out. Then zoom in on the left corner of the box.
Then drag the
ornament to it and slide the 3 parts towards each other.

When it is one piece,
a hatch opens up above it, you see a wooden role.
Turn the roller
around and find a bronze screw, take it out.
Then click on the
wooden rose and then screw the screw into the hole at the back of the rose.

This is now complete.
Zoom out and turn to
the lamp in the middle. Zoom in on the panel above the letter.
Drag the rose to the
hole at the bottom and 4 panels open.
You now have to push
the rose upwards, every time you do this the tiles turn around.
On the first panel
you go up, on the next you have to go down again.
Then back up again
and down again on the last panel.

It is not that
difficult.......You can also use the magic lens to see the path you have to
follow.
When you are at the bottom of the fourth
panel, the rose opens and there you will find a key.
Take this key
and.........the
lamp now sinks for the most part in the floor.
You can search the
book cases.....You will find 3 books with the names of the Kick starter backers.
You'll also find a
drawing of a press, this is an achievement and not necessary for the game.
Turn to the box and
zoom in (3X) on the top of the tower and you will find a keyhole.
Drag the key there
and turn it counterclockwise, the top opens.

Take out the
ornament, click it in your inventory and then pull the handle up.
The square bottom is
now octagonal, zoom out completely and turn to the lamp.

Zoom in on the top of
the lamp, where the octagonal ornament fits.
Drag it there and
turn it clockwise until you cannot go any further.

|
A beam of light falls
on lens / mirror 1, hence on mirror 2.
-Turn mirror 2 so
that the light beam goes to mirror 3 and further to mirror 6.
-Turn mirror 6 so
that the light beam goes to mirror 4 via mirror 5.
-Turn mirror 4,
the light beam should now go to mirror 7. The light beam continues to mirror 8.
-Turn mirror 8 so
that the light falls on the lens, the top closes and a light beam goes to the
bookcase.

Zoom in on the
bookcase and zoom in on the book to the right of the book with the yellow cover.

The book will be in
your inventory. Click on the book, this is now in the middle of the screen.
Turn the book with
the spine forward.
Then pull the 2 ends
down first and then the middle part, there you will find a button.

Press the button and
the book opens, read the letter and then pick up the Oculi Tempus.
This is the time
lens, with which you can look in the past.
|
Turn to the corner on
the right of the bust, pull the lens down.
You will see white
drops on the floor, click on them.
You will now see a
figure, you must draw it with you with your pressed LMK.

Then a time bar
appears at the bottom of the lens, slide the button to the right and see what
happens.
You see a shadow walking towards the wall
and pressing a panel.

Zoom in on that panel
and click on it. The bookcase slides slightly backwards.
Push the piece of
bookcase further backwards and you will find the corridor to:

Chapter
Three: The Workshop
Before you on the
table is a catapult tower, there is a lot to see and a lot has to be done.

Read the letter that
is on the table.
Zoom in on the 2
soldiers on top, turn the soldiers over.
If they both look
backwards, a 3rd soldier comes up.

This soldier has a
wheel in his hands, take this wheel. Then this soldier sinks down again.
On top of that you
can see 2 more wheels, turn 1 of the 2 wheels around until 1 flag rises. Turn
until you cannot continue.
Do the same with the
other wheel until you cannot go any further.
You now have 2 flags
and you automatically turn to the left side of the catapult.
A hatch opens and an
axle is pushed out, also a thin shaft is pushed forward.

Zoom in on the tip of
that thin shaft and drag the wheel from your inventory to that point.

Turn the wheel to the
left to put tension to the catapult, a stone rolls towards the end of the arm.
A hatch opens at the
bottom right, pull the ring to open it further.

In the hole there is
a metal part on the left, take this.
On the right you see
a trigger mechanism, pull it and a fireball is shot.
This ball lights up a lamp, you have a view
of a globe.

You are behind the
table with the catapult again, zoom in on that globe.
Then zoom in (2x) on top of that globe.
You now have to twist the top button and
the ring underneath in such a way that the patterns fit with the disc at below.

First turn the ring
so that the surfaces connect, then the top button.
If they are in the
right position, the disc pops up, pull it open completely.
Inside you will find
metal sun, grab this sun.

You see that this sun
needs something else.
Click on the sun and
turn it around, at the back you see 2 slots.
Now drag the metal
part that is in your inventory to the sun.
Now slide the 2 parts
together and turn the metal part so that it is stuck to the sun.

Zoom out and then
zoom in on the round disc in the middle of the globe.
Slide the 2 half
covers to the side, below you will find 3 discs.
You must rotate these
discs so that they form a kind of keyhole.
First the smallest
drive, there must be a sort of T.Then twist the other
2 discs until they coincide with the T.
Now drag the sun
here, it fits into the keyhole. Now turn the sun around until you cannot go any
further.
The outer shell of
the globe is now loose, move both halves aside.
Also 2 smaller rings
have now emerged.

Zoom out and you see
a desk behind the globe, zoom in on
the paper roll on the desk behind the globe.
Read the paper roll, there is a mechanical
toy hidden in the globe.
Zoom out and zoom in
on the wad of paper on the left side of the table.

Pull down your time
lens, you will see another figure that you have to copy.
Then you find the slider again, slide it to
the left. The paper is unfold.
Here you see 4 names, write down these
names and also the place where they are on the globe.

Zoom out, look at the
inkwell on the left.
Now pull the
inkwell to the left and at the disc underneath it, a plate will slide to the
left.
Then zoom in on the
inkwell and in the slot before you see a button, slide it to the right.

A plate is now
sliding away on the right side of the disc. You are now zoomed in on the disk.
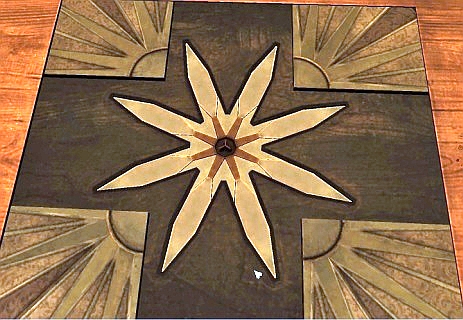
Now draw the 4
quarters of the disc to the corners, you will now see an 8 pointed star.
Now zoom 2x out and
then zoom in on the leg of the table, slide the panel up.

Take the strange key
out. Click on the key, at the top is a little disc horizontally.
Place this little disc upright and at the
bottom of the key a little plate will be placed horizontally.

Click the key to the
inventory and zoom out-2x.
Then zoom in on the
globe, zoom in on the leftmost ring.

Now pull the magic
lens up and you will see 5 scrolls with letters, these roles can turn.
Do you remember the
names on that paper and their place, if you have made a drawing then you know
that this must be TERRA.
Fill this in on the rollers and the small
ring turns away also twists the middle ring of the globe.

The small ring is now
above on the right side.
Zoom in on that ring
right above, this is now closed but on the right you see a button that you have
to push up.
The ring is now open,
pull the magic lens up and you see another mechanism.
If you look at your
drawing you will see that you have to fill in SIDUS here.

The clamps are
released and the small ring turns away, the upper part of the globe also twists.

Zoom in on the ring
at the bottom left, also this is closed but there is a button on the ring.
Slide the knob to the
other side and the ring is now open, pull the magic lens back up.
You have to fill in
LAPIS here, the ring is moved and a part of the globe is twisted.

Zoom in on the ring
at the bottom right, this one is closed too. There is no button in the ring but
1 in the bar on the right next to it.
Slide the button from
the rod, click it to your inventory and click the button again and place it on
the ring.

Slide the button to
the other side, pull the magic lens up again.
Here you have to fill
in IGNIS, the ring has disappeared and the bottom part of the globe is twisted.

You now see a zigzag
gutter on the globe, zoom in on the beginning of the gutter.
Drag the key from
your inventory the beginning of the gutter, turn the key.

It now goes down
through the gutter, after which the globe opens up. Pull the globe completely
open.

Zoom in on the
playing field, you see the map of Europe with 7 towers.
First take a look at
the board with the text, it shows what the intention is.

You start in Sardinia
and you have to conquer the rest of Europe, you can only move the towers through
the slots.
You must always
attack that country with the least soldiers.
You can also use the
conquered countries to attack other countries.
The sequence of
attacks and conquest then becomes:
Sardinia: 14, 29, 32, 19, 38 and 77.

When the first round
is finished, 6 sunken towers become visible, from a 7th hole a metal button
comes up.
Take this button and
zoom out 2x, zoom in on the desk behind the globe. Zoom in on the star.

Drag the metal button
to the center of the star, now twisting this button a little.
You then have 8
shorter rays on your star, slide these rays out.
The middle part now
rises, zooms in on the button and click on it. You will find another tower
there.

Take the tower and
click it to your inventory, then zoom out a number of times until you see the
globe again.
Zoom in on the globe
and further on the playing field, now place the tower on the metal button.

Now the 6 other
towers also come up and you see the board with text turning, go and read the
text.
The second round: 20,
28, 30. 47 and 58.

There are now 8 more
towers coming up and the board with text has changed again.
Go read the text and
then see what the lowest number of soldiers you can attack.
That is not always
the lowest number, but you cannot reach that lower from a red area.
The third round then
becomes: 100, 123, 46, 143, 34, 300, 55, 351, 512 and 790.

The tower in Africa
then slides aside and a solid ring now comes up.
Slide the knob to the
other side and the ring is open then pull up the magic lens.
You now see 3 round
discs and a shield.

First turn the middle
90 degrees, the left 45 degrees clockwise and the right 45 degrees
counterclockwise.
You can now slide the shield out, take the
shield out of the drawer to the side of the globe.

The globe closes, you
are done with it. Zoom out and zoom in on the slingshot.
Turn to the back
there you see the same shield, on the other side there is a place for another
shield.
Zoom in on the slot
you see there and drag the shield towards it, pull the shield down.

The back opens, pull
both halves open further.
On the right side is a key, in the middle
hangs a handle behind 2 sliders.
Take the key and then
slide the top slide down first and then the bottom slide to the right.

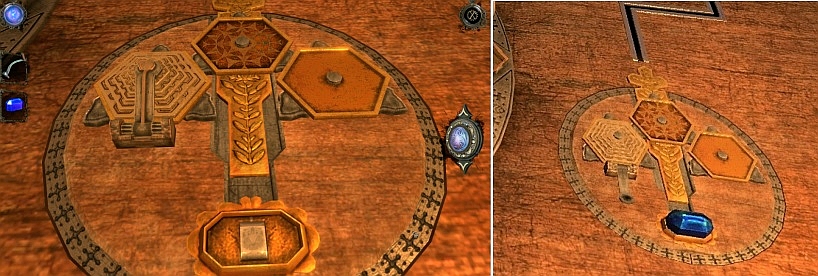
Take the crank, then
look at the wheel on the left above the 2 wheels, zoom in on it.
Then drag the key
there and turn the key, the wheel comes out.
Inside you will find a blue crystal, slide
the crystal to the right. Zoom out and go to the front.

Zoom in on the round
puzzle to the right of the catapult.
Drag the blue crystal
to the box at the bottom of the circle, the left clamp opens.
It is now the
intention that the stack of disks on the left will be moved to the middle.
It is not that
difficult, but more than 30 steps are needed.
LM means a disk from the left box to the middle box
Here is the solution
for this puzzle:

When this is done,
the circle turns around and you will find an opening for the crank.

Drag the crank to it,
the turret that stood on the right side of the table slides through the slot to
the circle with the crank.
The turret opens and
you see 2 bulbs on each other, this is the aiming mechanism for the catapult.
Then pull the magic
lens upwards and then turn the crank.
You see that there is
a drawing on both the globes.
Turn the crank until
the 2 drawings are above each other and form one whole.

Well, the catapult is
well focused. Zoom out.
Now zoom in on the
turning wheel on the left side of the slingshot, turn the wheel counterclockwise
to put tension to the slingshot.
Click on the trigger
on the right and the catapult shoots a fireball again.

This falls into a
fire pit that stands next to something that is hidden under and behind a
curtain.
Go there by double
clicking on it, then pull the cord.
The curtain slides
open and you will find a slender tower there.

Zoom in on the bottom
of the tower and there you will find a tetrahedron,
grab it.
Zoom out and then in
on the spire, there you see a triangular hole.
Drag the tetrahedron
towards it, that part of the spire will open.

Pull this part
completely open, a statue slides down and you will find a puzzle almost at the
bottom.
You need something
else to solve this, zoom out.
Then zoom in on the
piece that hangs down and take a disc off it, it has 2 holes.
Then go back to the
puzzle below, drag the disk here.

You
have to put the blocks in the right place.
Slide
the I to the left, the II down into the groove, then the III to the left against
the I.
Turn
the disc so that the other groove is at the top, now the IV to the left and down
in the groove.
Move
the III and I to the right and in place, place the IV up and to the left.
Turn
the disc, the II up and then to the left in place.
All
4 blocks have disappeared and the puzzle has been solved.
The
panel with the disc opens and you find a cube there, take it.

Zoom out -2x- and
then zoom in on the spire, go to the panel to the right of the open compartment.
Here you will find
the opening where the cube fits.
Drag the cube to the hole, which comes off
the spire

Pull this section
down, another statue will slide down.
On the panel below, a
rose opens and there you will find a push button.
Further down a panel
goes up, you see a similar puzzle as the first one.
Zoom out and then
zoom in on the rose with the push button, press the button.
A hatch opens and
there is another disk with 1 groove.

Zoom in on it and
pick up the disc, then zoom in on the puzzle below.
Drag the disk towards
it and then slide IV in and then the I, then slide the III into place.
Then turn the disc to
the right and slide I out and in place.
Turn the disc to the
other side and slide the II in, then turn the disc up.
Slide the II out and
to the right, turn the disk to the left again and place the IV in its place.

A cylinder now comes
out, on top you see a valve and 2 locks.
Zoom in on the flap
and open the locks, slide the flap backwards.

Take the object out,
click it away. You zoom out and the cylinder slides back inside.
You automatically
turn to the front of the tower again.
Click in your
inventory on the object, then turn the ends inwards and you now have a sphere
Zoom in on the
tower's spire and go to the left, there is a round hole.
Drag the sphere
towards it, part of the spire opens again.

Pull it open further
but it does not go down to the bottom, the statue goes halfway.
Zoom in on the statue
and rotate the statue, pull the panel completely open.
On the inside you
will find a disc, zoom in and turn the half circles aside.

Then click on the
disk, it also has 1 groove. Click away the disc and the panel closes.
The statue drops further down and there is
another puzzle. Drag the disc to the puzzle.
III to the left in
the disk, turn up and slide the III up and to the right.
Turn right again and
slide IV up the disc, turn up. Slide the IV up and to the right.
Turn the disk to the
right again, II in and up. Above you first slide III and IV down.
Now slide II out and
to the right and down, drag I to the right in place.
Turn the disk and
insert IV, rotate the disk and place IV to the left.
Turn the groove
clockwise again and II in it, turn up and put II in its place.

At last pick up III
and put it in its place. Another cylinder comes out.
Zoom in on that, you
see a metal plate and to the right a pair of wooden slides.
Slide this 2
backwards, now you can slide the metal plate to the right.

Inside you will find
a strange object, take this and click it away to your inventory. You
automatically zoom out again.
Click on the object
and you will see that there are 2 openings in it, if you look closely you will
see a slider in both.

Put the sliders to
the other side, the 2 points are now loose and now you turn them inside.
You now have a
dodecahedron, a polygon.

Click this away to
your inventory and see where it should go.
Zoom out and back in
on the spire, go to the left side. He has to go in there but there are bars for
it.

Zoom out again and
zoom in on the lower part of the tower, go to the left side.
In the middle of the
rear panel on the left you see a rectangular button.
Zoom in on it and
press the button, the rose below it will open.

Turn the knob that
you see around until the 2 arrow points point to each other, you will see the
bars disappear.
Zoom out again (2x)
and then zoom in again on the spire.
Go to the left to the 6 angular hole and
drag the dodecahedron towards it.

The panel will come
loose, pull it down. The statue slides down and a panel slides open.
Zoom in on the panel and turn the corners
into the correct position. This way the rectangle is no longer blocked.

Zoom 1x out and then
go to the other side of the tower, there you will find a drawer.
Zoom in and pull the drawer open, in the
drawer you will find a key. Take this key.

Zoom out and you will
see a cross-shaped button above the drawer.
Zoom in on it and
drag the key towards it, turn the key counterclockwise.
If the nut and the
key are off you can pull open the panel.

There you will find a
strange object again. Grab it and view it in your inventory.
On the wood colored part there are arrows,
turn these pieces until the surfaces have 1 color. 1 green plane and 1 golden
plane.
You can now press the
points inwards, you then have an octahedron-an 8 plane.

Zoom out and back in
on the spire, go to the right. There is the place for the octahedron.
Drag it there, pull
the panel down. Automatically you go to the front, at the bottom.
There comes a plateau down and out, on
there is a metal head of a ram and a gear.

Take both objects and
zoom out all the way back to the catapult, then zoom in on the slingshot.
Then turn to the back
where you found the key and the crank.

Click on the ram's
head and look at it, you see that it has a screw at the back.
Click the ram’s
head to your inventory, then zoom in on the wooden trunk at the bottom.
Drag the ram's head
towards it and turn the head on the trunk.
Keep running and the
back goes up, you will find a round button there.

Take this button and
click it to your inventory, the back of the catapult will close.
Zoom out and zoom in on the tower in the
back, zoom in on the spire, what’s left of it.
There is a hole and
drag that button towards it, turn the knob.

The spire disappears
and a castle / church rises from below.

Zoom in on the
church, drag the time lens down and you have to draw a figure again.
You will see the
timeline, now move the button.
You see that the 2 front towers can turn,
if both towers are in a certain position you can move the roof.

Click on the lens and
then zoom in on the round disc under the church.
Turn that disk and
you'll find a key that was hidden in that disk.

Take the key and zoom
out, then zoom in on the church tower, there you will see a keyhole.
Drag the key there
and turn the key, the 2 front towers come out.

These can now turn.
Pull down your time lens and draw the figure again.
Then move the knob
until you see the roof moving, leave the time lens.
Now turn the 2 towers
until they coincide with the towers in the time window.

When they are well
positioned, the rear 2 towers also slide out and the roof comes out a bit.
Now pull the roof all
the way forward and this tilts down.

Zoom in on the top,
you will see a keyhole and behind that a slot with a button.

Zoom in and move this
button to the left, the point of the tower to the left
opens up.
Push down the rod you
see there, you automatically go to the tower on the other side.

The side of the rear
tower opens, zoom in on the opening and turn the object 90 degrees.
Take it out and it's
a pocket knife,

look at the knife in your inventory and pull open the knife.

Go out of your
inventory, zoom out and go to the other side of the church.
There you see a knot
hanging in a rope, zoom in on it.
Now drag the knife to it and then release
your mouse button.

The knife is then on
the knot, you have to move the knife back and forth and you cut the knot.
Now pull the
remainder of the knot out of the eye and then pull the side up.

You see a number of
gears, now drag the gear from your inventory here.
The mechanism will
turn and you will automatically go to the front
You look at the roof,
it opens up.

There you see a
cylinder, it is divided into 3 discs and these rotate independently of each
other.
You see an opening in
each disk, these 3 openings together form the shape of an object.
This object is in the
cylinder, you now have to click on the discs to stop it.
However, there is a
problem, the disks remain stationary for a while and then turns again.
I cannot give you a
solution, you just have to try it.
You must click on the
disk if the opening is on the front and then quickly click on the other disks if
the opening is on the front.
And then hope that
the other openings are also in the front before the first disc starts rotating
again.
It is not that
difficult, you have to estimate when the opening comes on which disc.
And then hope that
the first one will not turn again.
If you succeed you
can take the object out, it is a crank with a pigeon.

Then zoom out and
then drag the crank to the hole you see on the top of the church tower.
Turn the crank
clockwise and on top a 6-angled column rises.

Zoom in on the column
and view it in your inventory.
Turn the golden
bottom part to the right and keep turning, the column slides out.
Continue until you
have a 3-layer column, on one of the sides of the upper part you will see a
button.
Slide this button
upwards, you then have a 6-sided weight with an eye on top.

Zoom out completely,
you are next to the slingshot, then look at the arc vaults in the back right.
Zoom in on the second
vault, there is a wooden wall.

Then zoom in on the
stone pillar to the right of the wall, there you see a narrow elongated opening.
Zoom in on it and then drag the weight
towards it, the wall slides open.

You will find a
wooden cabinet with 2 curtains. Pull up the magic lens.
You then see that there is something on the
left up in the vault, then go through the curtains into the cabinet.

Just leave the magic
lens on, you'll see a number of objects light up inside.
Turn slightly to the
left and you'll see just a bit of metal behind the dial, grab that object.

It is a aiming device
for the catapult.
Zoom out to the
catapult and zoom in on the slingshot, on the right side hangs a bracket with a
groove.
Drag that metal
object to that bracket, you now have a slingshot with a visor.

The turret to the
right of the catapult closes and slides backwards.
If all is well you are still looking
through the magical lens,
if not pull the lens up.
In the vault you can
see the mark which you have to hit with the catapult.
Zoom in on the crank to the right of the
catapult and aim the catapult at that spot.

Turn the crank and
then zoom in on the visor to see if you aiming is correct.
The crank on the screenshot is on the right
spot, the catapult is well aimed.
You now have to
switch between the crank and the visor several times and adjust the direction
with the crank.
If you are
well-aimed, zoom out and then zoom in on the wheel on the left side of the
slingshot.
Turn the wheel
counterclockwise to tension the catapult.
Then go to the
trigger and shoot the fireball, if you are well aimed the fireball flies in a
fire pit.

Now the area behind
the cabinet is lit, zoom back in on the cabinet and enter it.
You see a number of
statues there, a pedestal for an arch with a button above it that you can slide
up and down.
But
how should the

Turn
the knob up or down and turn the rotary knobs to adjust the statues.
I
cannot give you a solution, you have to play with the buttons and the rotary
knobs.
If
they are in the right position, a door will open, you will see the group of
statues.

The
group of statues slides apart and you are now standing in front of the pedestal.

Zoom
in on the top, there is another letter. Read the letter.
Then
draw the time lens down and draw the figure, move the knob.

You
see the drawing of the Vitruvian man, made by Da Vinci.
Turn
the discs until the drawing is correct and upright.

Then
a hatch opens at the front of the pedestal, there is a goblet.
This
is fixed, you have to twist the rings to be able to slide the protective cover
away.
If
the rings are right you can slide the 2 halves away and then slide the goblet to
the left.

The
plinth separates and the wall in the arch disappears, you see a spiral staircase
down.

You
have to make some light, zoom in on the top of the torch.
Slide
the small button to the side and a block of metal falls against a flint, the
torch is now burning.

Double
click on the bottom of the torch, you suddenly hear something fall.

There
is apparently something or someone around.
You
take the torch and you descend the stairs, you now enter:
Chapter
4: The Courtyard
2018:
Walkthrough by Dick Leeuw
Text
and screenshots by Dick Leeuw. Lay-out and web design by Louis Koot