2019: Walkthrough by: Louis Koot
If you have found this walkthrough via google search or via another site then you have probably not visited my site.
A lot more very detailed game walkthroughs can be found on my site at: www.pcgameswalkthroughs.nl
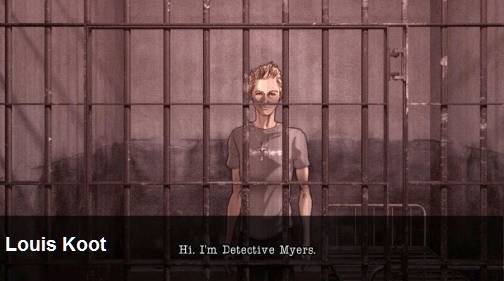
Erin Myers was a cop. Now she's dead. But how did she die? And why did she die? Find out when you follow 9 prominent moments from Erin's life. 9 moments that will answer those questions but In the end you can't save her. But maybe, maybe, you can understand her.
|
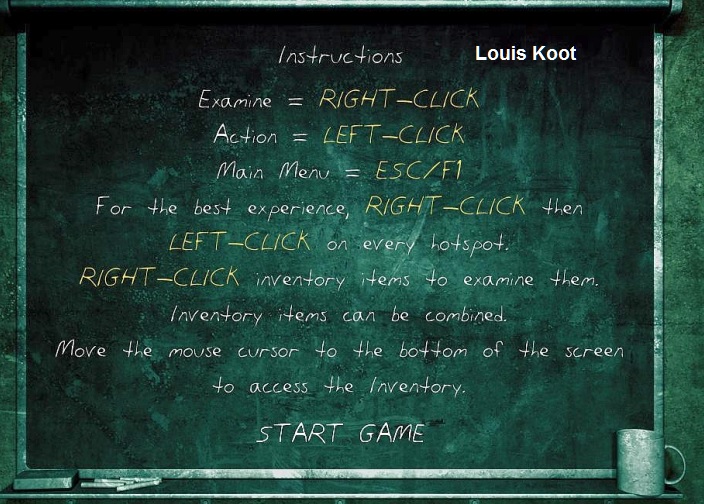
The death of Erin Myers is the first part in a series based on short, independent stories. Main menu - Escape key or F1 In the Steam edition you can earn 5 achievements by performing special actions, these actions do not affect the course of the story or the outcome of the game and therefore I will not mention those achievement in this walkthrough. You can save and load at any time in the game and you control the game with your computer mouse When you start a New Game you first see a screen in witch you can read how to control the game
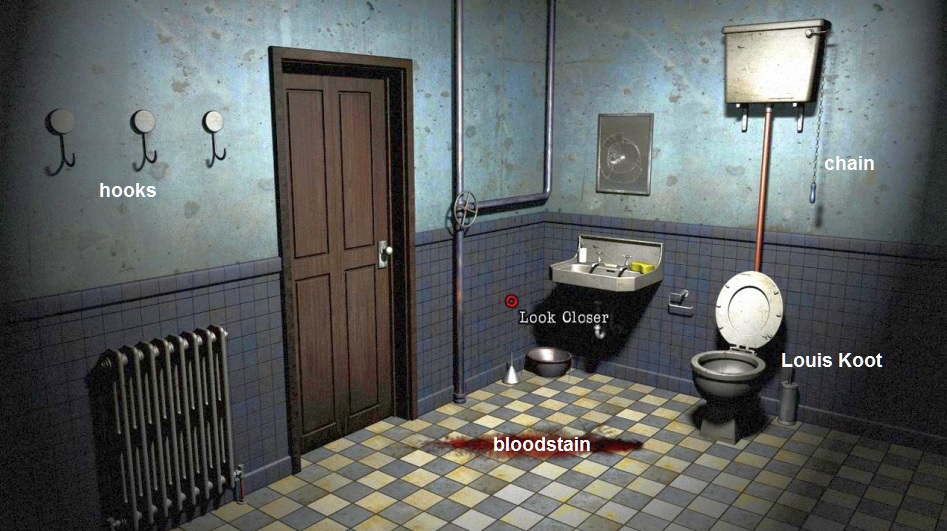
You begin this game in the bathroom of Erin's home when Erin is 10 years old
|
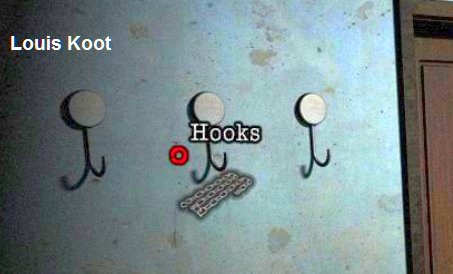
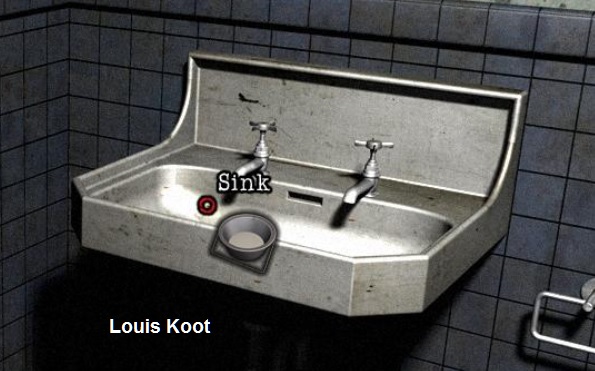
Bathroom
Erin is 10 years old and her father has locked here up in the bathroom. Erin must clean up the bathroom. There's a nasty blood puddle on the floor, in front of the sink and Erin must clean it up. Above the radiator are 3 hooks hanging on the wall and at the sink there's a valve wheel in the pipes.
Go in the close-up of the sink by clicking "Look Closer" on the sink.
On the floor stand a funnel and an empty bowl. On the sink stand an empty soap bottle, a bar of soap and a sponge.

Take the funnel, the empty bowl, the soap bottle, the bar of soap and the sponge
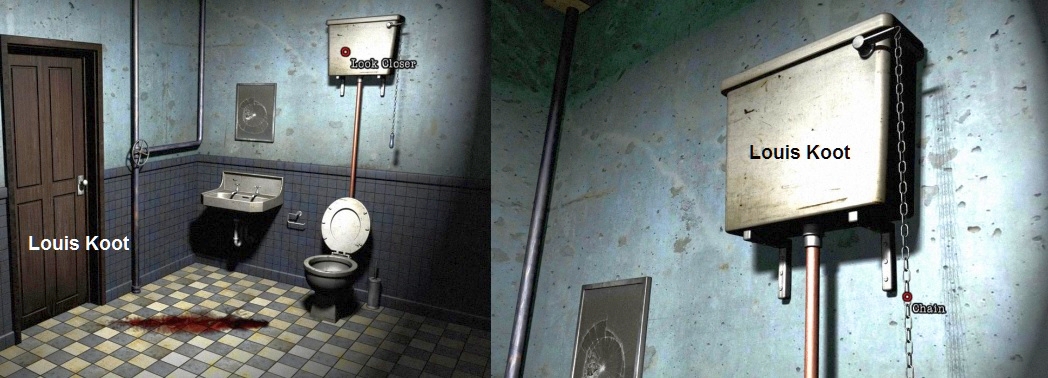
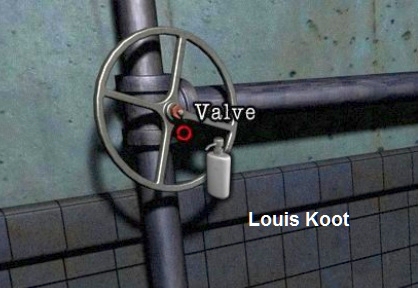
Try to open the hot water tap of the sink, but there's no water coming from the tap. Try to turn the water valve wheel in the pipes, but the wheel is stuck. Go out of the close-up by clicking the back arrow. Next to the sink is the toilet. Go in the close-up of the Toilet cistern and the take the chain.
Go out the close-up. Take the chain from inventory and then hang the chain on the middle the hook above the radiator.
Combine in inventory the bar of soap with the empty bowl
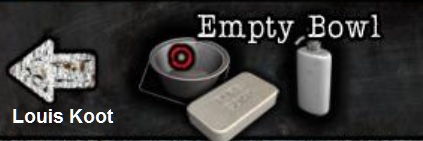
Take the Bowl with Soap from inventory and hang it on the chain.
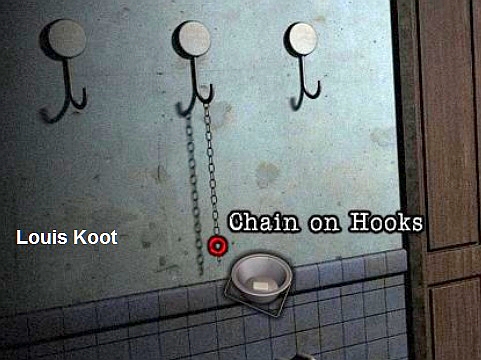
The soap melts because of the heat from the radiator. Take the bowl with liquid soap.

Combine in inventory the empty soap bottle with the funnel. Then combine the bowl with liquid soap with the soap bottle.

You then have a full bottle of liquid soap. Go again in the close-up of the sink
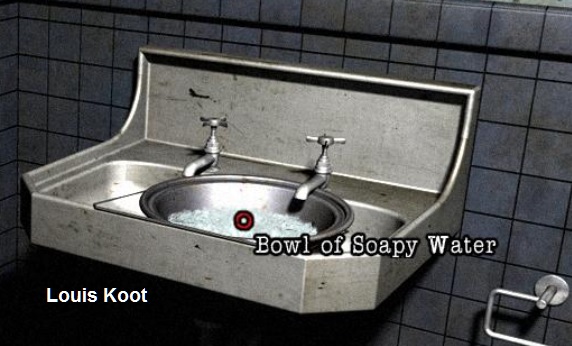
Use the Soap bottle with liquid soap on the valve and then click the valve to turn it open
Take the bowl with soap from inventory and put it in the sink.
Then turn on the hot water tap.

Take the bowl of soap water from the sink
Combine in inventory the sponge with the bowl of soap water. Then take the wet sponge from inventory and click with it on the blood puddle and......
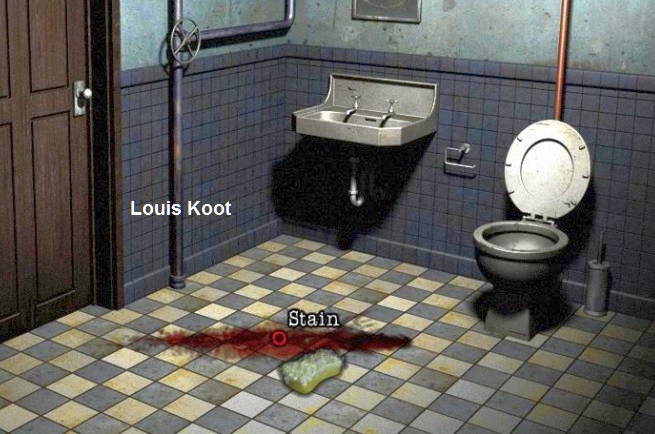
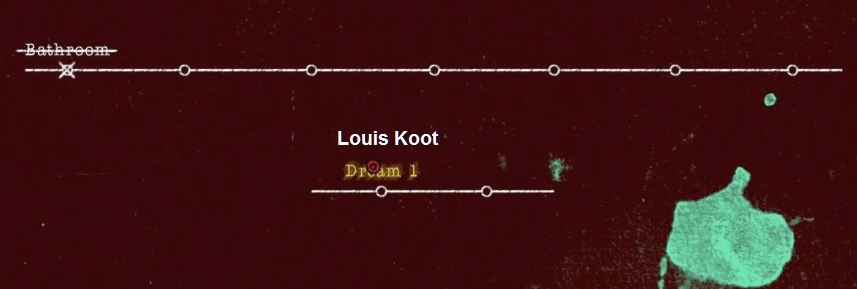
.......Erin wipes up the blood and this chapter ends. We go on with Dream 1
Dream 1
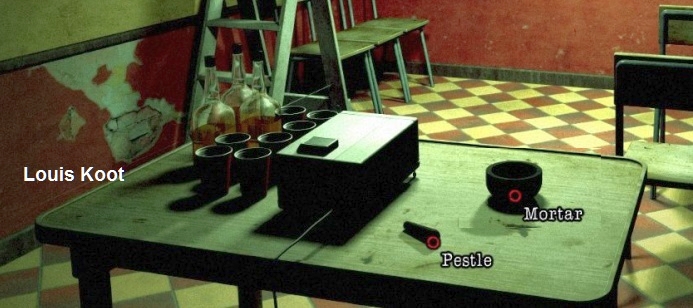
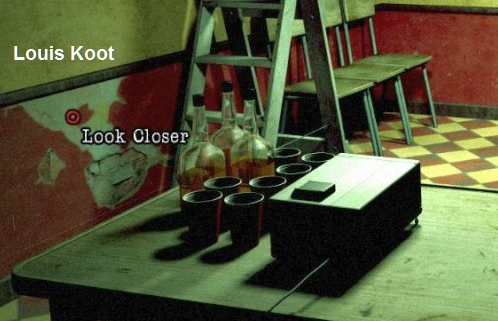
In the dream Erin is in the briefing room of the police station. There's a Pestle and a Mortar on the table and also a slide projector
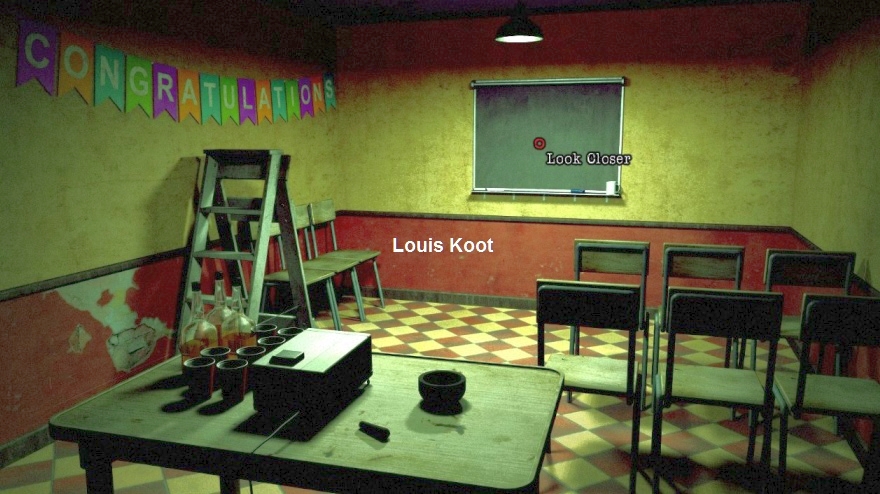
On the wall is a chalkboard. If you turn on the slide projector then no slides are projected on the chalkboard because the board isn't white.
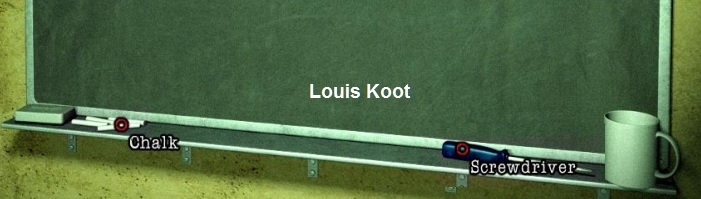
Go in close-up of the chalkboard and then take the white chalks and take the screwdriver
Leave the close-up and then take the mortar and the pestle from the table.
A part of the left wall is damaged, at the ladder. Zoom in on that piece of damaged wall.
You are then in the close-up of a paint container.
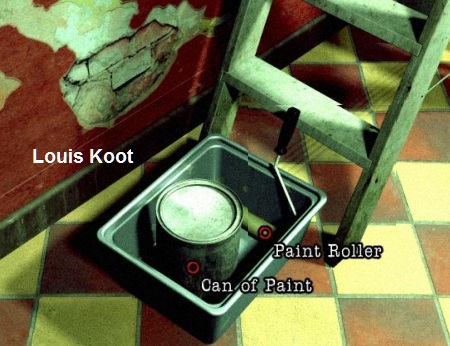
Take the can of paint and the paint roller from the container
Combine in inventory the mortar with the chalks and then with the pestle

You then have chalk powder. Combine the paint can with the screwdriver to open it.
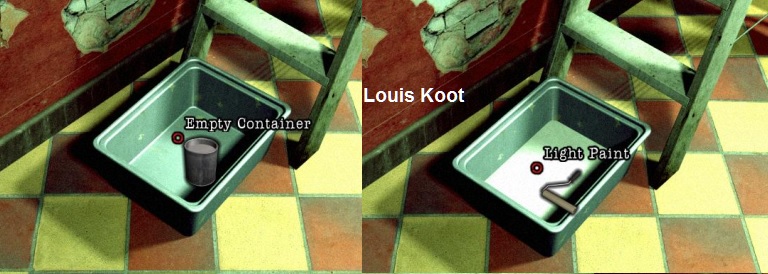
Combine the chalk powder with the opened paint can
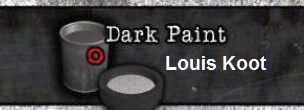
You then have white paint. Pour the white paint into the empty container and then click with the paint roller in it.
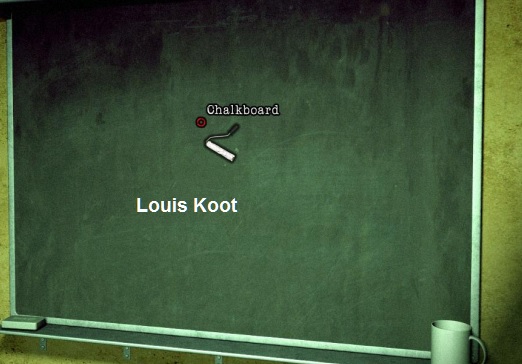
Leave the close-up and go again in the Close-up of the chalkboard.
Use the paint roller with white paint on the chalkboard to paint white.
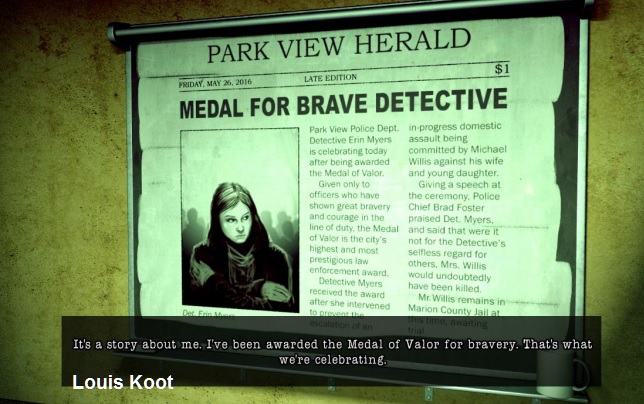
Go out the close-up and then click on the slide projector on the table to turn it on and........

Now there's a slide visible on the white Chalkboard.
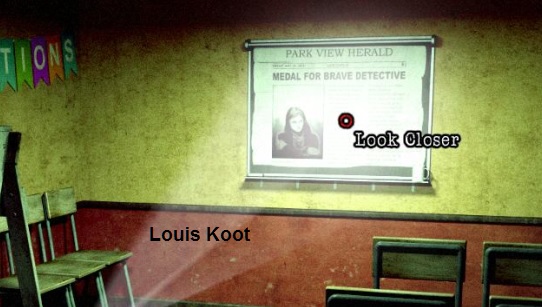
Zoom again in on the chalkboard and read the newspaper article about Erin.
End of dream. We go on in the Precinct

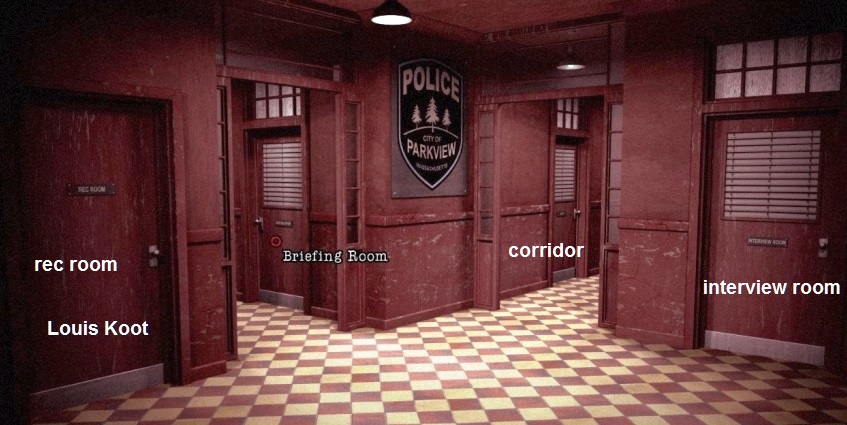
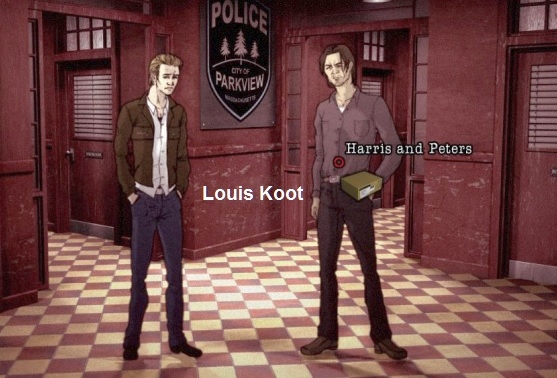
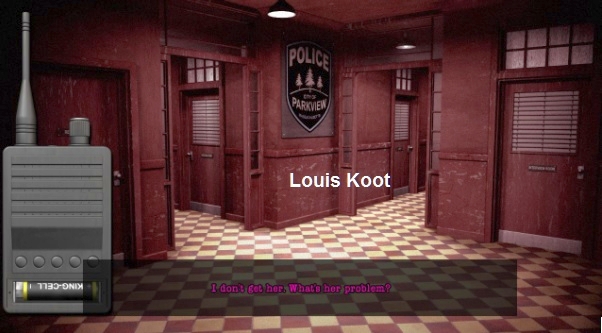
Precinct
You are at the police station / district and Erin has a talk with here male colleagues Harris and Peters in the hallway

When Harris and Peters are gone you enter into the briefing room
You can zoom in on the table and on the package that stand on the chair
First zoom in on the table
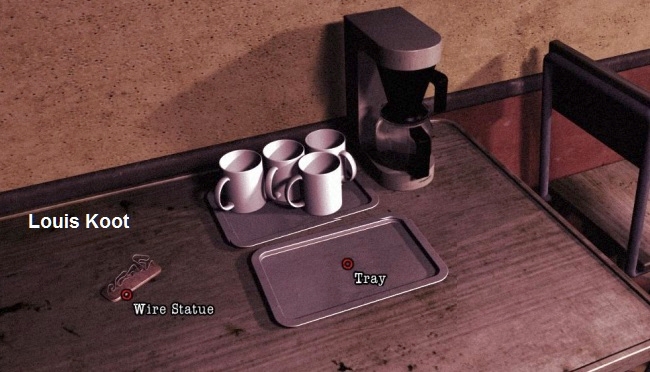
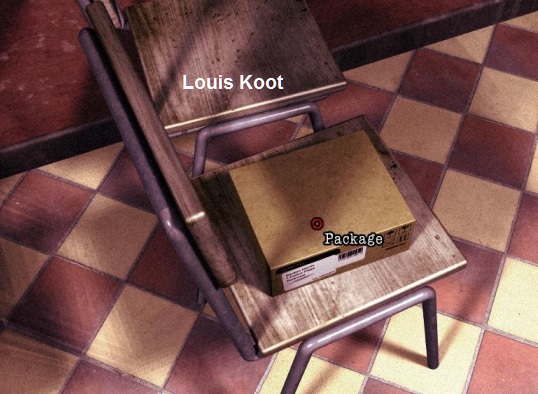
Take the Wire Statue and take the Tray. Go out this close-up and zoom in on the package that's on the front right chair.
Take the note and read it...the note tells Erin about a bug and a receiver and Erin wants to find them
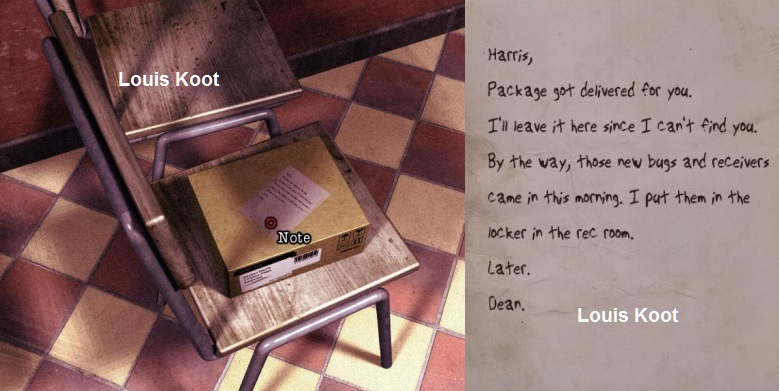
Click the note away and then take the package
Go out the close-up and leave this room, back to the hallway.
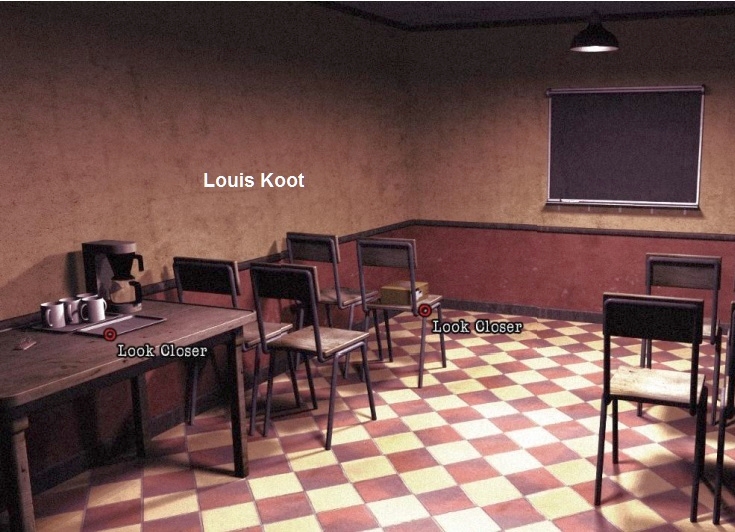
Now go into the Rec. Room.
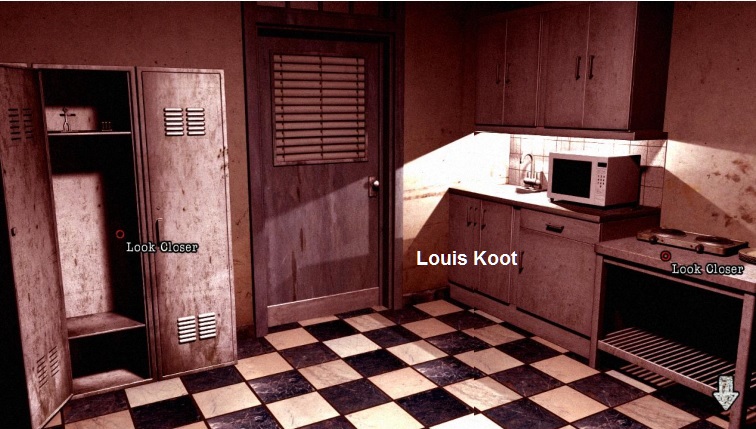
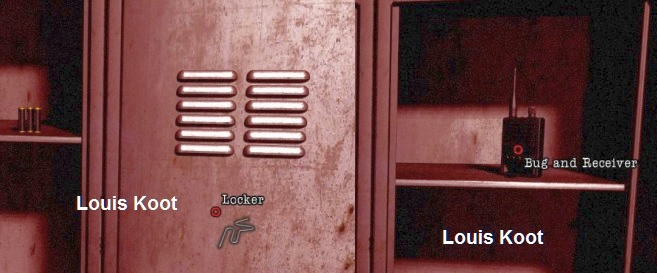
You can zoom in on the lockers and on the table. Zoom in on the lockers. The left locker is open and on the top shelf stand a metal nuts Statue and a few batteries.

Take the Statue and take a Battery. Zoom out and then zoom in on the table and take the Pliers that lies left of the electric stove
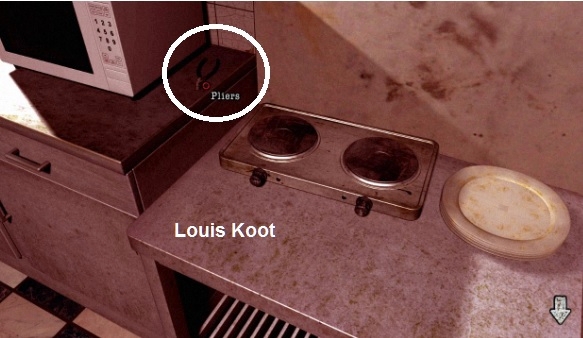
Stay in this close-up. Take the Tray out of inventory and place it on the electric stove.
Then place the nuts Statue on the tray. Turn the stove on by clicking one the stove's knobs and.....
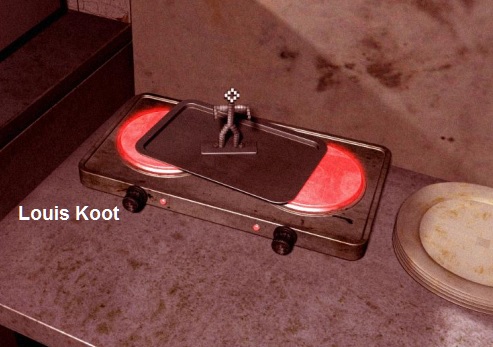
The heat of the stove takes the statue apart. Take a nut and go out this close-up

In inventory combine the Pliers with the Wire Statue to get a wire.
Zoom again in on the lockers and now click with the Wire on the right hand locker to force this locker open. Then take the Bug and Receiver.
Go out the close-up and leave the room. Combine in inventory the receiver with the nut and the battery. You then have a working receiver. Combine the bug with the package to put the eavesdropping bug into the package. Knock in the hallway on the door of the interview room. Give Harris and Peters the package with the listening device.
Harris and Peters return to the briefing room and you listen to there conversation through your receiver. They talk about Erin
end of chapter.
Apartment
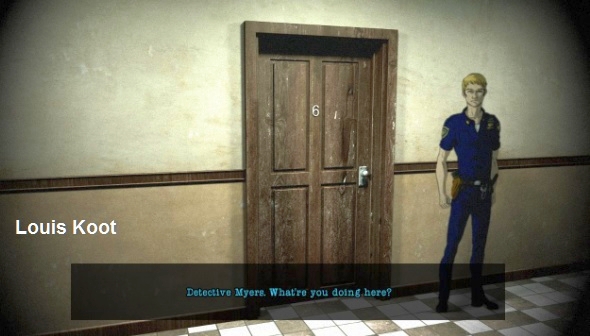
Talk to the police officer in front of apartment 6. Then enter apartment 6. After entering the apartment, Erin's cell phone rings.
Use (right mouse) the cell phone in the inventory. Click on the green "Answer" button.
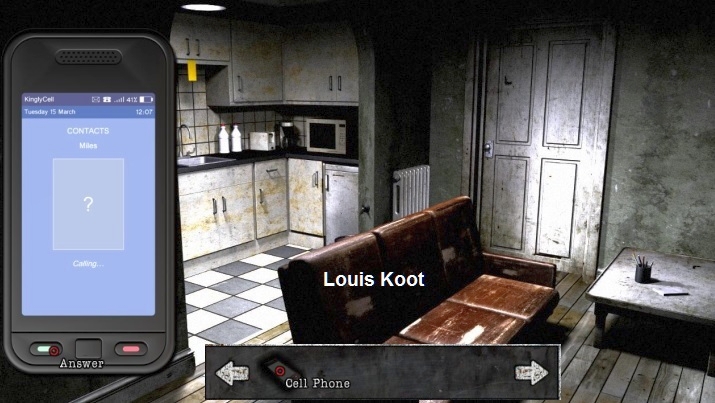
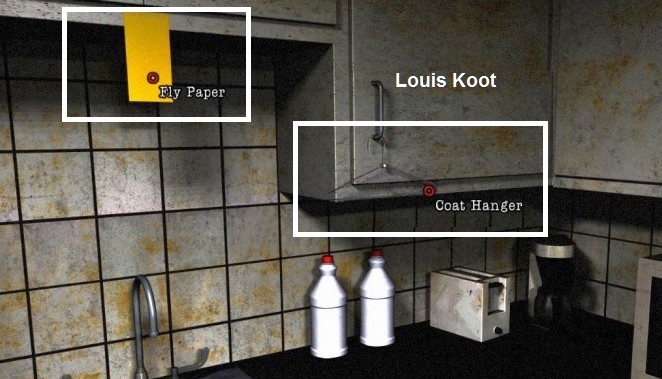
Talk to Miles and when this is over zoom in on the kitchen.
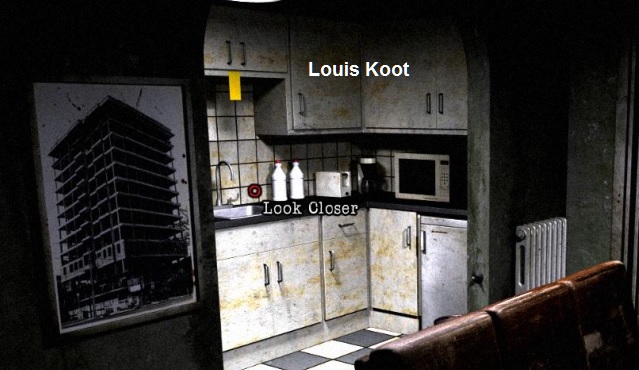
Take the yellow adhesive fly paper and take the coat hanger, hanging on the kitchen cupboard.
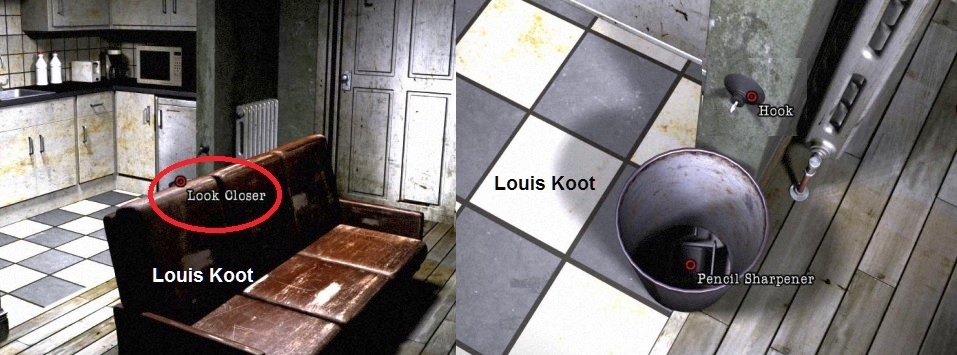
Go out the close-up. Behind the sofa stand a waste bin.
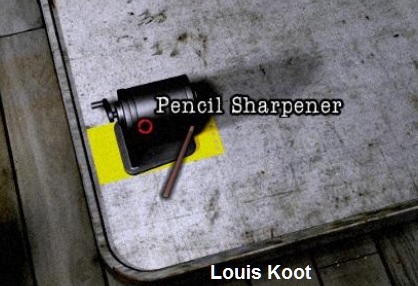
Zoom in on the waste bin and take the pencil sharpener from it and also take the hook with suction cup above the waste bin.
Go out the close-up and now zoom in on the table
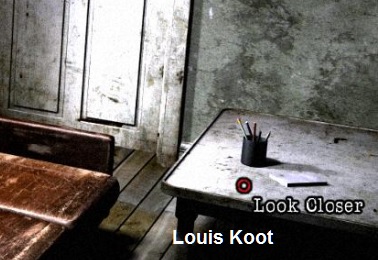
Take the notebook and a pencil from the beaker
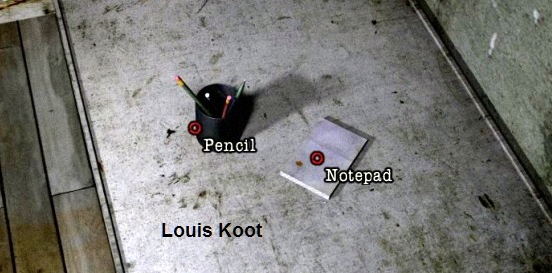
Stay in the table close-up. Look at the notepad in inventory. There are numbers printed on it but Erin can't read them.
Place the yellow adhesive paper on the table and then place the pencil sharpener on it. Use the pencil on the sharpener to sharpen it.
In inventory combine the notebook with the pencil and.......a four-digit code is visible.

Combine the hook with the coat hanger. Then use the hook / hanger on the picture against the wall.
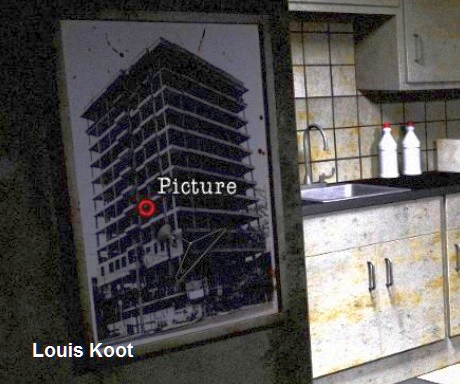
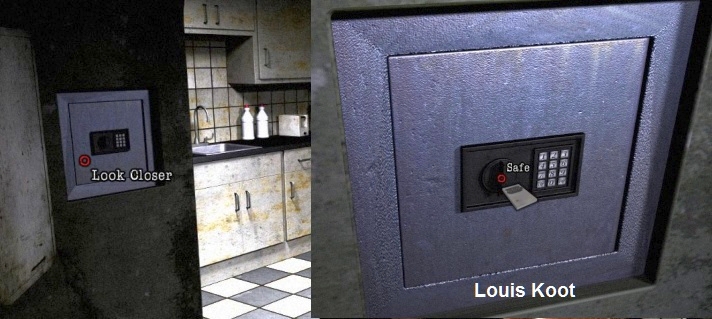
Erin has found the wall safe. Zoom in on the wall safe and use the 4-digit code paper on the wall safe.
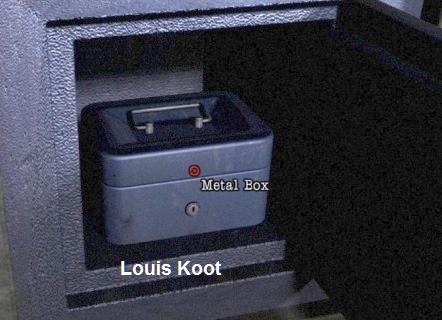
Take the metal box from the opened safe.
Erin is called again. Answer the conversation and talk to Miles. After the conversation, look at the Miles message on the mobile phone.
Miles shows a photo and address of the man you're looking for, Jake Collins.
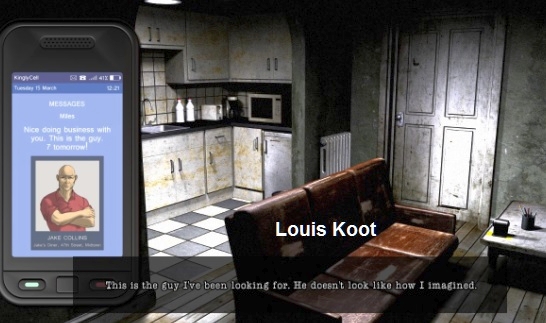
Click on the red button, "Close", of the phone to end this chapter. You go to the mortuary.
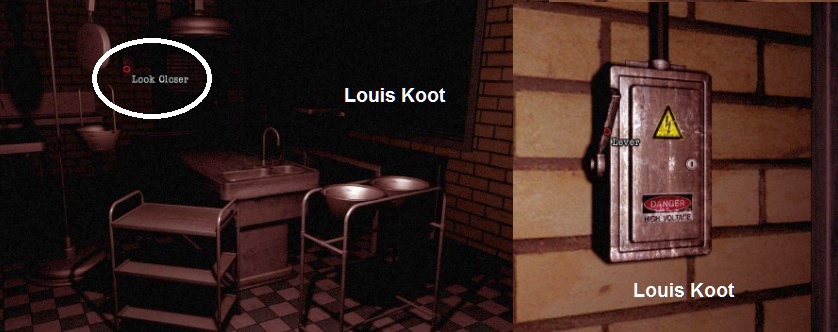
Morgue
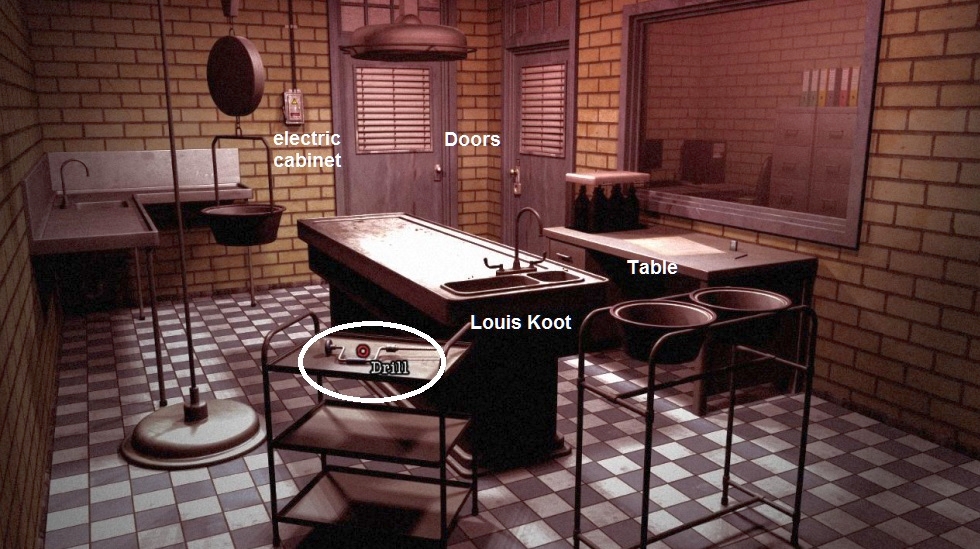
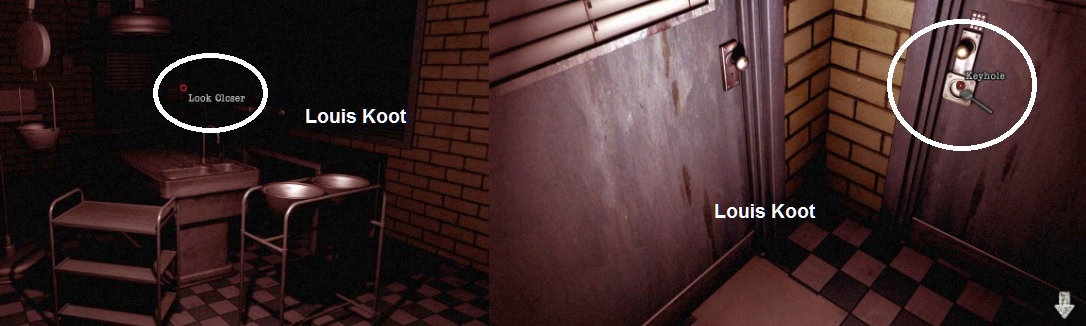
Take the hand drill from he trolley. Zoom in on the table under the window
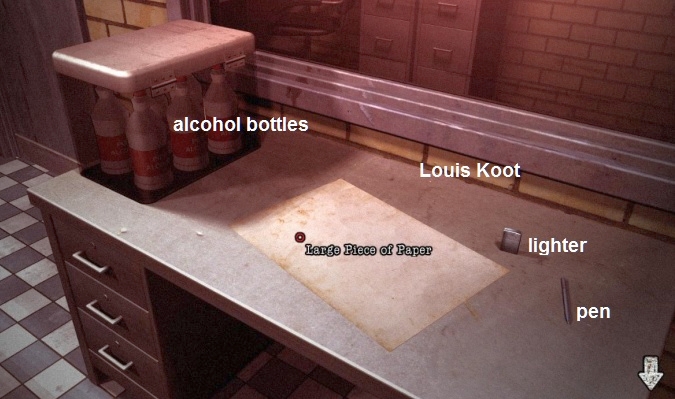
Take the sheet of paper, the lighter and the pen. The lighter has no fuel. Look at the medical alcohol bottles in the medical case.
Go out the close-up and zoom in on the 2 doors. Both doors are locked. The left door leads to a storage room and the right door to the office. You have the office door key in inventory but it won't open the door because it has also an alarm. The key of the storage room door sticks on the other side in the keyhole. Take the Sheet of Paper out inventory and click with it on the storage room door and....Erin slide the paper under the door. Now click with the Pen in the keyhole and......
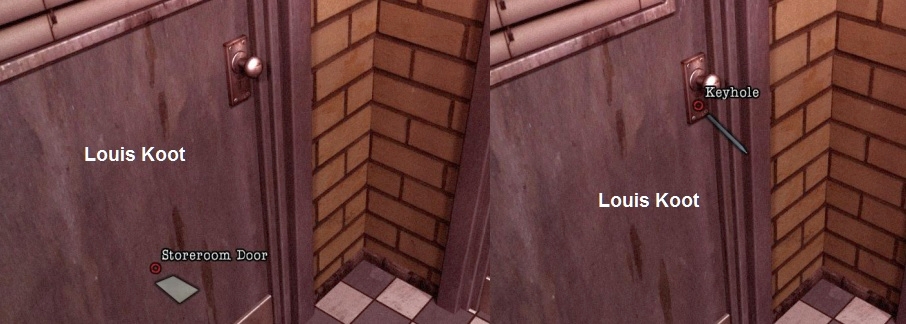
The key will fall on the sheet of paper, so click the pace of paper and then take the key
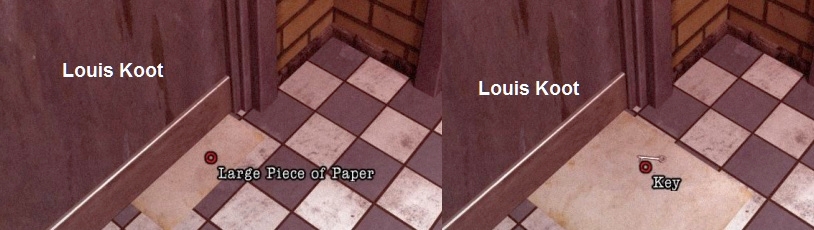
Use the key in the keyhole of the storage room door and then open the storage door.

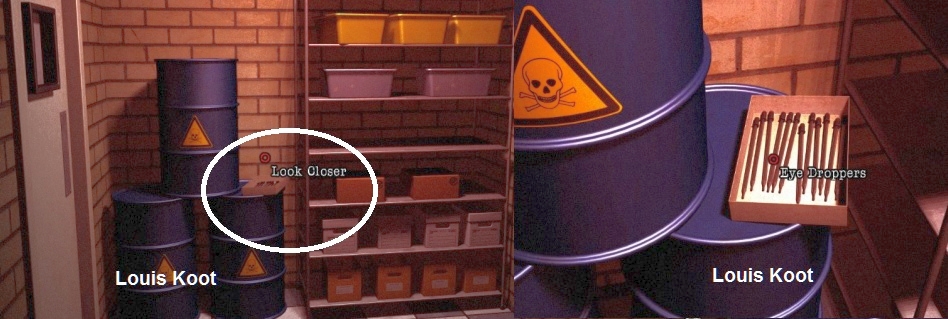
You enter the storage room. Zoom in on the Barrels and then take a Eye Dropper from the box
Click the back arrow twice to be back in the mortuary. Zoom in on the table under the window again.
Drill a hole in the medical case with alcohol bottles with your hand drill. Then use the Eye dropper in the hole to fill it with alcohol.

Combine the eye dropper with your empty lighter to fill the lighter with alcohol

Left of the storage room door is a Power box on the wall. Zoom in on the Power Box and then click the lever of the box up to turn off the power
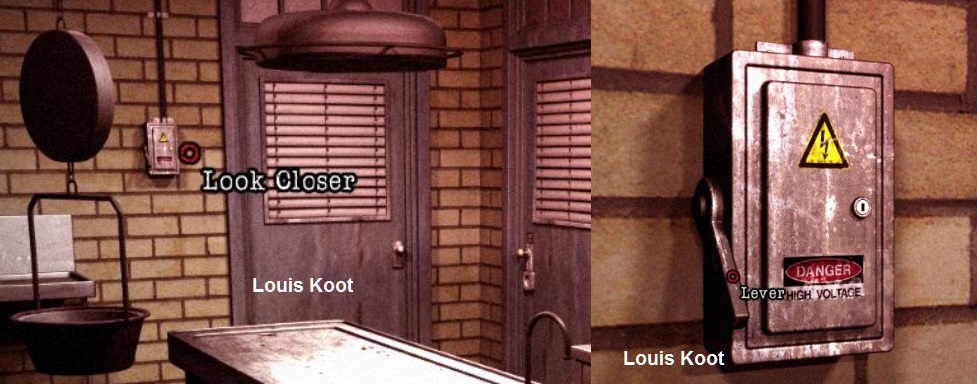
Go out of the close-up. The room is dark now but Erin automatically uses the lighter for some light.
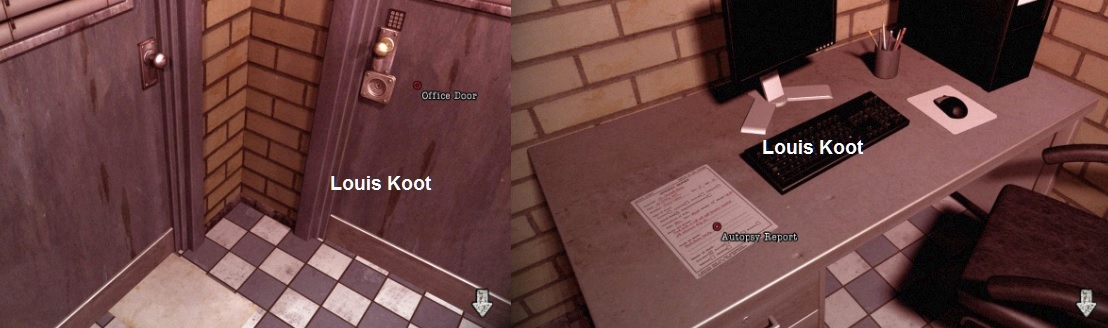
. Zoom in on the 2 doors again. Take the office key from inventory and click the key into the keyhole of the office door.
Because you have turn off the power the alarm won't go off now. Zoom out and zoom in on the power box again and click the lever of the box down again to turn on the power.
Zoom in on the two doors again and click the office door to get into the office. Read the autopsy report on the desk.
Jessica Collins died of a drug overdose
End of chapter and we go on with......
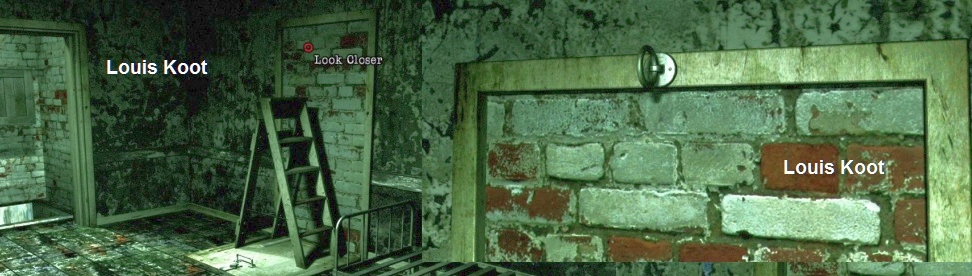
Dream 2
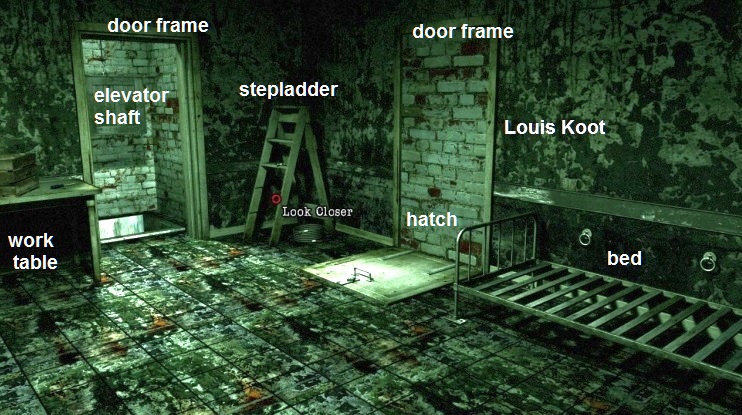
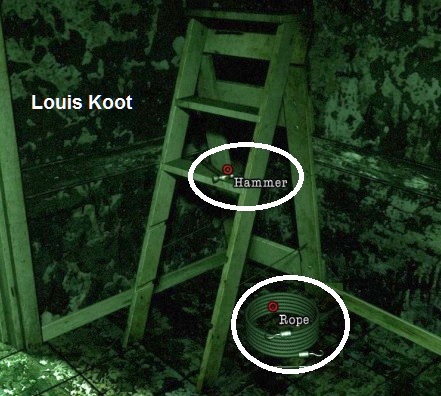
Zoom in on the Stepladder in the corner. Take the Hammer that's on the stepladder and take the rope that's on the floor
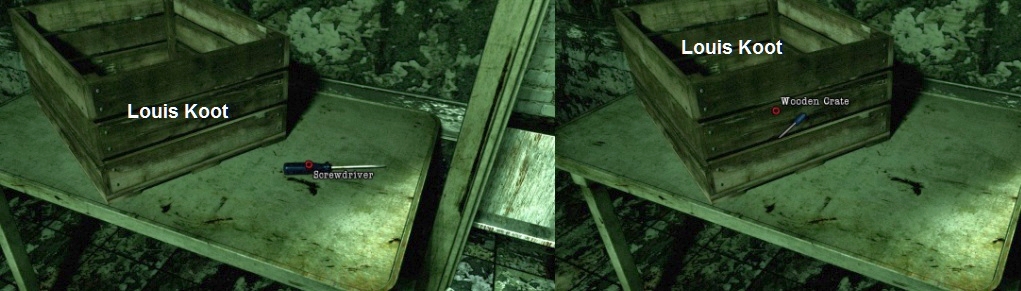
The stepladder is missing two steps, so you need to fix it. Leave this close-up and then zoom in on the work table that stand in the left corner. There's a wooden crate and a screwdriver on the table. Look at the crate.....the boards of the crate are a bit loose. Take the screwdriver and click with the screwdriver on the wooden crate to get two boards of the crate
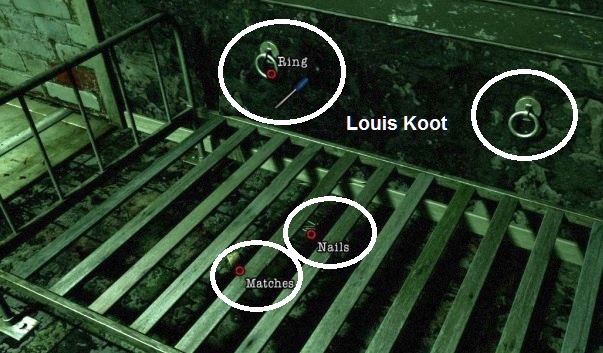
Go out the close-up and then zoom in on the bed. Under the bed are a matchbox and some nails. There are two hooks on the wall
Take the matchbox and take the nails and then click with the screwdriver on both hooks to take them both of the wall
Zoom out and zoom in on the Stepladder again. Click the boards on the stepladder.
Combine in inventory the nails with the hammer and then use the hammer / nails on the stepladder to nail the boards.
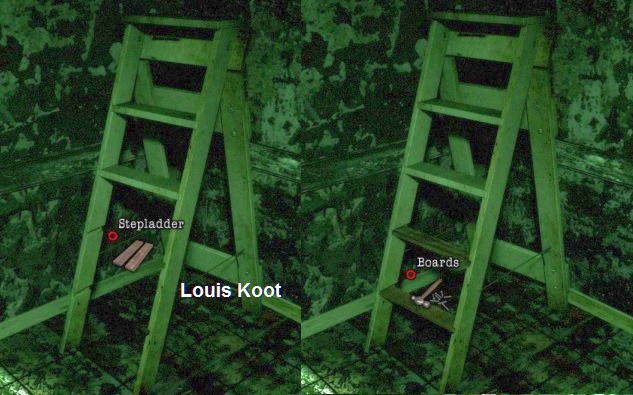
You have fix the stepladder. Take the Stepladder and go out the close-up.
Take the stepladder from inventory and click with it on the top of the door frame of the bricked up door above the hatch.
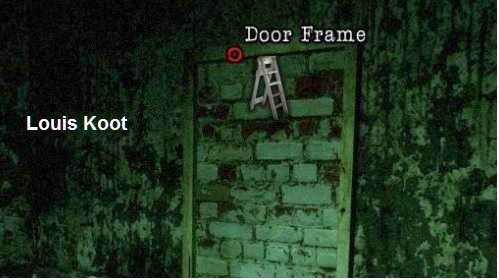
You place the stepladder on the hatch. Climb on the stepladder and then put one of the hooks on the top door frame
Go out the close-up. You put the stepladder back in inventory.
Take the stepladder out of inventory again and now click with it on the top frame of the elevator shaft
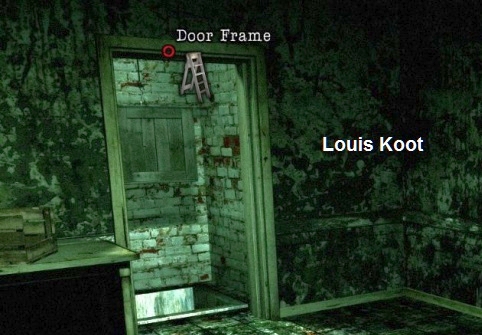
You place the stepladder in front of the elevator shaft. Climb up the stepladder and put your second hook on the top frame of the shaft
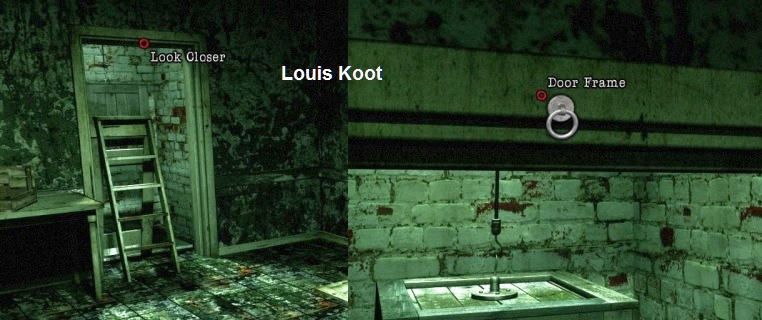
Go out the close-up. Now zoom in on the crate that hangs in the shaft and then use the rope on the hook on witch the crate hangs
You tie the rope through all 3 hooks onto the padlock of the hatch.
Zoom again in on the shaft and now use the matchbox on the rope, above the hook on witch the crate is hanging and......
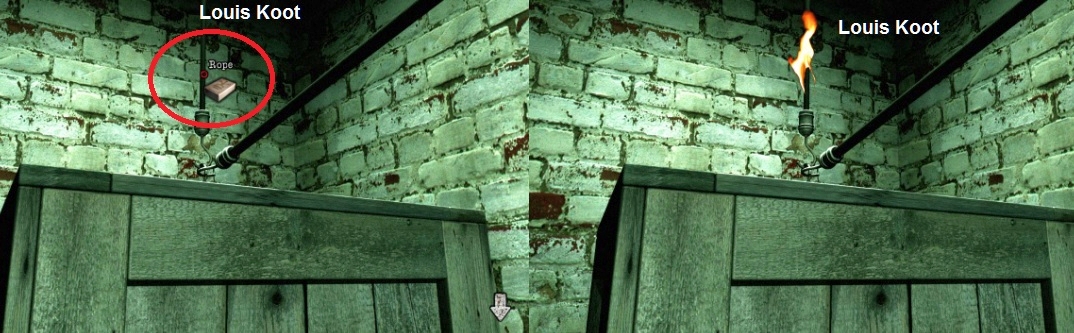
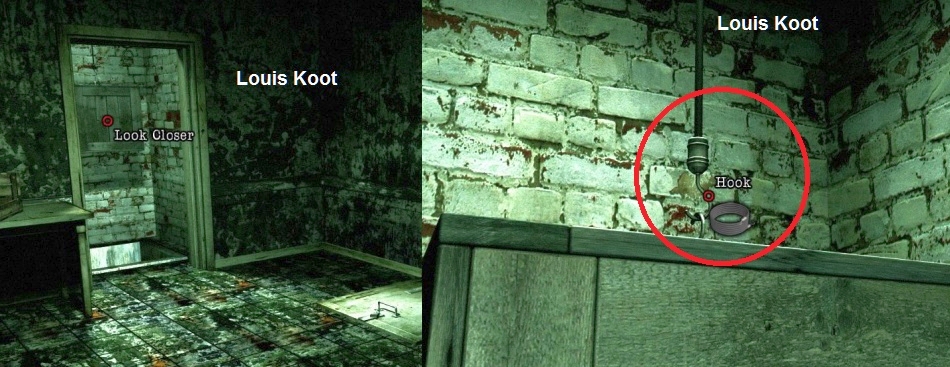
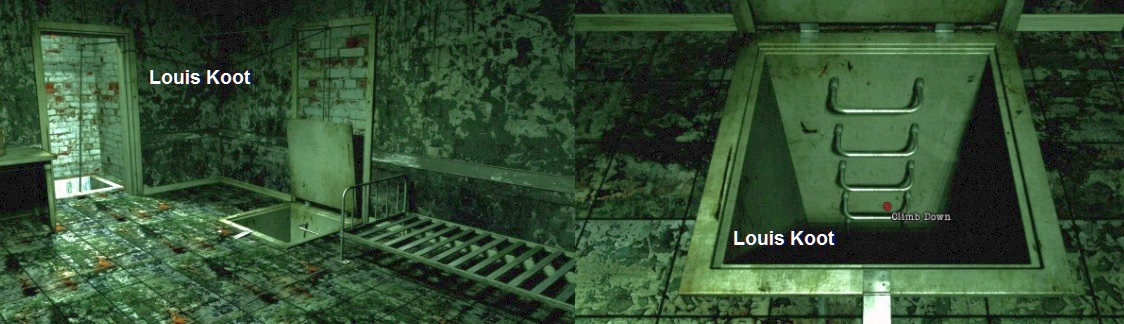
You burn down that rope and the crate goes down and the hatch goes open. Zoom in on the now open hatch and climb down to the cellar.
It is dark in the cellar. Click on the darkness. Erin calls Charlotte and talks to her

end of dream 2 and we go to the:
Cells
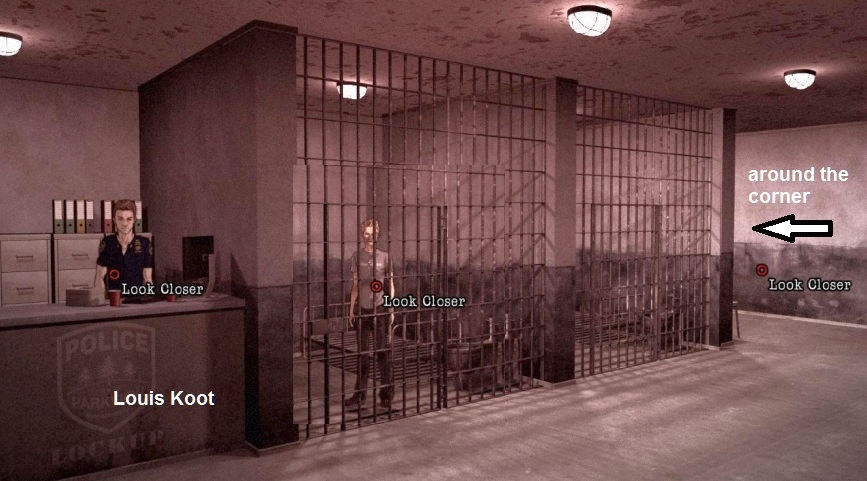
Zoom in on the teenager in the first cell and talk with him........he's hungry.
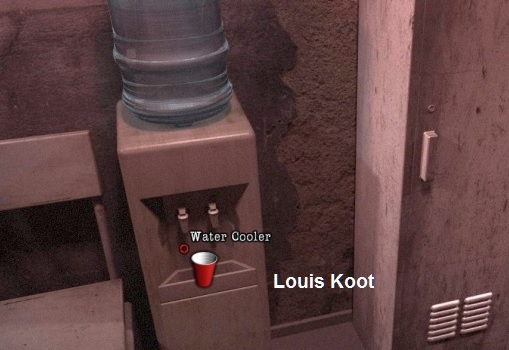
Zoom out and then zoom in on the police officer behind the counter. The lunchbox of the police officer stand on the counter and also 3 plastic cups.
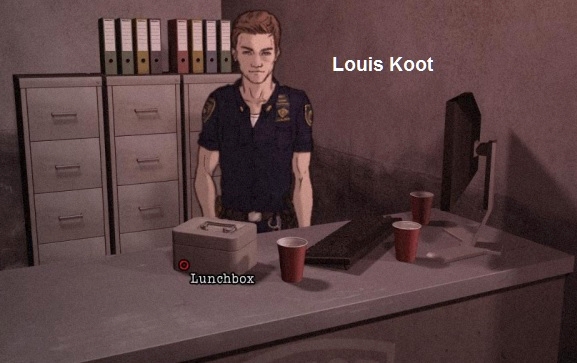
Talk to the police officer...... lunch time is over about three hours. Take the middle plastic cup. Zoom out and now go around the corner of the cellblock
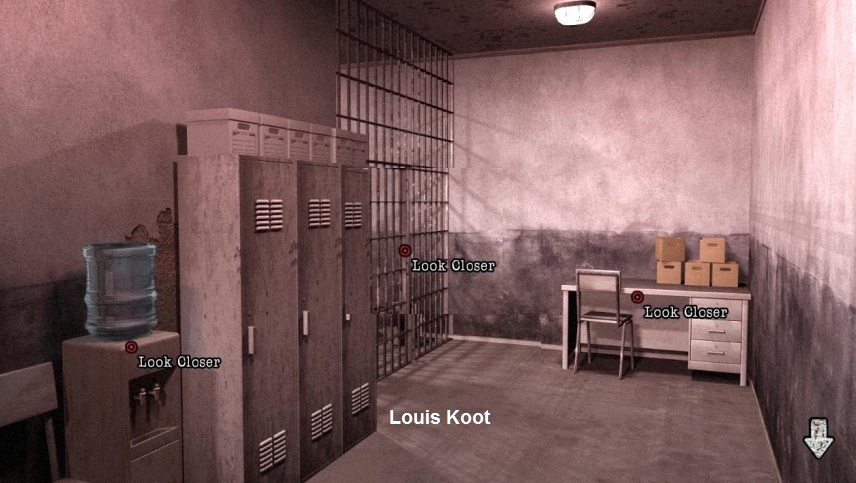
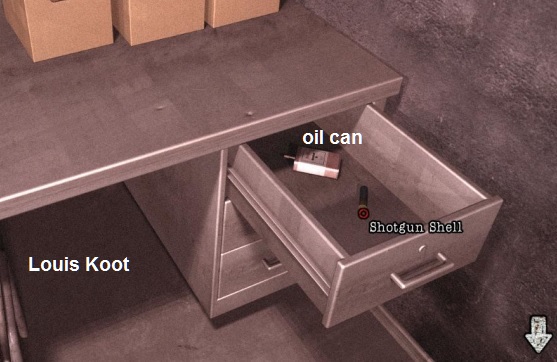
You can zoom in on water cooler, the cell and the desk, Zoom in on the desk. Open the top drawer and take the oil can and the shotgun shell
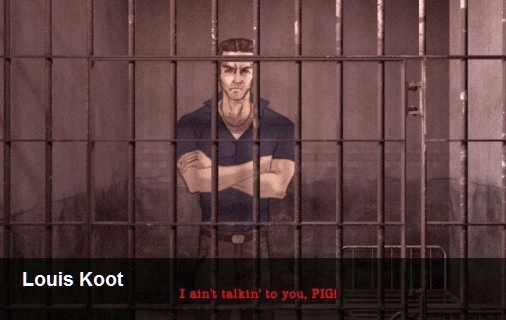
Zoom out and zoom in on the cell and try to talk to the prisoner, but he's is aggressive and won't want to talk with you PIG
Zoom out twice and go talk with the police officer behind the counter again. The police officer says that the aggressive prisoner has a hangover.
Go back around the corner. Zoom in on the water cooler. Fill your plastic cup with water from the water cooler
Look at the wall, right of the water cooler. That bit of wall is damaged.
Stay in this close-up and combine in inventory your dull knife with the can of oil to put oil on the knife.
Take the oiled knife from inventory and click with it on the damaged wall and......
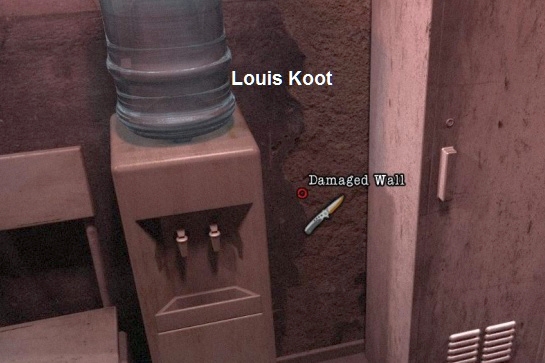
You then have a sharp knife. Combine the sharp knife with the shotgun shell to remove the salt from it. Combine the salt with the cup of water.
Leave the water cooler close-up and zoom in on the cell again. The aggressive prisoner is thirsty so give him the cup with salty water and.....

Go out of the close-up but immediately zoom in again.......The prisoner isn't feeling well now.
Go back to the police officer and tell them that the prisoner is not feeling well and he goes to the prisoner. Now take his lunch box.
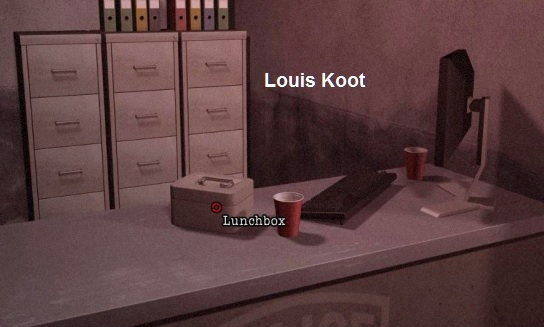
Look again in the cell with the teenager and give him the lunch box and then you talk to him.
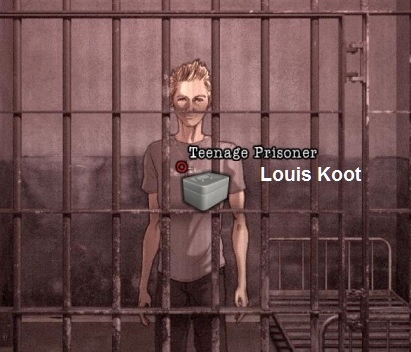
This boy is Eric Collins and he talks about the family -
end of chapter and we go to the next chapter
Dinner
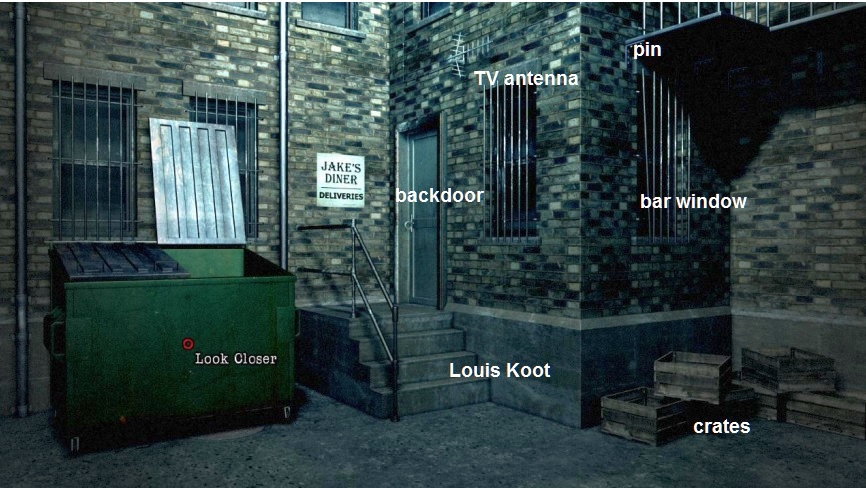
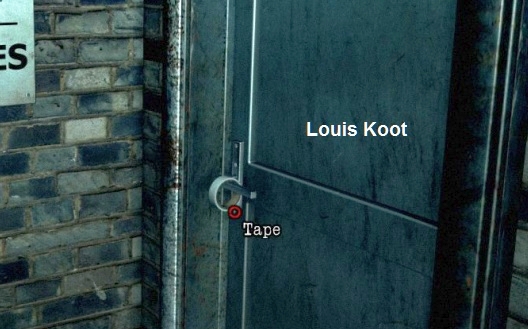
Look at the back door of Jake's restaurant and take the roll of tape that's on the door handle.
Knock on the back door of Jake's restaurant but nobody answers and the door is locked.
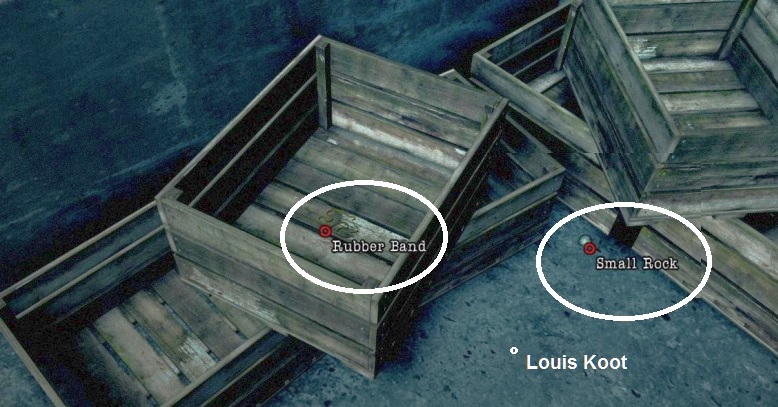
Zoom out and zoom in on the crates that are in the right corner.
Take a rubber band from to top crate and also take the small rock that's on the ground
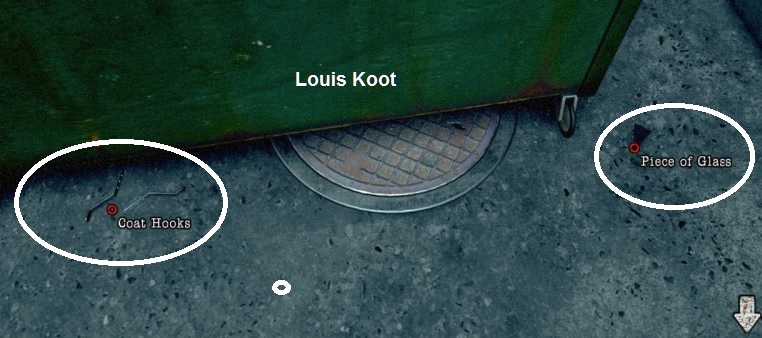
Zoom out and now zoom in on the Look at the bottom of the dumpster. Take the coat hooks and the glass shard on the ground.
The dumpster stand on the manhole cover but you can't move the dumpster because it's full of water. Zoom out. Above the backdoor you can see the TV antenna against the wall. The TV antenna is to high up to reach. Combine the coat hooks with the tape and then with the rubber band and then with the small rock. You then have a loaded slingshot.
Use the slingshot on the TV antenna.
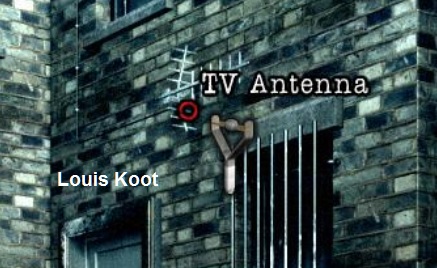
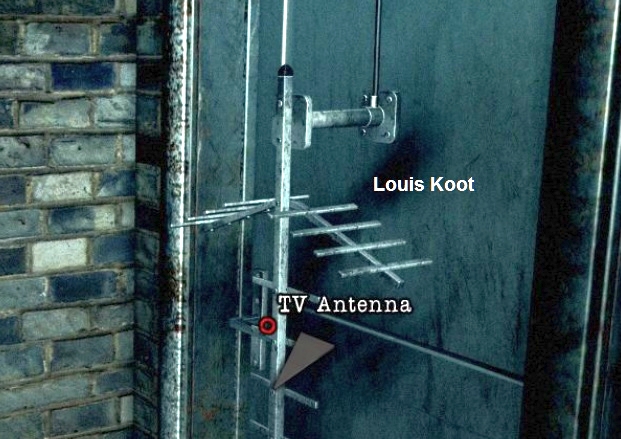
The TV antenna falls off the wall. Go in the close-up of the back door again and.....the TV antenna hangs here on the wire.
Use your glass shard on the antenna to cut the wire and take the TV antenna.
Look at the bars window above the crates and take a take a metal bar
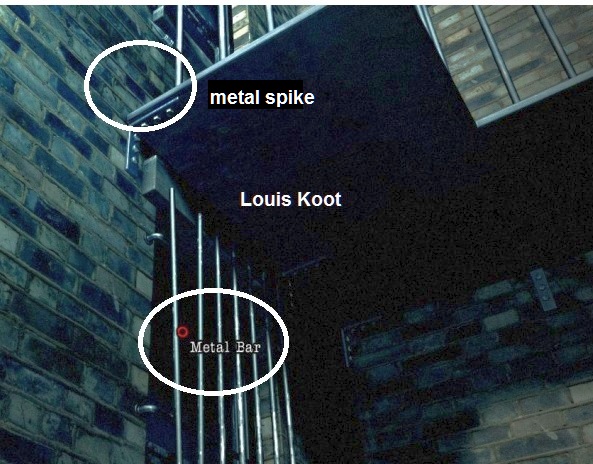
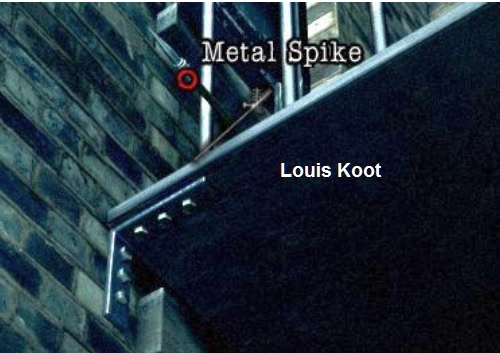
See that there's a metal spike lying on the balcony above you, but you can't reach it.
Stay in this close-up and combine the antenna with the metal bar. You then have a hook. Use the hook on the metal spike to take it.
Look again at the bottom of the waste dumpster. Use the metal spike on the rust spot on the waste container
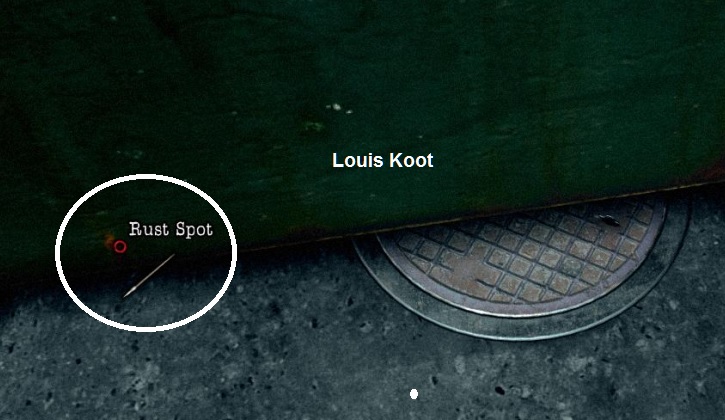
Water is leaking out and now you can push the dumpster away, so click on the dumpster to move it to the left
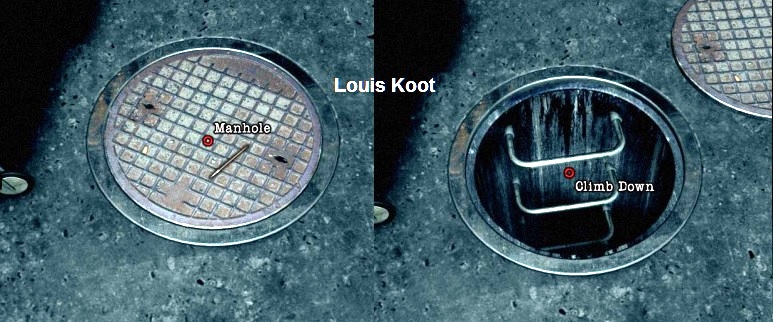
Open the manhole cover with the metal spike and then climb down into the sewer and..... .
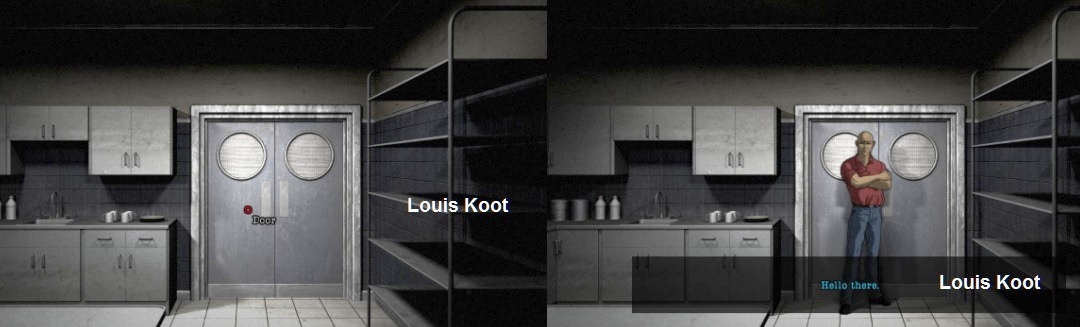
Erin has enter the kitchen of the restaurant. Click on the doors and......Jack Collins comes out. Talk with Collins and......
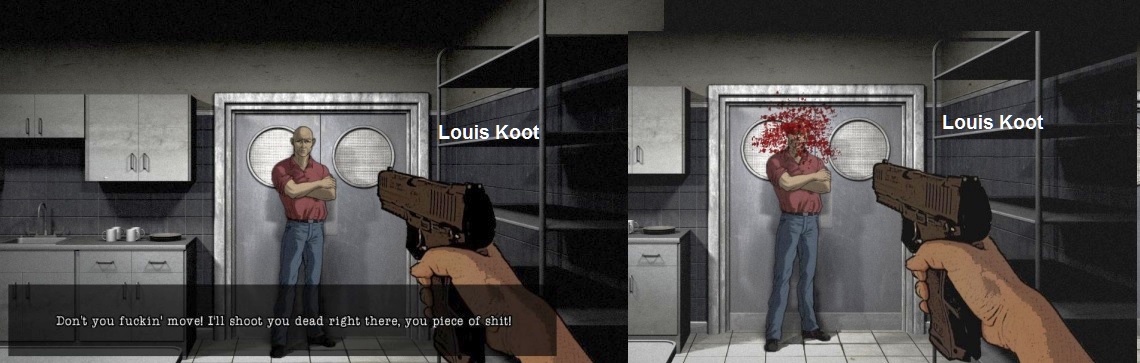
Well......Listen to the conversation between Erin and Jack Collins. At some point Erin shoot Jack's brains out and......
the chapter ends and we end up in the:
Park
Click through Erin's dialogues. Click anywhere in the park and then Erin's phone ring. So check your phone and read Miles's message and......
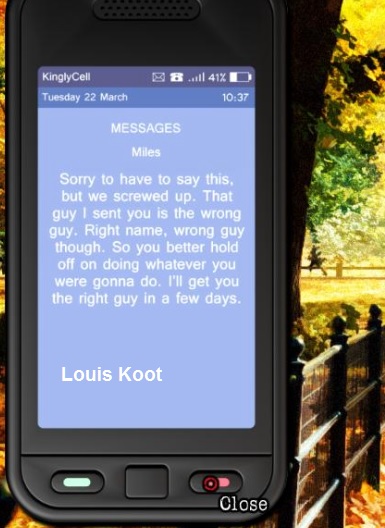
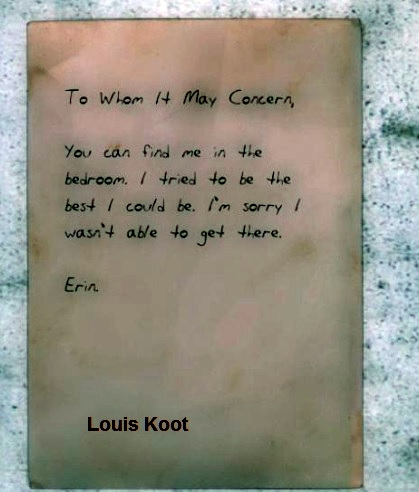
Erin has murdered the wrong Jack Collins. Close the phone and........Erin has killed herself
The end
2019: Walkthrough by: Louis Koot