
2018:
Walkthrough door: Dick Leeuw and Louis
Koot
Text
by Dick Leeuw and Screenshots and lay-out by Louis Koot
If
you have found this walkthrough via google search or via another site then you
have probably not visited my site.
A
lot more very detailed
game walkthroughs can be found on my site at: www.pcgameswalkthroughs.nl
Chapter
2: In and around the Great
Hall
Look
around, there is a lot to see but not much to do. All is still locked except the
door you came through.

You
are standing in the large central hall of the castle and you look at the stairs.
Above the hall are 2 balconies and the stairs go to balcony 1. Above the stairs
you see a circle of blue rings on the wall and that circle contains a number of
"stars". You will have to activate a few of those "stars" in
that circle. There is a wooden pedestal before the left handrail of the stairs. Under
the stairs you see a green door but that door is locked. To the right of the
stairs is an inlet of the hall and there is a grandfather clock. There is a
lever in the clock's case. Right in the corner is the door through which you
entered here.

In
the middle of the hall, right in front of the stairs, there is a stone pedestal.
Behind the pedestal is a door but it has been barricaded. In the corner, under
balcony 1, you see the door of a storage room and that door is locked. On the
table there are 3 "turntables" and to the right of the
"turntable" is a room, but also the entrance gate of that room is
locked.
Now
take a closer look at the "turntable" first. There are 3
"turntables" on the table and they each miss the disc.
You have to
find those 3 discs and place them here on the "turntables" to unlock
the green door, the door of the storage door and the gate.

You
cannot do much else now than going up the stairs to the balcony 1, so do that.
Upstairs you see, on the left a few pillars with something mounted on it. Right
behind is a door. That door is locked. In the middle behind you see a stone arch
on the wall with 6 skulls / devil's heads or what you want to call them.

On
the left of the railing against the pillar there are 2 coins. Zoom in on those
coins and grab them.

Zoom
out and turn to the right. In the niche in the wall are 2 armours, left with and
right without shield.

So
we have to find a shield for the knight on the right.
Turn
around and ...... On the pedestal is a round disc ...... zoom in on the pedestal
and take the round disc

Downstairs
we have seen a kind of turntables so we have to go there again. Zoom out and
click on the stairs to go down. Zoom in on the table with the 3 turntables.
Then
drag the disk to the left turn device and then click the disk on the left
"turntable"

The
disc will turn, a green light will illuminate on the middle turntable and you
will see that the door of the office on balcony 1 opens.

Turn
around to the stairs and go back upstairs and click on the door of the office to
enter

Office:
Look
around here, you hear a radio that only makes noise. Look at the windowsill and
zoom in on it and take the picture.

Zoom out and then turn left to the radio. Click on the red button of the radio
to turn it off and read the note that is underneath the little box.

Zoom
out and zoom in on the desk. You see a box on the left. Click on it and pick up
the coins.
Click
on the green book, read it and you will see a drawing of a knife with 2 blades,
1 of which can rotate through the knob of the knife.

That
knife is laying on the right side of the desk, take that knife. You can try out
that turning in your inventory.

Turn
clockwise. On a table, in front of the book case, you can see a disk lying under
a closed glass plate. You cannot take the disc yet.
Continue towards the door.
To the left of the door you see a box on a table.

Zoom
in on the box and open the box. There is a round disc in the box , take that
disc.

Turn
around and look at the floor, there is a round world map with a hole in the
middle. Drag the round disk to that hole in the world map.

You
now have a complete world map but this is a bit mixed up. The middle disk is stuck, the
other 3 A, B, C, you can
turn.

Turn
the 3 disks A, B, C until the picture is correct .....

You
know that it is good if you automatically zoom out and a spotlight lights up.
Follow the light, it shines on a book.

So zoom in on that book Click on the book. The book comes out and the lid of
Disc 2 opens.

You
can grab the disc now, so do that.

A
little later you hear noise from falling stuff. You now have to go back to the
table with the 3 turntables. Leave the office and now see where that noise came
from. You see the painting move ..... Click on the painting and the painting
will hang crooked. A light ball also flies away from behind the painting.

Now
click on the stairs to go back down again. Turn around to the table and drag the
disc to the right turntable.

There
is another green light on the middle turntable and the door of the storage room
opens.

Storage
room:
Click
on the door of the storage room to enter. The first thing you see is disk 3
under a closed lid.

There
are 3 very important things to be found here as well as coins and an action
figure. Turn to the left
To
the right of the door on the pillar you see a button. Zoom in on that button and
press it. The button turns blue.

To
the left of the door is a rack with shelf's
and on the second shelf in that rack is another button. Also press it and
this also turns blue.

You
now turn to the disc and the lid opens. Grab the disc.

To the right of the box with the disk is a large cupboard, open the doors and
search the cupboard.

On
the middle shelf on the right you will find a handle and left in the corner a
note. Grab the handle and read the note.

Next
to this cupboard you can see a few rolls of carpet with a yellow light shining
above the carpets. Zoom in on that spot and you will see a yellow Orb. Grab the
yellow Orb

Also
search the other large cupboard and the rack with shelves next to it. You will
find a box on the top shelf of the shelving unit.

The
lid of the box is a puzzle. Solve this puzzle by clicking on the parts of the
puzzle, if you have the right symbol the box will open. You will find 3 coins in
it again.

Turn
again to the door, in front of door
is a box with a spanner and a note on it.
Click
on the note. It is half of a drawing. Make a note of it because you will need it
later.

Also
look at the ceiling. You also see a puzzle there, but we do not know the
solution now. We will come back for this later.

You
are ready here for this moment so go back to the hall and to the table with the
3 turntables.
Place the disc on the middle turntable. The disc will rotate and the closed
fence next to that table will open.

Side
room or Reading Room:
So
now go through the opened gate that side room now. Look around here,
there is a lot to see and also to do.

On
the table, in the middle of the room, is a box . The lid of the box is again a
puzzle. On the left in the bookcase you see a note under a vase.
Look
at the right bookcase and ........ on the top shelf you can see a picture
between the books. Take the picture.

Zoom
out and look at the left cabinet again and now go look at that drawing, which is
under the vase.

It
is a drawing with the symbols of the box, that's on the table It is the solution for this puzzle. At
the bottom you see that you have to swap the star with the comet, so the star is
on the right. Furthermore you see that the crescent is crossed out in 3 places,
there is only 1 place left. So the crescent is on the left, the comet is crossed
out in 2 places. There remain 2 places left and above but left is the crescent,
so the comet must be above. For the round with the point only remains under.

So
zoom in on the box, which is on the round table and put the symbols in the right
place and the box will open.

Inside
is a bar, grab it and combine it with the handle in your inventory.

Zoom
out and turn to the left. To the left of the pillar you see a box on the wall
with a push button.
Zoom in on that box and press the button, a blue light will come on.

Zoom
out and turn further to the left, on the table next to the gate you will see a
book. Zoom in on the book. There are 2 coins on the book. Take the coins

Zoom
out and turn back to the round table and then look up at the ceiling.
In
the ceiling here you see again a puzzle but also we have no solution for the
puzzle so we will come back later.

Go
back to the hall. There are now 4 blue light beams that have to be aimed.
There
is another door that is closed and that is the green door under the stairs. Zoom
in on that and you'll see that you need 2 levers there.

1
lever you already have, so you need another lever. If you have previously looked
around in the hall, you have seen a lever in the grandfather clock and also that
you could not break the glass. So how to grab this handle now. Zoom in on the
face of the grandfather clock and you will see the slots in the middle. Think of
the knife of which you can turn one of the blades. Click on the knife in your
inventory, the knife is now in the middle of the screen. With the knob on the
back of the blade, move one part of the blade to the right at a 90 degree angle
to the other part of the blade.

Click
the knife back and then drag it to the dial of the clock. The knife slides in
and 6 lights are lit, 3 on each side.

Turn
the knife, so the hands of the clock now at three o'clock and 12
o’clock........ It seems very good but then the hands turn back and the 12
o'clock and the 3 o'clock light go out again ... ..
Click lights on and off until
only the lights are on at 12 and 3 o'clock. Then turn the knife to 3 and 12 and
....

You
hear a click and the knife slides out again. Get the knife back because you need
it again.
The lights are now off and the glass door opens.
Take
the handle out of the clock.

Go back to the green door, left under the stairs
and put the 2 levers in the slots. Then pull both levers down and the door
opens.

Middle
room:
On maps of the castle they call it the Parlor.
Click
on the green door and you will enter a next room. This is a between room. You
are facing a door, with a disc on it, that you cannot do anything with.

There
are also 2 other doors, 1 to the dining room and the kitchen. The other goes to
a small room. Through the green door you go back to the hall.

To
the right of the door with the disc, there is a cupboard with a few books on it.
There is a drawing on top of the books. Go and see that drawing.

It is half a drawing again and it belongs to the half drawing that you saw in
the storage room. Draw these too and put them side by side.

So
save this drawing for later. Turn around to the green door. Close to the left
side of the door you see on the bottom part of the wall a skull / devil's head.
Zoom
in on the devil's head and click on it and the eyes will turn green .... this is
the first devil's head for that arch on balcony 1 and you've now activated the
head.

Zoom
out and look at the table to the left of it. On the bottom shelf there is a box
on the left, zoom in on it and open it. Grab the 2 coins that are inside that
box.

In
the middle of the room is also a table with a device that you do not know what
to do with it.
First
go to the small room, through the door on the right.
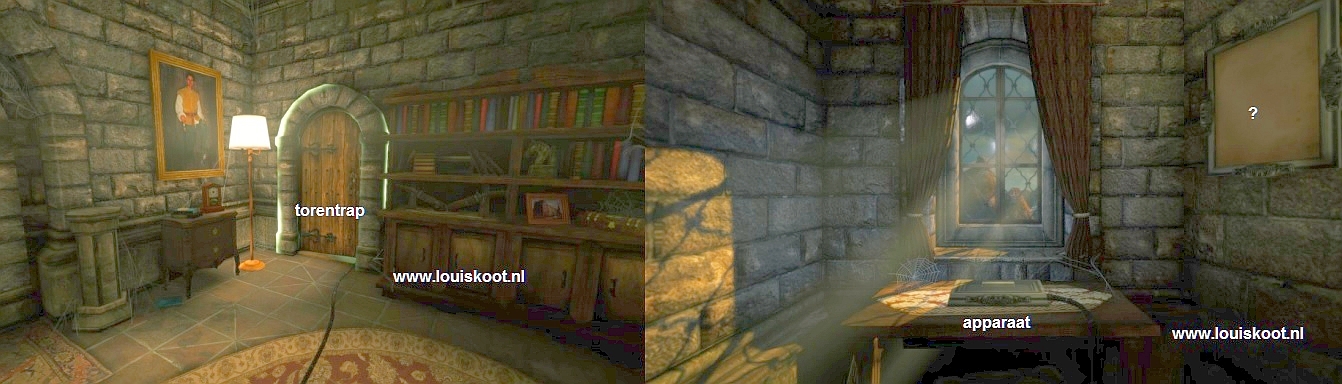
On
the table you can see such a device as in the room next to it.
Above
the door hangs another skull / devil's head, zoom in on it and click on it so
that the eyes also turn green.

Zoom
out. To the left of the door there is a cupboard with a box on it, also this one
has a puzzle in the lid.

Zoom
in on the box that is on the cupboard. You have to solve this puzzle by clicking on
the squares in the lid until there is a symbol.

The
box will open, take the photo out.

On
the box, next of the cupboard, is a note again, read this.

In
the back of the room on the narrow wall, see another device, because of the
slots in the device you think the knife should be in here, but there is
something missing here.

Go
back to the middle room and from there, through the other brown door, to the
dining room.
Dining
room

In
the dining room you will find a number of things / appliances that you cannot do
anything with yet. To the left and right of the door there are tables with a
device on top of it, there is also a device on the table. All these devices have
a slide, on the left of the pillar there is a painting with a slider underneath.
At the end of the room there is also a device with such a slider underneath. On
the small table under the window there are 2 coins, grab these 2 coins.

On
the fireplace under the large empty painting frame is a disk under a glass dome, you
need that but you cannot take it yet.

Furthermore,
we cannot do anything here now, go through the next door. You are now in a
storage room with the kitchen next to it.
Utility
room and kitchen
You
first enter the utility room. There is a chest with a combination lock, only we
do not have the code yet.
On
a barrel you see a same device as in the between room and the tower stairs
room.

Above
the doorway to the kitchen you will find another photo. Zoom in and take the
picture

On
the left is a table along the wall with a few books on it. Click on the top book
to open it.

You
now see 2 patterns with symbols, which we have seen before on the ceilings in
the storage room next to the hall and in the side room, behind the fence in the
hall.

These
are the solutions for those ceiling puzzles. We will solve these when we are back in the
hall.
Above
the table near the ceiling, see another skull / devil's head, zoom in and click
on it. The eyes turn green.

Zoom
out and go through the doorway to the Kitchen.
On
the blue refrigerator you find a picture, take it. In the trash can next to the
refrigerator you find a letter, read it.

Straight
in front of you on the wall you see a shield where you have to put 6 things,
that turns out to be 6 green prisms. you are going to look for those prisms.

You
will find 1 in a pan in the sink, 1 on top of the round hanging rack with frying
pans, 1 behind the barrel just next to the entrance of the kitchen,
1 under the
table, 1 in a dish under the shield and now the last one. These can be found in
a box on the shelf next to the refrigerator.

Zoom
in on the shield and drag all the prisms there. If these are all in place, then
the center piece rotates, you will see a kind of dial there.

Such
a plate is needed in the device on the narrow wall in the small room, so pick up
the "dial".
There is one thing to find here because in the first
cabinet, on the left, you see a teapot. Next to the teapot you see a bowl, zoom
in on it and you see 2 coins, take them.

In
the kitchen itself we are ready but in the space next to it we will come back.
So go out of the kitchen and through the dining room to the between room and
from there to the tower stairs room. Zoom back on the narrow back wall and drag
the dial to the device.

Click
on the knife again and make sure that the bottom blade is at a 90 degree angle
to the left.
Click
the knife back and then drag it to the device, the knife slides into it.

Then
turn the knife to the right.

An
opening now appears in the round wall with a staircase behind it. Click in the
opening.

You
can now choose. First up or through the green door. Go upstairs first,
There is not much to be found here.
There is a metal flower on a pedestal. There
is also a barrel. Just before the barrel you will find 3 coins again.

Zoom
in on the metal flower .......... you can turn the bottom ring by standing on it
with your mouse, keep pressed the left mouse button and moving your mouse to the
right.

The
flower opens and you will find a yellow Orb there, take it.
This
is all you have to do here, go down one floor and click on the green door. The
door opens and you can now go through that door to the other balcony in the
central hall.
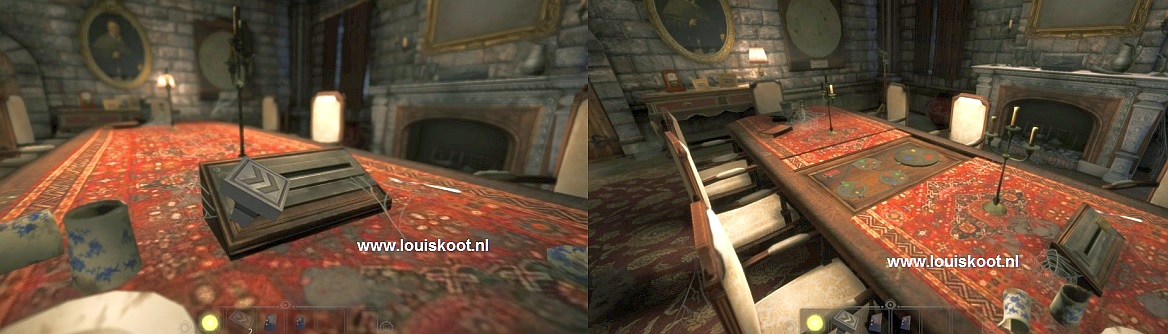
Balcony
2:

You
see many things here and you have to do a number of things here now. First we go
to the table with the 3 devices on it and with 6 handles at the front.

If
you look at the levers and you think of those 2 half drawings that you found, if
you combine those 2 you get the order how the levers should stand.

Put
the handles in the correct position and the 3 devices will open.

You
can now take the tablets out, so take the 3 tablets

You
can set multiple figures on each tablet, but you cannot use them here.

Turn
around and look at the green door to the stairs, you will see a table on the
left and right of it.

On
the right-hand table you will find two boxes, 1 on top and 1 on the shelf
underneath, open them both. On top are 2 coins in it and 2 coins at the bottom.

There
is a book on the left-hand table, look this through.

Zoom
out again and look above the door, here you will find another skull / devil's
head. Zoom in and click on it, the eyes will turn green.

Zoom
out and go to the knight in the niche. Zoom in and click on the shield.

You
now have the shield in your inventory and you can now give it to the knight
without a shield on the other side, on the balcony 1.
Now we have to deal with
the blue light beams and the devices on the pillars. Zoom in on the device on
the pillar closest to the green door.

This
is a system to focus the light rays on the stars.

With the slide and the turntable you have to focus the beam coming from this
pillar on the bottom star. If this is successful, the star will be fierce.

Now
go to the other pillar and zoom in on the device.

Aim
this beam at the star right above the first star, it is the one closest to the center. If successful, this star will also become fierce.

Now
go through the green door to the stairs. Before you go back down, look up along
the wall.
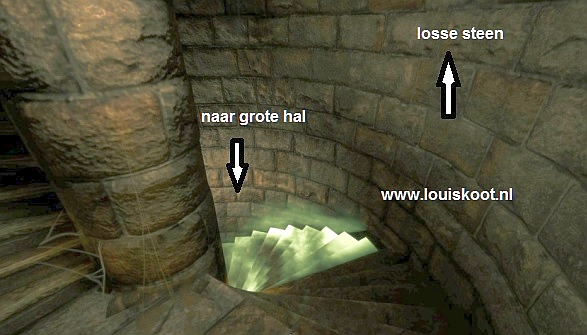
There
you see a stone sticking out of the wall, click on that stone and he falls down.
In the opening you will find a photo, take it.

Go
down the stairs and through the room back to the central hall. You are back in
the large central Hall and you look at the stairs.
Look in the direction of the
green door. Just next to the stairs is a pedestal, just behind it you see
something. Zoom in and you'll find another photo, grab it.

Zoom
out. There is also a table under the stairs. Earlier you could not zoom in on
that table, but now you can, so do this now.

You
see a book and a poster, click on both. In the book you see the constellation
Orion and on the poster you see a star nebula but also a figure of 4 numbers,
2024.

You
need number 2024 for the box in the room next to the kitchen so remember this
number. We now continue with the light rays, 2 are already aimed correctly.
Go
over stairs to the balcony and zoom in on the rear pillar, with the slide and
the turntable.

Aim
the beam with the slide and the disc to star 3.

If
successful, star 3 will also become fierce.

Zoom
out and zoom in on the pillar near the stairs. Aim here the ray D on the left
star 4, this also becomes fierce.

Then
a beam shoots from the center of the circle to the plinth in the hall and
something is brought to the plinth.

It
is time to give the right knight a shield again, you have to do something for
it.
The shield that the right knight receives must be the mirror image of the
shield of the left knight.

Click
on the shield in your inventory. Click it and it will appear in the middle of
the screen. You can now twist the symbols by clicking the symbols so that it
becomes a mirror image of the left shield. Click the shield back, zoom in on the
right knight and drag the shield to this knight. If you have done well then the
shield remains with the knight.

Zoom
out and the wall between the knights drops down and you see the constellation
Orion, but 3 lights do not light up.

You
can drag the 2 yellow Orb's you have already found,
to the constellation, 2 lights will now light up.

Still
1 to go, so looking for the third yellow Orb. Zoom out and turn to the left.
Zoom in on the arch with the 6 skulls / devil's heads.
From
4 devil's heads, 1 eye is green now. Now click on this 4 skulls and the other
eyes will also turn green.

2
more Devil skulls to find. Go down and walk to the plinth. On top of the plinth there
is now a blue Orb, grab it.

Now
that we are here again we can now solve those 2 ceiling puzzles, so go back to
the:
Storage
room:
Look
at the ceiling and click on the puzzle.

You
have to turn the 8 ceiling tiles and the solution of this puzzle you have seen
in the book in the pantry on the table.
So
turn all 8 symbol tiles so that they are pointing upwards. You then zoom out and
something falls out of the middle tile.

Look
on the floor and you will find your first doll / action figure. Take this.

Go
back to the central hall and then to the side room, behind the fence there is
also a ceiling puzzle.
Side
room:
Look
at the ceiling, above the round table, and zoom in on the puzzle.

In
the book of the pantry you saw the picture with the solution of this puzzle.
Name
the tiles from top left to bottom right: A to F.
urn
the symbols to the correct position but this must be done in the correct order.
You have to turn
the tiles in this order: A, D, E, B, C
, F

If
you do it well, you zoom out and you see the bookcase move. A secret passage is
released.
Note: Sometimes
this puzzle does not want to react, you have to leave the
game once and come back later. You must then re-rotate the symbols and make sure
it is done in the correct order

Secret
Corridor
Click
in the opening of the new passage. Halfway down the hallway the wall on the left
is broken. Turn to it, at the bottom you see a hatch, on the bar you can see 2
coins, take it.

At
the top right of the hole you see a ring, pull it down and the hatch opens.

Click
in the hatch and you will enter a cellar.

You
can only get into this little part, further in the game you'll get to the lower
part of the basement but then you cannot come to this part.
The
first thing you see is a painting on an easel. Zoom in and grab the painting.

Zoom
out and turn around. There are a few boards right against the wall. On the floor
just behind those shelves you will find a lever.
Zoom
in on the lever and pull the lever and ........

....
you automatically zoom out and you see in the lower basement a part of a wall
sinking down into the ground.

Here
you are now ready, the rest of the cellar cannot be reached from here. You go
there later in the game so click at the top of the ladder to return to the
secret hallway.

Turn
left to the wall opposite the hole, look up and there you will find another
skull / devil's head.
Zoom
in and click on it, the eyes will turn green again.

You
still have to find 1 skull, but you only can get that last one later in the
game. Zoom out and turn left again and continue through the secret corridor. You
come into the space, aside from the kitchen. You cannot go from here to the
other side because of all the rubbish, you have to walk around.

Between
the boxes and the pillar you will find your second doll / action figure, take
it. Furthermore, you will also find a radio with only noise, so turn it off.

You
are ready here so go back to the central hall via the secret hall and via the
door with the 2 levers to the Middle Room with 1 of the devices. We will now
solve the tablet puzzle. Click on the tablet and it will be placed in the middle
of your screen, you will see an image on the tablet. Via the arrow keys below
you can change the image, which one do you need here?
In one of the corners of
the room there is a painting with a flag, so put the image of the flag here on
the tablet.
Click
the tablet away again and zoom in on the device in the center of the table. Now
drag the tablet to the slot on top of the device, the tablet stays on top of it.

Turn
to the right and go to the small room with the tower stairs and look around and
....... you will see a painting where a sword is raised. So click on a tablet
again and change the image to a sword. Click the tablet away and zoom in on the
device and drag the tablet to the slot on top of the device, it stays here.

Now
go back to the room and walk to the dining room and then to the utility room.
The third appliance is located in the utility room. Go and have a look in the
kitchen ....... in the kitchen you see a painting of a windmill. So put the
image of a mill on your last tablet and drag it to the device.

If
it is on it you will hear something clicking but you do not know what yet. To
the left of the device is a chest on the ground with a combination lock.
We
found a number 2024 on the poster under the stairs. Zoom in on the box and enter
the number 2014.

The box opens and you will find a yellow Orb.

Dining
room:
Now
go back to the dining room with the different devices with the sliders
underneath.

Zoom
in on the box on the table right against the wall, the lip jumps off the lock
and you can now move the slider to the right.
The
box opens, in there are four buttons for the slides. Grab the buttons.

Zoom
in on the painting on the pillar. Drag 1 of the buttons to the slider below the
painting and then slide it to the right.
A hatch opens in the painting. There is a painting in it, take it.

Behind
it you now see a disc with 5 colored dots, on the edge there are 2 gray dots.

This
disk still has to be turned into the correct position but you do not know which
one yet. Zoom out and turn to the left. To the left of the door is a table with
a device on it. Zoom in on this, also drag a button here to the slider and then
slide it to the right.

The
clamps on top open. When you turn the disc, the drawer opens, open it
completely.

You
now see a picture, take it. Below that is another disc with four colored dots.

Here
again 2 gray dots on the edge, this disk must also be put in a certain position.
Zoom out and turn around to the table.

In
the middle of the table is device number 3, zoom in on it and then drag a
button. Then move the slider to the right.
A
panel now slides open in the center of the table; four discs and one button
appear.
Here
you can only twist the disc with 3 colored dots, 2 of the other disks we have
already found now the last one.

On
the wall against the kitchen is a large disc with a slider underneath, zoom in
on it and drag the last button to the slide.
Move
it all the way to the right, an image is projected onto the large disc, actually
it is 2 disks.

The
slider under the disc also folds and another slide appears. With the slider you
rotate the projection.
You
now have to play with the slide and the 2 discs until the stars on the disc match with the projection.

Success?
Then the middle disc rotates and another picture comes forward, pick it up.
Also
behind this photo is a disc now with 6 colored dots and 3 gray dots along the
edge.

Zoom
back in on the middle of the table, you see the 4 disks and the disks are
connected by power cables.
You
now have to ensure that the same color dot is on both ends of a cable. If you
look closely you will see that this is only possible in one way. You now have to
turn the 3 discs, on the pillar, in the table drawer and the Orion disc in the
correct position and on these screenshots you see how they should be.

Note from Dick: Louis, in the picture you changed the numbers 1 and 2 and
the disk with the 4 dots is now wrong. Yellow must be above and green. Louis's comment on this: Dick .... I did it according to your direction, but then the
middle part of the table does not collapse. This happens when I put the 3 disks
as in the screenshot above. Perhaps the solution for this puzzle is different for each
game.
If
you have turned the 3 discs into the correct position, you zoom in again on the
platform in the dining table.
Now
turn the large right disc so that red is above, blue below and yellow is left.

If
all discs are in the right position, click on the red button at the top left and
.......

The
panel in the table rotates around its axis and you see a large picture now, take
the picture. Zoom out and zoom in on the blank painting above the chimney. Drag
the large picture to the painting, then drag the slightly smaller picture to the
empty part of the large picture, then the smaller one and finally the smallest
picture to the empty spot in the larger picture.

You
automatically zoom out and the glass cover of the device opens.
Take the triangular plaque with which you can open the door with the strange
lock.

First
we have to go back to the central hall and to the niche between the 2 knights on
the balcony. Zoom in on the constellation and drag the third yellow Orb to the
star you still miss. When this is in place, the round tile, with the H-sign,
turns around and you get your second blue Orb.

So
far you are done here for now, the things that we have to do here and find, we
can only do when we have solved some puzzles in the next part of the castle. We
then find a secret passage and then come behind the table where we found the 3
tablets, there we find a painting and the sixth skull / devil's head. Then we
have to go all the way back to the tower stairs and the balcony with the skull
arch. More on that when we are ready for it.
So
go to the door in the middle room, that door with the strange lock.
Zoom
in on the lock and drag the triangular plaque to the lock.
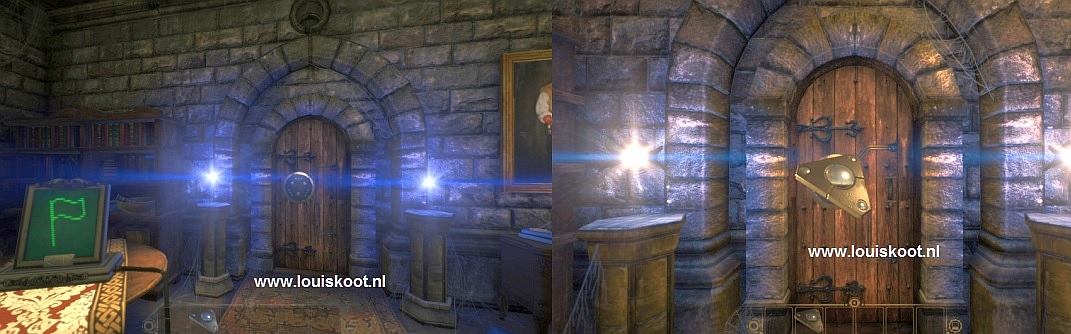
The
plaque clicks on it and rotates, the door is now unlocked.

Click in the doorway and you will now enter a room with a spiral staircase,
which is located behind a closed gate. You have arrived in:
Chapter
3: The Library
2018:
Walkthrough door: Dick Leeuw and Louis
Koot
Text
by Dick Leeuw and Screenshots and lay-out by Louis Koot