
Januariy 2020: Walkthrough door : Louis Koot en Dick Leeuw
Screenshots made by Louis Koot. Text is done by Dick Leeuw
If you have found this walkthrough via google search or via another site then you have probably not visited my site.
A lot more very detailed game walkthroughs can be found on my site at: www.pcgameswalkthroughs.nl
Dr. Richmond Walkthrough:
When the introductions are over you get control of the game. You must choose who you want to play: Richmond or as Tad.
Both scenario's have different puzzles and also several endings. Start as Dr. Richmond:

Deepwood Sanitarium:
You stand in front of your office, turn around. You see a corridor closed by a fence and on the right is a corridor with paintings.

Enter the corridor on the right and walk to the trash bin on the floor.
There is a doll's head on the floor, grab the doll's head and then click it to your inventory.

Then walk back to the beginning of the corridor and turn to the left, you are now in front of a door in the corridor and you also see a door in the hall.
The left door is the office of the nurses and the right door is the office of Dr. Richmond.

Nurse's office:

To the right is a placard on the wall with a VIP name on it.

You can collect about 40 VIP names in the game, but these are not necessary to complete the game. In the Menu screen you will find your scored VIP names under the heading "VIP Names". You can open the Menu screen by pressing your ESC key

There are also 20 gold coins hidden in the Stauf-Mansion that you can pick up and keep in your inventory.
As Richmond you can find 10 gold coins and also as Tad you can find 10 good coins.
De 1e puzzle
Go to the table and there is the first puzzle. Zoom in on it, but....

Before you can start the puzzle, nurse, Annabelle Vollmer, shortly called Anna, comes in and a conversation follows

When Annabelle has left the room you zoom in on the puzzle again
Slider puzzle with a twist

This is a sliding puzzle but the 8 buttons in the square can also rotate. You have to make a connection from the light bulb to the wire at the bottom right.

With the outer 6 buttons, A, B, C, D, E, F, you turn the 8 Cells, 1, 2, 3, 4, 5, 6, 7, 8 in the square.
By clicking on a cell you move the cell to the right, left, up or down, depending on where the open space is in the square.

|
More solutions are possible, but here's the solution that we have used.
Solved
When the connection is there, a letter will come from the opening at the bottom right. Listen to the story and read the letter.
|
Richmond's Office
Leave the office and go left, left again to Dr. Richmond’s office.

Inside you see a few things that you can activate by clicking on it with the Mask.
It's the thing that stands on the desk and the globe that stands in the corner. However, it is "just for the fun".

On the desk is the file of Tad Gorman, click on it and you will see a drawing / puzzle.

Move the Man to the X puzzle:
You must move the man from the bottom left to the top right to the X. You do that by clicking on the man and the arrows with your eyeball

Click on the man, who now appears between 2 arrows. Click on the man again and this will now appear between 3 arrows.

Now click on the right arrow that is to the left of the man, the man is going to the right.

Now click on the up arrow that is beneath the man. The man goes up 1, then click on the left arrow.

Click on the man, then click on the right arrow.

Click on the man again and then click on the up arrow below the man. Now the man comes on the X, puzzle solved.

Click on the door and you will meet the nurse Annabelle again at the gate.
After the conversation the nurse brings Dr. Richmond to Tad, another conversation follows.

Richmond gives the doll’s head to Tad and another conversation follows. Another conversation with Anna follows.
The next day Dr. Richmond goes together with Tad to the Stauf-Mansion.
Wonderworld
Tad sees something and flees from the car and enters the Wonderworld building.

Click on the door but Richmond cannot enter, you have to find another entrance.

Turn to the left and then turn right at the lamppost and enter the alley

Walk to the end and there you will find another puzzle: the Blocks Slide Puzzle.

Block Slide Puzzle
Click on the puzzle and follow the solution on the screenshots.

More solutions are possible but the screenshots shows you the solution that we have used. However, the screenshots do not show you the complete step by step solution because it would have been a lot of screenshots and there are already a lot of them. You click with your eyeball on a block and then on an empty spot where you want to move the block to


Click in the window and you will enter a study room, you can click on a number of things with the dental cursor.
These items are not stored in your inventory.

On the desk are 3 newspaper clippings, click on it with the mask.
You are now in close-up with the articles.

You automatically zoom out and you go through a door, you then go through a room with children's toys.
You will see Tad driving away by car.

You will then arrive in the Stauf-Mansion.
Stauf Mansion
Ground Floor Hallway
You are standing in front of the stairs, to the left next to the stairs are the dining room and the kitchen.
On the right side of the stairs are the music room and the library.

Click on Esc and then on Map, you will see a map of the Stauf-Mansion. With the arrows you can also view the other floors.

If you have been in a room before, you can later go through the Map to the different rooms where you have already been.
Walk to the back along the left side of the stairs and enter the kitchen.
Kitchen
You find Tad in the kitchen an a conversation follows and Tad walks away and leaves the kitchen through the right door.

Turn to the left, on the corner of the cabinet you will find a transformer.

Press ESC and then look in the inventory to check that the Tranformer is now there

You can click on the salt spreader and you will see a message: There is no possible way.

Then go to the stove and click on the large pan, a head comes out of the soup.

Then go to the chopping block and click on the knives, you will now see a knife fight.

Walk to the telephone on the wall, click on the telephone.
Telephone Puzzle:

You are now in the telephone puzzle, there are 3 circuits and you all have to repair them.

Look at these screenshot and then click on lines in the order 1 to 15. The lines you click become red

When the puzzle is solved, you will hear Stauf but you will not see him, but he will explain to Dr. Richmond what he wants him to do.
Exit the kitchen and go back to the stairs and walk around the stairs to the music room.
Music Room
In the music room there is a piano in the middle, click with the mask on it.
You zoom in on the newspaper and it disappears, you will find a puzzle there, but don't zoom in yet

On the right is a small piano that you can click with the mask on, you will hear and see music playing.
Then walk to the harp and the violin and click on it with the mask.

Then walk to the chair under the painting of a ballerina, on the chair is a cap of a gas tank.

Then go back to the grand piano and click with your mask on the newspaper, which is on the keyboard to read the newspaper.

The newspaper is gone now, so click with your brain on the piano to activate the:
Piano Puzzle

You will see 13 bars but there are only notes on 8 bars.

You have to swap the bars to play the right melody.
If you click on the bottom left button you will hear the melody and you will see the notes 1 by 1 passing by.
If you click on the bottom right button you will see the slider move from left to right and you will also hear the melody and you will also see all notes
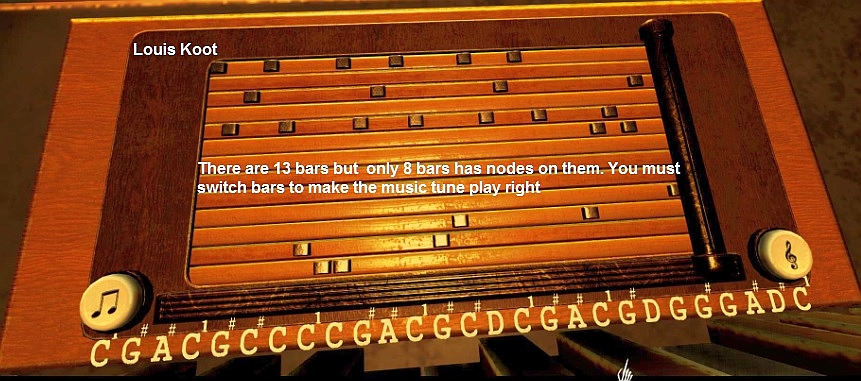
You can change the bars by clicking on the bar with your eye cursor and then clicking on another bar

If you click on a bar it will float, if you click on the floating bar it will turn around.
You have to turn over some bars.

Look at the screenshot below to see how the bars should stand and put the bars in the correct order.

Click on the play button on the right, if they are correct you will hear "ALL-right" and you zoom out.
Exit the music room and go to the other side of the stairs to the dining room. Jacob's spirit appears at the stairs.

Dining Room:

Enter the dining room,

walk to the candlestick on the table on the right against the wall.

I was not looking for it but there is a gold coin on the candlestick

Then walk further to the rear left corner cupboard, on the shield you will find another VIP name.

Turn around and walk past the table in the direction of the door.
You will see a pointer lying next to the plate, grab the pointer and click it to your inventory......it's a Gauge
Handle

Cut the Cake puzzle
Click on the cake in the middle of the table, this is another puzzle.

You see 12 gravestones and these must all stand upright, of course this must be done in a certain order.

You only need to click on three tombstones to solve this. Check these screenshots for the order.
Click the stones that are numbered 1, 2, 3 in the screenshots

When the puzzle is solved you see the gravestones sink in the cake and you see 7 people / ghosts behind the cake.

Go back to the hall and then go to the library, as you walk along the stairs, another spirit appears

When the girl is gone you go to the
Library
Go look at everything in the library, save the fire place to last because that is another puzzle.

Take the skull from the red chair and click it to your inventory.

Stand behind the telescope and click with the mask on the telescope, you will see the moon with a face.

Then go to the fire place and then click on the grid in the fireplace.

Is it a square or is it not a square:

You have to remove a number of rods, look at the screenshot to see which rods should be removed.
So click on the rods that are orange in the above screenshot to remove those rods
It is not square.

The Story of Stauf
The grid comes up and there is a book with the story of the Stauf family.
Click the book and.......You place the book on the table and you hear and see the story of Henry Stauf and his wife Lilith

Click on Esc and look in your inventory, if all goes well you now have 4 items in your inventory.
A Gas Tank Valve, a Gauge Handle, a Transformer, a Skull and maybe also the gold coin you picked up in the dining room.

You must go to Heine's room now.
Try to leave the library through the door and ..... the spirit of Lilith appears and she says, rather threatening, that you should leave Tad alone.

Look at the Map and you will see that the Heine room is on the next floor.
You can get there directly via the Map or you go up via the central staircase in the hall. I go through the Map.

But if you want you can leave the library to climb through the central staircase to the first floor

Then enter Heine's room.
Januariy 2020: Walkthrough door : Louis Koot en Dick Leeuw
Screenshots made by Louis Koot. Text is done by Dick Leeuw

