2023 :Walkthrough by: Louis Koot
If you have found this walkthrough via google search or via another site then you have probably not visited my site.
A lot more very detailed game walkthroughs can be found on my site at: www.pcgameswalkthroughs.nl
2023 :Walkthrough by: Louis Koot
If you have found this walkthrough via google search or via another site then you have probably not visited my site.
A lot more very detailed game walkthroughs can be found on my site at: www.pcgameswalkthroughs.nl
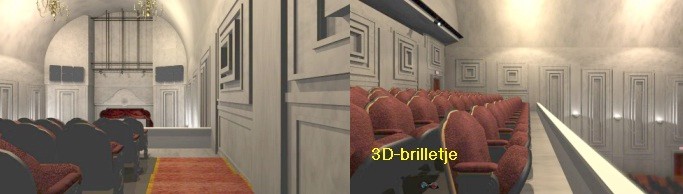
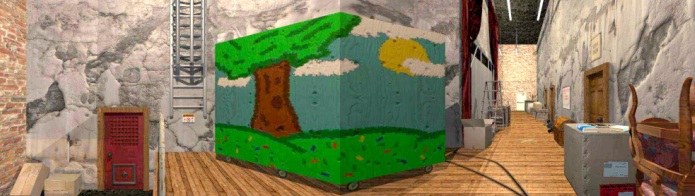
I did a Dutch walkthrough for this game in 2013. This is my English translation of the Dutch walkthrough. I do not have this game anymore and I do not know if it's still on sale somewhere. The screenshot where made when I played this game in 2013 to do the Dutch walkthrough. The Filmmaker is a 1st person puzzle adventure game. The game is "point and click" and you play with the mouse. The game takes place in an old movie theater, the Carson Stiles Gateway Theater.
Warning: This walkthrough is based on the The Filmmaker game that came out in 2013 and this was a point and click adventure game.
On Steam you can find a The Filmmaker game but that is a TEXT based game and it is not the game that I had and have played in 2013
Part 1: Evening:
The Carson Stiles Gateway Theater was built circa 1930 and was originally designed as a stage/musical theater. After a few totally flopped productions, the theater ran into financial problems and almost went bankrupt. However, suddenly an enigmatic film director by the name of Claude Ferucil came up with plans to save the theater from total destruction. Claude Ferucil was a producer and director of his own black and white B-movies and he suggested to the management of the Carson Stiles Gateway theater that his films be screened exclusively at the theater.
It was a success and the theater became a cinema where only the films of Claude Ferucil were shown. The theater was packed every night and made big profits. Until one day a horrific tragedy took place in the theater. The entire staff of the theater was gruesomely murdered, presumably by owner Todd Wickerman, who then committed suicide. The Carson Stiles Gateway Theater was closed and Claude Ferucil was gone. Now, one year after the horrific events at the Carson Stiles Gateway Theater, youl receive an envelope containing an invitation to attend the premiere of a new Claude Ferucil film, entitled "Primal AtmosFear", in the Carson Stiles Gateway Theater. Included are 2 tickets to the premiere.
You are amazed because you did not know that the Gateway theater had reopened.
You call a good friend to invite him to the premiere with you, but your friend is unfortunately unable to attend.
You then decide to go alone and get in your car to drive to the theater and then go to the premiere alone.
How to get into the Theatre:
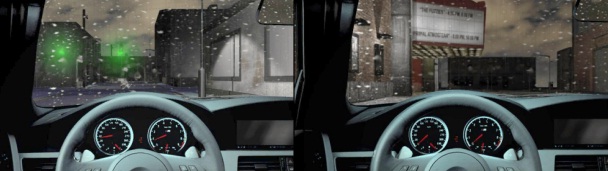
After a short drive you park your car near the theater and get out. From the theater, a well-built muscular guy walks towards you.
The guy addresses you and appears to have also received an invitation to the prièmere.
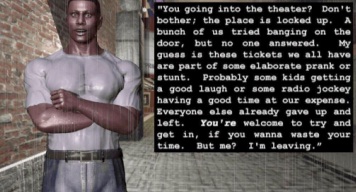
The muscle guy tells that a whole lot of people has received an invitation, but that the theater is closed and it doesn't look like the theater has opened again. Muscle man thinks someone has played a practical joke and he walks away angry. You're alone and the weather's cooler and the street is completely deserted. Everyone who received an invitation to the premiere of "AtmosFear" has already left disappointed. However, you decide to walk on to the theater anyway, to see for yourself whether the theater is indeed still closed.
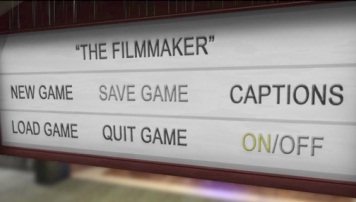
You have taken some things with you and they are stored in your inventory. The inventory pops up when you move your cursor to the top of the screen. In your inventory you now have the Invitation, the Cinema ticket and your mobile phone. You also have a magnifying glass that allows you to take a closer look at items in your inventory. You do this by clicking on an item with the magnifying grass. You will then see the item large on your screen. Step back via the down arrow to close the close-up screen again. At the bottom left of the game screen you will find a Rosette. That rosette will take you back to the main menu screen where you can save, load and exit the game. You have unlimited in-game Saves and can do so at any time.
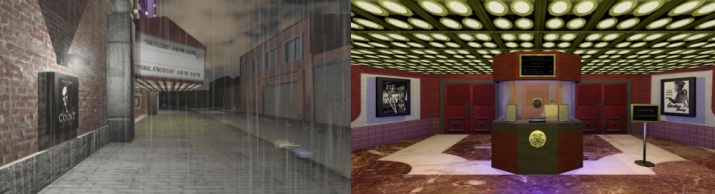
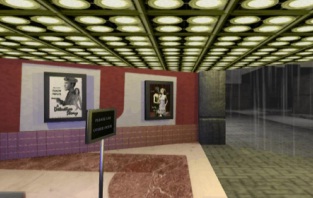
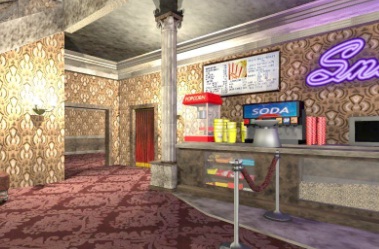
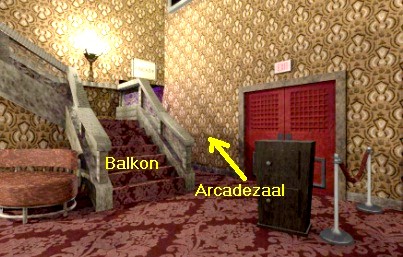
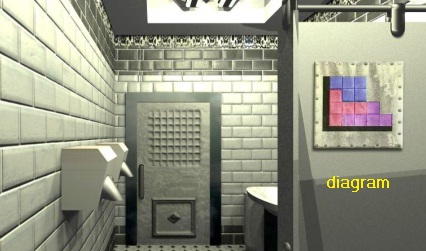
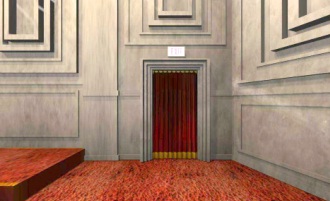
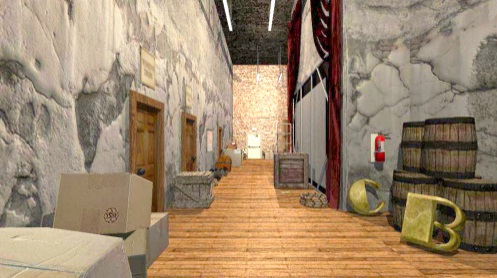
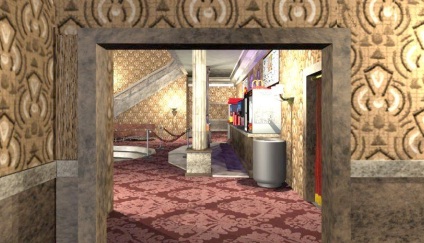
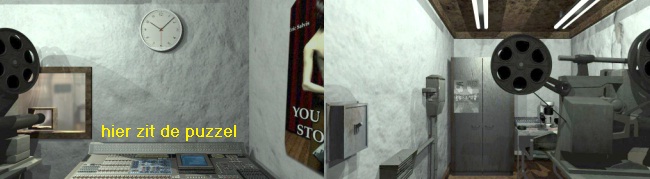
Straight ahead is the entrance to the Carson Stiles Gateway Theater. So walk forward 3 clicks and then turn left. You are now standing in front of the box office of the theatre. At the back left and right behind the ticket booth you see the red entrance doors. To the right of the ticket booth is a sign stating that the right-hand entrance is closed and that you must therefore use the left-hand doors to enter the theater.
Go forward to the cash register. A cashier is not present. Turn right. You are now looking at the sign and the right wall of the entrance.
There are 2 movie posters on the wall "A Detective Story" and "You Stole Him From Me".
You can take a closer look at those 2 posters and the board if you click on them with your circle cursor.
Do this and then turn around via the turn arrow cursor.
You are now looking at the left wall of the entrance and there are also a few movie posters on the wall.
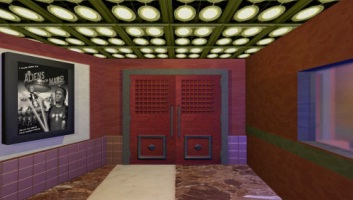
Go forward 1 click and take a look at the first poster. This is the poster of the latest movie "Primal AtmosFear".
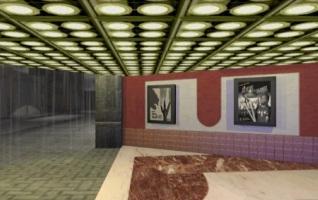
Step back and turn right. Now you are right in front of the left entrance doors.
Go forward to the doors and then turn left and take a look at the 2nd movie poster "Aliens from Mars".
Then turn right again to the red doors. Click on the door handles. Unfortunately...the doors are locked and won't open.
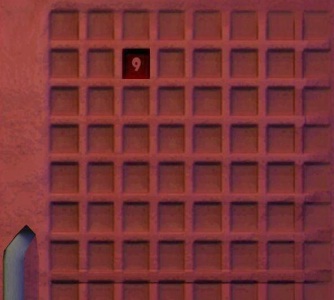
The Door puzzle:
|
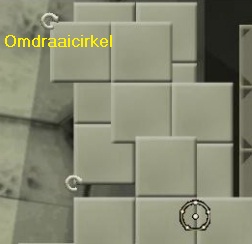
There is a panel with square boxes in both doors. Click on the box panel of the right door. You enter the close-up of the box panel. You can click in all those boxes and when you do, a number will appear in the box you clicked in. There are 8 X 8 = 64 squares. 1 of the 64 squares is the one that opens the door when you click into it. But that box that opens the door is always another box. If you click in a box, a number will appear in that box.
That number in the box then tells you how many more boxes you have to count to find the Secret Box. You can count horizontally and vertically, but not diagonally. However, if you click 2 times in a wrong box, you will hear a dull click because then the puzzle RESETS and then the Secret Box has been moved. For example, if you get the number 9 in a box, this means that the Secret Box is 9 boxes away from the box where you got the number 9. However, you don't know whether to count to the right, to the left, up or down. You have to guess that. So from the box where you got the 9, count 9 boxes further, to the left or right or up or down. However, if you click 2 times in a wrong box, then the puzzle RESET and you have to try again. After countless attempts, if you have finally found the right box, the door will open automatically and you will automatically end up in the Foyer of the Carson Siles Gateway Theater.
|
Inside the Carson Stiles Gateway Theater
Find the 6 Crystal Fragments of Claude Ferucil
Lobby:
You are greeted by Claude Ferucil, who looks rather disembodied. It is therefore the Ghost of Claude that you see.
Claude talks to you for a moment and then says that you have to put the entrance ticket in the box
You automatically turn to the ticket box where you have to deposit the entrance ticket.
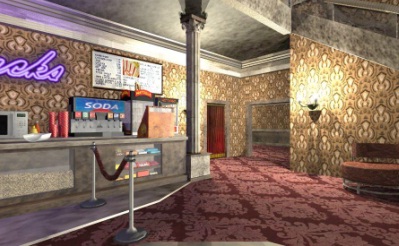
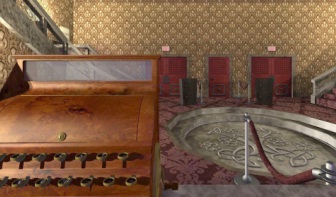
In inventory, click on the ticket and then hold down your mouse button and then drag the ticket from inventory to the slot in the Ticket Box and then click the ticket into the slot. You then can go further forward, so walk 1 click further forward. You are then exactly in the middle of the recessed "center circle" of the Foyer and right in front of the Snack bar and Claude Ferucil explains what he expects from you.
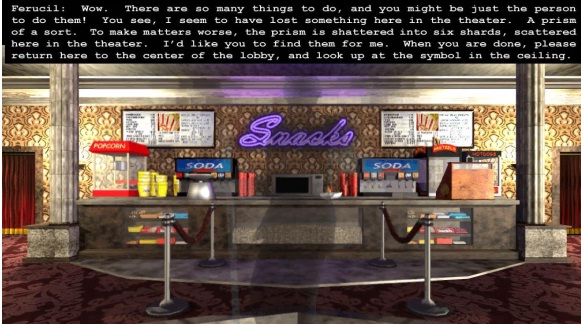
So you have to look for 6 Crystal fragments and when you have found them you have to return here to place the 6 fragments in the Mosaic, that's in the ceiling. Move your cursor to the top edge of the screen. Your cursor will then become the Up arrow, so look up at the ceiling. Exactly in the middle of the ceiling of the foyer is a mosaic rosette and around the rosette you see 6 holes in various shapes.
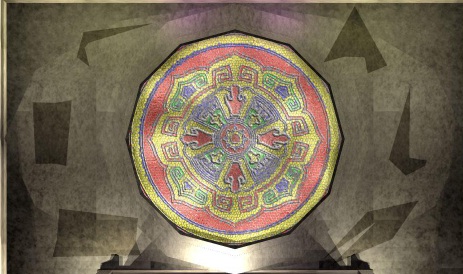
You must place the 6 crystal fragments, which you have to find first, in those 6 holes
Look down again via the down arrow. You look at the Snack Bar again.
The 3rd Crystal Fragment:
Let's take a quick look around the foyer first. Don't go forward but turn left. You look at the corner, to the left of the snack bar.
You see a staircase and you see a passage to the left side corridor. You also see a red curtain in a doorway.
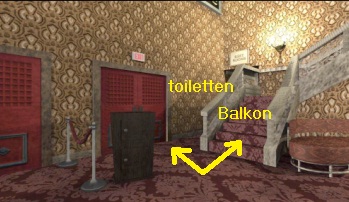
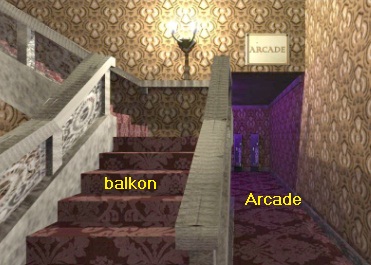
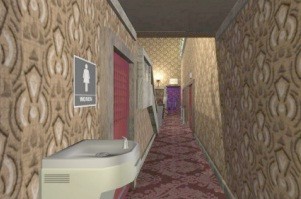
That red curtain is the left entrance to the large cinema room. Turn left. You now see the left staircase, which goes up to the balcony of the cinema room and to the Projector room. In the corner, behind the stairs are the toilets. You will also see the red Exit door through which you just entered the theater.
Turn left again. Now you are right in front of the middle of 3 red doors.
The left and right red doors are the Exit doors to enter and exit the theater. You entered through the right door.
The middle door is the door of the cash register / ticket booth.

Turn left again. You now see the right staircase, which also goes up to the balcony of the cinema room and to the Projector room.
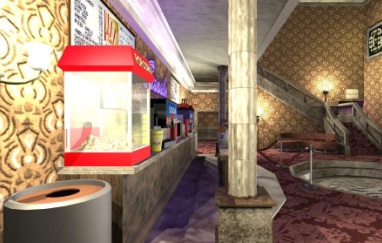
In the corner, behind the stairs, is the entrance to the Arcade room where there are a few slot machines.
Turn left again. Now you look at the right side of the snack bar and you see the right side corridor and the right entrance to the cinema room.
We have now explored the foyer a bit. However, I can well imagine that you may not feel like spending a long time in a completely deserted theater, where a number of murders have also been committed. Maybe you're thinking "Fuck You Claude Ferucil.......go find those 6 crystal fragments yourself.......I have better things to do tonight". Well....if you feel that way then you better make sure you get home safe as I can't guarantee you'll survive if you stay longer. So if you want to leave turn left 3 times and then, slantled right to the Exit door, which is the same door you entered the theater through. Click on the door to leave the theater and ...... FUCK ...... you can't leave because that bastard Ferucil screams that "The Show Must Go On". You have no choice... you will have to give Claude his way so you are forced to stay in the theater.
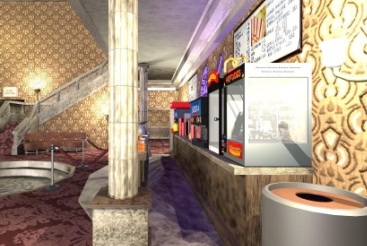
Move your cursor to the bottom of the screen and then click the flip arrow to turn around. You look at the Snack Bar again. Aim the forward arrow at the center of the Snack Bar and then move forward 1 click. You are again exactly in the middle of the foyer. Turn left and then go diagonally right to the red curtain, to the left of the Snack Bar. You will be right in front of the red curtain. This red curtain is the left entrance to the large cinema hall, but you don't want to go in there yet. So don't go through the red curtain, but turn right. You are now to the left of the Snack Bar and can now walk behind the counter.
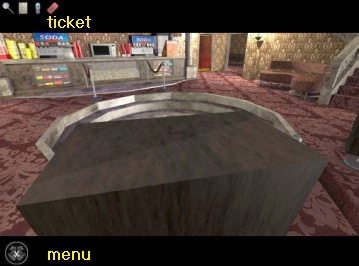
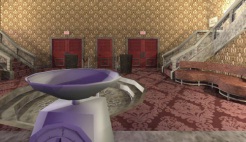
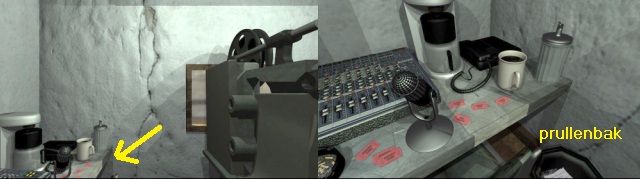
Go forward 1 click and turn right. There is a scale on the counter and you are now standing in front of the scale.
You can click on the scale to take a closer look.
Later you will need to weigh something with this scale, so remember that the scale is here.
Turn left. At the end of the counter is the orange / brown cash register.
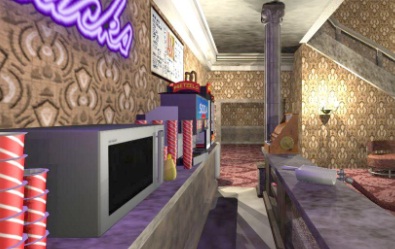
Go forward 2 clicks and turn right. You are now at the cash register.
Click on the cash register with the circle cursor to view the cash register in close-up.
The cash register has number keys and above the keys is a cover that is locked.
The cash drawer is located under the keys, but a code must be entered to open the cash register.
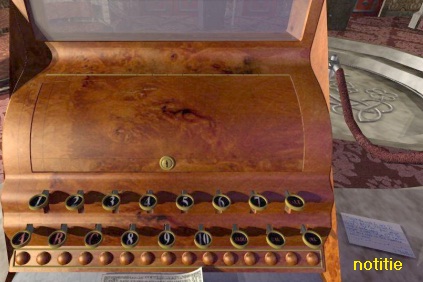
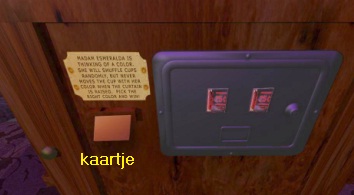
There is a note to the right of the cash register. Click on the note to read it in close-up.
It is a note from Heather and in it she says that she has changed the code for the cash register.
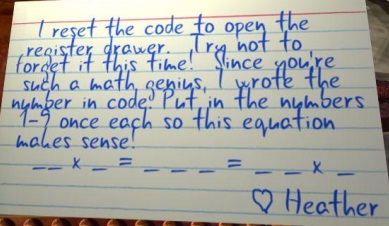
To find the code you have to solve an equation. You see the equation and Heater tells you that you can use the numbers 1 to 9 each 1 time in the equation. Click on the note again to put it back on the counter. Step back and turn left. So you are now at the right end of the Snack Bar and look at the entrance to the right side corridor. Go forward 1 click, turn right and then diagonally right 1 time forward. You are again exactly in the middle of the Foyer and look at the 3 red doors. Turn left. You look at the right stairs and the entrance to the Arcade room, behind the stairs, and the left red doors. Now go diagonally right to the left red doors and then turn left. Now you are on the right side of the stairs.
You can now go up the stairs via the up arrow or via the slanted left arrow to the Arcade room. Now go to the:
Arcade room:
There are several slot machines here. On the back wall is the brown wooden Fortune Teller machine, with which you can play a ball game. Go forward 1 time. You are then right in front of the fortune teller. On the left is a pinball machine and on the right is a gray trash can. The Fortune Teller, Madam Esmeralda, is a source of Hints for the many puzzles in the game, but she doesn't give those hints lightly. You only get the first hint for free and that is the solution to Heater's equation that you have to solve to get the code for the cash register.
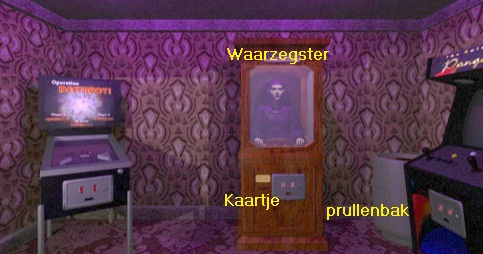
Click with your circle cursor on the bottom half of the Fortune Teller Cabinet.
You then zoom in on the coin slot and the slot where cards come out. An orange card is now sticking out of the card slot.
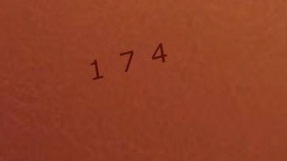
Take the orange card from the slot. The card shows 3 numbers, 1, 7, 4 and this is the solution of Heater's equation.
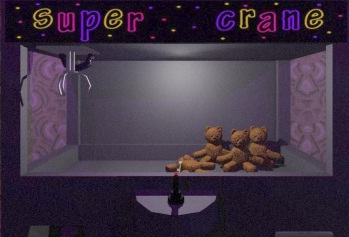
Click on the card again to make it disappear. Step back and turn around then turn right. You are now standing in front of the "Super Crane" grappling machine.
This is a machine in which you have to move a Grabber to grab a bear with it. There is a key on one of the bears in the cupboard and you need that key.
Unfortunately, you don't have any coins to activate the Super Crane gameyet. You can find coins in the cash register of the Snack Bar, but then you have to be able to open that cash register first. Turn left again and then go diagonally right and then 1 click forward, right and forward and ... you are again exactly in the middle of the Foyer. Turn right and then go diagonally left to the red curtain, right next to the Snack bar. So this red curtain is the right entrance to the main hall, but you still don't want to go in there now. Turn left. You are now looking into the Snack Bar again.
Go forward 1 click and turn left and .... You are behind the cash register again. Zoom in again on the cash register and take Heater's note again.
|
So the equation you have to solve is: -- -- X -- = -- -- -- = -- -- X -. Fortune teller Esmeralda's card gave you the numbers 1, 7, 4. Heater's note says that you can only use the numbers 1 to 9 once in the equation. So you have to solve 2 multiplications that both give 174 as a result. You then get a series of 9 digits in which the digits 1 to 9 occur 1 time. Well....it's a simple math. So the result of both multiplications is 174. I'll spare you the whole calculation and give you the solution right away, which is: 58 x 3 = 174 = 29 x 6. So the code for the cash register is then: 5, 8, 3, 1, 7, 4, 2, 9, 6. So click on the number keys 5, 8, 3, 1, 7, 4, 2, 9, 6 and ..... the money drawer will open.
Inthe cash drawer is the Crystal fragment number 3 (Prism Shard 3) and also coins. Take the Crystal Fragment from the drawer and also take all the coins from the cash drawer. The cash register drawer closes automatically. Click 2 times with the down arrow. You then look down at the shelves under the cash register.
|
The 2nd Crystal Fragment:
Look up again via the up arrow, turn left, 1 click forward, turn right, diagonally right ahead and you are back in the middle of the Foyer and look at the 3 red doors again. Turn right. You look again at the left staircase and the red door through which you entered. Behind the stairs are the toilets. Go diagonally to the right to the stairs. You are then right in front of the stairs. Next to the stairs is the hallway to the toilets.
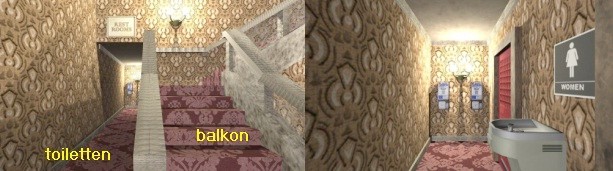
Go 1 click forward through the corridor to the:
Toilets:
The ladies room is the front toilet and the men's room is the back toilet. You're in the ladies' room.
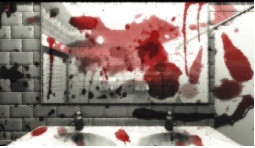
Turn right and go through the red door into the ladies room. Immediately turn left to the sink inside.
In the mirror you see a bloody vision for a moment.
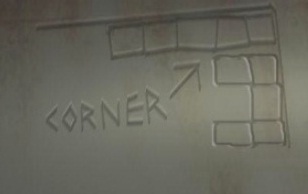
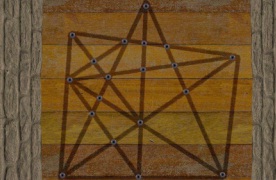
When everything is back to normal, turn right again and then go forward to the 3 toilet cubicles. Then turn around via the turn arrow. In the front toilet cubicle you see a block diagram on the wall. The blocks in the diagram are blue, red and purple. Draw over the diagram carefully because it is part of the solution of the Tetris puzzle that you will have to solve later.
When you have drawn the diagram, you leave the ladies' room again. In the hallway you turn right, 1 click forward, right and go through the door into the Men's Toilet. The men's toilet has 2 urinals and 1 WC cubicle. Continue to the WC cubicle and then click with the down-slanting arrow in the WC cubicle. There is a box on the floor and in this box is the Tetris puzzle. There is a note next to the box.
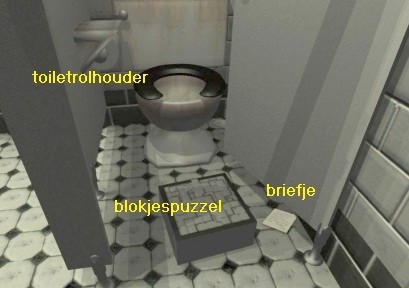
Click on the note to read it. It's a short note from Greg to Todd. Click the note away again. The toilet roll holder is on the left. Zoom in on the toilet roll holder and ... someone has scratched the 2nd part of the solution for the Tetris puzzle on top of the toilet roll holder. The clue shows you which 2 pieces should be placed in the top right corner. Also note this down
You can now solve the Tetris puzzle because you now have all the clues for it.
So look at the floor again and now click on the puzzle box, which is on the floor in front of the toilet bowl.
The Tetris Puzzle:
You see a playing field that is divided into 8X8=64 squares.
To the left and right of the playing field are the Tetris pieces that you must place in the playing field.
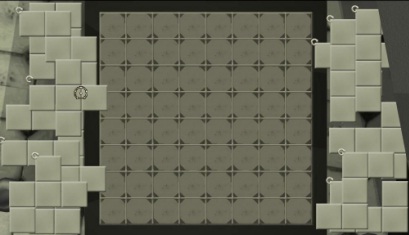
You pick up a Tetris piece and then drag it to the playing field and then click the Tetris piece in the correct place in the playing area. You can also rotate the Tetris pieces. A small white circle appears on one corner of most Tetris pieces. If you click on the white circle, you turn the Tetris piece 1 turn. So if you want to turn a Tetris piece several times, you have to click on the white circle several times.
So basically, the directions in the ladies Toilet and on the Toilet Holder of this Men's Toilet give you the, almost,complete solution to this Tetris puzzle.

So grab those 2 drawings and then solve the puzzle.
Keep in mind that you have to turn some Tetris pieces first and also that some Tetris pieces are the same.
A Tetris piece is in the right place in the playing field if the piece really fits exactly in the squares.
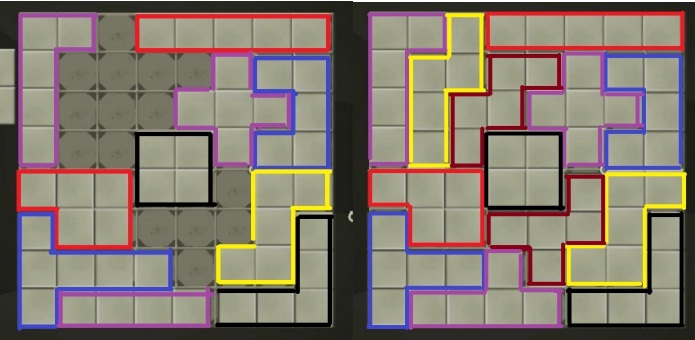
If you solve the puzzle correctly, the box will open and you can take out the 2nd Crystal fragment (Shard 2).
The 1st Crystal Fragment:
Go out of the puzzle box via 2 times the slanted down arrow to the left and then turn 2 times to the left.
Leave the Men's Toilet and in the hallway turn left again.
Go 2 clicks forward, back to the Foyer. Turn left and again 1 click forward to the center of the Foyer.
Turn right twice and go back to the:
Arcade room:
Continue to the Fortune Teller but not all the way.
Turn left and ..... you are right again in front of the "Super Crane" grab machine.
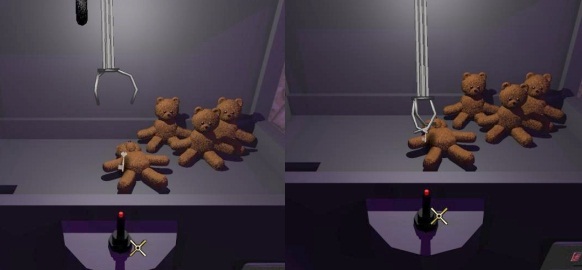
The "Super Crane" grappling machine:
Zoom in on the machine. There are 4 brown bears in the machine. There is a key on the bear that's lying on the floor and you have to get that key out of the machine with the grabber. The Grapple hangs at the top left. In the middle is the joystick with which you move the grapper through the cabinet. At the bottom right is the coin lock and at the bottom left is the opening where the Grapple will deposit the bears and therefore also the key.
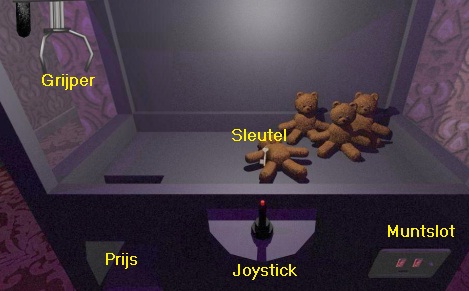
|
Take the Coins (Quarters) from inventory and drag a coin to the coin slot and then click the coin into the coin slot. You can play now. You have to click on the joystick to move the Grapple through the cabinet and you are allowed to click 3 times. You have to get the Grapple, in 3 clicks on the joystick, exactly above the key. If you keep waiting, after every click, for the Grapple to stop by itself, you won't make it. So you have to look closely at the Grapple and click as the Grapple moves through the cabinet. Your first click moves the Grapple to the back left of the cabinet. The 2nd click moves the Grapple to the back right of the cabinet. Your third click lowers the Grapple to grab a bear, the key, or nothing. So you should not wait with your 2nd click and your 3rd click until the Grapple has stopped automatically. Here's how to do it:
|
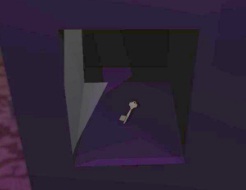
You will then automatically enter the close-up of the prize hole, so take the Key. This is the Office Key.
Step back and turn left and then go 1 click, through the corridor back to the Foyer.
You are then back at the left red door. Turn back. You are again in front of the right staircase. Now go up the stairs to the balcony.
Upstairs you go straight through the red curtain. You are then on the balcony of the theater hall,on the right side.
Walk until you can go no further and then turn left.
There are 3D glasses on the floor between the front row of seats and the 2nd row of seats. Take the 3D Glasses.
Turn left and walk back up and out through the red curtain. Turn right.
You now look over the "outside balcony" and you see a red door. Go forward 1 click and turn right.
You are now standing in front of that red door. It says "Employees Only" on the door. This is the Projector Room door. We'll be back here later, so don't go through this door right now. Turn right or left and go back down the right stairs or the left stairs and you will be standing in the middle of the Foyer again, so right in front of the Snack Bar again. To the left and right of the Snack bar are the red curtains that provide access to the main hall. There is also a corridor to the left and right of the snack bar. It does not matter whether you enter the main hall through the left entrance or through the right entrance. I'm going through the right entrance. So go through the right red curtain to the:
Main Hall
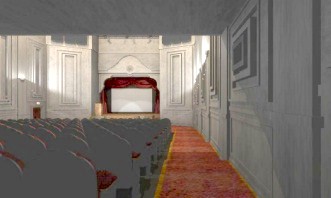
You are in the main hall and on the right side. Walk forwards, past the rows of chairs, and then turn left and .......
You hear a loud bang and a corpse drops down on a rope in front of the stage.
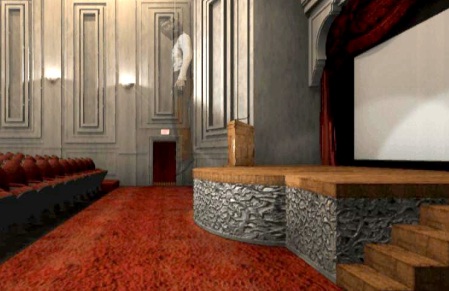
It's the ghost of a person who hanged himself here in the theater. There is a lectern on the stage. Go forward 3 clicks, along the stage, and then turn right. You are now on the other side of the stage and therefore at the lectern. Go up the stage via the stairs and then turn around via the turn arrow. You are now on stage and behind the lectern.
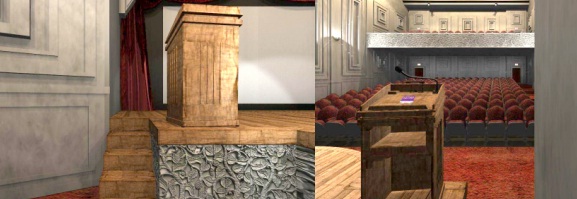
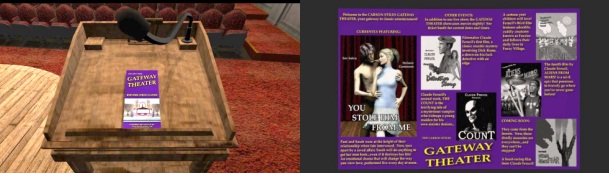
There is a purple brochure on the lectern. Click on the lectern and then take the "Gateway Theater Brochure".
In inventory click with your magnifying glass on the Brochure to open and read the brochure. The brochure lists all films by Claude Ferucil.
Step back 2 times, turn left and go forward 1 click and turn right.
You are now standing exactly in the middle of the stage. Look down at the floor.
You can see the outline of a square trapdoor in the plank floor of the stage.
Click on the trapdoor but ..... the trapdoor is locked at the bottom.

Look up again, turn right and go back 1 click forward and turn left. You are back at the desk.
Move your cursor down and then click with the down arrow and .... you jump off the stage and ..... you hear a loud scream.
.....Turn right and go forward to and through the red curtain in the corner.
You end up in the left side corridor and at the left emergency exit. You can click whatever you want on the white EXIt door, but the door won't open because Ferucil doesn't want you to leave the theater. Turn left and 1 click forward and then turn back. You look back down the hallway. You now see the white emergency exit door and a red door and the red curtain to the main hall. That red door Another red door is the left "Backstage" door through which you enter the big stage.
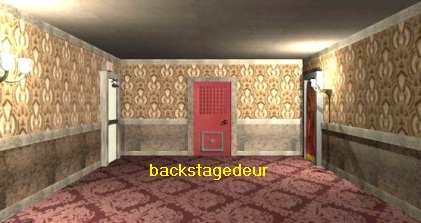
So go to the red "backstage" door and go through it. You are then:
Backstage:
Walk up the stairs. On the left is another white emergency door, but this one is also locked. Turn right.
You now look through the "corridor" behind the stage and you see 3 doors.
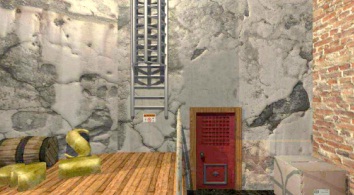
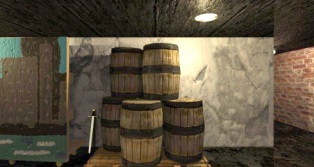
The first door is the door of the Women's Dressing Room. The middle door is the door to the office and the door at the back is the door to the Men's Dressing Room. On the right are a few barrels near the wall and a red fire extinguisher hangs on the wall near those barrels. Turn right. You will now see an extension ladder. The extension ladder is from the lighting walkway, which hangs above the stage. So this is the right ladder.
Do not go to the ladder yet, but turn left again and follow the corridor 3 clicks ahead.
You are almost on the other side of the corridor and at the door of the Men's Dressing Room.
Right in front of you you see another white emergency door and .... against the left wall are some chairs and ..... a round table.
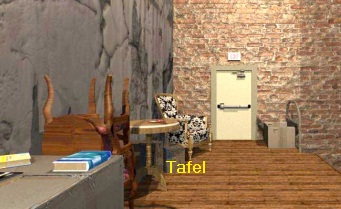
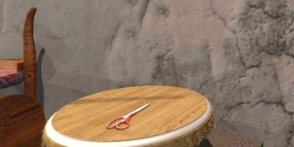
Go forward 1 more click and then turn left. Now you are standing in front of the round table.
There is a red Scissors on the table. Take the Scissors.
Turn around. You will now see the left "Backstage" door and the left extension ladder of the walkway.
Turn right. You look down the hallway again.
Go forward 1 click. To the right of you is the Mens Dressing Room door again.
In front of you is a ladder and on the right wall hangs a writing board on which, in red, blue and green, some stage directions are written.
Under the writing board is a large wooden chest
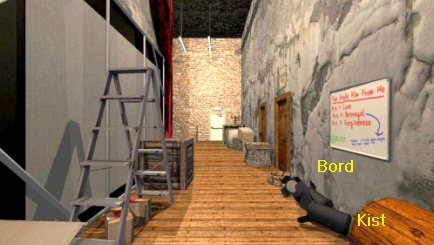
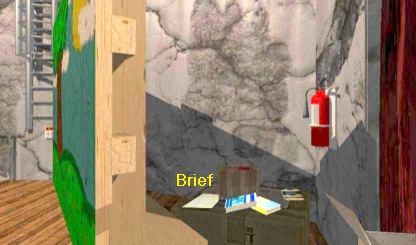
Zoom in on the writing board and read the stage directions for the movie "You Stole Him From Me". Step back and zoom in on the wooden chest. The chest has a number code lock. A 3-digit code must be entered to open the chest. Well .... you don't know the code, so step back again. Turn left. You will see another red fire extinguisher on the wall. There is a box under the fire extinguisher. On the box are a few books and a Letter.
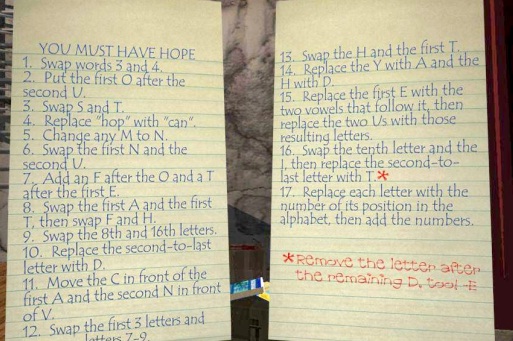
Click on the letter to view this inyour screen. This is the "YOU MUST HAVE HOPE" letter.
The letter has 2 pages and it's the very complicated explanation for the number code of the chest you just saw.
The explanation is in 17 steps and it is quite complicated to understand, especially if you don't understand English very well.
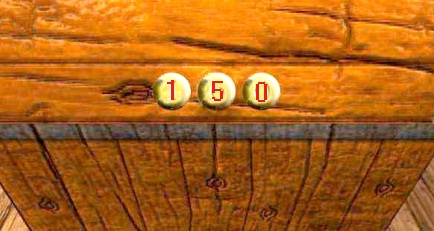
The Code for the Chest:
|
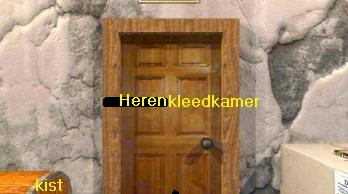
In short, it comes down to this. The letters in the sentence "YOU MUST HAVE HOPE" must be converted in 17 steps, You then give the letters in the new sentence a number, as they occur in the alphabet. So Y = 25, O = 15, U = 21, C = 3, N = 14, V = 22, I = 9, D = 4, F = 9, T = 20, E = 5. Then you add all the numbers together, but each letter only counts once. The result is then 145, but the last red sentence tells you to count an extra E and the E is the 5th letter in the alphabet. So the result is 154+5=150. So the code for the chest is 150. Stap achteruit en draai je dan om. Je staat nu rechtvoor de deur van de Herenkleedkamer en links naast de deur staat de kist. Step back and then turn around. You are now right in front of the door of the Men's Dressing Room and to the left of the door is the chest.
Click on the chest again to zoom in on it again. The code lock has 3 click buttons. Click on the buttons to get the number 150 and ....
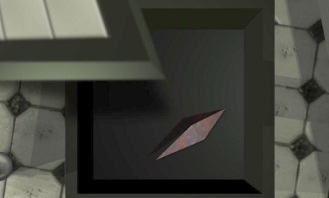
The chest contains the 1st Crystal Fragment. Grab the Crystal Fragment (Shard 1) from the chest.
Step back to exit the box. You are again right in front of the door of the Men's Dressing Room |
The 4th Crystal Fragment;
Click on the door of the Men's Dressing Room and then enter it
Men's dressing room:
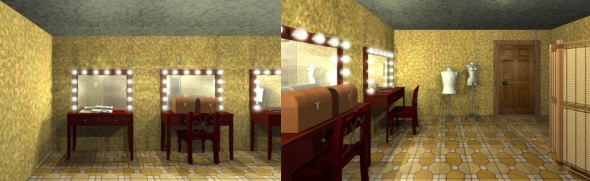
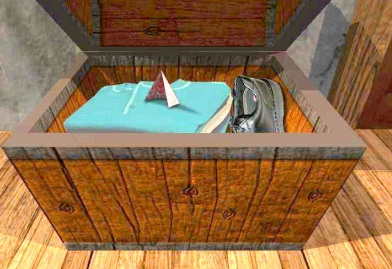
The dressing room has 3 dressing tables with large mirrors. There is a newspaper on the 1st make-up table. Go forward 2 clicks to the 1st makeup table. You are zoomed in on the newspaper "News Today". Click on the newspaper and read the review about the "You Stole Him From Me" movie. Use the down arrow to scroll down to read the lower part of the article. When you have read the article, step back and turn to the right. You now see the middle make-up table and the back make-up table. On the right is a folding screen and in the back wall you see a 2nd door. There are also 2 mannequins at the back wall. Go forward to the 2 mannequins and then turn left and .... you are in front of the rear make-up table. There is a black book on the table and a series of photos pasted on the mirror.
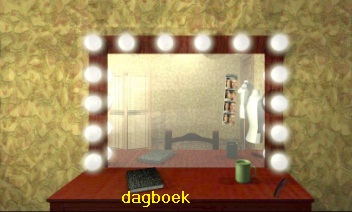
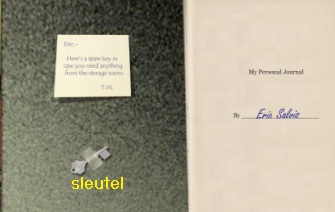
Zoom in on the photos to take a closer look. The photos show Eric Salvis and Melanie Gustonson, the 2 leading actors in the "You Stole Him From Me" movie. Step back again and now go forward to zoom in on the black book that is on the make-up table. Click on the book to open it. This is Eric Salvis' diary. Taped to the inside of the cover is the Spare Key to the Storage Room. Take the Spare Key.
Scroll through to the diary and read through the texts. You read pages 142, 143, 144 and 145. When you have read these 4 pages, you step back to put the diary back on the table. Then, via the slanted down arrow, step away from the make-up table. Then turn around via the turn arrow. You see the door on the left and the folding screen on the right. Go diagonally to the right to behind the room screen.
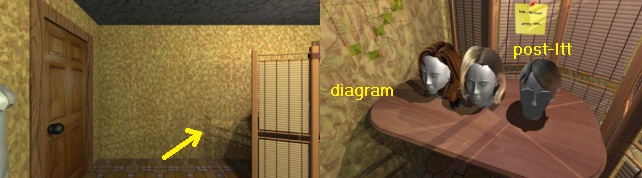
Behind the folding screen are 3 wig heads, with wig, on a table. Behind the wigs, a yellow Post-It note hangs on the folding screen. Note what is written on the yellow Post-It note: "Tod - The Count" and "Jeremy - Wed." This is a hint for the puzzle in the Projector Room that you will have to solve later. Someone has drawn a square diagram on the left wall. Some squares in that diagram are colored green. Draw this diagram carefully as this is also a hint for a puzzle that has yet to be encountered.

Step out from behind the room screen again, via the slanted downward arrow. Turn right, forward, turn left and leave the room through the door you entered through. You are back "Backstage". Turn right, 1 click forward and turn right again. You are now in front of the middle door and this is the door of the office of the theater director Todd Wickerman. Click on the door. The door is locked. Take the key you took from the SuperCrane Grab Machine from inventory (Office key) and click it on the doorknob. You will hear "Click" indicating that you have unlocked the door. Click on the door again. The door will now open, so step inside.
Office off Todd Wickerman:
You are right in front of the L-shaped desk. There is a computer on the desk.
To the left of the computer keyboard is a letter, a calculator and 4 red pins.
Click the down slanted arrow to zoom in on the letters, calculator, and red pins.
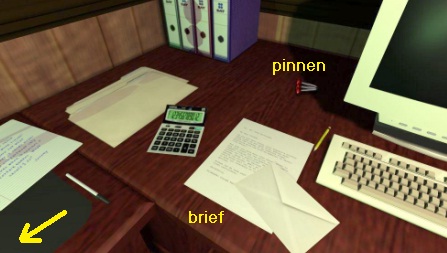
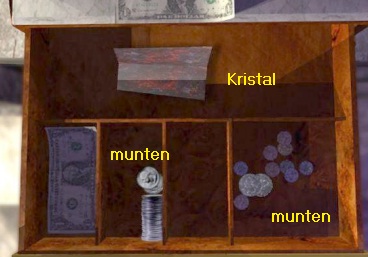
Take the Letter and read it through. It is a short note from Claude Ferucil to Todd Wickerman in which Claude offers his services to the ailing theatre. Click the letter away again. Above the letter are 4 red Pins. Take the 4 red Pins. They will be in your inventory 1 by 1 (Peg). Click the down slanted arrow on the left edge of the screen to look at the left half of the desk. On the left desk table are 2 printed statistics and a letter and there is a yellow Puzzle box.
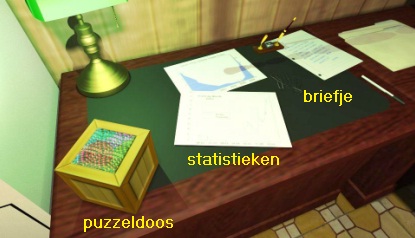
View the 2 stats. The 2 stats show that the theater's profits have skyrocketed since the theater started showing Claude Ferucil's film. On the short note from Jeremy you can read that the scale, which is on the counter of the Snack Bar, is broken. If you interpret Jeremy's message correctly, he says that the compartment in the scale only opens if you put something on the scale that has a certain weight.
Click the note from Jeremy again and now click on the yellow Puzzle box. You get the lid of the puzzle box large in your screen. There is a sliding puzzle in the lid. You may try to solve this sliding puzzle, in the hope that it will open the puzzle box. However, I can tell you that you will not open the box by solving this sliding puzzle. At the bottom right you see a tiny yellow button. Click, with your normal crosshairs, on that tiny yellow Button and ....... The puzzle box opens. Well.... I don't think you've ever solved a puzzle that easily....
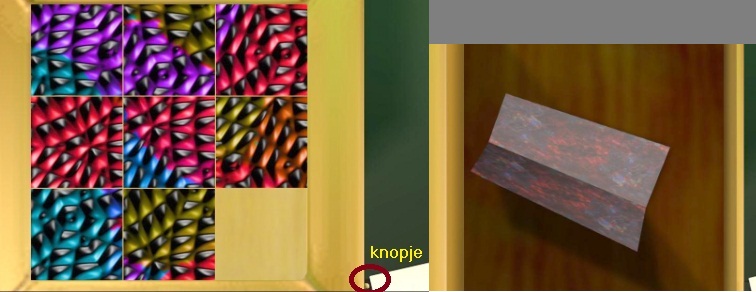
Inside the box is the 4th Crystal Fragment (Shart 4). Take the Crystal Fragment from the box. Ferucil's voice tells you to find 2 more Crystal Fragments. Step away from the desk via 2 times the slanted left down arrow. Look further around the office. So looking at the computer, which is on the desk, turn right and.....Hey......is that the ghost of Todd Wickerman....Wickerman is apparently very tired because he snores that it is a sweet pleasure.
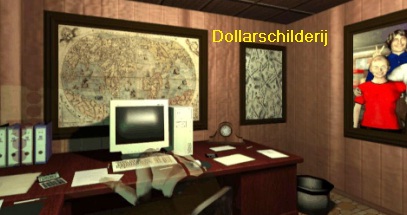
In the corner behind the desk hangs a Dollar painting. Look at that Dollar painting in close-up and then click on the Dollar bills. The Dollar painting folds away and .... You have found Todd Wickerman's wall safe. You cannot open the wall safe because the safe has 4 buttons that each have a different color: Red, Black, Green, Blue.
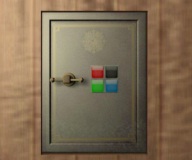
To open the safe you need to know the color code and you don't know it yet. Turn around via the turn arrow. This causes the Dollar painting to close again. You see the bookcase, the room door and the filing cabinet. Go forward to the room door and then turn left again. You will now see a large painting hanging on the wall and on that painting all the staff of the theater are depicted. You can also view this painting in close-up. Then leave the office through the door. You are then "Backstage" again. Turn right. You will see the door of the Women's Dressing Room again.
the 5th Crystal Fragment:
Go forward 1 click, turn right and then go through the door into the Ladies Dressing Room.
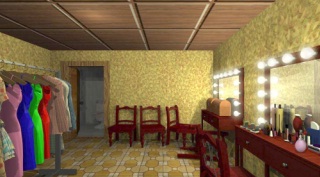
Ladies dressing room:
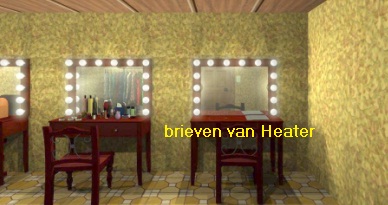
This dressing room also has 3 make-up tables. There is a letter on the front make-up table. Go to the front table so that you are in close-up view of the front makeup table. Next to the letter is also a necklace, but you can't do anything with it. Take the letter and read it. They are 2 letters and they are written by Heater and addressed to Jeremy.
It is a love letter in which Heater, the daughter of Todd Wickerman, expresses her love for Jeremy, the theater's boy stagehand. In the left letter you read more about a meeting between Heater and Jeremy, at 3:00 in the storage room. In the right letter you read that Heater is delighted that Jeremy also appears to be in love with her, but that she is afraid that her father will find out. You also read that Jeremy is 2 years older than Heater.
Click the letters away again and then step back and turn around via the turn arrow. There are racks in front of the make-up tables with a lot of dresses hanging on them. Turn right. You are now looking further through the dressing room. In the back is the toilet cubicle and you see more dresses.
Via the diagonally left arrow you can walk one step further into the dressing room and then you can view the dresses on the left and, on the right, the middle make-up table. However, you can't click on anything or grab anything else. However, take a look around and then leave this dressing room through the door to Backstage. Back Backstage turn right again and go 1 click forward, to the white Exit door. When you are in front of the white exit door, turn left. You are standing in front of the stairs that go down to the right door of the main hall. Click with the down arrow to descend the stairs and then turn clockwise twice. You see the stairs up to "Backstage" but you now also see the Basement Stairs, which go down to the basement.
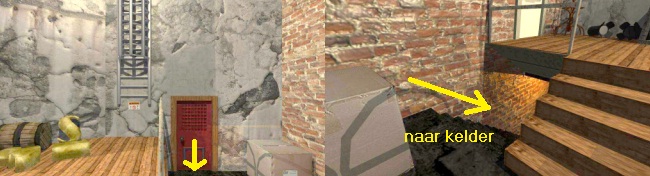
Now descend the basement stairs to the:
Basement
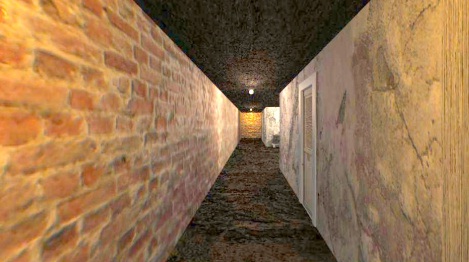
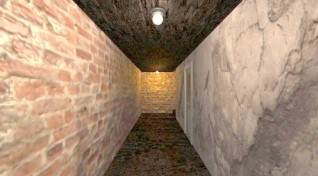
Turn right. You look through the basement corridor and see a door in the right wall. Beyond the door is a cove. Go forward 1 click, turn right and click on the door..... the door does not open .... you get a white flash and you hear a sound and the grille in the door moves for a moment. Strange door ....... But behind this door is the boiler room of the theater, but you can't enter it. Turn left and go 1 click further forward and then turn right again. You are now at the cove.
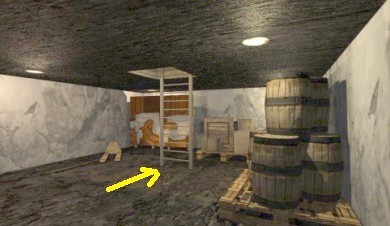
There are barrels and you see a ladder. That ladder hangs under the trapdoor, which is at the top of the podium of the great hall. Go diagonally to the right to the ladder and then climb up the ladder. At the top of the ladder, rest your head against the bottom of the trapdoor. Click above your head on the trapdoor. The trapdoor contains a puzzle that you must solve in order to open the hatch.
However, you have no idea how to solve this puzzle. Look down again and climb back down.
At the bottom of the ladder again, turn right. To the left of the barrels, a Sword leans against the wall.
You can't get the sword yet, but remember the sword is here.
Turn around and then left and then, diagonally right, enter the cellar corridor again.
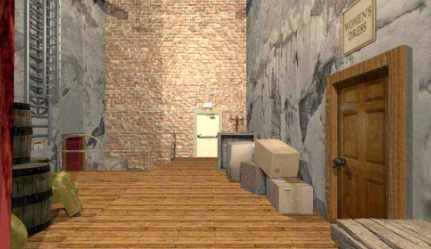
You are now in the 2nd part of the basement corridor and see another door.
Go 1 click further and then turn right again. You are now right in front of the storage room door. The door is locked, but luckily you found the spare key (Storage key) and took it from Eric Salvis' diary. So click on the door with the Storage Key to unlock the door. Then click on the door to open it and step inside.
Storage room:
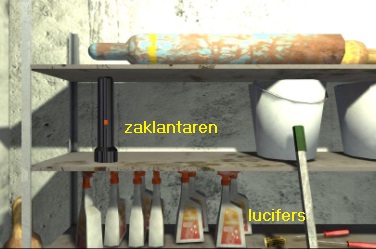
Turn left. On the left rack lies is al black flashlight and a box of matches. Take the flashlight and take the box of matches.
Turn left and go back out through the door. Turn right, 1 click forward and turn right again. You are now at the other end of the cellar corridor and thus at the left cellar stairs. Go up the stairs. You are then pressed against the left red door of the right side corridor. Open the door and then go all the way through the side corridor to the front, then turn right and .........step back into the Foyer.
Foyer:
Snack bar: The scale puzzle:
Step behind the snack bar. So you come back behind the snack bar at the cash register. Halfway there is a microwave in the snack bar. In front of the microwave is a coke machine and red drinking cups. Also beyond the microwave is a coke machine and red drinking cups. Continue to the microwave and then turn around via the turn arrow. You then look back at the red cups that are to the right of the microwave.
You will see 4 stacks of red cups. Number the cups, from left to right, A, B, C, D.
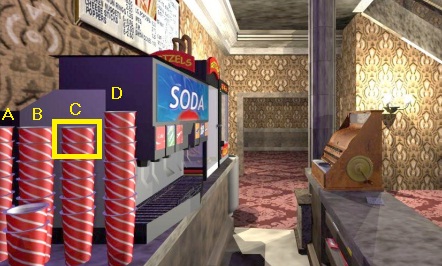
Then take the top cup from stack C because that's the only cup you can get. So you have to click with the circle cursor on the top cup of the stack C. Turn around again. You will see the scales on the counter again. 1 click forward and turn left. You are standing in front of the scale again. Click on the scale to see it in close-up. On the note from Jeremy, which you read in Todd Wickeman's office, you read that a certain weight must be placed on the scale. That weight will then open the compartment in the scale.
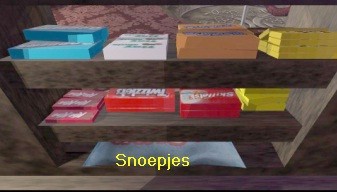
To the right of the scale is a click spot on the counter. Take the red cup you just picked up from inventory and then place the cup on the counter to the right of the scale. You have to find the right spot with the cup to click. The cup is then on the right next to the scale. If you have followed the walkthrough so far, you have also taken the blue bag of sweets from the cash drawer and you have the red scissors.
In inventory, combine the red Scissors with the blue bag of sweets to cut open the bag of sweets. Drag the now opened bag of sweets from inventory to the red cup and then click with the bag on the cup to fill the cup with the sweets. There will still be an amount of sweets left in the bag. Drag the bag with the remaining sweets to the scale and click it on the scale to put the remaining sweets in the scale and ..... the sweets have exactly the right weight and this makes the drawer in the scale go open
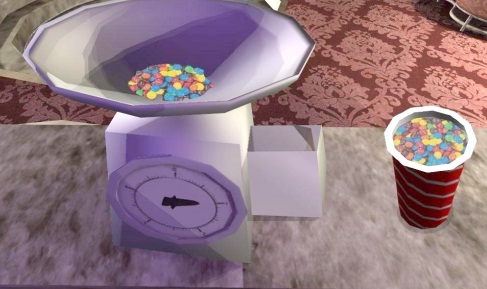
The tray contains Crystal Fragment 5, so click in the tray to take out the 5th Crystal Fragment.
Claude Ferucil tells you to find 1 more fragment, the 6th fragment. Step out of the close-up of the scale via the slanted right arrow.
The 6th Crystal Fragment:
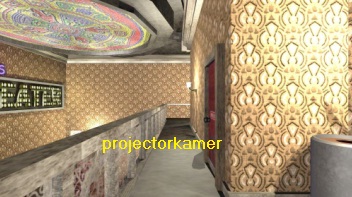
The 6th Crystal Fragment can be found in the Projector Room. In the Projector Room you have to solve a puzzle for this. You have found hints for this puzzle during your walk through the theater. You can also get hints if you play the "ball game" with fortune teller Esmeralda in the Arcade Room and win. However, this is not really necessary and also quite difficult, so I will not pay any attention to this "Ball" game in this walkthrough. By now you should also know where all the locations in the theater are and how to get there, so I'm not going to tell you extensively how to get there anymore. Now go to the Projector room door, above the Foyer on the balcony balcony. That is the red "Employees Only" door.
Projector Room:
Go through the "Employees Only" door.
Turn left and then go up the stairs and at the top of the stairs go through the brown door into the Projector room.
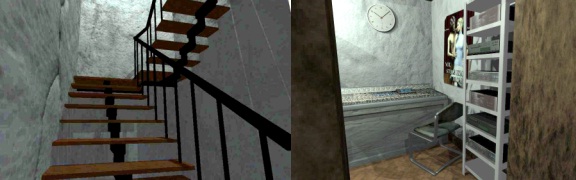
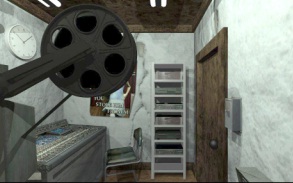
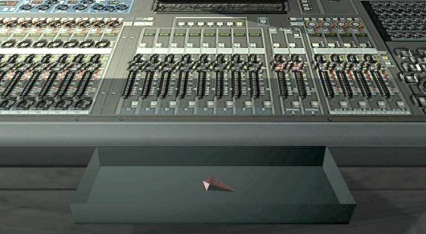
You are right in front of the large control panel. The clock hangs on the wall above the panel. Turn left.
To the left of the control panel is the large film projector. You are now looking through the room.
In the back is a double metal locker closet. On the wall, on the left, you see a gray box with a switch.
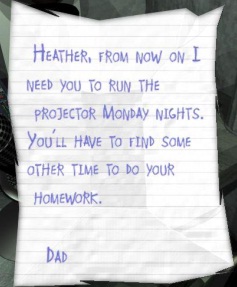
Go forward to the metal locker closet...... Click on the closet door and .... You hear Claude Ferucil who does not want you to open the closet now. Ferucil says that you must first fulfill his assignment and that is to find the 6 Crystal fragments and put them back together. Turn right. You are now on the other side of the film projector. Look down via the down slant arrow. There is a trash can on the floor here. There is a Note in the trash can.
Click in the trash can to extract and read the note.
The note is from Todd Wickerman, who instructs his daughter, Heater, to operate the movie projector on Monday evenings from now on.
Click the note away again and click the down-slant arrow again to stand upright again. Turn right.
You look back at the room door and now see the large audio rack.
Go forward to the audio rack. There is an audio CD on the mixer. Pick up the CD to take a look.
The CD is owned by Eric Salvis and contains Country Music. Put the CD back. Turn left.
You are again in front of the large control panel, above which the clock hangs. Look down.
The Work Schedule Puzzle:
There is a blue box in the control panel.
That blue box is the Work Schedule on which the work duties of the various members of staff are noted.
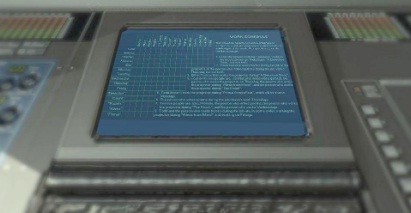
Click on the Work schedule and you will end up in the puzzle. You now have the work schedule large on your screen.
Make sure you don't leave this screen before you have solved this puzzle. If you leave this screen in between, the puzzle will reset itself and the solution will be completely different. Via the "HELP" button you can get an explanation about what the intention is and how to solve the puzzle. But it's relatively simple.
It is a graph and in the graph you have to tick which activities the various employees have to do on which day. You have found various hints for this, such as "Tod - The Count" and "Jeremy - Wed." , on the Post-It note in the men's locker room. The text, here on the work schedule, also gives you enough hints to solve the puzzle .

So you click in the boxes of the graph. You can click crosses and circles in the boxes. With your first click in a box you place a cross. With your 2nd click you change the cross into a circle. With your 3rd click in a box you empty the box again. So you have to put a circle in the right boxes. I'm not going to explain this any further, here's the full solution:
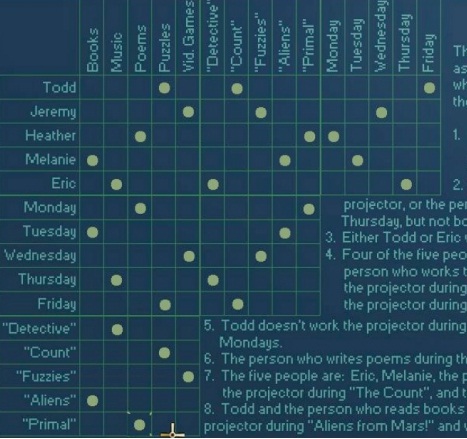
If you have filled in the schedule correctly, the drawer in the panel will slide open. The 6th Crystal Fragment is then in the drawer.
Take the 6th Crystal Fragment from the drawer.
Ferucil then tells you that you now have all 6 fragments and that you must return to the center of the Foyer. So go back to the:
Foyer:
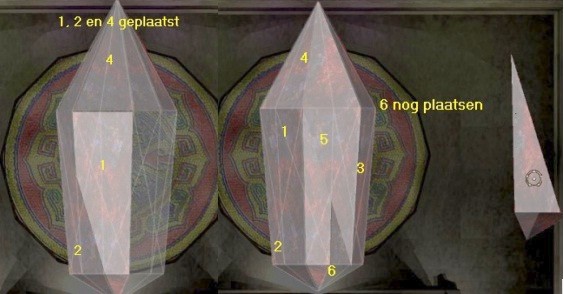
Stand exactly in the middle of the Foyer again, so that you are again directly in front of the center of the Snack Bar. Then look up at the ceiling. You see the rosette again, which is in the ceiling. There are 6 holes around the rosette. Each hole is shaped like a Crystal Fragment. Now place the 6 Crystal Fragments each in the correct hole. So drag a crystal fragment from inventory to a hole and then click the fragment into the hole.
When you have clicked all the fragments into their correct hole you will hear Ferucil again who says that you now have to puzzle the Fragments together.
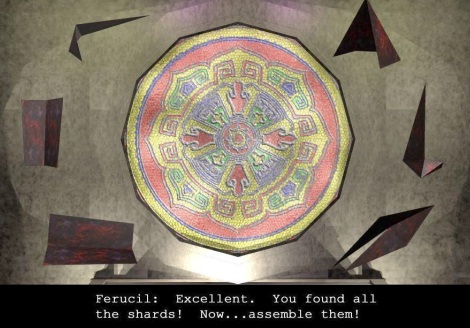
You then get the puzzle screen in which you have to puzzle the 6 fragments into 1 large Crystal.
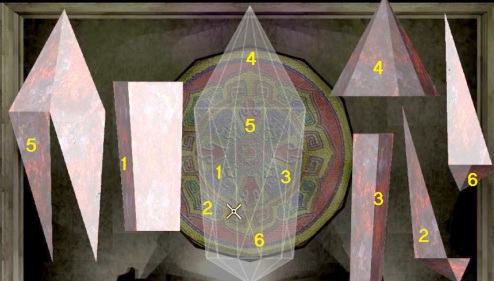
In the middle of your screen is the outline of the Crystal in which you now have to click the 6 fragments. This is quite complicated. So you have to click each fragment exactly in the right place in the outline and this must be done really exactly between the white lines. You will hear a "Click" sound if you really click a crystal into the outline just right. If you don't hear a "click" sound, you just didn't click the crystal correctly. Well .... Puzzle the Crystal together......you also have to place fragments on top of each other.
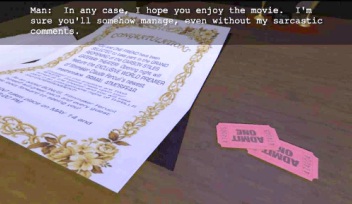
If you do it right, you will see the Final Cutscene of this first part of the game.
Ferucil appears and confiscates the Crystal, regaining all its magical powers.
You then go on with.....
2023 :Walkthrough by: Louis Koot