2018: Walkthrough by: Louis Koot
If you have found this walkthrough via google search or via another site then you have probably not visited my site.
A lot more very detailed game walkthroughs can be found on my site at: www.pcgameswalkthroughs.nl
The Five Cores is a Myst clone. You start with a bird flight over a mysterious island and you have no idea how and why you end up on that island.
But you will immediately find out that it is your job to activate 4 crystals, because you automatically pick up a letter..........The letter is a cry for help and says:
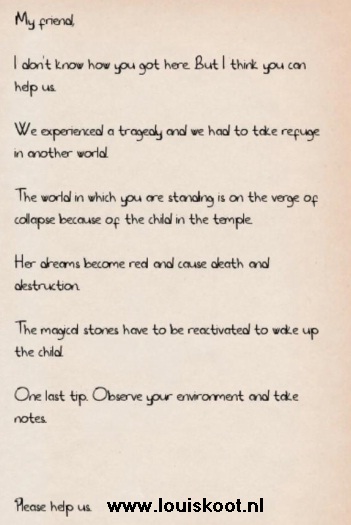
|
If you can't read the letter here is what it says "My friend: I do not know how you got here, but I think you can help us. We have come across a tragedy that has forced us to seek refuge in another world. The world where you are now is about to collapse, because of a child in the temple. The dreams of the Child become reality and cause death and destruction. To stop this, the Magic Stones must be reactivated to awaken the Child from her sleep. I can give you one last tip: Look out your eyes, observe your surroundings and take notes Please ............. HELP US ........... " |
You walk over the island via the Arrow keys on your keyboard, or via the W, A, S, D keys. With your mouse you can rotate 360 degrees around. You get a Hand cursor on objects that you can click on and you do that with your left mouse button. If you hold down the Shift key you will run and jump with the Space Bar. There is no Inventory because you do not have to pick anything up anywhere in the game. As said ..... The Five Cores is a Myst clone. Unfortunately there are only 3 Save game Slots, so you can save 3 times but then you will have to overwrite previous saves. The game can be purchased via the Neebla games website as a digital download
A: Find the Temple and the Child:
Well ...... It is that time again ....... you have to save the World again from a catastrophe.
The letter has told you about some child that is dreaming in a Temple and those dreams seem to become reality. Perhaps it's a good idea to first find that Temple and that Child?
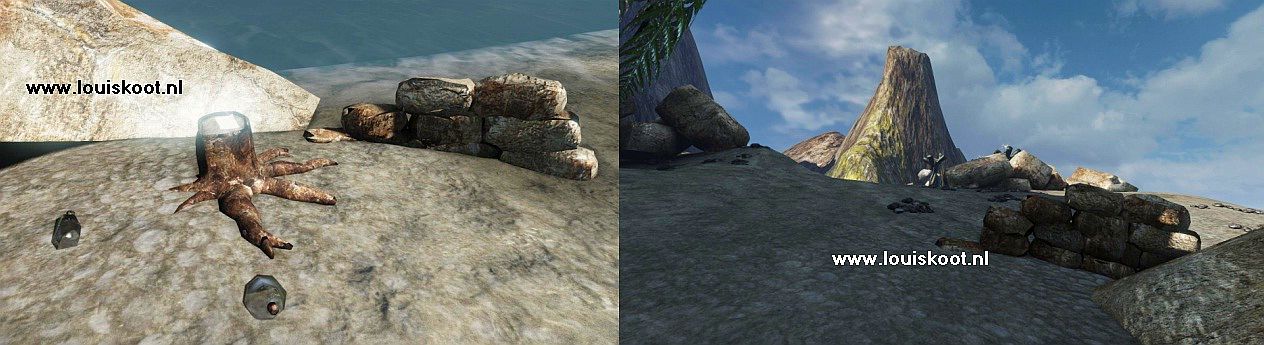
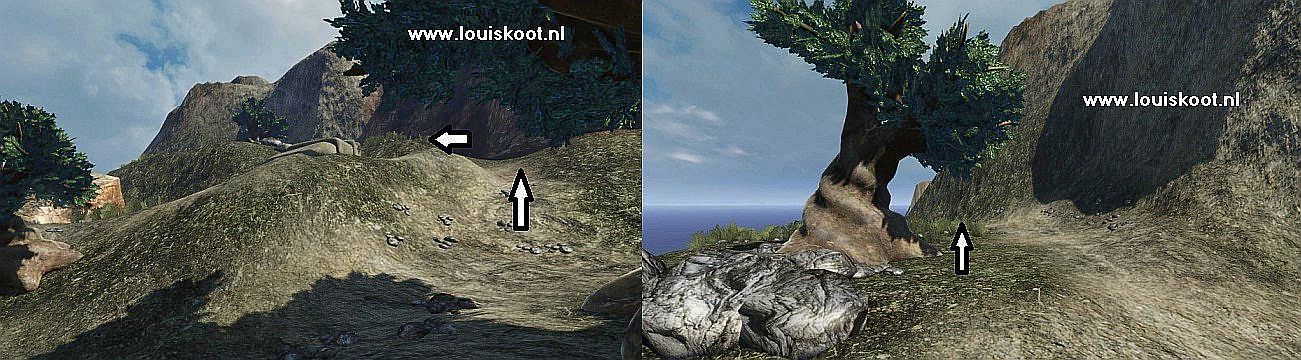
You are standing in front of the tree stump where the letter is on, the letter you just have picked up. Turn left and ....
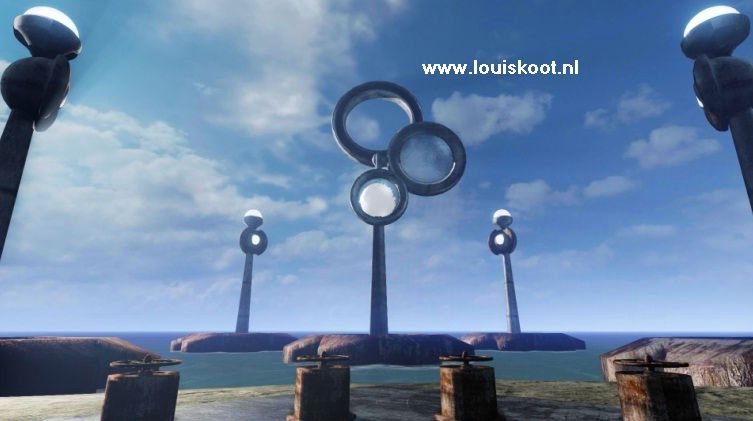
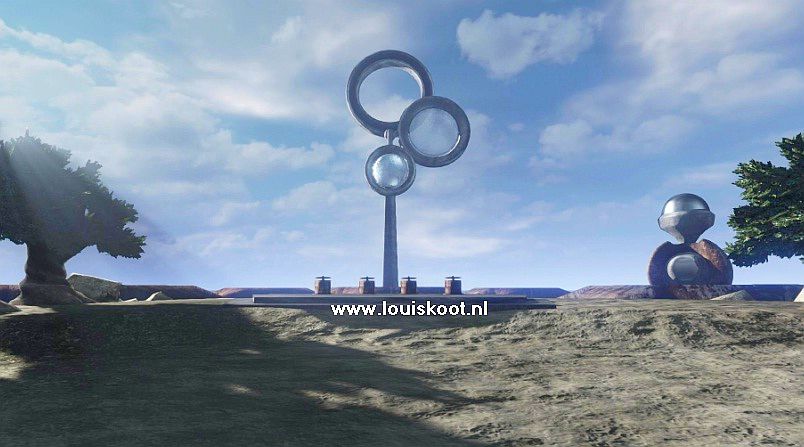
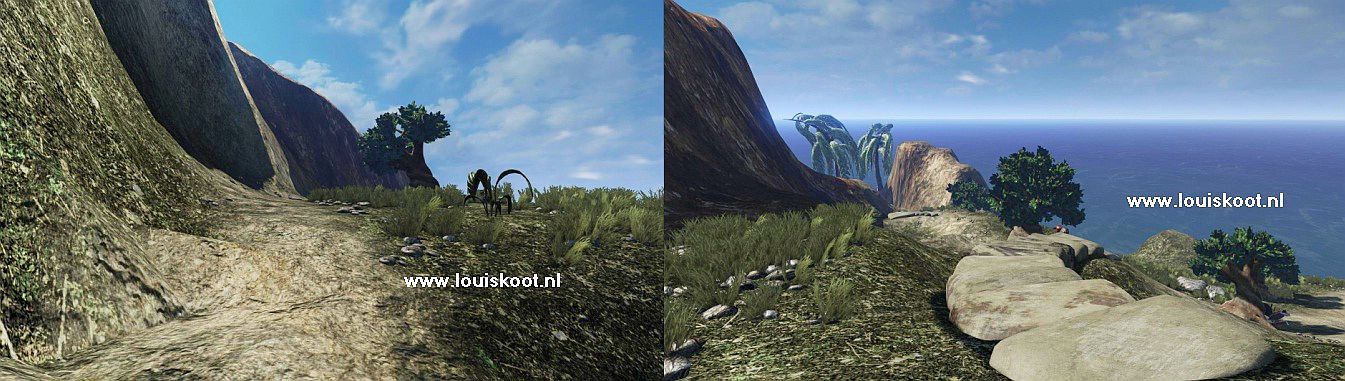
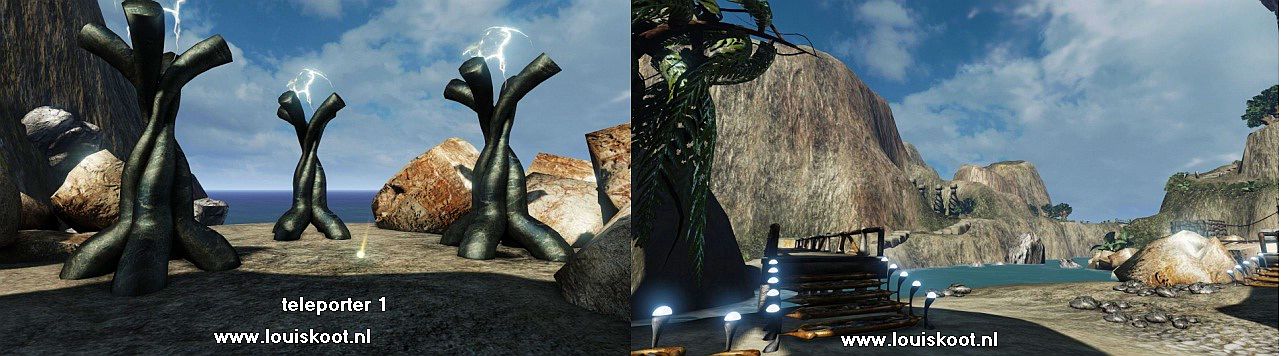
In the distance you see a pointed rock and at that rock you see a number of " Globe Trees" ... Walk forwards to the pointed rock and the "Globe Trees". When you are at the "Globe Trees" you see that they are not real trees but that they are 3 twisted pillars with transparent bulbs on it.
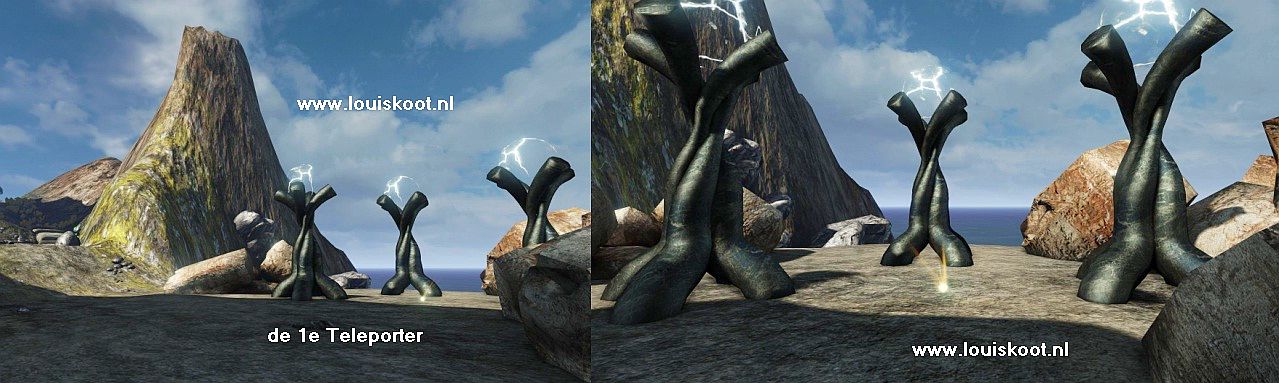
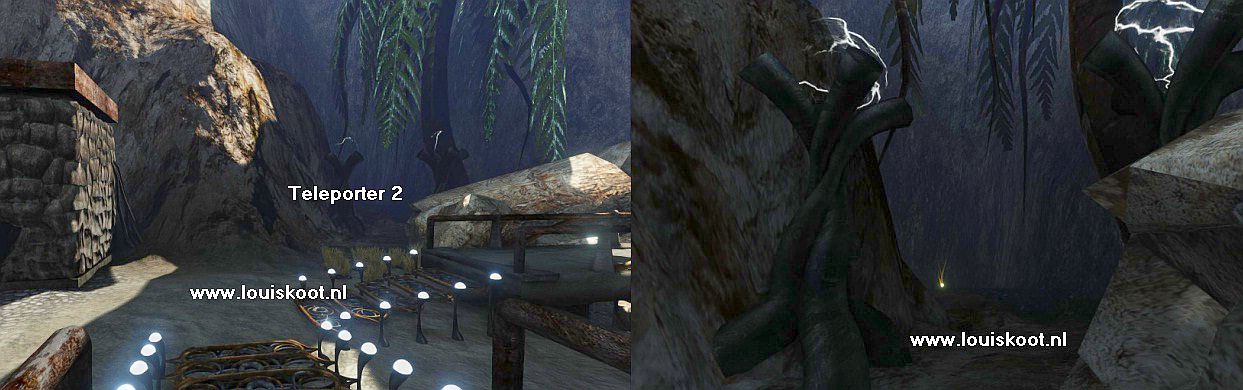
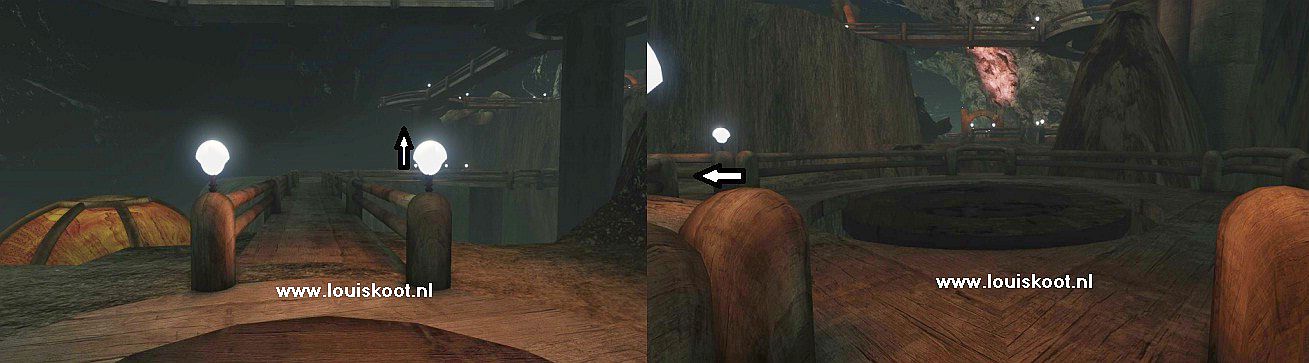
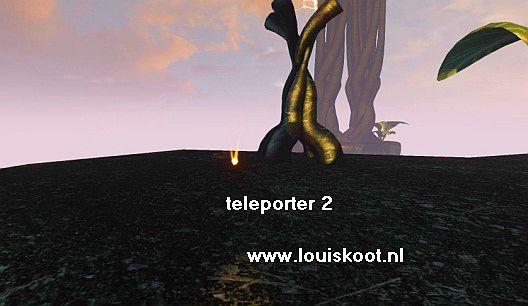
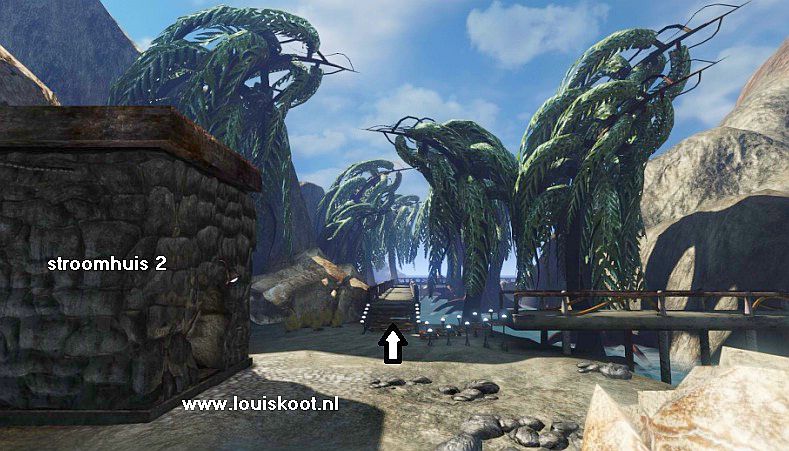
In the middle of the 3 pillars a small "Fire Globe" is lying on the ground ........ This place is the 1st Teleporter .... if you walk over the "Fire Globe" then you will be teleported to another part of the island. Let's try this out right away ... So walk against the little "Fire Globe" and ......... oops ...... you immediately land at Teleporter 2, on the other side of the island .....
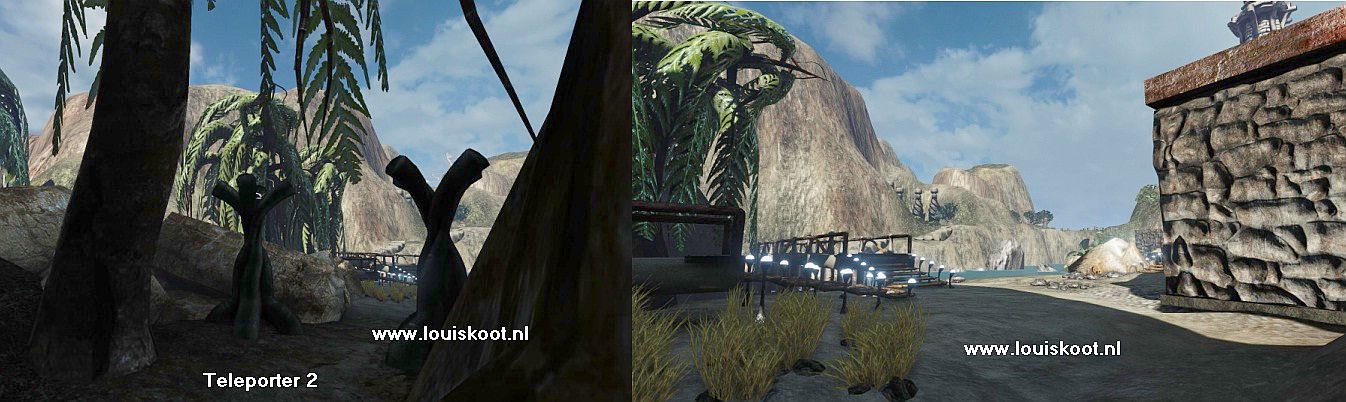
Teleporter 1 has transported you to Teleporter 2 and there you are now. You stand midway between the twisted poles of Teleporter 2.
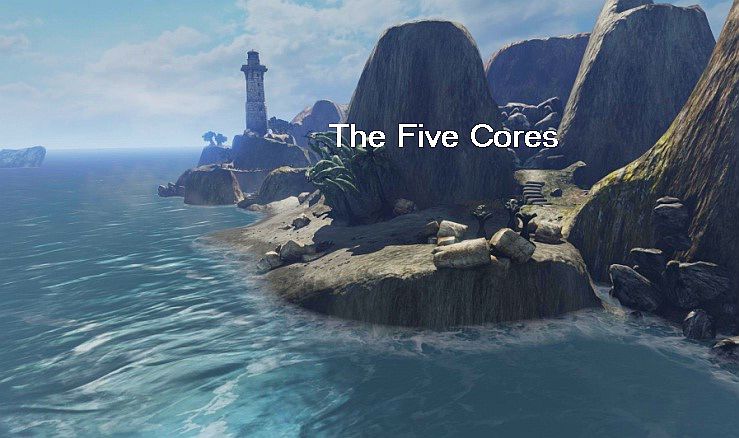
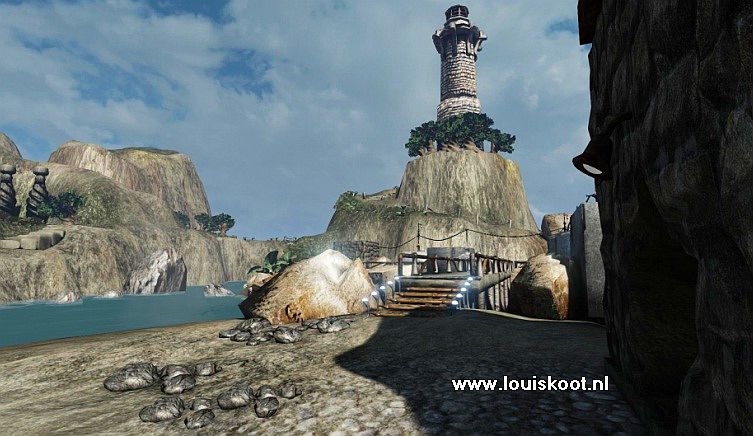
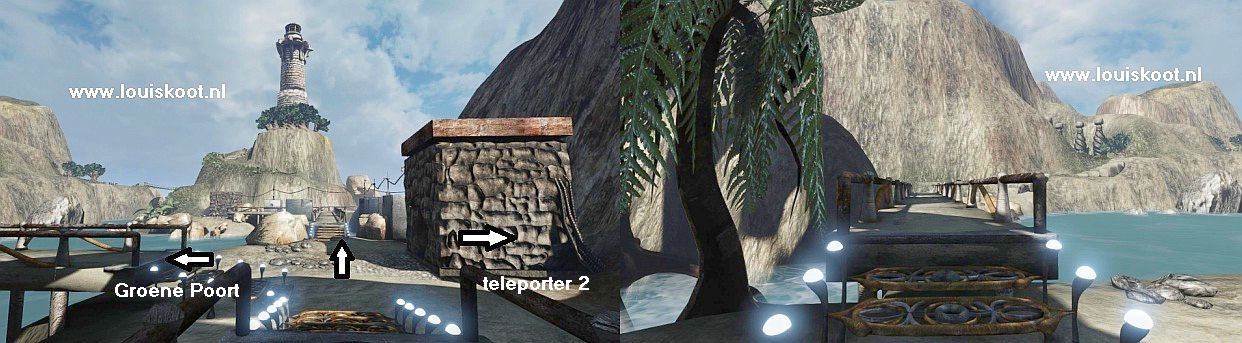
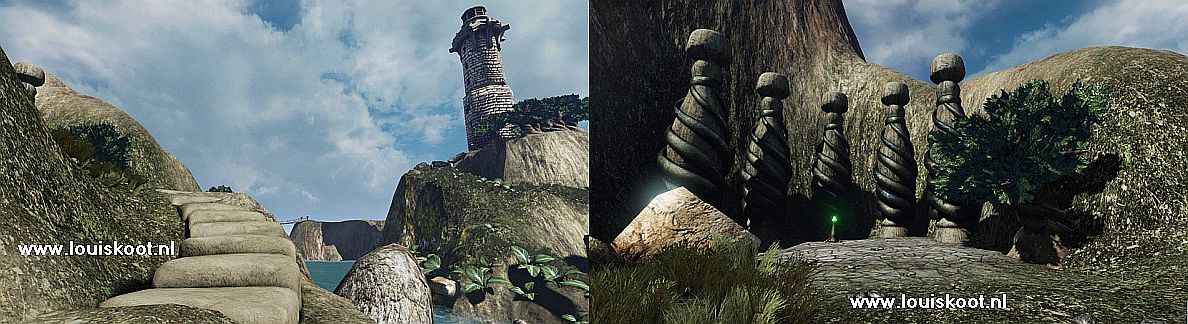
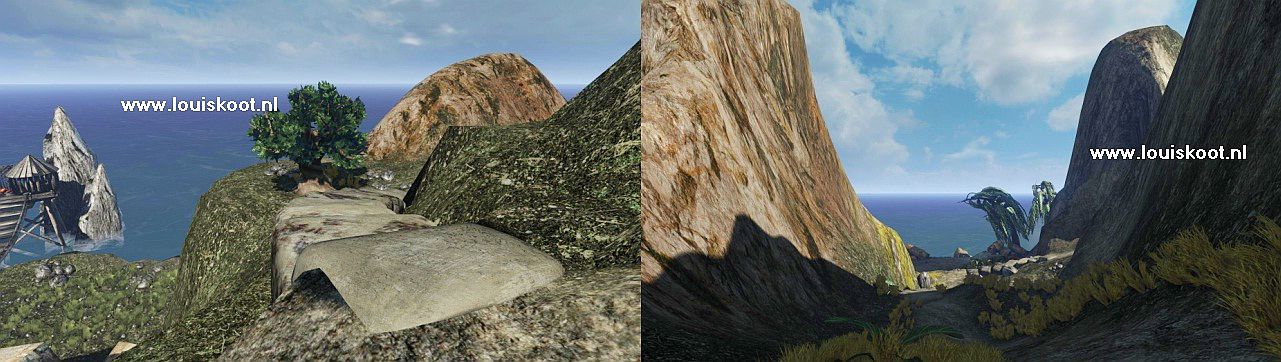
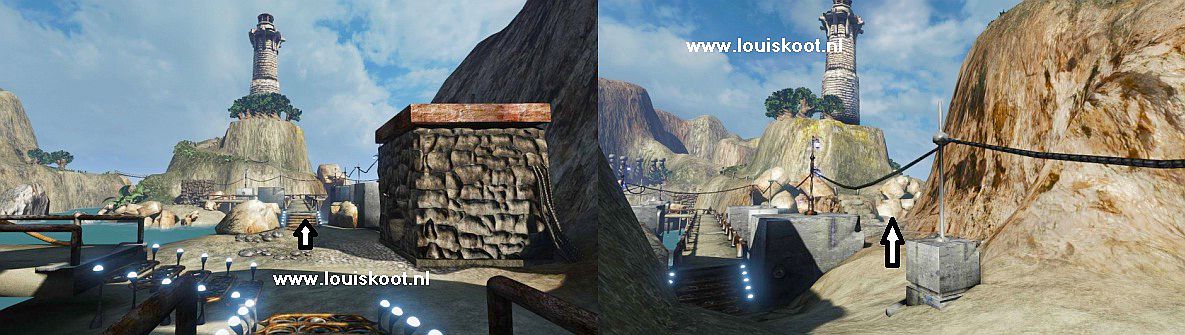
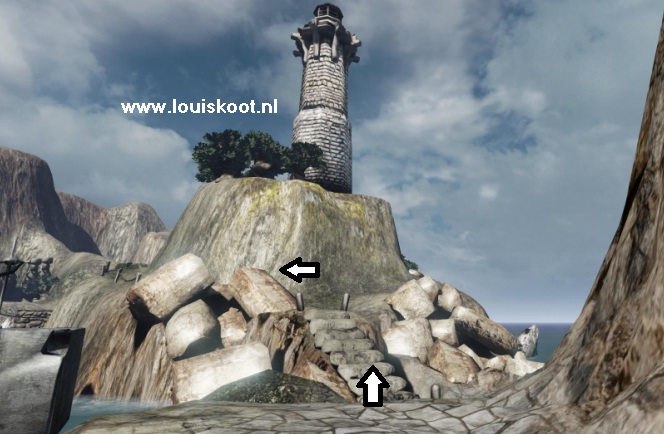
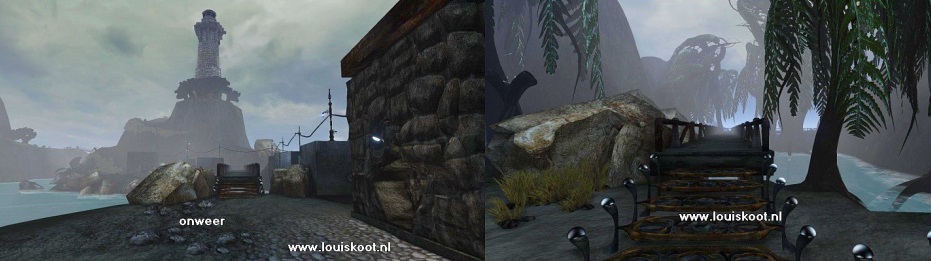
Walk forward and ...... you end up at a crossroads with 3 walkways and a stone house. If you look to the right you will see the Lighthouse, which stands on a rock high above the island.
A footbridge goes towards the lighthouse rock, but we are not going that way yet. Turn left and ... you see 2 walkways.

The right bridge goes to the other side of the lake and then you can go up to Teleporter 3, but that we'll do later. We will now follow the left footbridge.
So go up the left footbridge and follow the bridge, which then turns right and ..... you end up on the beach
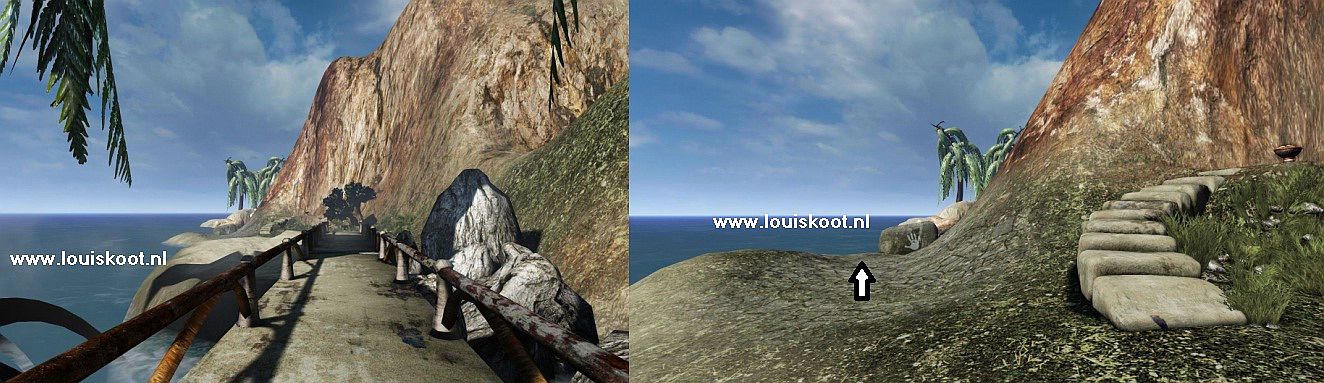
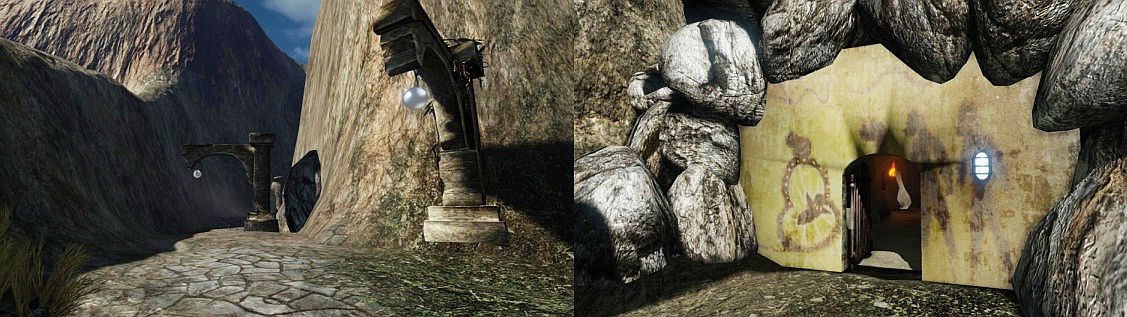
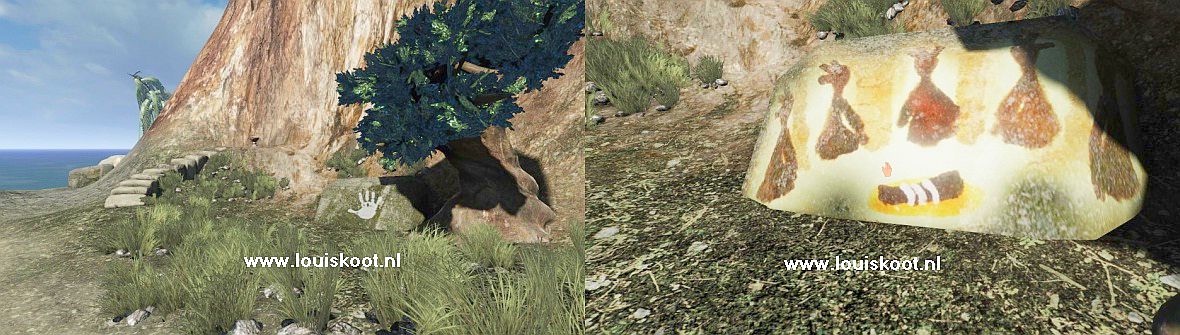
Follow the beach and ignore the stone staircase and the scale above the stone staircase for now. In the distance you see a couple of palm trees and a thick rock with a Hand drawn on it. Keep walking straight and .... you end up at the bridge that goes to the Temple and the Stone with the Hand.

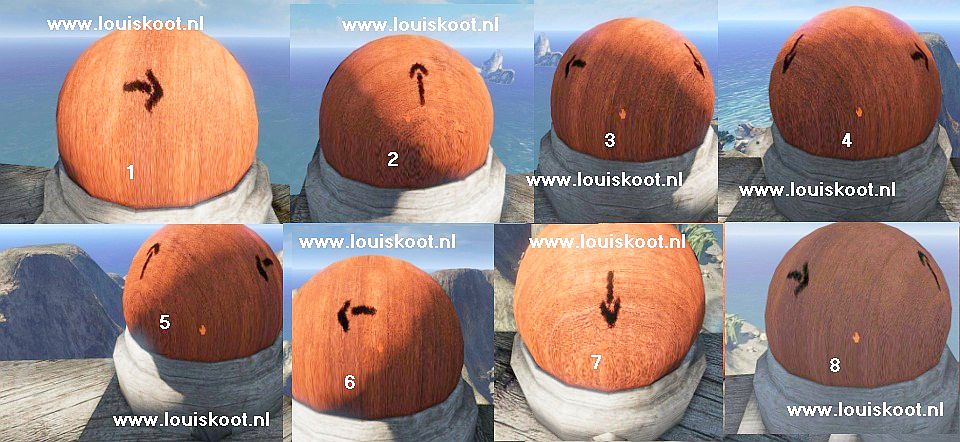
This is your 1st Hand stone ....... just stand in front of the Hand so you get the Hand Cursor on the Hand and then click with your Hand cursor on the Hand and ..... the big Hand disappears, but there appears, vaguely, another drawing on the stone and you hear, very softly, a voice. Ok ...... you now also know how to click on things with the hand cursor. Follow the walkway, which will take you to the temple via a right-angle bend to the right.
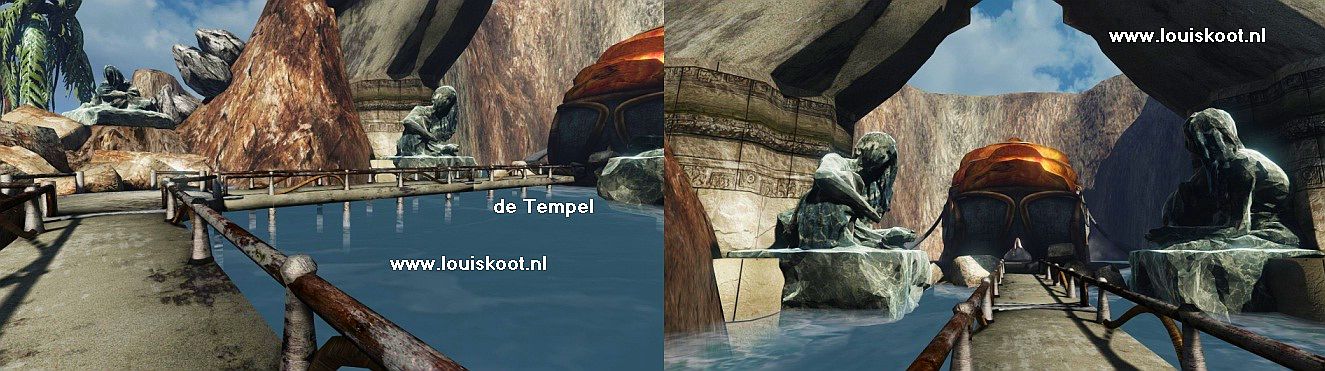
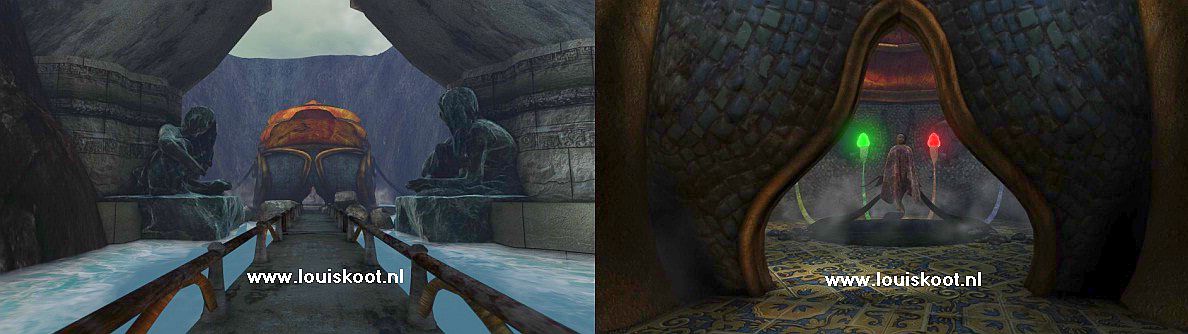
The temple
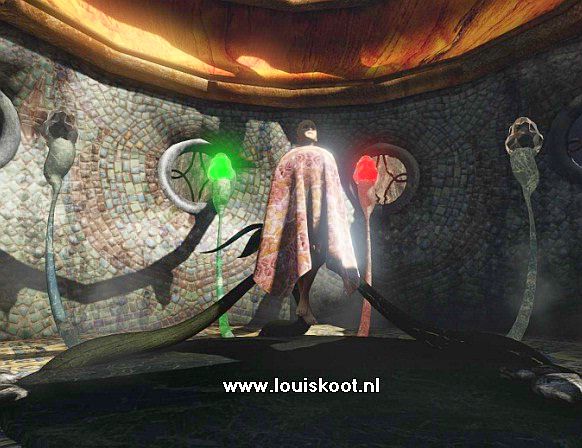
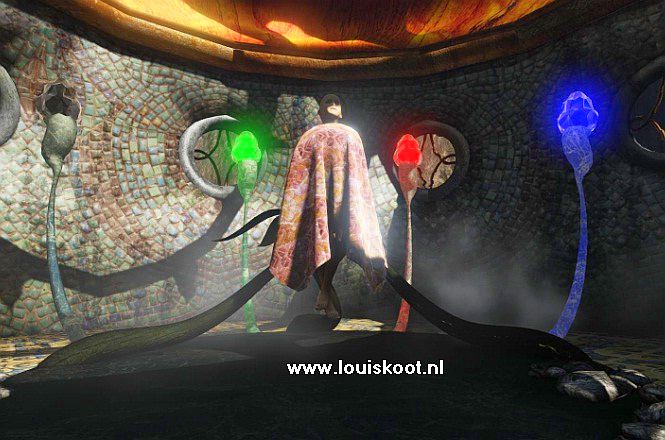
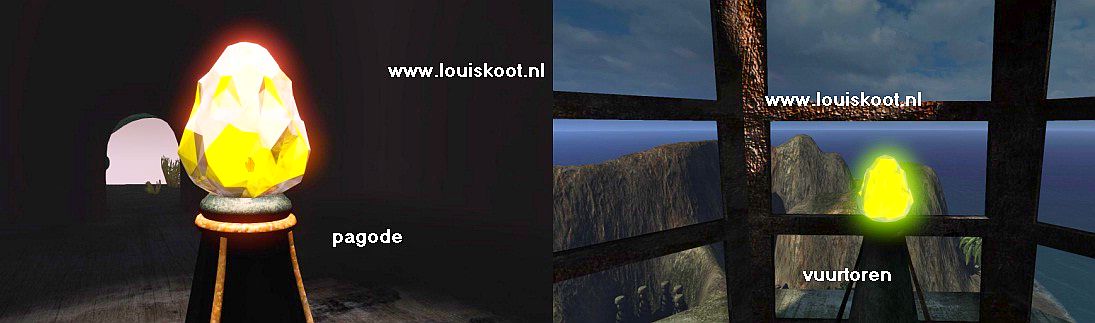
Enter the temple and ........ well .... in the Temple floats the Sleeping and Dreaming Child
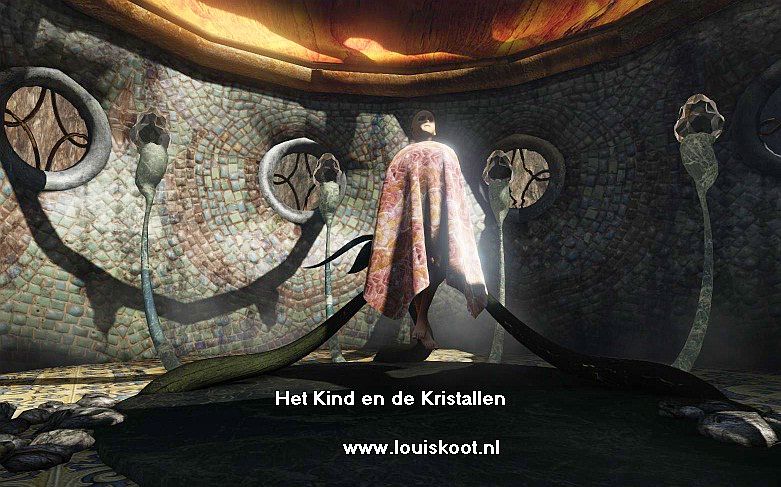
The Child is a girl and she is in deep sleep and dreaming. There are 4 long sticks around the Child and a Crystal sits on each stick. The 4 crystals are extinguished, but they are the "Magic Stones" that you read about in the letter. It is the intention that you blow these 4 crystals into new life, so that they start glowing again. You can not see it because the crystals aren't glowing now, but there is a Black, Blue, Red and Green crystal.
Turn around and leave the Temple and follow the route across the walkways and the beach back to the crossroads at the stone building.
You will see the Lighthouse again. On your right is the path to Teleporter 2, but that will bring you back to Teleporter 1. So go over the left footbridge to the other side.
On the other side of the footbridge you walk against the 2nd "Hand Stone".
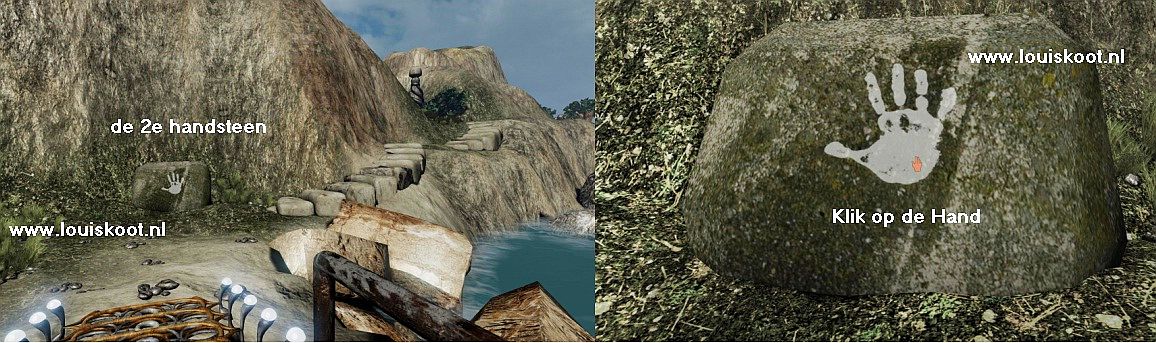
Click again with your Hand cursor on the big Hand and ........ The Hand disappears and a drawing appears on the stone ..... On the stone you now see the 4 Crystal Gates
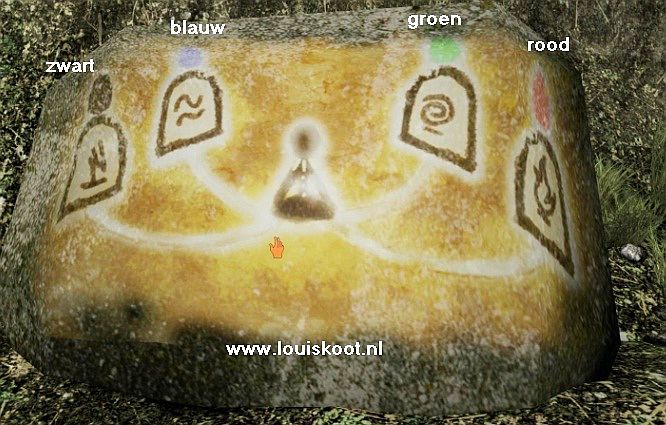
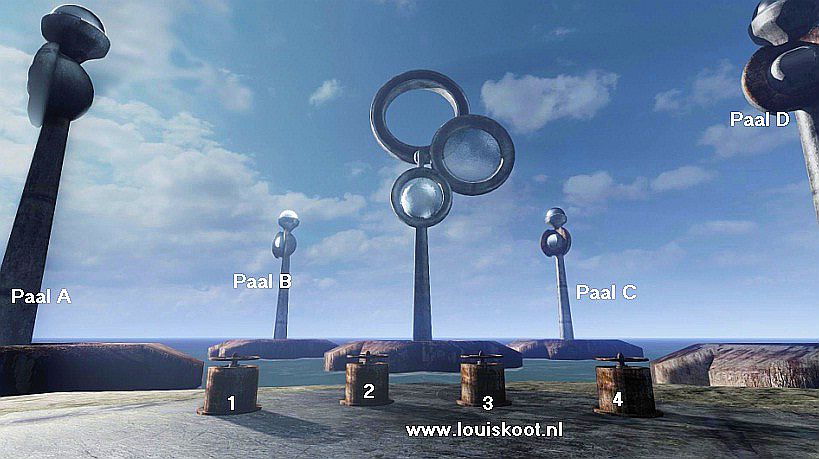
As you can see there is a Black Gate, a Blue Gate, a Green Gate and a Red Gate. These 4 Crystal Gates are Teleporters and each Gate teleports you to another part of the island, where you have to solve the puzzles to activate the corresponding Crystal. The Temple stands in the middle.
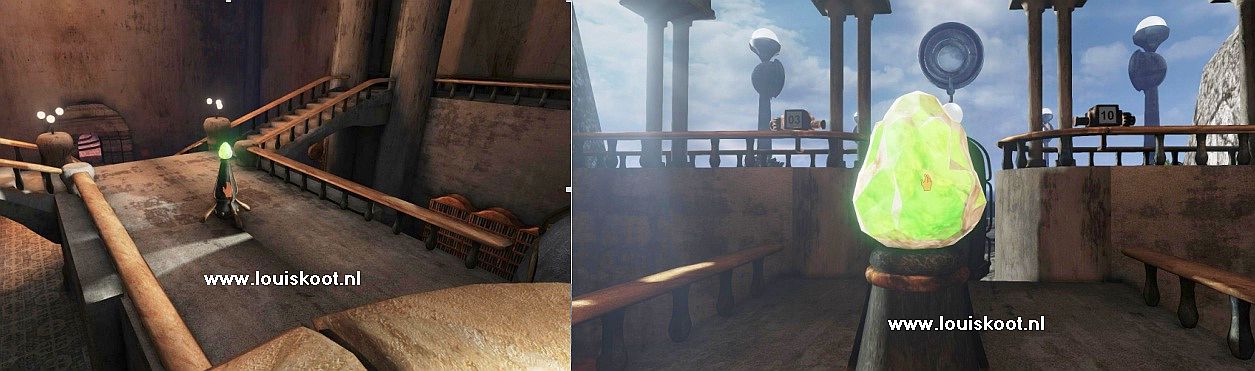
Turn right and then climb up the mountain steps. You have a beautiful view of the Lighthouse during your climb. You climb 2 stone stairs and ..... you end up at the Green Crystal Gate.
The Green Crystal glows in front of the 5 pillars. Walk on to the green Crystal ........
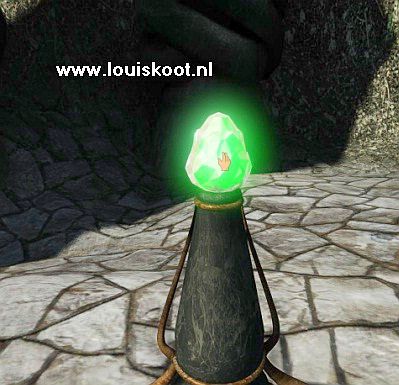
Well ....... don't be frightened ....... the crystal does not bite you and you will not turn into some weird animal ....... Touch the Crystal with your hand and ......
Flats ....you will be teleported and, after the movie ....... you have ended up on another part of the Island
B: Activating the Green Crystal:
The Beach Pavilion and the Lens
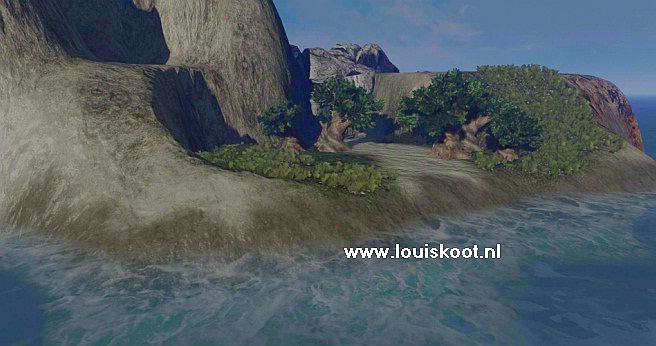
You look at the ocean ..... turn left. You see that you have landed on a beach between 4 green trees, as you also saw in the video.
Go forward, between the trees and ...... you will see the entrance of the Pavilion, witch is built into the rocks.

Walk through and enter the pavilion. You end up in a reddish corridor

Go on and.....the reddish corridor takes you to the hall, at a crossroads of corridors. Straight ahead the corridor leads to a bedroom.
On the left a corridor leads to the Balcony room where the green Crystal stands. On the right, a corridor leads to the outside terrace.
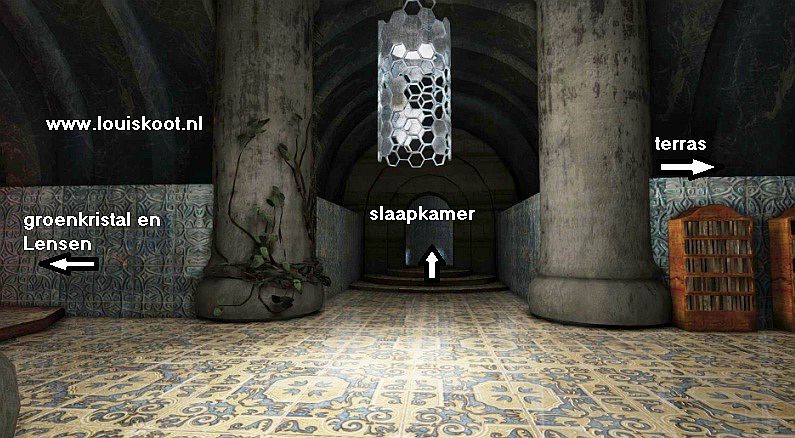
Go straight ahead and follow the winding corridor to the bedroom.
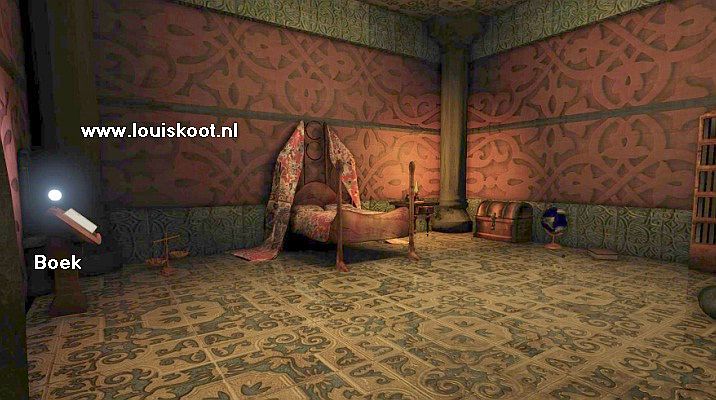
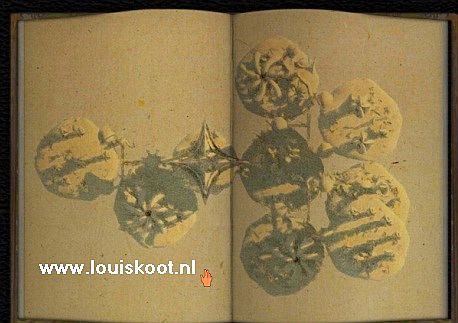
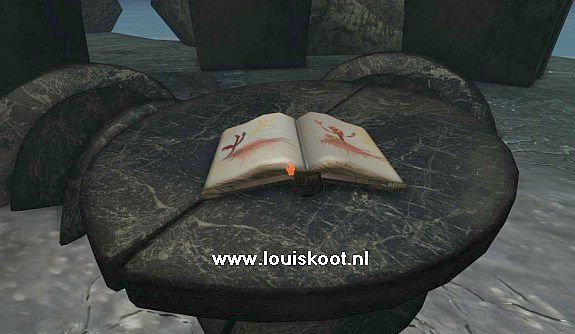
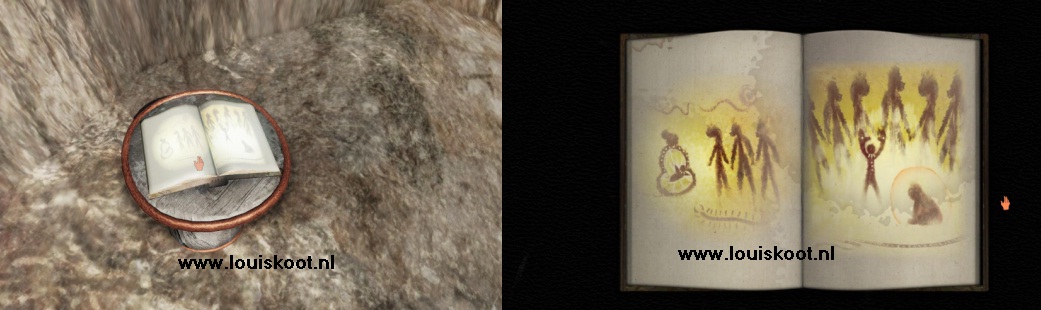
On the left wall a Book lies on a bookstand. Stand in front of the book and then click on it to get it big in your screen.
Then browse through the book. You can see spots on all pages in various forms, but you have no idea what the mean.
Leave the bedroom again and return to the hall and now go, via the right corridor, to the
Crystal Room
Walk up the stairs
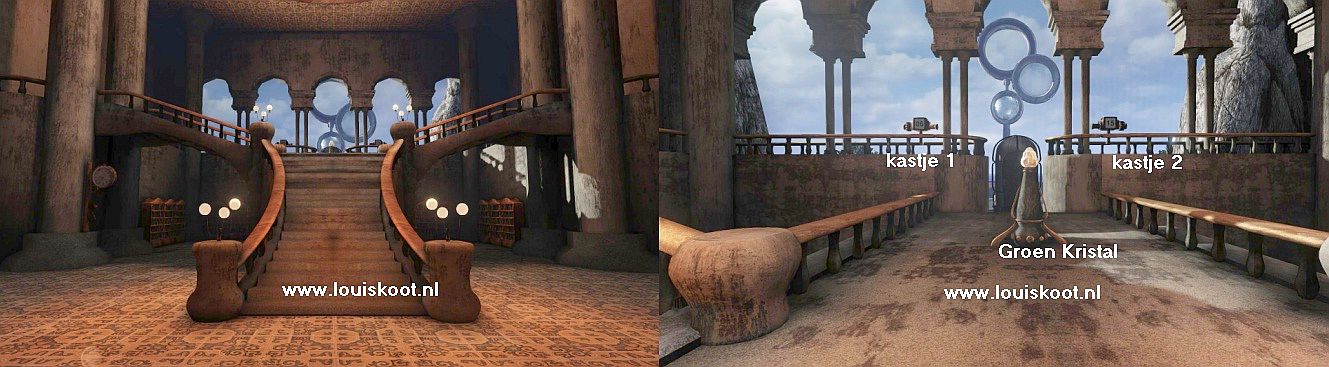
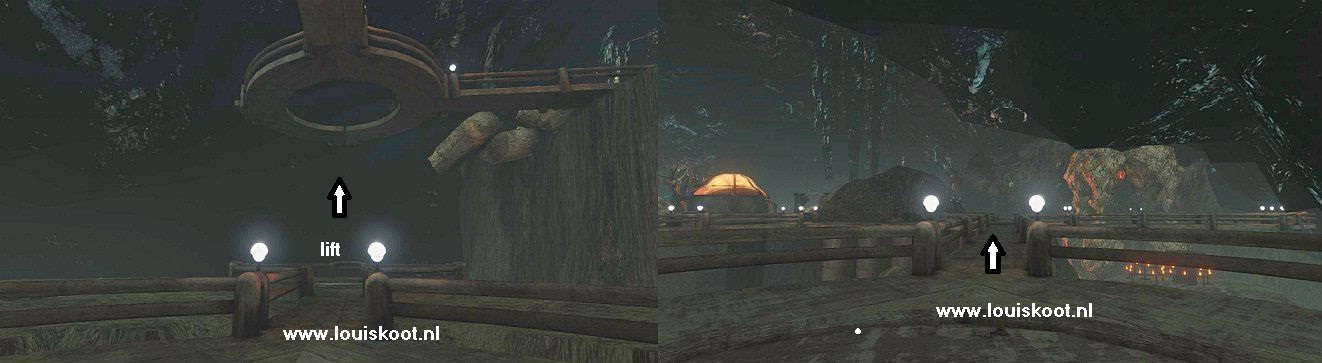
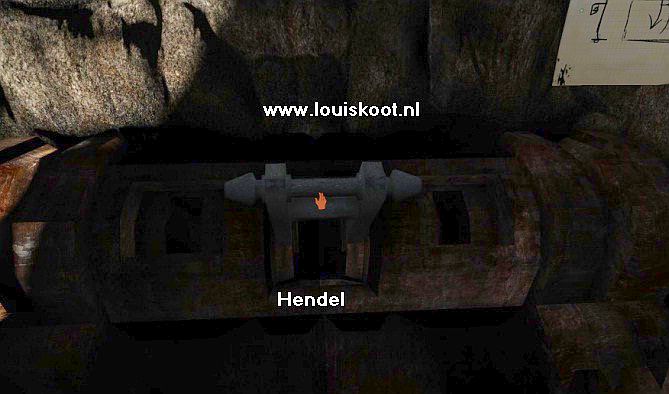
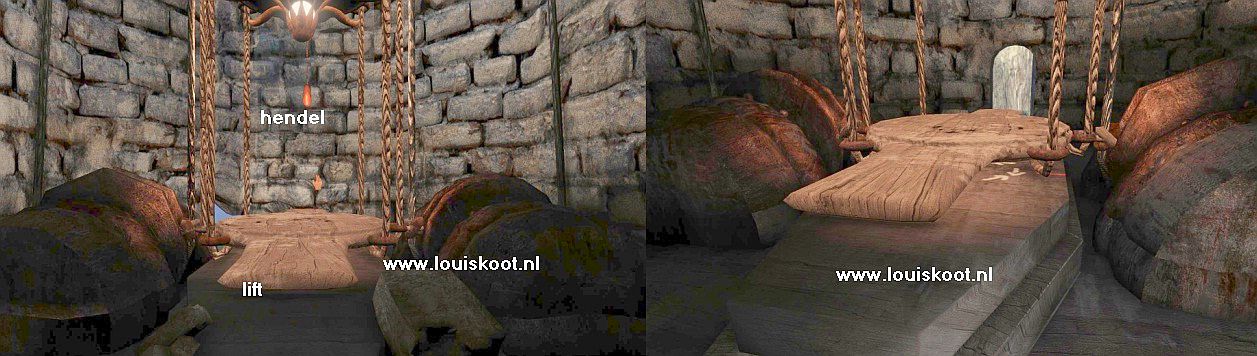
You are at a white Crystal standing on a pillar. This is the Green Crystal, but the thing has to be activated and only then it will be green. The left and right stairs leads to the 2 balconies. On every balcony there is a box with a number. Ignore those 2 boxes for now... .Walk ahead, past the crystal and .... you are at the lift.

Yes .... this metal cabinet is a lift. Stand in front of it and then open the door by hitting the door handle with your hand cursor. The lift door opens ...... step into the elevator quickly, otherwise the door will close again. When you have stepped into the elevator, the elevator will bring you down automatically and you will be downstairs and in the area behind the Beach Pavilion. Get out of the elevator.
Activate the lens:
Right in front of you is a concrete platform with 4 thick valves on it. Behind the platform a huge pole is raised and at the top of the pole there are 2 round lenses and a spotlight:
Walk on to the 4 valves. The 4 Valves are 4 turn wheels, but you can not turn them now. The Lens post stand on an island and around that island are 4 other islands. On the rightmost island you see the top of a Spotlight Pole. Turn right. In the distance you see two trees and beyond those two trees you see a slope. On top of that slope is the Pump House and 3 hydraulic pumps, with which you have to do something with.

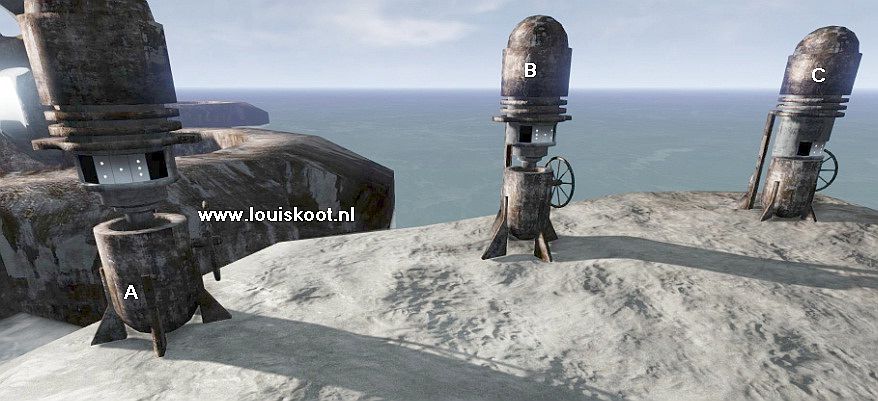
Walk to the 2 trees and then further up via the stone staircase. You are then on top of the slope, at the stone pump house and the 3 hydraulic pumps.
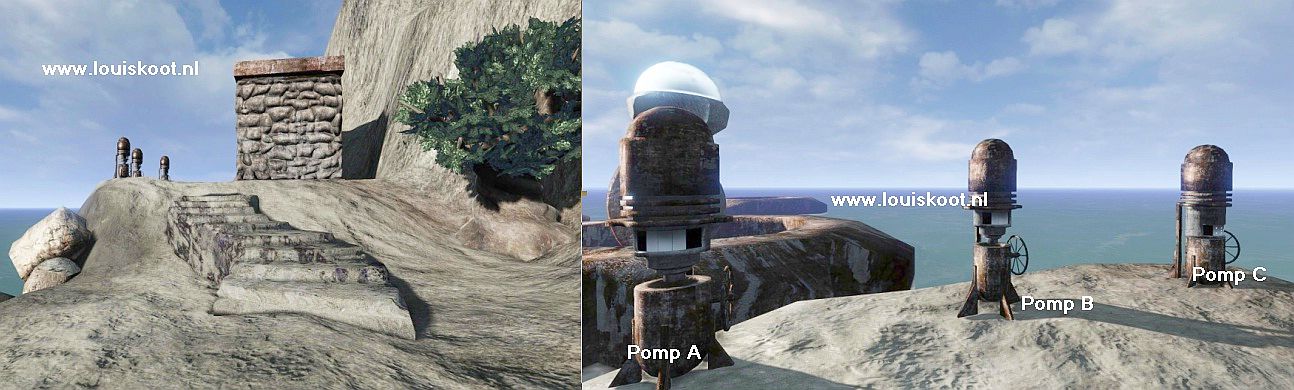
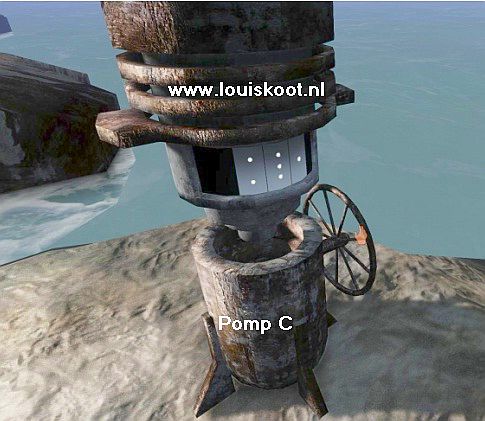
The stone pump house is not important but the 3 pumps are important. View the 3 pumps. There is a turning wheel on each pump and in each pump you see a gray plate. If you turn the turn wheels, you can raise or lower the gray plate in the pump. Name the 3 pumps, from left to right, Pump A, Pump B and Pump C. On the gray plate of Pump A and Pump B you now see nothing and those 2 plates are now both up. On the gray plate of Pomp C you see dots.
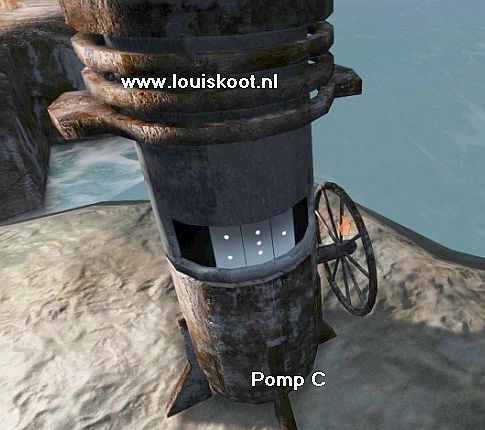
The dots on the gray plate of Pomp C are numbers and yes the are the numbers 2, 3, 1 and the gray plate is now down. Leave it that way now. You must ensure that there are also dots on the plates of Pump A and Pump B. And for that you have to go back to the Pavilion. So turn around and walk back to the concrete platform, where the 4 Valves are on, and then go left and back to the elevator.
Go back up with the elevator, get out and go down the stairs, back to the hall. Follow the corridor straight ahead, to the
Terrace.
On the terrace you can turn left to the Planetarium and right to the Pump Simulation
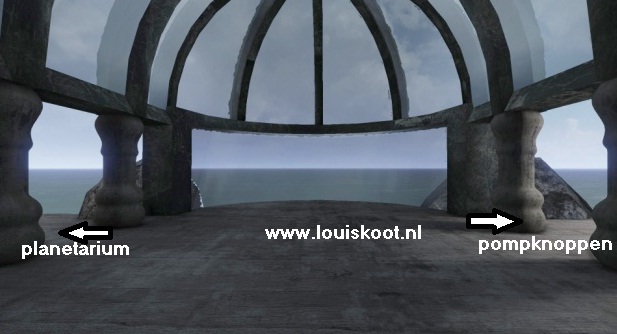
Go left first, to the
Planetarium.
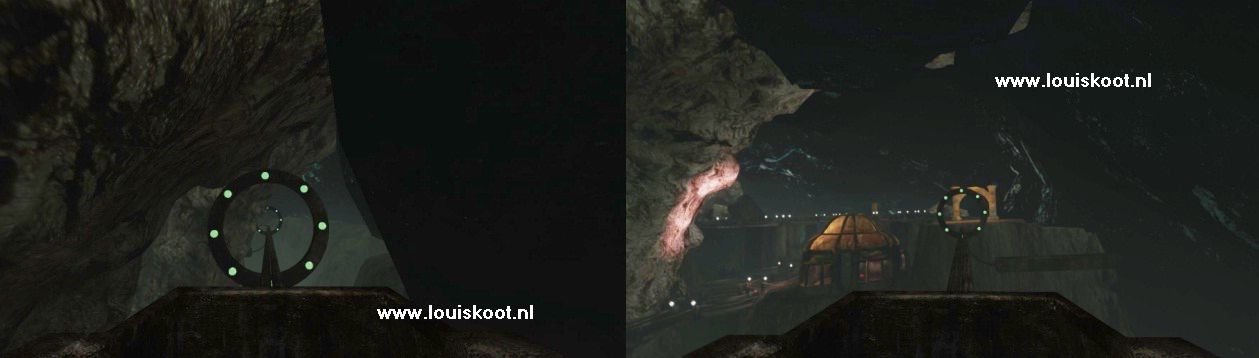
The Planetarium consists of 2 Planets, which can rotate around each other. In the floor, around the planets, there are 12 lamps.
On the left lies a Black Dot and in front of the planets stand the Push Button. See the whole as a clock. The lamps are then the Hours of the Clock and the black dot is at 12 o'clock.

Go stand in front of the Push Button and click on it to rotate the planets and watch carefully how the planets rotate...
The planets rotate 2 times around but in each round the planets stop for a moment .
In the 1st rotation, the planets stop at 3 o'clock and in the 2nd rotation at 10 o'clock .... in other words .... the planets give you a time and that time is 10 minutes past 3 o'clock. Remember this or write this down.
Turn around and walk to the other side of the terrace ... you are standing in front of the
|
miniature pump installation.
Name the 3 buttons, from left to right, A, B, C. Behind the buttons is a platform with 4 pillars. Those 4 pillars represent the 4 islands that lie outside around the large Lens Pole island. Top right stand the Reset Lever with which you can let the 3 buttons jump back if you make a mistake. You now have to press the 3 buttons in a certain order and you have to do this twice in o roll. With these 3 buttons you set the number of dots, on the gray plates of Pump A and Pump B. To be able to press the buttons you have to stand just in front of each button, so you will have to walk back and forth between the 3 buttons .
We will first set Pump A: Press Button B. Press Button A. Press Button C. You have placed the dots 2, 1, 3 on the plate of Pump A. On the platform the pillars then rise in a certain order. We are now going to set Pump B. Press Button C. Press Button A. Press Button B. You have placed the dots 3, 1, 2 on the plate of Pump B and on the platform the pillars rise in a certain order |
Leave the terrace and return to the Crystal Room and get back in the elevator, to get behind the Beach Pavilion again . Go to the 3 hydraulic pumps and see .......
On the plate of Pump A the dots 2, 1, 3 and on the plate of Pump B are the dots 3, 1, 2.
The gray plates of Pump A and B are up but the plate from Pump C is down. You have to change that now.
Stand right in front of Pump A and then click on the turning wheel to lower the gray plate. Go right in front of Pump B and click on the turning wheel to lower the gray plate.
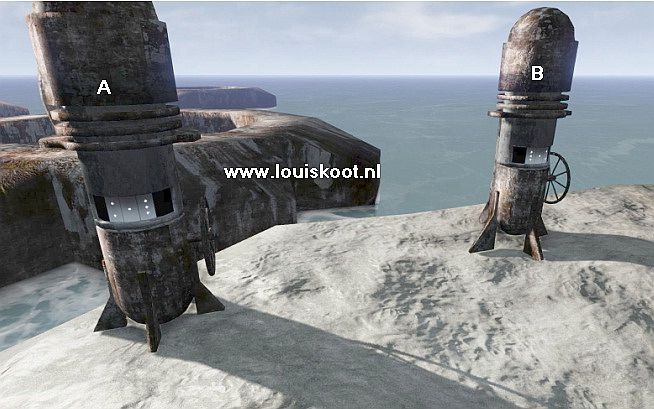
Go right in front of Pump C and click on the turning wheel to raise the gray plate and ....
Wow ........ on the 4 islands the Spotlight poles are now up.
Now go back to the platform where the 4 Valves stand on and make sure you are right in front of the 4 valves. Look at the islands. On the 4 islands, around the Lens Pole island, the 4 Spotlight Poles have now risen. You now must direct each Spotlight to the Lens post, on the middle island. You will do the this by turning the posts with the 4 rotating valves.
Number the 4 valves, from left to right, 1, 2, 3, 4. Name the 4 posts, also from left to right, A, B, C, D.
Pole C is already pointing to the center, so you do not have to turn Pole C anymore. Valve 1 turns Pole A, Valve 2 turns Pole B and Valve 4 turns Pole D.
All 4 poles are then turnt with their spotlight on the Lens Pole and the thick bulbs, on top of the poles are now lit.
|
Turn around and run back to the Pavilion and dive into the elevator again. The elevator will bring you back up at the Green Crystal. The crystal is not yet activated because the light of the Lens Post does not yet shine on the crystal. The lens post must still be "calibrated". The Planetarium has given you the hint to correctly calibrate the Lens Post ...... 10 minutes past 3 o'clock ..... On top of the two balconies stand is a numerical box. On the left balcony stand Box 1 and on the right balcony stand Box 2.
Go, via the side stairs, first to the Box 1 and go stand right in front of the box
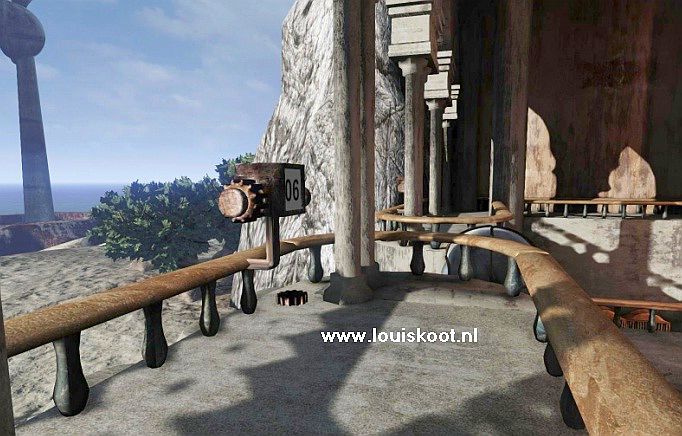
In Box 1 you set the Hours. Probably you now have 06 in the box. Click in the box and keep doing that until you have 03 in it (that is 3 o'clock).

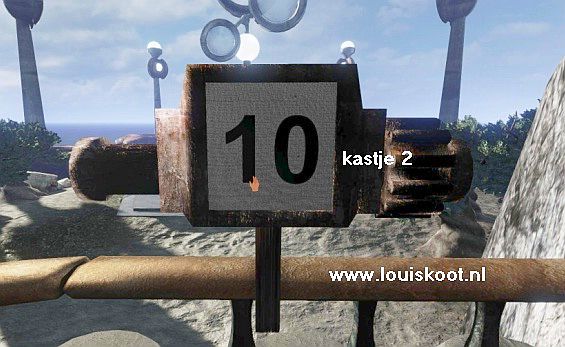
Go back down and then via the other side stairs to the other balcony, to Box 2. In this box you set the minutes. Click in the box until you have 10 in it (10 minutes) and .......
........ you see how in the lens post the two lenses are being put go over each other and ..... the light of all the spotlights is now being sent , through the lens post, to the Crystal.
Turn around and see ..... the Crystal is now GREEN and thus activated. Go to the now Green Crystal and touch it with your Hand and .....
You will be teleported back to the Green Crystal Gate. Follow the route back to the Temple
So go from the Green Crystal Gate back down to the 2nd Hand stone and then across the walkways and the beach to the Temple.
Go back into the Temple and see ....... the Green Crystal is now activated by the Child:

C: The Red Crystal:
Activate the Red Crystal Gate:
The Green Crystal is now activated. 3 more Crystals to find and to activate. Now we first go find the Red Crystal gate, which will teleport us to the area where the Red Crystal is to be found.
If you, like me, are back in the Temple now, you leave the Temple and follow the route back to the 2nd Hand stone and then further up to the Green Crystal Gate.
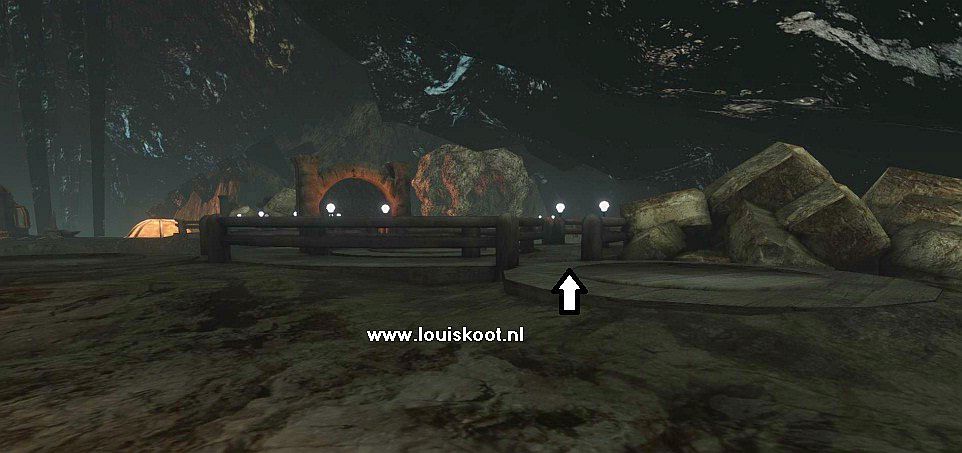
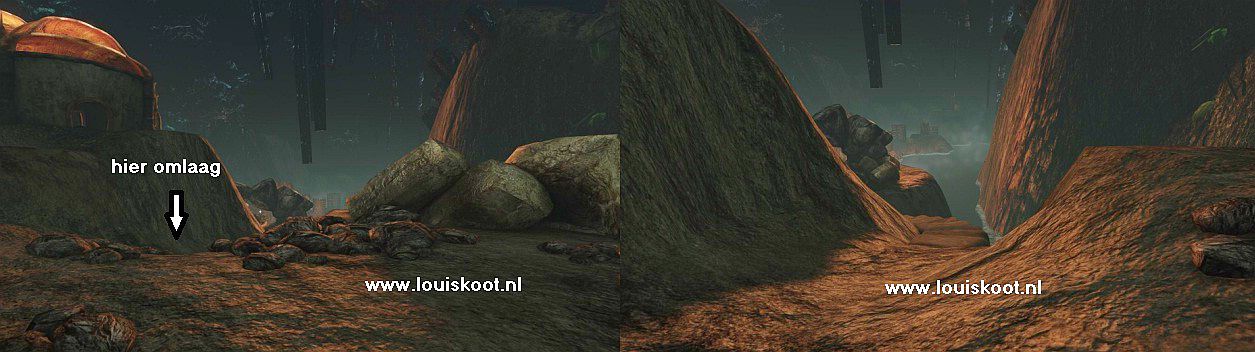
Back at the Green Crystal Gate, continue to the right and continue to follow the mountain path.
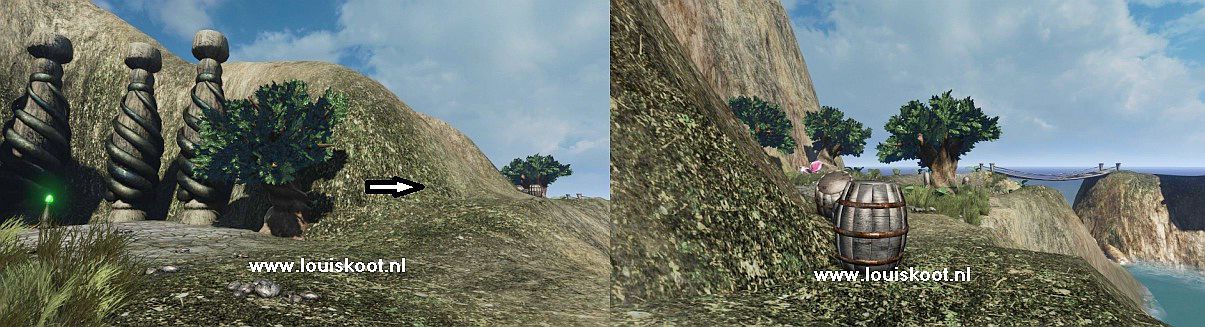
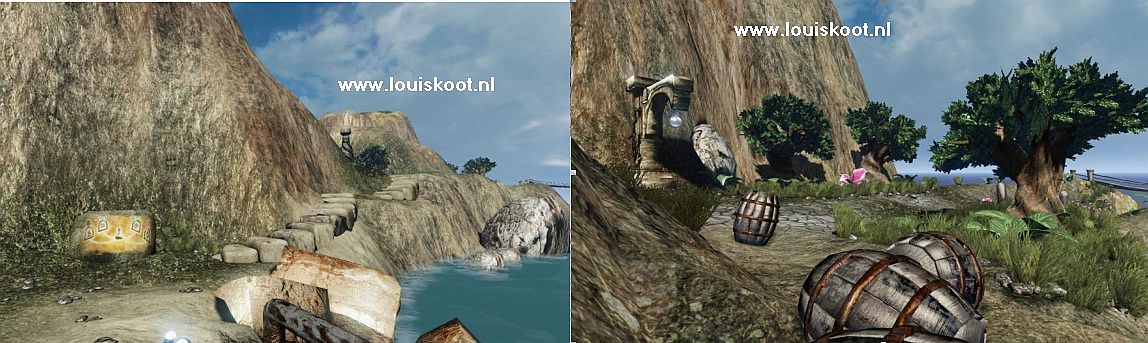
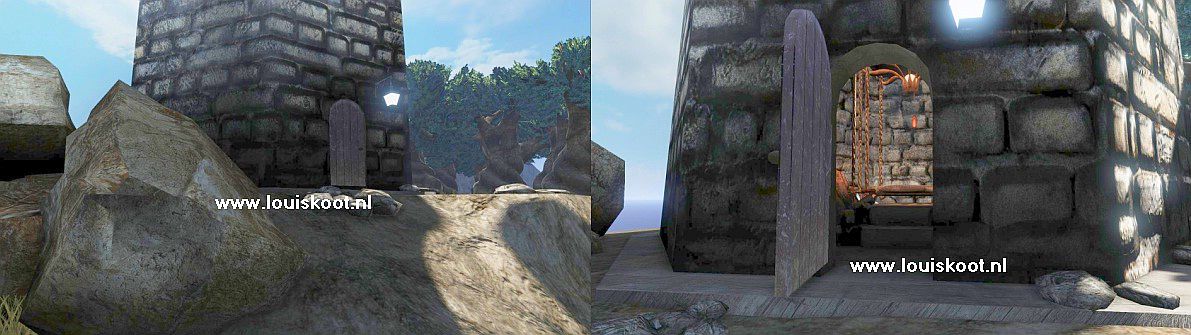
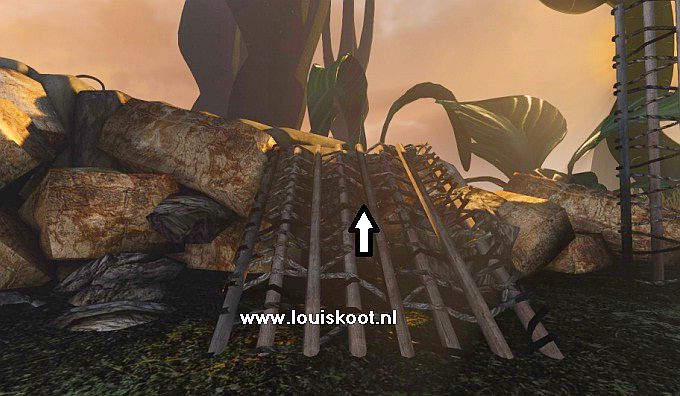
Halfway along the path you come across a number of wooden barrels that are annoyingly in the way. Just walk against the barrels and then just keep going. You just push the barrels out the way .At the top of the path you end up at a junction. To the left is a cleft / gorge / canyon with stone arches with hanging lamps. To the right the path continues to the Lighthouse and to the beach.
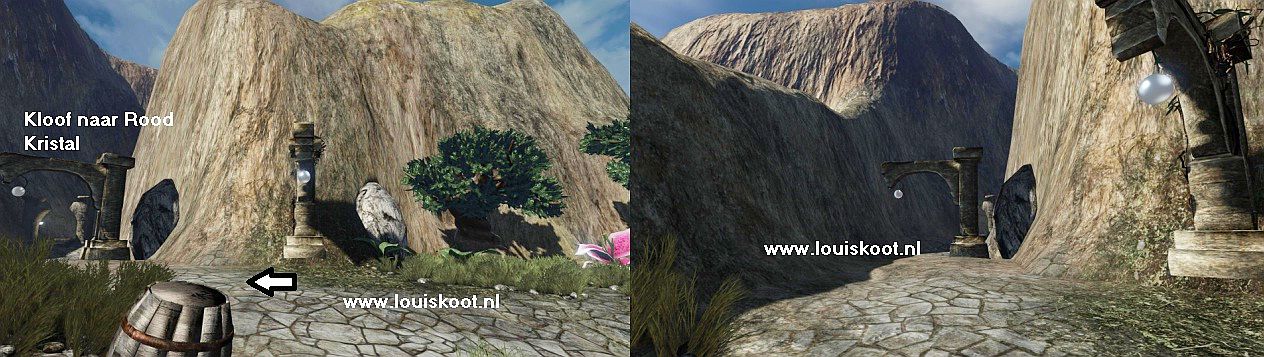
Go left into the gorge and follow the narrow gorge to the end and ...... you will reach the entrance of a cave. The entrance is closed with a gate. Open the gate and go inside.
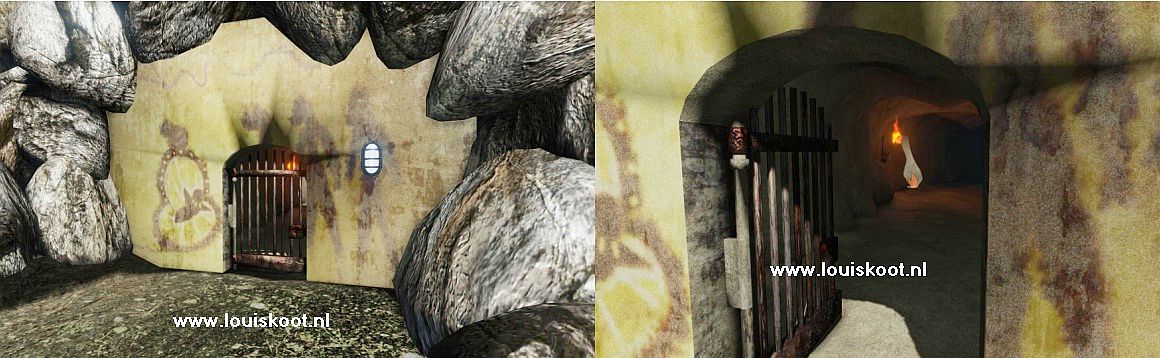
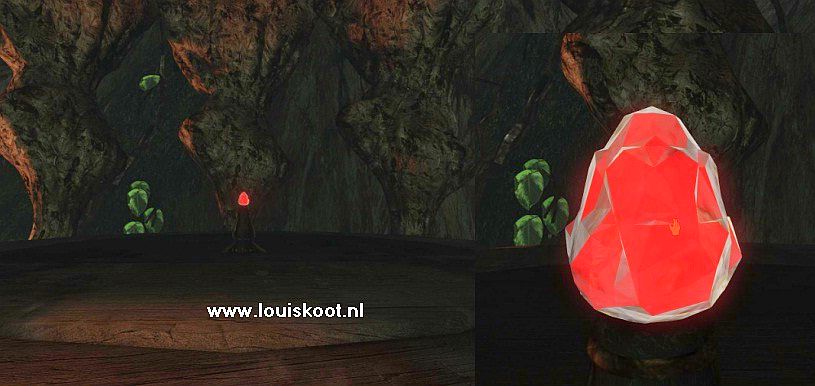
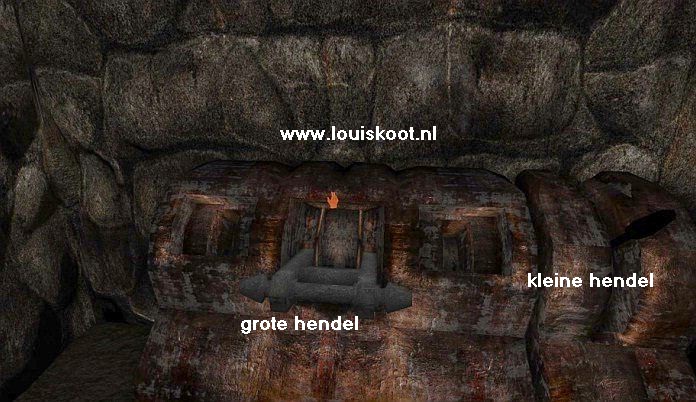
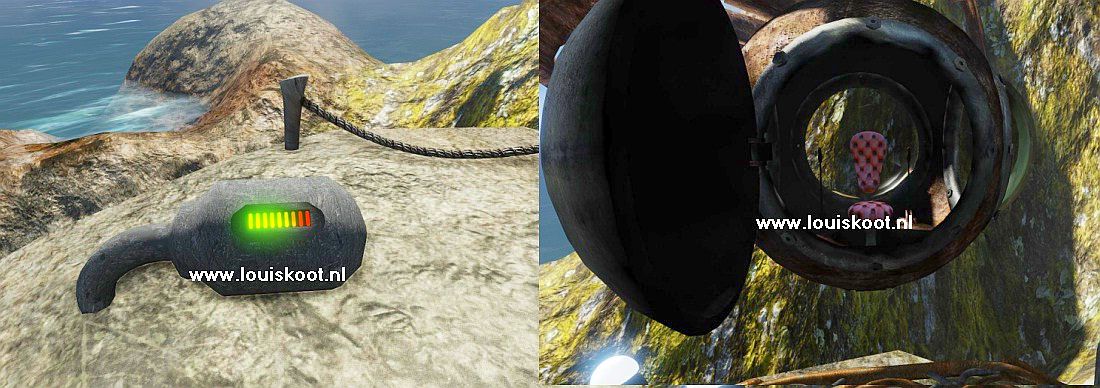
Follow the short tunnel into the Cave and ..... you have found the Red Crystal Gate. In the middle of the cave stand the extinct Red Crystal is on a pole.
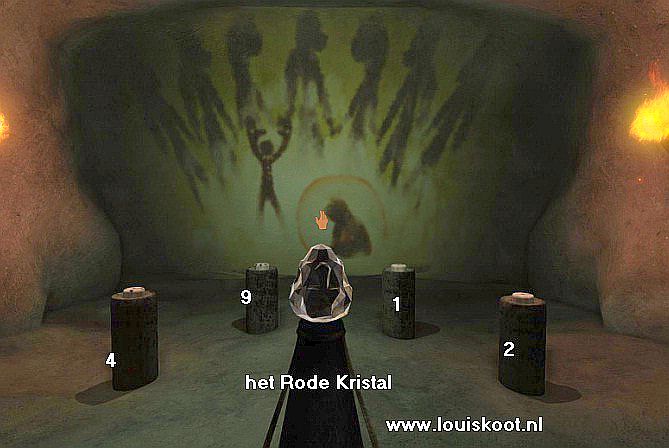
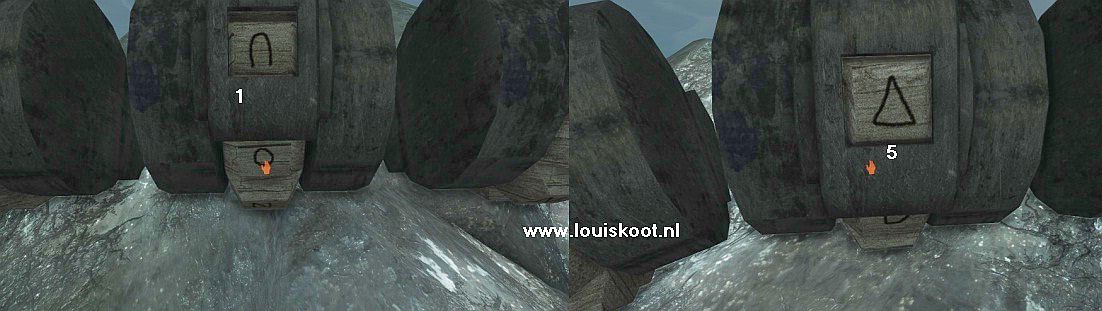
On the wall you see a drawing and there are 4 low pillars, standing in a half circle. The Red Crystal isn't activated so it can not teleport you now.
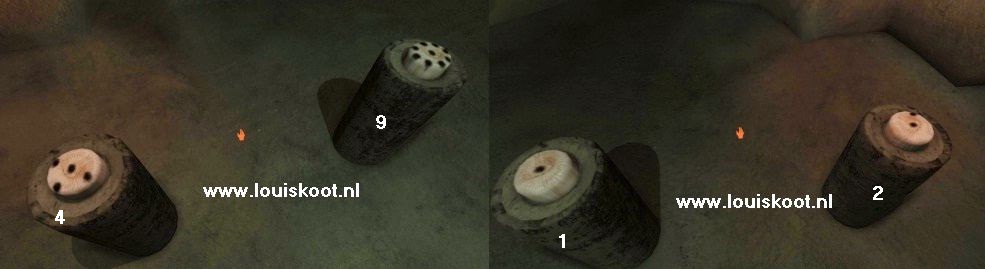
Go look at those 4 pillars. On each pillar there is a button and on each button there are dots. The number of dots on the button are digits.
From left to right the dots make the number 4, number 9, number 1 and the number 2 pillar. You have to press the buttons on the 4 pillars in a certain order to activate the red crystal. But what is the order in which you have to press on those 4 buttons? Here in the cave there is no hint to be found ......you have to find the hint about the four buttons somewhere else and for that you first have to go back to where you started the game ..... to Teleporter 1 .
Find the hint for the 4 buttons in the Cave:
Leave the cave and walk back through the gorge to the beginning of the gorge. You are then back at the point where you have pushed the barrels on the path out of your way. You see the Lighthouse. Straight ahead you can go, via the high path and the bridge, to the lighthouse and the area behind the lighthouse. You can also go down to the beach and then, via the beach, to Teleporter 1. To the right is the path you have just climbed up.

So....from here you can take 2 routes to get back to Teleporter 1.....It's your choose which route you want to go to get back to Teleporter 1. You can go straight on and then down the stone stairs to the beach and then follow the beach to the left and then back up to Teleporter 1. But Teleporter 1 is linked to Teleporter 2, so if you now go back to Teleporter 2 and then use Teleporter 2 then you end up at Teleporter 1, and that's what I'm going to do.
So I take the right path, back down, to the Green Crystal Gate and then further down to the 2nd Hand stone.
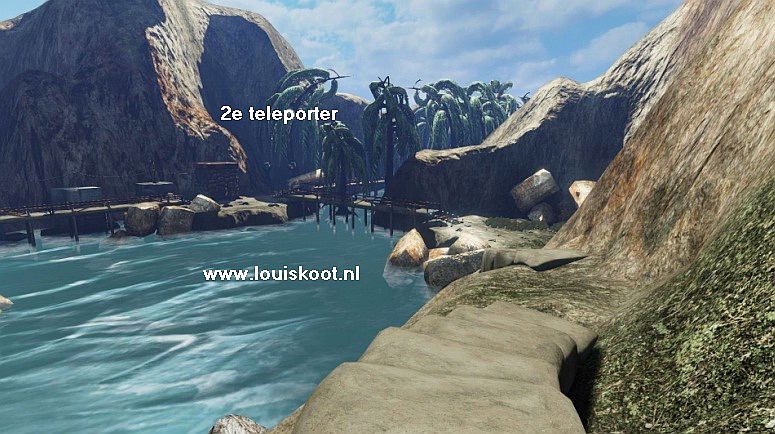
At the 2nd Hand Stone you go over the footbridge and then straight on to Teleporter 2
Wall the way to the "Fire Globe" of Teleporter 2 and walk against it and ..... ZAP ...... you will be teleported back to Teleporter 1.
Walk one step ahead, out of Teleporter 1, and then turn clockwise.
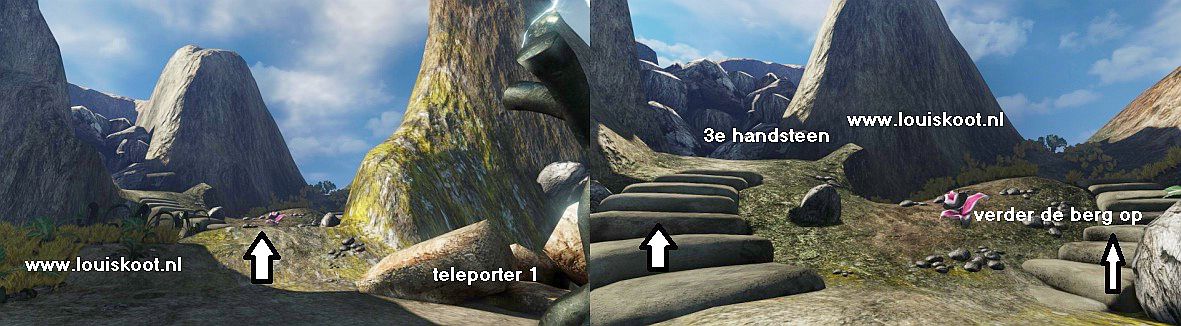
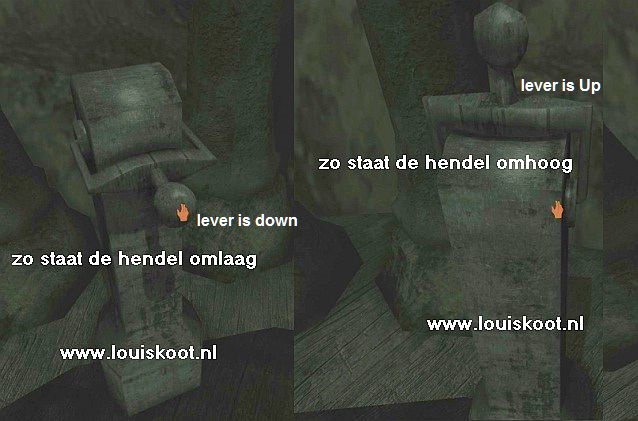
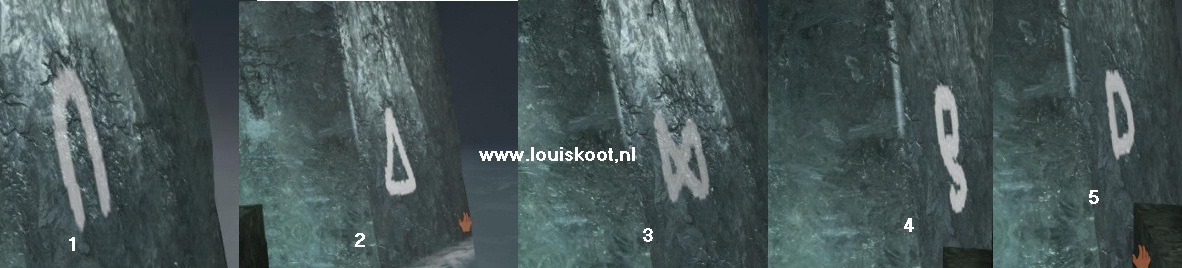
You see the area on the left side of Teleporter 1. You see a short slope and a stone staircase. Walk up the slope and ...... you are at 2 stone steps. Via the right-hand staircase you can go further up the mountain, but first go up the left stairs because at the top of the left staircase is the 3rd Hand stone. Walk to the Hand Stone and touch the Hand and ...... a drawing appears on the stone and you hear the voice again.
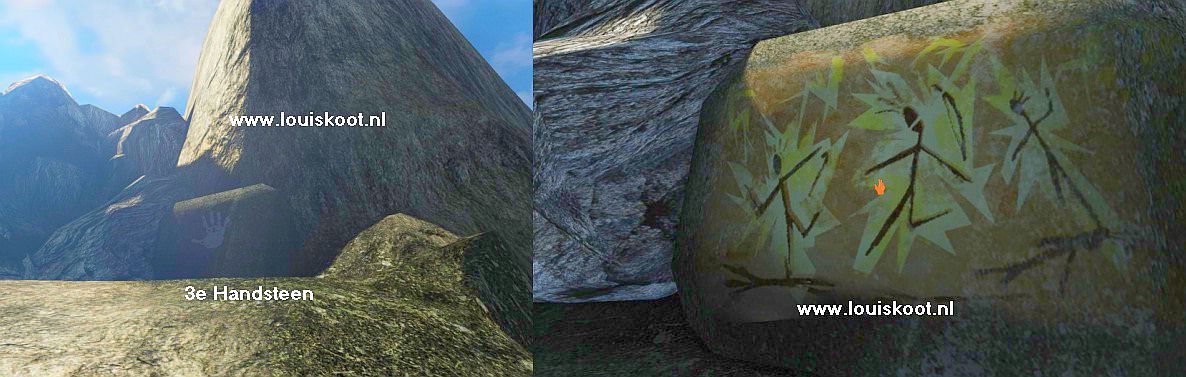
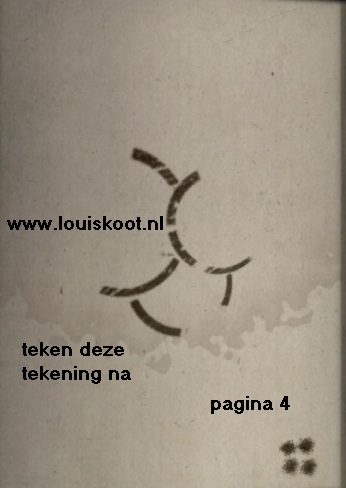
The drawing shows you 4 figurines, 3 of which are quite "startled" and the 4th is on the floor. Honestly ..... I really have no idea what this drawing means.
Turn around and go down the stairs and continue up the right-hand staircase. The staircase ends but you just walk further up the mountain slope

At the top of the slope you reach the next stone staircase. Follow the stone stairs further up and .... halfway through this staircase you look right and down .....
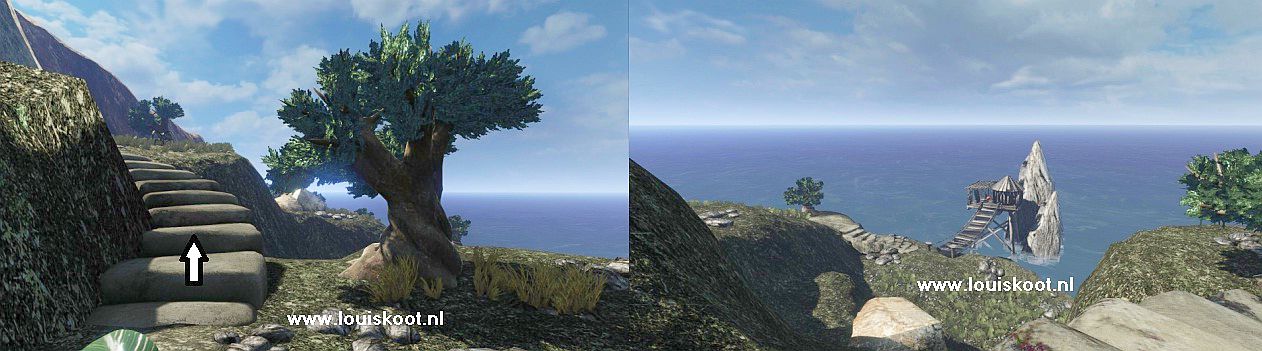
..........you will see a wooden shed below you. The shed is on a platform near a rock that protrudes from the sea. Walk further up.
The stone staircase ends again because you are now completely above. In the distance you see a lone tree again. Walk on to that tree and past it.
Past the tree, the slopes go down again and you are again at a stone staircase. Below you see 2 trees You have to go to the left tree. You can go down the stairs and then further down to that shed that you just saw. But do not go down the stairs now, but now go down the hillside, left of the stairs, to the left one of the 2 trees.
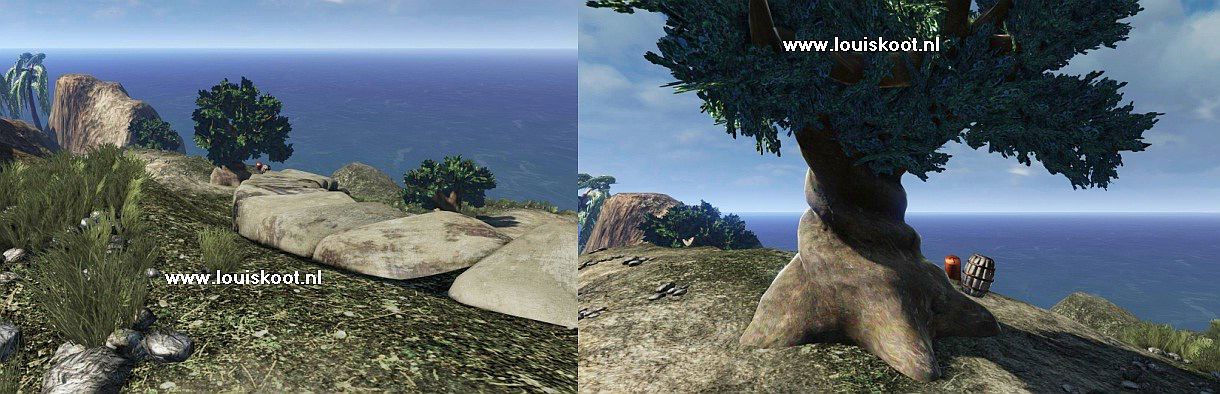
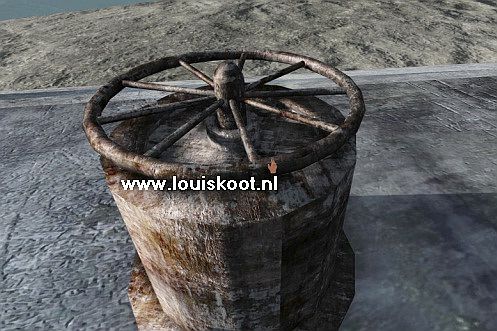
Behind the left tree stand a wooden barrel, at a small orange pillar. Walk to the barrel and the orange pillar.
There is an arrow on the pillar and that arrow points forward, to a metal barrel that is slightly down.
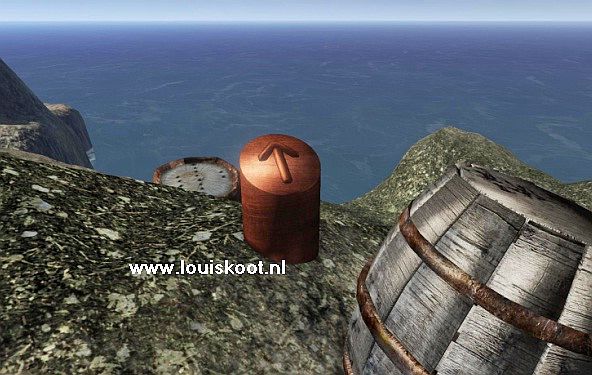
Stand straight in front of the orange pillar and then look forwards and downwards and ...... you will see the top of the metal barrel.
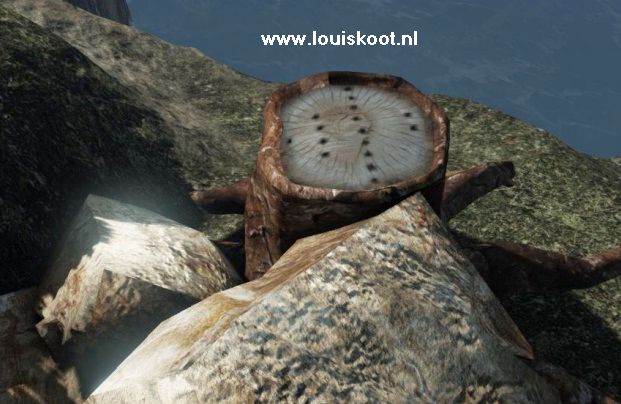
At the top of the rusty metal barrel you will see 4 rows of dots. From left to right the dots represent the digits 1, 4, 9, 2
Well .... this is the HINT for pressing the 4 buttons in the Red Crystal Gate cave. So you have to press those buttons in this order: 1, 4, 9, 2.
But for that you have to go back to that cave. So first back to Teleporter 1. Turn around and walk back up, via the slope or the stone stairs.
Back up you follow the sandy path back to the stone staircase, behind the tree.
Go down the stone staircase and then down the slope and the bottom stairs, further down to Teleporter 1. Use Teleporter 1 to be back at the area of Teleporter 2.
From Teleporter 2, follow the route over the footbridge, back to the 2nd Hand stone.
At the 2nd Hand Stone you go up again, via the two stone steps, to the Green Crystal Gate and then further up through the Gorge. Follow the gorge back to the entrance of the Cave.
Walk into the cave.
You are back in the Red Crystal Gate cave and you now know in which order you have to press on the 4 buttons, on the 4 pillars .... 1, 4, 9, 2. Go and do this and ......
......... the Red Crystal here in the cave is then activated but the Red Crystal in the Temple still isn't.
This Red Crystal is the Teleporter to teleport you to the area where you can find and activate the real Red Crystal in the Temple.
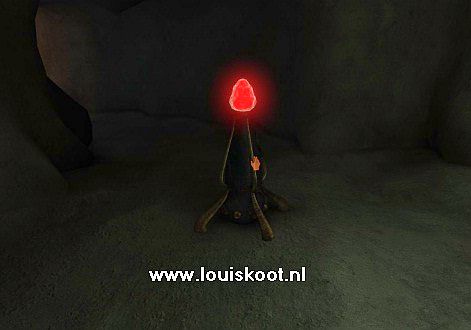
Click with your hand on the now, red-hot Crystal and ... .....you zap away to a new area
Caves, Village and the Red Crystal:
After the cut scene you have landed in a huge cave. if you are now staring a lot of stones the turn slightly to the right.
You are standing on a path and in front of a broken gate. In the distance you see a round metal gate with lights on it.
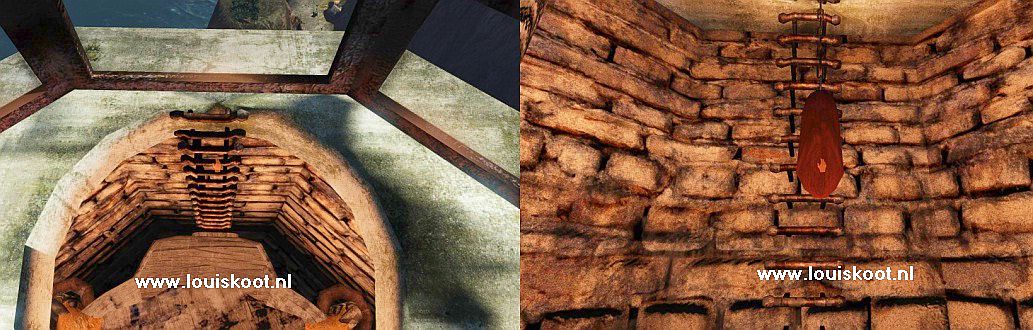
Follow the path to that round metal gate, The metal gate is the beginning of a rail over which mine carts glide and ........ there is a mine cart at the gate waiting for you.
So jump in the mine cart and "enjoy" your ride down the rail.......
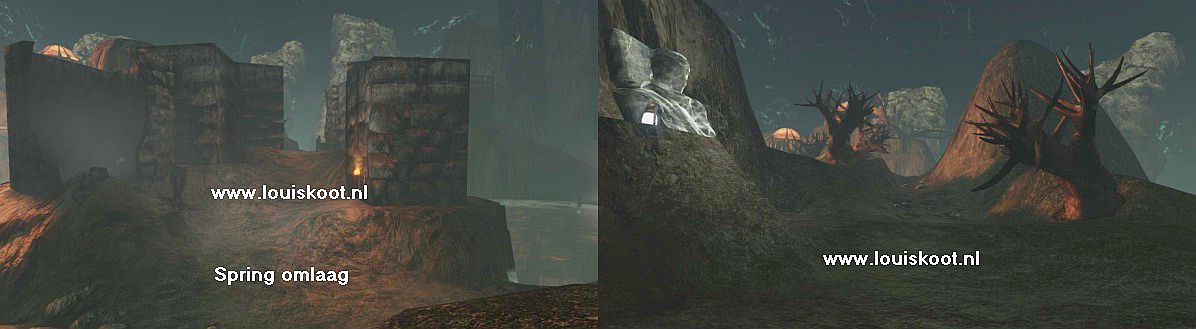
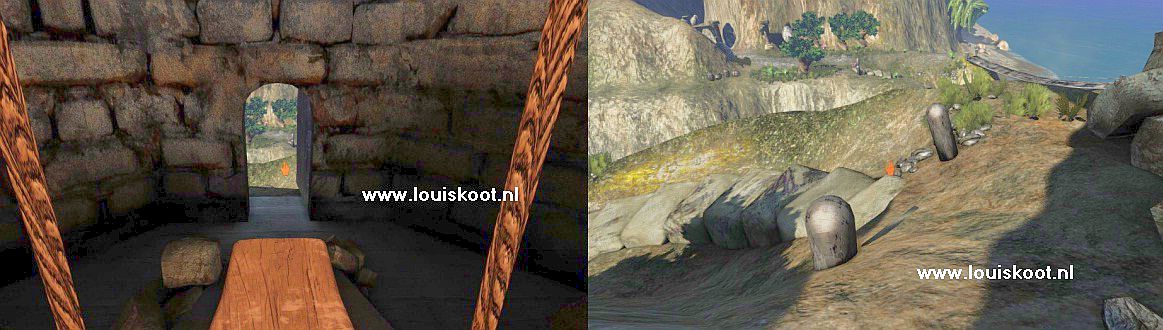
At the end of the ride you will be thrown out of the mine cart, and the cart will return without you to the metal gate. Fortunately, you are unharmed and see that you are standing in front of a Stone Gate
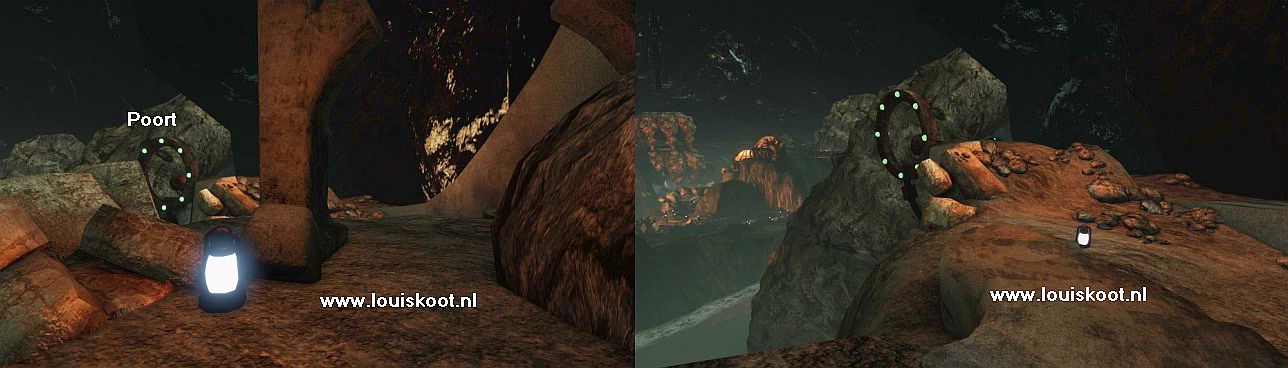
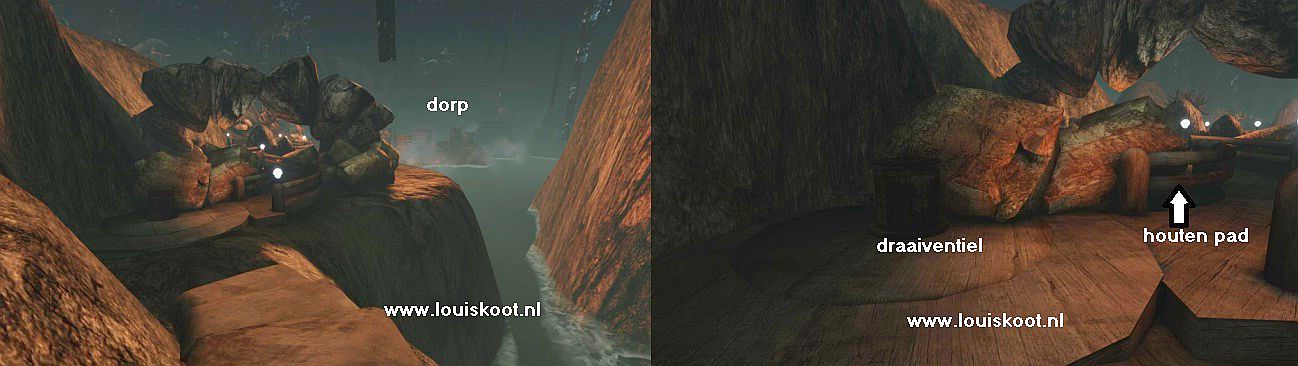
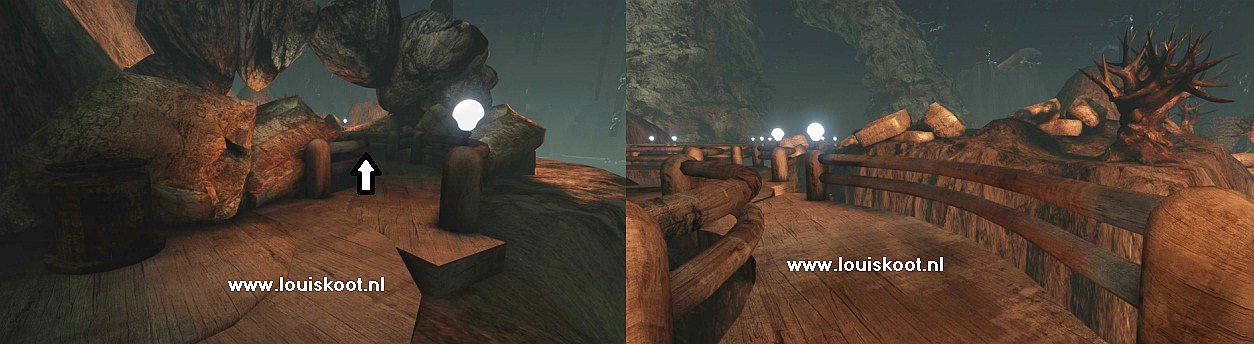
Walk through the Stone Gate and ..... you end up at the beginning of the Rotunda and Wooden Path system......This is Rotunda 1:
The middle wooden circle is the Rotunda and you can enter the Rotunda via the wooden circles left and right. It does not matter whether you go left or right onto the Rotunda, but the left entrance is very close to the abyss and there is a chance that you will fall down and die. So enter the Rotunda via the right-hand circle.
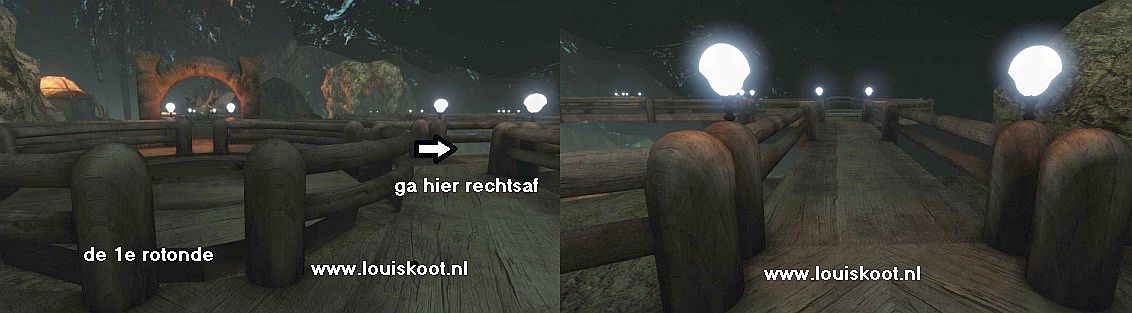
Go, on the right-hand side onto the Rotunda and then take the right-hand path and follow it to the next corner circle.
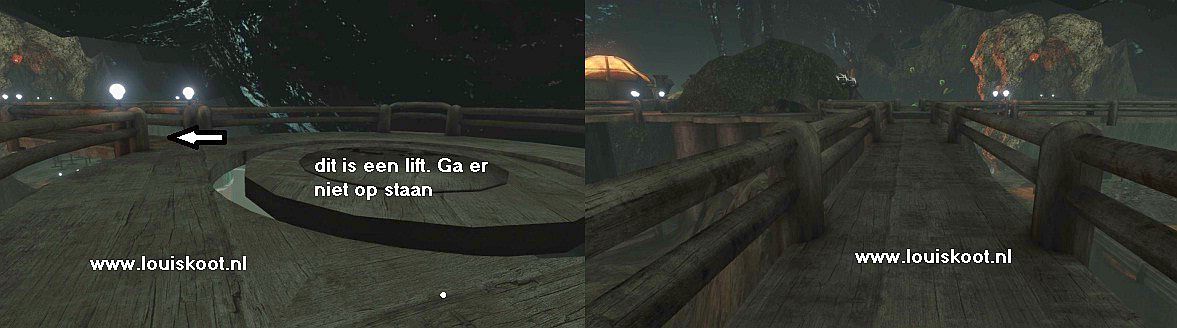
TAKE CARE HERE..... do not stand on the Circle because it's a Lift and you have a chance that it takes you down, and you don't want this now. Walk around the middle circle to the left and then follow the path to Rotunda 2. At Rotunda 2 you can go right, left and straight. Walk around the Rotunda to the straight ahead path and follow this path and ................
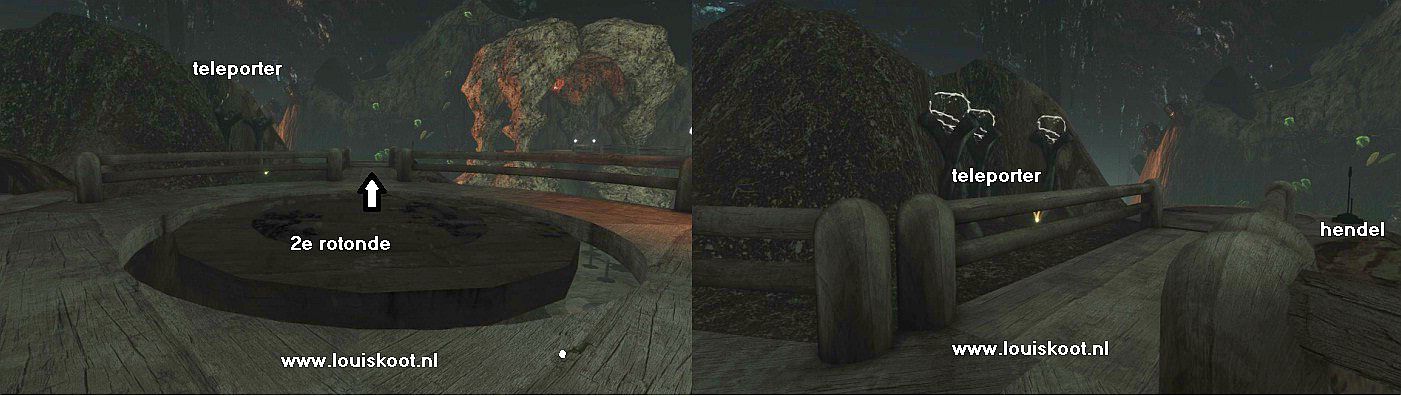
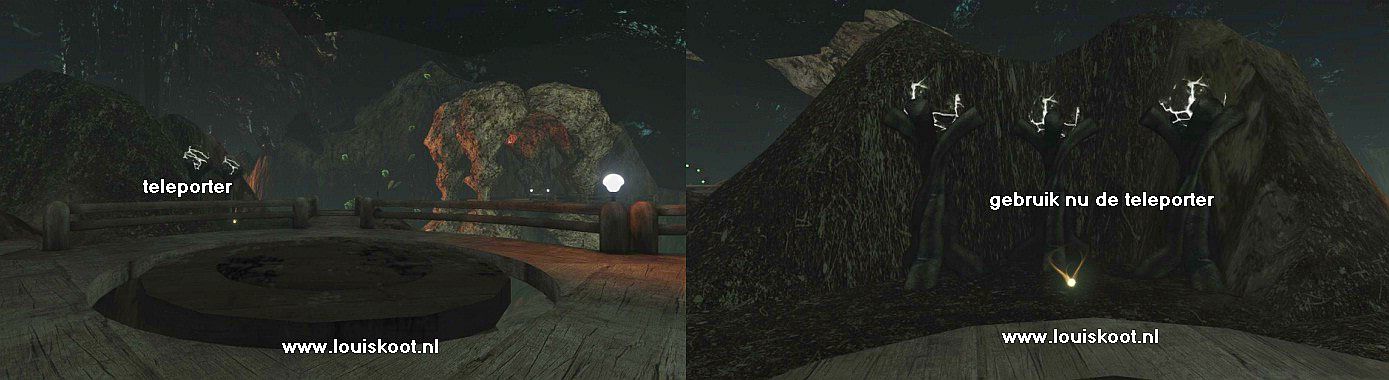
........you end up on an End Circle with a Lever and a Teleporter. Walk to the Lever
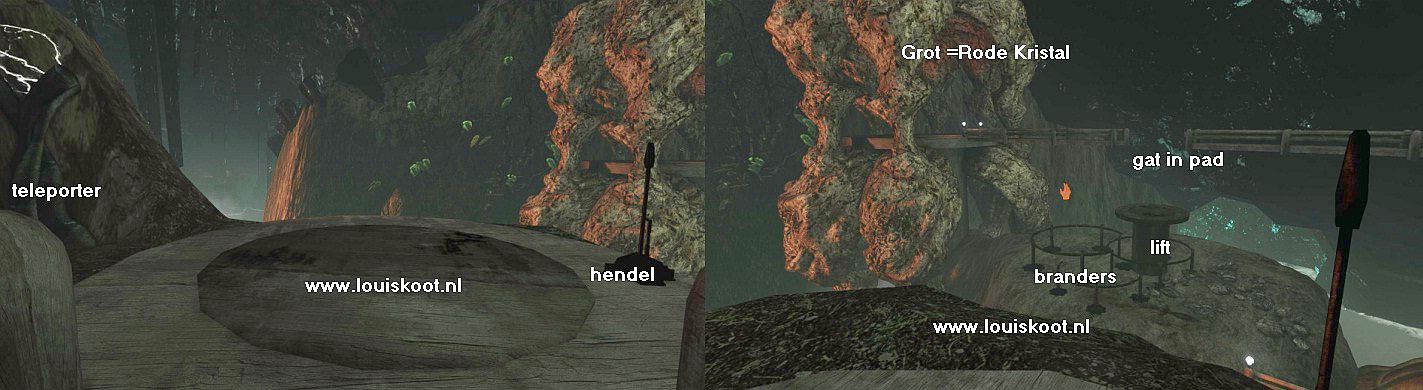
You see another path in the distance and that path goes to a cave. In that cave is the Red Crystal you are looking for. Unfortunately you can not reach the cave because the lift is down and that is why part of the path is missing. The lift is lowered and must be activated. You can pull the Lever here as often as you like but nothing happens. There are burners around the lift and the burners have to burn
Turn around to the Teleporter. Do not use this Teleporter now, so be careful not to hit the "Fire Teleporter Globe".
Walk to the far edge, to the right of the Teleporter, and look down. You can glide downhill via a sloping slope.
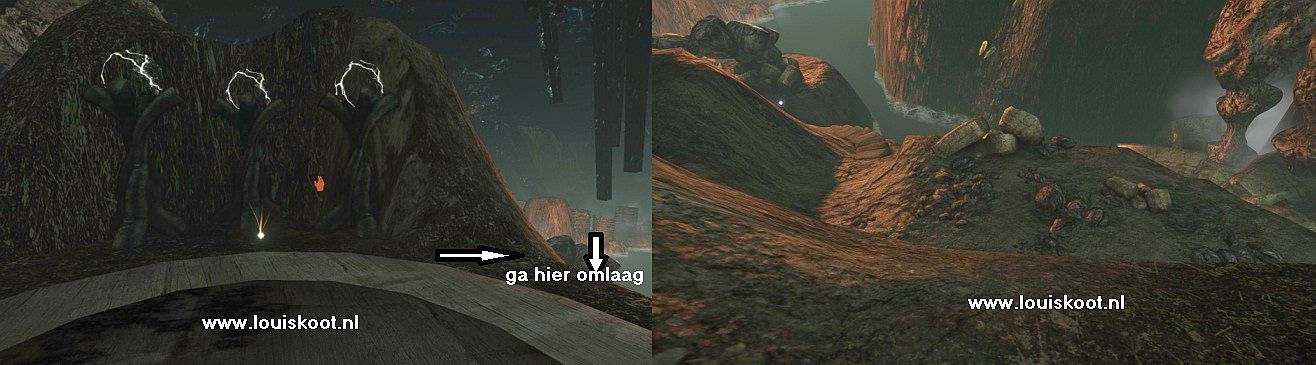
So...go down the slope until you find large boulders below. If you look to the right you will see that you are now at the same level as that round lift. Look to the left and .... you see a building with a dome roof and there goes a slope with a stone staircase further down.
So go, from the pile of large boulders, to the left and then descend via the stone stairs further down.
While you descend the stairs you have a beautiful view over the lake and a distance a village. Via the stairs you will end up on a new wooden path.
There is a collapse and........In front of the large lumps of stone stand a valve. Stand directly in front of the valve and then click on the turning wheel to turn the valve open.
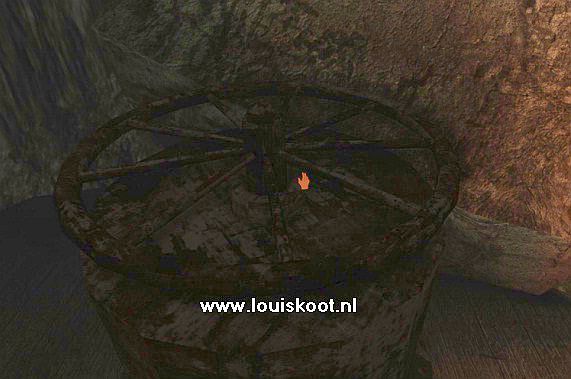
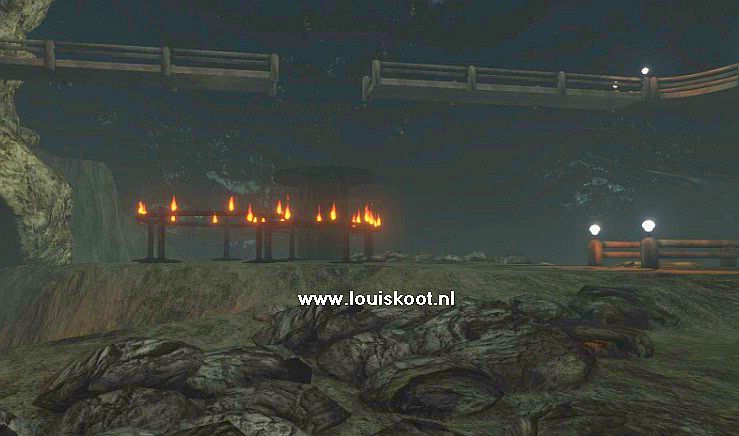
By turning this valve on you have switched on the burners at the round lift.
If you walk back up the stairs for a short while and then run back to the pile of boulders, you'll see that the burners at that lift now are really burning.........But..... the lift is not yet activated.
Turn around again and go back down, to the beginning of the wooden path where the valve is that you just opened up.
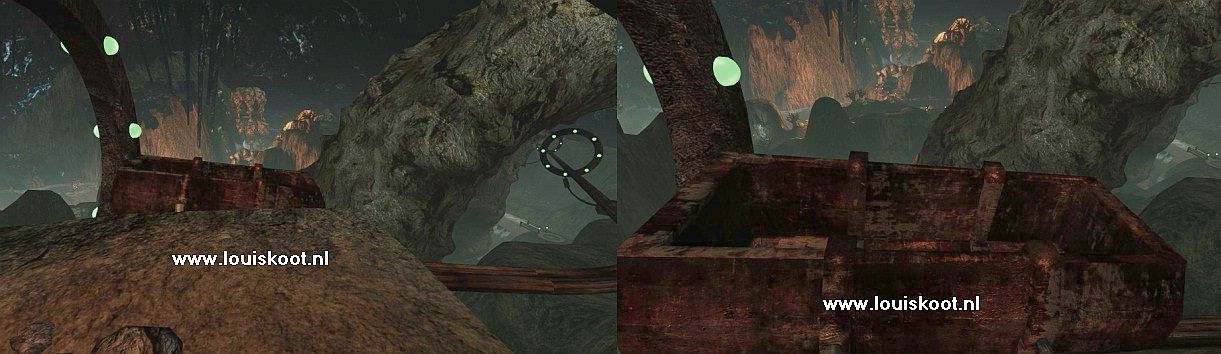
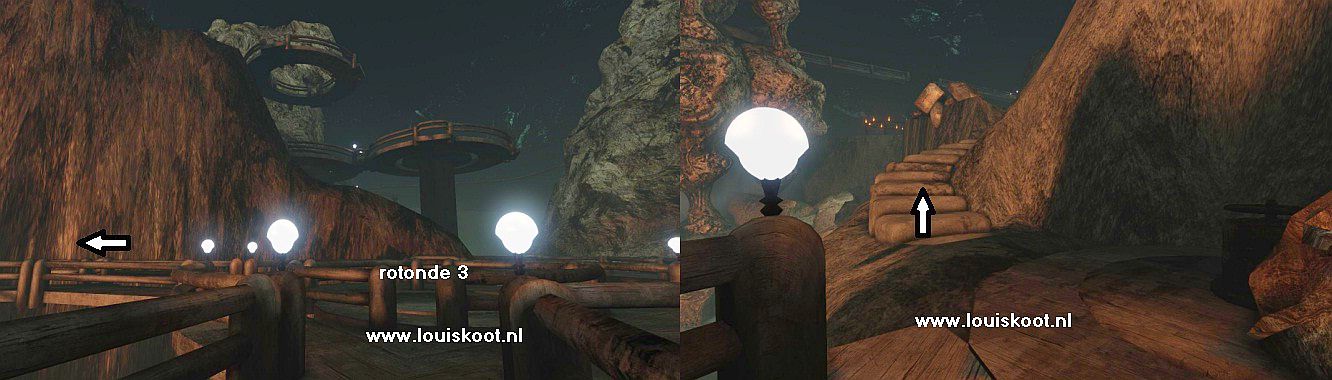
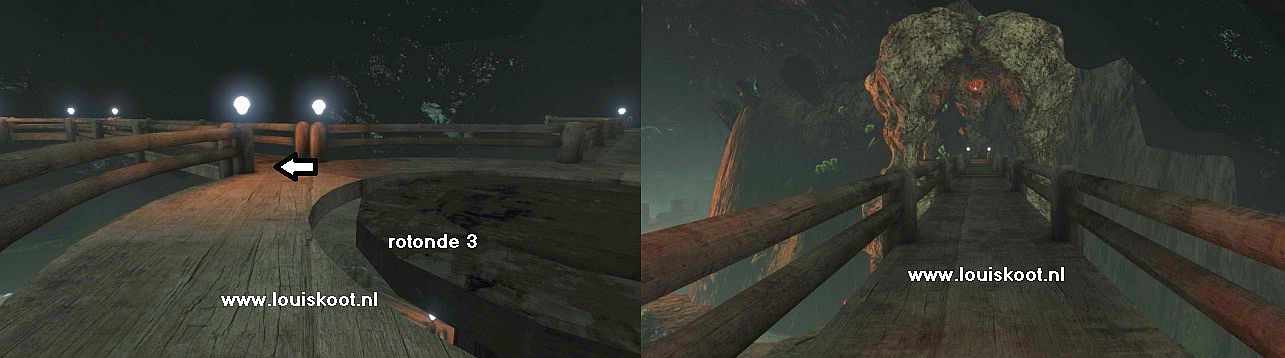
Follow this path now. It is a winding path and after a few turns you see, on the right, a dead tree on the rocks. Continue walking and ... you then reach Rotunda 3
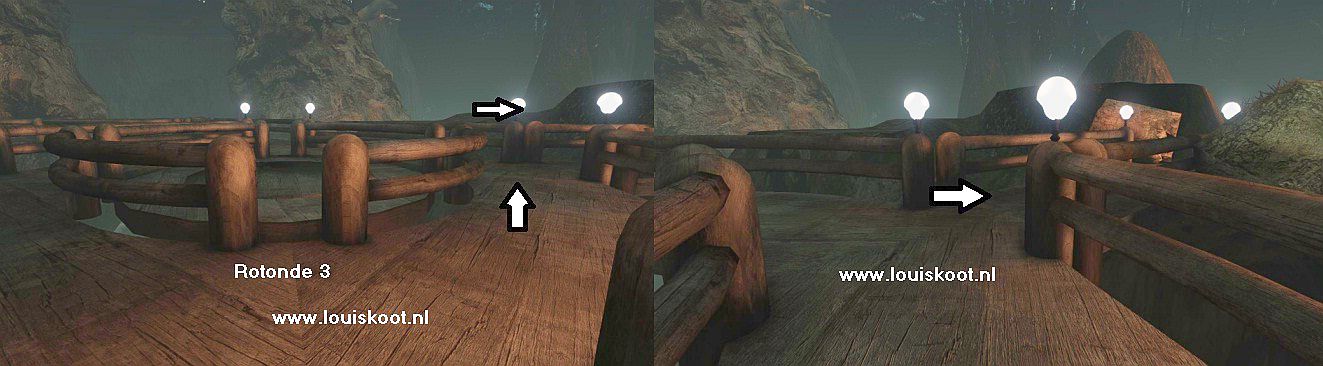
Go clockwise on the Rotunda and then take the right path.
The wooden path ends and the path becomes a slope that you follow all the way down to:
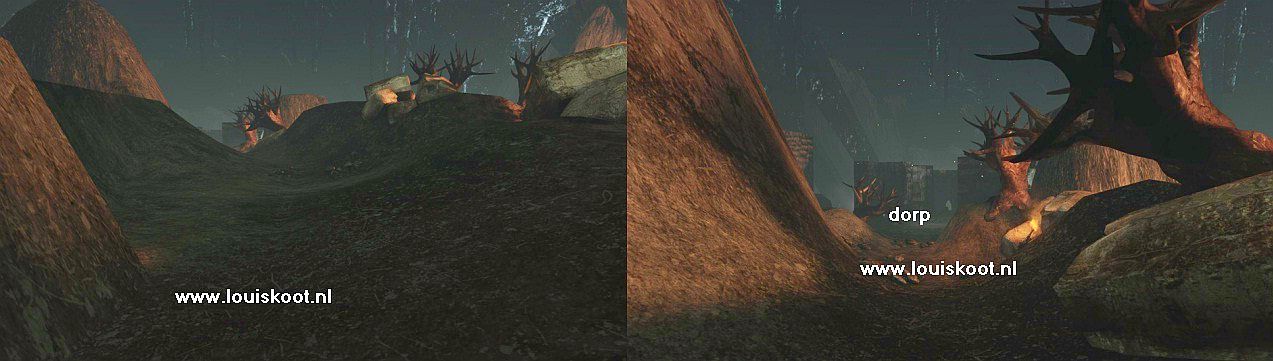
The Village:
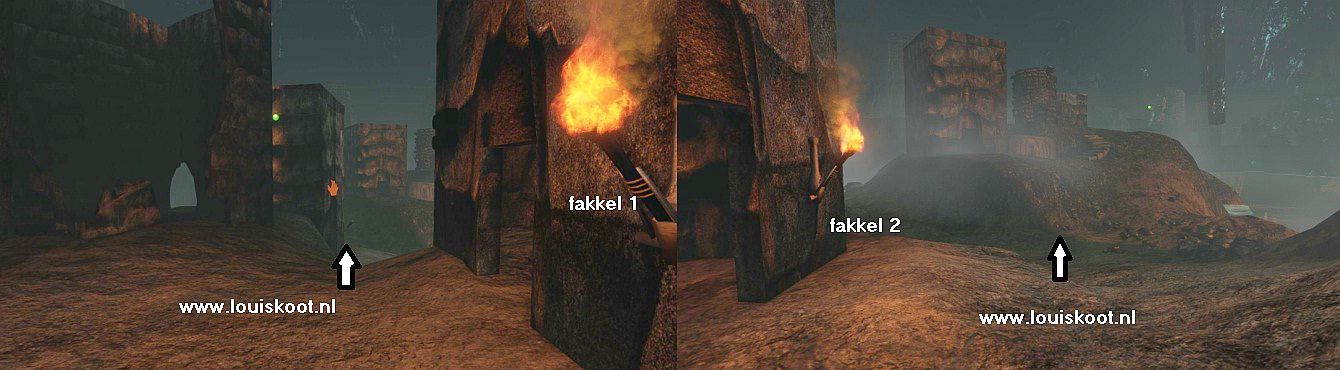
Continue to the 1st House. The village is pretty burnt down and deserted. There is a torch on the first house.
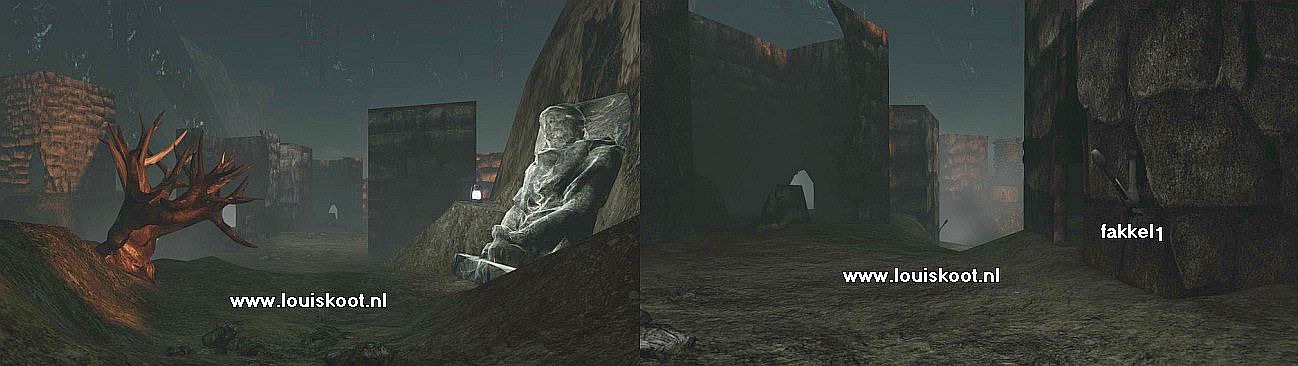
Walk to the torch and click on it and ..... the torch will light up. There are still 3 torches that you can, on must, light up
NB: you have to light all four torches because there is a book in the last house and there are drawings in that book. However, you can only see those drawings in the book when all 4 torches are lit. You should not be too slow now, because the torches do not continue to burn infinitely. If a torch has gone out again, you can not see the drawings in that book. 1 of those drawings in the book is important, so make sure you light up all 4 torches and make sure you do not take too long to reach the last house.
Walk further on and on the last house on the left, hangs torch 2. Click on the torch to light the thing.
The last 2 houses of the village are on the hill. ...so walk to the hill. However, you can not climb up the hill.
Standing in front of the hill, you turn left and ..... you see a small jetty in the corner. So walk up to the jetty and then turn around to the hill.
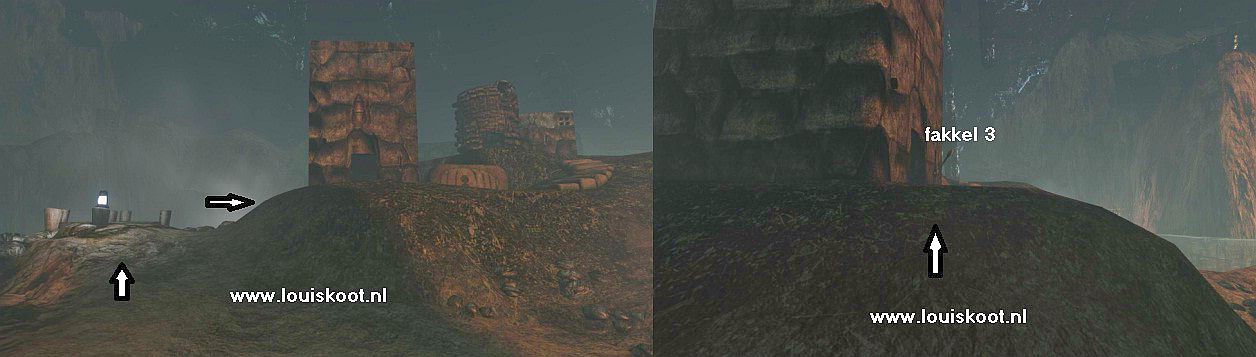
Continue up the hill and the 3rd Torch, which hangs on this house.....Light up the 3rd torch
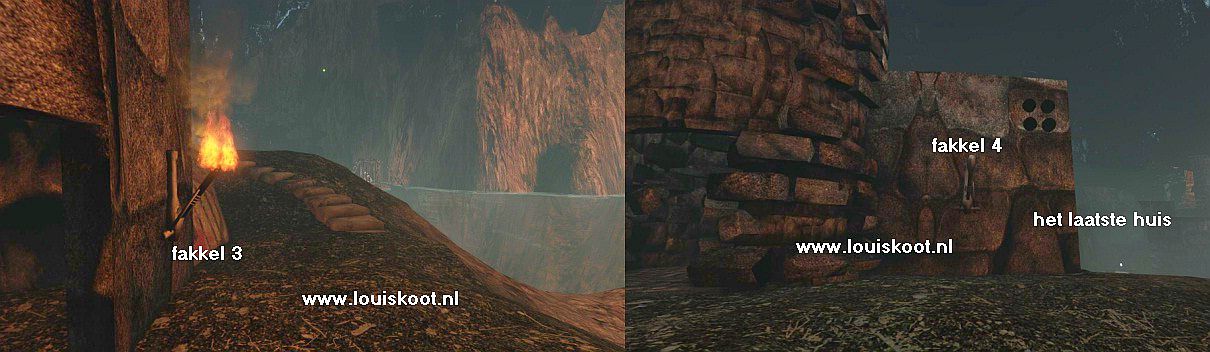
Then walk on and left around the corner and ..... you are now standing in front of the last house.
At the top right of the façade you can see 4 thick black dots and Torch 4 is also hanging on the façade. Light Torch 4 and remember the 4 black dots because they mean the number 4.

Enter the last house and walk to the back room. Then turn left and see ...... an open book is on a pillar:
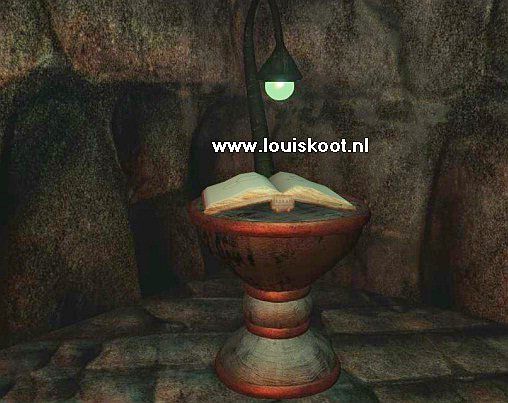
Pick up the book. There are dots at the bottom right of each page. The number of dots tell you the page number. 1 dot is page 1, 2 dots is page 2 and so on. You will see a drawing on each page. On the outside of this house you saw 4 thick black dots ... so browse to the page with 4 dots. Then draw over the drawing on this page, or remember this drawing.
Ok ....you're done in this dreary and completely deserted village. You have to go back to the Teleporter. So leave the house and jump at the Torch 3 house down to the main street of the village.
Follow the street and then continue up the path, to the wooden paths at Rotunda 3. On Rotunda 3 go left and back to the beginning of this wooden path, where you have opened the revolving valve.
Climb up the stone steps and continue to the large boulders. In the distance you can see the round lift again with the burning burners.
Right above you is the platform with the Lever and the Teleporter, but you can not climb back up the slope here.
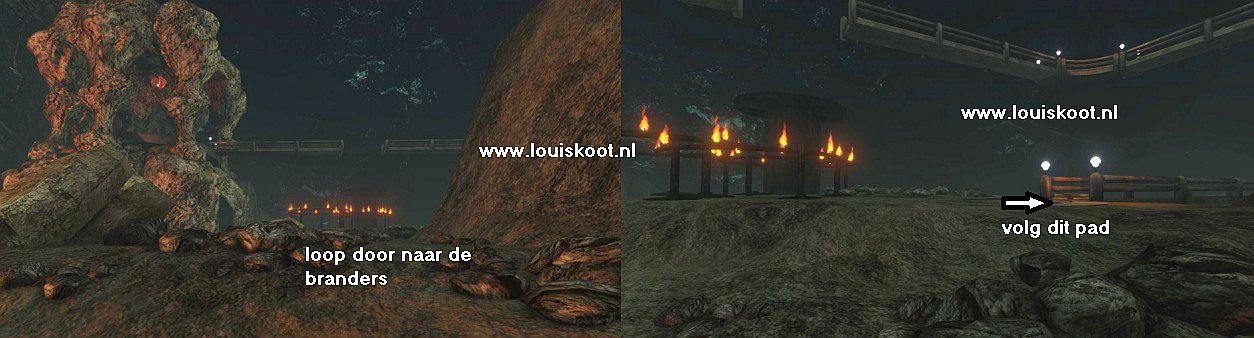
So walk on to the burners at the lift and then go to the path, that starts on the right side of the lift.
Follow this wooden down path to the next circle. You are then right beneath Rotunda 2. Go left to the next corner circle. This is a lift......
Stand on the center circle and ......... the circle lift brings you up to the top path.
Follow the top path again to Rotunda 3 and then straight on to the end platform with the Lever and the Teleporter.
The Burners at the round lift are now burning but when you pull the lever towards you again, the lift still does not go up. Turn around and walk into the Teleporter and .....
.......you will be teleported to another part of the caves.....You are at Rotunda 4. Behind the Rotunda you see 3 colonnades.

The middle circle of the Rotunda is a lift, so walk around the center circle and go take a look into each of the 3 colonnades.
There are a number of Lever pillars in each colonnade. In the left colonnade are 4 lever pillars, in the middle colonnade are pillars are 3 lever pillars and in the right colonnade pillars are 5 lever pillars. If it is the same in your game as in my game, then all levers on all those pillars are now DOWN.
With these levers you turn the burners around the lift on and off. It is now the intention that you switch off certain burners and switch on other burners, so that the burners that are on make the same shape as the drawing you saw on page 4 of the book in the last house of the village. When you then pull the lever again, at the top Teleporter, the round lift will rise and close the hole in the top path. Oh, here we go.
Go to the Left Colonnade.
Here are 4 lever Pillars and in my game the 4 levers are all DOWN, but this can be different for you
Number the pillars, from left to right, A, B, C, D. Then click the levers on the pillars B and D UP.
So it here it has to be: Lever A = Down, Lever B = Up, Lever C = Up, Lever D = Down.
Go to the middle Colonnade.....
Here are 3 lever pillars A, B, C
Set the 3 levers like this: Lever A = down, Lever B = up, Lever C = down
Go to the right Colonnade:
Here are 5 lever pillars: A, B, C, D, E

Set the levers like this: : Lever A = down, Lever B = Up, Lever C = Up, Lever D = Down, Lever E = Down.
Go back to the Teleporter and Teleporter back up and go to the big Lever and see ...... The burners that now burn around the lift now form the drawing you saw on page 4 of the book...... Pull the Lever towards you and ....... the lift now goes up and closes the hole in the top path and the Red Crystal in the cave is now activated. You can now go to the cave.
Turn right and walk to Rotunda 3 and then follow the left-hand path to the lift and the cave.
Enter the cave and .... as soon as you enter the cave, the Crystal will turn red. Walk on to the Red Crystal and touch it with your Hand Cursor and .......
...... you will be teleported back to the Temple Island and you will be back in the Red Crystal Gate Cave.
Leave the cave and go back through gorge and then right again and down to the 2nd Hand stone
Go back to the Temple via the footbridges and see ...... behind the Child the Red Crystal no also glows:
D: Activate the Blue Crystal :
Power for the Monorail Dive Bell
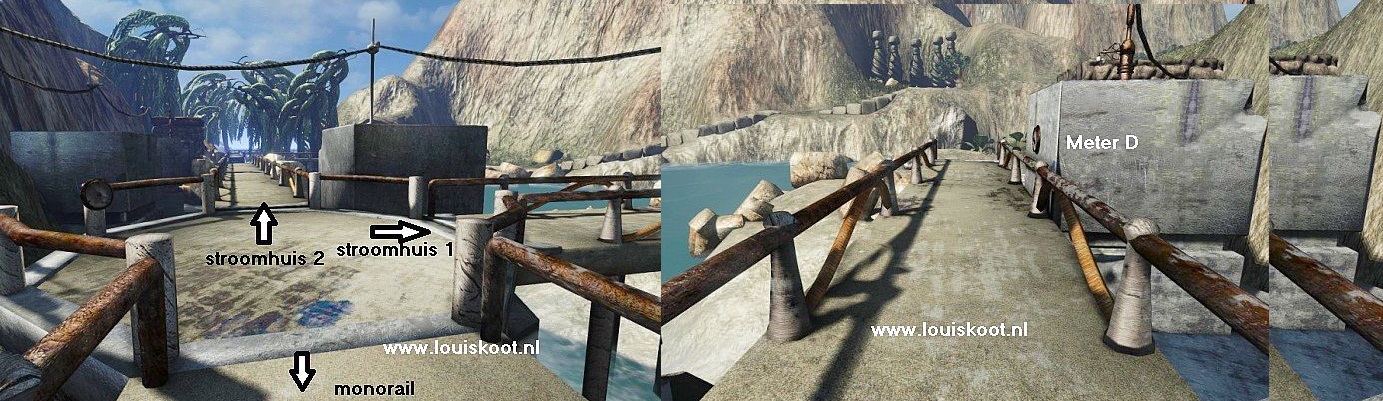
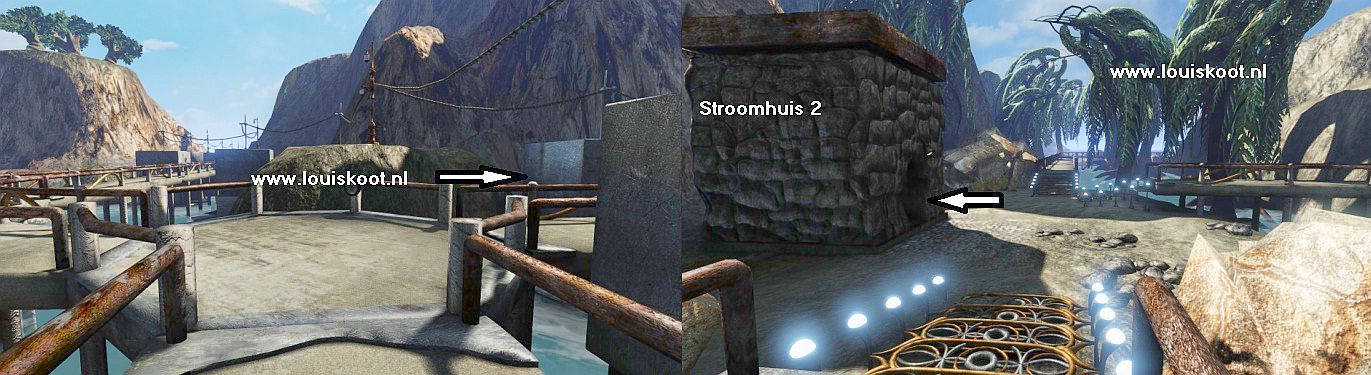
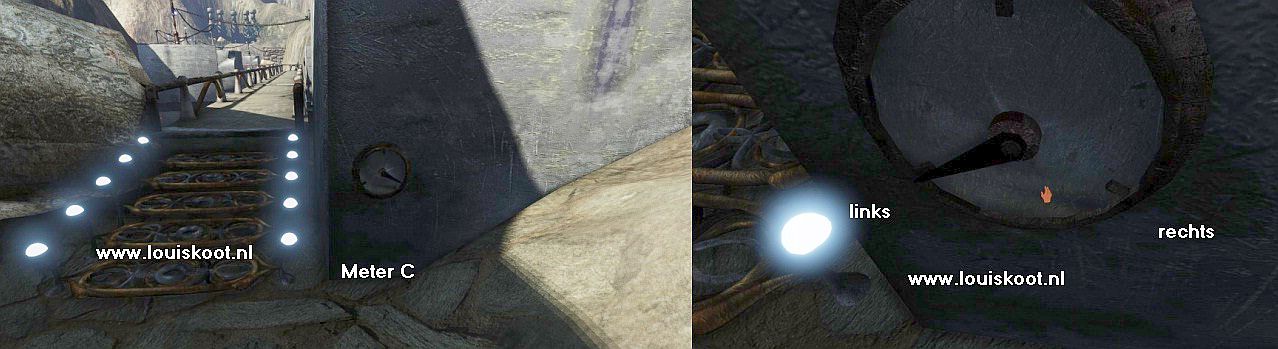
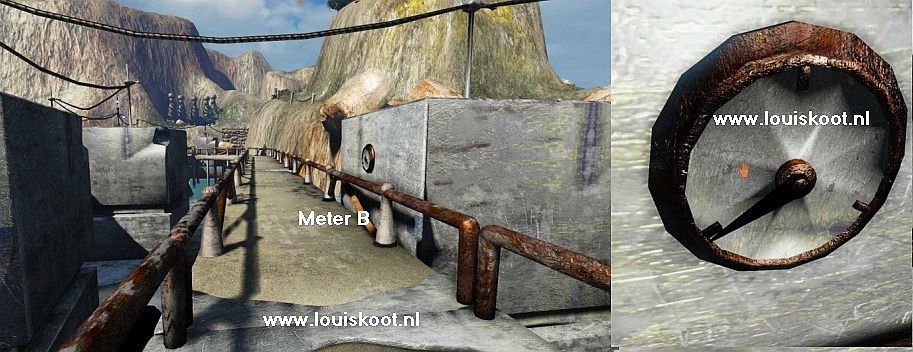
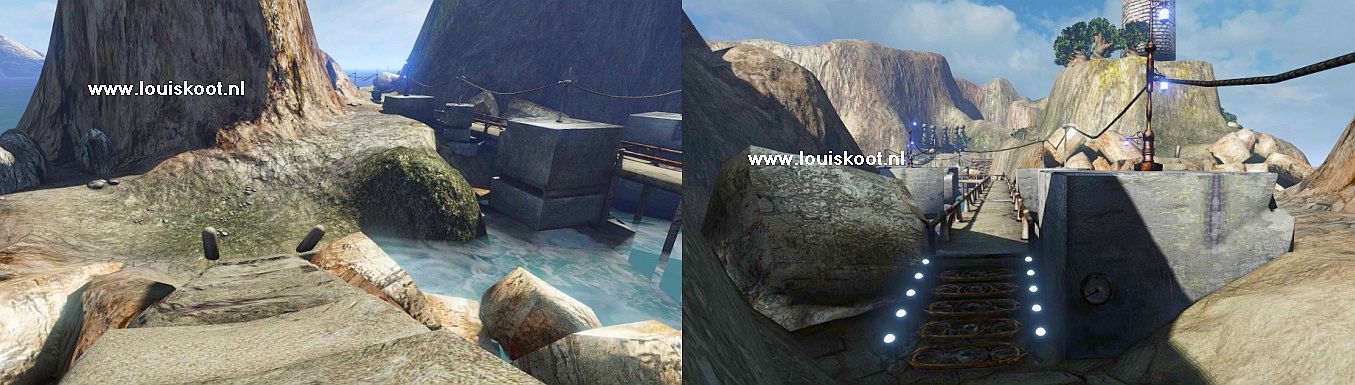
Leave the Temple and return to the crossroads of walkways, at the 2nd Teleporter. The stone house that stands here is the 2nd Power House. So there much be also a Power House 1. Now follow the walkway straight on, past Power House 2. On the right side of the walkway are large gray concrete blocks, where the poles of the power cable are on. On the first of those concrete blocks you'll see a round gauge. This is the first of 4 gauges and number this one as Gauge A. You can not do anything with these meters now, because there is no power.
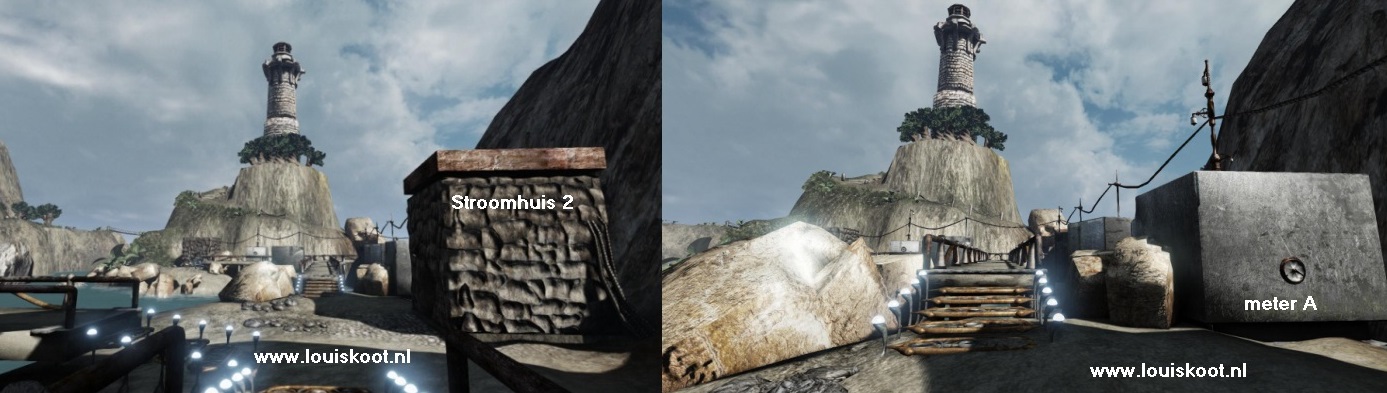
Follow the walkway further. Just before the Lighthouse Rock you end up at a Rotunda.
To the left the walkway goes to Gauge D and Power House 1. To the right it goes to the Gouges B and C and ...... the Monorail

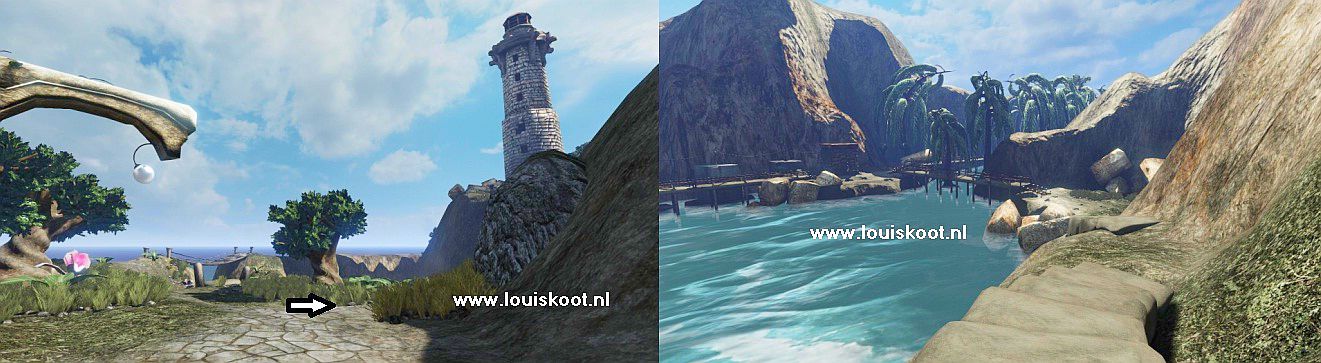
Follow the walkway to the right. The concrete blocks are now on the left side the left side and halfway through you see Gauge C on one of them. Walk on and you reach the end of the walkway. Follow the power cable further to the ocean and ........ you will automatically end up at the Monorail Dive Bell.
The power cable ends here and the Gauge, which you see on the right side of the concrete block, is broken. To the left of the Monorail is the Flow Meter and if you look at that thing then you see that there is no power. You can not open up the Monorail Dive Bell, because there is no power and that is what we are going to take care of first.
Go back to the rotunda of the walkways and then turn right. You will then see Gauge D on the concrete block.
Behind the concrete block stands Power House 1, so walk on and at the end turn right and enter Power House 1.
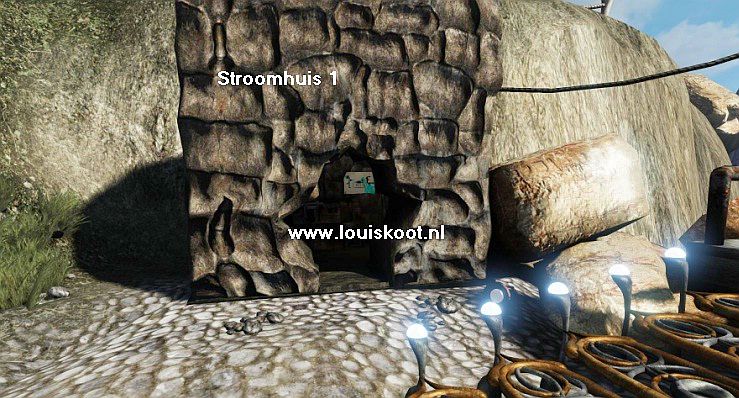
It is dark inside. On the wall is a diagram drawing of the power supply and underneath the drawing hangs the dynamo with a thick gray lever.
View the drawing. On the diagram you see a dynamo where the thick gray lever is on but also a smaller lever. That smaller lever is the dynamo in Power House 2.

Stand straight in front of the dynamo and then pull the gray Lever down ......
When have pulled down this gray lever not much happens yet. Leave this Power House and return to the rotunda.
Turn right and then follow the walkway back to Power House 2 en enter it now
Again, it is fairly dark inside Power House 2, but here too there is a Dynamo and this dynamo has the thick gray lever and the small lever.
Pull the thick gray Lever down and ...... you get a bit more light and you can now see the smaller Lever So also pull the Small Lever down and ..... you have turned on the power.
Ok .... leave Power House2 and now go all the way back to the Monorail Dive Bell. Back at the Dive Bell you go up again to see the flow meter and see ........
...... there are now 5 green lights and 2 red lights burning in the flow meter ....
Unfortunately you will still not be able to open up Monorail Dive Bell because there is still not enough power. Turn around.
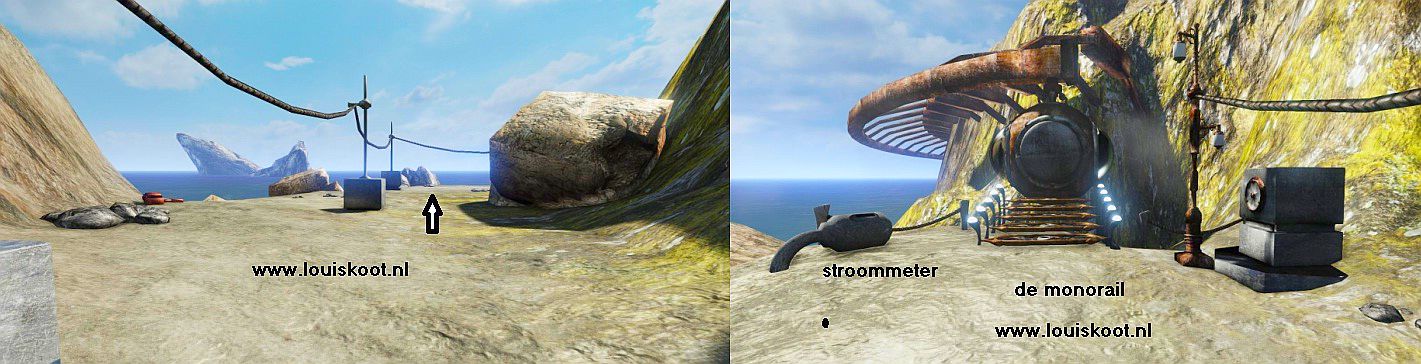
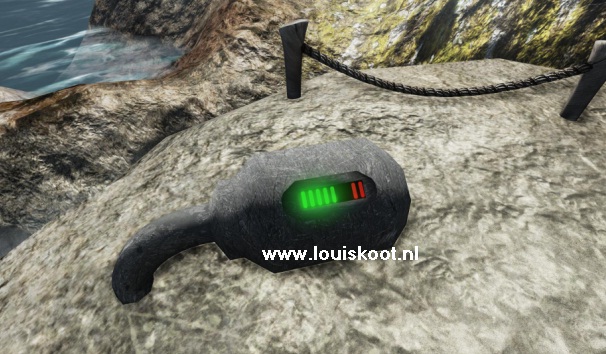
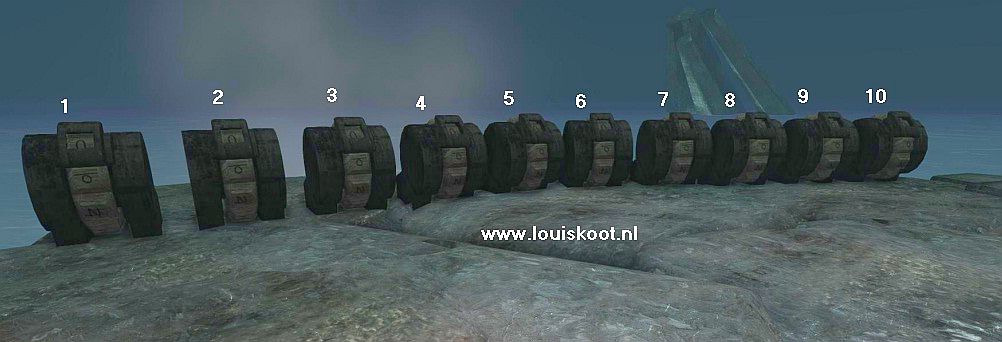
In the distance, near the rocks, you see a red copper plank. Walk to the red copper plank and look at it. On the copper plank are 6 whole cylinders.
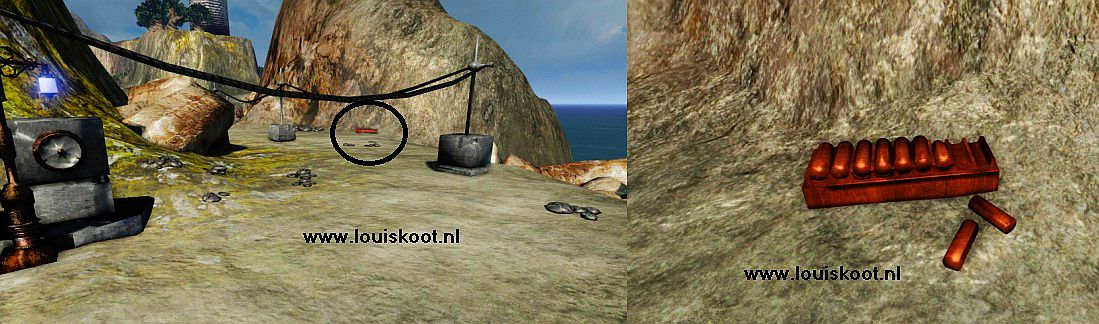
The 7th cylinder is broken but there are still 2 cylinders in the sand. This is the hint for the number of lights that should light up in the flow meter, to open the dive clock.
During your walk along the walkways you have found the 4 Gauges A, B, C, and D..... All 4 gauges have a pointer that you can click to the right or left. Now all those 4 pointers points to the right. In order to provide the Monorail Dive Bell with enough power , you must now move 3 of those 4 pointers on the gauges to the left.
Walk back to the beginning of the walkway, but do not go up the steps. To the right of the steps you'll see, in the concrete block, Gauge C ...
The pointer of Gauge C points to the right. Click on the Pointer to move it to the left.
Walk up the walkway and walk on and ... halfway on the walkway you will see Gauge B on the concrete block. Turn the pointer of Gauge B also to the left.
Walk to the rotunda and then go right, to the concrete block, at Power House 2 where Gauge D is on Click the pointer of Gauge D also to the left
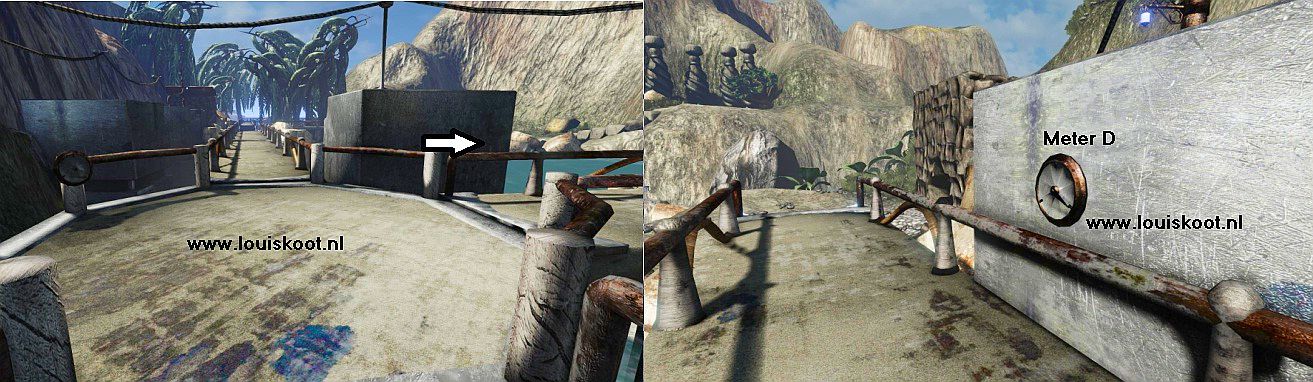
NB: Do not go to Gauge A, on Power House 2, because if you click the pointer of Gauge A also left then you'll cause a short circuit and you will have to start all over again. So you only move the pointers of the gauges B, C and D to the left. It does not matter in which order you do that.
If you have put the pointers on the gauges C, B and D to the left, you return to the Monorail Dive Bell to look at the Flow Meter again and see .....
.. there now 7 yellow lights and 2 red lights burning on in the flow meter. Click again on the round door of the Monorail Dive Bell and ...... the Dive Bell will now open up
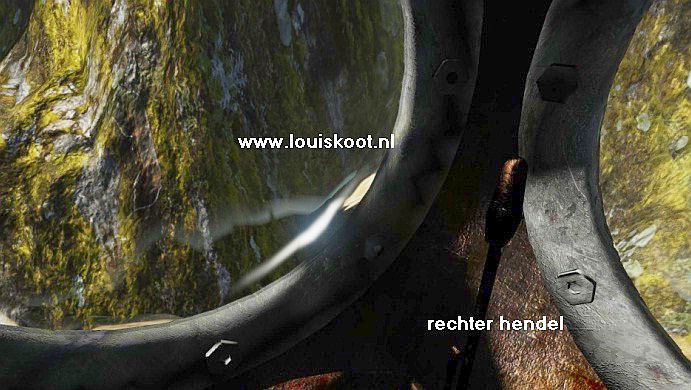
Well ... click on the Chair and ..... you step into the Dive Bell and take place on the chair. A lever is located on the left side and on the right side of the chair. Find the right side lever and pull it and .....
Enjoy the short ride along the Monorail and ..... the Bell will dive under water and then lie still at the bottom of the ocean. Through the round window you see a blue rock.
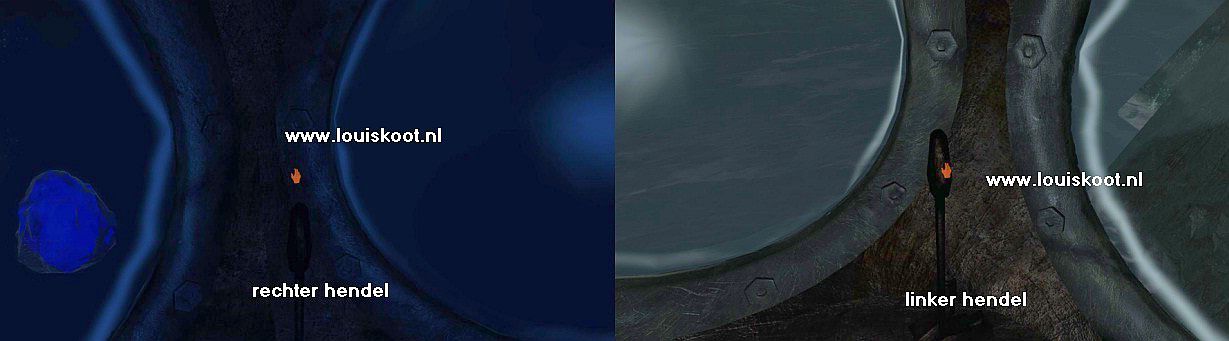
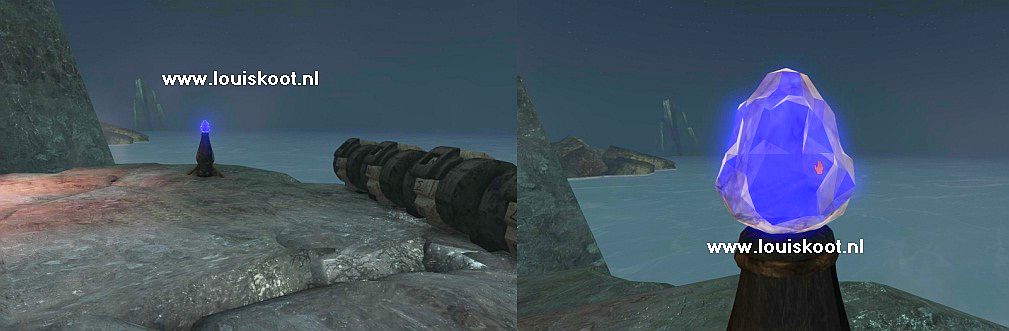
Turn right and find the right side Lever again and pull the thing towards you and ..... The Bell dives up and comes out of the water again. Now find the Left side Lever and pull it and .... you will automatically leave the Monorail Dive Bell....You have landed on one of the many small Basalt Stone islands, which lie around the main island in the ocean. Turn around and .... Hello .... a Teleporter.
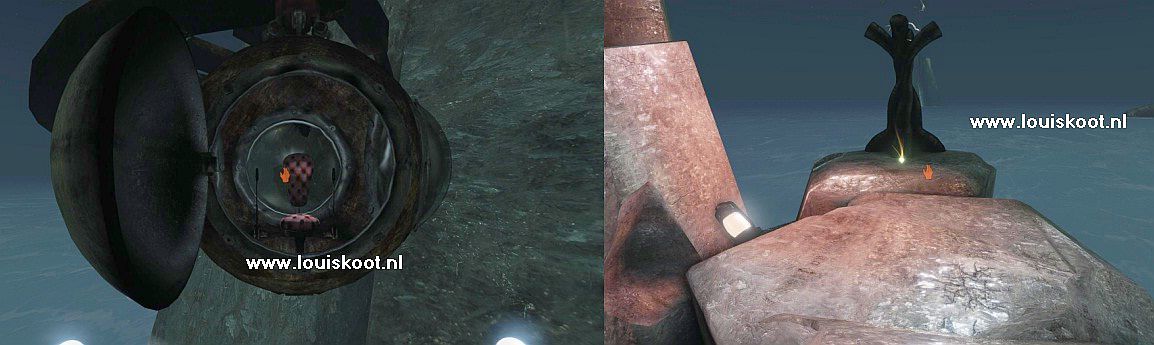
Well .... walk against the "Fire Globe" and ..... you will be teleported to the largest:
Basalt Stone Island:
Warning ..... You have to solve a Sound Puzzle here:
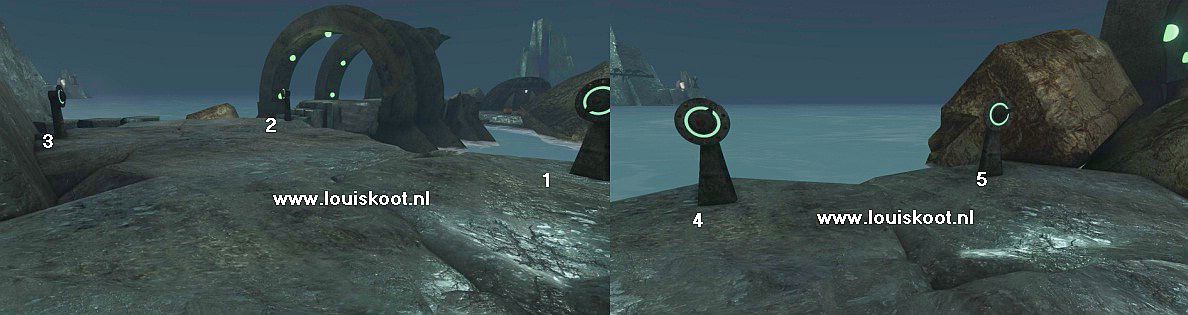
Turn around or slightly to the right, so that you have the Teleporter in your back and you look out over a basalt stone path.
Take a step or two ahead and ........ you will see a lamp on the path in the distance. Continue until just before that lamp.
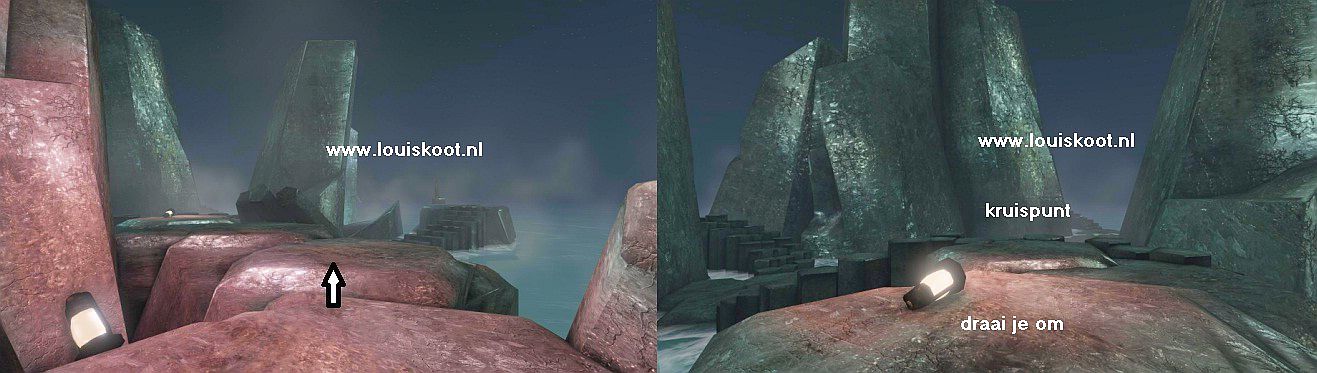
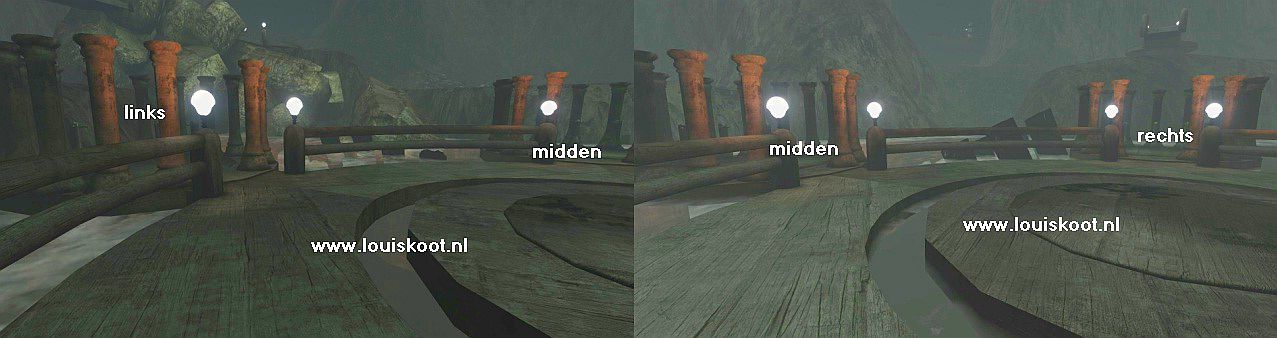
Beyond this burning lamp is the crossroad from where you can take 3 paths, right, middle and left. But don't go to the crossroad yet......instead turn around.
You then look back at the Teleporter but now you see also a strange device, between the two pointed shiny rocks
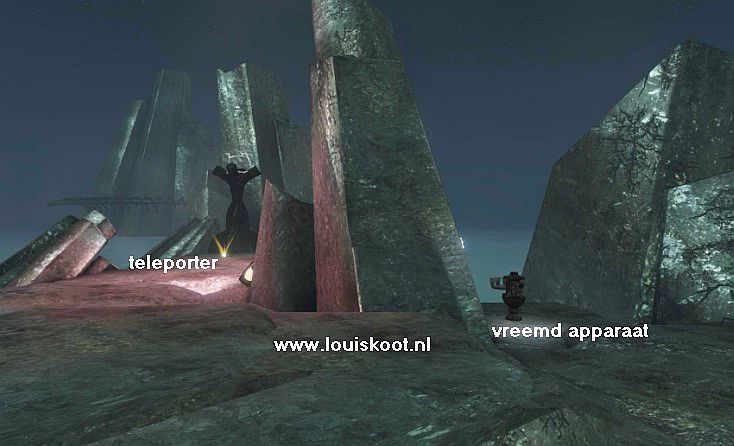
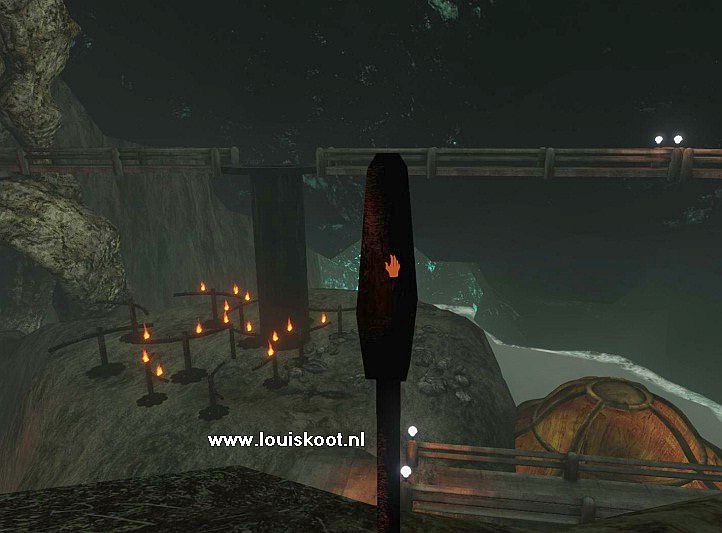
Walk to the Strange Device and take a good look at it. There are 3 pipes and a Crank on the device.
If you click on the Crank you will hear a melody that consists of 5 tones of different pitch. This device is a "Music Box".
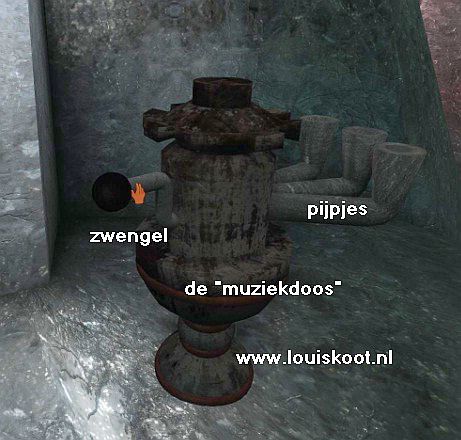
You have to remember the melody, the order of the 5 tones, you hear, because you will have to play these 5 tones later on the Organ.
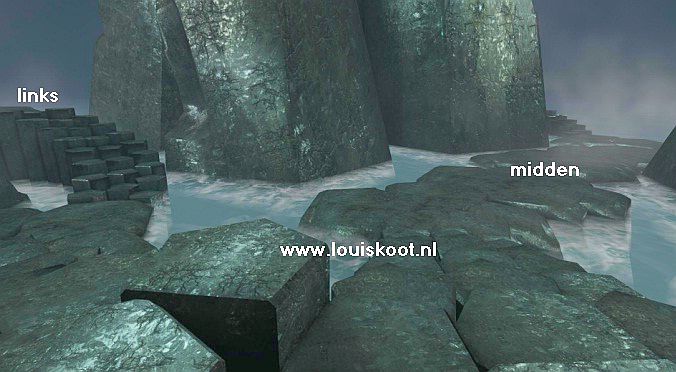
But don't try to remember it now, because we are going to explore this basalt world first. Walk back to the path and now walk to the crossroads, just past the lamp.
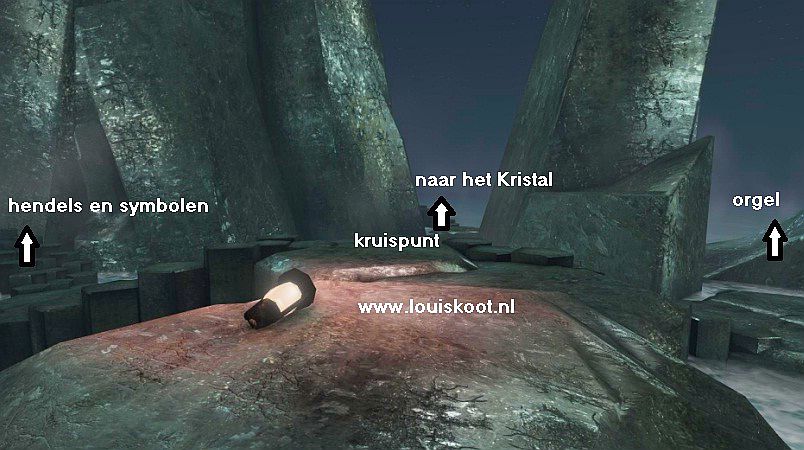
The middle path brings you to the Blue Crystal, the left path goes to Levers and Symbols and the right path goes to the Organ. First go , via the right path, to the Organ
Power up the Organ:
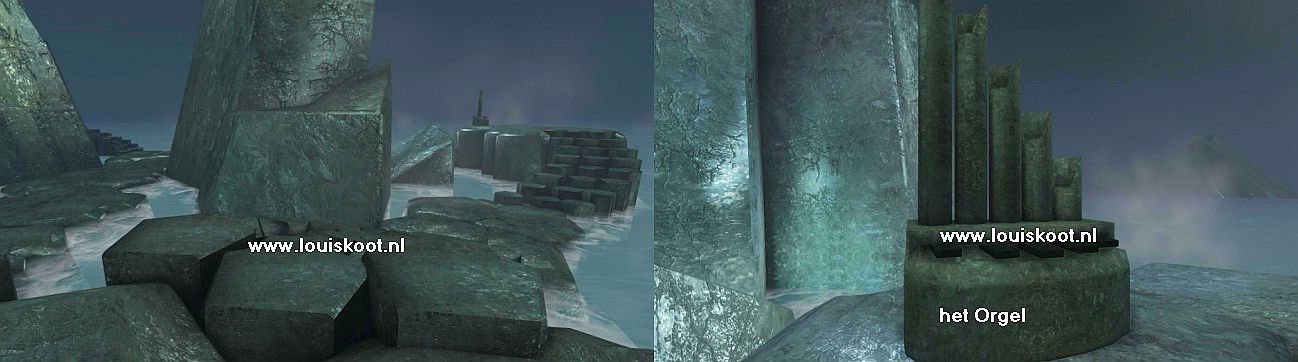
The organ has 5 keys, but the thing is dead. You must provide the organ with power before you can use the thing. Walk back to the crossroads and now take the middle path.
The middle path brings you, again via a basalt stone staircase, to the plateau where the extinct Blue Crystal is located. There are also 10, more or less, round blocks, standing here in a row.
Each block has a turning wheel with symbols on it. You must turn the right symbol in the" windows" of those 10 blocks.
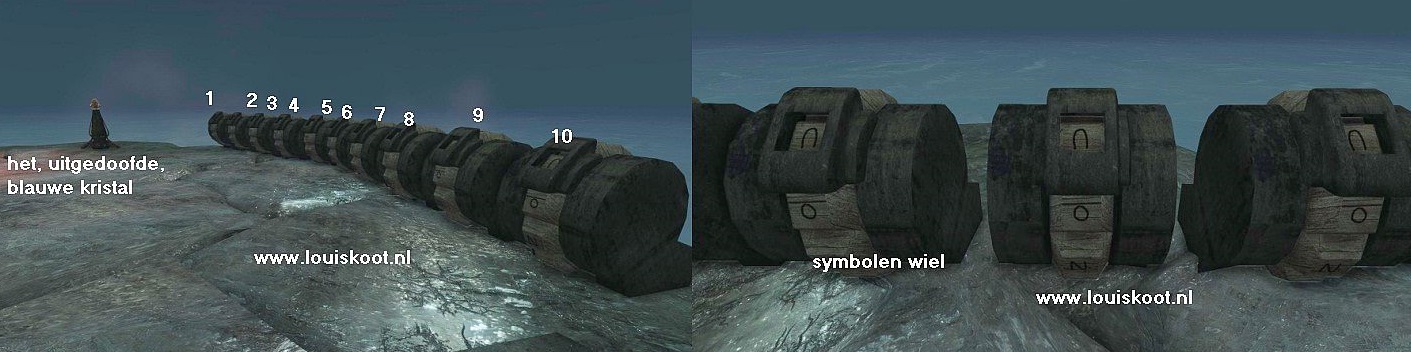
First we must find out witch symbol we have to set on each of these 10 blocks.
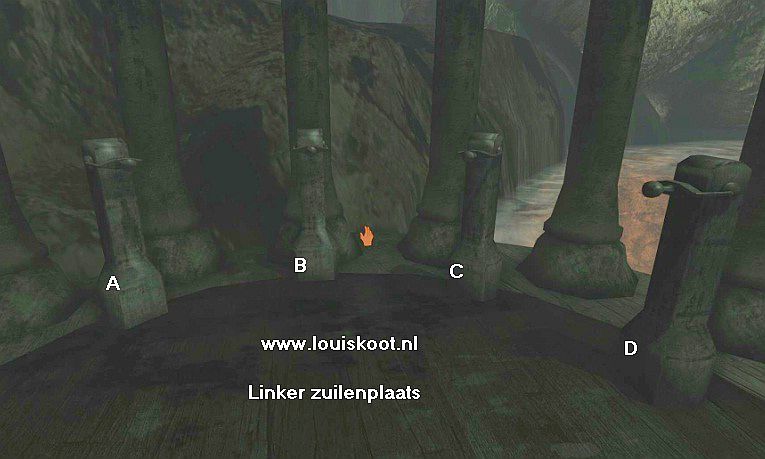
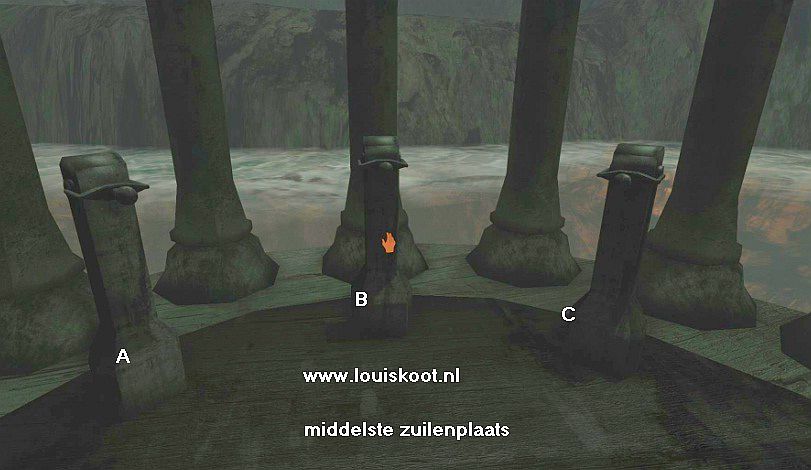
Return to the crossroads and then take the left path. The left path will take you to a plateau with 3 pillars on it. In the distance you see a bow path. If you continue to the end of this plateau you will notice that you can go down a flight of stairs and you will see two more of these pillars. The 5 pillars are the power distributors of this island and they are all out now. So you have to switch them on.
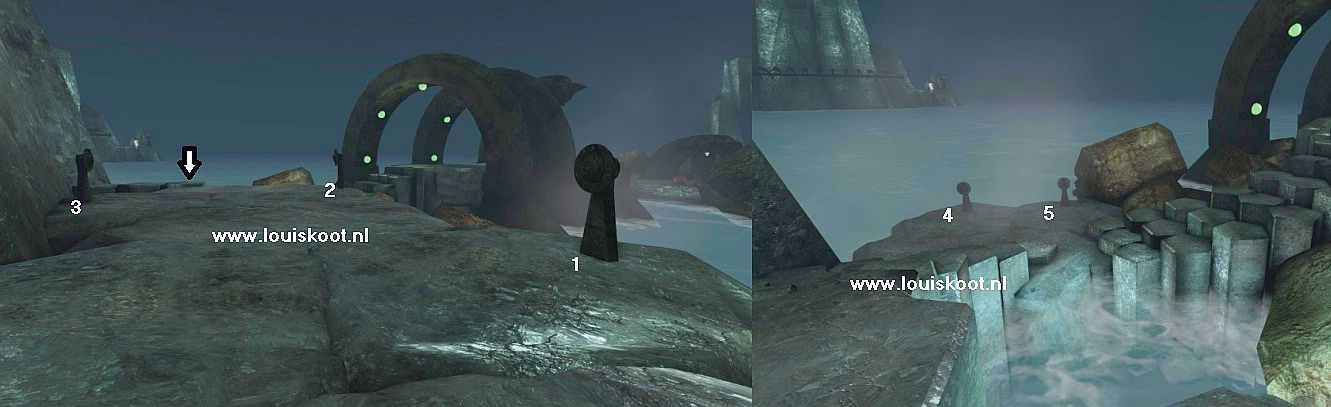
Okay ... stay on the plateau where the 3 pillars, 1, 2 and 3, are. In the round "heads" of the 5 pillars you can rotate a round pointer.
Go to the first pillar (1) and stand straight in front of it. Click on the round pointer until a illuminated circle appears around the pointer and then do not click on the pointer again. So click as often as is necessary on the pointer to make the illuminated circle appear around it
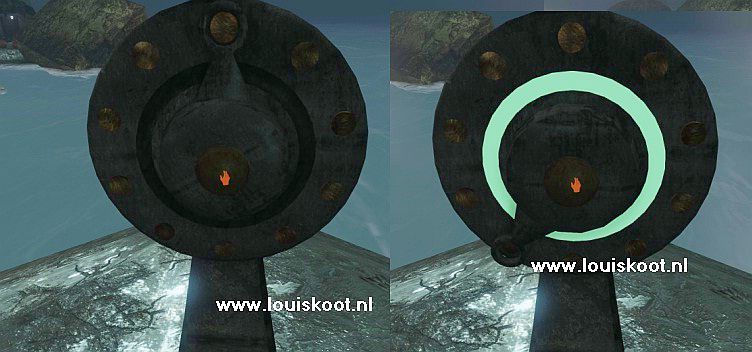
Go do this with all 5 power pillars. So when you have set Pillar 1 then go to Pillar 2, Pillar 3, Pillar 4 and Pillar 5.....Make sure that on all 5 pillars the illuminated circle appear around the pointer.
When you have done this you are below at the Pillars 4 and 5 and you have now activated the organ.
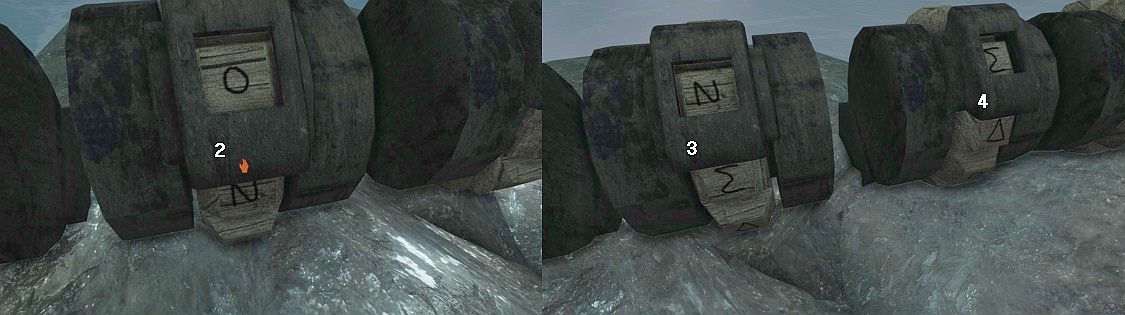
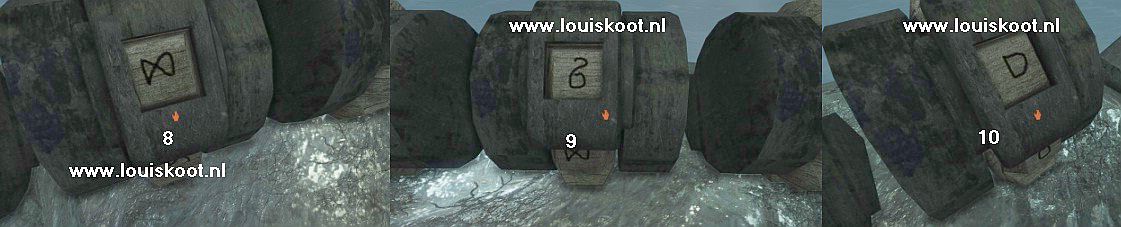
Walk up the stairs and then continue under the arches to the end. You end up on the end platform. An open book lies on a standard and ....... there are 10 wooden cubes, standing in a row.
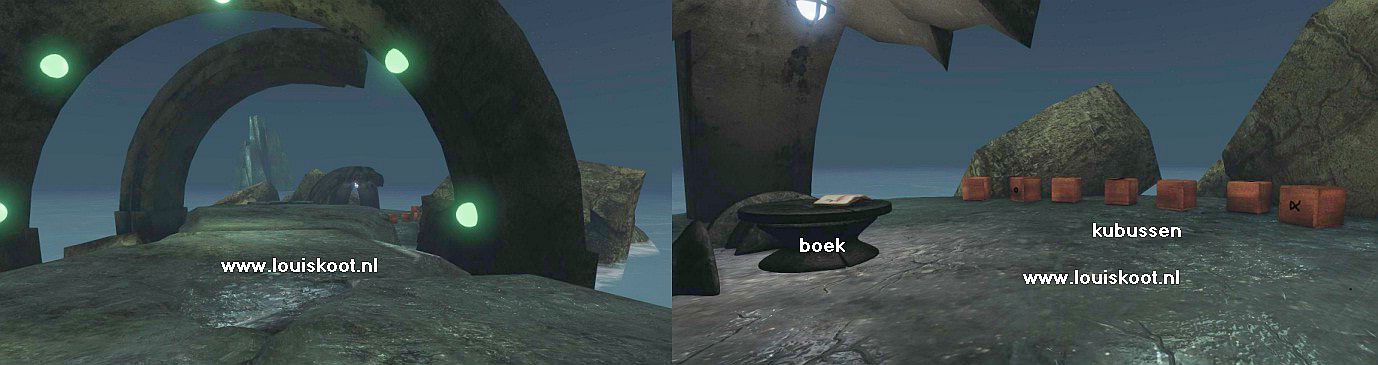
On each cube there is a Symbol and on 5 of the cubes the symbol turns white for a moment.
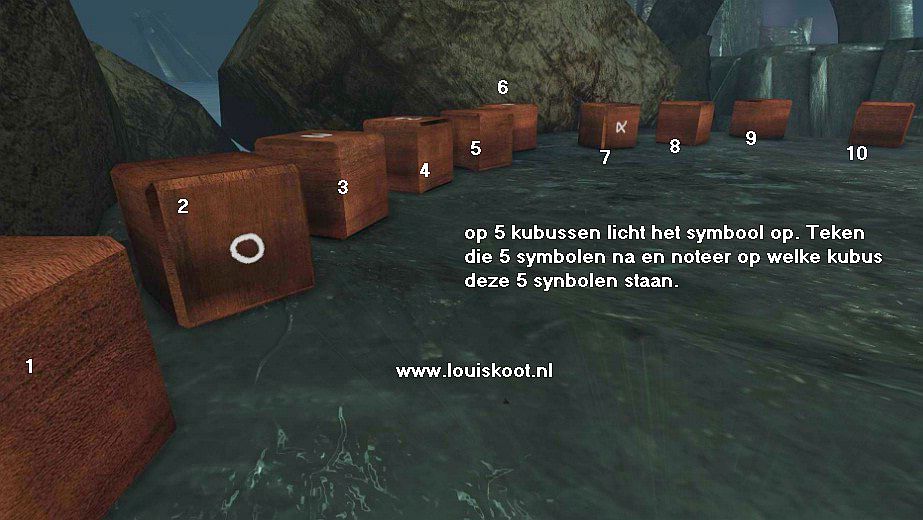
Number the cubes, from left to right, 1 to 10 and then go to the cubes of which the symbol now lights up white. Draw these 5 symbols over and also note which cube the symbol is on. When the 5 symbols go "out" then you just wait until they turn white again. The 5 white symbols can be seen on the cubes 2, 3, 4, 6 and 7:
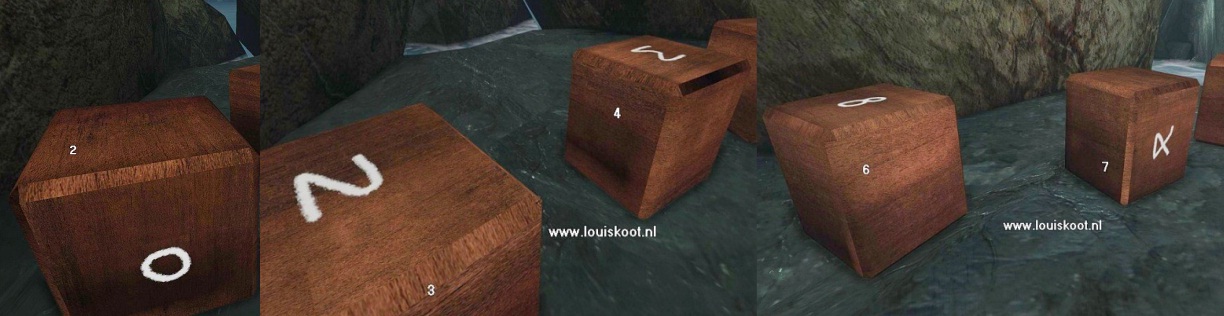
Again ..... draw the 5 white symbols and write down the number of the cube, in the numerical order. You now know the first 5 symbols for the "round" blocks 2, 3, 4, 6 and 7, at the Blue Crystal
The other 5 symbols we are going to find via re-playing the melody, from the "Music Box", on the organ. You can view the Book here, which is on the standard.
Organ:
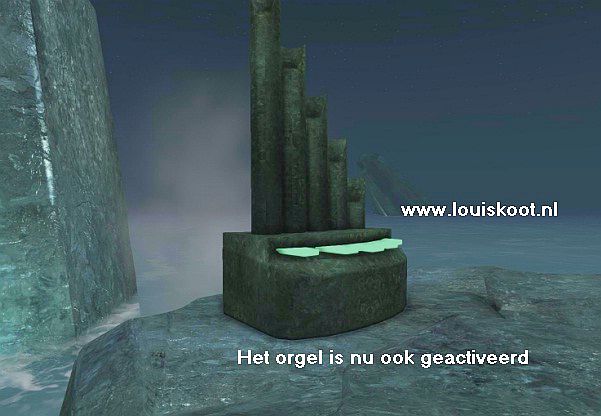
Go all the way back to the crossroads and then continue to the Organ. The organ has power now
If you no longer have the melodic notes in your head then you can always go back to the "Music Box" to listen to the melody as often as you want. But it is not necessary because I'm just going to tell you in which order you have to press the keys of the organ.
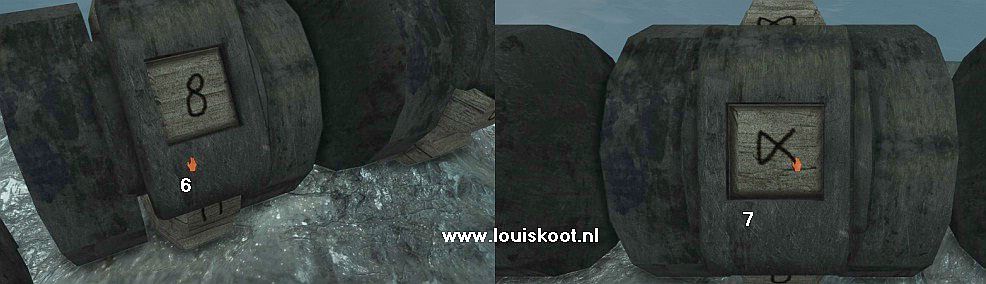
The 5 keys of the organ are now white, as a sign that the organ is now activated. If you click on a key of the organ you hear a tone and then a Symbol appears, on the rock behind the organ.
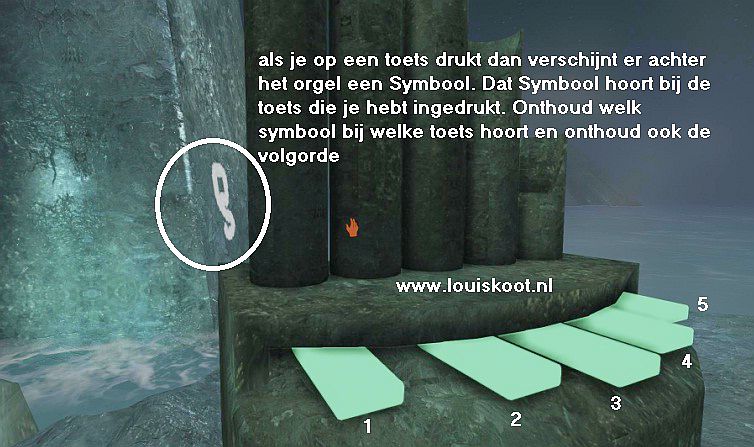
There are 5 keys and each key makes a different tone. The tones go from left to right, from very low to very high. Ok ..... number the 5 keys, from left to right, 1, 2, 3, 4, 5. You must click the 5 keys in the right order to replay the 5 tones of the melody of the "Music Box". When you click a key a Symbol appears on the rock behind the organ. Draw these symbols over and number them in the order you press the keys.

It is a bit difficult to click on the keys and then quickly look behind the organ to seethe symbol that appears, but you figure that out by trying this out yourself
The order in which you have to click on the keys is: 4, 5, 3, 1, 2, and you will see these symbols:
.... did you succeed? Then go back to the crossroads and then back via the middle path to the plateau where the extinct crystal is and the 10 wooden blocks.
Activate the blue Crystal:
Number the 10 blocks, from left to right, 1 to 10:
First you have to put the symbol in the windows on the blocks 2, 3, 4, 6 and 7, which you saw on the cubes 2, 3, 4, 6 and 7. So do this first.......
Go stand straight in front of a block and then click with your hand on the wheel or in the window, until you see the right symbol in the window...here they are
Have you done this? Then go set the symbols of the organ on the remaining blocks, in the order in which you clicked on the keys of the organ, so start with block 1......here they are
When you have put all the right symbol on all 10 blocks the..... the Blue Crystal will be activated. Go to the Blue Crystal and touch it and ........
...... you will return to the main island, at the Monorail Dive Bell.....
Follow the route, via the walkways, back to the beach, just in front of the Temple. Walk to the lonely tree and see ....... under the tree is now the 4th Hand stone.
Touch the Hand on the stone and ...... a drawing appears ...... Well what are they really ... ... sandbags or Indian Tipi tents or trees? .
At the top of the stone stairs lies a book on the standard. That book was blank so far, but now you see drawings in the book. View the drawings. Honestly ... I have no idea what they mean.
Oh well..., walk on to the Temple and see ..... the Blue Crystal is now also glowing
E: The Yellow Crystal:
The Lighthouse: The Yellow Crystal Gate
Leave the temple and return to the crossroads at Power House 2. Follow the straight ahead walkway to the rotunda and then go right to the beach where the Monorail Dive Bell is. Do not walk all the way to the Dive Bell but turn around when you're off the walkway. You then stand in front of the block of concrete on which Gauge C is located.
From this point you can climb up to the lighthouse, so go ahead to the right of the concrete block and then continue towards the Lighthouse rock.
Go up the stone stairs and at the top of the stairs you go left and further up around the rock and you end up at the base of the lighthouse.
Open the wooden door of the lighthouse and step inside.
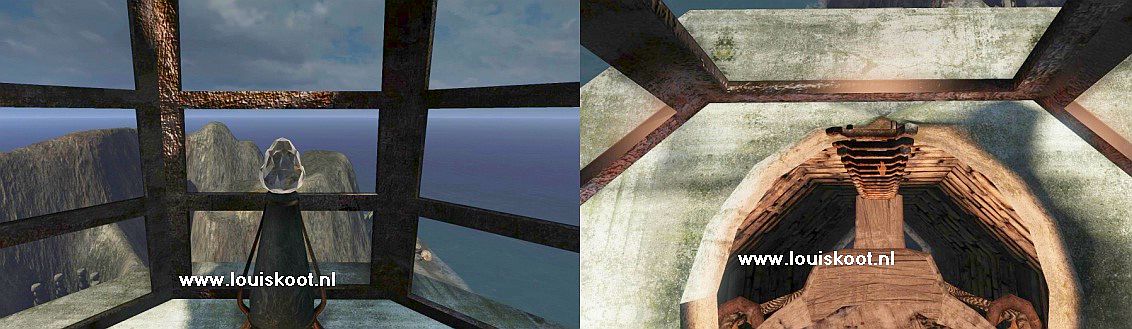
The wooden platform in the Lighthouse is a lift. You control the lift with the orange button lever, which dangles on the lift rope. Do not pull the orange button yet, but walkover the lift platform and get off at the other side. Then turn around and see ..... the wooden lift platform rests on the raised floor of the tower and you see that a drawing has been drawn on the floor.
You have to look at those drawings, but that is not possible now because of the lift platform that is in the way. You can not just walk up the wooden lift platform from this side, so you have to jump to get back on the lift platform. When you are back on the lift platform you turn to the orange pull Lever . Now pull the orange Lever and then immediately run off the lift platform ....... because the elevator will now go up and if you go up you can not go back down ....... So make sure you run off / jump off the platform when you have pulled the orange Lever
Then go and look at the drawing on the floor.
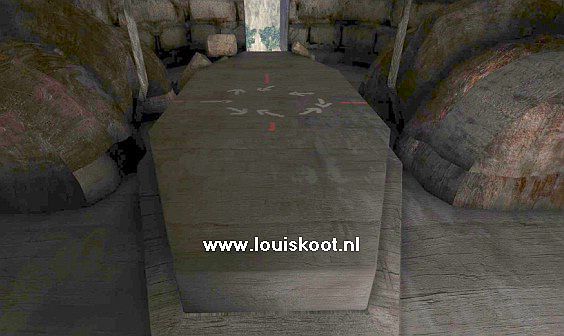
The drawing shows you a circle of 8 arrows, each pointing in a different direction. Mark the arrows 1 to 8 because you have to set those arrows on the outside balustrade of the Lighthouse. Some arrows point downwards and some point upwards. The start arrow is the arrow at the left orange bar and then it goes further clock wise
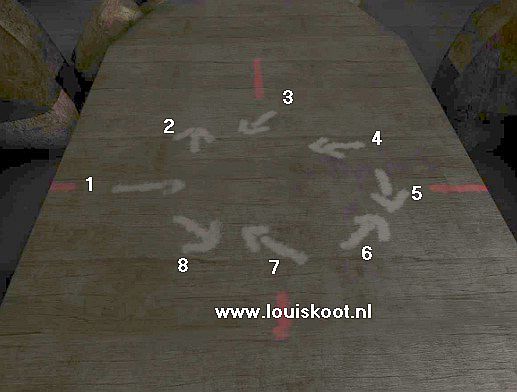
The lift is now up in the tower and has to come back down. ... When you made your own drawing of the arrows then just walk out the lighthouse and the lift platform will come back down of it's own. Go stand back on the lift platform and pull the orange lever again and now stay still and ..... lift platform will bring you go up now, but not all the way to the top. Turn around and find the iron ladder sports, which go up on one of the walls.

Then stand close to the ladder sports and then click with your hand on a ladder sport and ..... you climb further up and you end up in the Lamp House of the lighthouse. Here stand the Yellow Crystal which is the Teleporter that will teleport you to the "other world". But the Crystal isn't active.....so you have to activate this crystal first. Turn around, look down at the round ladder hole and make sure you can click on the ladder sports again and ..............
You automatically climb back down and get back on the lift platform. Turn around until you see the exit and then step outside.
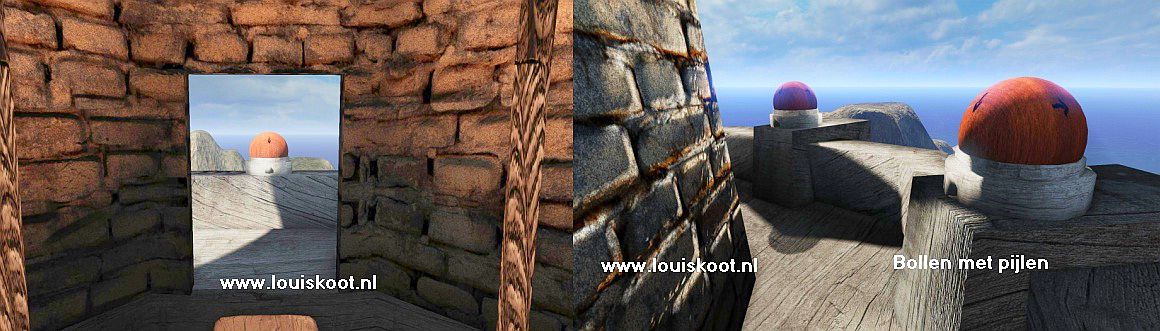
You are now on the outside "balcony" of the Lighthouse, high above the ground. You can walk around. On the balustrade are 8 large wooden balls with arrows on them. You can turn 7 of the 8 Balls to turn another arrow at the front side on the balls There is, however, one ball that you can not turn and that is the ball where you see the right-pointed arrow. First look for that Ball with the Right-pointed arrow, because that is the Start ball and you can not turn it
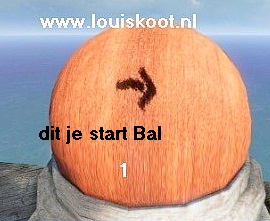
The arrow drawing shows you 8 arrows, all pointing in a different direction. Well .... you have to turn the other 7 balls so that the arrows on the front side of the balls point in the same direction as on the arrow drawing. The starting ball is already done and from the starting ball you go over the balcony to the right, to the next ball and the next ball..... and so on........ Click on a ball o turn the ball until you have the right arrow on the front side of the ball.
On the drawing you saw that some arrows are at an angle. On the balls, however, there are no angled arrows, so on the balls that must have a angled arrow you have to make sure that you see 2 arrows. Here you see how on each ball the arrows should stand. Again .... you start with the Start ball and then you follow the balcony to the right to the next ball.
If you have done all 8 balls correctly then you go back in the tower and look for the ladder sports again and then you climb back up to the Crystal and see .....
the Crystal is now glowing yellow and thus activated .........
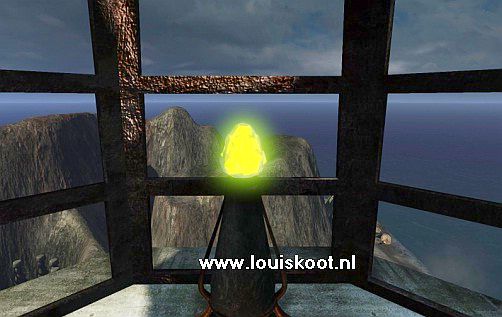
....... So this is the Yellow Crystal Teleporter , and not yet the Yellow Crystal for the Temple. Touch the Crystal now and ..... you will be teleported to the:
Floating Islands in the Air:
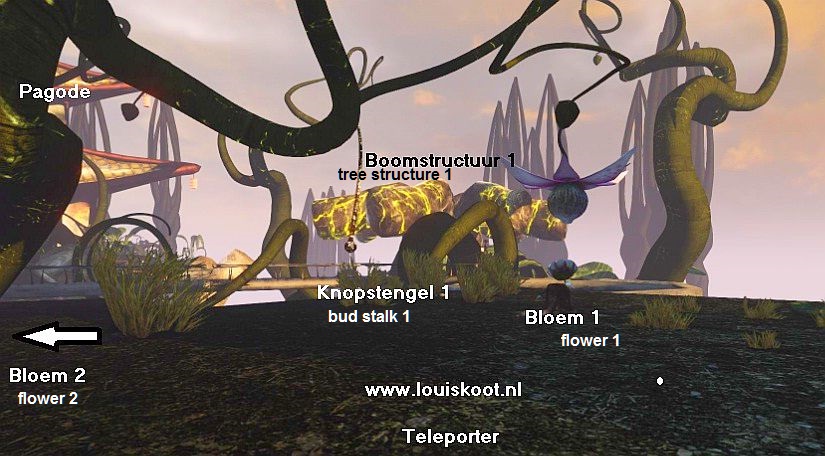
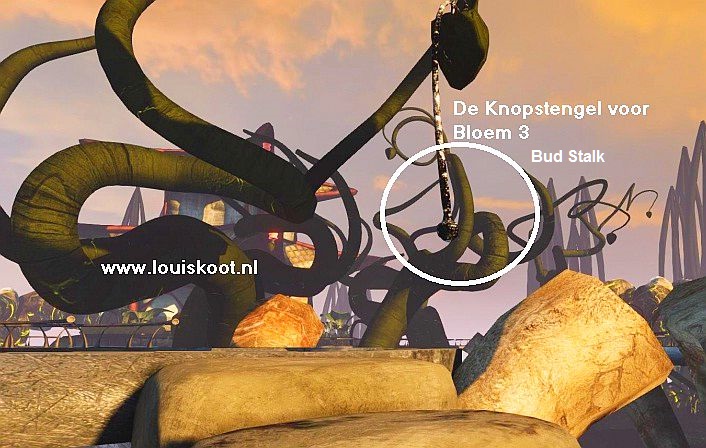
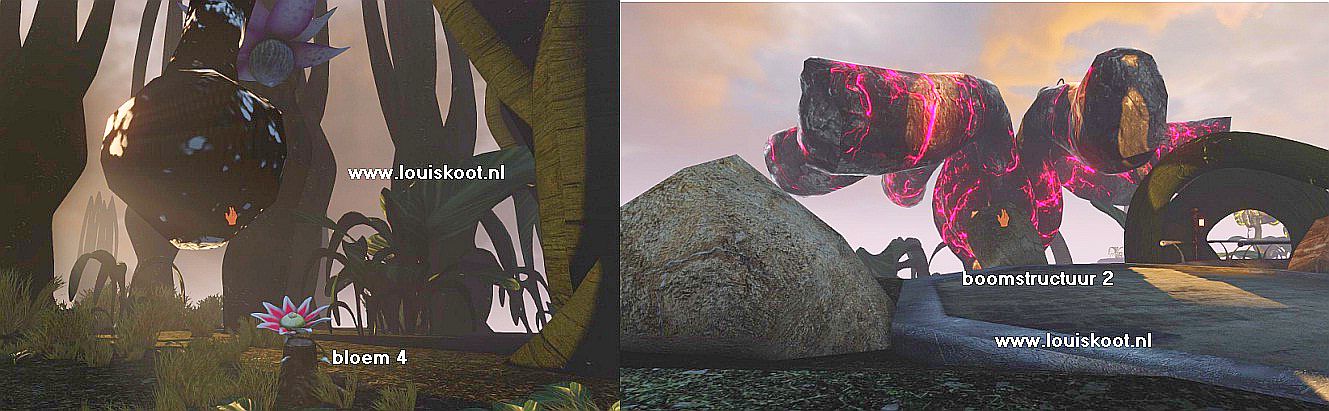
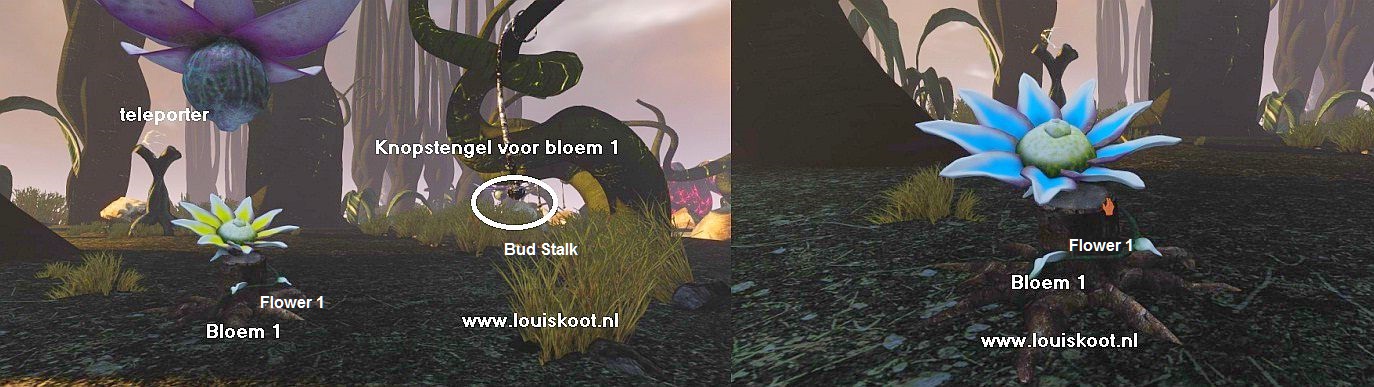
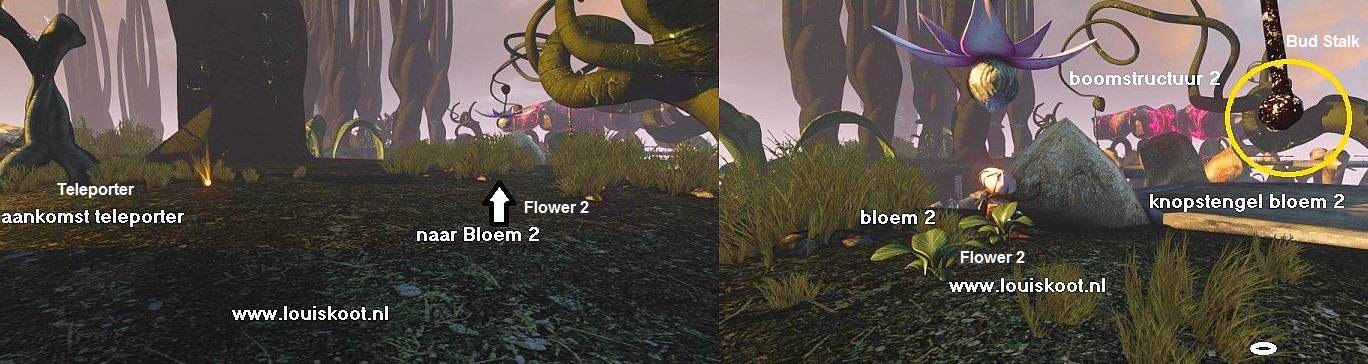
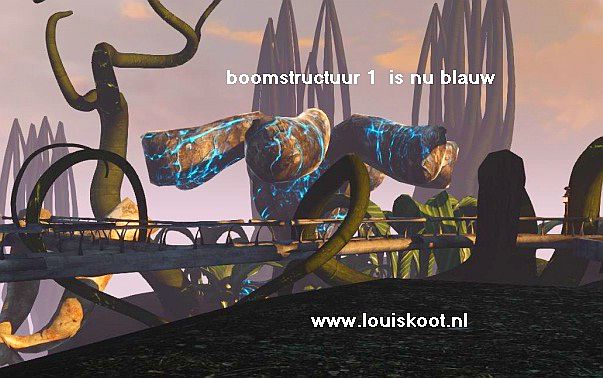
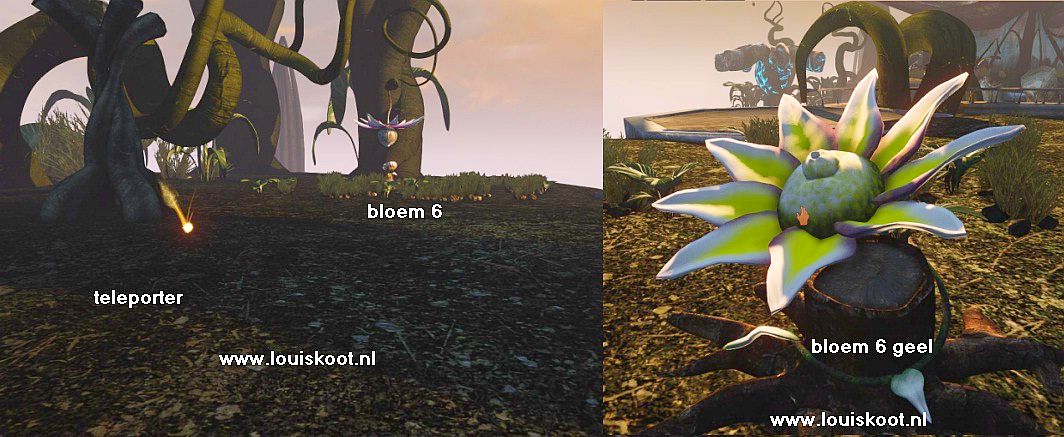
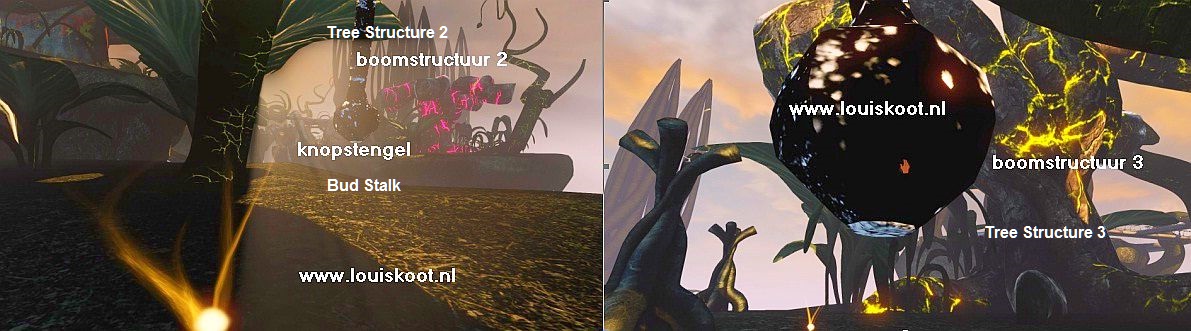
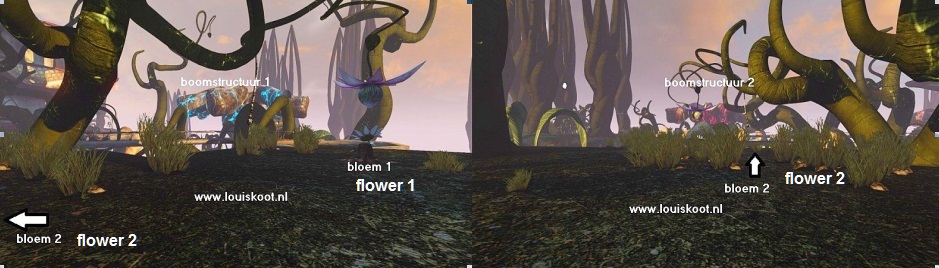
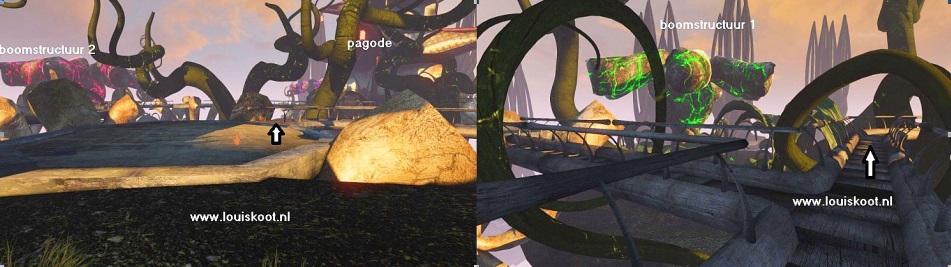
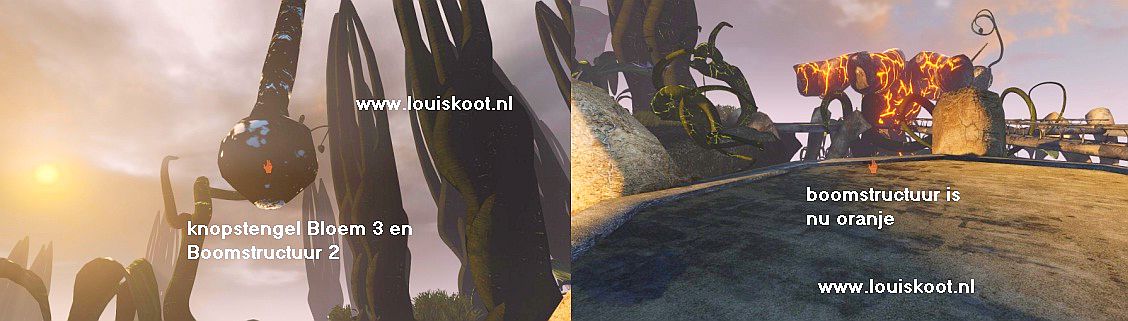
You have landed on Island 1. Remember that this is Island 1 because you shall go back and forth over the islands and will come back here a few times. These floating islands are world with all kinds of strange plants. You stand in front of the Teleporter and look straight ahead. Right in front of you see a "veined tree structure" whose "veins" now radiate a yellow glow. There are 3 of those "Veined Tree Structures" in this world and the intention is that you get all 3 glowing in the right color. The "yellow" tree structure you are looking at now is Tree Structure 1.
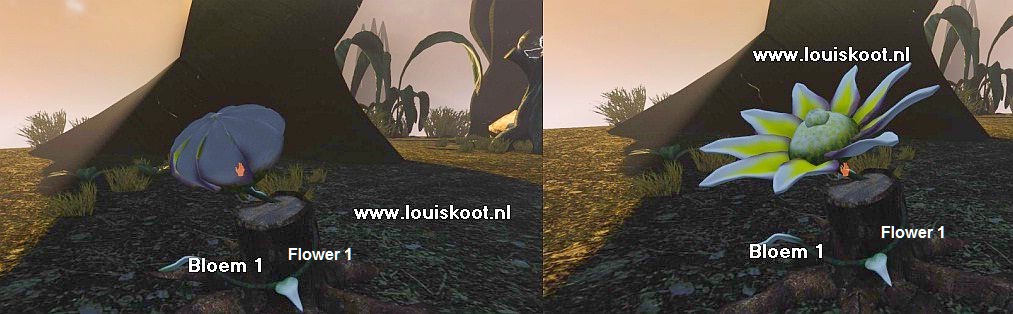
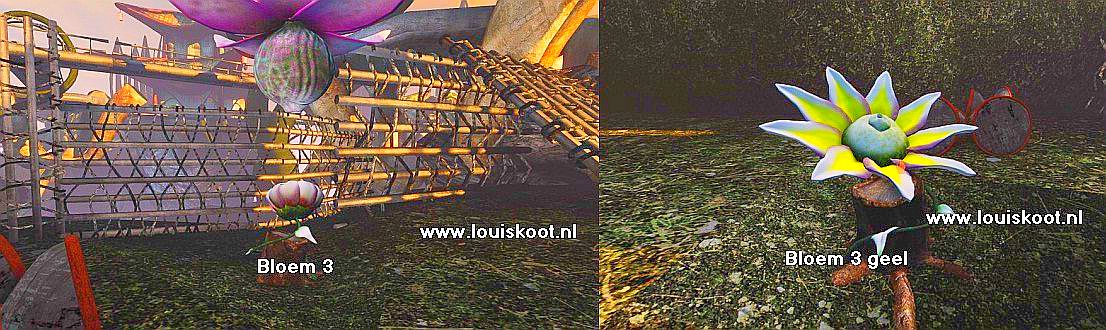
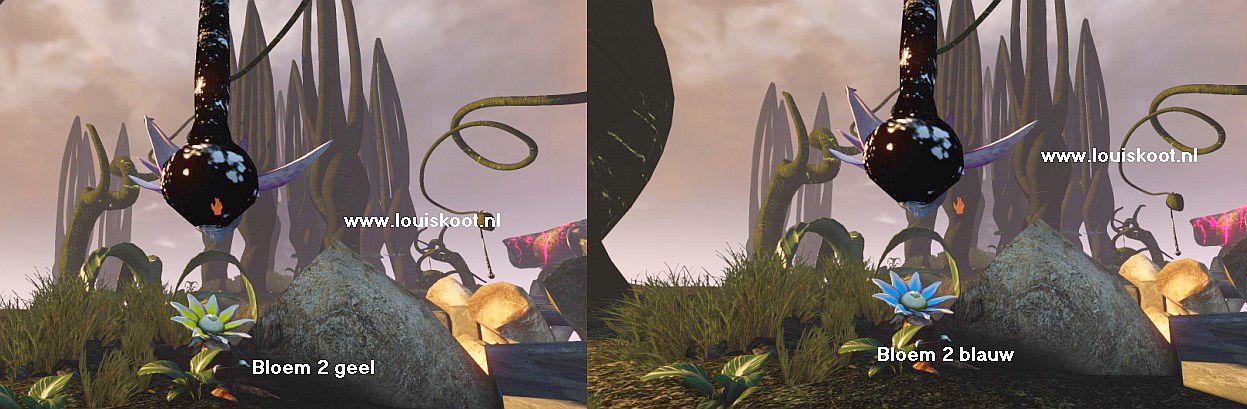
Somewhat to the right you see a folded Flower. Above the Flower hangs an unfolded Flower. The folded Flower is Flower 1. You have to find 6 of those folded flowers. If you are looking straight ahead at Tree Structure 1, you will also see a Bud Stalk dangling.......it is Bud Stalk 1. If you click Flower 1 you unfold Flower 1 and then click the Bud of Bud Stalk 1, Flower 1 will change color and when Flower 1 changes color then Tree structure 1 will also change color.
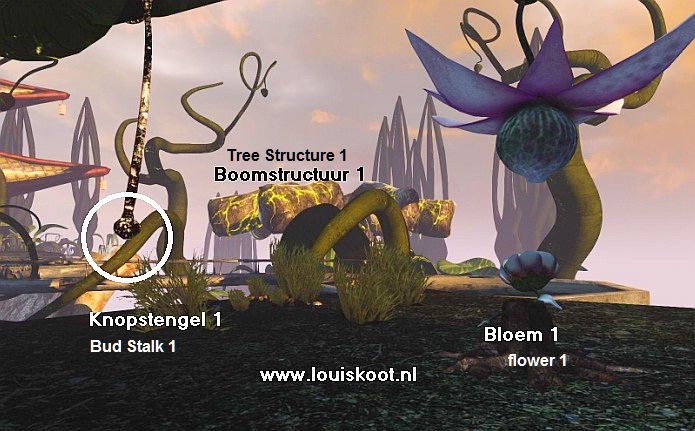
To the left of Tree Structure 1 you can just see aside of the Central Pagoda where the extinct Yellow Crystal is in. To activate the Yellow Crystal you have to alter the 3 Tree Structures in the correct color. And that is going to take you a whole lot of work. No first go to Flower 1. Make sure you are standing on the other side of Flower 1 and then click with your hand on the Flower and see ...... Flower 1 opens up and the flower has the Yellow color. Yellow is always the first color of the flowers.
Go to the right and make sure you stand behind Bud Stalk 1,with view on Flower 1. Click on the bud of the stalk and see ....
the flower that hangs above flower 1 "spits out "pollen on Flower 1 and thus Flower 1 changes color. Flower 1 is now red.

Click again on the bud and ...... Flower 1 will turn blue.
Ok ..... you know that now ..... By clicking the Buds of the Bud Stalks you can change color of the flowers and the colors goes from yellow to red and then blue. And when the flower change color then the Tree structure, which belongs to the flower, also changes color.

If Flower 1 is blue now, click the Bud again to make Flower 1 yellow again.
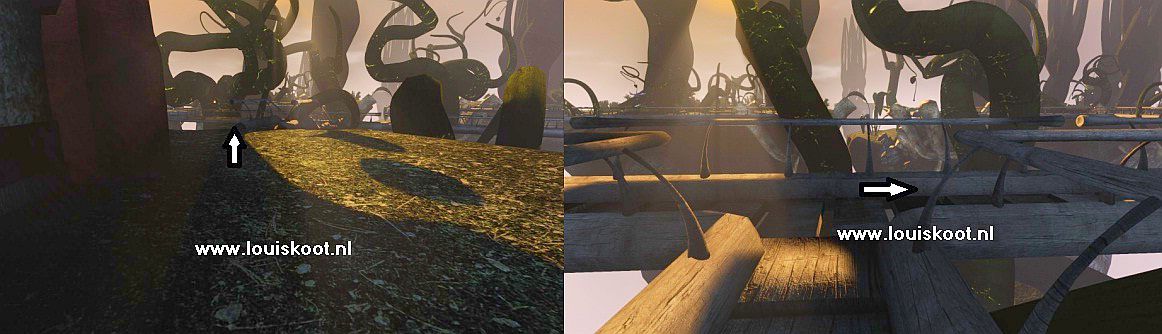
Go back to Flower 1, which is now yellow. Make sure that you have flower 1 in your back. You then look again at Tree Structure 1, which is now yellow again. Walk straight ahead, onto the platform.
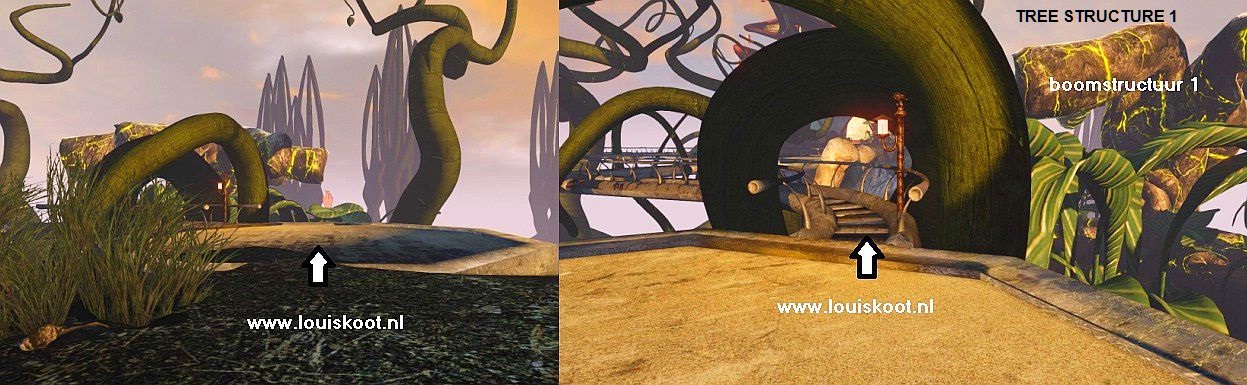
You are on platform 1 and here the walkways start, over which you can go to the various islands and the Pagoda.
The Pagoda
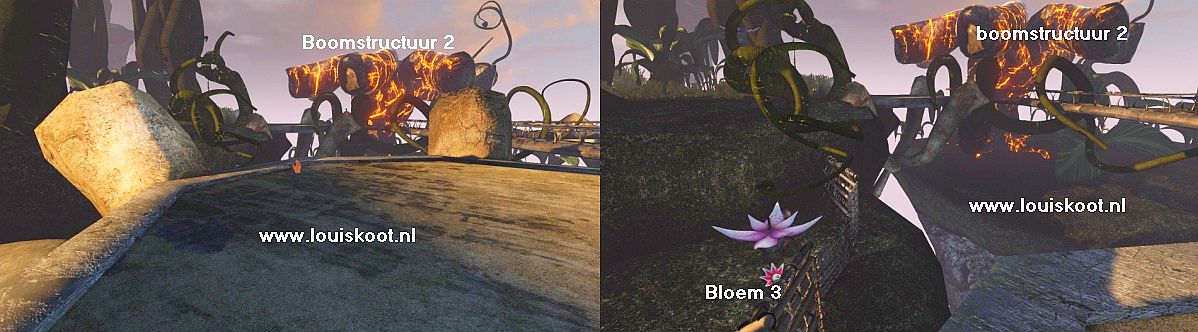
Follow the walkway to the 1st turn to the right. You can also go straight ahead and in the distance you can see Tree Structure 2, which is now colored yellow.

Take the right path now and then over the next platform and follow the walkway to the next crossroad.......You see the Tree Structure 2 now clearer but first go right and to the Pagoda.
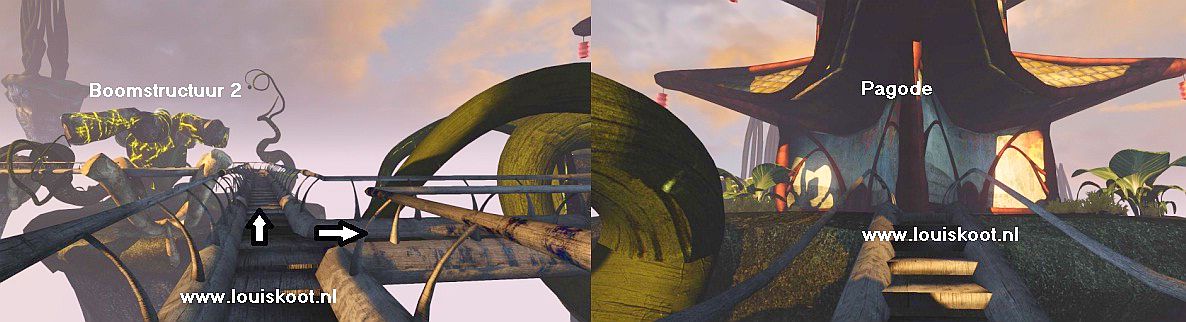
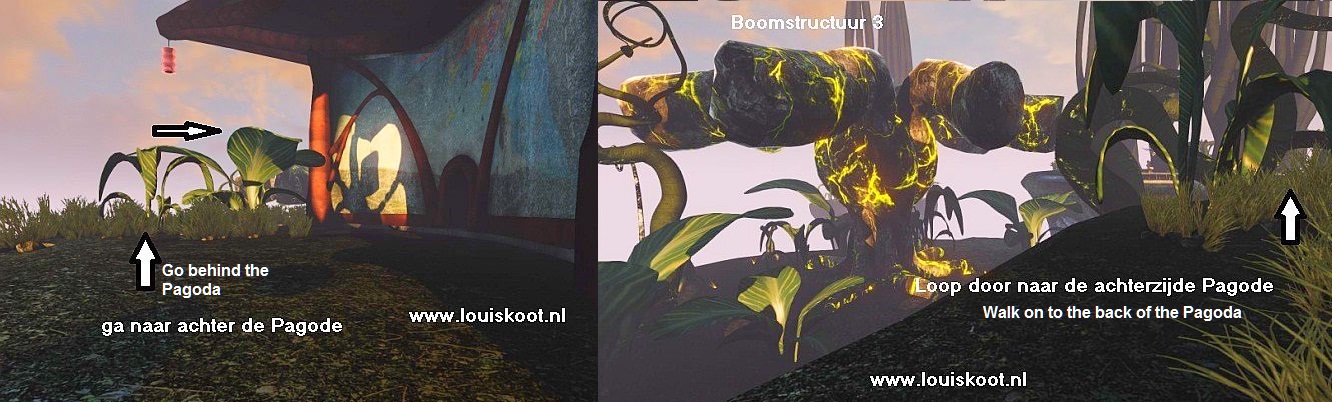
You can walk all around the Pagoda and on 4 sides there is an entrance. Go to the left and then go inside the Pagoda via the entrance that you see
In the middle of the Pagoda stand the, not activated, Yellow Crystal. The intention is that you succeed in activating the crystal, so that the crystal glows yellow. You can exit / enter the Pagoda via 4 exits / entrances, but it is better that you leave the Pagoda via the entrance / exit that you entered just now. So turn around and then go outside again through the same entrance / exit. Then walk to the left and back up the walkway.
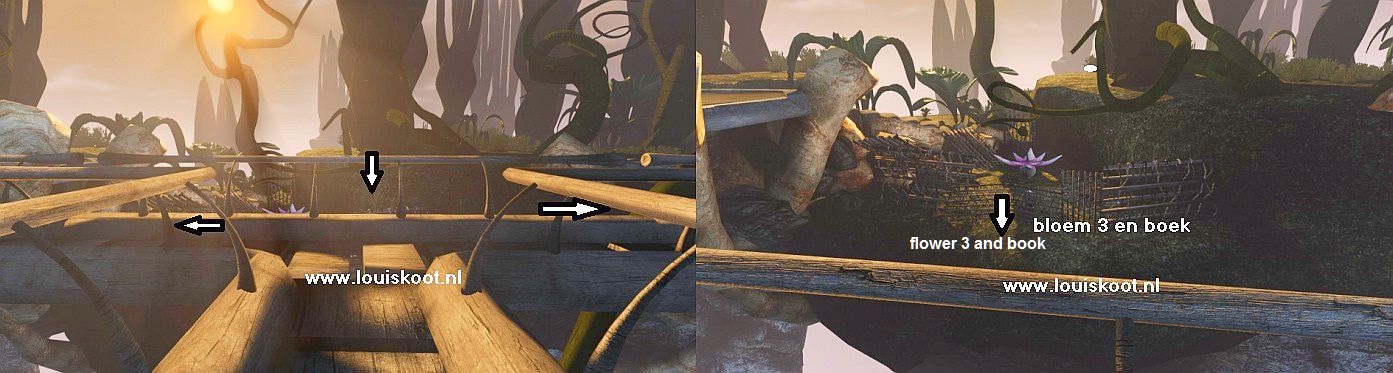
At the intersection, turn right and follow the walkway, which then takes a left turn, and then continue over the next platform to the next junction. Walk straight on, so that you stand against the balustrade of the walkway. Look down and.....You'll see a hanging flower and some wooden fences. That hanging flower hangs above Flower 3.
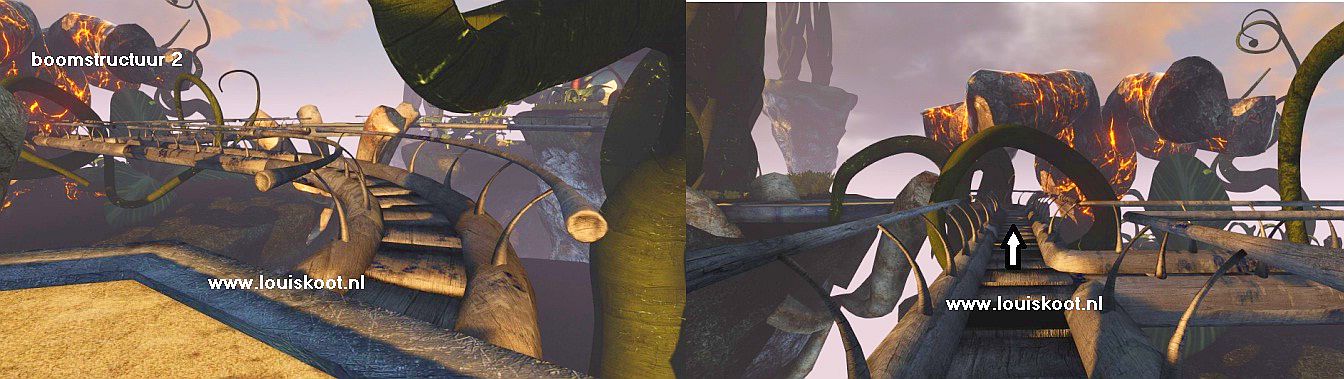
Turn left and follow the walkway to the next round platform.
Between the two boulders a stone staircase goes down to the downstairs area that you just saw, where flower 3 stand.
Just above the stairs hangs Bud Stalk 3, but you can not see it properly yet. Walk through and then descend the stone stairs
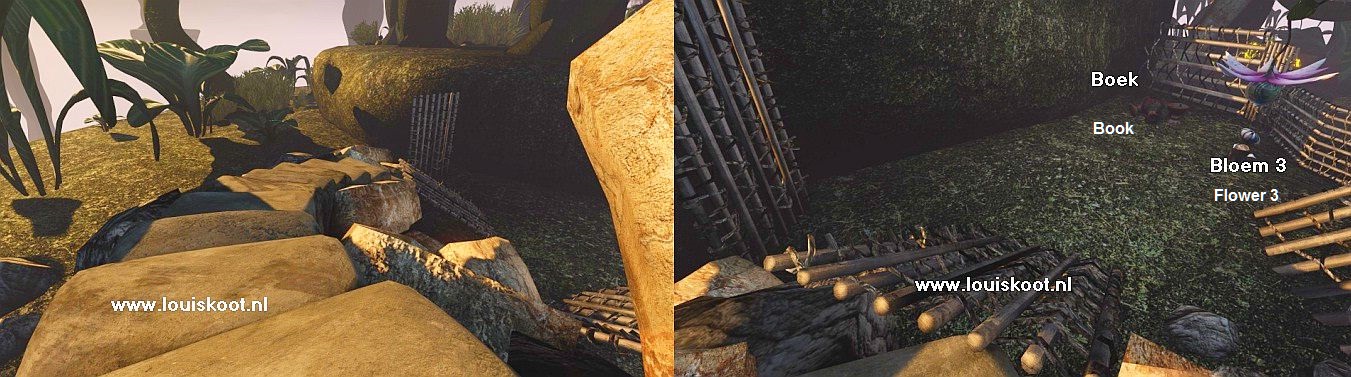
The bottom part of the staircase is gone but you can continue to walk down over the wooden gate that leans against the stone stairs at the bottom.
You might have to jump to get onto the fence. Further on stand Flower 3 and in the corner are a few stools on the floor. Walk on to those stools.
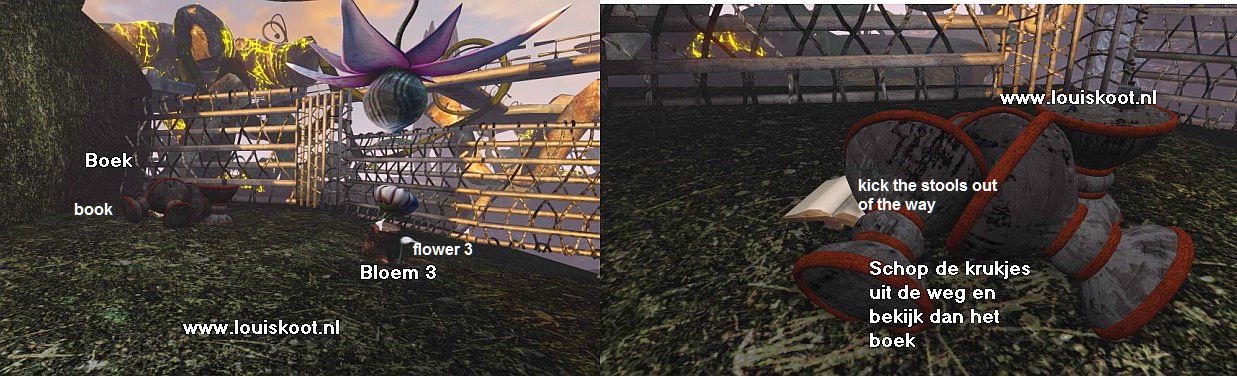
The stools cover a book, so walk against the stools to kick them out of the way and then look at the book.
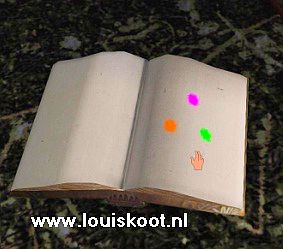
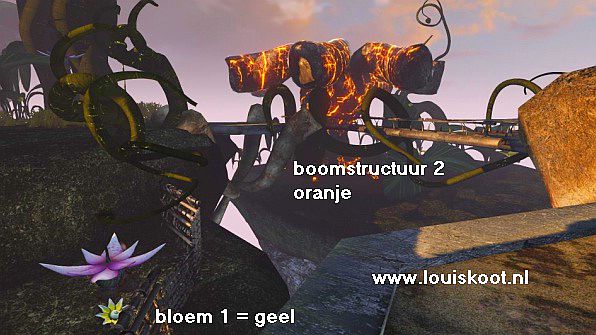
The book shows you 3 colored dots, Lilac, Green and Orange. These are the colors in which you have to change the 3 Tree Structures.
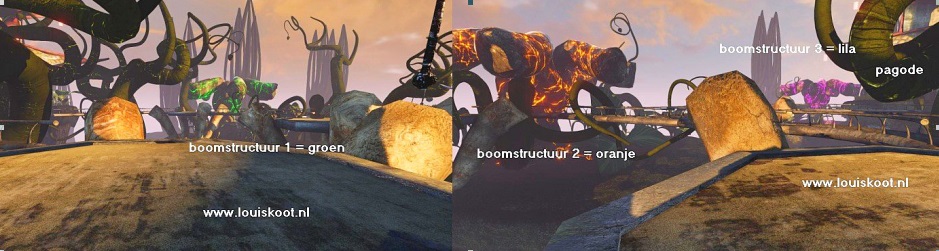
Tree structure 1 has to be Green, Tree structure 2 must be Orange and Tree structure 3 must be Lilac.
Now go to Flower 3 and stand right in front of it. Click on Flower 3 to open up the flower. Flower 3 also starts in the yellow color.
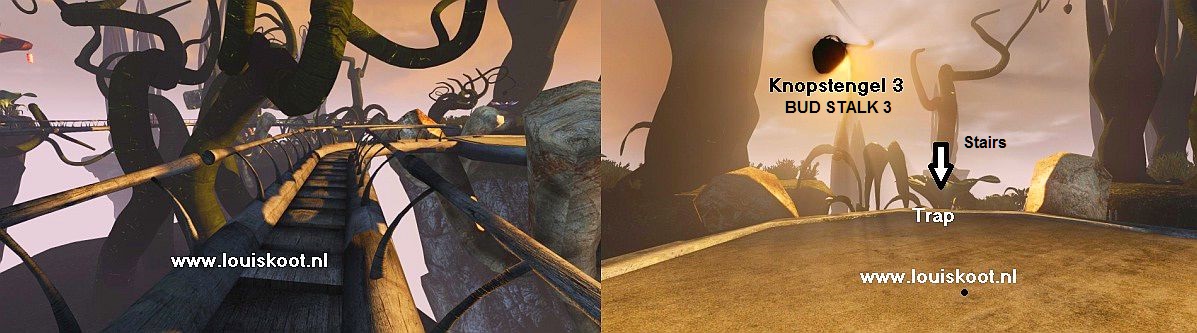
Bud Stalk 3, with witch you can change the color of Flower 3 and Tree Structure 2 hangs above the stone staircase.
So go back to the stairs and climb up the stairs via the wooden fence and then further up.
When you are almost up, you will see Bud Stalk 3 hanging above the stairs
so move further up and make sure you stand straight behind the Bud Stalk ......you also see Tree Structure 2.
Click once on the Bud of the Stalk to make Flower 3 red. This makes Tree Structure 2 Orange. Take a look whether this is indeed the case for you.
Orange is the correct color for Tree structure 2 but still it will have to take another color for a while, because otherwise you can not get change the Tree Structures 1 and 3 in the correct color.
Leave this platform via the walkway and at the exit to the right you go straight ahead.
The walkway then goes through a left bend along Tree Structure 2 and delivers you on another island, where two boulders are on the edge.
Between the two boulders you see some bushes and behind them you see Flower 4 and Bud Stalk 4

Walk on to Flower 4 and open it up by clicking on it...... Flower 4 also starts yellow.
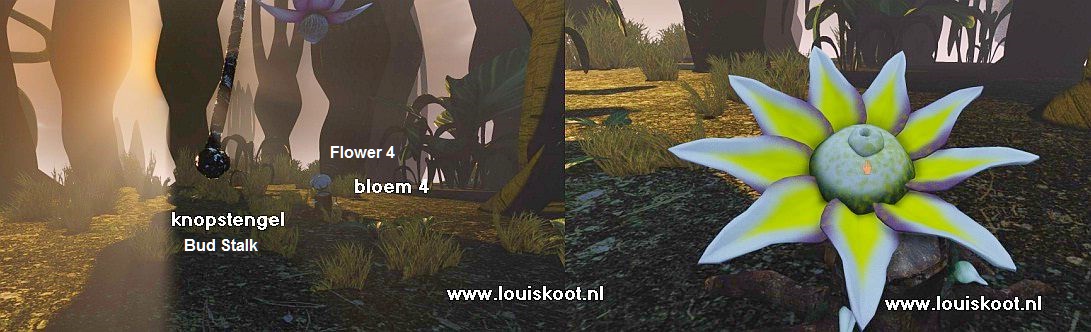
Go to the Bud Stalk and click on the Bud to make Flower 4 Red and ...... Tree Structure 2 will now also turn red and you must keep it this way for now
You now must return to Flower 1 and Flower 2 on island 1. It is not that complicated. Follow the walkways back to the exit to the Pagoda and then continue to Tree Structure 1 and island 1, where you started. Then walk on to Bud Stalk 1 of Flower 1. Flower 1 is still yellow but now has to turn blue. Go stand at Stalk 1 in such a way that you also see Flower 1, and then click the Bud 2 times to make Flower 1 turn from yellow to red and then to blue.
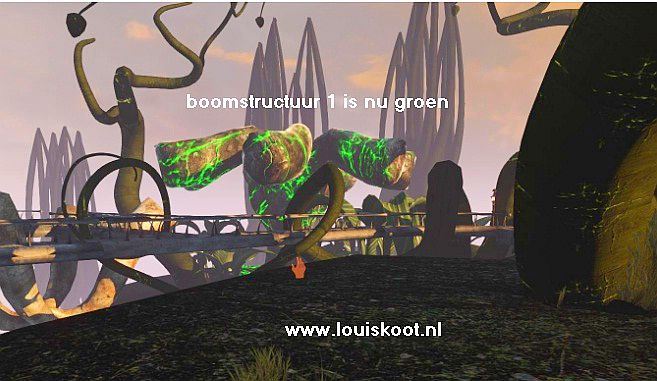
If you now look at Tree Structure 1 you see that it is now green.

Now Flower 2 must also turn blue. Look at the Teleporter and then walk to the bushes to the right of the Teleporter. Behind the bushes you will find Flower 2 and the Bud Stalk for it.
First open up Flower 2............Flower 2 starts on yellow. Go to the Bud Stalk and make sure that you can also see Flower 2.
Click the Bud of the Stalk twice to make Flower 2 Blue now.
Look at Tree Structure 1 and see ...... Tree Structure 1 is Blue now, as it should be
Ok .... You now have Tree Structure 1 blue, Tree Structure 2 red and Tree Structure 3 yellow .
Tree structure 3 is located behind the Pagoda, on an island that floats lower than the islands where you are on right now. You must now return to the Pagoda. From Flower 2 you can enter the round platform and then return to the Pagoda via the walkways. Back at the front of the Pagoda you walk left and then you see Tree structure 3, which is now yellow.
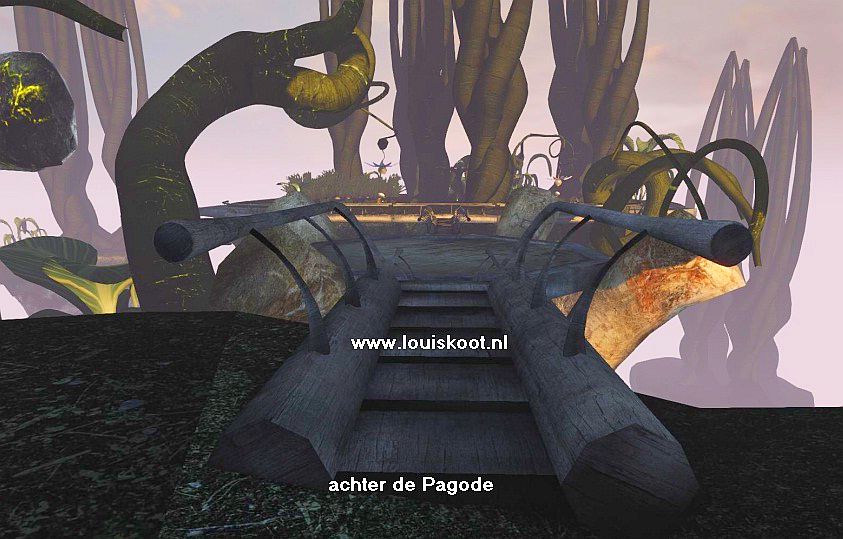
Walk through the high grass to the back of the Pagoda and you will see the walkway to the lower islands.
The island with Tree structure 3 is on the left. Walk to the island in front of you and ...... you will see the Flowers 5 and 6, left and right
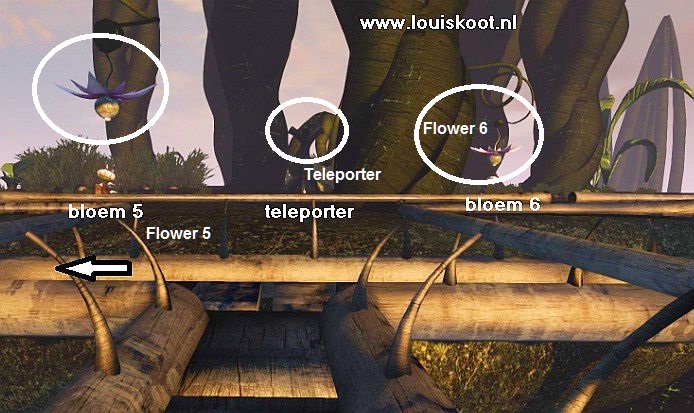
It doesn't matter which flower you open up first...... I first went to Flower 5. Follow the walkway to the left and you will board the island.
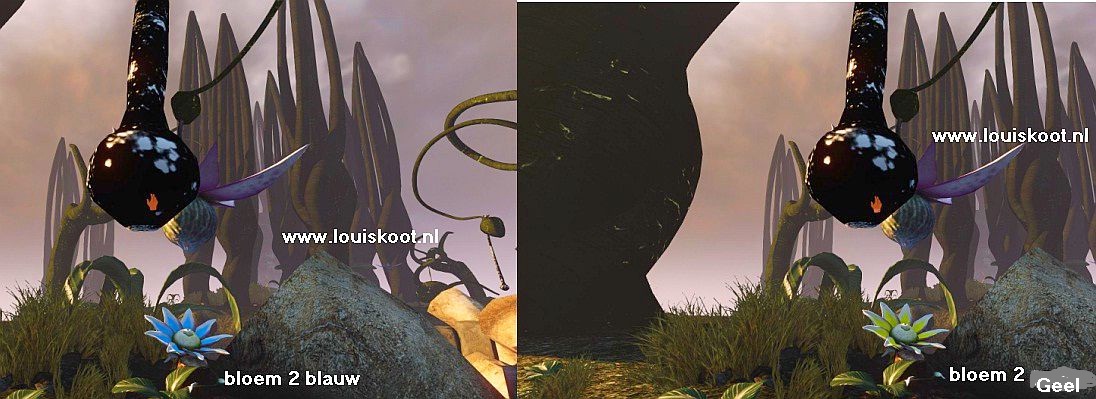
You will see Flower 5, then a Teleporter and then Flower 6. Go to Flower 5 and open up the Flower. Flower 5 thus starts on yellow.
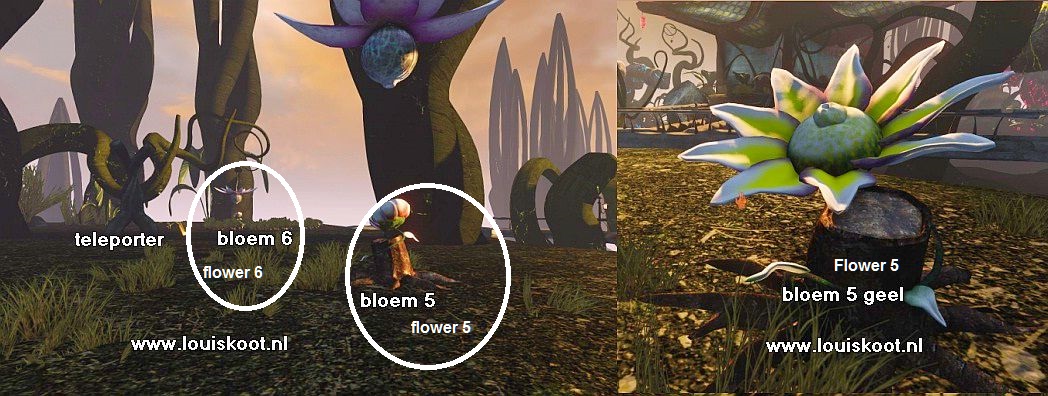
Walk to Flower 6, but be careful not to step into the Teleporter yet. Open up Flower 6 ...,Flower 6 is also yellow ....
The Bud Stalk for the Flowers 5 and 6 does not hang here. Walk to the Teleporter and walk over the "Fire Globe Stone" and ......
...... you end up on the island of Tree Structure 3 and right in front of you stand another Teleporter.
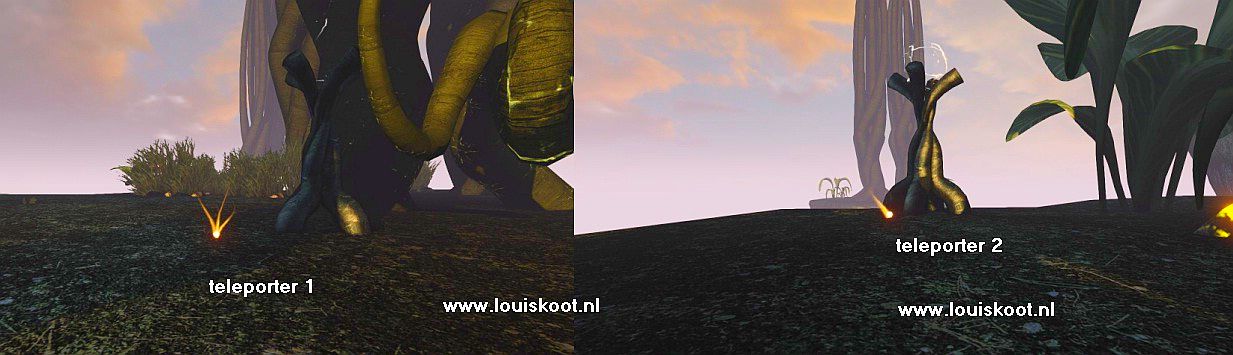
Turn left, but be careful not to touch the Teleporter Stone again. To the right of your Teleporter hangs the Bud Stalk for the flowers 5 and 6 and Tree Structure 3 .......
Go stand straight behind the Bud Stalk, so you see the Bud and also Tree Structure 3. ....You stand here at the roots of Tree Structure 3. Tree structure 3 is now yellow and the flowers 5 and 6 are now also yellow. Tree structure 3, however, must be changes to Lilac, so click the Bud of the Bud Stalk as many times is needed until you see that Tree Structure 3 is LILAC.

NB: Unfortunately, the LILAC color looks very much like the RED color of Tree Structure 2, but if you look closely then you can see the difference. When you turn around, you can also see the red Tree Structure 2 , so you can compare the Lilac and the Red colors. Convince yourself that Tree Structure 3 is now LILAC
There are 2 Teleporters here. The Teleporter through which you ended up here and the Teleporter who is right in front of it.
You now have to go back to island 1 to give Tree Structure 1 the correct color via Flower 2. Use the furthest Teleporter because it teleports you directly back to Island 1
If you use the other Teleporter you will have to walk back through the walkways. Anyway...when you're back on island 1 then leave Flower 1 alone.......go straight to Flower 2.
Stand again behind the Bud Stalk, so that you also see Flower 2. Flower 2 is blue. Click once on the Button to make Flower 2 Yellow again.
Look at Tree Structure 1 and see ....... Tree Structure 1 is now Green and that is the right color.
The Tree Structures 1 and 3 are now in their colors. All that you have to do now is to change Tree Structure 2 to Orange.
Go, via the walkways, back to the platform where the Bud Stalk for Flower 3 hangs above the Stone Stairs that goes down to the Book and Flower 3.
Click on the Bud of the Stalk until you sees that the Tree Structure has become Orange again.
Flower 3 is yellow again.
You are done here....... Tree structure 1 is green, Tree structure 2 is Orange and Tree structure 3 is Lilac.
The Crystal in the Pagoda should now be activated, so run over the walkways back to the Pagoda and go back inside and see ......
The Crystal smiles you kindly, but especially it is glowing Yellow.
NB: If the Crystal isn't yellow now then you have made a mistake somewhere down the line .... the most likely is it then is that you haven't made Tree structure 3 is not made Lilac but Red . Then go and change that.
Click on the now Yellow Crystal and .... you will return to the lamp house of the Lighthouse on the Temple Island
Turn around and climb down the iron ladder sports to the wooden lift platform and then pull the orange lever down. The lift brings you back down, so turn around to find the exit and then leave the lighthouse.
Walk back down the mountain and then back up the steps to the beginning of the walkways.
Follow the walkways back to the crossroads at Power House 2 and ..........
.... the game takes over for a while because it gets cloudy and dark and you turn around to the Lighthouse and back again ..
The power is now also off because all the lights go out because the 4 crystals in the Temple need all the power.
When you can move again you follow the Walkway to the beach and Hand Stone 1 and then continue to the Temple.
Go into the Temple and to the Child and ..... The 4 Crystals are glowing and you float up to the face of the Child....
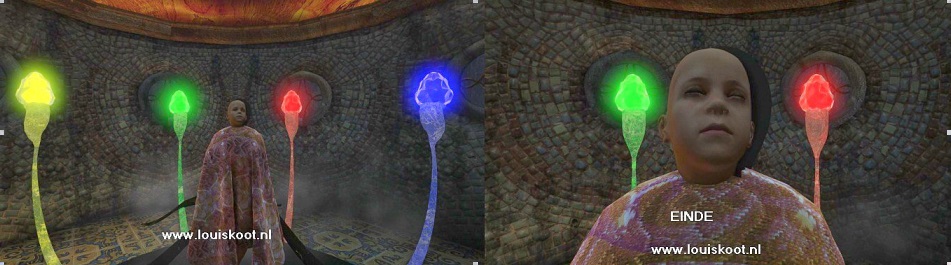
The Child wakes up and opens his eyes and ........ well ...... nothing because ......... this is the
END:
2018: Walkthrough by: Louis Koot