
2019 Walkthrough by: Louis Koot
If you have found this walkthrough via google search or via another site then you have probably not visited my site.
A lot more very detailed game walkthroughs can be found on my site at: www.pcgameswalkthroughs.nl
Chapter 2: Egypt:
A: Water well and Sailboat
The Journal now contains your friend's notes about Egypt.
Read the journal carefully again because it contains important hints, and sometimes the complete solution, for the various puzzles that you have to solve here in Egypt.

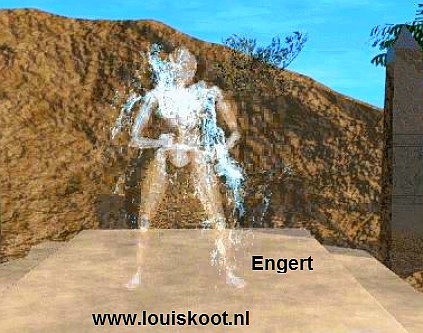
On arrival you see, straight ahead, a sailboat in the harbor. However, we are not going to the harbor yet. First turn 2 times to the right. You are then standing in front of a fountain. However, the fountain does not spray any water. There are 4 pillars around the fountain pond. Move forward 1 click. Hello .... the water in the pond rises and becomes a face and this face talks to you.

You hear a woman's voice say: "Blessed is the wind that will bring you over the Nile" .....
Go ahead 3 more clicks. You are now completely zoomed in on the round pond and you see the bottom through the clear water. On the bottom of the pond you see a drawing. You see 4 baskets and then another 2 baskets. Water is thrown from each of these 6 baskets. Take a good look at this drawing. It gives you a clue as to how you should open the "doors" of the harbor. You can also find this drawing in the Journal.

Zoom out 3 times. The water face repeat its message. Zoom out again and then turn right. You see a pyramid.
Just before the pyramid stand a statue along the sandy path that goes to the pyramid. Turn right again. You see the sailboat again.

Take 1 step back (zoom out) and then turn left. Now you can go to the pyramid, so move 5 clicks forwards and then turn left.
You now stand in front of that statue and you hear a male voice.

The male voice says that "If you find the Scarab, you will also find the Key".
Turn right and continue 3 clicks forward and then turn left again. Now you are standing in front of the entrance of the pyramid.
Go forward 4 clicks and you are inside and zoomed in on the code lock of the door, at the back of the pyramid's front hall.

The signs that you see on this code lock are Egyptian Numbers. You cannot yet "decipher" them and you do not know the correct code yet. So you can't do anything here now. But you will eventually come back here again because this pyramid is the "exit" out of Egypt . Now keep your cursor on the left, or the right, of your screen. Your cursor then becomes a narrow turn around arrow. So click to turn around and leave the pyramid again via 3 clicks Forward. and.......
Gosh ... Who, or what, was this..... The "apparition" that emerged from nowhere said to you: "So ... you can end this nightmare". You will come across this thing more often, and eventually you will have to "catch" it. I will call him "The Creep". Go forward another 1 click and then turn right and follow the sand path then 8 clicks forward, back to the fountain. Turn left. You now see that sailboat again.

So let's go there now. Go forward 11 clicks, past the stone water well, and then turn right. You are now at the harbor where the sailboat is moored.

Go 3 clicks forward over the "jetty" to the end. Turn left. You can now see the forepart of the sailboat and also see that the "lock gates" are closed. The sailboat cannot get out. At the bottom of your screen you can just see the top of a lever. Click 1 click Forward and you will now see this lever completely.

The lever is connected to the "lock gates" with a rope. Click on the lever and drag the lever to the left and then release. However, nothing happens. The "lock gates" remain closed. Zoom out, turn left and go 1 click forward, back over the jetty. Then turn left. You now look along the backside of the Stone Water Well and you see a Basket hanging on a Rope, above the water.

Turn right again, 2 clicks forward and turn left. Go forward 1 click and turn left. You are now in front of the Water Well. Move forward 1 click.

Tap 6 baskets of water to unlock the lock gate
A round beam hangs above the well and a pulley hangs from it. A rope goes into the well via this pulley and you see a lever on the pulley. You will also see a lever in the well, at the bottom right. The lever on the pulley is Lever A and the other lever is Lever B. Move forward one more click. Now you look in the well. A bucket is hanging on the rope in the well. You also see a pipe. The bucket does not hang directly under the pipe.

Zoom out once and then click on lever A, the pulley lever. Look into the well again. The bucket has come up and is now hanging directly under the pipe.

Zoom out 2 times, turn right and go 2 clicks forward and turn left. You are now on the side of the Stone Water Well.
Go 1 click forward into the water and then turn left. You are at that basket.

According to the drawing, at the bottom of the fountain, you must now first fill the well with 4 baskets of water.
So click with your "hand" on the Basket. The basket then scoops water into the well.

Repeat this 3 more times, so that you have put a total of 4 baskets of water in the well.
Then turn left, 1 click forward, right, 2 click forward, right and you are back in front of the well. Go forward one more click and ........ now click on Lever B. You hear "Splash". Look in the well. The bucket is now filled with the "4 baskets" of water and because of this weight the bucket has dropped a lot.

Zoom out twice and go back to the basket and put 2 more baskets of water into the well. You have entered a total of 6 baskets of water into the well, just like you saw on the fountain drawing. Go back to Water well and click on Lever B. Again you hear "splash". Look into the well again. The bucket is now full of water and has fallen further down but is now tilted.

Zoom out once and click lever A again to lower it straight. Look into the well again. De bucket is now straight again.

Zoom out 2 times, turn left, 1 click forward, right and go 3 clicks forward to the end of the jetty. Turn left, 1 click forward.
Click on the lever again and drag it to the left and release ... and .... Now the "lock gates" will open.

Turn left, 1 click forward, turn right. You are now in front of the aft deck of the sailboat.
Go forward 1 click and then turn right. You are now on the boat and in front of the cabin entrance.

Go forward 3 clicks, through the cabin and….

You now sail with the sailboat out of the harbor to the other side of the bay and moor at the jetty of the:
B: Temple:
Dispel the Crocodile:
You look at the front point of the sailboat. If you click forward now you will sail back to the harbor, and you do not want to do that now. Turn left. You can now see the entrance to the temple. Go forward 2 clicks and ... .. Oops ... a crocodile will appear out of nowhere and this crocodile will prevent you from continuing.

Turn left twice. You look again at the sailboat and you now see a long spear against the cabin. Move forward 1 click and grab the spear.

The spear ends up at the bottom right of your screen. Turn back to the right and go forward 1 click again. The crocodile appears again. You have to "chase away" the crocodile to continue and this is not easy. So you have to stab the crocodile with the spear. You stab with the spear by pressing your mouse buttons, but you must hit the crocodile exactly at the RIGHT spot.
The crocodile keeps moving its head back and forth. Wait until the crocodile moves its head to the left and then raises it. As the crocodile moves its head to the left, then point with the spear to its neck, to the pale yellow spot above its right leg. In response, the crocodile then moves its head farther to the left and UP. While the beast does that you must quickly stab with the spear on the yellow spot above its right leg.

If you do this correctly, the crocodile will disappear. There is no other way and no other place where you can hit the crocodile, so keep trying. If it does not work, you turn around again and go 1 click back to the boat, then turn around again and go 1 click back towards the temple. Each time the crocodile will reappear and you will get another chance to try again. If you have succeeded in driving away the crocodile, then you immediately lose the spear. Then go 6 clicks forward into the temple. You are then zoomed in on the large round altar at the back of the temple.
The Gods Altar:

On top of the altar stands a large head and on the edge of the altar you see a small Glass Ball. In this Glass Ball you see an image of a God. Place your "hand" on the Glass Ball and then hold down your mouse and drag the Glass Globe to the right. The Glass Globe then turns to the right and in the Glass Globe you see another God. Keep moving the Glass Globe to the right until the end of the edge. You will find out that 8 different Gods are visible in the Glass Globe...here they are

Before you start doing anything else it is best to take a sheet of paper and on that sheet of paper you draw a table consisting of 9 columns and 6 rows. You have to remember a lot of drawings and data and this is best done by putting it all in this table. Here is an example of how your table shout be.......Draw it spacious and nice and big:
| A | B | C | D | E | F | G | H | |
| 1 | god drawing | god drawing | god drawing | god drawing | god drawing | god drawing | god drawing | god drawing |
| 2 | name of the god | name of the god | name of the god | name of the god | name of the god | name of the god | name of the god | name of the god |
| 3 | symbol drawing | symbol drawing | symbol drawing | symbol drawing | symbol drawing | symbol drawing | symbol drawing | symbol drawing |
| 4 | digit | digit | digit | digit | digit | digit | digit | digit |
| 5 | column number | column number | column number | column number | column number | column number | column number | column number |
Put the Glass Ball back to its starting position on the left and repeat the rotation of the Glass Ball completely again and now draw the Gods on the first line of your table. So from left to right you place your drawings of the gods on: A1, B1, C1, D1, E1, F1, G1, H1. You can always "park" the Glass globe so that you can draw the God. If you have seen all 8 Gods in the Glass Globe and have drawn them in your table, then make sure you have the Glass Globe on the far left again and then zoom out once.
Turn right. You see n You enter the entrance to the right side room and you will see a chest there.
Move forward 3 clicks and you are zoomed in on that chest. Click on the chest to open it

There are 9 rolled-up scrolls in the chest. Click on each scroll. Each time the scroll on which you click appears in your screen. On 8 of these scrolls you see the image of a God and you also read the name of that god on the scroll. So they are the 8 Gods that you have also seen in the Glass Globe of the altar. Do you recognize them? .

Grab your table and compare your drawings with the heads that you see on the scrolls. Then write down the names of the gods on the second line of your table. So write down the gods names on: A2, B2, C2, D2, E2, F2, G2, H2. The god on A1 is therefore Osiris, so write down his name on A2. The god on B1 is therefore Basset so write down his name on B2 ... etc etc ....
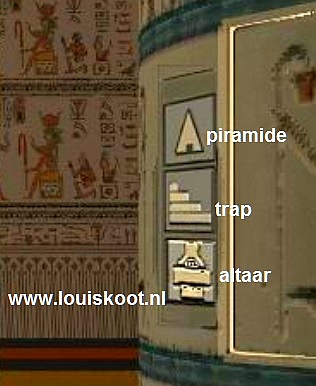
Close the chest and zoom out once and then turn left twice and go forward 3 times into the Altar room again. You are now in front of the entrance of the Left Side Room. Do not enter there yet, but turn left. You now look outside through the temple and you see your sailboat. You also see 3 round pillars. You will see 3 symbols on the front pillar. Go forward 1 click and then turn left. You can now see the pillar with those 3 symbols on the right-hand side of your screen.

This is the "Power Source" and those 3 symbols are, from top to bottom, Pyramid, Staircase, Altar. At the moment the middle symbol, so the Staircase, is switched on.
Click on the Lower Symbol, so on the Altar Symbol, to activate the large round altar.
Go forward 1 click and then turn left. You are standing in front of the big altar again. Move forward again 2 clicks and you are fully zoomed in on the altar again. If all is well then the Glass Ball is completely left again. Through the 9 Scrolls, from the chest in the Right Side Room, you now know who all those 8 Gods, that you can see in the Glass Ball, are. Now you have to turn the Glass Ball to the right, step by step. You must now do this carefully and slowly. Each time a Symbol also appears in the Glass Ball, on the God. The big Head now also changes into the god you see in the Glass Ball. Draw the Symbols and place them with the correct god in your Table on Line 3, so on A3, B3, C3, D3, E3, F3, G3, H3

If you have seen the symbols in the Glass Ball for all 8 Gods and have copied them into your table, then zoom out once and turn left. Now go 2 clicks forward and you are in the Left Side Room. In the corner here is a "bunch" of spears. Turn left. You see an Annubis statue in the middle of the room . A nice fire burns between the legs of the statue.

Go forward 1 click and then click on the Annubis statue. A voice tells you to "look for the tablet".
Find the Stone Tablet:
Continue 1 click forward to the rear wall. There are 6 thick vases against the back wall, 3 on the left and 3 on the right. Turn left. Now you see 5 baskets and to the right of the baskets stand another Vase. There are fruit or something in the 3 low baskets, but not in the two high baskets. Continue to the wall ........ There is a hand mirror in one of the high baskets. It is the "Mirror of Hathor". Take the mirror from the basket and zoom out.

Take a step back ..... You can now move the mirror over the wall behind the baskets. ...... If you start at the height of the leftmost basket and then move the mirror to the right across the wall to the Vase, you will read: "You will not leave the temple storeroom without replacing the mirror of Hathor ".

So you can't take the mirror with you out of this room. Turn right. You see those 6 large vases and the mirror has come with you. Grab the mirror again and place it in the middle vase of the 3 on the right. You look through the mirror in the vase and you see that there is a Key in it. Click in the mirror on this Key. The key will then appear in the lower right of your screen and the mirror will disappear.
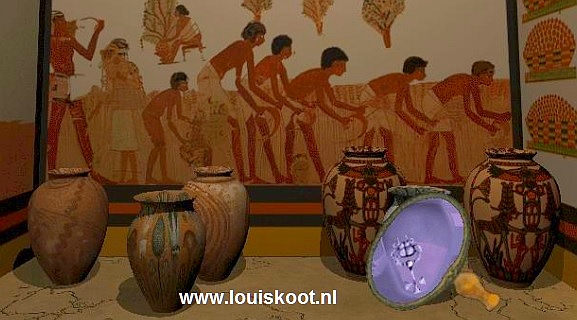
Turn right. A chest. Grab the key and insert the key into the keyhole of the chest.

Go forward 1 click and click on the chest. The chest opens. In the chest is a Head and a gray Stone Tablet
If you move the mouse back and forth you will see that the eyes of the head follow the movements of your mouse.

Click on the Stone Tablet. The tablet will now appear large in your screen. On the tablet you see 10 images and next to each image is a gray symbol. Well, those symbols are the Egyptian numbers 1 to 10 and so they indicate the quantity of each item. You now have to find out which symbol is which number and you should do that by looking for the 10 types of objects that you see on this tablet and then counting how many of each object you encounter.
Count the items in the Right and Left Side Room:
You cannot take the Tablet with you, so take a picture of it with your camera, but you can also simply draw the 10 Egyptian number symbols on a piece of paper and write behind each symbol the name of the object. Then click the Tablet back in the chest, close the chest and zoom out.
So in both the left side room and the right side room you must now look for the 10 objects that you saw on this Stone Tablet and simply count how many Daggers, sofa's, Chests, Spears, Baskets, Arrows, thin Vases, Scrolls , thick Vases and Sarcophagi, can be found in total in the two side rooms. We'll just start here in this left side room. So here you will find 1 chest, 8 thick vases, 5 baskets. On a mat, that lies on the floor in front of the Annubis statue, you will find 4 Arrows and in the corner at the entrance there are 6 Spears.
Go to the right side room. So there are 9 scrolls in the chest at the entrance. Standing in front of this chest, turn right so that you look back through the room. What do you see in this room? In the center of the room is an image of a Negro holding a rod. Opposite this statue is a chest and to the left of this chest is a batch of slender vases. There are also 2 large sofa's and 1 Sarcophagus in this room. Open the chest and count the daggers in it. There are 9 daggers. Close the chest, zoom out and turn left, 1 click forward, right. Count the thin Vases, there are 7. Turn left, 1 click forward and click on the Sarcophagus. This opens. A rat feeds on the mummy. Close the Sarcophagus and zoom out and turn left or right 2 times.
Well, you have now counted all items on the Stone Tablet and you now know that there are: 1 Sarcophagus, 2 Large Loungers, 3 Chests, 4 Arrows, 5 Baskets, 6 Spears, 7 Slim Vases, 8 Thick Vases, 9 Daggers and 10 are Scrolls. Write these numbers behind the Egyptian Figures of the Stone Tablet and you can now count to 10 in Egyptian.

Go back to the Right Side Room and go to that Negro statue. Move forward 1 click and then click on the "skirt" of the statue.... a secret box opens and there is a scroll in this box.

Click on the scroll. This will be shown in your screen. This is the MATH SCROLL.
On this scroll you see the 8 Gods again and you also see number symbols for each God. Make a PHOTO of it. You will need this scroll later

Now read the journal and you will learn that a Numeral Symbol left of a god means: subtract; and a Numeral Symbol to the right of a god means adding up.

Click the scroll into the statue again, close the it and zoom out. Now go back to the "Power Source" pillar and click on the middle Stairs symbol to activate it. DO NOT FORGET THIS. You have now activated the Stairs again. If you forget to do this now, you will soon not be able to "roll out" the Stairs.

Go 2 clicks forward to the wall, right, 3 clicks forward and you are outside again. Turn left. You see a cat running away.

Follow the cat, so go 1 click forward, left, 2 click forward, left, 2 click forward and right.

The Columns / Gods Statues puzzle and the Cobra
You are now standing behind the temple and at the beginning of the Marble Path that connects the temple with the "Sanctuary in the Mountain". Both left and right there are 4 large Marble Columns along this path. Name the Columns on the left along the path, from front to back, L1, L2, L3, L4. Also name the Columns that are on the right along the path, from front to back, R1, R2, R3, R4. You will need the following things: the Photo of the Math Scroll, your list with the Egyptian Gods and your Columns Table in which you have already drawn the drawings of the 8 Gods and their Symbols.
Now go 2 clicks forward and turn left. You are now in front of Column L1 and on this you see the god Thoth and the number 1.

Look at your photo of the Math scroll. You can see that Thoth has the number 1 BEHIND him.
That means that you have to INCREASE the number you see on Column L1 with 1.

So the number for Thoth isn't 1 but it is 2. In your Column table you now enter the number 2 in box F4 and put L1 in box F5.
Turn clockwise twice. You are now in front of Column R1. On this you see the god Sebek and the number 4.

The Math Scroll tells you that you have to subtract 1 for Sebek. So the figure for Sebek becomes 3.
In your Column table you place the number 3 in box H4 and put R1 in box H5
Turn left and go forward 3 clicks and then left. You stand in front of Column L2. On this you see the god Set with the number 8.

The Math's Scroll teaches you that you have to add to Set 2. So the figure for Set becomes 10.
In your Column table, place the number 10 in section G4 and L2 in section G5
Turn clockwise 2 times. You stand in front of Column R2. God Knumm with number 5.

The arithmetic scroll says that for Knumm you need to increase this figure by 4. So the figure for Knumm becomes 9.
In your Column table you place the number 9 in box E4 and in box E5 you enter R2
Turn left, move forward 3 clicks and turn left. You stand in front of Column L3. On this you see Osiris and the number 7.

The Math Scroll teaches you that you must subtract 1 for Osiris. So the number for Osiris becomes 6. Write this in box A4 and put in box A5 L3.
Turn 2 times to the right and you are in front of Column R3. God Horus with the number 3.

According to the Math Scroll you have to increase Horus by 4. So the figure for Horus becomes 7. Place this in box D4 and put in box D5 R3
Turn left, 3 clicks forward, left. Column L4 and you'll see Basset with the number 9.

The Math Scroll tells you to subtract 8 from this, so Horus gets the number 1. Place this in boxes B4 and L4 in box B5
Turn clockwise 2 times. Column R4 with Annubis and the number 10.

The math scroll lets you get 2 from this, so the figure 8 remains for Annubis. Place this in boxes C4 and R4 in boxes C5.
Your Column Table is now ready and contains all the necessary data to solve the Crystal Puzzle right away. Your Column Table might look like this:
| A | B | C | D | |
| 1 |  |
 |
 |
|
| 2 | Osiris | Basset | Annubis | Horus |
| 3 |  |
 |
 | |
| 4 | 6 | 1 | 8 | 7 |
| 5 | L3 | L4 | R4 | R3 |
| E | F | G | H | |
| 1 |  |
 |
 |
 |
| 2 | Knumm | Thoth | Set | Sebek |
| 3 |  |
 |
 |
|
| 4 | 9 | 2 | 10 | 3 |
| 5 | R2 | L1 | L2 | R1 |
Turn left. You are now just in front of the entrance to the "Sanctuary in the Mountain", so go forward 4 clicks and you are inside.

You are in the front hall. In front of you is a Stone Altar and behind it you see the entrance to a corridor. Both left and right are 4 life-size God Statues. From the entrance, these statues correspond to the 8 Marble Columns, ie: L1, L2, L3, L4 and with R1, R2, R3, R4. First move 6 clicks forwards. You are then in the corridor behind the Stone Altar and your further passage is blocked by a lifelike Cobra.

Click with your finger on the Cobra… .O.......you better don't do it........... The Cobra spits green poison at you and your screen turns black. Just wait until the game starts up automatically again. The Cobra must be eliminated in order to proceed through this corridor. Turn around and go 4 clicks back into the front hall. Then turn left or right twice. You are again at that Stone Altar. Click the "asterix" at the bottom of your screen to take 1 step backwards and then click with your "hand" on the Altar. You look in the altar and you see 8 transparent miniature Crystals in it, 4 on the left and 4 on the right.

These crystals also correspond to the Marble Columns along the path and therefore to the 8 Gods statues that are inside here, 4 on the left wall and 4 on the right wall.
Zoom out 2 times and turn 1 time counterclockwise. You are now in front of the first God statue on the left side of the front hall (from the entrance).
This is Statue Left 1 and in front of the statue stand a purple Glass Crystal.

Go forward 1 click and you are zoomed in on the glass crystal. The crystal has 3 segments. The upper segment contains the image of the God, the middle segment the number and the lower segment the symbol. By clicking on the segments you can set a different God, Number or Symbol. What you have to do now is to go to each of the 8 Crystals and then set the correct God, Number and Symbol on each crystal. You do this according to the data that you now have in your Column table.
Start with this image and then go to the other 3 images on the left wall and put the correct God, Number and Symbol on the crystals with those images
It most look like this.....

Then go to the 4 statues on the right wall and do the same there, thus:

When you have set all 8 crystals correctly, you will look again at the Stone Altar. If you have set all 8 crystals correctly then the 8 miniature crystals in the altar are now all white and a RED JEWEL floats between these small white crystals. Grab this Red Jewel.

The Red Jewel ends up in the bottom right of your screen and stays there. Take 1 step back and then enter the corridor 5 clicks forward.
You are again faced with that dangerous Cobra. Take the Red Jewel and click it on the Cobra and......

The Cobra disappears and the Red Jewel returns to the corner of your screen.
Now proceed 7 clicks further down the corridor. You are then in a round end hall and on the right side of your screen you see a thick Round Pillar. On the pillar you see a small tile with the stair symbol on it. Stay away from it now. In the semicircular red stone wall you see a dark place where a torch burns. Go 2 clicks forward there. You now look down into the deep masonry water well. Along the round wall white stones go down into the well and at the bottom of the well is water. Take the Red Jewel again and throw it in the well.

You throw the Jewel down and the thing ends up in the water. Movie: A guy appears in the water of the well. It is an Atlantian.
Listen to what this Atlantian has to say

.When the video is over, place the mouse cursor on the bottom edge of your screen to get the back arrow. Then click 2 times in a row to take 2 steps backwards. You are back at the Round Pillar with the Staircase Symbol. Now click on the Staircase symbol. You hear, in the well, the characteristic abrasive sound of stones that rub over each other.
NB: You can only press this stair symbol now, and thus make the steps appear in the well, if you have also pressed the stair symbol in the Temple on the Power Source Pillar. If you have forgotten that then you must go back to the temple because you still have to do it first.
If you have pressed the stair symbol then you will advance 1 click towards the burning torch. Then move your mouse cursor to the right edge of your screen. You get the Right Arrow, so click to turn right once. Then go 1 click forward to the red wall and you are now standing in front of the steps that have now come out of the wall of the well. Go 3 clicks down the stairs.....The "Creep" appears at the gate.

After calling out "trespasser" the Creep disappears again. Go forward another 2 clicks and then turn right. You are at the gate.
Follow the cave tunnel 8 clicks ahead and you will find yourself in the "Sanctuary".

Sanctuary:
So it's a cave. In front of you is a large round altar with a God head on top. 2 clicks forward. Click with your "finger" on the god. The torch comes on and the little god mumbles something about snakes and then all kinds of snakes creeps out of the various openings of the God. When everything has returned to normal, turn left. You see a large Golden Cupboard with a double door in it. An eye is on the left door, but the second eye isn't on the other door

Turn left twice. You now see a kind of podium of stone pillars and on the left you see a large tablet on the wall.

There is a story written on that tablet. Click on the Tablet and read what is written on it. The text on the tablet gives you an explanation about the Snake Dice game that you have to play now. Zoom out 1 time and then go 1 click forward to all those stone platforms. Your screen will now go black for a moment and then you will be in:
Cobra Dice game

The game actually plays by itself. The only thing you have to do is to click on the Dice if it is your turn. You cannot influence this game at all.
If you have won, so your Red Ankh is on the Golden Platform, then click with your "hand" on the Eye.
The Eye appears in the lower right of your screen. Zoom out, you do that at the bottom left or bottom right of your screen. Then turn right 2 times and go 1 click forward to the Golden Cupboard. Place the Eye on the right door and open the cupboard.
Enter 1 click forward into the cupboard. The Egypt Gene Pod is on the pillar in the cupboard and there is a scroll on the wall. Take the Gene Pot first ...
Video: Listen to the girl.
When she has finished talking, the Gene Pod will be in your Gene Pod inventory. You can check this by going to your options screen and then, at the bottom left, clicking on the Gene Pod Inventory. |
Return to the game and then click on the scroll on the wall. The scroll will appear large in your screen. You cannot take this scroll with you, so make your own drawing of these 4 rows of Symbols. These 4 rows of symbols are namely the 4 digits of the digit code for the code lock of the door in the pyramid. How does this Code work then? Well if you count the rows from left to right then the first row has 3 symbols, the 2nd row has 10 symbols, the 3rd row has 9 symbols and the 4th row has 4 symbols. So you just count the number of symbols in each row and the code is therefore: 3, 10, 9, 4. In Egyptian Numbers.

Click the scroll away again and zoom out 3 times and turn left. You are now in front of the closed entrance door. In the door you see a circle whose "leaves" change blue. Go forward 1 click and then click on the door circle. Movie: another girl gives you some history lessons.

Move forward 1 click. The door opens. Go 9 clicks forward and you are back in the well.

Turn left and go back up, right and back in 6 clicks and you are again in front of the burning Torch. Take 2 steps backwards and then find the thin Turn arrow in your screen and click to turn around. Now you have to go all the way back to the front of the Temple, so where your sailboat is still moored. When you get back there, go back into the Temple and find the Power Source Pillar again. Now click on the UPPER SYMBOL to reactivate the PYRAMID.

If you now forget to activate the Pyramid here again, you will not be able to open that door in the pyramid immediately. So Click on the Upper Symbol of the Power Source Pillar and only then go to the sailboat and go up the front deck. Turn left and click 1 click forward to the front of the sailboat and you will sail back to the harbor.

Open the Door in the Pyramid and go to the Transporter
When the sailboat is stationary again in the harbor, you look at the fore point. Click the Zoom Out arrow twice to take 2 steps backwards and then turn right.
Go 1 click forward onto the jetty, right, 2 clicks forward, left and then 10 clicks forward and you are again in front of the fountain.

Right and then 8 clicks forward to the Pyramid, left and through 4 clicks inwards and you are back at the Code Slot.

On the left you see an arrow. The slot therefore consists of 4 "tumblers" and on each "tumbler" are the Egyptian numbers 1 to 10.

You know the Code. With your "hand" you can turn the tumblers down or up.
So you have to put the code exactly at the height of the arrow and the code is, in Egyptian Numbers and from left to right: 3, 10, 9, 4 ....

Once you have set this, click on the ARROW and the door will open.
Move forward 5 clicks and the sarcophagus opens. You look at the Transporter.

Move forward 6 clicks. Your friend appears again twice in the Glass Globe above the transporter.

When your friend has finished, click on the second circle on the left, that is the circle with the Blue Insect on it. You travel to:
2015: Original Dutch Walkthrough by: Louis Koot
2019: This English translation by: Louis Koot


