Aura: Fate of the Ages.
2020: Walkthrough by: Louis Koot
If you have found this walkthrough via google search or via another site then you have probably not visited my site.
A lot more very detailed game walkthroughs can be found on my site at: www.pcgameswalkthroughs.nl
The screenshots that are in this walkthrough are made when I played the game in 2012 and wrote the Dutch walkthrough, so the text on all screenshots is in Dutch. I do not have the game anymore so I can't make new screenshots with English text on it. I'm sorry for this but it can't be helped
Chapter 1: Ademika Valley
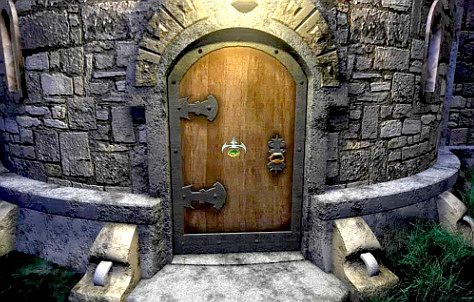
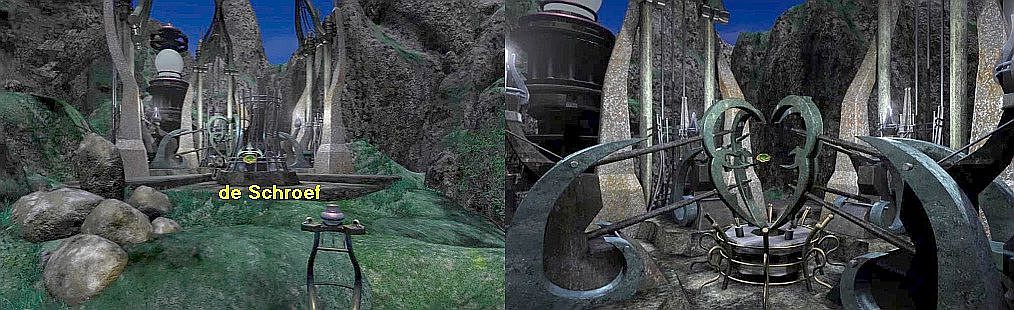
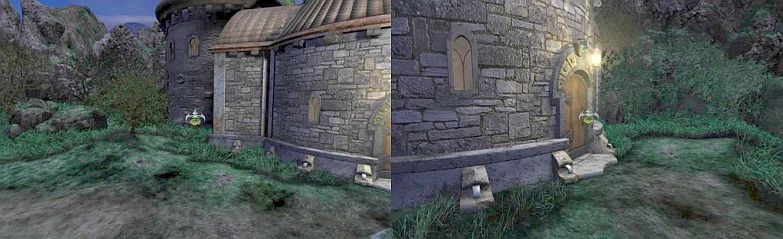
A: Grifit's House:
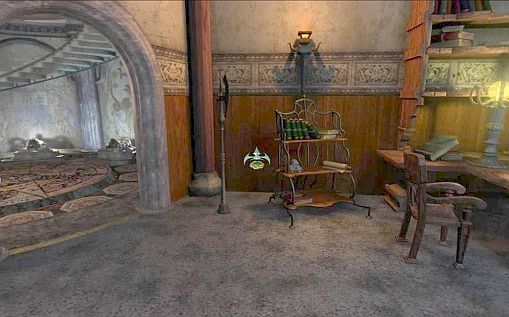
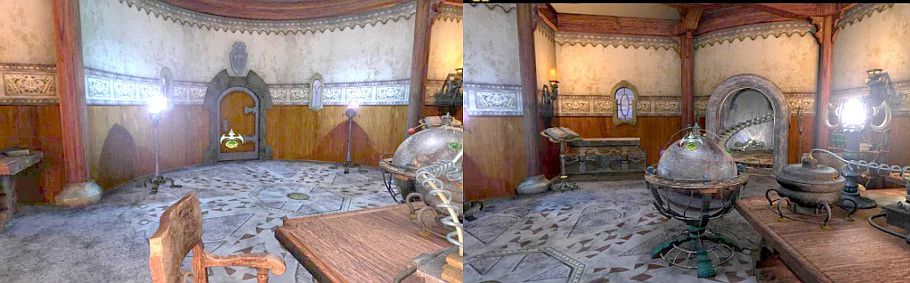
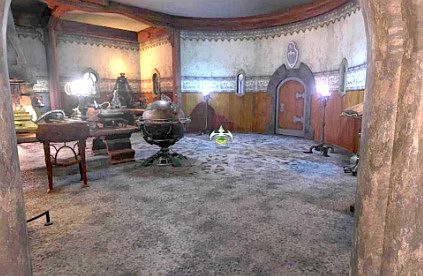
You stand outside at the door of Grifit's house. Click on the door and you go inside. You enter the large front room. In the middle of the room is a large low L-shaped wooden table on which a number of devices are placed. There is a large globe in front of the table.
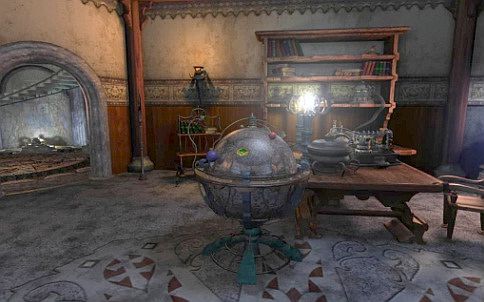
If you turn slightly to the left you will see a gate to a circular hall. You also see a large wooden chest against the wall.
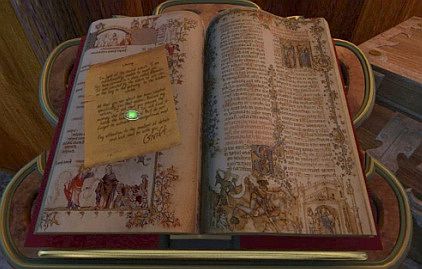
In front of the chest is a book stand with an open book on it.
Aim your arrow at the gate and go forward 1 time and then turn to the left, towards the bookstand.
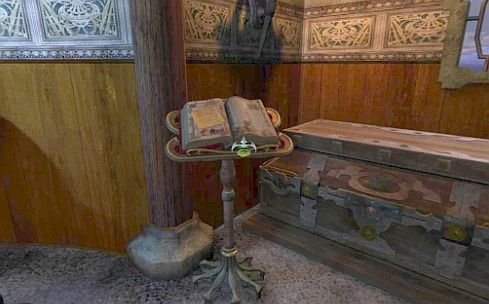
Click with your Forward arrow cursor on the book and you are then in the close-up of the book.
There is a brown letter on the left page of the book.
Click on the letter. Then a number of things happen. Firstly, the letter will now appear large on your screen and, secondly, you will see the Journal book light up in the lower right corner of your screen as a sign that something has now been added to your Journal.
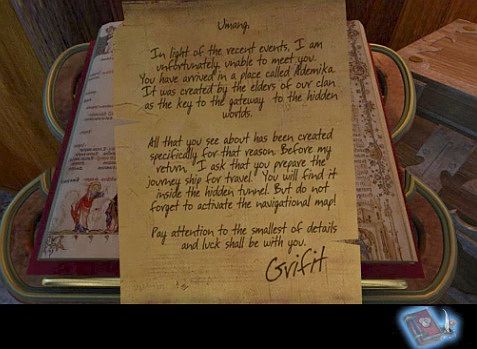
First read the letter. It is from Grifit and addressed to you, Umag. You read:
"Umag: In light of recent events, I am unfortunately unable to welcome you. You have arrived in Ademika. Ademika was created by the Clan Elderly to serve as the Key of the Gate to the Hidden Worlds. Everything you will see here has been created especially for that purpose, and before I return I will ask you to prepare the "Journey Ship" for the voyage, and you will find it inside the Hidden Tunnel, but do not forget to first do the Navigation Activate map. Pay attention to every little detail and luck will be with you: ............... Grifit. "
When you have read the letter, you open the inventory with a right-click. Your inventory will then appear at the bottom of your screen.
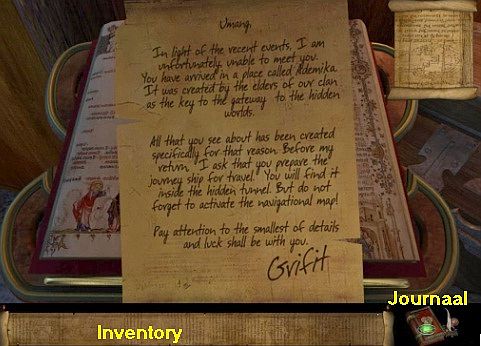
There is nothing in your inventory yet, but on the right you see the Journal book.
Click on the Journal Book to open it. When you clicked on the brown letter from Grifit you already saw that something was added to the journal. You see a drawing of a strange device. Use the arrows that you get on the left and on the right of the screen to browse through the journal. So browse through the book and view the various drawings ........
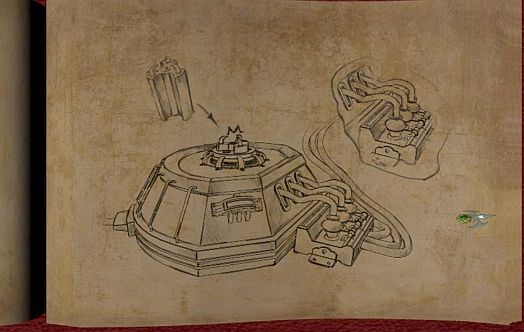
You find that 5 drawings of 5 devices have been inserted in the journal. View them and then close the journal via the zoom-out arrow at the bottom of your screen. Then zoom out of the opened book, also via the zoom-out arrow that you get at the bottom of the screen.
Well, the letter from Grifit "tells" you that you have to activate the so-called "Journey Ship". But you first have to find that thing. According to Grifit's note, this "Journey Ship" is in a hidden tunnel. You must also find a Navigation map and activate it. Turn clockwise so that you see the gate passage to the hall again and the wall to the right of it. In front of that wall is an iron Bookshelf with 3 shelves.
Move 1 click forward to the bookshelf. Then click with your arrow on the bookshelf.
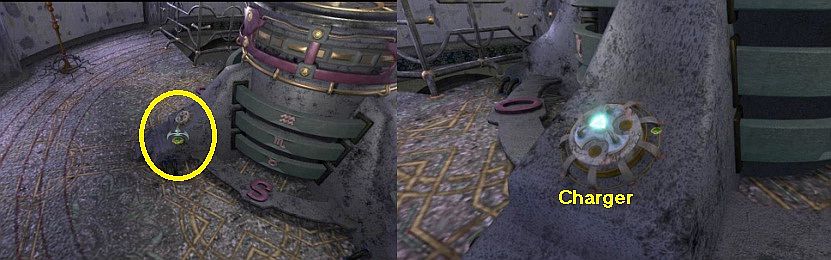
You zoom in on the middle shelf and on this shelf is a gray device and a scroll.
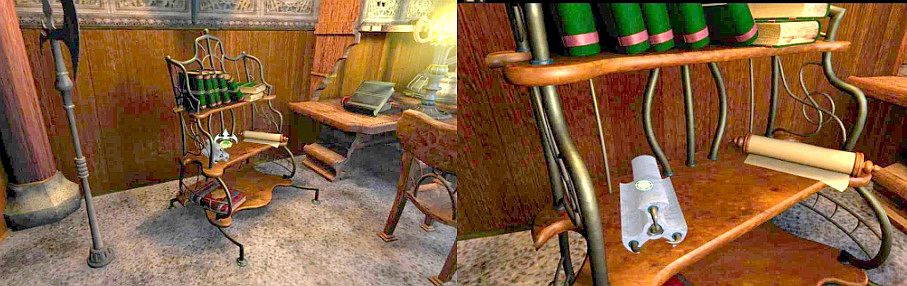
Grab the Gray Device. It disappears into your inventory. Open your inventory and in your inventory place the cursor on this gray device. At the top right of your screen you will see a picture of the thing and read what it is. It is a "Charger", a battery. Right-click again to close the inventory and then click the zoom-out arrow to step out of the bookshelf close-up. Turn to the right until you see that big Globe and the front door again. Go to the right of the Globe, 1 click forward towards the front door. Then turn left again towards the Globe.
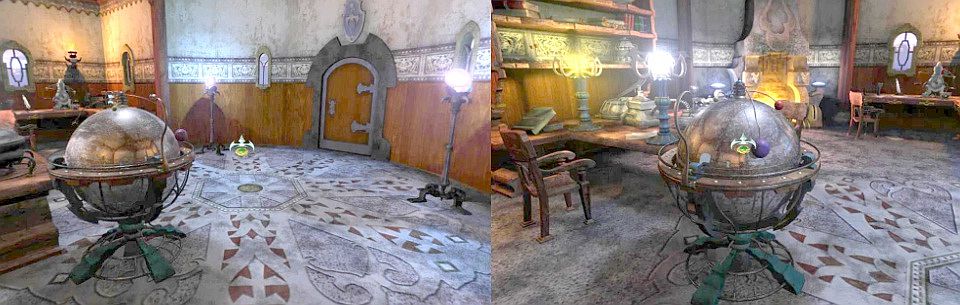
You then get the forward arrow exactly on the Globe, so go forward once and you are zoomed in on the Globe.
The Globe:
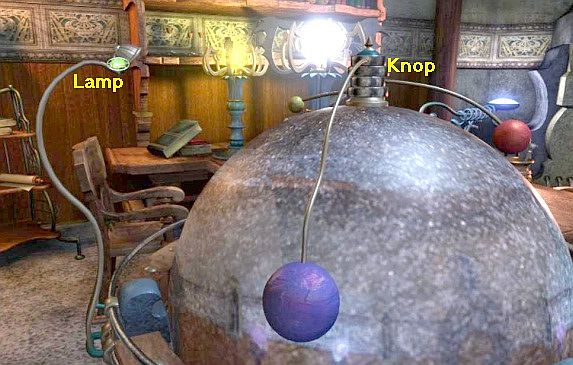
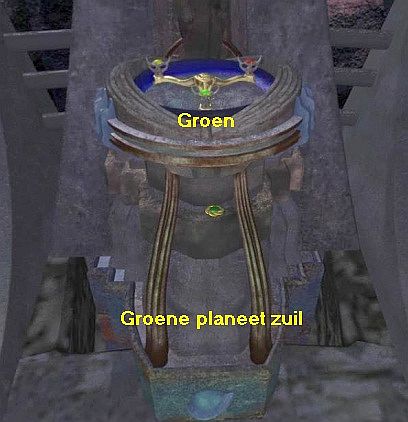
A lamp is lit on the left side of the Globe. On top of the Globe is a thick button with 4 planets hanging on it. However, you can only see 3 planets from this side. You don't see the 4th planet hanging now. The 4 planets are: a large Blue Planet, a medium-sized Red Planet, a small Yellow Planet, the planet that you cannot see is a Green Planet with a Ring around it.
If the next section one is going too fast for you now, you can keep repeating it endlessly until you have "mapped" it. Do the following:
|
Click on the Lamp. The lamp comes on and illuminates a small piece of the Globe. Now click on the button and ....... The planets will orbit the globe and if they end up in the light of the lamp they will change color briefly. Note which planet changes to which color as they turn through the light of the lamp. If it goes too fast to see it for the first time, then click twice on the lamp to turn it off and then on again and then press the button to repeat this sequence. You can continue to do this as often as you want.
The small Yellow Planet becomes Green. |
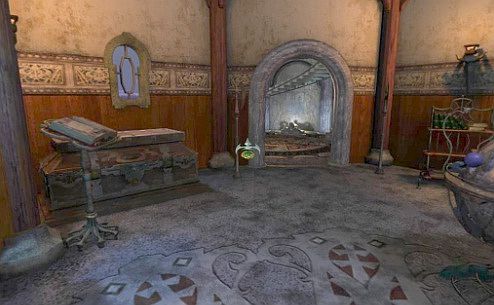
Once you have written this down, you zoom out of the Globe via the arrow at the bottom of the screen. In the back right corner you see an L-shaped desk under the window. On the left you see a fireplace. Go forward 2 times to the left part of that L-shaped desk. There is a scale on the desk.
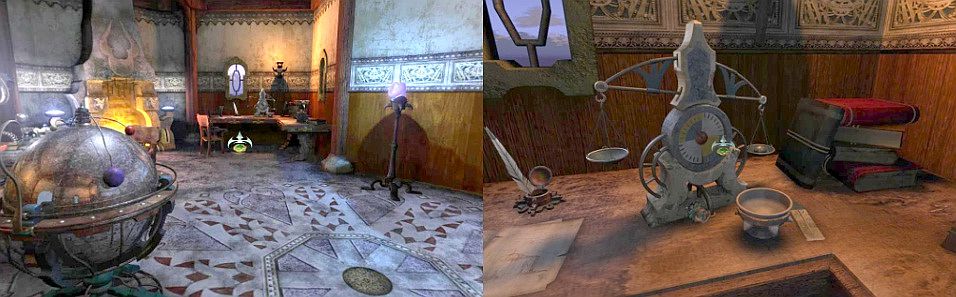
Zoom in on the scale. There is a bullet in the right tray of the scale and the left tray is empty. You can click on the scale to have it weighed.
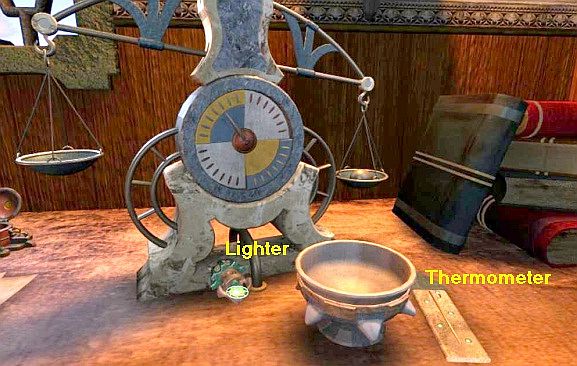
There is a device at the bottom of the scale. Grab that device. In your inventory you will discover that this is a "Lighter". Next to the bowl, which stands in front of the scales, is a plank on the table. Grab this plank. It turns out to be a Thermometer. Zoom out via the zoom arrow and then turn right to the right part of the table. There is a nice little box on this part of the table
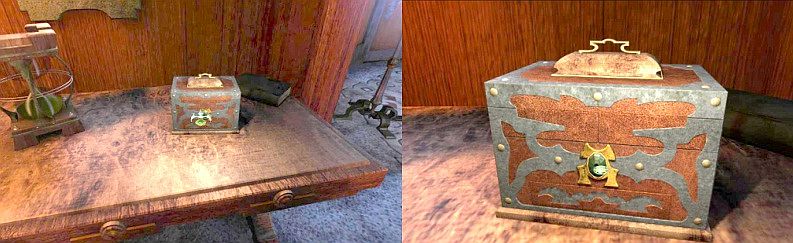
Zoom in further on the box and then click on the green button on the front of the box and ......... The box will open and 6 items will flow out, all of which will disappear to your inventory. Then a drawer also opens and also an item from the drawer disappears into your inventory.
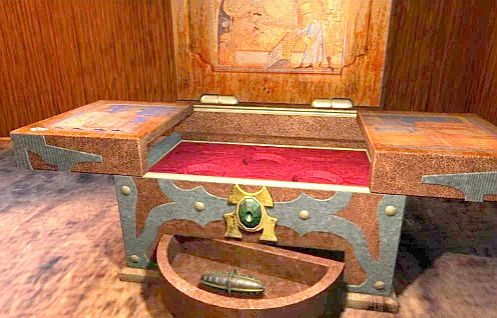
Zoom out of the box and then look in your inventory for the things that came out of the box.

From the box came: a Green Jewel, a Red Jewel, a Blue Jewel, a J-stamp, a Comma-stamp, a V-stamp and a Generator.
Charging the "Charger":
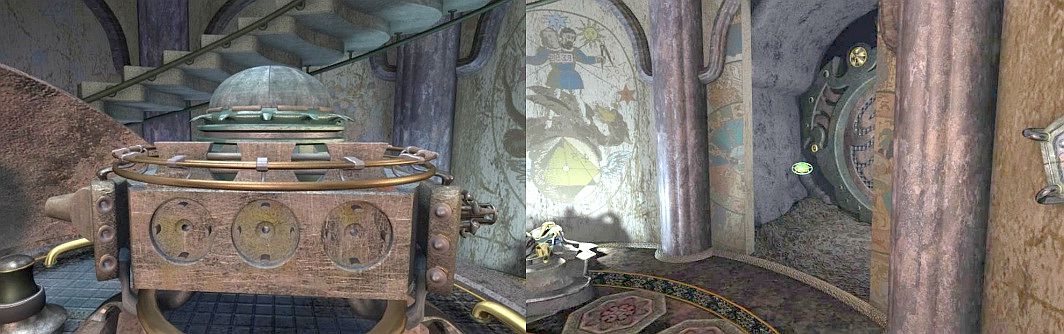
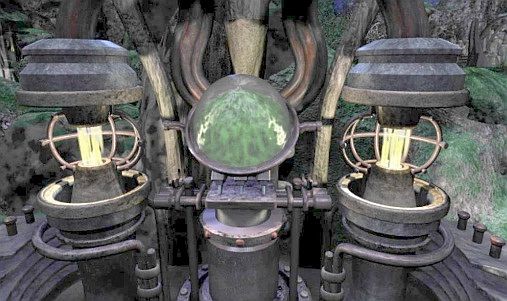
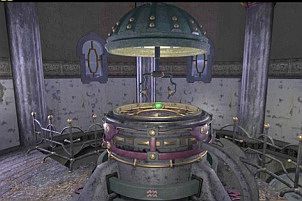
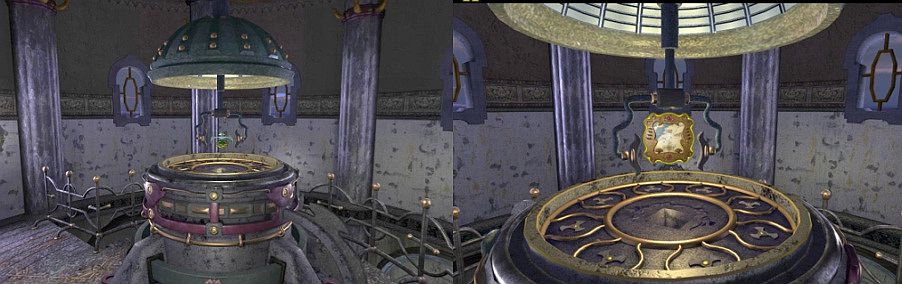
Close the inventory again and turn to the right so that you look again at the large table and the globe in front of it. On the large table are a number of devices that are all connected to each other. Aim your arrow between the globe and the chair in front of the large table and then move forward 1 time. You end up at the front end of the table, between the globe and the chair.
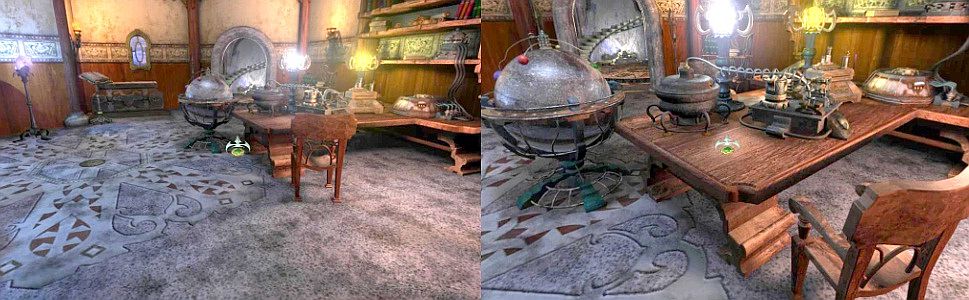
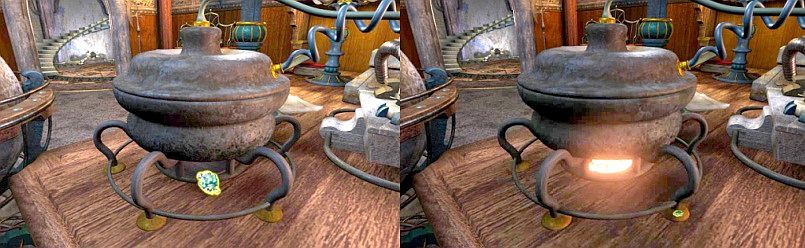
Go forward one more time to zoom in on the 1st device on the table, right next to the globe. This is the "Steam Boiler" and it is connected to the device on the right and that device is connected to the next device which is then connected to the last device. You must now light the "Steam Boiler". So take the "Lighter" from your inventory and click with it on the opening at the bottom of the kettle to light the fire. The "Steam Boiler" will now produce steam ....
Zoom out and turn to the right. You then get the forward arrow above the seat. Go forward 1 time and then turn left.
Then zoom in on the left device, which is in front of the "steam boiler" on the table.
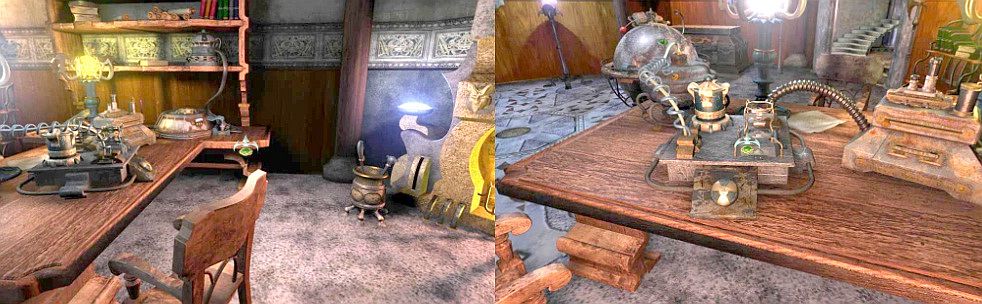
At the bottom of the device is a square block with a large round button. Click on the round button.
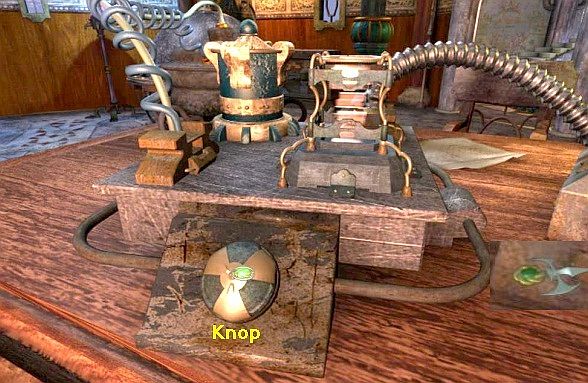
The "cup" on top of the device will now turn. Click on the round button again to let the steam, via the hose, go to the middle device. Do not zoom out at the bottom of the screen but place your cursor on the right side of the screen. You then get the right arrow. Click with the right arrow and you are immediately zoomed in on the middle device.
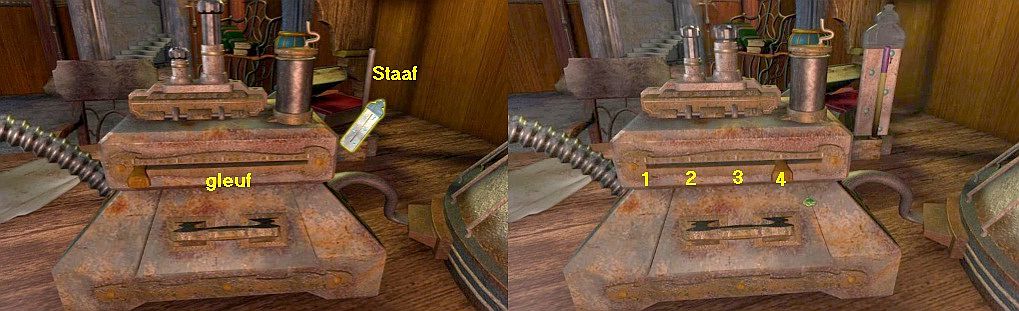
A bar protrudes from this device on the right-hand side. Take the thermometer from your inventory and click it on that bar. You click the thermometer onto the bar. The tube of the thermometer is then completely purple in color. In the middle of the front of the device is a slot with a slider. The slider is now at the far left. The slot has a scale of 5 small lines. Move the slider to the right until the slider is on the 4th line. The tube of the Thermometer has now turned yellow for 3 quarters.
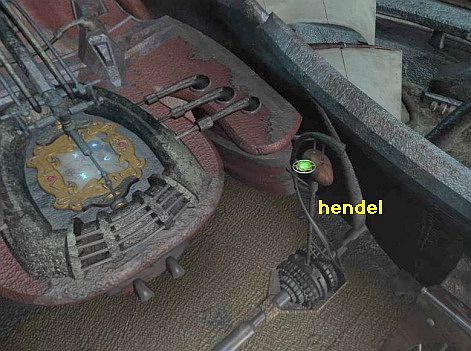
Go right again, via center right, to zoom in on the last device. On the first page of your Journal is a drawing of this device. On top of this device is the "filling opening" and on the right side 3 tubes come out of the device. Take the "Charger" from your inventory and click it on the filling opening.

You place the "Charger" in the device. If the Charger is in the device, click on those 3 tubes and then wait patiently for what the device does. You see sparks coming from the "Charger". Your "Charger" is now charged.
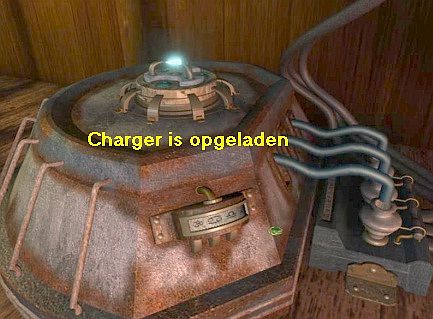
Take the "Charger" out of the device again.
Zoom out and turn left so that you look at the front door and then go forward 1 time. Turn right so that you look at the Globe again and go forward 1 time.
Turn right and go forward to the open gate of the hall. Enter the round hall through the gate.
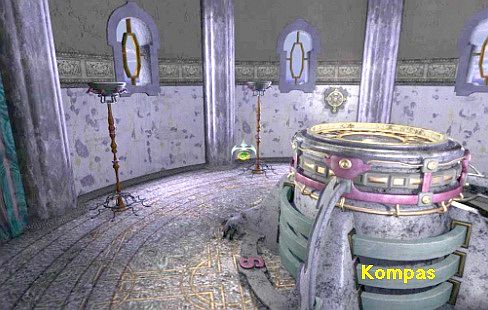
The Zodiac Room
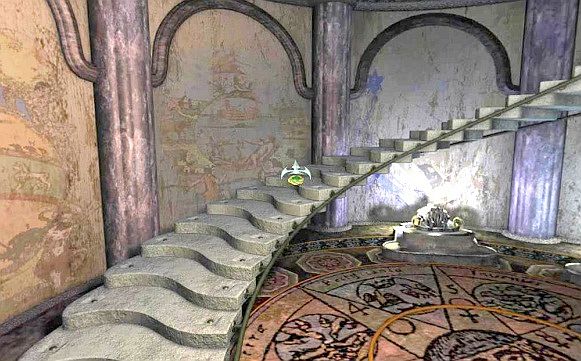
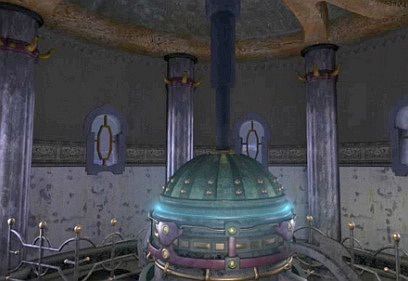
You are in the round hall. A spiral staircase goes up to the upper balcony of the hall.
On the round floor you see circles drawn and the signs of the Zodiac are shown therein. Go up the stairs twice to the top floor.
Once you reach the top floor, you just have a look around. You can't do much here right now.
There is a large Compass and on the wall you will find two "Wheels" in which you see symbols.
You will also find such a wheel on the wall by the stairs. Zoom in on such a "Wheel" to view it in close-up.
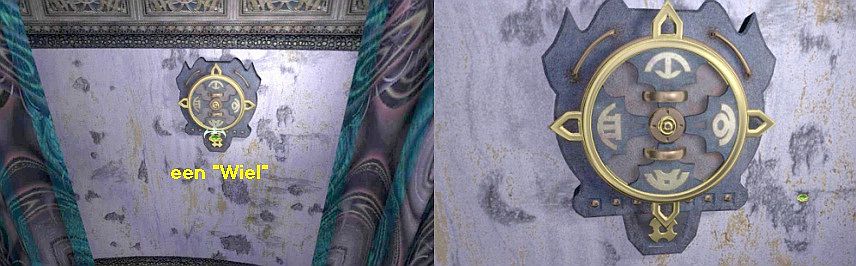
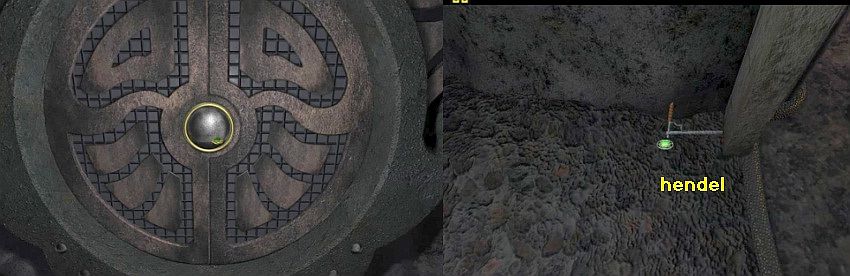
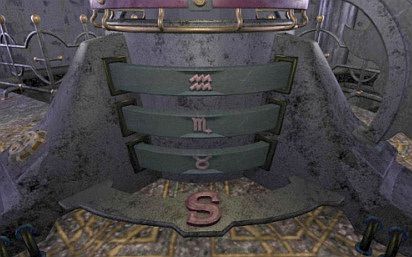
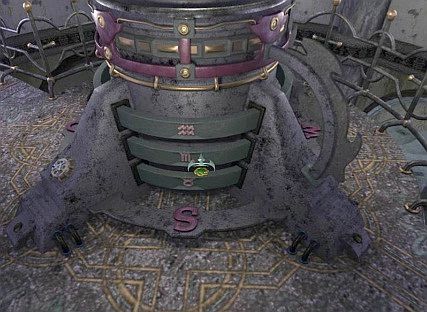
You can click on the 4 protrusions of these "Wheels" and then rotate the wheel. However, do not do this now because you do not yet know what this means and what you should do, but on the 2nd drawing in your Journal you also see such a "wheel". Go back down the stairs to the ground floor of the hall. You will then see a 5-pointed "clock" on the wall, to the left of the gate. Zoom in on it.
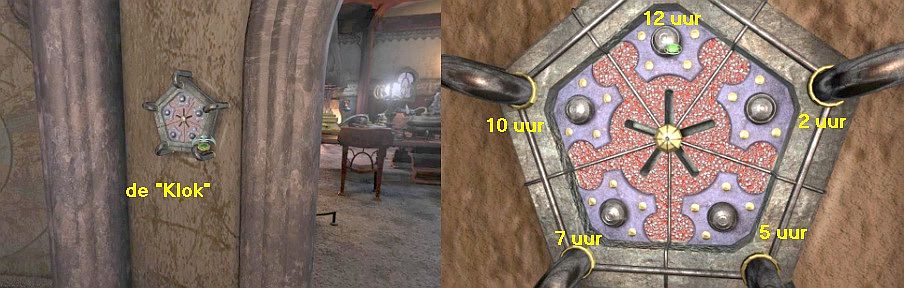
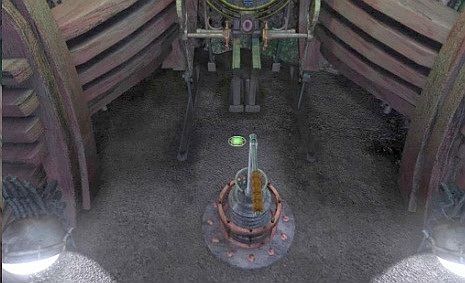
The "clock" has 5 buttons and they are on: 12 o'clock, 2 o'clock, 5 o'clock, 7 o'clock and at 10 o'clock. Click on each of these 5 buttons in the order of the clock hands, so click on the 12 o'clock button, then on the 2 o'clock button, the 5 o'clock button, the 7 o'clock button and finally the 10 o'clock button and ..... A large device now rises from the center of the round floor.
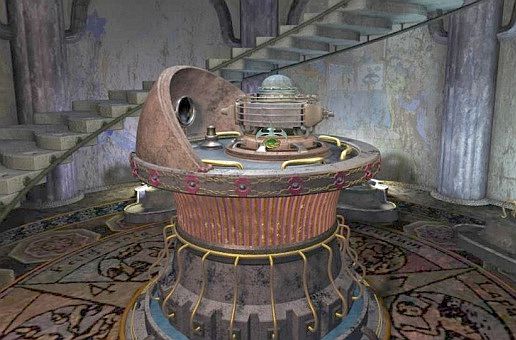
Click twice with the forward arrow to the device and ..... You zoom in on the spherical cover of the device and this spherical cover now opens and a "gripper" comes up from the device. Take the "Generator" from your inventory and place it in the "gripper" and ......
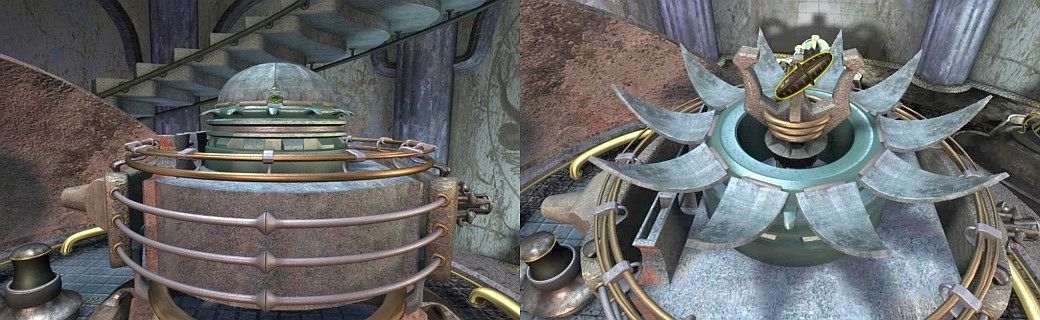
The generator disappears down into the device. You zoom out automatically and you see 3 bars that surround the device, withdraw and a flat rectangular surface appears. In this rectangular surface you see 3 circles. To the left of the device you will see a flame appearing from the pipe. You also turn to the right and see that a secret niche in the wall goes open. You then turn back to the device.
You absolutely do not know what to do next with this device, so zoom out and turn clockwise and then click in the secret niche that has just opened. You are then in the niche and in front of a large round, closed door and you cannot open it. In the middle of the door is a large thick round and black button. Look down at the floor and then turn clockwise. A lever is lying on the floor in the corner of the niche. Take the lever.
B: Get the Navigation card:
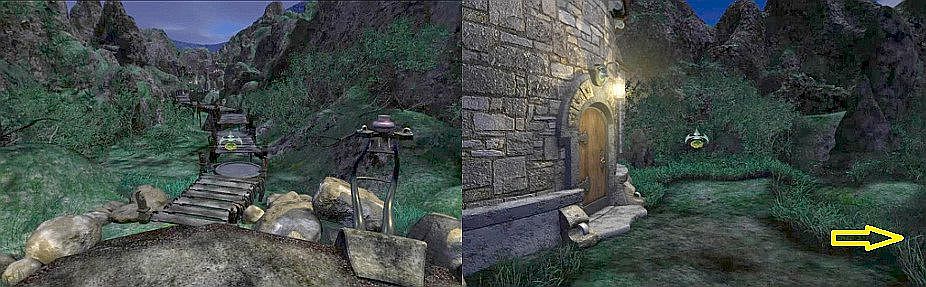
Go back into the round hall and then through the gate to the front door. Leave the house through the front door.
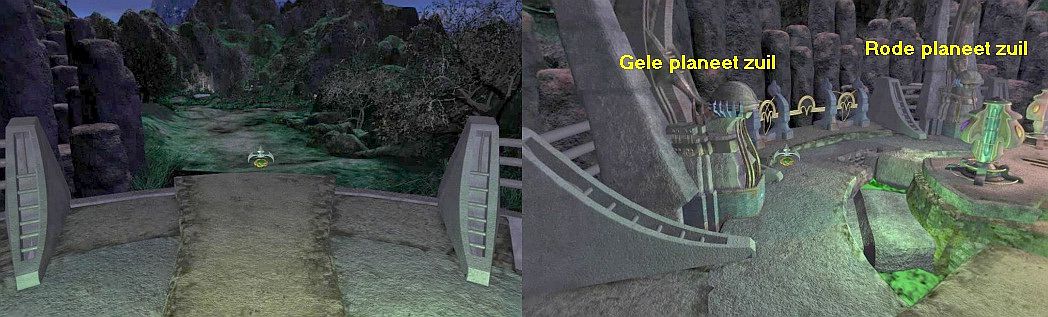
You are then outside and with your back to the front door. Turn to the right until you get the forward arrow on the path.

Move forward 2 clicks along the path. Then turn slightly to the right. Straight ahead you see a green illuminated structure
Move forward again 1 click. You then come to a few stone steps that go up to a "square".
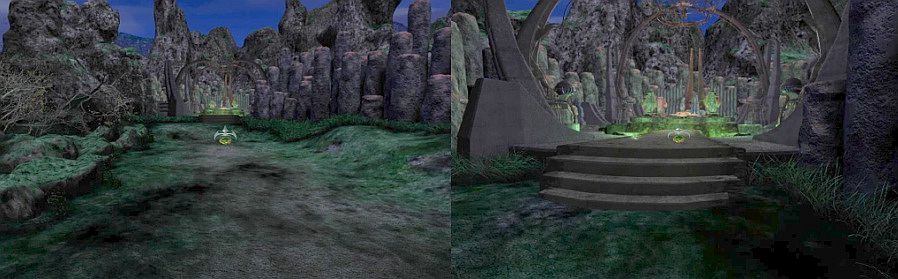
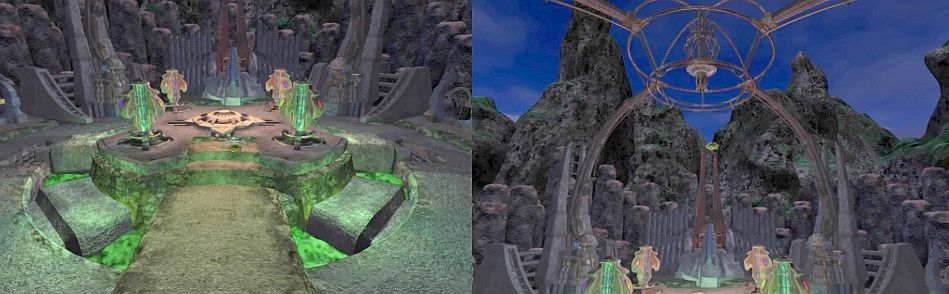
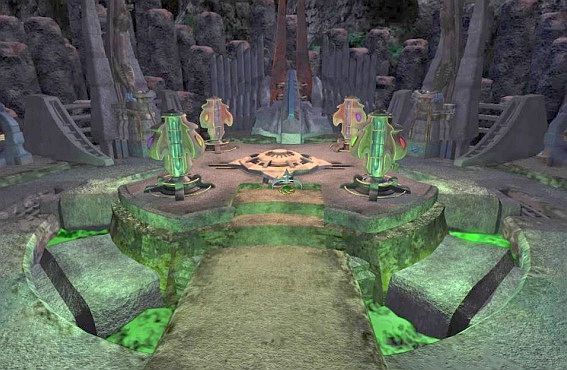
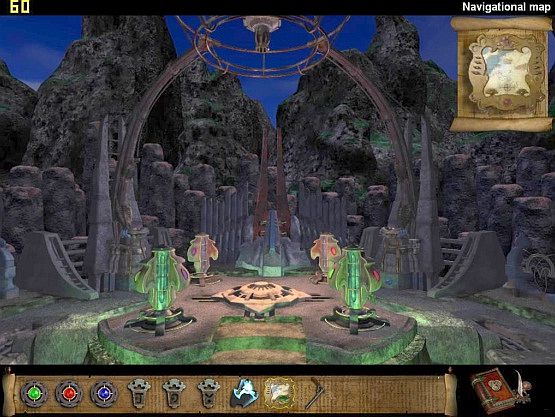
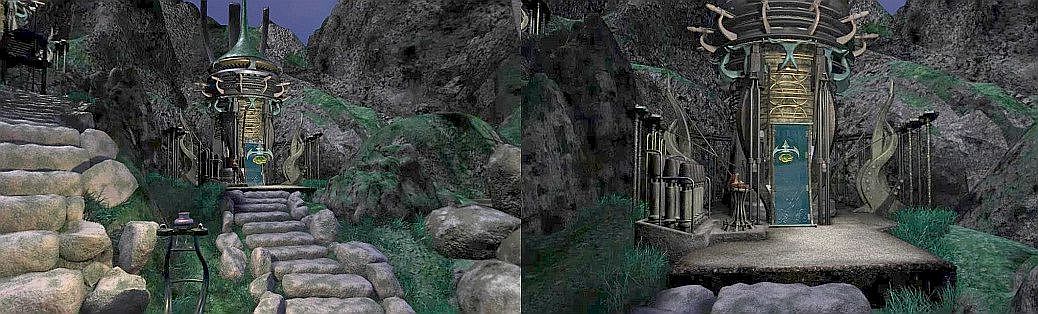
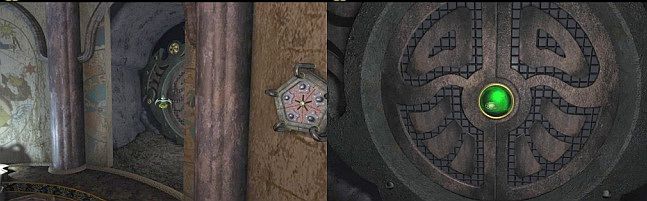
Go forward 1 click again on the stone steps and you will find yourself in the entrance of the "Square". Above the entire "square" is a metal construction that is attached to 4 large columns. Right above the "center dot of the square" there is a device in this metal construction.
Drawing 4 in your journal shows the purpose of this Planets puzzle.
The Planets Puzzle:
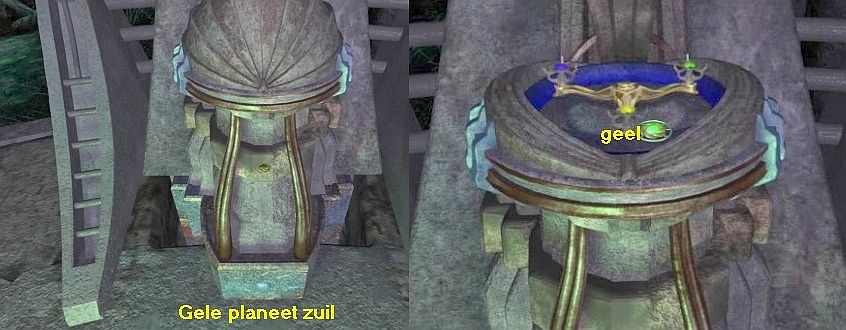
This "square" is a round cove between the rocks and it consists of an Outer Ring and an Inner Ring. Go ahead and you will be in front of the "center dot" on the Inner Ring. Stand still and just take a look around to take in the situation. In the Outer Ring you see 5 large columns. At 4 of these large columns you will also see a smaller Dome Column.
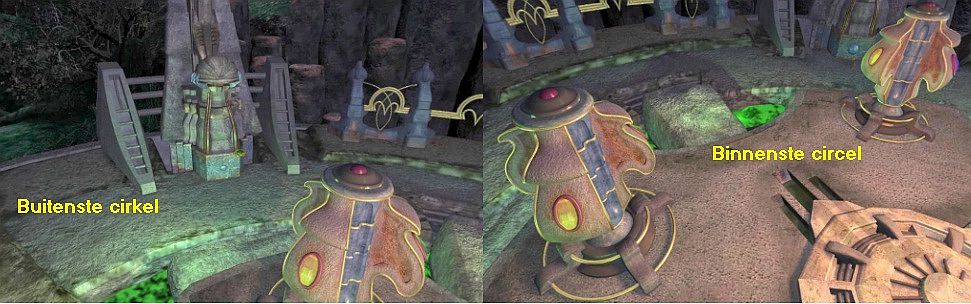
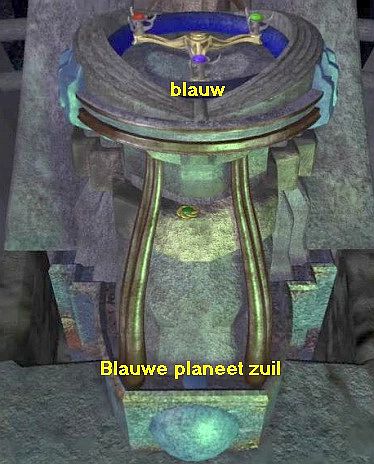
At the bottom of each dome column you will see a blue dot. These dots represent the 4 planets that you circled around the globe in Grifit's house. The size of the dot determines for which planet the column is intended. There are also 4 small columns on the Inner Ring. They are multicolored and have a colored oval on each side in the colors: Yellow, Green, Blue and Red. So those are the colors in which the 4 planets, around the Globe, changed as they went through the light of the lamp. Each of these columns is therefore directly in front of one of the dome columns.
Those 4 dome columns each have a blue dot and those blue dots represent the 4 planets that you have seen in the Grifit house on the Globe. If you are standing in front of the "center dot" on the Inner Ring and with your back to the entrance, do the following: Stand with your face to the entrance of the "square" (the "center dot" is behind your back) ) and then go forward 1 time. Then turn to the right so that you get the forward arrow to the Outer Ring.
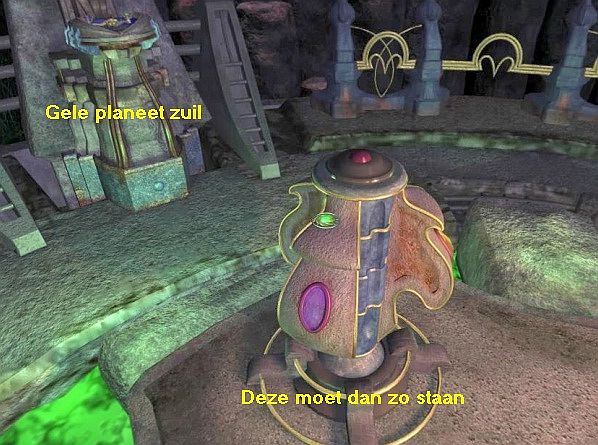
Then go forward 1 time to the 1st Dome column and then turn to the left so that you are directly in front of the Dome column. At the bottom of this column you will see a small blue dot. This Dome Column therefore represents the little Yellow Planet. Click on the dome. The dome opens. In the dome you see three colored balls on a turntable.
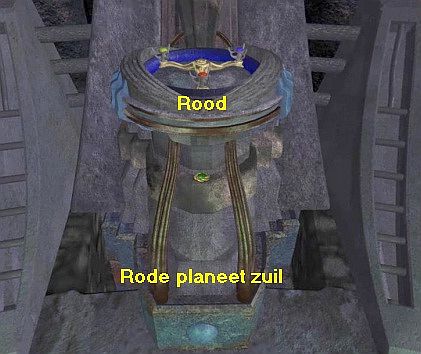
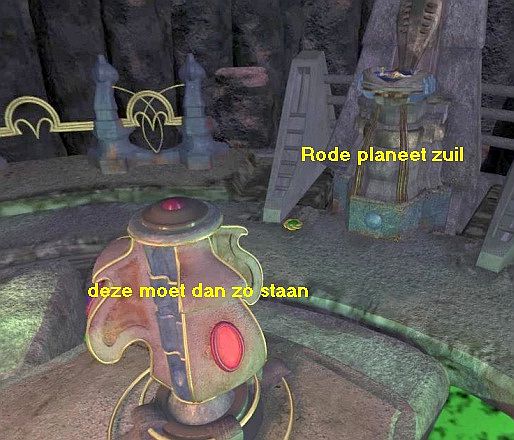
This is the case in each of the 4 dome columns. What you have to do is to make sure that the right color sphere is placed in the front of the dome. Because this column is for the Yellow Planet, the Yellow ball must therefore be placed at the front. However, that is already the case, so you don't have to do anything here. Turn clockwise and go forward to the next column, the Red Planet column, and then turn left again.
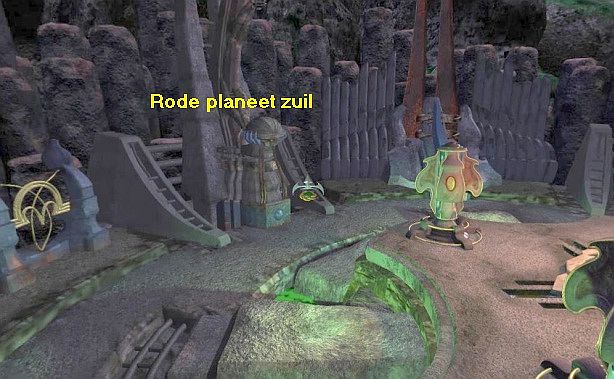
You are then directly in front of the Red Planet column. At the bottom of the column you see a medium blue dot. This column is therefore for the medium-sized Red Planet. Click on the dome again to open it. Again you see three color balls on a turntable. However, the red ball is already at the front, so you don't have to do this again yourself.
Turn right and go forward to the third column and then turn left again.
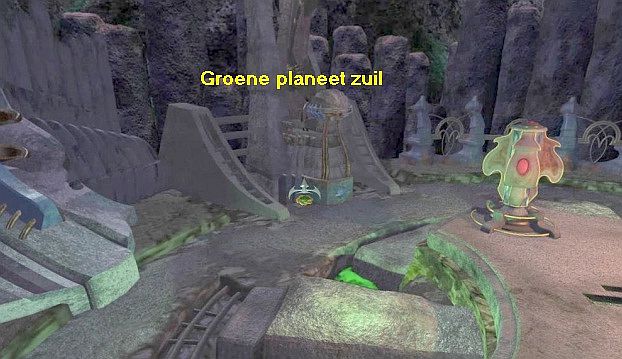
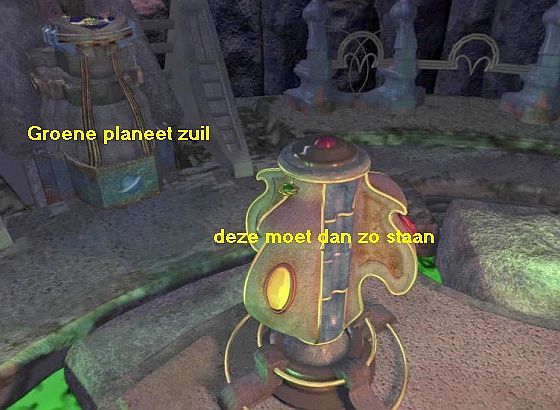
You are now standing in front of the Green Planet column. Open the dome again and you'll see 3 colored balls on a turntable
Now click on the balls until you have the green ball up front.
Turn right again and go forward 1 click and then turn left again.
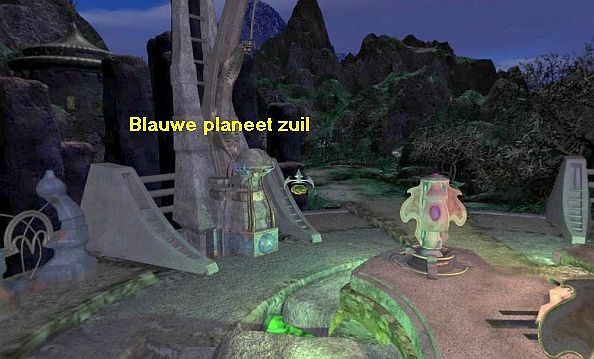
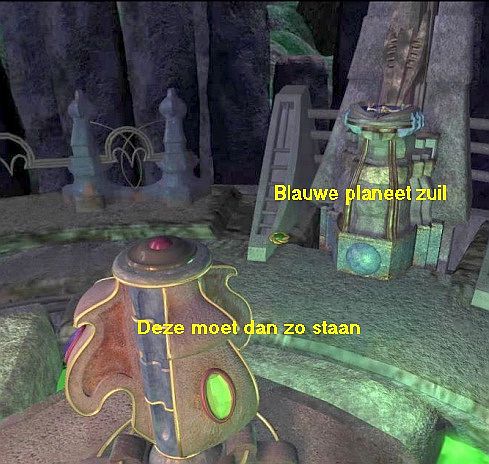
You are now in front of the 4th column and this one is for the large Blue Planet.
Open the dome again and you'll see 3 colored balls on a turntable. Put the blue ball in front here.
Well, this was part 1 of the puzzle. Now comes part 2.
You know that in Grifit's house, the planets changed color as they went through the light of the lamp. Well, you also have to set these colors now. And you do that with the 4 small columns on the Inner Ring. So go back to the "center dot" and then turn around again so that you look at the multi-colored column that stands in front of the dome column of the Yellow Planet.
These multicolored columns each have 4 sides and on each side you see a color oval. If you click on the column, it turns 1 turn and then another side faces the dome column. You must therefore ensure that each of the 4 multi-colored columns faces the dome column with the correct color side. The Yellow planet changed to green, so make sure that the Green Oval side faces the Yellow Planet Pillar.
Then go to the column in front of the Red Planet dome column and make sure that this column with the Yellow Oval side faces the dome column.
Then go to the column that stands in front of the Green Planet dome column and then turn this column with the Blue Oval side towards the dome column.
You don't have to do this for the Blue Planet column because the Red Oval side is already facing the Blue planet.
If you have done all this well then you will see a movie and this movie will start if you have correctly rotated the columns for the Yellow, the Red and the Green planet ......
White laser beams shoot through the metal construction and thick white laser beams come from the multi-colored columns and touch the Dome columns. The "Middle Dot" opens and the "Navigational Map" appears and is put in your inventory.
After this video it is a good idea to take a look in your inventory to see if the "Navigational Map" has actually ended up in your inventory.
The Bell:
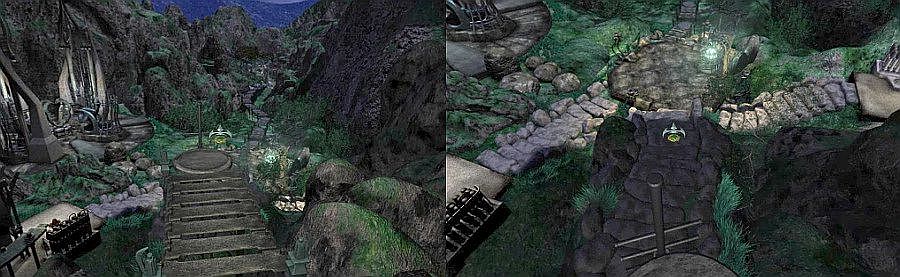
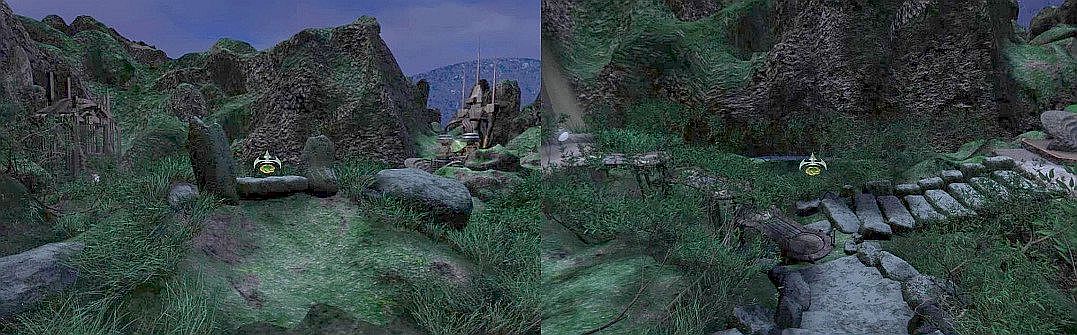
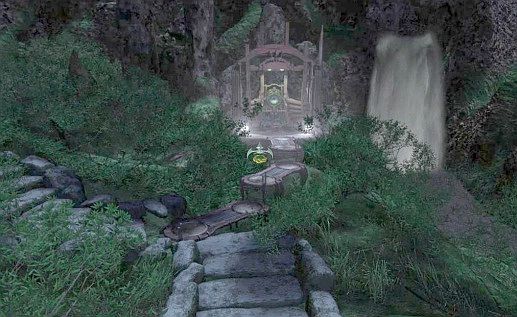
You are probably still at the "middle dot". Go to the entrance of the square. You are then at the top of the stone steps and the forest path is in front of you again. Go forward 2 times on the forest path. Straight ahead you will see Grifit's house again but you are not going back to that now. Turn clockwise. You then look into a path that goes to the right.
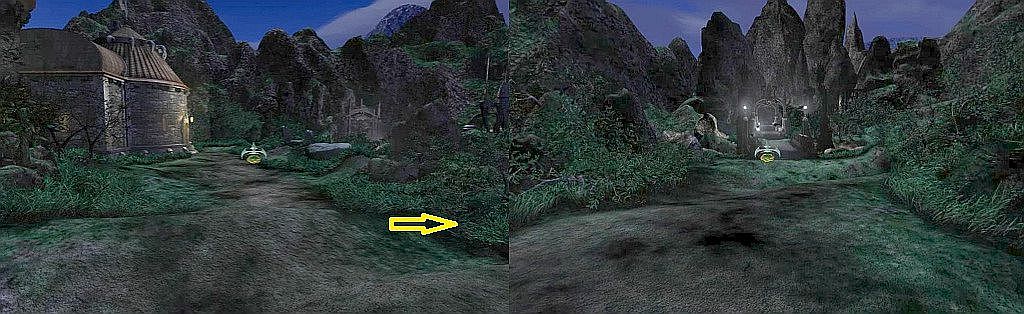
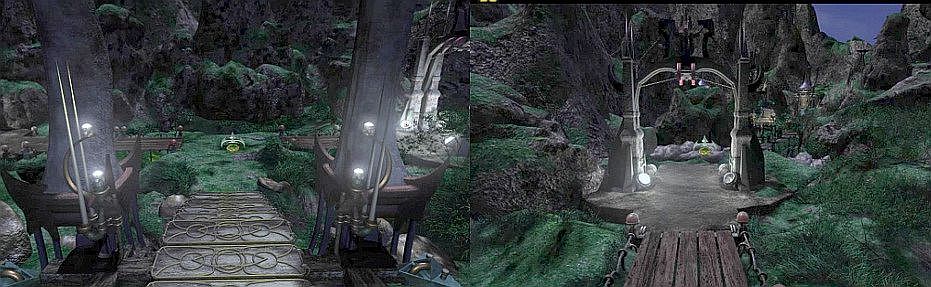
Go forward 1 click over this path. You then stand in front of a stone bridge that lies over a deep gorge. A river flows in the gorge and to the left of the bridge you see a waterfall crashing down. On the other side of the bridge you see a wooden path that goes through a number of arches.
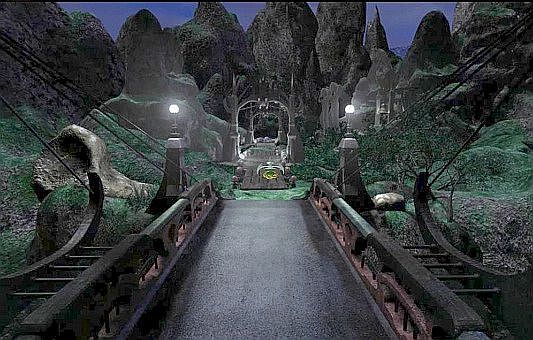
Continue 3 clicks forward. You then went over the bridge and through the front arch. You can continue further along the path, but first turn to the right. You see a staircase that goes up to a plateau and above that plateau is the big bell.
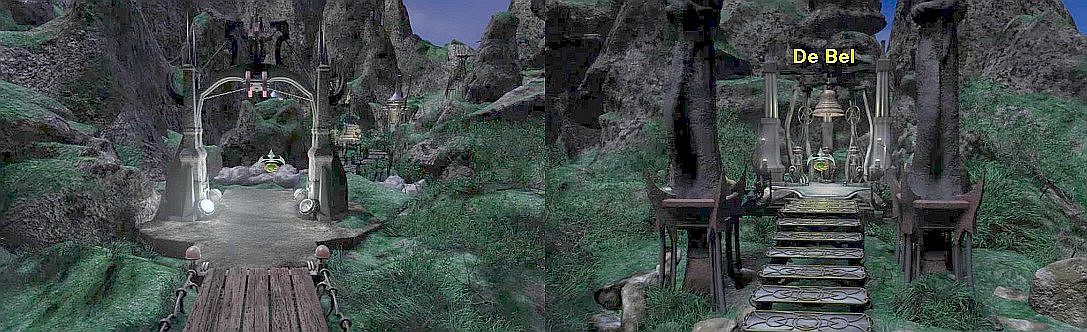
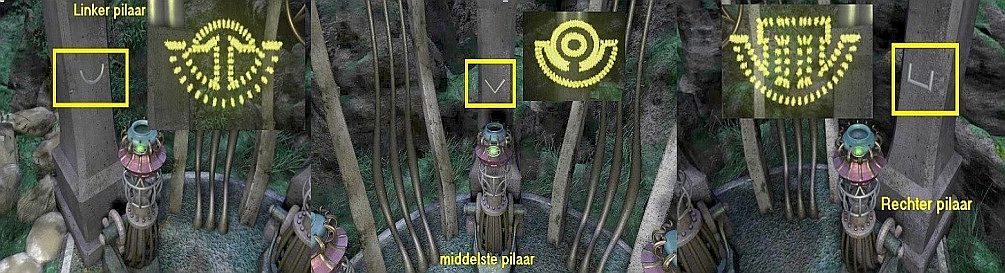
Go up the stairs twice. You are then on the plateau and at the big bell. Take a look around. The bell hangs on three pillars. On each pillar you see a sign and at each pillar there is a kind of "Pot". Drawing 2 in your Journal has to do with these pillars. Click on each of the three "pots" that stand in front of the pillars. A kind of "smoke" comes out of each pot and this "smoke" makes a large Symbol in the air above the pot. The symbol from the "pots" remains visible for only a few seconds, but you can keep clicking on the "pots" endlessly to see these Symbols again.
You need to remember these 3 "pot" Symbols and you need to know which pillar sign they belong to. So just name the 3 pillars for your convenience: Left Pillar, Middle Pillar, Right Pillar and then draw the 3 Signs on each pillar and then also draw the three Symbols that come out of the pots. Make a note of which Sign belongs to which Symbol. You will have to set these Symbols on the top floor of the Zodiac room.
When you have finished drawing, turn to the stairs and go back down the stairs.
At the bottom of the stairs, turn to the right and go forward through the 2nd arch.
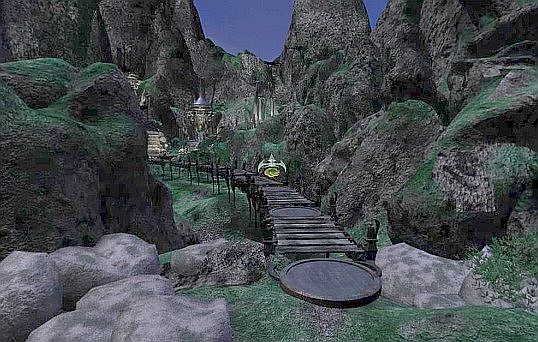
You then stand in front of a wooden "jetty" path that continues through the narrow gorge.
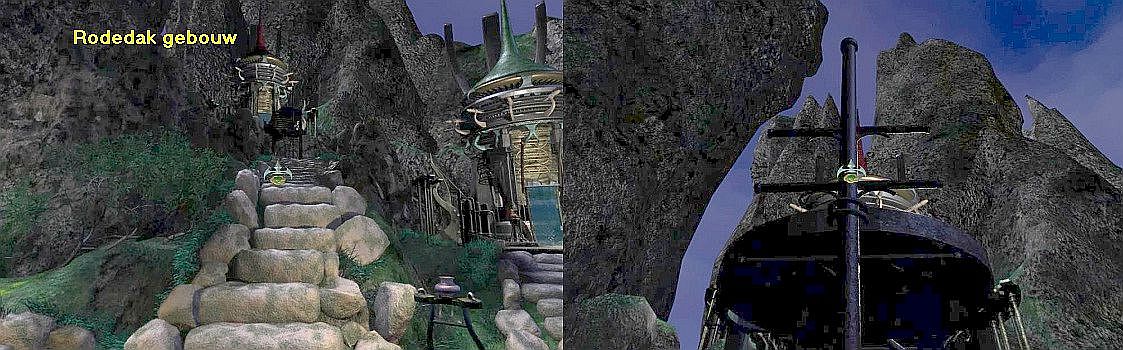
C: The 3 Pointed Roof Buildings:
Follow the "jetty" path 3 times forward to a small circular platform. First take a good look around before you start doing something. From this small round platform 3 stone steps go up. Every staircase goes to a building with a pointed roof on it. The three roofs of these 3 buildings each have a different color. The left staircase goes to the Bleu Roof Building. The middle staircase goes to the Red Roof Building and the right staircase goes to the Green Roof Building. To the left of the left staircase is a kind of lamp construction that you can zoom in on.
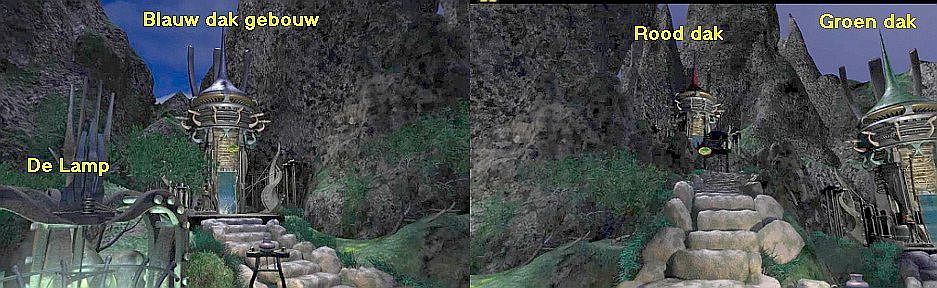
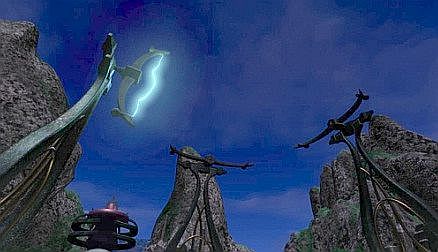
To the right of the right staircase you see a large cove among the rocks. There is a larger construction there. There are 3 Antennas around that construction. Just go there. You can see that it is a kind of screw that protrudes from the platform here.
So there are 3 large Antenna pillars around this Screw. Go back to the round platform with the 3 stairs.
The Blue Roof Building:
The Pointed Roof puzzle is explained in the 5th drawing in your Journal. On the round platform, turn to the Left Stairs and go up the stairs twice.
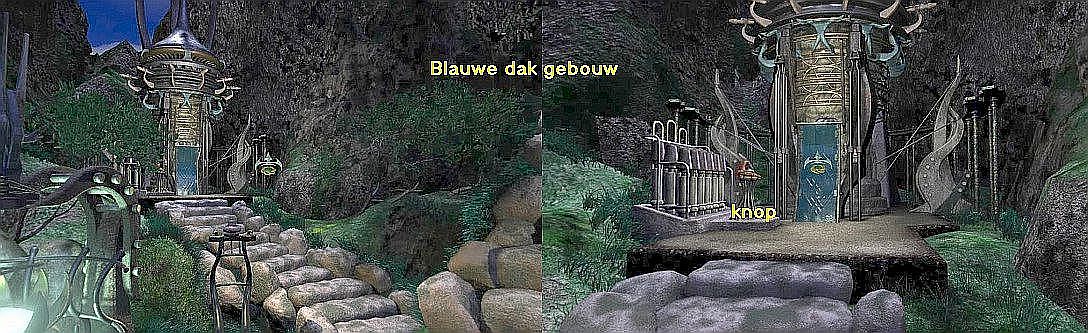
You are then at the door of the Blue Pointed Roof Building. The door is closed, but on the left is a pillar with the door button on it.
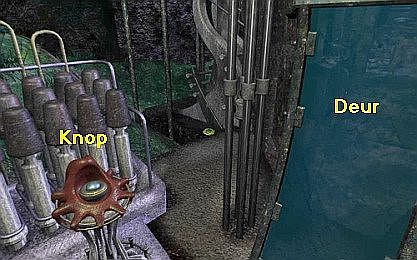
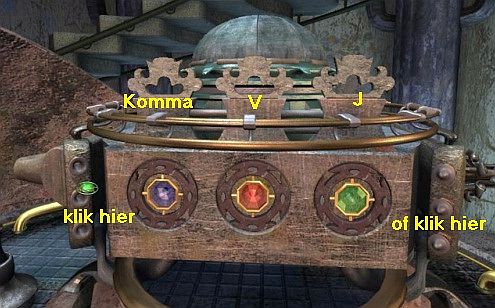
Turn to the left so that you are directly in front of the button. Click on the blue button and ...... the door will open. You turn back to the building automatically. You now see a lilac box in the building. Click on this Lilac Box with your cursor or with your forward arrow. You are then zoomed in on the device that is in the building. This device can be spun around and you will see the next lilac box. So it's a carousel and this thing has 3 of those Lilac squares. In the lilac boxes you see the J, the Comma and the V. Just like on the 3 stamps that you have in your inventory and that have come out of the box that is on the L-shaped table in Grifit's house.
What you need to do is to make sure that in each of these 3 Pointed Roof buildings the correct Lila box appears to activate those 3 antennas at the Screw structure. You do this by clicking on the lilac boxes. The device will then turn and show you the following Lila box. If that is the right box then you see a scene in which one of the Antennas is activated and finally you see how the 3 activated Antennas loosen the Screw, which opens the roof of the Grotto (in the ground under the screw). The Journey Ship is in that cave.
In this Blue Building you will first see the V-box. Click on the V-box. The device turns and shows you the J-box. Click on the J-box. The device turns again and then shows you the Comma box and ........ You can see that the Left Antenna is now being activated.
Zoom out, turn around and go back down the stairs to the round platform.
The Red Pointed Roof Building:
Then turn around to the Middle Staircase. Click 2 times forward on the middle stairs again. You are then standing against an iron climbing pole.
Look up and then climb up via the forward arrow that you get at the top of the climbing pole. Upstairs you go forward to the door of the building
The blue door of this Red Pointed roof building is also closed, but here too the Door Button is on the left. So turn left again and click on the button again and the door will open again. Zoom in on the Lila box. This is the J-box. Click on the J-box. The carousel turns again and then shows you the comma box. Click on the Comma box. The carousel turns again and you see the V-box and the rear antenna is now activated.
Zoom out, turn around, move forward 1 time, look down and then advance 3 times to get back on the round platform.
The Green Pointed Roof Building:
Turn around to the Right Staircase and go up to it
Press the Door button again to open the door and zoom in on the carousel again. You see the comma box. Click on the comma box to make the carousel spin and you will see the V box. Click on the V-section to turn the carousel back to the J-section and ....... The Right Antenna is now also activated.
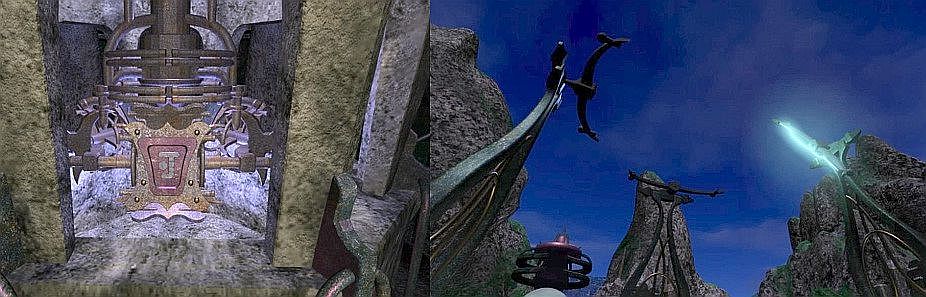
All three antennas are now rotated and activated and they drop and grab the Screw. The antennas loosen the screw and the roof of the large cave opens.
D: The Zodiac Triangle
Go back to the round platform and then turn clockwise to the left stairs. Now zoom in on the Lamp, which is on the left next to the left staircase. You see the lamp bulb and you see that an iron bar comes out of it. At the bottom of the bar you see a triangle. That is the Zodiac Triangle. You can now click on it but you cannot get the thing off. At the top of the bar is a screw.
Click on the screw and the rod will be pulled up and the Zodiac Triangle is now free. Click on the Zodiac Triangle and it will appear in your inventory. Check the inventory to see if the Zodiac Triangle is actually in it.

Zoom out and turn left to the "jetty path". Now go forward 8 times, over the jetty path and then through the two arches and over the bridge, and you are back on the forest path. Turn right and go forward 1 time towards Grifit's house. However, do not go all the way to Grifit's house but turn right again.
Again you look into a path that goes to the right. Go forward 1 time. You are then at the top of a stone staircase that goes down.
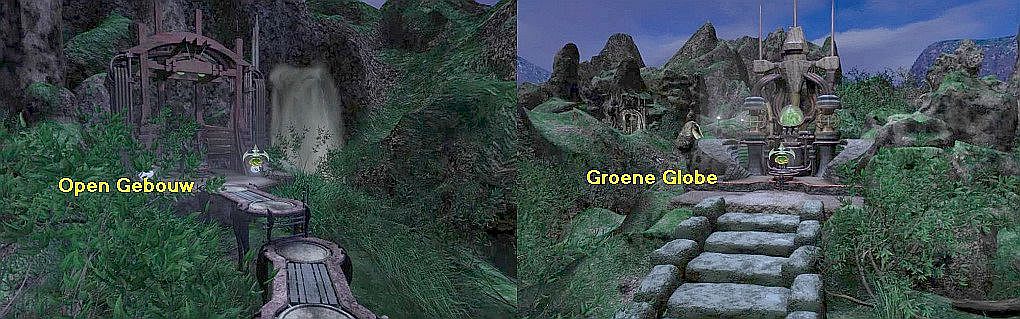
Look down and then go down the stairs. Downstairs you can go to the left to an Open Building and to the right to a Structure with a Green Globe.
We now first go to the right, to the:
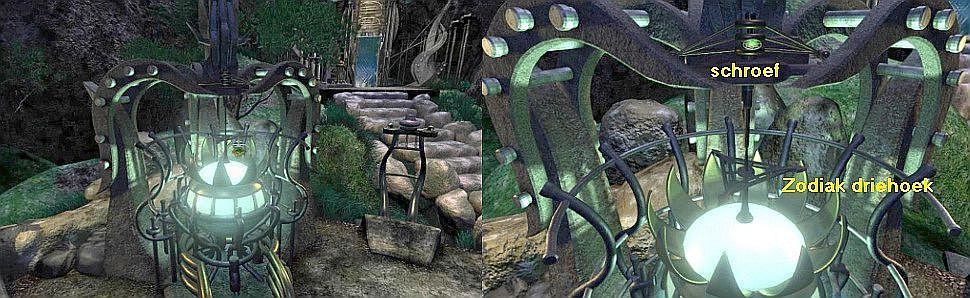
The Green Globe structure:
So on the path, turn around to the Green Globe structure and then move forward until you are facing that green globe. Look down. There is a small pillar under the green sphere. Take the Lever from your inventory and place the lever on the pillar.
Then click on the lever and .............
The lever turns one turn and then back. Left and right of the green sphere you see "smoke" and the green sphere rises and then turns around.
The camera turns around and you now see the Open Building on the opposite side and that building is now illuminated in white.
After the video, turn around again to the green sphere. Look down again and grab the lever back from the pillar.
Turn around again and go forward 2 times to the building on the other side
The Open Building
You are now in the Open Building and you are standing in front of a "wheel". On the outside of the "wheel" you see the letters W, N, O, S and in the inner ring you see blue symbols. W = West, N = North, O = East and S = South. So it's a kind of compass and those blue symbols are the Signs of the Zodiac. The 3rd drawing in your Journal explains this puzzle. Look down again at the floor. Also here is a pillar where you have to put the lever. So grab the Lever from your inventory again and put it in the pillar again.
Click on the lever again. The Lever turns again and the Compass now goes flat and you zoom in on it automatically. A pin is inserted in the middle of the compass.
Take the "Zodiac Triangle" from your inventory and click it on the Pin of the compass
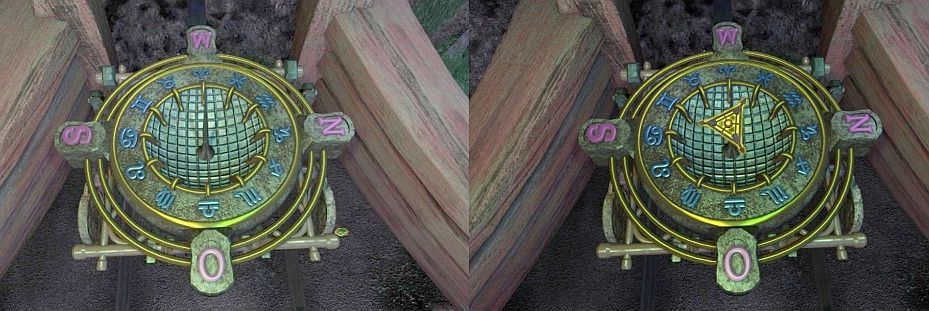
The Zodiac Triangle is placed on the pin and you see that the bottom of the compass goes open. You see three round turntables that are above each other. You will see a symbol on each turntable and a large S.
Then you are zoomed in again on the top of the compass.
The Zodiac Triangle now points to the West with the upper point and all three points of the triangle point to a blue symbol.
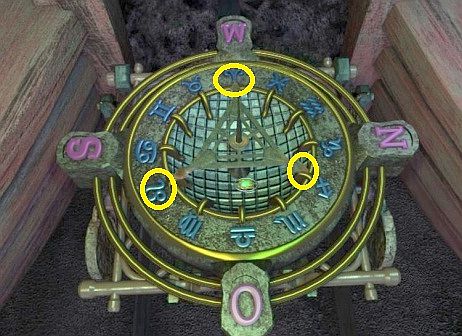
So those three blue symbols belong to the West. However, the compass has informed you that you must have the Symbols that belong to the South (the S). So click on the Zodiac Triangle. The Zodiac Triangle will then rotate and point back to W, O, N or S by 1 point. Now make sure that the triangle with the left point indicates the S. So click on the Zodiac Triangle as many times as necessary until the left point of the triangle points to the S.
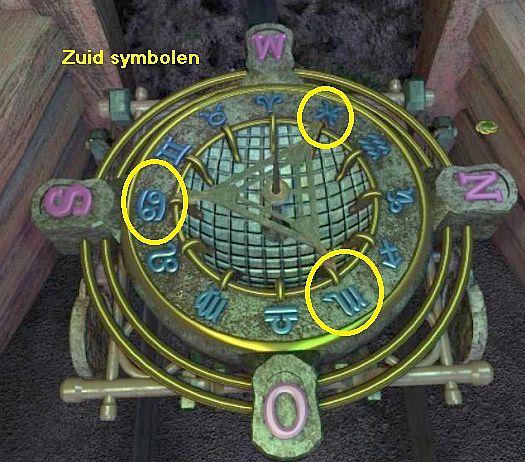
The three points of the triangle then each again indicate a Blue Symbol. Draw these 3 Symbols. The 1st blue symbol is to the right of the W, the 2nd is to the right of the O and the 3rd is to the S. Draw those 3 symbols in this order and then zoom out. You now have all you need to solve the Zodiac Room with which you have to open the Big Round Door, in the secret niche, and activate the Navigation Map. Turn around and go back one time and turn right and go up the stairs.
Back up you go forward to the left side of Grifit's house and turn right ...
1 click forward, turn left and enter Grifit's house through the front door.
E: Grifit's House:
Go back through the gate into the round hall. You are back at the bottom of the:
Zodiac Room: Ground floor
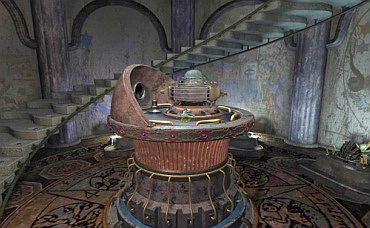
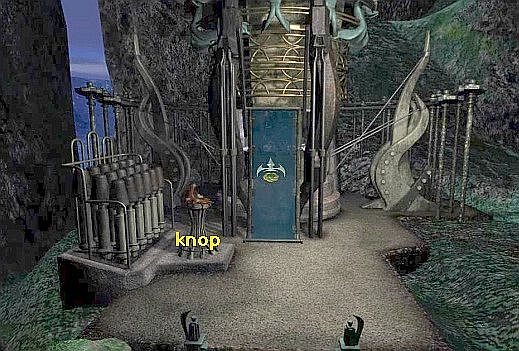
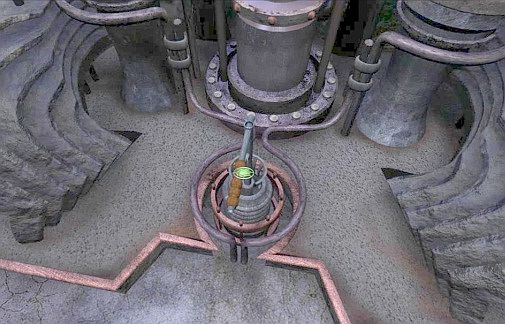
Zoom in again completely on the device that has risen from the middle of the floor. Those three rods withdraw and the rectangular surface with the three circles appears again. To the left and right of this surface you can still see the end of the 3 bars protruding. You can also see the flame coming out of the pipe on the left.
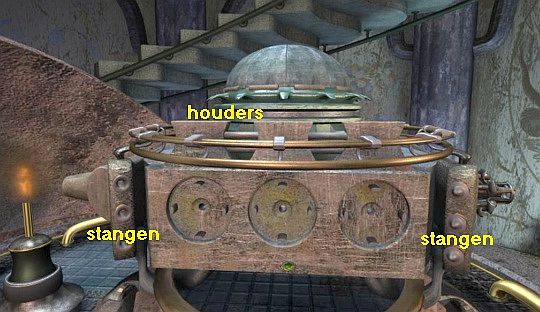
The three Circles that you see in the rectangular area represent the 3 Pointed Roof Buildings with which you have activated the 3 antennas. You know that the roofs of these 3 buildings have a certain color. The Left Building has a Blue roof, the Middle Building a Red roof and the Right Building a Green roof. From the box that is on the table in the front room, you have obtained a Blue, a Red and a Green Jewel and also 3 stamps. Via the 3 Pointed Roof Buildings you know that the Comma-stamp belongs to the Blue Building, the V-stamp to the Red Building and the J-stamp to the Green Building.
Above each of the 3 circles in the rectangular area is a holder in which you must place the stamps. The Left Circle is therefore for the Blue Building, the Middle Circle for the Red Building and the Right Circle for the Green Building. Open your inventory and take the Blue Jewel out and place it in the left circle. Then place the Red Jewel in the middle circle and the Green Jewel in the right circle. Then take the Comma-stamp from your inventory and place it in the holder above the blue jewel, place the V-stamp in the holder above the Red Jewel and the J-stamp in the holder above the Green Jewel.
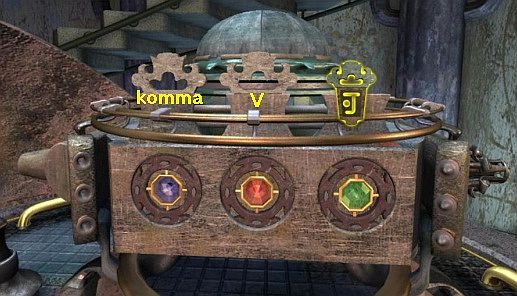
Then click, left or right of the circle box, on the ends of the three bars and ....
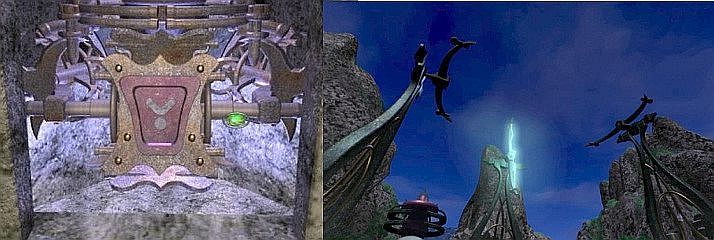
The circle box disappears inside again and the 3 bars close again. You turn automatically clockwise and a laser beam is sent from the device to the large round door and this beam hits the large thick button in the middle of the door.
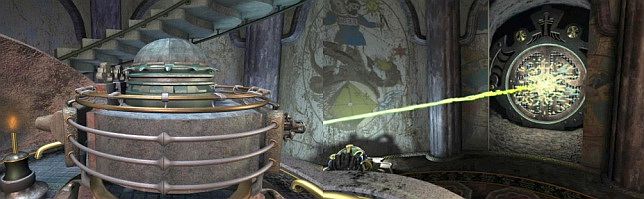
You turn back to the device and then you see how the thick button in the door turns green and then you are again in front of the device.
Zodiac Room: Upstairs
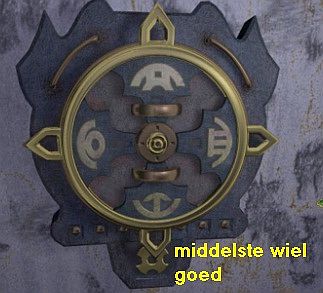
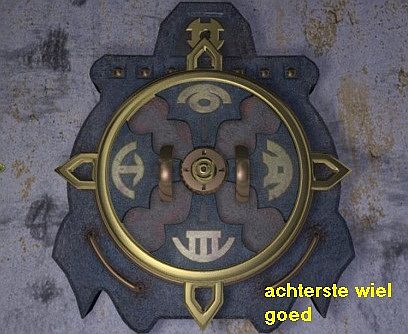
The 3 "Wheels"
The Navigation Map must now be activated. Do you remember that there is a large "Compass" on the top floor? And that there are 3 "Wheels" on the round wall of the upper floor? Well, that compass is the same kind of compass as it is in the Open Building and on which you have found the 3 South Symbols. Those 3 "wheels" represent the 3 pillars and the 3 "pot symbols" that you saw at the Bell.
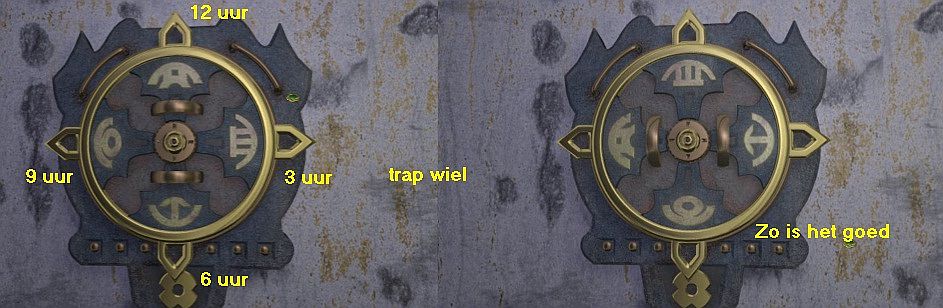
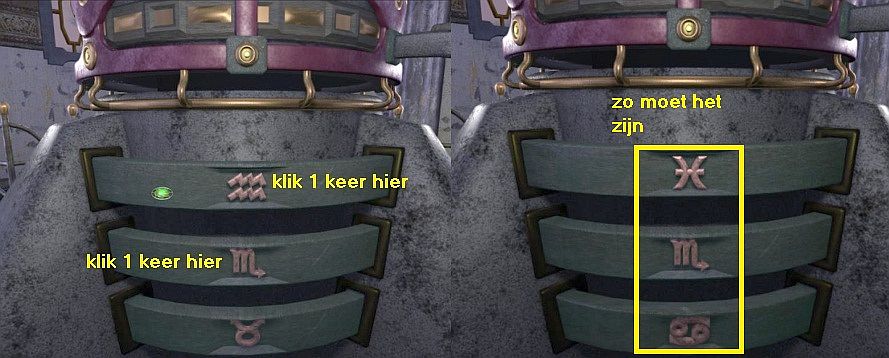
Each of the 3 "Wheels" has 4 "Arrows" on the outside and in the "Wheel" there is a Symbol next to each "arrow". If you look at the "Wheel" as a clock, the "Arrows" and the Symbols will be on: 12 o'clock, 3 o'clock, 6 o'clock and 9 o'clock. At the bottom of the wheel a sort of "Button" sticks out, so at 6 o'clock. The arrow at 6 o'clock protrudes over the top of that button with the point. If you really have a lot of imagination then you could see that the tip of the 6 o'clock arrow with the top of that button makes the SIGN that you have seen on one of the 3 pillars of the Bell. 3 of the 4 Symbols that appear with each "arrow" are therefore the 3 symbols that came out of the "pots" with the bell. So you have to find out which wheel belongs to which pillar and then put the correct symbol on that wheel at 6 o'clock by clicking on the 9 o'clock or the 3 o'clock arrow.
Now go up the spiral staircase 1 time forward. You are then halfway up the stairs.
Turn to the wall to the left and zoom in on the "Wheel" that is halfway up the stairs on the wall.
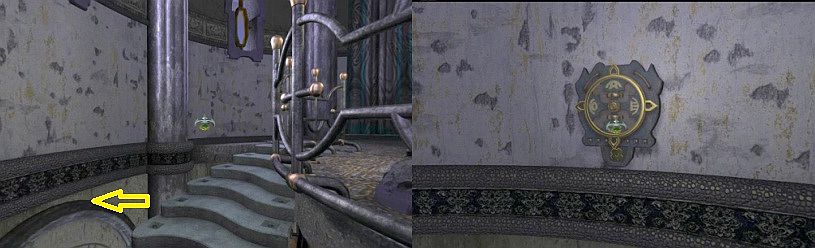
This "stair wheel" is for the Middle Pillar at the Bell, so you have to put the "pot symbol" of the Middle Pillar in this wheel at 6 o'clock. That symbol is now at 9 o'clock. So click on the 9 o'clock arrow and the 9 o'clock symbol appears at 6 o'clock. Ready.
Zoom out of the wheel, turn clockwise and go up the top floor twice. Turn to the left and zoom in on the Middle Wheel.
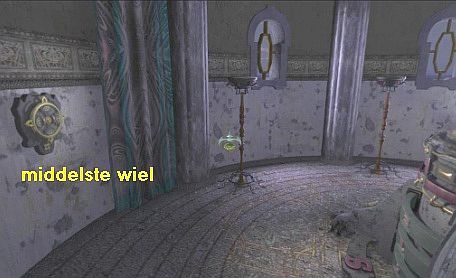
This wheel is for the Left Pillar at the bell, so you have to set the "pot symbol" of the Left Pillar to 6 o'clock.
That symbol is now at 12 o'clock. So click twice on the 9 o'clock or on the 3 o'clock arrow and you're done.
Zoom out of the wheel, turn right and go forward 2 times to the Rear Wheel.
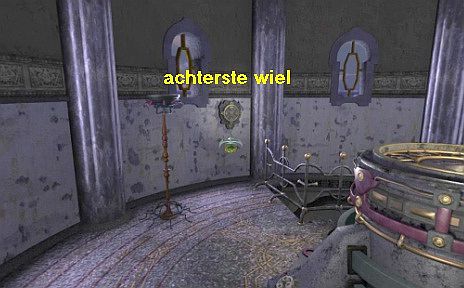
So this wheel is for the Right Pillar at the Bell.
The correct symbol is now at 12 o'clock so make sure this symbol appears at 6 o'clock by clicking twice on "9 o'clock" or on "3 o'clock" and ...,.
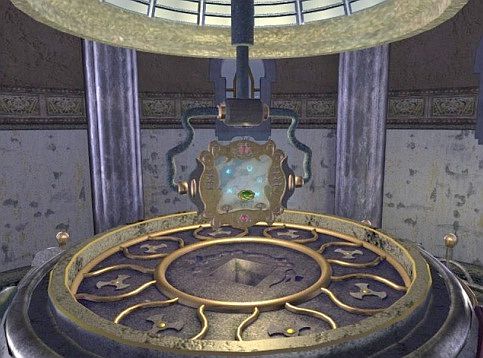
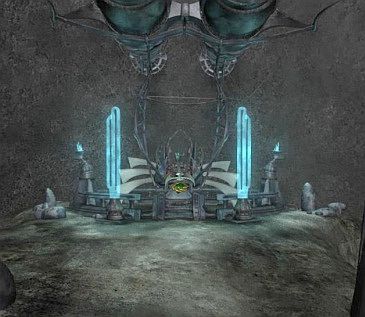
Video: half a dome comes down from the ceiling. A Holder protrudes into the dome.
The dome then hangs above the Compass as a lid that still needs to be closed.
After the video you stand in front of the big Compass. Look down. Below the compass you see 3 round symbol stones on which you now see the 3 West Symbols. In the left leg of the compass you will see a round opening. Zoom in on the opening in the left leg. Take the charged "Charger" from your inventory and insert this thing into the opening in the leg.
Zoom out. Look up again and zoom in on the top of the compass. A "gripper" hangs in the lid.
Open the inventory and take the Navigation Map and then click the Map in the gripper
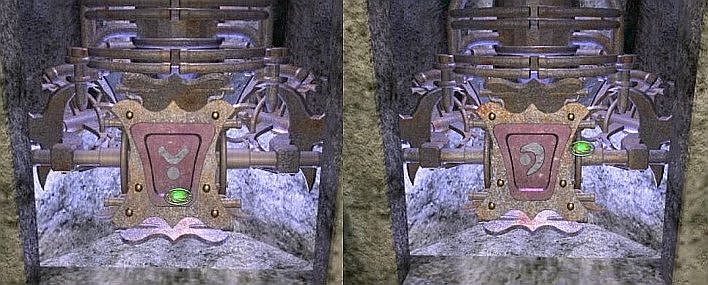
Step back and look down and zoom in on the 3 symbol stones of the compass.
On the 3 symbol stones you now see the 3 West symbols but they must become the South symbols. By clicking left or right next to a symbol you turn the tiles and see other symbols. However, the 3 stones do not rotate separately. If you click on the top tile, the top and the middle tiles rotate. If you click on the bottom stone, the bottom and top stones turn. If you click on the middle stone, the middle and the bottom stone turns.
This is the solution:
Click once on the top stone, to the right of the symbol. Then click 1 time on the middle stone, left next to the symbol and ....
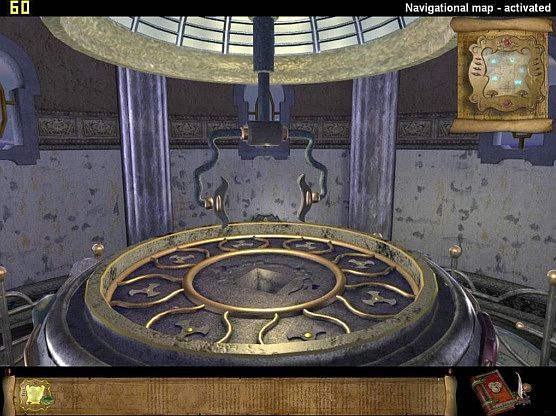
Movie: The Navigation map disappears in the "compass", the lid closes and the map is "loaded" and is now activated.
You are then back on top of the Compass. The lid is open again, the gripper now hangs the activated navigation folder.
Take the now activated Navigation card back from the holder.
Just to be sure, check whether you now have the Activated Navigation Map actually in inventory.
Get out at the back, turn right and descend the spiral staircase to the ground floor again.
F: The "Journey ship"
Enter the secret niche and click on the green button of the large round door.
The door will now open and you will automatically end up in the tunnel. Go forward 2 times and .....

You now meet Belik and he tells you about a revolt within the Clan. Duran and his warriors try to gain control of the "Holy Ring" and the "Tetrahedron." However, Arakon has managed to get hold of the "Sacred Ring" and he wants you to get it and take it to the Parallel Worlds where you must go find Grifit and get the "Tetrahedron. You must ensure that the "Sacred Ring" and the "Tetrahedron" do not end up in the hands of Duran, so now you have the "Sacred Ring" in your inventory, because Belik gave it to you.
Go all the way through the cave to the Journey Ship. A moment up, you will see the hole in the roof that you opened through the 3 antennas.
You are now in the Journey Ship and in front of the "controls". You will see a blue / purple Holder in which the Navigation Map must be placed. But you cannot just click the Navigation Map in that holder. Above the holder is a "gripper". Take the Activated Navigation Map from inventory and click the thing on "gripper".
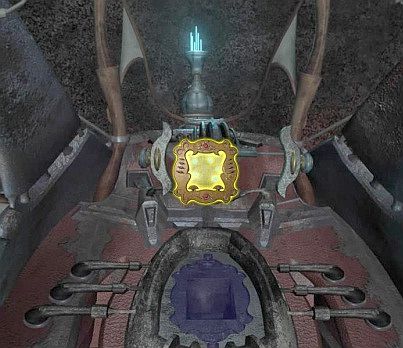
The "Gripper" then places the Navigation Card in the holder. Look down and to the right. You see a lever
Click on the Lever and enjoy the journey in the Journey Ship.

You end up in:
2012: Original Dutch Walkthrough by: Louis Koot
January 2020: English translation by: Louis Koot
