
2023: Walkthrough by: Louis Koot
If you found this walkthrough through Google search or through another site, you probably haven't visited my site.
Many more highly detailed game walkthroughs can be found on my site and here is the url of my site: www.pcgameswalkthroughs.nl
Chapter 1: Back to the Future
Castle Gordon
Main Hall:

In the middle of the Great Hall stand a big Globe. The Globe stands on a square pillar. Keep your arrow on this pillar.
Your arrow turns red and in the upper black border you read that this is the "Monolith".
Left click on the Monolith and Samuel walks towards it and he tells you something about it.

This Monolith is the family stone laid by Marcus and Mordred Gordon in 1206 as the foundation stone for the original castle.
Left click your red arrow on the Monolith again. Samuel then tells that the marble slab contains all the names of all the Gordons who have ever lived in the castle.
On the wall, behind the Globe, hangs a large portrait painting. Click on that portrait painting. Samuel walks over to take a closer look at the portrait and says that this is the portrait of Marcus Gordon. Marcus was the younger of the two brothers who once started the Gordon dynasty. You enter a close-up of the portrait. Look at it and then click the arrow on the right to exit this close-up.

On the wall, between the dining room door and the common room door, is a small table. Click there. Samuel walks over and says that Bates, the butler, always puts the mail on this table. However, there is currently nothing on it. There are 4 Exits here and they are: "to the sitting room", "to the dining room", "to the library", "to the stairs". Now go through the bottom right exit "to the stairs".

Samuel then enters the front part of the Great Hall where the front door is.
During the conversation with Victoria, Samuel said that he actually wants to go to his room first.
So that's what we're going to do now. On the left side of your screen is the "to the stairs" exit.

So go up the stairs on the left side of your screen. When you reach the top you are on the gallery. Continue straight through the gate.

You are then in a corridor. On the left of your screen is Victoria's room, on the right is Robert's study.
On the right side of your screen and on the left in the gate above the steps you can continue through the corridor to "the Chamber".
Now first click on the door of Robert's study.

Samuel knocks on the door and Robert opens it. You will notice that Robert does not invite Samuel to enter. There will be a conversation in the door and then your conversation topics will appear at the bottom of your screen, in the form of icons. So use all these 3 conversation topics: "William", "Black Mirror Castle" and "News". The conversation comes to an end on its own and Robert retires to his study.

To the left of the door of Robert's study is a newspaper rack. Click on the newspaper rack.
Samuel finds today's newspaper and in the newspaper he finds a note. You will see the note in close-up on your screen.

It's a note from one "H.H." and addressed to Robert. Samuel starts reading the note and then you hear another voice continue reading the note. When the voice is finished reading, click on the "Curved Arrow" to exit the close-up. Then go, via the steps or via the right side of the screen, "To the Room". You are then in the continuation of the corridor. At the back, near the "two chairs and a table", is the door to Samuel's room. Click on Samuel's door. Samuel tells you that the door is locked but that Bates, the butler, gave him the key. So take the key from your inventory and click it on the door again.

Samuel opens the door and steps into his room.
Samuel's Room:

Samuel says that his room still looks exactly as it did when he was last here 12 years ago. Just look around the room first. Move your cursor across the screen to see where all the click spots are. You will find the following items that you can click on: The mirror above the chest of drawers, the chest of drawers, a stand with a bowl, all the paintings, the suitcase on the couch, the fireplace , the crucifix on the right on the mantelpiece, the bed. First left click on Samuel's suitcase that is on the couch. Samuel opens the suitcase and reports that he has only packed the bare essentials. Click on the now open suitcase again.

Samuel takes a jar of headache pills from the suitcase. Click on the suitcase again. Samuel now takes his wallet from the suitcase. Then click on the suitcase again, but Samuel will not take anything from the suitcase anymore. Open the inventory and then right click on the jar with headache pills. Apparently Samuel suffers from frequent headaches and so he takes a pill every now and then. Right click on the wallet to extract a coin. Right click on the coin.....it's an ordinary metal coin. Right-click on the wallet again. So there is quite a lot of money in the wallet.

There are 4 paintings hanging on the wall behind the sofa. Click on each of these 4 paintings. The round painting shows the portrait of Samuel's wife Cathrin, who died 12 years ago. Apparently there was a fire in the castle 12 years ago and Cathrin died. Samuel is still weighed down with guilt because he thinks it was his fault. The remaining paintings show the castle and the family country home in Wales. All these paintings were painted by William. To the left of the sofa is a stand with a bowl. Click on the bowl. It is an old-fashioned wash bowl and Samuel goes to wash his hands in it.
Click on the large painting hanging on the wall above the fireplace. Samuel does not know who this woman is, but that it is a very old painting. Click on the crucifix that stand on the mantelpiece. Click on the fireplace. Samuel says it's cold in the room and he'll ask Bates, the butler, to light the fireplace. Click on the bed. However, Samuel does not want to rest just yet. On the wall, to the right of the door, there is a chest of drawers under the mirror.

Click on the top drawer of the drawer cabinet. Samuel opens the drawer and you are in the close-up of the cupboard.
On the cabinet stand a picture of Cathrin.

Click on the picture. You see a cut scene, actually it's a vision of the fire 12 years ago. There is a photo album in the drawer. Click on the photo album but Samuel does not want to view the photos in this album. Click on the curved arrow at the bottom right to exit the close-up again. Now click on the bottom drawer of this cabinet. This drawer is locked and Samuel can't remember where he left the key 12 years ago. Samuel says there's an old camera in this drawer.
Now move your cursor over the door frame. Your cursor will turn red on the top edge of the door frame. Left click on the top edge of the door frame. However, Samuel reports that it is too high to see if there is anything on the edge. Then right click on this top edge of the door frame and ...... Samuel feels over the edge with his outstretched hand and he finds a key.

Then take this key from your inventory and click it on the bottom drawer of the chest of drawers.

Samuel opens the drawer and you are back in the close-up of the cabinet. There is a camera, rolls of film and a bible in this drawer.

Click on the camera. However, Samuel does not want to take the camera. Note that you can keep clicking on the camera. So remember, this camera is right here in this drawer. Later in the game Samuel needs a camera and only then can you grab the camera. Click on the rolls of film. Samuel does not want the film rolls either. The rolls of film are too old and no longer usable. Click on the bible and then leave the close-up via the curved arrow. Exit the room through the door. You're back in the corridor.

Click on the painting that hangs in the middle on the back wall. Then click on the two chairs and a table on the back wall. Samuel says that he often played a game of chess with William here. A large painting hangs on the long wall, between the two doors. Click on that big painting. This painting was William's favorite painting and it is 300 years old. Click on the door, right next to the painting. It used to be a children's room, but now this room is empty and Samuel refuses to enter it. On the left of your screen you can just see a piece of a chest of drawers and on this cabinet is a clock. Click on the clock. Then go back to the first part of the corridor via the exit on the left.

You are back at Robert's study in the corridor. On the corner wall is a small semicircular table and above it hangs a painting. Click on the painting. It is the portrait of Jennifer, wife of Tobias Gordon. There is a Meal on the table. Click on the meal, it's Robert's Lunch that was placed here by butler Bates. Click on Victoria's door again. Victoria is not in her room. She's in the sitting room (common room). Go back through the exit at the bottom of your screen to the gallery. Do not go down the stairs now, but click on the right side of your screen to go to the next screen. Then click in the stone gate to go to the "Old Wing".

The Old Wing of the castle:

So this part of the castle was destroyed 12 years ago by the fire that killed Samuel's wife Cathrin. There are a number of click spots here. Click on the chair that stand against the left wall. In the corner, to the left of the stone gate, is a large vase. Click on the vase. The thing is made of black marble. Click on the vase again. There is nothing in the vase. There is a cabinet against the back wall. Click on the cabinet .... there is only dust in the cabinet. Walk from the cabinet to the door in the back right corner. This is the attic door. Click on the attic door, but the door is locked. Achandelier hangs from the ceiling. Click on the chandelier ...... the chandelier is rickety.
In the right wall is the "Cold Fireplace" and next to the fireplace hangs a "Burnt Painting". Click on this painting. Finally, click on the "Cold Fireplace". Samuel says there is only cold ashes in the hearth. Now right click on the fireplace. Samuel now sees something glistening in the ashes and he bends down to find a large number of snippets of a torn and burnt photograph.

The snippets disappear to your inventory.
So go to your inventory and right click on the scraps and you will now enter your first puzzle of this game:

The Photo Snippets Puzzle:
Well, it's quite simple. You have a bunch of snippets and you have to put them back together into a complete picture of a man with a beard. You pick up a snippet by clicking on it. You can rotate a picked up snippet by clicking with your right mouse button. You simply click a snippet in the right place in the rectangular box formed by the 4 corner points. It's not too complicated. It is best to first take apart the stack of snippets and spread all the pieces over your entire screen.

Start with the left and right sides and the top and bottom sides and then fill in the rest.
It's a face that you have to piece together and these screenshots show what it should look like in the end

When you click the last snippet in the picture Samuel tells you that he has never seen this guy and he wonders why someone ripped up this picture and tried to burn it. The photo is now in your inventory. Go back to the gallery via the bottom center and then via the exit on the left side of your screen back to the gate. Click in the gate and you are back in front of Robert's study.
Click on Robert's door again and you knock again. Robert sticks his grumpy head out again. Ask Robert about the photo you have just pieced together. Robert says he doesn't know who this guy is and he wants to know why you're asking him. 2 masks will now appear at the bottom of your screen. These two masks always appear when you have to answer a question with a positive or negative response.

Via the mask with the open mouth you give a Positive answer and via the mask with the closed mouth you give a negative answer. Now give Robert a positive answer. Robert retires to his study. Go back to the gallery via the bottom center of your screen and then descend the stairs to the ground floor.
Great Hall
You are back on the ground floor in the great hall. So on the right you can just see a piece of the great Globe.

Place your cursor in the middle right and then click this exit and Samuel walks behind the globe and is then left in the back of the hall at the doors of the library. Bates, the butler, is dusting the fireplace. Click on Bates to have a chat with him. After the introductory conversation, your conversation topics will appear at the bottom of your screen. Use them all, don't forget to use the "Fireplace in the Room" and the "Key to the Attic" topic.

Through the "Fireplace in the room" topic, Samuel asks Bates to light the fireplace in his room, and Bates promises to do so. Through the "Key to the Attic" topic, Bates tells that the attic door key can be found in the kitchen. If you forget to ask Bates about this, he will never light the fireplace in your room
Above the fireplace hangs a very large portrait painting and below this painting hangs the family coat of arms. Click on the painting. You enter the close-up of this painting. This is the portrait of cruel Mordred Gordon who ruled the Gordon estate in medieval times. Exit the close-up via the curved arrow and click on the family coat of arms. Also click in the fireplace itself. You see a seat on the right. There's a sofa there. Click on the sofa.... Samuel says that William used to read his newspaper here.
On the left you can just see the Globe. Move your cursor over the round floor with that globe on it. There is a border with symbols in that floor and your cursor will turn red on it. So click on that symbols border. Samuel tells you that there are all kinds of symbols and signs in that border, but he doesn't knows what these symbols and signs mean. To the right of the library doors is a chair against the wall. Click on the chair. Bates has a habit of sitting on this chair when he has nothing to do for a while. So if you need Bates, just check to see if he's here on this chair. Now click on the doors of the Library to enter there.
Library:
Dr. Hermann is standing on the left by the bookcases. Go talk with dr. Herman

Ask Hermann about William and about your photo.
Hermann will tell you something strange. During the examination of William's body he has found severe burns on the body, but Hermann doesn't want to discuss it further here. Hermann invites Samuel to visit him tomorrow and then he will tell you everything about it.
To the left of the bookcase where Hermann is standing, another painting hangs on the wall. Click here. It's the portrait of Jeremy Gordon, William's father. Go to the central part of the library via the exit to the left of the painting. You will see a desk near the back wall. Don't go there yet. In the left corner is a small round table and on this table are some "scrolls of parchment". Click on those parchment scrolls.

Samuel walks to the table and finds the map of the area and puts it in his infinite deep pockets
Open your inventory and right click on the map. You get the map large on your screen.

It is a map of the area surrounding the castle. This map allows you to quickly travel to the various locations. You must have visited a location, or have a reason to go to a location, before it becomes available on the map. Place your cursor on a location. If the location then turns red, you can click on it and travel to this location. At the moment only the Black Mirror castle is available. You are already in the castle, so don't click on it, but if you do click on the castle now, you will end up back in the large hall at the front door. Then quickly go back to the library.
To the right of the small round tables is a box on the floor. Click on that box. However, Samuel does not need anything from this box. To the right of the large desk you see a large world map and a Globe. Click on the world map. It is a hand-drawn world map from the 16th century. Click on the Globe. You enter a close-up of this globe.

The Globe is half open and you see a white ball with 9 wooden pegs in front of it, each at a certain distance from the white ball. In the outer edge you see 9 round holes that run from small to large. This is the Planets puzzle, but you can't do anything with it yet, so leave this close-up again via the curved arrow. Now click on the wall left behind the desk to go to the "Back Part". Samuel is then standing left in front of the large desk.

On the desk (table) is a large book. Click on this large book. It is the "Chronicle of Warmhill" book and you now get a history lesson
. You see the book open in your screen.
Listen and read along with subtitles and learn about Warmhill Church and the history of the Gordon family.

When the lesson is over, click on the curved arrow. If you want to hear the whole story again, click on the left page of the book. For now, this is all you can do here in the library. You can still click on some of the bookcases and on some more parchment scrolls, but Samuel won't do anything with them now. Go back to the front of the library and then back through the doors to the main hall. Then click in the middle of the bottom of your screen and on the next screen click in the gate with the Red Curtains to go to the dining room:

Dining room
It's just a narrow room. In the middle is the large long dining table.
Against the left wall is a serving table with a marble top. There is a fruit bowl on this table.

Click on the fruit bowl. There are apples and candies in the fruit bowl. You enter a close-up of the fruit bowl.
It contains 3 apples and two of Samuel's favorite chocolate candies. Click on a candy to take them both out of the bowl.

Close close up. You can click on the middle chair that is on Samuel's side against the dining table. This used to be Samuel's place during family dinners.
Then place your cursor on the candlestick at the back of the dining table and click the "To the Kitchen" exit there and you will enter the:
Kitchen:
On the left you see the cellar door. To the right of the cellar door hang two keys on the paneling. Click on the keys.

Samuel takes 1 of these keys. It's the attic door key. At the back of the kitchen is the back door to the outside.
So now go outside through this door and you are in the:
Back gardens
Samuel is now standing at the rear of the castle in the garden. There's a dead tree here. Click on the trunk of the dead tree. In the right background is the summer house Click on the summer house, Samuel walks to the summer house and tells something about it. Then place your cursor on the thick roots of the dead tree. You will get the "To the Backyard" exit. Click this exit and Samuel continues to the rear of this garden

The fountain is at the bottom right of your screen. Click on or in the fountain.

The water in the fountain is dirty and Samuel finds this outrageous. He will ask Henry, the gardener, to clean out the fountain. Behind Samuel is the door back to the dining room. At the very right corner of the castle is the exit to the stables. Click this "To the Stables" exit. Samuel then walks past the castle on the path to it, but he then stops. Samuel cannot continue to the stables here because the path is overgrown with bushes. To get to the stables, Samuel has to go around the front of the castle. So now go back to the dining room through the door and in the dining room you go, via the exit in the middle of the screen, to the large hall. In the large hall you go to the front door via the exit at the bottom right. Click on the front door and Samuel is outside at the front of the castle.

Front gardens, Stables and the greenhouse
Go to the next screen on the right, via the exit at the bottom right , or the exit at the left, of your screen.
You will now see the entire front of the castle. Click on the stairs to go down.

Samuel is then at the bottom of the stairs. To the right of the stairs, Henry, the gardener, is busy raking up the leaves.
Near the stairs, a pile of leaves is also smoldering. Click on Henry to chat with him.
Ask Henry anything about "Henry", "the Fountain", "William", and the "Photo".

Henry has only been working as a gardener at the castle for a year and he complains that the gardens are much too large for one man to properly maintain. Henry doesn't feel like cleaning that fountain. He doesn't really have time for it and doesn't see the point of it either. That fountain is in the backyard and no one ever comes there anyway and moreover that fountain cannot be seen from the front of the castle. Samuel is now going to be boss and threatens Henry with firing if he doesn't clean that fountain. Henry doesn't know much about William. He has not had much to do with William and refuses to say anything further on this subject. Also, Henry doesn't know who that guy in your photo is.
Click on the gate behind Henry to go to the Greenhouse.
Greenhouse:

Samuel is then standing in front of the large greenhouse building. On the left are a few bags on the floor. Click on those bags. To the right of the bags stand the grinder. Click on the grinder. You enter the close-up of the grinder. There is blood on the inside of the grinder's funnel. Samuel finds this strange.

Exit close-up. Then click on the middle part of the greenhouse building. Samuel walks to the door of the building and tries to open it. However, the door is locked. Go back to Henry, via the bottom right exit. Talk to Henry again. Ask him about "the Blood in the Grinder" and about the locked greenhouse.

Henry doesn't believe there could be blood in that machine. He just ground some branches into it. Samuel begins to doubt whether he really saw blood in that machine. Henry says that he keeps his garden tools in the greenhouse and that he closes the greenhouse because he doesn't trust Morris, the groom. He's seen this Morris creeping around the greenhouse before. Samuel wonders what a groomsman has to do in and around the greenhouse.
Go back to the castle via the stairs and when you reach the top, click on the main entrance of the castle.
Samuel is then standing at the front of the main entrance. Click in the gate to the left of the main entrance to go "To the Stable".

You go 1 screen to the left and you are now to the left of the main entrance. This corner of the castle is the tower from which William fell.
Almost at the corner you see that the fence is damaged. Click on the damaged spot in the fence. This is where William crashed.

Then proceed to:
The Stable:
At the stable, Morris, the groomsman, is chopping wood. There is a cart full of wood and in the foreground is the large well.
Go talk to Morris. Your conversation options are: "Bates", "William", "the Castle", "Henry" and again about the photo.

Morris has been working as a groomsman at the castle for almost 5 years now and he thinks Bates, the butler, is a grumpy guy. This surprises Samuel, who remembers Bates as a good-humoured butler. Morris doesn't like theOld Wing of the Castle very much, his room overlooks it and he has secretly visited it once in a while. He mentions "the drunk" a few times. According to Morris, Henry, the gardener, is a drunk. Morris also doesn't know who the guy in your photo is.
After this conversation you can click on this screen on the side or the front of the well, the large doors of the stable, the wooden stairs and the cart. None of this will get you anywhere, but do it anyway. Enter the stable through the entrance in the side wall. There is a workbench in the stable. The workbench is against the wall to the right of the entrance. There are several click places on the workbench. Those are the "shelves", the "vise", the "bottle" (behind the vise), and the "drawer" under the vise.

Click on the drawer of the workbench. Samuel opens the drawer. In the close-up of the drawer, click on the hammer.
However, Samuel now has no reason to carry a heavy hammer with him, so he leaves the hammer in the drawer.
Also click on the iron box .

Then close the close-up. Then click on the Bottle that is on the workbench. On the label you can read that there is an expensive wine in the bottle.

Click on the bottle label. The bottle comes from the wine cellar of the castle. Samuel wants to ask Morris how he got the wine bottle. Close close up. Here in the stable you can alsoclick on the carriage, the family coat of arms at the front of the carriage, several buckets, one of which is full of holes, a pile of hay. There are a number of horse boxes in the stable. There is a light switch on the left upright of the front horse box.

If you click on the light switch, a light will turn on in the middle cage. However, click the switch again to turn the light off again. Go back outside and talk to Morris again. Ask Morris about the bottle of wine. Morris claims he got the bottle of wine from William. However, Samuel cannot believe that William gave such an expensive bottle of wine to a groomsman.
Go back to the main entrance. You do this by clicking twice at the bottom right of your screen. Back at the main entrance, click in the front door to enter the castle again. You are then back in the main hall. Go up the stairs to the gallery and then go right back to the Old Wing. On the Old Wing, take the Attic Key from your inventory and use it to click on the attic door, in the back right corner.

Samuel now opens the attic door and you end up on the:
Attick
There are a few more clicks here again. Against the wooden wall to the left of Samuel is a large wooden chest, but it is locked. There are shelves on the wall but nothing of any interest on them. The corner, on the right, will not get you anything either. On the left of your screen is an old rocking chair and in front of the rocking chair are boxes and a red-brown opened chest. Click on all these spots, but it won't get you anything. Then walk all the way to the left, so past the rocking chair.

You will then reach the left part of the attic. In the stone wall you see the door to the Tower.
However, the door is boarded up with planks. Click on this door.

Samuel can't get through this door and says he has to remove those planks. However, he cannot do that with his bare hands. Walk back to the right part and then go back to the Old Wing and then back to the Gallery. Now go back to Robert's study. Click on Robert's door. Ask Robert about "Robert" and 2 times about "Henry".

Then go, right, to the continuation of the corridor where your own room is.
Bates comes out of your room and tells you that he lit the fireplace in your room.

You can go into your room, click on your door, to check if the fireplace is lit.
The Red Symbol
Then go to the ground floor of the large hall and click there in the middle right of your screen and you are back in the corner with the large fireplace.
Bates is here dusting the mantelpiece again.

Talk to Bates You now get 3 subjects: "Toolbox", "William's place of death" and "The entrance to the tower". Ask Bates about the Toolbox first. Bates says that there is a toolbox in the stable. Then ask Bates about the "Tower Entrance". Victoria has had this entrance closed. She doesn't want anyone to come into William's room. Then last ask about "The Spot of William's Death".
NB: in the conversation with Bates you will get the topic "The Spot of William's Death", only if you have previously explored the spot in the fence outside
Bates now takes you outside to where William ended up when he was thrown out of the tower window.
Bates points to a spot on the bricks to the right of the lower window and then Bates leaves.

Now look closely at the bottom window in the wall of the tower. On a stone, to the right of this window, you see a red circle (Stain).
Place your cursor on the red circle (Stain). Click on it and you will enter the close-up. You will see a red symbol

Samuel says he better s "capture" this symbol. Draw it over yourself, just to be sure. Go out this close up.
Now go back to the stable and enter the stable again through the entrance in the side wall.
Click on the drawer in the workbench again and click on the Hammer again.

Now Samuel takes the hammer from the drawer because he now needs the hammer. Leave the stable and go back to the castle via the main entrance and via the stairs to the gallery and then back to the Old Wing and via the door in the back right corner, back to the attic. Go all the way back to the left, to the barricaded door of the tower. Take the hammer from your inventory and click it on the door. Samuel now removes the planks. Then click on the door again.

Well, the door is still locked. Walk back to the right and exit the attic.
To take a picture of the Red Symbol:
Go through the gallery and the corridor to your own room. Enter your room.
In your room, click again on the bottom drawer of the chest of drawers and in the close-up, click on the camera again.

Now Samuel takes the camera from the drawer. However, there is no roll of film in the camera and you know that those rolls of film in the drawer are no longer usable. Close the close-up and leave your room. Go knock on Robert's door again. Ask Robert about the "film". At first Robert says that you should go to Willow Creek and buy a roll of film there. But then he remembers that he does have a roll of film in his box that is in the attic. So ask Robert about his chest and he will give you the key to this chest.

So back to the attic. So Robert's chest is the light box that stands against the wooden wall, next to the red coat rack.
Take "Robert's key" from your inventory and click it on the chest.
Then click on the chest again and Samuel will automatically take out a roll of film.

Open your inventory. You now have so many things in your inventory that you can now click on the right arrow to scroll through your inventory items. Then click on the film roll and click with the film roll on the camera. You put the film in the camera. Walk to the left again, to the tower door and click on the door again. Samuel says to ask Victoria if she knows where the key to this door is. Exit the attic and go back to Robert's door. Click on the door again and then use the "Robert's Key" topic to return the key to Robert.
Go to the ground floor of the main hall and then exit through the front door. Click the "to the stable" exit to go 1 screen further to the left and you will be back at the place where William has met his maker. Click again on the Red Symbol (stain) to the right of the window. You return to the close-up of the window. Take your camera from your inventory and click it on the red symbol.

You automatically go out of the close-up and Samuel takes a picture of the symbol and says that he must have the film developed. But where do you do that? Go back to the main entrance and re-enter the castle. Go to the next screen at the bottom of your screen and click on the large double doors of the sitting room (common room).
Finding the "Strange Object":
Victoria is still sitting at the table enjoying a cup of tea. Go talk to Victoria.
You get a whole range of topics that you can talk to Victoria about. Keep the "Key to the Tower" topic forlast and don't use the "photo" topic at all now.

So ask Victoria any other questions first. The Henry topic requires you to give Victoria a Positive or Negative answer. Give a Positive answer. The "Black Mirror" design gives you two additional subjects and they are: "The Secret Chapel" and "Marcus Gordon". Use these two subjects and Victoria talks about a secret Crypt in which this Marcus Gordon is said to be buried. Finally, ask her about "the Key of the Tower".However, Victoria does not want to talk about the Tower at all. It is the place where William locked himself up for days and where he died. Victoria gets mad at Samuel and she sends Samuel out of the room.
Go through the dining room to the kitchen. In the kitchen, Bates is working at the sink. Talk to Bates and use the Victoria topic. Bates advises you to apologize to Victoria as soon as possible. So as the devil go back to Victoria in the sitting room. Click on her again and use the "Apology" topic to apologize for your impertinent question.

Victoria "unfreezes" and she now tells that she had the key for the tower door destroyed. Maybe William still had a spare key, but she doesn't know. You'll have to tell Dr. Hermann to ask. Now use the "Photo" topic and ...... Victoria recognizes the face in the photo, but she knew this face many years ago when this guy was a boy. William then brought home an orphaned boy. Victoria doesn't know what became of this boy, but she says Robert might know. That's weird because Robert has said he doesn't recognize the face in the photo.
Leave the sitting room, via the exit in the middle left. Back in the main hall, take the exit in the middle left again to get to the left corner of the hall, near the large fireplace. Click on the library doors to re-enter the library. Dr. Hermann is immediately on the right. Talk to dr. Hermann about the "Personal Possessions".

Dr. Hermann says that Samuel can collect William's personal belongings from the morgue tomorrow, but Samuel wants them today. Dr. Hermann will therefore send someone to the main gate of the castle at 7 o'clock with a package that will contain William's personal belongings.
Exit the library and exit the castle through the front doors. Go to the stable and talk to Morris again, who is still chopping wood.

Use the "Well" topic to remind Morris that Victoria wants him to board up the old well.
Then go back to the main entrance of the castle but do not enter the castle.
Take the exit, at the bottom right of your screen, to the stairs and then go down the stairs.

Down you click in the gate, right behind the stairs, to go to the greenhouse. When you reach the greenhouse, first click on the Grinder again.

In the close-up of the grinder you suddenly see no more blood in the funnel
. Samuel now doubts whether he actually saw blood in the crusher the first time an he takes one of his headache pills.
Close the close-up and click on the middle part of the greenhouse building to enter. In the greenhouse you see Henry standing on the left. He is busy putting plants in pots. Just before Samuel is a painting on an easel. Click on this painting. You enter a close-up of the painting. It is a painting of the castle and you hear Samuel say that William used to like to paint here in the greenhouse.

Click on the painting again and then close the close-up. Go talk to Henry and ask him about the "Painting".

Henry tells that William painted this picture a long time ago, when he often visited the greenhouse.
Leave the greenhouse, middle right, and when you get outside, go back to the screen with the stairs via the bottom right. Go back up the stairs to the castle and go back to the main entrance. Do not enter the castle, but click the exit "To the Stable" to go 1 screen further to the left. You are back on the corner with the tower, where William ended up. Click on the bush (Shrubs) that is to the right of the tower behind the fence. Samuel walks over. Then right click on these bushes.

Samuel examines the bush more closely and notices something hanging between the bushes.
Samuel fishes out a "Strange Object" from among the bushes.
In your inventory, right-click on this Strange Object. So the Strange Object is not complete.
Getting Willow Creek Available:
Go 1 screen to the stable and talk to Morris again. Talk to Morris about this "Strange Object".

Morris doesn't know much about it. He says that it is a piece of hard stone and that it has symbols on it. Morris says you better talk to a Murray about this. Murray is a pawnbroker who operates a pawn shop in Willow Creek. Go back 2 screens to the right, to the main entrance and re-enter the castle.
Go through the dining room (the gate with the red curtains) to the kitchen and talk to Bates again in the kitchen. Also ask Bates about the "Strange Object". Bates recommends handing the object over to Inspector Collier and he tells you to go talk to Henry. So leave the kitchen and dining room and go back out through the front doors. Go down the stairs and then back to the greenhouse. Enter the greenhouse again and talk to Henry again. Use the "Foreign Object" topic again in this conversation.
You find out that Henry, earlier, also found such a stone in the bushes, but that his stone contained a Ruby. However, Henry has pawned that stone with ruby for money to Murray, the pawnbroker in Willow Creek. Samuel also wants this stone and asks Henry for the Pledge. However, Henry says he no longer has this Pledge. You get the "Proof of Pledge" topic. Use this, but Henry insists that he no longer has the pledge note. However, Samuel doesn't really believe this.
Leave the greenhouse and go back into the castle through all the exits and then enter the sitting room. Victoria is still enjoying her cup of tea. Would it be cold tea by now? Also talk to Victoria about the "Foreign Object". Victoria does not know anything about this stone, but she does say that she has seen such a stone on William's desk and that William did not want to tell anything about it. Leave the sitting room and go to Robert's study. Click on Robert's door and ask Robert about all the topics that you will now have available which are: "Morris", "Developing the film" and your "Photo".

According to Robert, Victoria hates Morris because the groomsman is a vulgar guy. Robert says that you can get your roll of film developed at Willow Creek by that Murray and now Robert also says that the guy in your photo could very well be a former patient of his.
All right, you've gotten a few clues about that Murray and about Willow Creek a few times now. The most important thing is that you let Robert tell you where to get your film developed. Open your inventory and then right click on your map. Place your arrow on the Willow Creek location and see........ this location now also turns red to indicate that you can now go there.

So click on your map on the Willow Creek location and you are now traveling there.
Willow Creek:
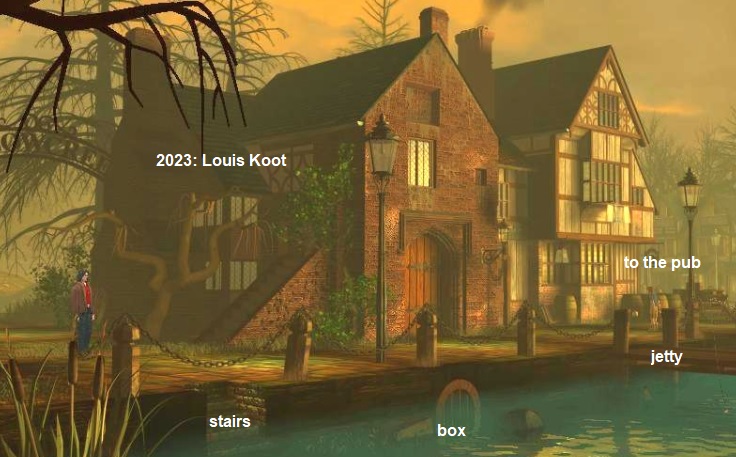
You are on the path next to the river and on the left side of the 1st house of the village. Just before Samuel, a small stone staircase goes down into the river bank to the water. Click on this staircase. Samuel tells you that the boats are launched via this staircase, but that it is better to go to the other side via the bridge. Click on this staircase again and you will experience how slippery the steps are. Click the front door of the 1st house. This one is locked. Now look at the quay wall in front of the 1st house. You see a grid that is half submerged in water. Must be a sewer outlet. To the left of this grid a box floats in water. Click twice in a row on this box.
Further to the right is a boy throwing his ball against the facade of the corner house. If you place your cursor on that white corner house, you will get the exit "To the pub". Don't click this exit just yet, though. Right in front of this corner house you see a jetty, to the right, going into the river. On this jetty, just to the right of your screen, you will see a fishing rod. Now click with your arrow cursor on the jetty. Samuel walks towards the jetty and your screen scrolls to the right and you see a fisherman sitting on the jetty. Click on the fisherman to start talking to him and ask the fisherman about "Fish".

The fisherman has not caught anything today and his boat is also leaking. After this chat with the fisherman, click the "To the pub" exit.

You are then in front of the white corner house. This is the local pub, the "Three Kegs". There are a number of places you can click on and they are: The name of the pub above the door, the menu board to the left of the pub door, a chest that is under the menu board, a barrel to the right of the door and the barrels that further on, stand on the corner and then you can also click on the cart. Click on all these places and then go talk to the balling boy.
Ask the kid for his name. He doesn't want to tell you his name. He wants a candy, preferably a chocolate. Your masks will appear on your screen. Click on the Positive mask and you will give the boy your candies. So the kid's name is Vick. Ask Vick about that guy in your photo. However, Vick does not know who this is. Via the exit in the middle right, go over the bridge to the other side of the river. Samuel walks over the bridge and ends up on the other side of the river in the next part of the village.

In the background you see the large church tower and to the right of it is a blue / white building. Click on this building. It turns out to be the "old fish market". The corner house, right in your screen, is the pawn shop, so walk on to that shop Above the window you can read that this is "Murray's Pawnshop". Click on the name. Click on the shop window. Click on the pawn shop door. The door is locked. Samuel walks back to the window and he reads the note taped to the window. "Be right back, Murray" he reads. But how long has this note been here? There is a pile of rubbish on the corner. Click here. A rowing boat floats in the river in front of the pawnshop. Click here. This must be that fisherman's flat boat. Go back across the bridge to the pub. Talk to Vick the ball boy again and ask him about the "Pawn shop". According to Vick, Murray left for the big city this morning and seeing that he had on his smart suit, Vick expects that he will not return until tomorrow. Then Vick breaks a window with his ball and runs away. Now enter the ....
Pub.
Talk to Harry, the bartender. Use the "News" topic first. The guy, who's sitting at the table hoisting beer, gets involved too. This is Tom.
Harry gets mad at Tom because of Tom's outstanding pub bill. In the end, Samuel succeeds in telling who he is and your topics appear on screen.

So ask Harry all kinds of things about the "Castle", the "Pub" and about the "Pawnshop". You experience that the pub is often open until late in the evening and that Harry is often here playing chess with that Tom. Then keep asking about the "Pub" and you will learn that your grandfather William was a fanatical poker player and used to come here quite often to play his cards. However, William has not been here in the pub for the last six months. Harry then mentions one Mark who might be able to tell more about what William was doing in the last months of his life. Harry says about the "Lommerd" that it is closed today.
Then go talk to Tom. You will again get 4 conversation options and they are: "Curiosity", "Guilt", "Village" and "Fisherman".

First use the "Curiosity" topic and then give a Positive answer to Tom's question. Then use the "Debt" topic. Tom lets you know that he does have some information about William, but that he doesn't want to share it with you for nothing. The conversation is then over. Talk to Harry the bartender again and use the "Debt" topic and then the "Pay off debt" topic.
Samuel pulls out his wallet and pays Tom's debt to Harry. Then go talk to Tom again and use the "Guilt" topic first. Listen carefully to what Tom has to say about William. Then use the "Mark" topic. That Mark is a casual / permanent worker who sometimes does odd jobs for Murray and sometimes for Dr. Hermann. Use the "Curiosity" topic again and then the "Village" topic and finally ask Tom about the "Fisherman". The Fisherman on the jetty is Tom's uncle and we call tihim "Old Jim".
There is a poster at the entrance. Click on the poster and then go back outside. Go, via the exit in the middle left, one screen to the left. Then click again on the jetty where Old Jim is fishing and if you see Old Jan again, click on him. Ask Old Jim about the "Pawn shop", but Jimbo isn't interested in that Murray at all. Tom has told you about the Church and the Parish. Open your inventory and then right click on your map.

The "Warmhill Vicarage" has now also become available on the map. So click on this location and you will travel there:
Warmhill Vicarage

Click on the main entrance of the church. However, the main entrance is only open on Sundays. On other days you have to enter the church through the side entrance. So click on the side entrance of the church. Samuel walks towards it and as he does, the gravedigger pops up on the right of your screen. The side entrance is also locked, so you cannot enter the church. The gravedigger is busy digging a grave. Go talk with the gravedigger. You get 4 conversation topics: "The Church of Warmhill", "Father Frederick", "Grammer" and the "Church". Use them all.

You learn that for years there have been rumors about tunnels that run deep under the graveyard and the gravedigger tells a creepy story about a girl who once heard crying but never saw it. Father Frederick is not here. The gravedigger has no name, everyone knows him as "Father Frederick's gravedigger". You also get the "William" topic, so use this too and then listen carefully to what the gravedigger tells about William's nightly visits to the cemetery and to Father Frederick in the church You can't enter the church and then the conversation is over.
Walk back to the front of the church and then, left of the church, go to "the cemetery at the back".You are then at the graveyard.

On the left of your screen are the large stone tombs. The stone building on the left is William's Tomb. Click on this tomb and you will walk towards it. To the right of the larger building is a smaller building. Again to the right of this crypt is the Tombstone. Click on the crypt. William does not know which Gordon is buried in this. Click on the Tombstone. You enter the close-up of the tombstone. It's William's tombstone. See the year of birth and of the year of death: 1903-1981. So William turned 78 years old.

Close the close-up and return to the front of the church and walk on the gravedigger. Click on the gravedigger again and he wants to talk to you again. Use the "Father Frederick" topic. Father Frederick is not back yet and gravedigger still refuses to let you into the church and the conversation is over again. Samuel mumbles something to himself and then you hear the church bells strike 7 o'clock.

It's time for your meeting with Dr. Hermann
. You automatically end up at the main gate of the Black Mirror castle and you meet the guy sent by Dr. Hermann.

A conversation follows in which it becomes clear that this is Mark. Mark leaves his package behind and disappears.

Click on the box in front of Samuel. Samuel picks up the box. Go into your inventory and then right click on the box. A Watch comes out. Right click on this "William's Watch". A note comes out of the watch. Click on the arrow to scroll through your inventory and then right click on the note. Samuel reads what is written on the note.

Close close up. Open your inventory and right click on your map
On the map click on the Black Mirror Castle to return to it. You will end up in the Great Hall.
Castle:
Go to the library and enter the library.
Library:
Go to the "Central Area" and then on to the "Back Area". Samuel is then standing in front of the large desk again.
Search the desk with your arrow. On the front left of the desk table is an "Inkwell". Click on the inkwell.

Samuel discovers a button under the inkwell and he presses this button.
This will open a "Secret Cabinet" in the corner behind the desk to the left. Click in the Secret cabinet.

Samuel takes out a "Box". Open your inventory and scroll through your items to the Box
Right click on it. Inside the box are miniatures of the planets of our solar system.
Go back to the "Central Area" via the middle left. Then click on the Globe that is right next to the desk.

You enter the close-up of the globe again and you are in the:
|
Planets puzzle: Open your inventory and take out that box with planets and click with this box on the wide outer edge of the globe.
The planets are automatically placed neatly in the holes of the outer rimsize.
The white ball in the middle is the Sun. So the 9 planets of our solar system revolve around the sun, each in its own orbit around the sun. What you have to do is to place each of the 9 planets on the correct peg so that each planet revolves around the sun in its proper orbit. Just think of the 9 planets as balls. Then number the 9 balls, from left to right, as 1 to 9. Number the 9 pins, from outside to inside, as A, B, C, D, E, F, G, H, I Then place the 9 balls on the 9 pegs as follows: Ball 1 on Pin A, Ball 6 on Pin B, Ball 7 on Pin C, Ball 8 on Pin D, Ball 9 on Pin E, Ball 3 on Pin F, Ball 5 on Pin G, Ball 4 on Pin H, Ball 2 on Pin I
When done correctly, the part with the balls will open and you will see a large key. Take this Key from the globe. It's William's Key for the tower door in the attic. Close close up.
|
Leave the library and go through the gallery and theOld Wing to the Attic.
Walk all the way to the left in the attic until you reach the Tower Door.
Take the "Key of William" from your inventory and click it on the tower door. Samuel opens the lock.

Click on the door and you end up in:
William's Tower room

The door closes behind you and is locked. Samuel has left the key in the lock on the other side. So you are now locked in, in William's study. Examine everything in your screen again. If you go left from the door, there is a "Chest" under the 1st window. Then you come to the Roll-Up-Desk. In the left side of the desk is a "drawer". In the foreground stand a small round table on which is a "Chessboard". To the right of the door is a "Heavy Chest".
Click on the chest under the window. However, the chest will not open. Click on the lid of the Roll-Up-Desk.

Samuel opens the lid. Click in the now open lid and you will get in the close-up.

On the left you see 3 parchment scrolls. Click on these roles. However, Samuel has no interest in it. At the back scroll stand a chesspiece, it's the black tower, but Samuel does not want to take it now. On the right stand a little box. Click on this little box. It's a music box. Wait for the music to end. The music box will disappear to your inventory. Close the close-up and now click on the "Drawer" of the roll-up-desk. Samuel opens the drawer. Click on the drawer again (on Samuel's left).

You come into a close-up. Click on the book that's in the drawer. The book goes to your inventory. Close close up.

Open your inventory and scroll through your items to the "Untitled Book" an rightclick on it. Samuel takes a "little Key" from this book. Click on the chessboard, Samuel sees that the black tower piece is not on the board. Click on the "Heavy Chest". The chest is locked so take the little key, you just took out of the book, from your inventory and click it on the "Heavy Chest". Samuel unlocks the chest. Click on the chest again. Samuel opens the chest

.Click on the chest again and you are in the close-up. Click, left, on the globe. Then click on the "Strange Sphere".

Samuel picks up the sphere and says that the Sphere feels strange. The Sphere goes to your inventory.
Close close up. Now click again into the open roll-up-desk.

Look again at those 3 white parchment scrolls on the left. In front of the rear reel is a chess piece. It's the Black Tower. Click on the black tower and it will now end up in your inventory. Close the close-up again. Open your inventory and scroll to the black tower. Right click on the black tower which is now called the "Deceiver". A little knife comes out of the bottom of the black tower
Right click on the open drawer of the roll-up-desk and.... Samuel finds William's journal that was taped to the side of the drawer.

You automatically get into the close-up of the book. Listen to William's voice as he reads from this diary. The pages turn by themselves.

It's too much to write it all down, but the main points from William's story are:
Insanity has reigned in the Gordon family for 700 years. Probably because of some curse. You hear William speak of the "5 Symbolic Keys". William has managed to locate 4 of these keys, but he doesn't know where the 5th key is. William goes on to tell about the Tomb of Marcus Gordon, under Warmhill Church and how he managed to find this tomb. He tells about a mechanism in a plinth in the bell tower. He has discovered that Marcus is not in his tomb.
If you want to hear the story again, you can use the arrow, left, to scroll back and then click on the left pages each time. Close close up. Click on the door ..... Oh .. stupid, of course ..... the door is locked. Take the black tower from your inventory (with the blade unfolded) and click it on the door. Samuel picks open the door. Click in the doorway and .....

The game will now continue on its own to the end of this chapter.
Samuel comes back to the attic and he then collapses unconscious on the floor. We'll be in Samuel's room then. Samuel is in bed. Bates and Robert are with him.

A conversation ensues and then Robert and Bates disappear. Samuel goes to sleep and then we end up in:
2023: Walkthrough by: Louis Koot


