
2023: Walkthrough by: Louis Koot
If you have found this walkthrough via google search or via another site then you have probably not visited my site.
A lot more very detailed game walkthroughs can be found on my site at: www.pcgameswalkthroughs.nl
Chapter 3: England: Willow Creek:
Part 1: Where is Angelina
Gordon's Palace Hotel:

After a long flight and then a long taxi ride, Darren has ended up at the only hotel in Willow Creek. The hotel is called "Gordon's Palace". There is a small fountain (Bird bath) in front of the hotel. Darren thinks Angelina has also booked a room at the hotel. Samuel took his camera, the Letter of C, the Photo of Willow Creek, the photo of Angelina and the Ring with the Celtic Symbol with him on his journey. Enter the hotel.
Lobby:

Owner/receptionist Murray is standing behind the reception desk and Darren speaks to him and asks about Angelina. However, Gordon's Palace is a "discreet" hotel, so Murray does not provide any information about any guests staying there. Murray, on the other hand, chats happily about the hotel. The hotel was formerly a sanitarium and Murray purchased the building 12 years ago after it was discovered that several murders had been committed at the sanitarium. The remaining patients were then transferred to various other institutions and Murray converted the building into what it is today, Gordon's Palace. Darren asks again about Angelina, but Murray again refuses to provide information. In desperation, Darren books a room for 2 days. Darren gets the key for room 12 and Murray tells him that Angelina has room 13. But Murray hasn't seen Angelina since yesterday morning.
To the left of the counter is the door to the hotel rooms (To the rooms). The guest book and a telephone are on the desk. On the right is a postcard stand with postcards. Further on the right of the counter is a box containing cheap souvenirs. The room keys hang in the wall behind Murray. There is also a cupboard with lockers (lock boxes) behind the counter. There is a luggage cart (Trolley) at the front door. In the foreground is a sitting area with 2 chairs and a table. On the table is a bottle (Flask) and a cup with 2 plates (Dishes).

Click the box of cheap souvenirs and do that a few times. Darren lists the cheap junk offered as souvenirs in the box. Among other things, there's a so-called "Soul Keys" in the box, but Darren does not want to take anything from the souvenir box now. Click 3x on the postcards and Darren takes a postcard from the stand showing the location of the 12 murders. The picture postcard disappears into inventory and Murray puts the prize on Darren's account. This postcard will soon serve as a map of the area, just like the postcard of Biddeford did.
Click th lock boxes. Darren reports that they are wooden boxes but that they look sturdy. Look at the room keys. 1 of those keys is for room 13, Angelina's room. But as long as Murray is behind the counter, Darren will not be able to get the key. There's a flask and dishes on the round table. Click on the flask to know that it contains gin. Darren says he can grab the bottle when Murray isn't looking.

Wait until Murray looks away for a moment, for example to the left. Then quickly grab the Flask. If you do this quickly, the flask of gin will end up in inventory. If you try to grab the bottle when Murray is looking straight ahead, you will not be able to grab the bottle. Click on the dishes, which are also on the table. Darren then takes a Knife, which was between the 2 plates. The Knife disappears into your inventory
NB: If you are unable to grab the Bottle of Gin and the Knife from the round table, that's okay.
Later, once you've caused Murray to run out of the hotel, you'll get another chance to grab the bottle and the knife.
Go talk to Murray again. You now get talking points.
Ask Murray about all the topics you get: "Angelina", "Sanatorium", "Willow Creek", "Black Mirror", "Room 13", "Soul Key"

Murray isn't really worried about Angelina. Actually, Murray doesn't care where Angelina is because she paid for the room in advance and there hasn't been a crime in Willow Creek for 12 years. Murray continues to refuse to give Darren the key to Angelina's room and he also refuses to be bribed. If you ask about the Sanatorium, Willow Creek and Black Mirror, Murray will give you a lot of background information about the Curse and the Gordon family, of which only Victoria is still alive. If you ask about the "Soul Key", Murray tells you that this is a replica of Samuel Gordon's 7 "Soul Keys". If you put a battery in the "Soul Key" the thing lights up. The original keys were never found. There are only images of it that were found after Samuel's death.
If you have asked Murray everything, there are no options left. Then close the conversation screen and go through the door to the left of the reception desk. Darren enters the corridor with rooms 13 and 12. Darren tries to see if room 13 is open, but it is not. Darren then goes into his own room, room 12, to take off his backpack, and then comes out again.
Rooms Corridor:
Darren is standing in the hallway in front of his room door. To the left of room 12 is room 13, Angelina's room. Opposite room 13 is the door to the Lobby. The wall at the back of the hallway appears to be a temporary wall. In the foreground there is a cozy seating area. There is a bookcase, 2 chairs around a round glass table. There is an ashtray (Ashtray) and a newspaper (Newspaper) on the table. There is a clock on top of the bookcase.

Examine the wall at the back of the hallway. Darren suspects that it is a temporary wall and that the part of the building behind the wall is currently being renovated. Walk to the sitting area. Look at the clock on top of the bookcase and do that 3 times. The clock is a wooden imitation clock, without a winding mechanism.

Darren suspects the clock runs on batteries. The clock is screwed to the bookcase. Look at the bookcase. The bookcase is full of books that Darren does not find interesting. On the round table lies a newspaper, at the lamp, an stand an ashtray Click a few times on the newspaper. The newspaper is already a few weeks old and Darren tears a few pages out of the newspaper and puts them in inventory. Click the Ashtray, which is in the middle of the round table. Darren reports that there is a box of matches in the ashtray. Take the box of Matches from the ashtray. There are still a few usable matches in the box.

Click with the exit cursor on the door to the Lobby to return to the Lobby. Back in the Lobby, you leave the hotel through the front door.

Darren is outside again, in front of the hotel entrance. Darren has to think of a way to make that annoying Murray disappear behind his desk for a while, so that he can "borrow" the key to Angelina's room. On the left is a bench under the windows and in front of the bench is a fountain (Bird bath). On the far right, ivy (Ivy) grows up along the facade. View the fountain.
Look at the bench. Check out the windows and the fountan an also check out the ivy. Do this a few times until you no longer get a cursor on the windows, bench and ivy. However, you can keep clicking with your eye on the fountain, so I guess we'll have to do something with the fountain later.
Walk past the bench to the left. There is a car parked. Behind the car is the hotel's conservatory. There is a pile of leaves in the garden bed in front of the car. You can't do anything with the car. You can view the conservatory twice. Darren thinks the conservatory is the hotel's dining room. Look at the pile of leaves and do this at least twice. Darren then says that the leaves are wet but that the soil under the leaves is still dry. Take the newspaper from inventory and click with it on the pile of leaves and Darren stuffs the newspaper under the pile of leaves. Take the matches from inventory and now also click on the pile of leaves and....

Darren lights up the newspaper and the pile of wet leaves starts to produce smoke.

Quickly go back into the hotel and talk to Murray again and use the Fire topic to tell Murray that there is a fire outside. Murray runs outside.

This is your chance to get Angelina's room key. Left-click 2x on the room keys and.....Darren takes the key to Angelina's room.

NB: If Murray has not returned yet and you were unable to get the flask of Gin and the Knife from the round table earlier, now is your chance to get them.
So do that now because you won't get another chance.
Murray returns and takes his place behind the counter again. Go back to the to the rooms)
Take Angelina's room key from inventory and click with it on the door of Angelina's room and....

Angelina's room:
The TV is on a small cupboard (Little cupboard). A framed photo of Angelina hangs above the radiator. Next to the chair is a desk with a table lamp. There is also a glass and a plate with a few pieces of lemon on the plate. There is a blanket on the bed and in the corner, near the room door, is the large cupboard. You can also see the door of the bathroom/toilet. Darren finds nothing of interest in the bathroom/toilet and in the large closet.

Click the cupboard where the tv is on. Darren opens the cupboard. In the cupboard,
Darren finds a bottle of sleeping drops. Take the bottle of Sleeping drops from the TV cabinet.

Click 2x the picture of Angelina, which hangs on the wall above the radiator. It's one of the photos that Darren took in the hotel room amer from Angelina's Wild Coast hotel. Did Angelina put the photo here as a hint for Darren? Darren takes the photo from the wall and....behind the picture Angelina has taped 2 sheets of paper to the wall

Darren automatically takes the 2 sheets of paper and stores them in inventory. Right-click on the 2 sheets of paper in inventory to take a closer look. Darren reports that the 2 sheets have each been folded twice and they appear to be blank. Perhaps Angelina wrote something down with invisible ink? Click the blanket / sheet on the bed. It is a wool blanket and there are wool threads sticking out of the blanket. Click on the blanket with the gripping hand and.....Darren pulls one of the woolen threads (Woolen thread) out of the blanket and stores the thread in his pockets.

Look at the plate with the lemons and the glass of water on the desk. A splinter of wood sticks into one of the lemons and the glass is empty. Take the flask of gin from inventory and click it on the glass to pour the alcohol into the glass. Take the woolen thread from inventory and also click on the glass to hang the thread in the glass.

The alcohol in the glass serves as fuel and the wire absorbs itself with alcohol and now serves as a fuse. Take the matches from inventory and click on the glass to light the wire. You have now created a "lamp". Take the 2 sheets of paper from inventory and click with them on the now burning glass and.....

Due to the heat of the fire, the text that Angelina wrote on it with the lemon juice becomes legible on the two sheets. Darren does not read the text immediately but puts the 2 sheets back in inventory. In inventory, right-click on the 2 sheets (Message) again to get them large on the screen, so read Angelina's message.........You also hear Angelina's voice reading the text aloud, and that's a good thing because the text is vague and almost impossible to read.

Angelina writes that she discovered something in the museum about the Gordon family and the Celtic tree symbol on the ring that Darren stole from the safe on Borris' boat. Angelina has also obtained information about a sinister secret society that is still active here in Willow Creek and that wants to summon the "Dark Forces". Angelina also found a secret passageway, but before she could investigate further, she saw Reginald Borris in Willow Creek. Angelina then decided to leave her discoveries encrypted for Darren on these notes and hide them behind her photo in her hotel room.
Darren now wants to go to the village, Willow Creek, because he hopes to find out more about Angelina.
Leave the room and return to the Lobby and then leave the hotel through the front door.

Outside again, click with the exit cursor at the bottom right of the screen and....Darren ends up in:
Willow Creek:
Darren bumps into Miss Valley, who drops the books she is carrying in her hands.

Miss Valley turns out to be the local librarian. Darren apologizes because Miss Valley is a beautiful young woman and Darren is certainly not averse to that. Miss Valley believes in the Gordon's curse. The castle and village are more than 1000 years old and are owned by the Gordon's. Only Lady Victoria Gordon, her butler Bates and her daughter-in-law Eleanor now live in the castle.
After the introductory conversation, you continue talking to Miss Valley via the conversation option
During the conversation, Miss Valley takes Darren on a tour of the village to show him all the important buildings and tells him some historical facts. Miss Valley shows Darren the local pub, which is now owned by Tom, the thief from Black Mirror 1.
Next to the pub is the funfair and a chilli stall, which is also run by Tom. On the other side of the bridge is the library and a little further on the museum, where, according to Miss Valley, a tasteless horror exhibition has been set up in the back.
When Darren asks if she knows anything about the tree symbol of the ring (order), Miss Valley reacts quite anxiously and tells Darren to forget that symbol as quickly as possible. When Darren also tells
that he is from Maine, Miss Valley suddenly runs away, leaving Darren very surprised.
Museum:

Miss Valley has left Darren in front of the local museum. Enter the museum.

Two tourists, a man and a woman, are arguing with each other inside. You can tell by their accent that they are Germans. Eventually the two bickering tourists walk away to the right to take their tour through the museum. Behind the counter is Bobby, the museum's security guard/doorman. Talk to Bobby.
Bobby is a bit simple and he stutters a bit. Bobby is only present as a security guard during the day. At night there is no guard but the alarm is on. Bobby thinks the museum is a bit "spooky". Bobby is Tom's brother, who now runs the pub but was the thief in Black Mirror 1. Bobby used to help his brother Tom with his housebreaking barges. Bobby lives with his brother in the pub, but that costs him all his hard-earned money. Darren believes that Bobby is being exploited by brother Tom.
Look around the museum. If you continue to the right, the screen scrolls along and you notice that the museum is larger than you initially thought. However, first take a look at all the stuff that are here on this first screen at Bobby. On the left of the screen is an old-fashioned stove. The stove is between a large barrel and a table with a glass display case on it. There is an globe in front of the table. There is a brochure stand on the counter that contains brochures. There is a Bottle of bubble mixure on the counter in front of the brochure stand. Look at the brochure stand and look at that Bottle of bubble mixure on the counter and do that several times.

Darren doesn't think the brochures are important. When you look at that bubble blowing tube, Bobby screams that it is his bubble blowing tube.
Look at the glass display cabinet on the table and do that 3 times.The display cabinet is broken and there is nothing left in it.

Darren reads on the nameplate of the display case that it once displayed the "Black Ball of Destiny" but apparently it is gone. Continue to the right. The screen scrolls. To the right of Bobby's counter is a shelving unit containing antique plates and large glass bottles. To the right of the shelving unit you come to a large display cabinet containing a thick book. Behind the display cabinet is a large wooden cabinet (Cupboard) with the doors slightly open. Look at the wooden cupboard. Darren doesn't think this cupboard is part of the exhibition.

Click on the large display cabinet where the thick book is located. According to the nameplate, that thick book is the "Chronicles of the Gordon Family" and Darren finds this extremely interesting. Click on the display case again and you end up in a close-up of the thick book. There is also a large key in the cupboard and the lock is in the top edge. Click the lock....the display case is locked, so Darren needs the key from Bobby to open up this display case

The chronicle book is open and you can read those 2 pages. So click on the book (read) and......Darren reads the text out loud.
The text is about the secret brotherhood, whose members do not know each other but who pursue a higher goal. Darren suspects that the "higher purpose" that the secret brotherhood pursues is mentioned in the previous pages. So Darren would really like to read the entire book.
Click the exit cursor at the left edge of the screen to leave this close-up. Continue walking to the right. Darren ends up with those two tourists who were previously arguing with each other at Bobby's counter. Behind the red curtain is the back room where the horror exhibition can be admired. There is an antique desk at the wall on the right.

Talk to the 2 tourists. It doesn't matter if you talk to the woman or the man. These 2 tourists have heard that the ghost of Samuel Gordon still wanders around and that a flickering light can be seen in the sanatorium, which is now the hotel. There is a List on the antique desk. Click on that list and ....Darren reads information about an old sewer system under the village. A bunker from World War 2 is connected to the sewer. Go through the opening in the red curtain (To the Black Museum) to the Horror Exhibition

Look at the dolls. The dolls represent the murderer and his victims. There are 4 dolls and they depict 2 murder scenes. You can click on the 2 yellow/red buttons to make the dolls move. There's a Shredding machine that occasionally spits out artificial blood. There is a small window above the shredder. Click the 4 dolls and press the 2 yellow/red buttons. Also check out the shredder and the small window. The shreddercomes from the garden of the Black Mirror castle. The window is locked and connected to the alarm. Once you have viewed everything here, walk back to the main room and then back to the left, to Bobby's desk. Talk to Bobby again and use all the options you get.

Bobby has the key to the large display cabinet where the chronicle book is located, but Bobby is not allowed to take the book out of the display case. Victoria has said it's a bad book. There was a large black ball in the broken display cabinet, next to the stove, but it was stolen 4 weeks ago. If you have previously looked at Bobby's bubble blowing tube, you can now also ask Bobby about the Bubble Blowing Tube. Bobby then says that the tube is empty because he has already blown a lot of bubbles today. Darren offers to fill the tube with soapy water, but Bobby doesn't want that. Bobby doesn't feel like blowing bubbles anymore because he is hungry. You then also get the "Chilli" topic. Use the "Chilli" subject so that Darren offers to get Bobby something to eat.
Once you have asked Bobby everything again, right-click in inventory on the postcard that you took from the postcard stand earlier in the hotel.
Because you are now in Willow Creek, the postcard is now "activated" and appears on your screen.

The postcard is now the Map with which you can now travel from place to place, just like the Biddeford postcard. Again, you must first have visited a location once before you can go there via the postcard. You can now travel via the postcard to the various locations in Willow Creek and to the Gordon's Palace Hotel. The red circles on the map are the 5 murder locations from Black Mirror 1. So you can now walk to the various locations in Willow Creek or use the map.
Leave the museum through the front door.
Back outside, walk over the bridge one screen to the left, to the pub owned by Tom, Bobby's brother.

To the left of the pub is the bakery. To the right of the pub is the fair, where there is also the "Chili stall" of Tom, Bobby's brother. Click on the fair to end up at the Chili stal. The stall is right next to Tom's pub. There are gas bottles on a box between the pub and the stall. Behind the stall you can see the Ferris wheel turning around. You cannot go any further to the right into the fair. Tom is standing in his chili stand. Talk to Tom.

You get a lot of talking points, but the most important one is the "Chilli" topic. If you don't feel like having long conversations, you immediately use the "Chili" topic to buy Bobby a plate of Chili. Otherwise, talk to Tom first about all other topics. Anyway, Darren buys a plate of hot chili. Use the postcard to return to:
The Museum:
Through the postcard, Darren immediately ended up back at Bobby's museum. Take the plate of Chili from inventory and give it to Bobby.

Bobby has no money to pay for the Chili, but Darren doesn't mind. As a thank you, Bobby gives Darren a sparkler. Bobby goes to eat the chili and Darren walks to the right and waits for Bobby to eat the chili. Darren then walks back. Talk to Bobby again and ask him about his bubble blowing tube again. Now that Bobby has eaten, he wants to blow bubbles again, but his bubble blowing tube is empty. Darren again offers to fill the tube with soapy water and this time Bobby agrees. So now grab the Bottle of bubble mixure from the counter.

Walk to the right again, to the large display cabinet. Behind the display cabinet is a large wooden cupboard with the doors slightly open.

You've looked at this cupboard before. Now click again on the cupboard and.....Darren finds liquid soap in the cupboard and he automatically fills the bubble blowing jar with liquid soap. Liquid soap is not yet soap suds. Water still needs to be added to the tube. Leave the museum via the front door. Walk over the bridge back to the pub.

There is a jetty in the canal in front of the pub. There is a rope around the front post of the jetty. Walk onto the jetty and click on the rope. Darren reports that the rope is going into the water. However, the water is too dirty to see what is attached to the rope. Click again on the rope and....Darren pulls up a bucket. Click the bucket. There is water in the bucket and that water is cleaner than the water in the canal.Take the Bubble Tube from inventory and click it on the bucket and...

Darren fills the jar with water from the bucket and you now have soapy water in the jar. Go back to the:
Museum:
Bobby is sitting in a chair and he has hung his jacket over the back of the chair. Bobby's jacket contains the key to the large display cabinet.
Take the bubble blowing tube from inventory and give the jar to Bobby and...

Bobby gets up and takes the bubble blowing jar and stands in front of the window blowing bubbles.
Quickly...click on Bobby's jacket and.....Darren steals the key to the large display cabinet from Bobby's jacket.

Walk to the right again and click again on the large display cabinet containing the large Chronicles book.
You come into close-up again. Take the Display cabinet key from inventory and click it on the lock of the display case and.....

......you go out of the close-up and hear through the speakers that the museum is closing. So Darren doesn't get the chance to steal the book from the display case because he has to leave the museum now. Outside, Darren is approached by a trampwho shouts at Darren to get off. The guy yells at Darren "You're DEAD" and "You're CURSED."

Go back to the hotel, via the bottom right or via the postcard:
Gordon Palace Hotel:
In front of the hotel, Darren meets the attractive Miss Valley again.

Miss Valley is very nervous and she babbles something about "12 years" and that every 12 years something terrible happens in the village, forest or castle. Miss Valley bursts into tears and walks him. Darren then walks into the hotel where he is told by Murray that a letter has been delivered for Angelina. However, Murray does not want to give the letter to Darren and he stores the letter in the lockers. Darren then continues walking to the hallway.
Go back to the Lobby. Murray is now sitting behind the counter reading the newspaper and drinking a cup of tea. Murray always places the cup of tea on the counter, to the left of the guest book, after he has had a sip. Take the bottle of Sleeping medication from inventory. Wait until Murray puts the cup of tea back on the counter and looks at his newspaper again. Then quickly click the sleeping potion on the tea cup to pour the sleeping potion into Murray's tea.

Darren walks back into the hallway to allow Murray to finish his tea and returns after a few minutes.
Murray is now fast asleep in his chair. Click on the Lock boxes behind the middle 2 pillars again and....

Darren reports that he cannot open Angelina's locker without the key or burglary tools.
Darren needs "Lockpics" to open Angelina's locker, without Murray noticing that the locker has been opened. Travel via the postcard to:
The pub

The postcard takes Darren straight to the pub. In front of the pub sits the tramp who spoke to Darren when he came out of the museum. Talk to the tramp. To do this, you have to click on the tramp twice with the talking cursor. The guy calls Darren the "antichrist" and says Darren is possessed by "evil spirits." According to this drifter, Darren is the Devil himself. Walk slightly to the left and then enter the pub

Tom and Bobby and those 2 German tourists are present in the pub. Talk to the 2 tourists again and use all conversation topics again. Then talk to Tom.Tom is drinking beer and you get the "Shops" topic. Use the "shops" subject and...Darren asks if Tom can pick a lock for him. But Tom refuses and says he only sells beer.

So order a beer via the beer topic. Darren buys a beer for himself and Tom. Tom quickly gulps down the beer, but Darren takes it slowly. Use the "shops" topic again to ask Tom to help pick a lock. However, Tom is not drunk enough yet, so buy Tom another beer. Then use the "shop" option again. Tom is starting to get drunk and now he's talking about his "lockpics". Tom wants £100 for his "lockpics", but Darren only has £70. Tom insists he wants £100 for the "lockpics". Order another beer and.....Tom has now really reached his limit and puts his head on the table. Use the "shop" option again and.....Darren now gets the "lockpics" from Tom for 50 pounds. Darren leaves the pub In your inventory you then have the Lockpicking tool. Go back to:
Gordon's Palace Hotel:
Lockpick puzzle
Go inside. Murray is still lying in his chair. Take the Lockpick from inventory and click with it on the lockers

Darren explains what needs to be done and you end up in the close-up of the lock of Angelina's locker:The lock pick is the wire you see on the left. You see 4 with a spring sticking out of them. There is a line on the sleeves and behind the sleeves you see a red line. You need to press the sleeves down so that the lines on the sleeves is exactly on the red line. You do this by bending the wire and then letting the wire move over the sleeves.First see what happens when you move the wire over the sleeves. So click on the top of the first sleeve and see what happens.

The wire moves to the right and over the 4 sleeves, pressing the sleeves down and then returns to the starting position. The wire did not have the right shape to press each of the 4 sleeves down exactly because the sleeves also come back up to the same height as they were before However, you now know what to do. You must first bend the wire into a certain shape until it has a shape where the wire presses the sleeves down so that the lines on the sleeves fall exactly on the red line.
To bend the wire, place the arrow cursor on the wire and then left click. Hold down the left mouse button and then drag the piece of wire you are holding down, or up, into a shape that you think is right. Bend the wire in 4 places in this way so that those 4 places in the wire can press the 4 sleeves down sufficiently.

It's a shitty puzzle and I would be very surprised if you succees. Because the starting position of the sleeves differs per game, I cannot give you a ready-made solution. However, if you have checked the "Additional game help" in the game options, the Auto-solve button will appear after a few minutes. So if you are unable to solve this puzzle, you can use the Auto-solve button to solve the puzzle.
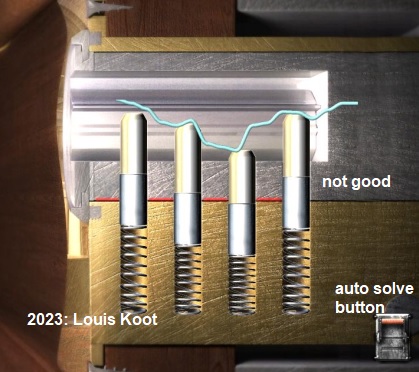
So I can't show you what your thread should look like. I can show what shape I had to bend the wire into, and you can see that in this picture.

Anyway. Once you have solved the puzzle, the locker will open and you will automatically leave the close-up.
Then click on the lockers and....Darren takes the Letter for Angelina (Letter) from the locker.Go to:
Angelina's room:
Click on the bed again and.....Darren looks under the bed and sees that there is a metal lid in the floor under the bed.

Click on the bed again and Darren slides the bed away from the wall and.....there is a large round metal sewer cover in the floor under the bed.

Examine the sewer cover and do that twice. Darren says that there are 5 rings on the cover and that each ring has animal images. The rings can be rotated and there is a lever in the middle of the cover. You will then get the gear cursor on the cover, so click on itand....Darren tries to turn the cover to open it, but it doesn't work because he doesn't know the right combination.
Right-click in inventory on the letter of Angelina to read the letter now. You hear Angelina's voice again reading the letter. Angelina wrote the letter herself and sent it to herself at the hotel. However, the letter is intended for Darren. In the letter, Angelina writes about 2 German fairy tale tellers, the Brothers Grimm. In the letter you will see a code: GFT/62/17/1/25.

This code refers to a fairy tale book by the Brothers Grimm and to certain pages in that book.
Click the letter away and go back to the hallway. Back in the hallway, click on the bookcase again and....

Darren automatically takes the "Grimm's Fairy Tales" book off the shelf and opens the book to the Contents page. Click the book away and Darren tears the contents page out of the book and stores this page in inventory (Contens). Go back to Angelina's room. Click on the metal sewer cover again. Now you come to the close-up of the sewer cover

|
The sewer cover puzzle: In the lid you will see 5 smaller circles. 4 circles surround the center circle. The center circle contains numbers and each of the 4 other circles contains 4 images of animals. By clicking on the 5 circles you rotate the circles. Number the 5 circles A, B, C, D and E, where E is the middle circle. A is above E. B is to the right of E. C is below E and D is to the left of E.
The code in Angelina's letter: 62/17/1/25 refers to the contents page that Darren tore from the Grimm book. You must view that page in inventory and then look in the table of contents to see which animal has number 62, number 17, number 1 and number 25. So first now get out the close-up of the puzzle. In inventory, right-click on the Contents page and look for numbers 1, 17, 25 and 62 in the table of contents. Make a note of the animal listed with these numbers.
Number 1 is the Frog King Number 17 is the White Snake. Number 25 is the Seven Ravens. Number 62 is the Queen Bee. Make a note of all this and click the page away again. Click on the round lid again to return to the close-up. Now that you know which animals you need and which number belongs to those animals, you can start turning the rings A, B, C, D, E. The numbers are on Circle E. Circles A, B, C and D contain the images of the Frog, the White Snake, the Raven and the Queen Bee. You now have to rotate each circle so that the correct image is on circles A, B, C, D towards Circle E and then you rotate Circle E so that circle E has the correct number for each image.
If you look at Circle E you will see that no matter how you rotate Circle E, the numbers 1 and 25 and the numbers 17 and 62 are always opposite each other. So there are 4 possible solutions for this puzzle. For example, if you first rotate circle E so that 1 is at the top, 25 is at the bottom, 62 is on the right and 17 is on the left. Then turn the relevant animal figure on discs A, B, C, D to 1, 17, 25 and 62. If this is not the correct solution, mirror the whole and try again. Then put the 1 at the bottom on E. Then 25 is at the top, 17 on the right and 62 on the left. Then turn again on A, B, C, D the correct animal figure to the numbers on E. It may also be that you have to place the 1 on E on the left or right. You have to find this out yourself. If you don't understand it, you can now use the Auto-solve button again to solve the puzzle If you do it right, or you solve the puzzle with the Auto-solve button, the cover will open and you will go out of the close-up. There will be a dark round hole in the floor. It is the entrance to the sewer. Click in the hole but Darren refuses to descend into the hole because it is pitch dark.
|
Go back to the Lobby. The 2 German tourists are in the lobby and want the key to their room.

Murray wakes up and hands the key to the 2 tourists. Darren needs a lamp to descend into the sewer. You know that the souvenir box on the counter contains so-called "Soul Keys" and that these things can serve as a flashlight. So click the souvenir box again and Darren will now take out such a "Soul Key".

Look at the thing in inventory and Darren reports that there are no batteries in the "Soul Key". Go back to the Hallway. There is a clock on top of the bookcase. If you have previously looked at the clock wyou know that the clock runs on batteries, but that the clock is also screwed to the case. You have already taken the Knife from the round table in the lobby. Take the Knife from inventory and click with it on the Clock and Darren unscrews the clock with the knife and takes out 2 batteries.

In inventory, combine the Batteries with the Soul Key to insert the batteries into the Soul Key. Go back into Angelina's room and click in the round sewer hole again and Darren kneels again and looks down through the hole with the help of the Soul Key. Darren sees water and ladder steps in the hole. Click again in the hole with the Exit cursor and....

Darren descends through the hole and lands in the sewers
2023: Walkthrough by: Louis Koot


