
2023: Walkthrough by: Louis Koot
If you have found this walkthrough via google search or via another site then you have probably not visited my site.
A lot more very detailed game walkthroughs can be found on my site at: www.pcgameswalkthroughs.nl
Chapter 5: Darren Micheals is Adrian Gordon
Lighthouse:

Darren regains his senses and wonders what really happened, did he really found Angelina's burned corpse here or was it a dream.
At the far right of the screen you will now see a Gravestone. Click 2x on the Gravestone.
The stone says "Fuller"....it is Fuller's grave and....Fuller's ghost appears.

Fuller briefly insults Darren and then disappears again. Is this all real? Now click on the Tree and.....
Darren sees the spirit of his mother in the tree and she says: "you are no longer my son".

Click on the door (Entrance) of the lighthouse and... 3 Reginald Borris ghosts appear and start beating Darren.

Darren passes out again and wakes up in the ruins of the:
Academy:
Darren hears a voice from under the corrugated iron roof, in the left corner (Hideout) and walks towards it. Ralph is sitting under the corrugated iron.
Talk to Ralph and use all conversation options.
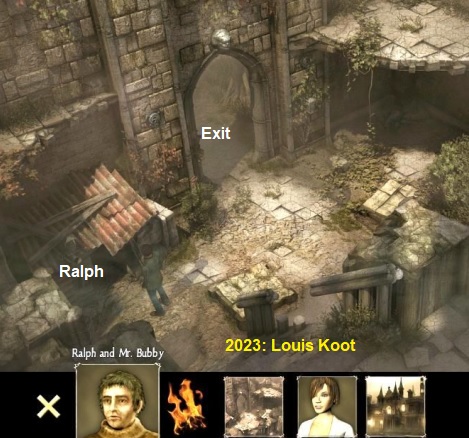
Ralph provides some interesting information, also about Angelina. Ralph lives here with Mr. Bubby. But you get the distinct impression that Ralph "doesn't have them all sorted out." And that's right because Ralph used to live in the former Sanatorium of that crazy Gordon. Ralph and Mr.Buddy are therefore one and the same person. Ralph/Buddy brought Darren here from the lighthouse. Angelina was often here to look for a "door in the ground". Angelina was here yesterday.
Once you have asked Ralph everything, the conversation will automatically come to an end. Go through the gate (To the lighthouse) back to the Lighthouse. Move your cursor over the old tree until you get a note (Note) hidden in the burnt and withered grass. Then grab the Note.

Darren automatically reads the note out loud. The note lists the positions of chess pieces, but Darren can only read a small portion of the text.
There is a knife stuck in the Entrance door of the lighthouse. Take the Knife.

The round tower rises up on the left. At the bottom of the tower there is a Crevice in the wall.
Click inside that Crevice and.....Darren finds and takes the King chess piece from the crack.

At the left edge of the screen, you can return to Willow Creek. At the right edge of the screen you return to the Academy. You can also use the postcard to return to Willow Creek or the Academy. Now go, via de Exit behind the tree, to the Academy. Darren reenters the ruins through the gate. Walk, via the top right, to the right part of the ruin. Darren ends up at a large round metal door.

There is a round pillar in front of the door. The top of the pillar is a chessboard. A raven flies in on the left.

The raven has entered through a crack and sits there for a while but then flies away again. Click on the round metal door (Gate). Darren suspects there is a room behind the door, but how to open the door? Click the the chessboard pillar (Stone plinth). Darren reports that there are 4 holes in the chessboard. Some grass grows at the bottom of the pillar. Click on the Grass. Darren sees that there is a Stone Figure in the grass. So take that Stone Figure from the grass and it turns out to be the Queen chess piece.

To the right of the round metal door is a pile of stones in the corner (Stones).
Click 2x on those Stones and Darren finds and takes the Pawn chess piece from under the pile of stones.

There are 4 holes in the chessboard, which is the top of the pillar. The 4 holes are at: Top, Right, Bottom, Left on that chessboard. Take the King chess piece from inventory and place it in the Top Hole. You will hear a "click". Take the Queen from inventory and place it in the Left Hole. You will hear "Click" again. Take the Pawn from inventory and click it in the Bottom Hole. You will hear "click" again.

You are still missing the Knight chess piece and we are now going to look for it. Walk back one screen via the middle bottom of the screen and then click with your talk cursor in the entrance of Ralph's corrugated iron shelter to talk to Ralph again. Ask Ralph about the Raven and about the Chess pieces.

Ralph says that the raven steals things and he tells that Mr. Buddy has found the Knight chess piece. Mr. Buddy (Ralph) loves music and would like to have a piano in exchange for the Knight piece. To the right of the gate you see the remains of what used to be the 1st floor gallery (Gallery). In front of that gallery you will see a Bush. Click on that busk and then take the Knife from inventory and click with it on the bushes and Darren will cut off a branch from the bush.

In inventory combine the Knife with the Branch (Stick) in inventory to cut a flute from the branch. Go talk to Ralph again and use the flute topic.
Darren tries out the flute and Ralph wants the thing and he now exchanges the Knight chess piece for the flute.

So go back to the Chessboard pillar. Take the Knight chess piece from inventory and place it in the right hole of the chess board.

You hear "Click" again and....the round metal door now rolls open.

So go through the now opened round gate and we end up in:
Cave:

A raven flies up and out through the hole in the ceiling. Continue to the stone pillar (Stone plinth), which is more or less in the middle of the cave. On the left is a Rucksack and an Oil lamp. A Sleeping bag lies at the closed gate. Click a few times on that stone pillar. There are 3 grooves on both sides of the pillar, but Darren has no idea what to do with this pillar... and to be honest, neither do I. Click on the rucksack.

Darren reports that the raven has been pecking at the backpack. Click again on the rucksack and Darren searches the rucksack and takes Angelina's Diary. In the diary, Darren also finds a folded letter. But first Darren reads the last 2 pages of the diary and you hear Angelina's voice again. When the reading of the diary pages is finished, click the diary away and....Darren now takes that separate letter and also stores it in inventory. Darren then discusses with himself for a moment. Right-click in inventory on the letter (Message) to read it now. It is a letter from Angelina and you hear Angelina's voice reading the letter again.

In her letter, Angelina talks, among other things, about, , a Curse and about 3 Mosaic discs. Angelina reports that she has only found 1 of those 3 Mosaic discs.
Click the letter away when the reading is finished.
So Darren is a Gordon. Darren's mother was the mistress of one of Gordon's and from this affair Darren was born. So Darren is the bastard son of one of the Gordon's, so the blood of the Gordon's also runs through Darren's veins. It's even worse for Darren because he is now the only living Gordon and thus the next victim of the "Curse of Gordon's". There is also a Secret Society, led by Miss. Valley, trying to summon the Devil.
Click the rucksack again, hoping that the one Mosaic Disc that Angelina mentioned in her letter is still inside. But no...the Mosaic Disc has disappeared. Darren thinks the Raven took that disc from the backpack. The raven has flown towards the Black Mirror Castle. Click the Oil Lamp, but Darren won't take the Oil Lamp. Click on the Sleeping Bag. Darren searches the sleeping bag but finds nothing.

Darren can't do anything more here right now, so leave the cave and Darren automatically ends up at the entrance gate of:
Black Mirror Castle:

Darren wants to find out who his real father is and he wants to find the 3 mosaic disks. But he has to be careful, because in her letter Angelina mentioned that at least one of the castle's residents is a member of the Society of Miss. Valley. Darren is standing in front of the large entrance gate of the castle. You hear the raven. On the right is a smaller entrance gate. On either side of the large entrance gate is a Nymph, who holds the large globe lamps with her hands. There is also such a Nymph on the right next to the small gate. To the left of the small gate is the Bell and the Letterbox. (Mailbox).On the far right is a Branch (Branch).

Click on the large gate a few times. The large gate is locked with chains and Darren sees no way to open the gate. Click on the 3 Nymphs a few times. Click 2x on the Mailbox. Darren reports that the lock on the mailbox is broken and Darren opens the mailbox but there is no mail in the box. Click 2x on the Bell. It is a modern electric bell and Darren presses the bell but....the bell does not work. Click 2x on the small gate. Darren reports that some of the fence posts are rusted and Darren tries to pull/push the gate open, but he cannot. Click 2x on the Branch, which is located in the bushes to the right of the right nymph. Darren takes that Branch. Immediately take the Branch from inventory and click with it on the small gate and...
Using the branch, Darren then opens the gate. Walk through the now opened small gate and....
Darren ends up at the front door of the castle and meets Louis, the gardener and Bates the butler.

Darren introduces himself as Inspector Falk and says he is here to investigate a murder. Continue talking to Bates via all conversation options.

The castle is now owned by Lady Victoria and her sister Lady Eleanor also lives in the castle. Darren tells Bates that Angelina was murdered and.....because A ngelina is an acquaintance of Bates, Darren can come in. Bates takes Darren into the castle to meet Lady Victoria and Lady Eleanor.
Great hall:

Darren also introduces himself to Lady Victoria as Inspector Falks. The Lady says she doesn't know Angelina. Talk to Lady Victoria through all conversation options and eventually Darren will be given permission to look around the castle, except for the private rooms. Also talk to Lady Eleanor and do so again via all conversation options. The gardener, Louis, was Eleanor's gardener in Wales and Eleanor brought the man along to Black Mirror. Eleanor's husband, Sir Richard, was a scientist who conducted his experiments in the castle's Summer House. Darren is willing to bet that in Chapter 4, he was held captive in Eleanor's castle, in Wales. Sir Richards researched the Gordon's blood to find out why madness is so common in this family.
Lady Eleanor is knitting and her knitting basket is on the floor with her. Click 2x on the Knitting Basket

Darren politely asks Lady Eleanor if he can take a woolen thread from her knitting basket. That is allowed and Darren takes a Woolen Thread from the basket. Walk one screen to the right via the right side of the screen. You now see the entire Great Hall from a top view. In the middle of the hall there is an enormous globe on a pillar. The two Lady's are sitting behind the globe. At the rear left is the large fireplace. There is a painting above the fireplace. At the back right is a large potted plant and there is also a painting above the potted plant. There is a mirror on the wall to the right of the potted plant. To the left of the globe are 2 doors. There is a red armchair near the right door and the door is slightly open. To the right of the globe is a hallway. In the right foreground is the stairs to the 1st floor gallery.

Click 2x on the Globe. Darren then stands at the front of the globe. There is a Stone Slab in the stone base on which the globestands. The Globe stands on a stone circle with a balustrade. That balustrade has stone pillars and on top of those stone pillars are small pyramid-shaped "caps". Click the Stone Slab in the base of the globe. There are names engraved on the plate and the first name Darren reads is Maximilian Mortimer Gordon, and that name is also mentioned in Angelina's letter. Darren takes a closer look at the stone slab and thinks that there must be a secret compartment behind the slab that may contain one of the mosaic discs.

Click on one of those pyramid-shaped "caps" on the balustrade. Darren has no idea what that balustrade and those "caps" are for. Click again on the "cap" to unpress it again. Exit this close-up via the left side of the screen. Now take a look at everything else you can see in this great hall. So look at the Fireplace, the 2 paintings, the potted plant, the mirror and the red armchair. Once you have done that, you go through the red curtain to the corridor (Hall) on the right and.....Darren ends up in the:
Kitchen:
Sally, the cook and also the maid, is preparing the food on the large stove. On the left is a coffee grinder and a door. To the right of the door is a Vase on a small table. Above the coffee grinder hangs a bag of Garlic and also 2 Hooks. On the right is a china cupboard with 2 pans in it and on which a silver Teaspoon (Teaspoon) lights up. Behind Sally is the back door to the Stables and near this door is a pair of green rubber Boots. Right behind Sally are the kitchen cabinets with the sink (Kitchen range). First go talk to Sally and use all the conversation options again, and there are many.

The only really interesting fact that chatterbox Sally has to tell is that she too has seen the Ghost of Samuel Gordon, in a window of the Forbidden Wing of the castle. That Forbidden Wing is locked because no one is allowed to enter it. Once you've finished chatting with Sally, go back and click on everything that you can click on. The door behind the coffee grinder is locked, but Darren thinks it is the cellar door. Then look at and take the silver Teaspoon, which is on the china cupboard. Darren doesn't want to take the 2 pans that are at the bottom of the cupboard. Examine the rubber boots and then take the Rubber Boots.

Leave the kitchen through the back door.
Backyard:

Darren is now in the back yard of the castle. Here we find the Stables and the Well. The Raven sits on his Nest on top of the stone arch of the well. Next to/in front of the well is a mud puddle (Mud). There is a wooden cart (Cart) near the shed and at the bottom left the black limousine of the Lady's. Gardener Louis lies under the car. Louis' feet and legs stick out from under the car, on the right. On the right side of the barn there is a wooden staircase to the top door of the barn. Firewood is stacked under the wooden stairs. To the left of the large barn doors is a wooden ladder and a Cart wheel. Under the cart wheel is a rickety wooden bench and to the left of the bench is the Toolbox of grumpy gardener Louis. Behind the wooden cart you see trees and between those trees you can return to the back door (Door) of the kitchen. You can go to the front of the castle via the right edge of the screen
First click everything again. Click on the Raven's nest, on top of the well. Darren thinks the raven has hidden the mosaic piece, from Angelina's backpack, in its nest. The wooden stairs lead to the stable boy's room, but Darren doesn't want to go there. Then go to the ladder and click 2x on the ladder to take the Ladder.

Click 2x on the Toolbox to take a Hammer from the toolbox.

Darren thinks the black car was the car Ralph also saw. Talk to Louis and do this again completely, until there is nothing left to ask.

Once you have discussed everything with Louis again, this conversation will automatically come to an end. Walk back to the well. Take the Ladder from inventory and click it on the Well to place the ladder against the water well. Then click on the raven's nest and.....Darren climbs up the ladder in the hope that he can look into the raven's nest for a moment.
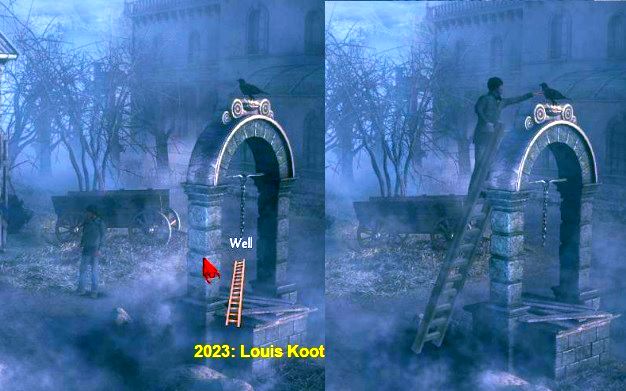
But the raven doesn't like snoopers and pecks Darren's hand. Darren climbs back down. Darren has to get that raven off its nest. Well...ravens love shiny things, so in inventory combine the silver Teaspoon with the wolled thread. Then take the wire/spoon combo from inventory and click with it on the wooden stairs of the shed and....

Darren hangs the silver spoon on the wooden stairs. The spoon attracts the attention of the raven who now leaves his nest to grab the spoon.
Quickly... click on the raven's nest again and Darren climbs back up the ladder and takes the 1st Mosaic disc from the nest.

Take the Boots from inventory and click with them on the mud puddle (Mud), next to/in front of the water well, to make the boots muddy.

Go, between the trees, back to the kitchen and in the kitchen, via the bottom right, back to the Great Hall.
Lady Victoria is no longer on the couch, but Eleanor is still in the chair. Click with the Exit cursor on the half-open door of the library.

Darren walks to the door but doesn't go in because he hears that Lady Victoria is in the library on the phone.
Darren plays eavesdropper, but is caught by Lady Eleanor. Darren apologizes. Go to the top floor via the stairs:

Top floor:

Darren ends up in the corridor of the top floor via the stairs in the Great Hall. On the left is a cupboard with 3 drawers. There is a red telephone and a yellow vase on the dresser. Above the cupboard hangs a painting depicting an orgy of naked Nymphs. Past the chest of drawers you see the bathroom door. Walk slightly to the left. At the back of the hallway is the door to butler Bates' room. Click on Bates' door. Bates's door is locked. Go into the bathroom and take a look around. Click on everything you can see in the bathroom

Go back to the corridor, via the right side of the screen (To the corridor). Back in the hallway, go back down through the gate.
Back downstairs in the Great Hall you see that Lady Victoria has now left the library, because she is sitting on the couch again. So enter the library now.

Library:

As you would expect in a room that is furnished as a library, there are bookcases full of books. Those bookcases are on the left. and there is also a serving trolley (Table) near the left bookcases. To the right of the room doors is a large panel in the wall on which the complete family tree of the Gordon's is depicted. In front of that family tree panel is a table on which an old-fashioned telephone stands.
Click both bookcases and Darren will tell which books they contain. Click the serving trolley (table) The serving trolley contains a tea set without a teapot and tea. Click the Family Tree is almost exactly the same as the one Darren saw in Eleanor's castle in Wales. Go back to both Lady's in the main hall. Click on Lady Victoria with the talk cursor to talk to her again. You ask Lady Victoria about Sally.
Walk back to the overview screen and now try to see if you can open the bottom door on the left, i.e. the door in the bottom left corner. However, that door is locked and Lady Victoria screams from the couch that the door remains closed. No one is allowed to open that door because that door is the entrance to the Forbidden Wing of the castle. Go back to theKitchen. Talk to Sally again about all the topics you get.

Darren desperately wants to know what goes on behind that closed door in the Grote Hall can be found, but as long as both Ladies are in the hall, Darren will not be able to enter the Forbidden Wing. Behind Sally is the kitchen with the sink and there is also a stove. There is a Teapot on that stove. Click 2x on the teapot .....

Darren then gets an idea....What if it were Tea Time? Then both Ladies would leave the hall to drink tea in the library. So try to take the Teapot, but Sally screams that you are not allowed to take the teapot.....there is no more tea and Bates has gone to the village to buy fresh tea.
Sally has to be lured out of the kitchen. Leave the kitchen into the Great Hall and go to the bathroom on the top floor. The bathroom looks spick and span, the beautiful tile floor has also been polished shiny clean. Well... let's change this... Take the muddy boots from inventory and click them on the bathroom floor to make the floor dirty.

Go back to the kitchen and speak to Sally again and tell her that the bathroom floor is dirty. Sally disappears to the bathroom floor.
So now grab the Teapot
Go back to theLibrary. Take the Teapot from inventory and place the pot on the serving trolley (table).

Now we still need tea and for that Darren has to return to the village, but in order to be able to move safely through the village, Darren first wants to lure the members of the Order to the hotel. There is an old-fashioned telephone on the table in front of the family tree panel. Click on the phone and............

Darren calls Murray from the hotel and says he is leaving and that Murray can make up the bill and that he will come to the hotel in half an hour to pay.
Open the postcard and click on the postcard on the Willow Creek Library and....
From the corner of the museum, Darren sees Bates coming out of the library. Bates walks across the bridge to Tom's pub and Darren follows him.

Bates has a conversation with Tom and Darren overhears the conversation. Bates and Tom both leave and Darren stands in front of the Chili Stand.
Continue to the left, to the front door of the pub. The pub will also sell tea, but the pub is closed. Try the door, but the door is locked. So take the Lock picking tool from inventory again and click with it on the door and... Then do the Lockpick Puzzle again, in the same way as you used it to open the safe in the hotel.

If you have trouble with it again, wait for the Auto-solve button to let the game solve the puzzle itself and that is exactly what I have done now. In any case, whether you solve the puzzle yourself or have it solved...the door opens, but the Lockpick wire can no longer be used. Darren is then in the pub. There is a bag of tea on the table where Tom and Bobby were previously sitting.

Grab the Tea and leave the pub and Darren will automatically be back at the entrance gates of the castle
Black Mirror Castle:
Go back through the small gate to the front door of the castle and then enter through the front door (Main entrance).
Go to the Library and place the bag of Tea on the serving trolley (table).

Go to the Kitchen and speak to Sally again and tell her that it is tea time and.....Sally disappears to serve tea to both ladies in the library. Go back to the great hall. Both Ladies have disappeared, because they are now sipping tea in the library. Zoom in on the Globe again. Click on the Stone Slab again, in the base of the globe. Darren again reports that he is sure there must be a secret compartment behind the plate.... but how to open the plate? Exit the close-up and go back to the bathroom on the top floor.
Bathroom:
The mirror hangs above the sink on the left. Click on the mirror and....
In the mirror, Darren sees now the ghost of Samuel Gordon and the ghost points with his finger to a tile on the opposite wall.

Darren is terrified and smashes the mirror into pieces with his fist.
Click on the mirror again and Darren will then point out the tile you need to look at. The tile is in the wall above the shelves.
Find that tile. Take the Hammer from inventory and then break the tile with the Hammer and....

From the hole Darren then retrieves a page from the diary of William Gordon and Samuel Gordon.

Right click in inventory on the diary page and then listen to Darren. There are a lot of little pyramids on the page and 3 of those pyramids are checked.This is the clue to the Globe in the Great Hall. So go back to Great Hall Zoom in on the Globe again. So there are a lot of small pyramids on the balustrade, surrounding the globe. Right-click again in inventory on the diary page that you just found in the bathroom. Now you get the page on your screen. On the page you see the Globe and 5 small pyramids. The 1 e, the 3rd and the 4th pyramid are checked a cross. Click the paper away again.

So there are a lot of small yellow pyramids on the balustrade. You count them from the right side. According to the diary page, the 2nd, 4th and 5th pyramids must be pressed. So click on the 2nd, 4th and 5th pyramid to press all 3 of them. Darren reports that it is okay but that nothing else happens. Now click again on the Stone Plate and...Darren now presses the plate and...finds the 2nd Mosaic disc.

Bates then returns from the village and catches Darren. Bates then reports to the Ladies that he is back and then goes to his own room to rest.
Go to the top floor and knock on Bates' room door. Talk to Bates in his room and again use all conversation options.

After this conversation, Darren is back in the hallway. Darren wants to search Bates' room, but he can't as long as Bates is in his room.
Go to the bathroom. Sally has cleaned the bathroom because there is now a bucket and a stick mop (Cleaning bucket) next to the bath
. Click 2x the bucket and mop.

.Darren only takes the Mop. Check out the bathtub. Darren reports that the plug has disappeared from the bath.
Take the Mop (Wash cloth) from inventory and click it in the bath to stuff the mop into the drain.

Then click on the water tap and .... the bathtub overflows and the water flows over the floor. Go to the kitchen and tell Sally about the bathroom flood. Sally runs off to the bathroom. Go back upstairs and knock on Bates' door again and also tell Bates that the bathroom has flooded. Bates then also disappears into the bathroom and Darren is back in the hallway.

Click on Bates' door again and Darren enters Bates' room again. Bates is in the bathroom now, so look around the room. Bottom left is Bates' bed. There is an oxygen machine (Oxygen mask) on the bed. Click on the Bedpost with your eye cursor. Darren thinks the bedpost looks strange. Click on the bedpost again and....Darren notices a slot in the bedpost and takes out a small Copper Key.

There is a dresser to the right of the window. Click the dresser. Darren reports that the dresser drawer is locked.
Click on the dresser with the copper key you just found to open the top drawer.

In the drawer, Darren finds a jewelry box that he places on top of the dresser.
Darren also finds documents and a photo, both of which he stores in inventory.

The photo shows Darren's mother and a man. But is that man Darren's father? Darren doubts it. Right-click in inventory on the documents to let Darren view them. Among the documents, Darren finds a "Combination" note (Aide memoir) and this is now stored separately in inventory. Darren placed the jewelry box on top of the dresser.

Click on the jewelry box and do that a few times. Darren reports that the box has a combination lock with symbols and that he does not know the combination. In inventory, right-click on that "aid memoir" paper again and Darren will read out loud what Bates has written down on it. The piece of paper states: On the portrait of Sir Egmond. The builder's eldest sister. My firstname. The letters of the nymphs. So this is Bates' mnemonic note that allows him to remember the symbol combination of the jewelry box. So Darren now has to solve Bates' riddle to find the combination of symbols for the jewelry box.
Solve Bates's riddle:
A: The Letters of the Nymphs:
Leave Bates' room. In the hallway, Darren hears Sally and Bates arguing in the bathroom. Sally and Bates then come out of the bathroom and both go downstairs. The Nymphs painting hangs above the cupboard on which the red telephone is located. Click on the painting. The painting depicts naked Nymphs and Darren reads the Roman numeral XVIII = 18 in the painting

Outside, at the entrance gate of the castle, you have also seen 3 stone Nymphs.
Open the postcard and then click on the postcard on the entrance gate of the Black Mirror castle and......
......Darren then ends up outside at the entrance gate

So there are 3 Nymphs here. Click the left Nymph. On the pedestal of the left Nymph, Darren sees the Roman numeral XX = 20. Click the Middle Nymph. On the pedestal of the middle Nymph, Darren sees the Roman numeral XIX = 19. Click the Right Nymph. On the pedestal of the right Nymph, Darren sees a vertical line representing the Roman numeral I = 1. Darren now knows all the "Letters of the Nymphs" and translates these Roman numerals into the corresponding letters of the alphabet. So I = 1 = A. XVII = 18 = R.....A. R. S. T...It's an anagram so Darren makes it STAR = STAR. The Letters of the Nymphs therefore refer to the STAR symbol.

B: Bates' first name:
The mailbox is located to the left of the small gate. Click on the mailbox again and....this time Darren finds a letter in the letterbox.

The letter is for Bates and Darren stores the letter in inventory. Right-click on the Letter in inventory and Darren reads the letter.
It is a bill for a gravestone and in it Darren reads Bates' first names and they are: Edward Bartholomew.
C: The name of the builder's eldest sister:
Go back to the castle and enter through the front door. Bates is now sitting alone on the couch by the fireplace in the Great Hall.
Go to the Library. The two ladies are still sipping tea in the library. Talk to Lady Victoria and ask her all the questions again.

Lady Victoria tells that in the middle of the 1st century the Apostle Bartholomew was said to have died because his skin was torn off. The name Bartholomew therefore symbolizes a 'knife'. So Bates' first name, Bartholmew, represents the Knife symbol. Lady Victory also tells the name of the builder of the Black Mirror castle and that is Frederic Arthur Gordon.
Take another look at the family tree of the Gordon Family, to the right of the library doors.
In the close-up of the family tree find the word "Builder" and then click on it and.....

Darren searches and finds among all the names that of Frederic Arthur, the builder of the castle.
Frederic Arthur, the "Builder" had four sisters. His eldest sister's name is Rose.
D: On the portrait of Sir Egmont:
Leave the library and go to the kitchen. Talk to Sally again and ask her about Sir Egmont.

Sally knows ofSir Egmont but she doesn't want to tell Darren anything about Sir Egmont right away.
Sally still thinks Darren is a police inspector and in exchange for info on that Sir Egmont,
Sally wants Darren to destroy her brother's speeding tickets.
Go to the Great Hall and talk to Bates and ask the old and sick butler about Sally's brother's tickets (Speeding ticket).

Bates says that Sally comes from a farm in Sussex and that her family still lives there.
Go to the upper floor hallway and click on the red telephone that is on the cupboard under the Nymphs painting.

Darren calls Sally's farm and gets her brother Rupert Wood on the line.
Darren lies just as happily by telling Rupertje that his ticket has been torn up. Darren learns that Rupert is 34 years old.
Go back to the kitchen and talk to Sally again and tell her that the issue of her brother's ticket has been resolved.
As a thank you, Sally then gives Darren a bag of Sir Egmont cereal. There is a medal in the shape of a cross on the bag.

Ok...we now have all the information needed to open Bates' jewelry box. So go back to Bates' room.
Click again on the jewelry box that Darren previously took from the dresser and placed on top of the dresser.
|
You now come to a close-up of the symbol lock of the jewelry box. The lock has 4 sliding windows. Each window has a button that you can press.
In each window you can slide various symbols by clicking on the buttons.So you have to slide the correct symbol into each window, in the order of Bates' note. Bates' mnemonic has given you the correct solution, namely:
So click on the 4 buttons to put the 4 correct symbols in the windows as follows: in the upper windows the: CROSS symbol, in the right window the ROSE symbol, the KNIFE symbol in the bottom window. In the left window the STAR symbol
The box opens and Darren takes out a Key and half a Locket.
The locket contains a childhood photo of Darren, but the name "Adrian" is on the back of the photo. Darren is now really starting to doubt his origins...is he adopted? |
Leave Bates' room and go back downstairs to the Great Hall. In the large hall, walk to the door at the bottom left, the Closed Door of the Forbidden Wing.
Take the Large Key, which you just took from the jewelry box, from inventory and click with it on the door and....

Darren unlocks the door and ends up in the:
Forbidden Wing:
Darren walks down a hallway and tries all the doors, but all the doors are locked. Darren continues walking down the aisle and then eventually end up in the only room that is accessible. The furniture in the room is covered with sheets. The fireplace is on the right wall and there are 2 cupboards built into the wall. There is a covered painting against the wall between the right built-in cupboard and the fireplace. Near the covered painting there is a small wooden tile (Wooden plate) on the floor. A large wall mirror is built into the rear wall (Wall mirror). Click 2x on that little wooden tile. Darren takes the tile to store it in inventory.

The tile is part of a children's game. The front of the tile features an animal head and the name "Ralph" is written on the back. So could this tile belong to that Ralph in the Academy? Click a few times on the large wall mirror . Darren then walks over to the mirror to take a closer look and explains that in the bottom edge of the frame there is a mechanism and a keyhole.

Darren then reports that the keyhole is shaped like a ball.
Darren can't continue here right now, so let's go back to Ralph to give him the tile back.
So right-click on the postcard in inventory and go back to the:
Academy:
Darren is back in the ruins of the Academy. Bottom left is still Ralph's corrugated iron shelter.
Click with the talk cursor in the opening of the shelter again to talk to Ralph about the wooden tile you just found in the Forbidden Wing room.

The wooden tile is a tile from a wooden tile sliding puzzle.
Ralph got that sliding puzzle from a beautiful woman when he was little and he still has the puzzle.
Ralph now gives the sliding puzzle box to Darren.
The wooden tiles sliding puzzle:
Right click in inventory on the Sliding tile puzzle box Darren says that he remembers this game from his youth. Darren also says that he hears something rattling in the box. In inventory, combine the loose tile (Wooden plate) with the Sliding tile puzzle box to place the loose tile in the box and.....

Darren explains the purpose and then you end up in the puzzle:
|
The box panel consists of Silver and Gold Animal Heads. On the edges you will see Silver and Gold Buttons. Those Silver and Gold buttons indicate how many Silver and Gold Animal Heads you need to place in each row and in each column.
It's a sliding puzzle, so you have to move the animal heads. If you have difficulty with it or no patience, use the Auto-Solve button again to solve the puzzle. Name the Columns A, B, C, D and name the rows 1, 2, 3, 4. Column A should contain 2 Gold and 2 Silver heads. Column B 2 must contain 3 Silver and 1 Gold Cup. Column C should contain 2 Gold and 2 Silver heads Column D should contain 3 Silver and 1 Gold cup. There must be 4 Gold heads in Row 1. Row 2 should contain 2 Gold and 2 Silver heads. There should be 4 Golden heads in row 3. Row 4 should contain 3 Silver and 1 Gold heads. So do your best or use the Auto-Solve button. You click on the animal heads to move them. If you solve the puzzle yourself, an arrow button will appear in the bottom right box.
Then click on the arrow button and......... You leave the puzzle and Darren takes a small metal ball from the puzzle box.
|
Open the postcard and then click on the postcard on the facade of the Black Mirror Castle to return to the front door of the castle:
Black Mirror Castle:
Forbidden Wing:
Through the postcard, Darren has now ended up straight back in the Great Hall. Click on the door of the Forbidden Wing and Darren will immediately be back in the room with the large wall mirror. Click on the large mirror again so that Darren walks towards it again. Then take the metal Ball from inventory and click it on the mirror and...

Darren puts the ball in the bottom edge but tells him to bring the ball to the middle. Now click on the mirror again and......
Listen to Darren who now explains what the intention is and then you end up in:
Mirror Ball Puzzle:

It's a kind of a pinball puzzle. You are in the close-up of a circle and in the circle you see 5 rings. The Ball is in the holder that hangs at the bottom of the circle. At the bottom left is the start button with which you shoot the ball from the holder. The ball must go from the holder through all the rings to the hole in the middle. The rings have openings through which the ball can pass from one ring to the other. But that doesn't just happen automatically. You must adjust the rings so that the Ball can roll through the openings in the rings to the hole in the center. There are 5 buttons on the outside of the circle that you can press. With those 5 buttons you can turn the rings so that you can ensure that the ball cannot roll back. However, you cannot rotate a ring until the Ball rolls through the rings.
So click the Start button to release the ball from the holder. The Ball then starts to roll through the 1st ring to the 2nd ring. You now have to try to turn the rings with the 5 buttons in such a way that the ball does not roll back but rather rolls through all the rings to the hole in the middle. If you are unable to get the ball in the middle, you can use the Auto-Solve button again to have this puzzle solved automatically. Once the ball has gone through the hole in the middle, you will automatically leave the puzzle and the large mirror will slide to the right and you will have opened the Secret Door.

Then go through the Secret Door to:
Children's room:
This room is one of the most beautiful in the entire castle and it seems that everything in the room is still very well maintained. On the right is a writing table with a mirror and a photo on it. The writing desk also has drawers. Click on the drawers in the writing desk and.....Darren finds a music box in the drawer, which he places on the writing desk. Darren also finds the 3rd Mosaic disc in the drawer, which he stores in inventory.

Darren has placed the Music Box on the writing table. Click on the Music Box and then listen to the melody of the music box and......

Darren gets a splitting headache and falls to the floor unconscious and has another nightmare.

2023: Walkthrough by: Louis Koot


