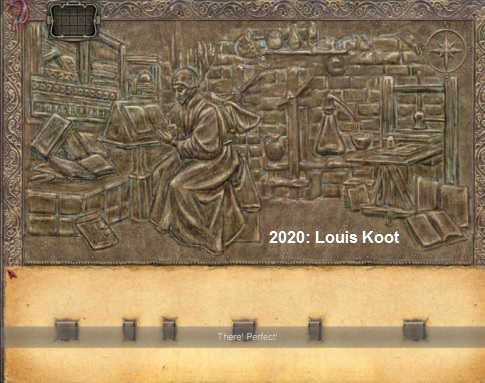
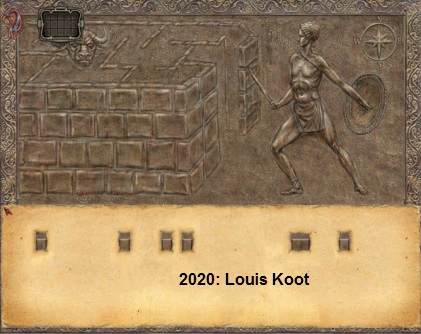
Dracula Origin:
2013 / 2020 Walkthrough by: Louis Koot
If you have found this walkthrough via google search or via another site then you have probably not visited my site.
A lot more very detailed game walkthroughs can be found on my site at: www.pcgameswalkthroughs.nl
This game has been re-released on Gog.com
Dracula Origin is a point and click adventure game from Frogware. You control the game completely with the mouse. In fact, the game works just like the Sherlock Holmes games, which are also from Frogware. The main menu screen includes the options: "New Game", "Save", "load", "Options" and "Exit game". In the Option screen, you can set anything yourself, such as video resolution, sound settings, and game settings.
In the game, you open the menu screen using the keyboard's Escape key.
You can save your game any time you want it and there are no restrictions on the number of saveslots
When you press the spacebar of your keyboard you will see all the so-called Hotspots in the game screen. You will see in the screen all the "feet", "hands" and "eyes". Double-clicking an Exit will get you quickly to the next screen. The inventory/Journal screen opens and closes when you Right click in the screen
Intro
Professor Van Helsing, the famous, or if you like infamous, vampire hunter is in his office and talks about his years of researching Vampires.
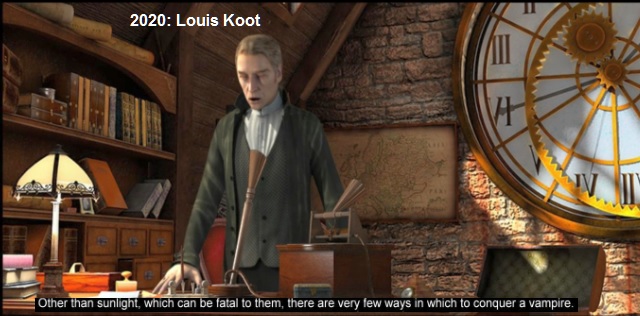
Van Helsing lists some weapons capable of holding back a vampire. According to folklore, books and legends, vampires can be defeated by sunlight, garlic, their own reflection, running water and silver bullets. But Van Helsing has experienced in his years of hunting vampires that only the Crucifix, Holy Water and a Wooden Stake are the only real weapons against vampires.
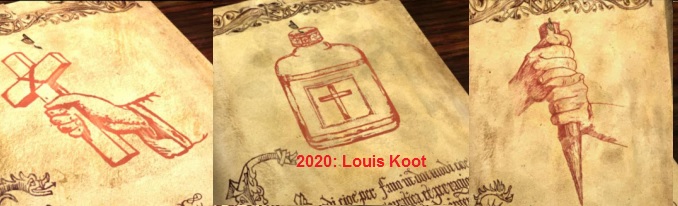
The Crucifix causes the Vampire to recede, Holy Water paralyzes the vampire and attacks his flesh, and a Wooden stake, stabbed right through the heart, kills the Vampire.
Maria, the professor's lodger, knocks on the door and inquires about Van Helsing's health. Maria shoves a letter and a newspaper under the door. The letter belongs to Jonathan Harker. Harker writes that he found Dracula's castle and that, under false pretenses, he managed to penetrate. Harker goes on to write that he showed Dracula a photo of his fiancée Mina. Dracula turned out to be very interested in Mina and he suddenly disappeared. Van Helsing finds this disturbing news and fears that Mina is in danger and he decides to go to London to visit Mina.
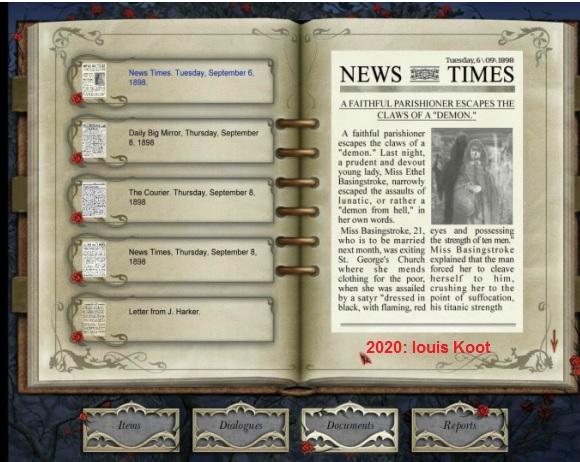
The Document Screen appears and in this you read the Jonathan Harker letter. Right-click to also read the newspaper article.
The newspaper article is an article from the News Times of Thursday, September 8, 1898. The article reports on a family drama. In a flat on the London's New Kent Road, Gerrit Melford first murdered his wife Magdalene and then killed himself. The article ends by mentioning that a similar family tragedy took place last Tuesday.
After you have read both Harker's letter and the newspaper article, you click right to close the document screen
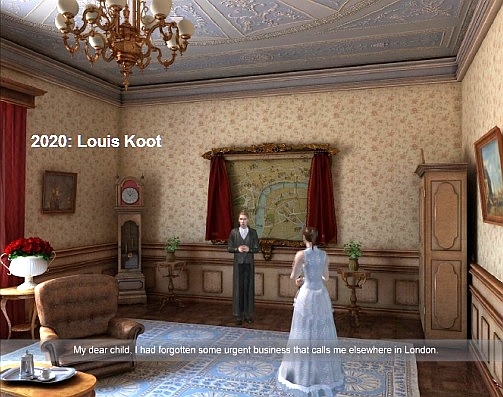
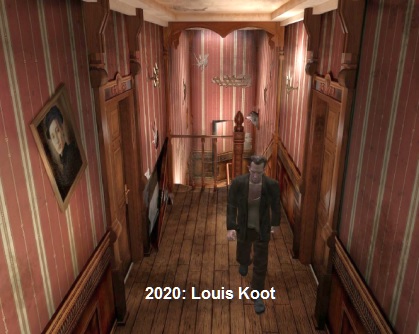
We end up in London, in Mina's house. Mina receives Van Helsing in her salon and she apologizes for the mess.
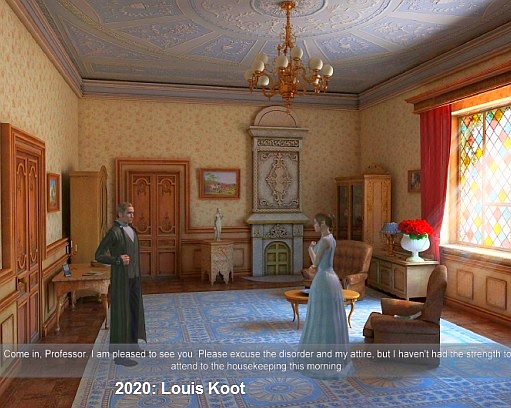
Mina hasn't had time to run the house today. In the upper right corner, the conversation screen appears in which the conversation options appear and you have to click on it. So ask Mina "What is going on" and Mina tells us what's going on. The sister of Mina's maid Jenny was murdered yesterday, and this morning the police broke the news to Jenny. Jenny was taken to the police station to identify the body. Now you really get control of the game. In your inventory you have a box of matches and a crucifix.
Chapter 1: London:
Part 1: At Mina:
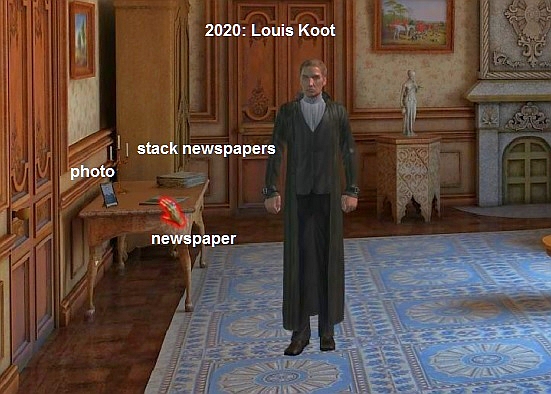
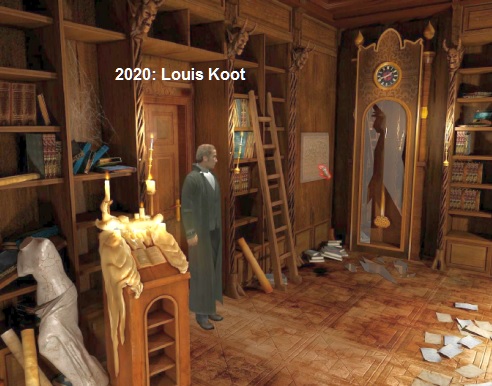
Van Helsing is in Mina's salon. There's a table against the left wall. There's a picture on the table.
In front of the picture is a newspaper and there is also a stack of newspapers on the table. There's also a newspaper in the front seat.
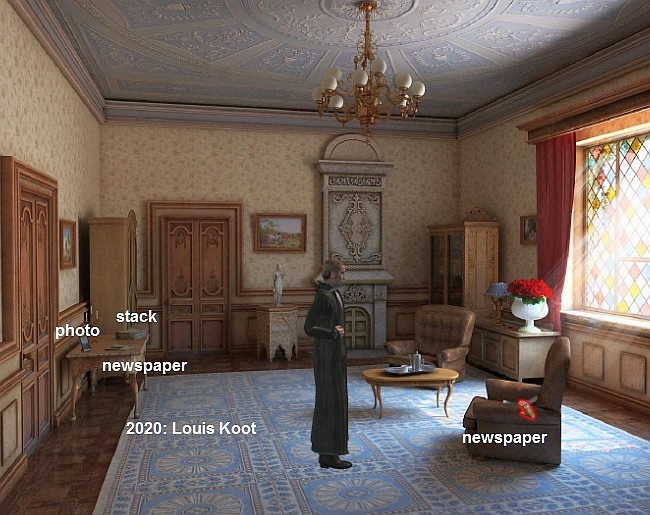
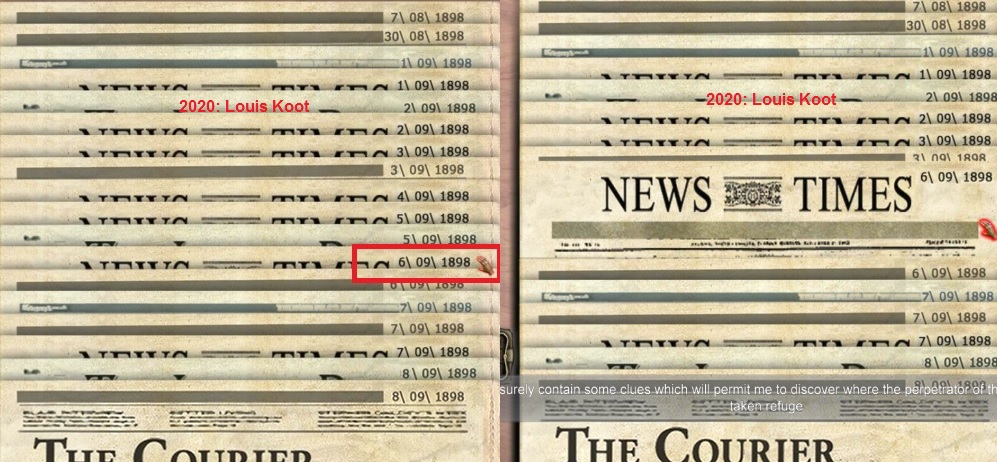
In your screen the stack of newspapers appears but you only see the names of the newspapers and the dates. So you have to fish the right newspaper out of the pile by clicking on the right date. Well.... Jonathan Harker was here 2 days ago and it's now 8 September, so click on the New Times newspaper of 6\09\1898. So you have to click on the date. This newspaper then comes up from the pile and is stored in the documents screen
|
You have now taken the 3 newspapers and, together with the newspaper you got at the beginning, you now have 4 newspapers in your document inventory. Read these 4 articles now in your document inventory. These newspaper articles contain the clues to the London map puzzle that you need to solve in a moment. In the newspaper articles you must remember the places where murders were committed and where the killer then disappeared.
|
Once you've read all these newspaper articles, close the document screen. Take the photo from the table. It's a picture of Jonathan Harker. The photo is stored in your Document Inventory. Then, via bottom screen, walk down a screen. Van Helsing will be standing in front of the other wall of the room. Click on the red curtains to slide them open and.... you open the London Map.
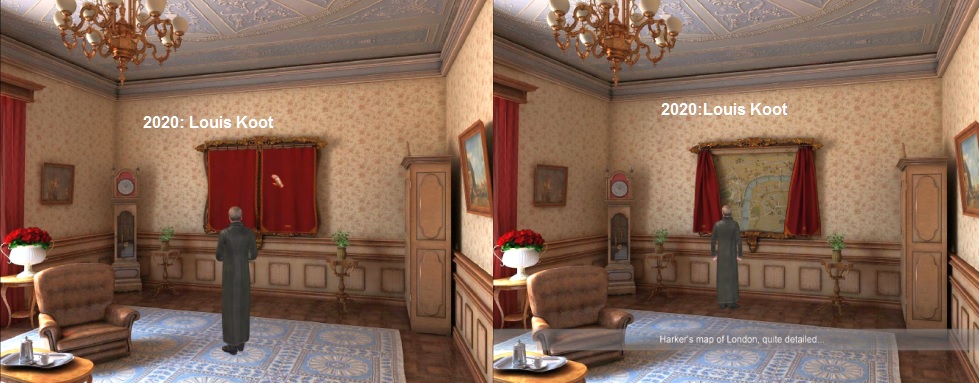
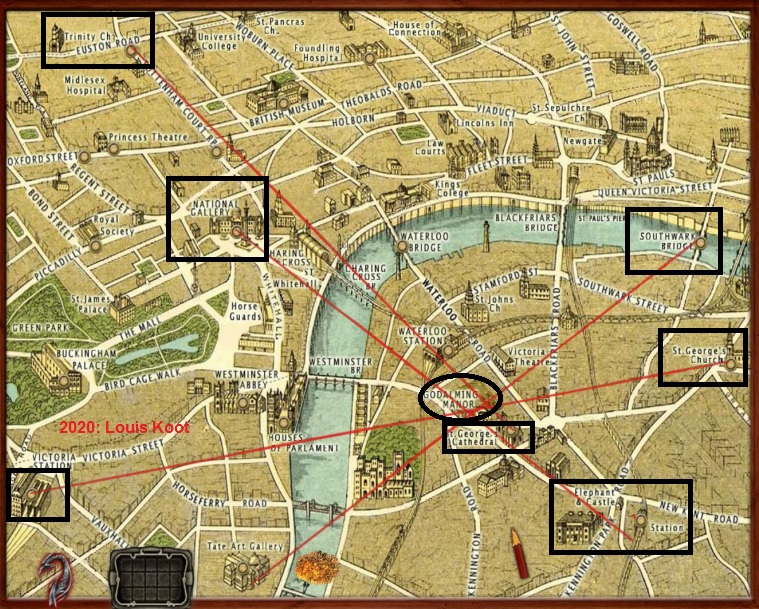
The london map will be filling your screen. In the lower left corner you see a curve arrow and the inventory/documents screen.
At the bottom of your screen there is also a Flat Eraser and a red pencil.
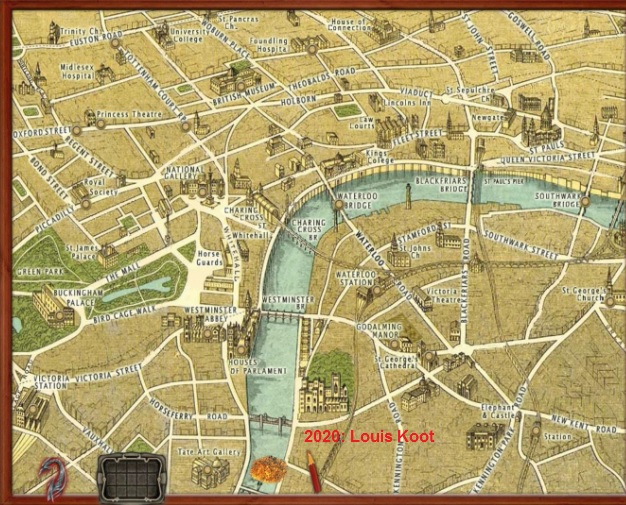
Once you've read the newspaper articles, this puzzle won't be difficult. So you click on a location round with the red pencil and then you hold down the mouse and drag the pencil to the location where you want to connect the previous round. You then drew a line between the two locations. Van Helsing always tells you if you have connect the 2 right locations.
You now have 4 red lines on the map and you can see that the intersection of these 4 lines is exactly located at the location "Godalming Manor".
Click the last one, with the pencil, on the round of "Godalming Manor" and..... You go out the map and Van Helsing concludes that he must now go to Bloomsbury Cemetery, the cemetery next to Godalming Manor, because the killer must have his hiding place there. Close the document screen and....
. ........ Mina comes back in and Van Helsing apologizes for not being able to go to the park with Mina. He asks Mina to buy a bunch of garlic and hang it above her front door. Van Helsing will return tonight. We end up in: |
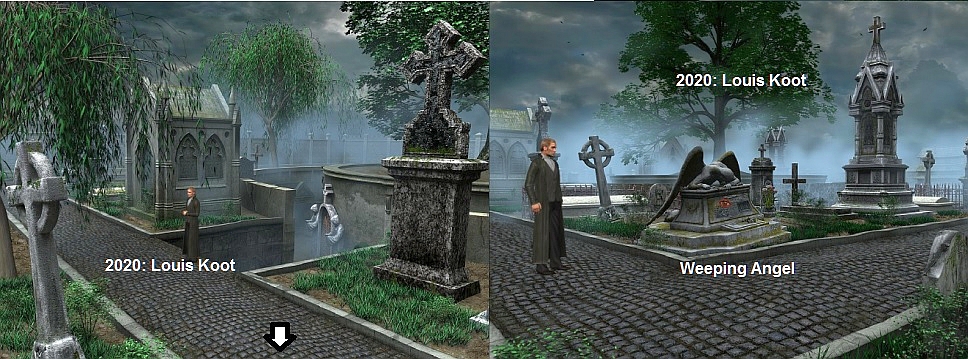
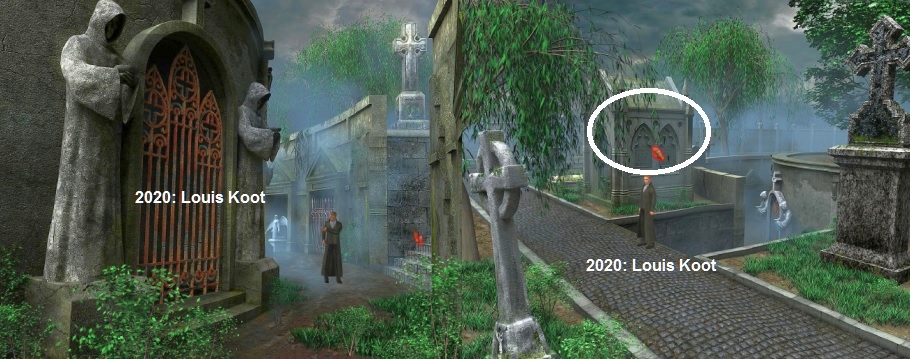
Part 2: Bloomsbury Cemetery:
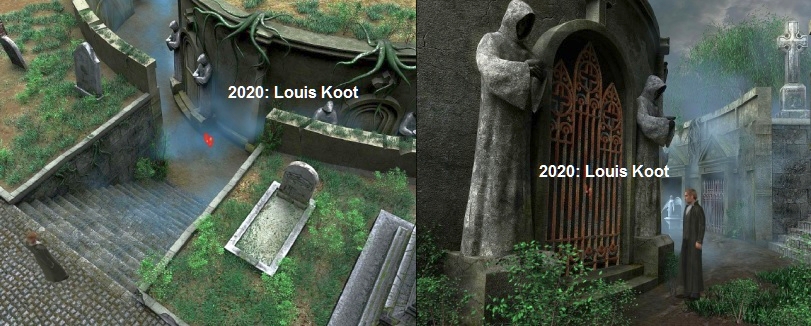
Van Helsing ends up at the entrance of the cemetery. The building that van Helsing is standing at is Godalming Manor. The fence you see is the entrance to the cemetery. Knock on the doors of Godalming Manor. Hendrick, the butler, comes out and he swings menacingly with a wooden club.
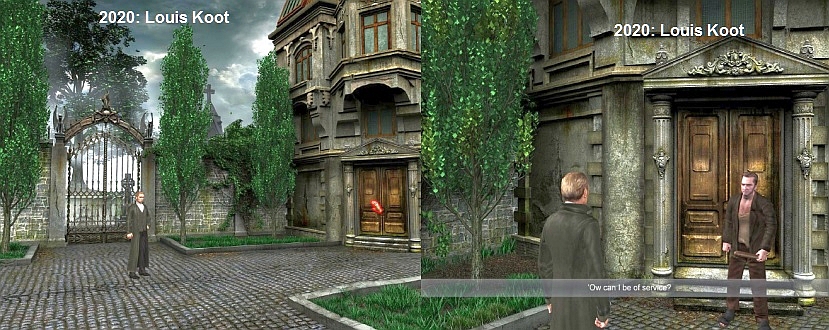
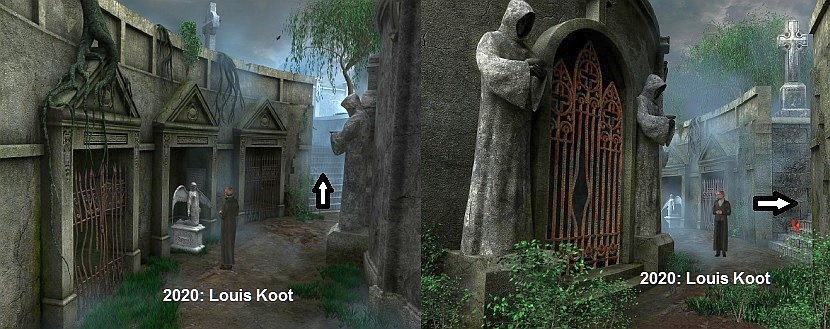
A conversation follows, in which Hendrick is not really friendly and in which Van Helsing introduces himself as Professor Ernesto Slavicopete and that he is looking for a quiet house to live in. Hendrick's master, however, is sleeping, and Hendrick can't let anyone in. Hendrick disappears back inside and Van Helsing thinks that he should come back here because he really wants to look around inside. Click with your feet on the entrance gate of the cemetery and Van Helsing goes into the cemetery:
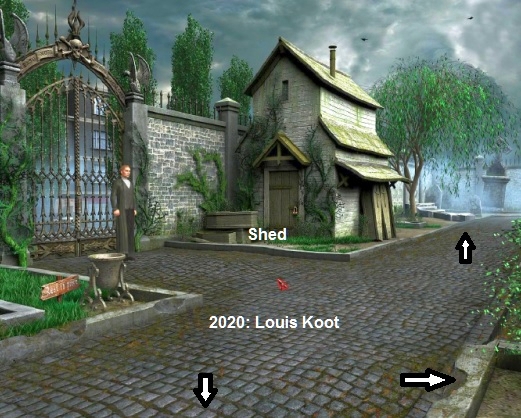
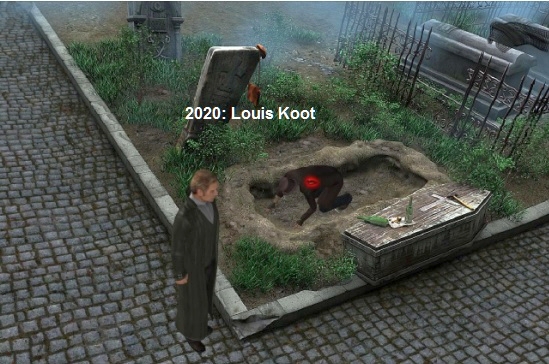
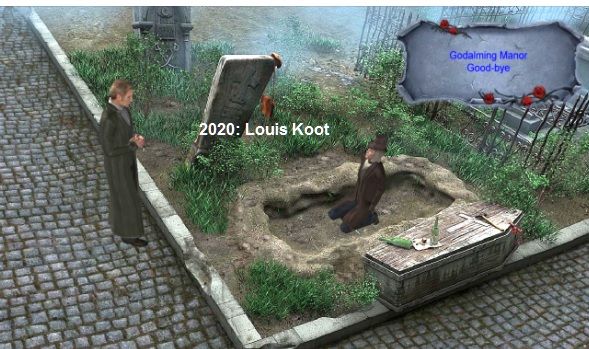
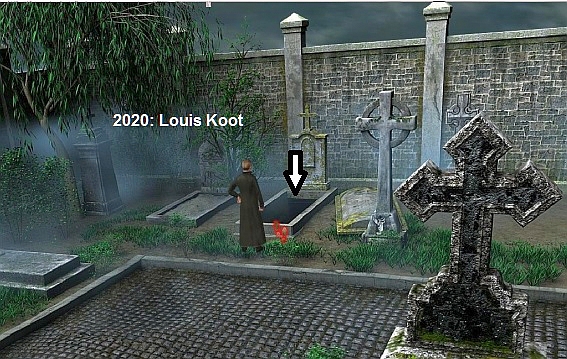
Follow the path up to the next screen and Van Helsing joins Paul Long, the gravedigger of the cemetery. Paul Jong is digging, or excavating, a grave. On the curb is a coffin and in front of Paul Long is his Scraper. On the coffin are 2 empty bottles that you can view. There is also a hammer on the coffin. Grab the Scraper and then talk to Paul Long.

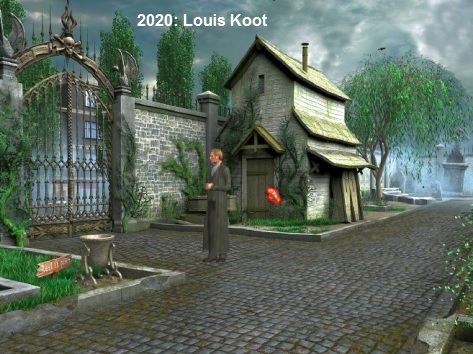
Long's shovel is in the barn, but he can't open the barn because of the numbers lock. So ask Paul Long about, "The Combination?".
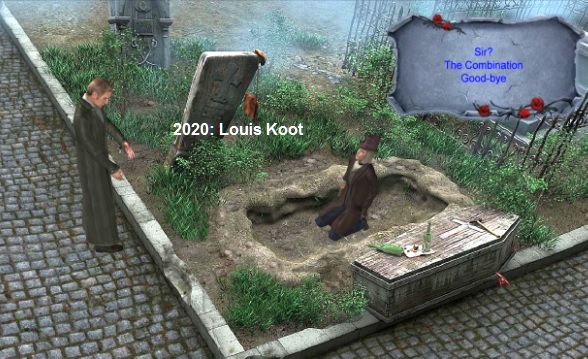
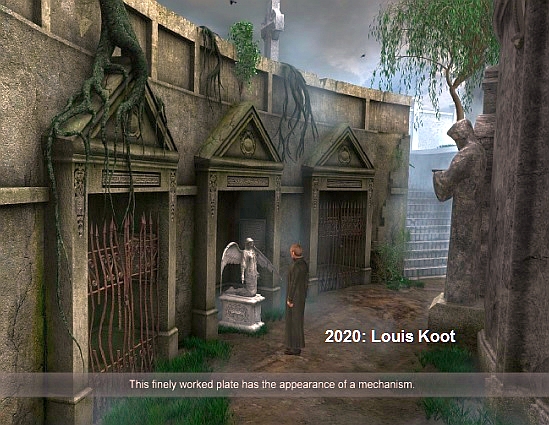
Paul's boss did tell him the combination, but he can't remember it. So ask further about "Opening the Shed". Long then tells that the code for the lock is the age of J.B Lemon and his wife Susy. These ages are engraved on the mausoleum of J.B Lemon and his wife and that mausoleum can be found near the north staircase. Also, Long says that you have to reverse the numbers, so that for example a 6 is a 9. Say "good-bye" to end the conversation. Go, via center right, a screen back to the shed and then, through the bottom right, to the stairs that go down to the path that runs around the crypts. Walk down the stairs. Downstairs you can see 2 grave crypts that are sealed by a fence.

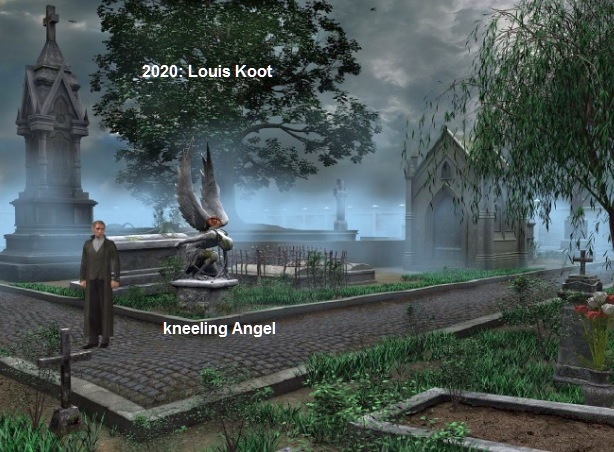
Between the 2 crypts stand a "white Angel". Continue to the next flight of stairs. You will see a tomb with two large monk statues on either side.
Go up the stairs, right, and you'll be at J.B Lemon's Mausoleum.
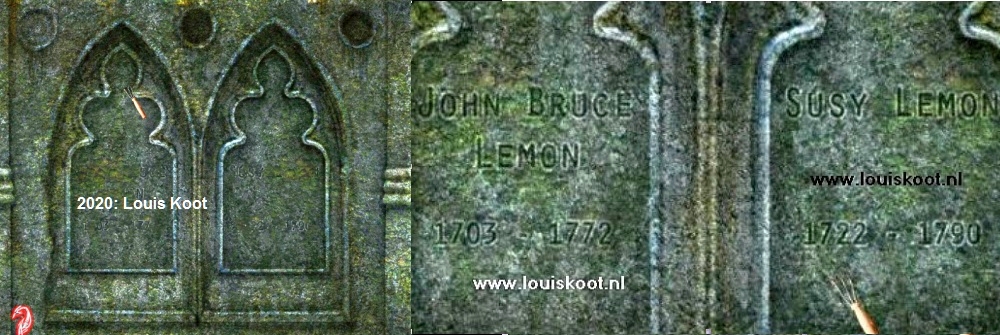
If you do this right, the document screen will automatically appear in which you will read the date of birth and the date of death of John Bruce Lemon and his wife Susy Ice Lemon. "John Bruce Lemon 1703-1772" and "Susy Lemon 1722-1790". John Lemon is 69 years old and his wife Susy 68 years old.
Note: You have to scrape the 2 niches completely, within the frames. It's not enough that you see the letters and the numbers clearly. You have to keep scraping until Van Helsing says he can read everything properly and the document screen appears.
Store the scraper again and click on the curved arrow to get out of the close-up. Go back to the shed, at the cemetery entrance. So you can just follow the path up to the entrance from the J.B Lemon mausoleum, or you can go back through the lower path. Back at the shed you click on the door/padlock and. this time you will end up in the close-up of the padlock.
Note: you will now only get into the close-up of the padlock if you have done the clean-up of the 2 niches in the right way, so if the dates of J.B Lemon and his wife are also stored in your document screen.
So now you have to put the correct code of 4 numbers on the padlock. J.B Lemon is 69 years old and his wife Susy 68 years old. The code, you'd think, will be 6968, were it not that Paul Long has told you to turn the 6 and the 9. So a 6 is 9 and a 9 is 6. Then the correct code is 9698. The lock has 4 squares. Click in the boxes until you have the correct number in each box, so from left to right: 9, 6, 9, 8. Then Click the round button,which protrudes on the right side of the lock.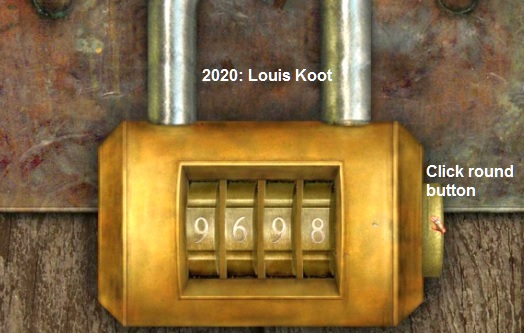
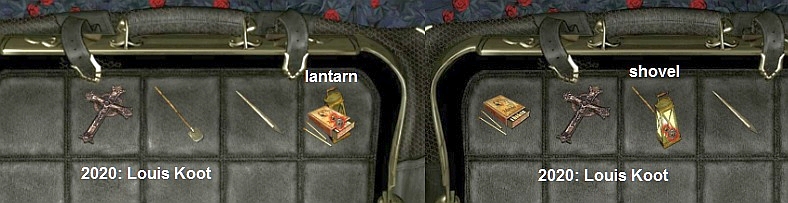
The lock opens and Van Helsing ends up inside the shed. Look at everything with your eye cursor.
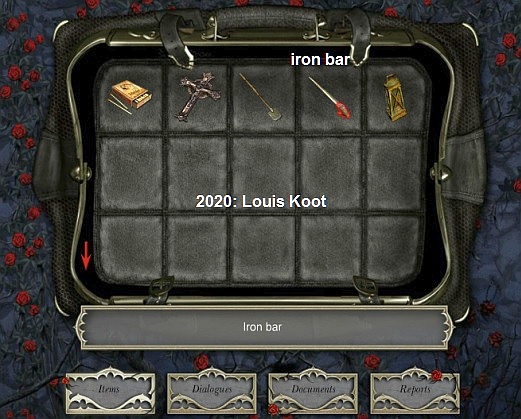
Behind Van Helsing, right next door, there is a shovel and a Metal Rod. On the table is a Lantern
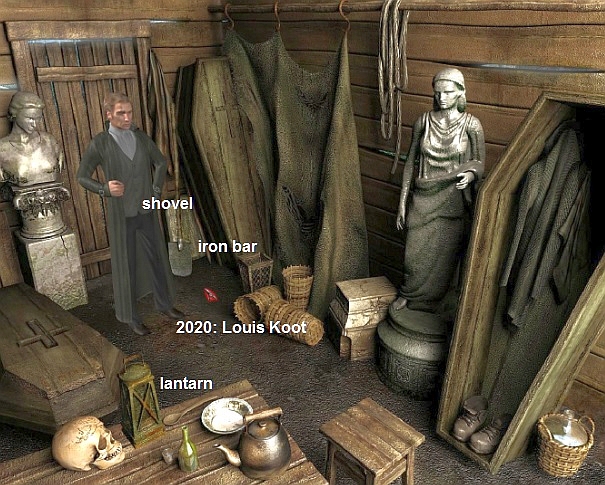
Grab the shovel and also grab the Metal Rod and grab the Lantern.
Go back out and walk back to Paul Long,the gravedigger. Talk to Paul Long again and ask him about "Godalming Manor" and then about the "Other Entrance".
Paul Long tells that someone, from the Godalming house, wanders around the cemetery at night. The gravedigger also tells that his predecessor has said something about a tunnel that runs between the cemetery and the Godalming house. Ask "Where is the Watchman?" That predecessor of Paul Long is buried in the crypt with the 2 great monk statues and in his tomb would be a book about the secret tunnel. Say hello to Paul Long and go back to the J.B Lemon mausoleum. Go down the stairs again at the J.B Lemon mausoleum and you are back at the tomb crypt with the 2 great monks statues. Click on the fence with your feet to get into the close-up.
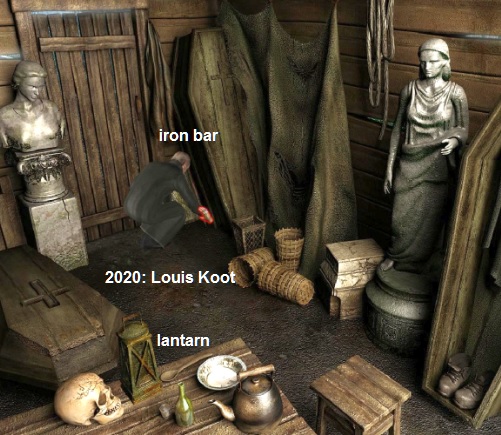
Van Helsing then sees an inscription on the floor, behind the fence, but he can't read it because it is dark inside. Close the document screen. You can't open the gate with your hands. So open the inventory/documents screen and click Items to open your inventory. In your Items inventory, click the Metal B ar to select it.
Close the screen and the Metal B ar will be in the top right corner of your screen. Now click right in the middle of the railing of the tomb and....
With the metal rod, Van Helsing bends the 2 middle bars of the fence apart. Now you can shine in with the lantern.
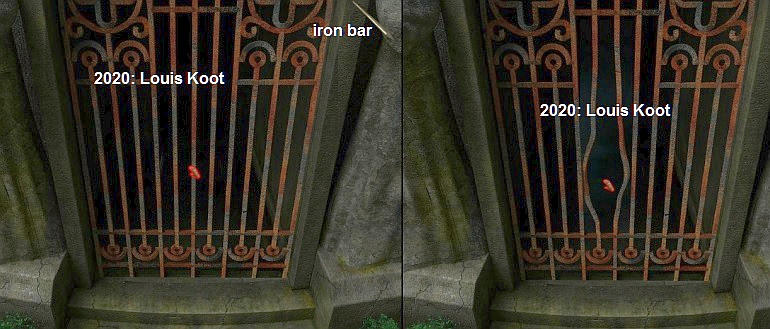
Click again between the 2 curved bars and..... Now Van Helsing can read the inscription in the back of the tomb.
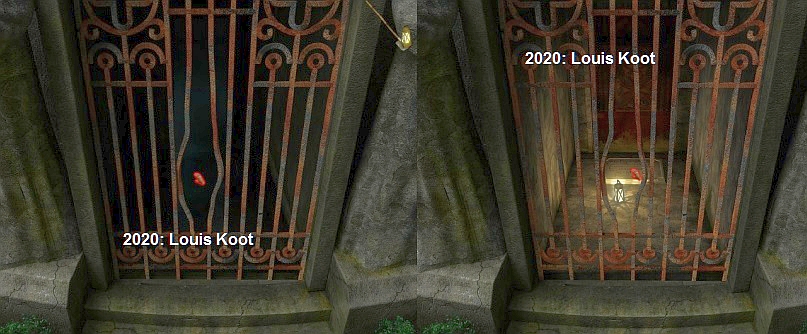
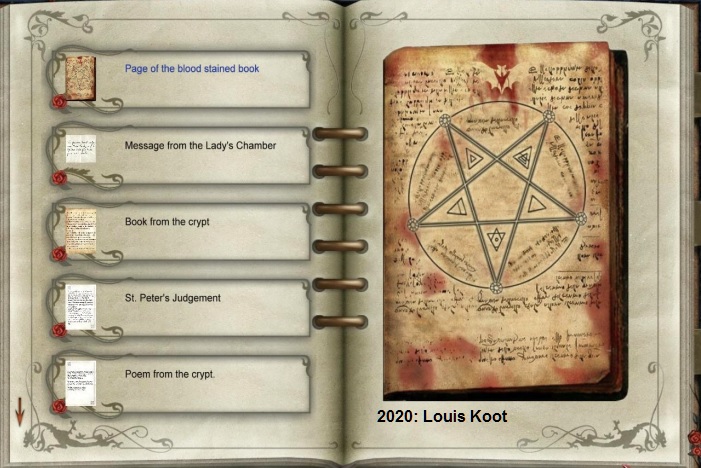
Click the inscription tile with your hand and Van Helsing copies the text to the document screen. Read this "Poem from the crypt"
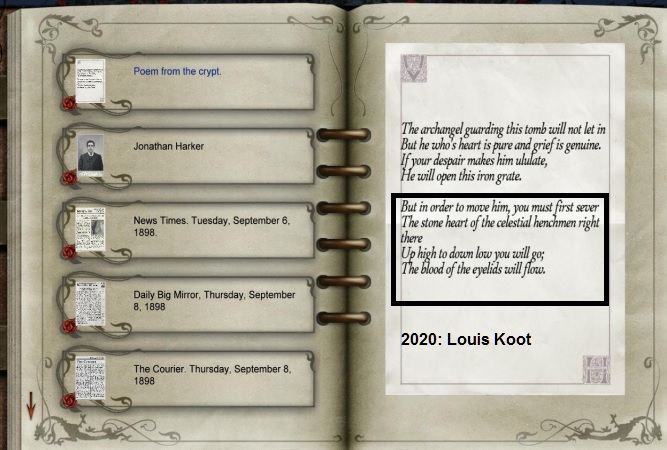
So it's a poem and it goes like this:
"The archangel guarding this tomb will not let in. But he who's heart is pure and grief is genuine. If your despair makes him ulutate, He will open this gate. But in order to move him, you must first sever The stone heart of the celestial henchmen right there. Up high to down low you will go; The blood of the eyelids will flow"
So this poem tells you what to do to open the crypt's gate and how to open the grave.. Close the document screen and then click in the middle of your screen with your feet to zoom out. Go a screen up to the white angel that stands between the 2 other crypts.
|
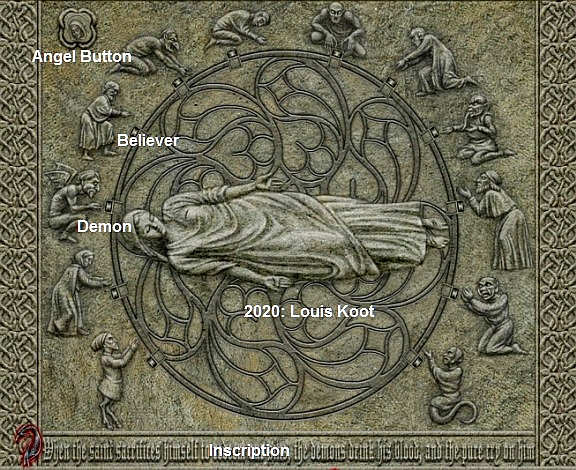
"White" Angel:
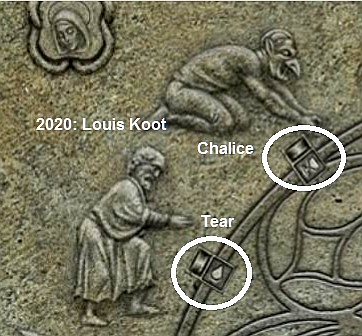
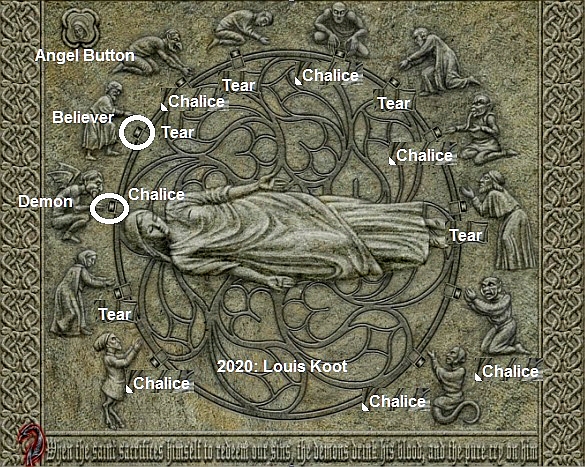
View the white angel image with your eye and you end up in the close-up. An Angel lies in a circle. Around the circle are demons and believers. In the outer edge of the circle there is a button and a box, in front of every believer and demon. In the lower border is an inscription. Read that inscription.
Van Helsing then reads the inscription aloud. By clicking on the buttons you put a Tear or a Chalice in the box. Ateach Demon you have to put a Chalice in the box and at every Believer a Tear. In the upper left you can see the "Angels Button".
When you have put a Chalice in every box at the demons, and a Tear at the Believers, you click on the "Holy Button" and........
....."Perfect" says Van Helsing and..... blood then flows through the "veins" to the Angel and you go out of the close-up. Go back to the stairs, at the crypt with the 2 monks, and up this staircase again.
You're standing in front of the J.B Lemon mausoleum again. Go a screen down through the bottom right and.... on the corner is the statue of a "Crying Angel". "Crying" Angel
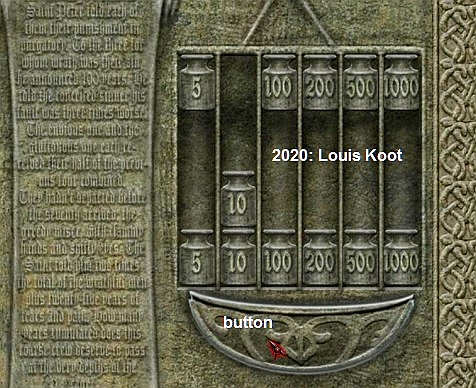
Look at the crying Angel with your eye again. You end up in a close-up again. You see a scale. The left bowl is full of Demons. The weights hang above the right-hand scale.
First read the inscription between the two scales again. This inscription is copied to your documents. Read this "St. Peter's Judgment" first. You read about the "Judgment of St. Peter". St. Peter has punished a number of sinners with years of punishment. The sum of all penalties tells you the total weight that you must put on the right scale of the scale.
Add these penalties together, so: 300 + 300 + 300 + 300 + 625 = 1825 years = 1825kilo. So weights hang above the right scale of the scale and that is 2 times 5, 10, 100, 200, 500 and 1000. Click on the bottom 5 to lower it. Click on both 10 to lower them both. Click on the bottom 100, 200, 500 and 1000 to lower it and then the scale will be 1825 kilos.
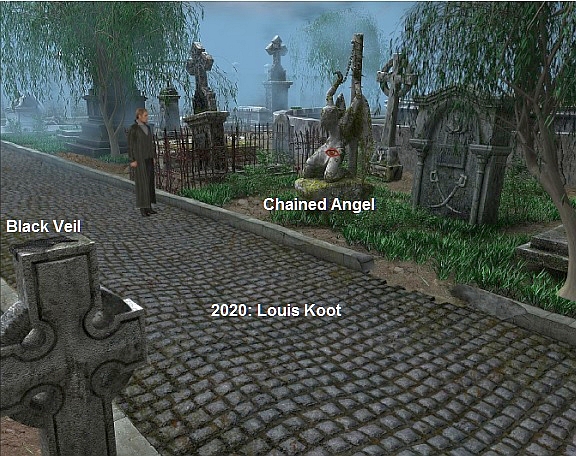
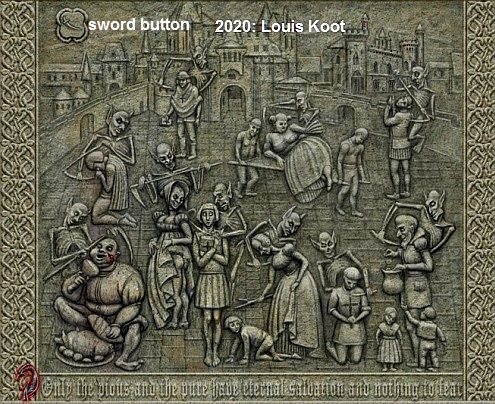
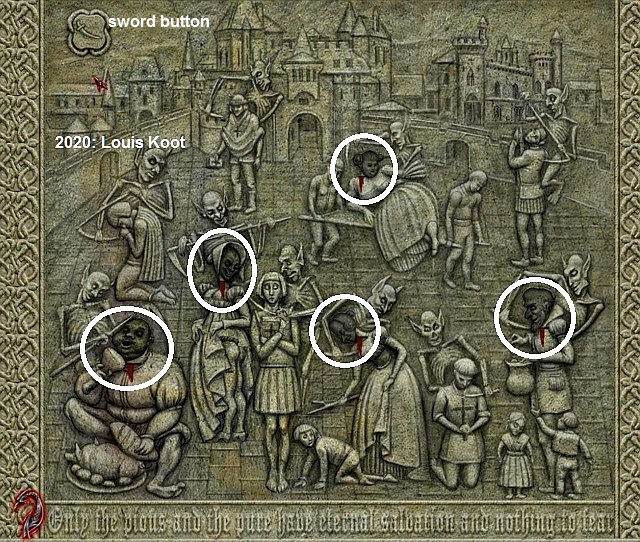
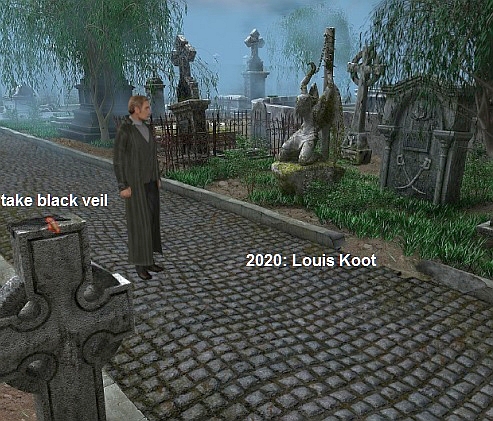
Then click on the scale button and....."Perfect"... calls Van Helsing again and automatically you go back from the close-up. Walk back to the right, to the next screen. You see a "Chained Angel" and, below left, a stone Cross. The "Chained" Angel On the Stone Cross lies a black Veil.
Zoom in on the "Chained Angel". In the close-up you will see Demons trying to seduce the believers and the sinners. First, read the inscription that says that "Only the godly will receive eternal forgiveness". Top left is the "Sword Button".
You must select the Sinners by clicking on the heads of the sinners. If you click on a sinner's head, the head turns black. So sinners are the figures you see doing things that, in the eyes of the godly, are sinful.
Click on the "Sword Button" and... the throats of the 5 sinners are cut. "Perfect" Van Helsing says again and automatically you zoom out. Now grab the black Veil.
Walk a screen further to the right and Van Helsing is back with Paul Long, the gravedigger. In your Items inventory, select the black Veil and then talk to Paul Long.
Paul, however, has no interest in the black veil and says you can keep the veil, or throw it away. Move a screen to the right again. You'll be back at the shed. Walk to the left, through the bottom left, and you'll be at the: "Bowing" Angel:
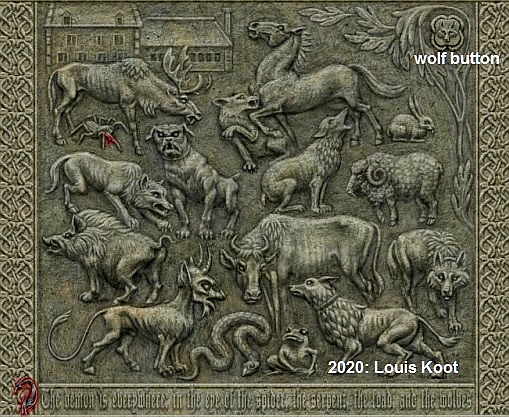
Zoom in on the Bending Angel. In the close-up you see beasts engraved on the stone slab. First read the inscription again, at the bottom of the plate.
You read, "The Devil is everywhere, in the Eyes of the Spider, the Serpent, the Frog, and the Wolves." So you have to click on the Eyes of the Spider, Snake, Frog and on the eyes of some Wolves. So you really have to click on the EYES and not on the beasts. The eyes turn red. Click on the "Wolf Button" in the upper right corner. Click on the eyes of the: Spider, Snake, Frog. Then click on the eyes of the following Wolves: The wolf under the spider. The wolf attacking the horse. The wolf standing on the left next to the ram.
Click on the "Wolf Button" and......"There... perfect"... van Helsing says again and you zoom out. Van Helsing now says that the crypt of the former gravedigger should be open now. So now go back to the crypt with the 2 great monk statues and. Indeed.... the crypt is now open |

So enter the now-opened crypt and walk backwards. There are two coffins in the niche. On the bottom coffin is a book.
Grab the Boek and read this "Book from the crypt" in your document screen.
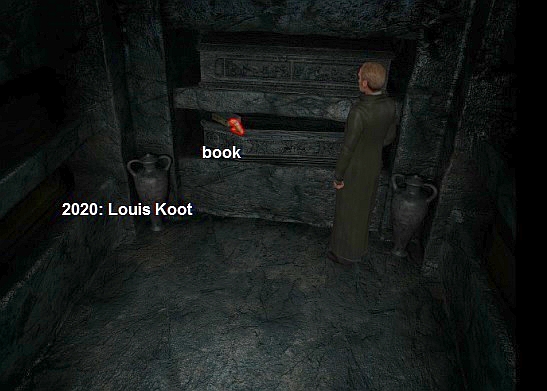
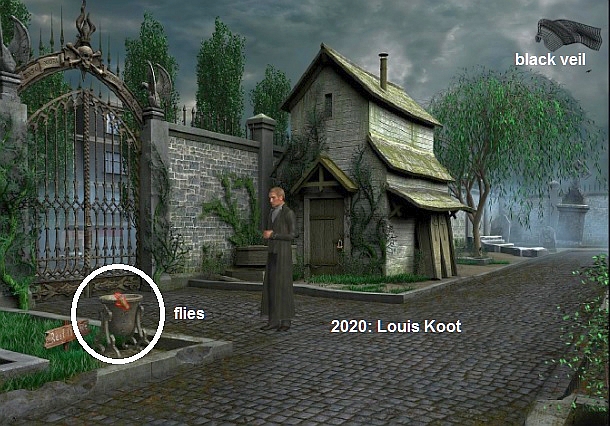
You read about Lord Godalming's secret tunnel. The entrance to the secret tunnel is located in the Northeast corner, between a grave without a lid and a large Gothic Cross. Leave the crypt and go up the stairs again. Before you start looking for the entrance to the tunnel, you first go back to the entrance of the cemetery. To the left of the entrance gate is a large Pot in the grass. Flies fly over this stinking pot. In your Items inventory, select the black Veil, close the Items screen, and then click with your hand cursor just above the pot to catch a pair of Flies with the veil.
From the entrance, walk a screen back down. You'll be back with the "Bowing Angel." Go another screen to the right and....
At the top of your screen you will see a grave without a lid and a grave with a small cross. And you see a Gothic Cross.
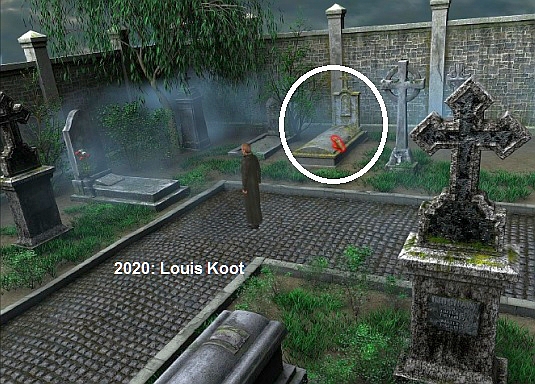
In your Itemsinventory, select the Metal Bar again, close the Inventory screen, and then click on the Grave with the little cross and.. Van Helsing slides with the rod the lid of the grave and..... You found the entrance to the Secret Tunnel. Click with your feet in the now opened grave and.....
Van Helsing descends through the grave and ends up at a door. It's Godalming Manor's secret entry.
...... the door opens and Van Helsing ends up in the basement of Godalming Manor.
Part 3: Godalming Manor:
Basement:
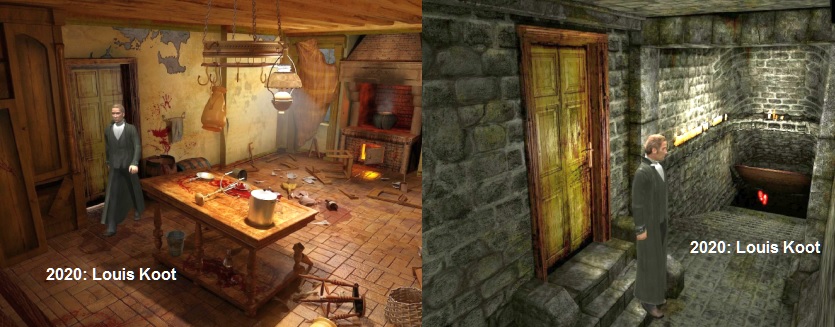
The secret door is hidden behind the shelving cabinets, of which one cabinet has now been partially shifted. The basement looks like a torture chamber. There are cages and mean-looking traps to catch animals. An axe sticks in a chopping block and that axe was used recently. There's a work table on the left wall. On the work table there is a vise and next to the vise is a Box of Nails. Under the work table is a Glass Jar. To the left of the work table is a pair of pliers against the pillar.
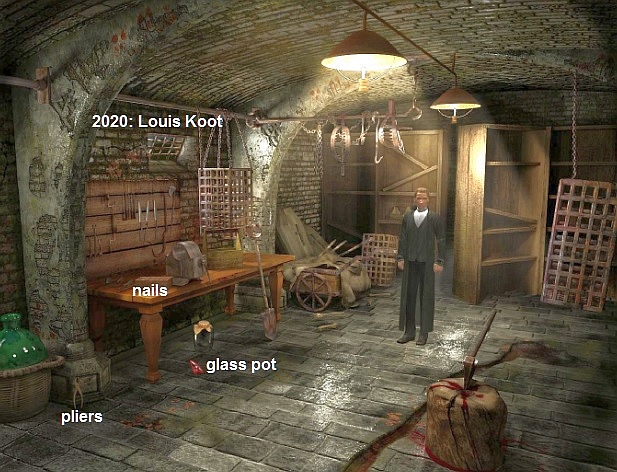
Grab the Glass Jar. Grab the Box of Nails and Grab the Pliers.
Walk a screen down a screen via bottom screen. You will see a saw against the lower steps of the stone staircase. Grab the Saw.
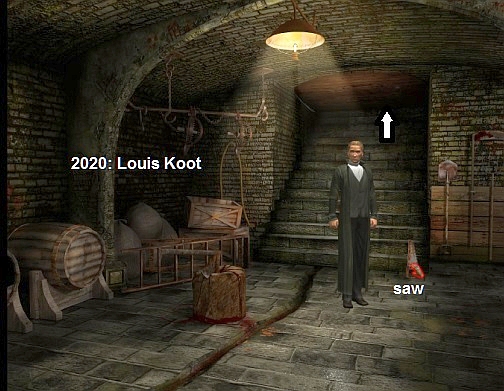
Click with your feet on the wooden hatch, above the stairs, and Van Helsing ends up in the ground floor corridor
Kitchen:
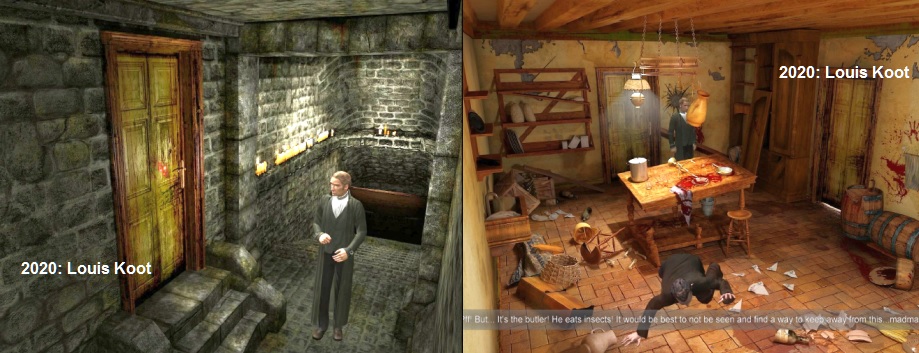
Go through the yellow door. You'll be in the kitchen and you'll see Hendrick, the butler, mopping the floor with his tonque, looking for insects to eat them. Van Helsing is disgusted and he doesn't want to be seen by Hendrick. In front of the filthy table is a file on the floor. On the filthy table is a Wooden Spoon
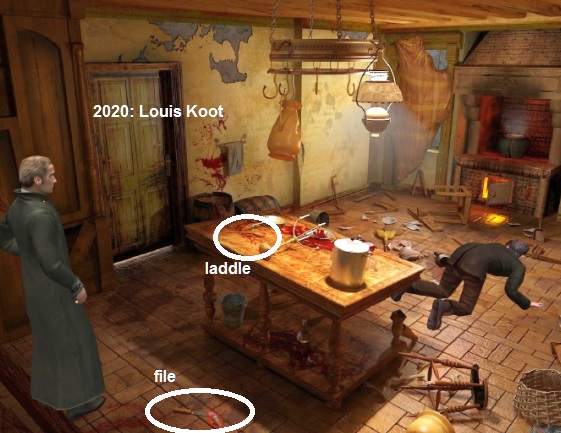
Grab the File. Grab the Wooden Spoon (Laddle)
Click on the door with your feet to the left of the table, but Van Helsing won't open that door because of the noise. In your Items inventory, combine the Flies (A few flies) with the Glass Bowl to put the flies in the pot. Then select the Glass Pot and close the inventory screen. With your hanscursor, click on Hendrick and..... Van Helsing rolls the pot to Hendrick who then greedily eats the flies. Quickly.... As Hendrick eats up the flies, you click your feet on the left door again. Now Van Helsing will go through the door. Van Helsing ends up in a corridor.

Walk a screen down, via bottom screen. You'll see the front door of the house. To the left of the front door is an umbrella box.
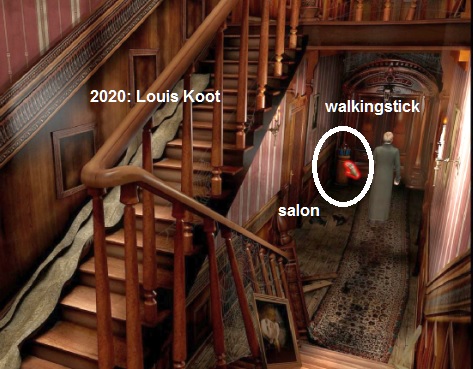
Click on the umbrella box with your hand cursor and Van Helsing will take out a Walking Stick.
Then go through the door, opposite the kitchen. Van Helsing ends up in the:
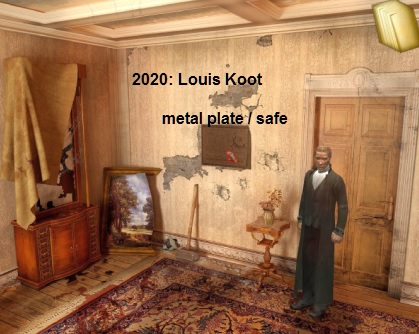
Salon:
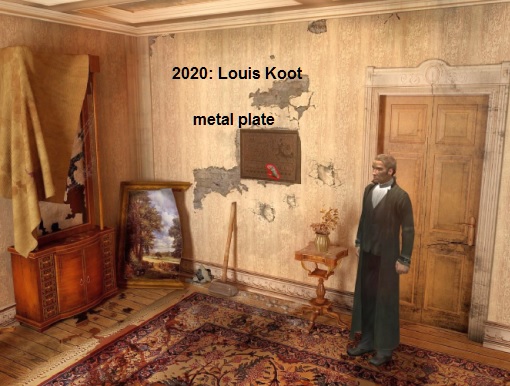
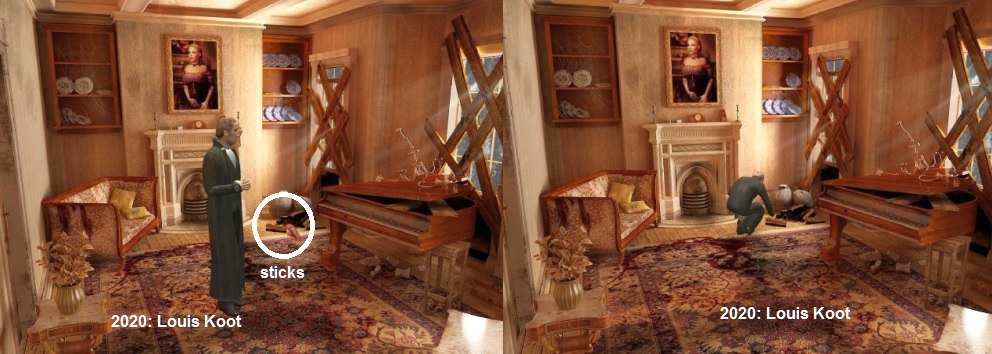
In the wall, left next of the door, there is a large metal plate. Click on the metal plate. Van Helsing tells you it's a safe. You get in the close-up of the safe door, but Van Helsing says he needs something. So zoom out again via the curved red arrow. Walk further into the room via bottom screen. You'll see a rickety piano, two nailed windows and a fireplace. In front of the corner window, to the right of the fireplace, is a pile of logs. Click on the logs with your hand cursor and Van Helsing grabs a few wooden sticks.
Leave the room again through the door, back up the corridor, and back down the hall, then go up the first flight of stairs.
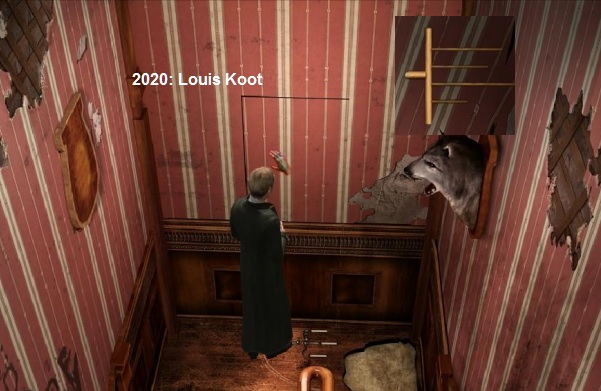
Van Helsing ends up on the landing, between the two stairs. In the wall you can see, at the 3-armed candlestick, the outline of a door.
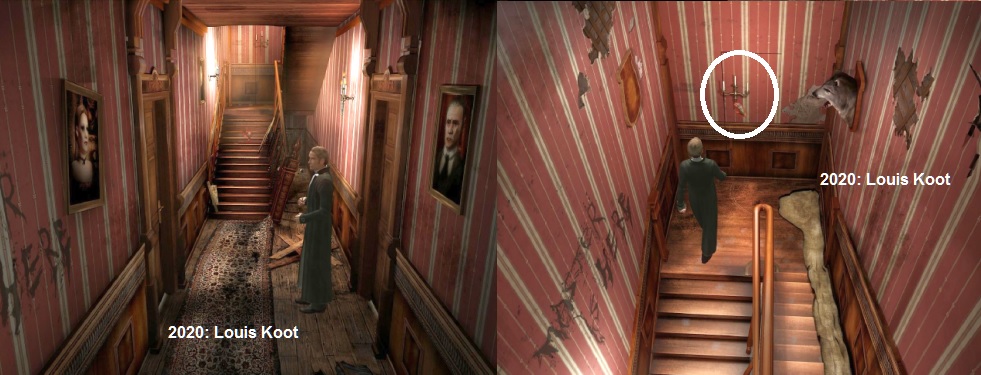
Click the candlestick. The candlestick seems to be loose, but nothing else happens. Walk up the next stairs and you'll end up on the 1st Floor
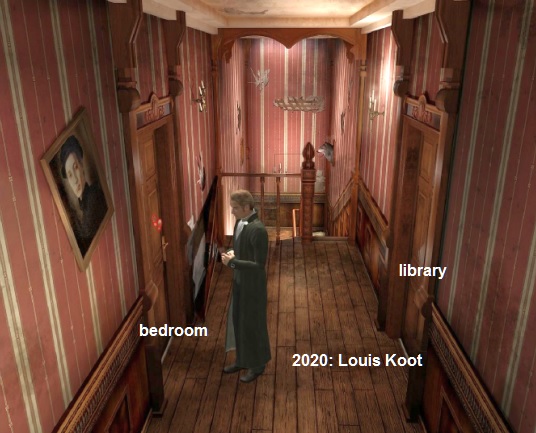
Bedroom of Lady Godalming:
Enter Lady Godalming's bedroom through the left door. In front of the large wardrobe is a Thread Spool you on the floor.
To the left of the small cabinet, on which the candlestick stands, is a brown Paper against the plinth of the wall. Grab the Thread Spool and grab that brown Paper.
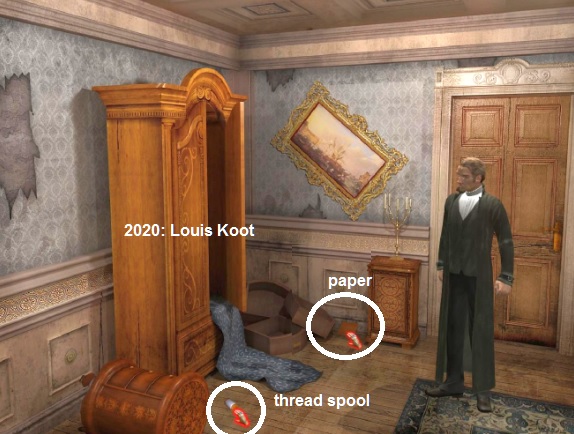
Read the message (Message from the Lady's Chamber). This is a clue to that candlestick door on the landing of the stairs. You read: "It's from there that I saw him enter, Madam, touching one of the torches. Right after, he was found in his". Close the document screen. Continue further into the room, using the bottom right feet. Now you see the bed. In front of the bed is a roll of measuring tape on the floor.
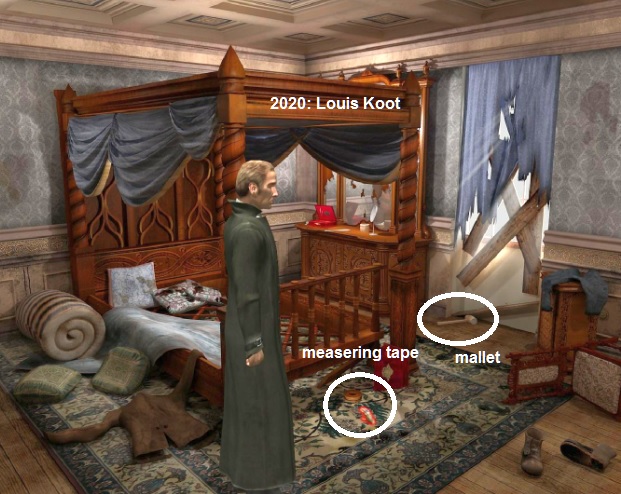
Grab that Measuring Tape. At the window is a Wooden Hammer. Grab the Wooden Hammer (Mallet). Check out everything you see. The jacket, which is next to the bed, is from Hendrick the butler. Apparently that butler is sleeping in this room now. Walk back a screen and exit the room into the hallway and then go through the right door to the:
Library:
On the right you see a large grandfather clock. In the wall, to the left of the longcase clock, you see another large metal plate. This is also a safe door and you cannot open it yet. Walk through a screen to the right at the bottom right to see the rest of the library. It is a bloody mess around and in front of the lectern.
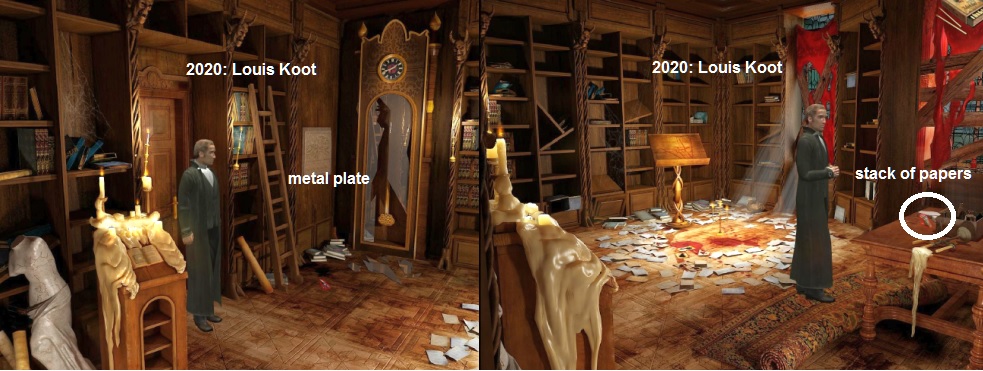
On the table is a stack of writing paper. Grab the writing paper.
Walk back to the door and click on the metal plate in the wall. Below the image is a Latin text. Below the text you will see buttons. At the top left is the red zoom out arrow and your Items inventory. Click the Items Inventory screen to enlarge it. Then select the Writing paper stack in your Items and then right-click to return to the close-up of the Metal Plate.
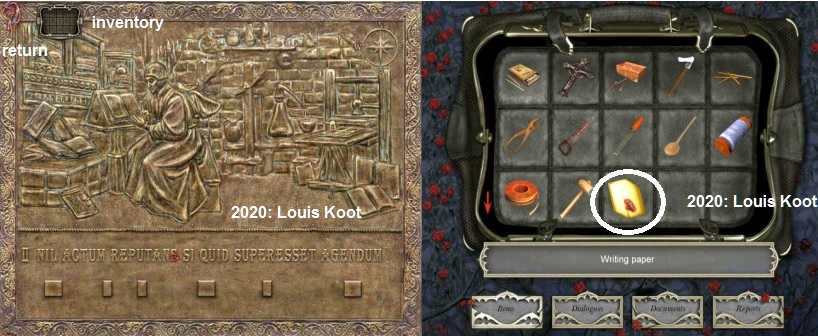
On the metal plate there is now a sheet of writing paper. Drag the sheet of paper down so that the sheet of paper covers the Latin text and the buttons below the text. You can drag that down by dragging your mouse down. If the sheet of paper covers the bottom part of the plate, click with your left mouse button and ... holes will be punched in the sheet of paper by the buttons on the plate.
Use your mouse to drag the paper up again so that you can click on the curved zoom out arrow to zoom out of the plate. The sheet of paper with the 6 holes is then in your Items inventory. Exit the library. Back in the hallway you walk a screen down, through the bottom of the screen. You will see Van Helsing on the back and you will also see a door at the end of the corridor.
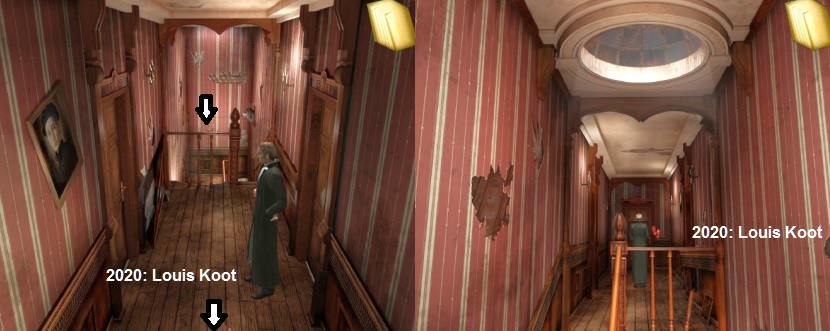
Click with your feet on that end door. Van Helsing then reports that the door is locked with a lock that he cannot open. However, he feels that the secret of this house will be behind this door. Walk back and then go back up the stairs to the Salon on the ground floor.
Salon:
Click here again on the metal plate on the wall. This record also has a Latin text and buttons below the text. At the bottom of the plate you see 12 rotary knobs. In your Items again select the Writing Paper again and then right click again. Drag the sheet of paper down again until it covers the Latin text and the buttons again and then click again and .... again holes are punched in the paper.
Remember that this is the Salon paper. Click the zoom out arrow again to exit the close-up. Leave the Salon and return to the Library on the 1st floor.
Library:
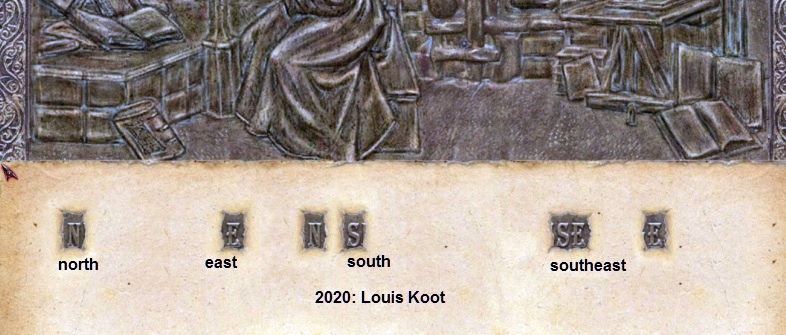
In the holes you see certain letters. You'll see the letters: N, E, N, S, S, SE, E.Click your left mouse button to write the letters in your Document Inventory. Close the document screen and click the red zoom arrow to exit the close-up. Go back to the ground floor and back to the:
|
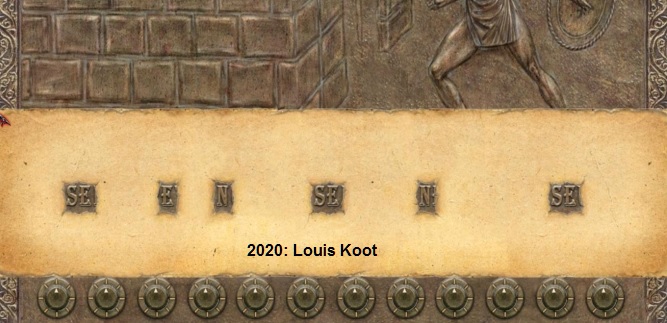
Salon: In your Items inventory, select the paper with the library holes and zoom back in on the Metal Plate. Drag the paper down again and make sure the holes are back on the Latin Text. Again see in the holes certain letters: SE, E, N, SE, N, SE.
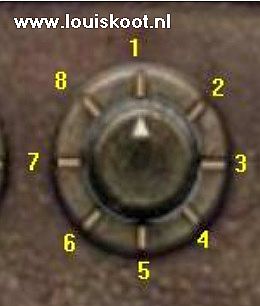
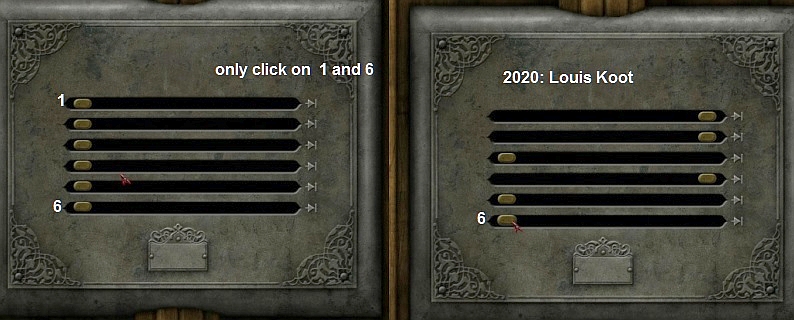
Click again to also save these letters in your Documents. Store the paper again by clicking the zoom out arrow Open up the Safe: Make sure that nothing is selected in your Items inventory and then zoom in on the Metal Plate again. So at the bottom of the metal plate are 12 rotary knobs. Each knob has an arrow and 8 dashes. So you can click any rotary knob at 8 positions. At the top right of the plate is a compass. The dashes on the knobs indicate the Wind Directions, North, Northeast, East, Southeast, South, Southwest, West, Northwest. The Letters, which you saw through the holes in the 2 papers, also indicate the Wind Directions. N = North, E = East, S = South, SE = Southeast. Number the rotary knobs, from left to right, 1 to 12. Number the dashes 1 to 8.
dash 1 = North, dash 2 = Northeast, dash 3 = East, dash 4 = Southeast, dash 5 = South. Dash 6 = Southwest, Dash 7 = West, Dash 8 = Northwest Click on the buttons to turn the arrow to the correct dash. If all goes well, all arrows of all 12 k nobs are now on the North dash, so on dash 1. You only have to change the buttons that should not be on the North. The order is that buttons 1 to 6 must be changed via the letters you saw on this Salon plate and buttons 7 to 8 via the letters you saw on the Library plate. So the order becomes: SE, E, N, SE, N, SE, SE, N, E, N, S, SE, E., Set Knob 1 on Southeast, so on dash 4. You zoom out and Van Helsing says ..... "There Perfect ....
Van Helsing opens the Safe. There's a key in the Safe. Grab the Key.
|
Leave the room and go up the first stage again in the hallway to the landing. In your Items, select the Pliers and then click on the 3-armed candlestick and.......
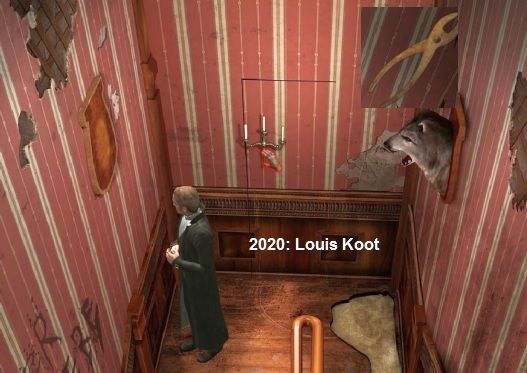
.... The candlestick falls to the ground. Click on the door with the hand cursor, you will see 4 holes in the close-up. Click on a hole with your arrow cursor and Van Helsing tells you to measure the depth of each hole. Click the Item Screen to open the Items Inventory. In your inventory, combine the Tape Measure with the Wooden Spoon. Then combine the Thread Spool with the Wooden Spoon/Taper combo and you have a Measuring Instrument. Select this Measuring Instrument and close the screen. Your measuring instrument will be in the lower left corner of the close-up screen. Pick up your measuring instrument and then click it, from top to bottom, on the 4 holes.
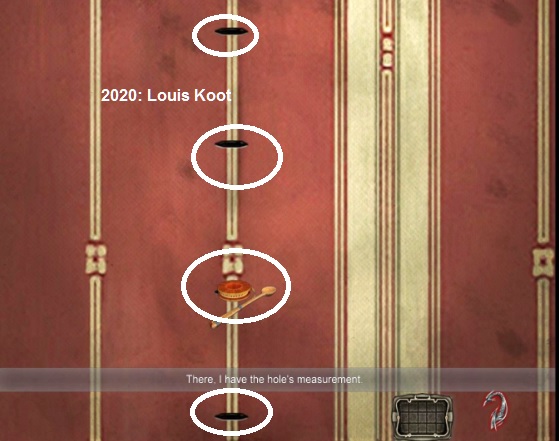
Van Helsing always says "There... I have the Hole's measurments" and at the bottom hole he says he needs to make a special key now. The holes are 10, 8, 12 and 5 cm deep. Close the inventory screen. Walk back down the stairs and then go back into the kitchen, through the door in the left corridor wall. Van Helsing tells you that Hendrick, the butler, has since disappeared from the kitchen. Walk a screen to the left and you end up back in the hallway behind the kitchen.
Click on the stone stairs to return to the:
Basement
|
To create a key: Walk to the work table. Now that you know you have to make a key, and also know the dimensions of the key, you can click on the vise. So click on the vise.
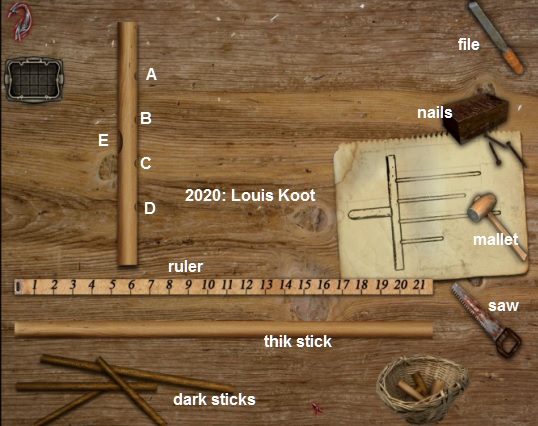
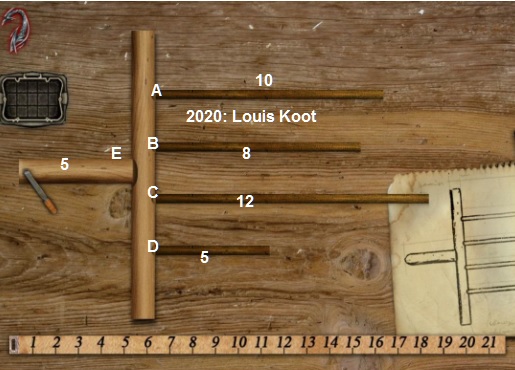
You'll end up in the close-up screen of the workbench. Top left is the zoom arrow and your Items screen. On the workbench are now all the tools and means to make a key. There is a file, nails, the wooden hammer, the saw, a basket with wooden pins, 4 dark round sticks, a large light round stick, a ruler and a round stick with holes. So that round stick with holes is the key stick that you have to assemble now.
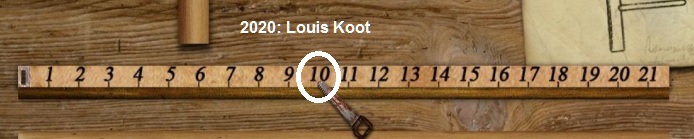
In that key stick you see 1 large hole on the left and 4 small holes on the right. They are holes A, B, C, D, E. Dark round sticks have to be inserted in holes A, B, C, D and now sticks 10, 8, 12 and 5 cm long. Pick up a dark stick and drag the stick under the ruler. Make sure the stick is exactly under the ruler and then click to place the stick under the ruler. You now have to cut the stick to 10 cm. So pick up the saw and then, with the tip of the saw, click on the 10cm mark of the ruler.
You then saw a 10 cm stick. Pick up the 10cm stick and drag it to the top right hole A of the key stick. to insert the stickinto the top hole A. You also have to put a stick in the big left hole of the key stick and then you have to nail those sticks. Pick up the thick round light stick and put it under the ruler. Saw the thick round stick to 5cm with the saw. Then insert this 5cm thick round stick into the large hole E, on the left side of the key stick. Then pick up the file. Click with the file on the ends of each of the 4 dark sticks that you have inserted in the key stick on the right side. You file a point on each stick. Also do this with the thick round stick that you have inserted into the key stick on the left.
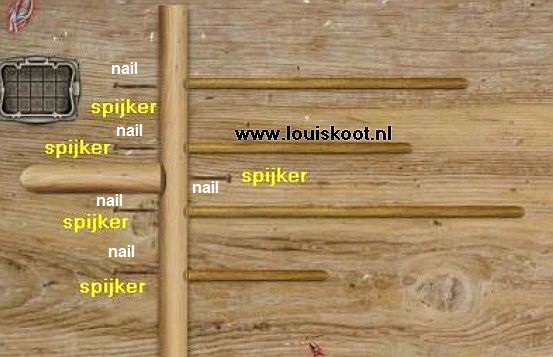
Place the file back in the top right corner of the screen. Now just nail it down: Grab a Nail. Now click with the Nail on the left side of the key stick at the height where the poles stick for the holes. You can keep clicking with one nail Do that for the thick stick on the right side.
Then pick up the Wooden Hammer and ram it on each of the 4 nails to nail the sticks and ..... |
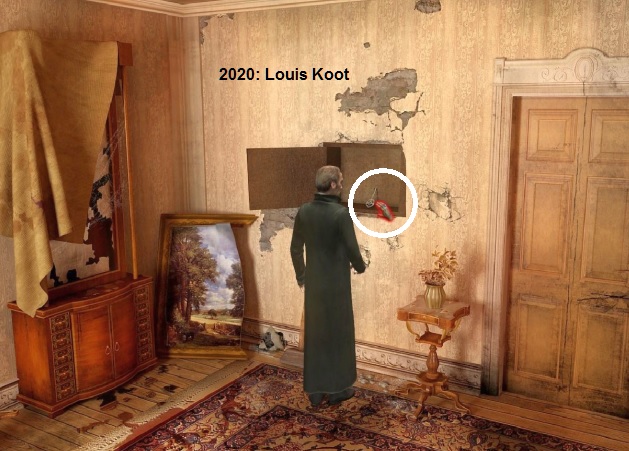
You go out of the close-up. In your Items Inventory you then have the Homemade Wooden Key (Makeshift wooden key). Go back through the kitchen to the landing. Back on the landing, select the Homemade Wooden Key in your Items and then click again with your hand cursor on the "wallpaper door" and .... The key works and the door opens.
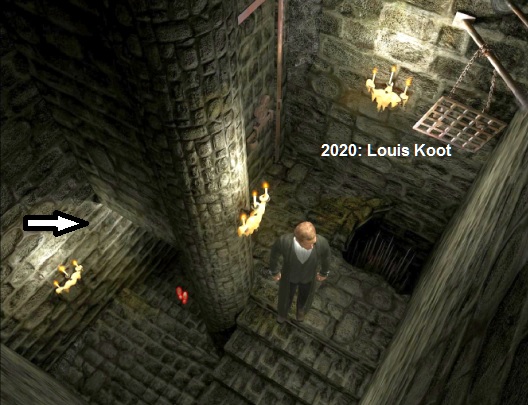
Van Helsing warns that it is now dark outside and that he has to be very careful and then he steps through the now opened door and ends up in the secret passage. This secret passage is a narrow stone staircase. Continue up the stairs via bottom right. On the left you see another door. In the right corner you see a hole with pins in the floor. The metal grid hangs above the hole. Check out the pin hole.

Select in your Items the Key that you have taken from the Salon Safe, and then click on the door and ... Van Helsing ends up in:
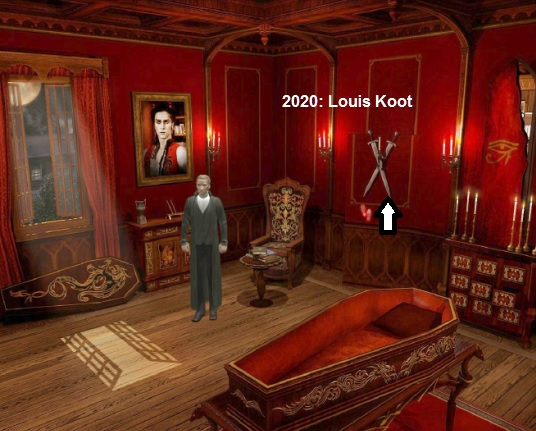
The Room of Count Dracula:
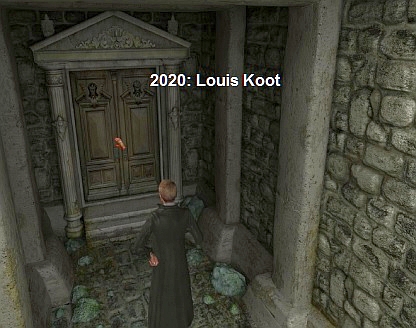
Van Helsing senses that there is something, or someone, in the room. Examine the room thoroughly. The door with the 2 swords is therefore the door to the secret passage. On the left wall is a painting by Count Dracula. Under that painting is a cabinet and on that cabinet is a thick Book. Click on the Book.
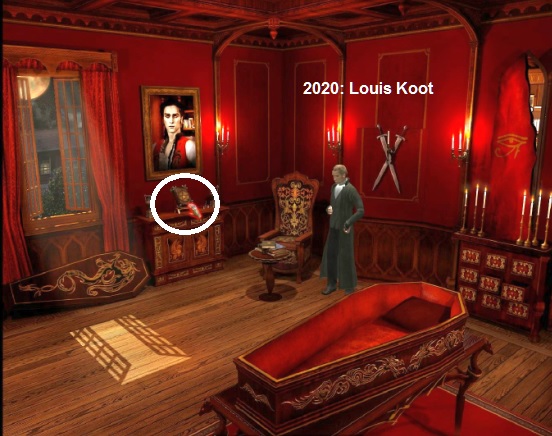
The book is protected and has a Pentagram lock. You can't do anything with it yet, so get out of the close-up again. Walk further into the room via the bottom left. You will then see the corner bookcase and a door. That door is the end door of the 1st floor corridor and does not open. In the right part of the bookcase you can grab a book on the middle shelf of the front compartment. Take that Book from the bookcase.

Your Documents screen opens and contains a bloodstained page from that book. On the page you see a Pentagram.
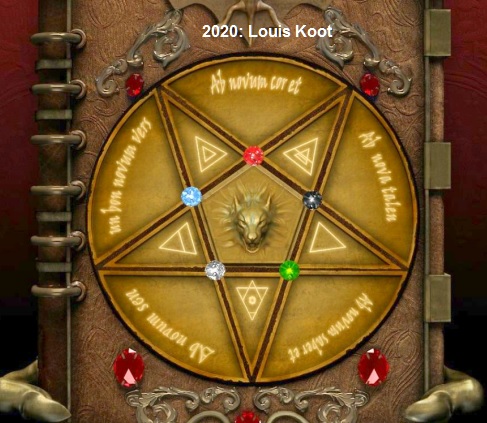
In the 5 outer triangles of the pentagram you see text and in the 5 inner triangles you see a jewel.
Close the screen and walk back to the box under the Dracula painting. Click on the Book again. You will return to the close-up screen.
|
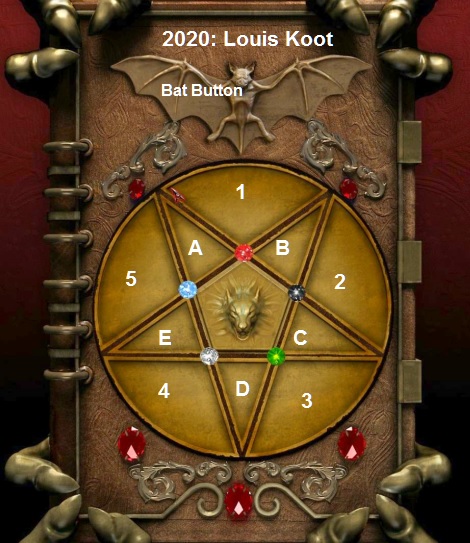
Pentagram Puzzle: You will see the Pentagram slot again. At the intersections of the inner triangles there is a, a red, black, green, white and light blue gemstone. Below the pentagram you see 3 large red gems. If you click on the middle red gem you reset this puzzle to the starting position. Above the pentagram is a large bat mouse button On the bloodstained page you saw that in the 5 outer triangles there should be a text and in the 5 inner triangles a symbol. Number the 5 outer triangles 1 through 5. Number the 5 inner triangles A, B, C, D, E
The puzzle consists of 3 parts. Part 1 is to get the right symbols in the right inner triangles. Part 2 to get the right text in the right outer triangles. Part 3 is to put the 5 gems in the right place Part 1: The Symbols in the Inner Triangles: When you click on the Bat, a symbol appears in one or more of the inner triangles. If you click on 2 of the inner triangles, they switch places. You have to swap the triangles A, B, C, D, E in the right way so that the right symbols appear in the right triangles. Step 1: Click on the bat. The correct symbol appears in triangle E. Step 2: Click on triangle B and then on triangle D. B and D switch places. Click on the Bat. The symbol appears in B and D. Step 3: Click on triangle A and on triangle C A and C swap places. Click on the Bat. The correct symbol appears in A and C. All inner triangles now have the correct symbol.
Now put the right texts in the right outer triangles. Several solutions are also possible here. The outer triangles also switch places if you always click on 2. Part 2: The right text in the right outer triangle: Step 1: Click on triangle 4 and 5. Click on the bat.
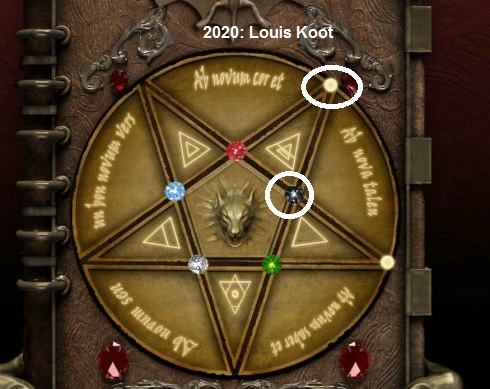
Part 3: Move the gems: The red, black, green, white and blue gemstone should be moved to the points of the inner triangles in the outer edge of the circle. But it's not just going to happen. If you click on a gemstone, the possible places where that gemstone can go will be light. If you click in such a free place, the gem goes there. Again, several solutions are possible. Click on the black gemstone and then click on the top point of triangle B.
Click on the red gemstone and then click on top point of triangle C. It looks like this now.
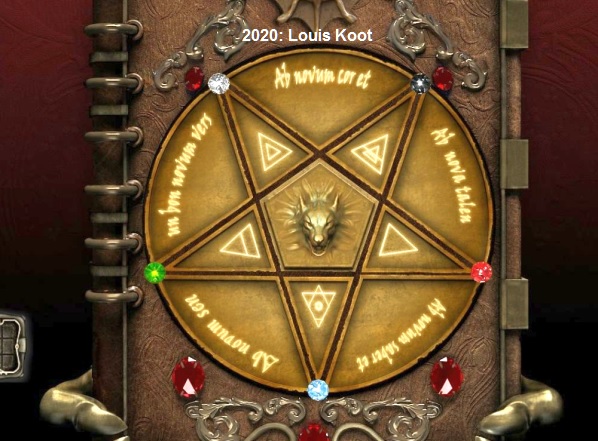
Click on the Bat now and.... the book opens and is copied to your documents inventory. |

So, in your Documents, read the text of the Count Dracula book. You read how Count Dracula became a vampire and you read about Irina, a terrible massacre, the suicide, the return and about Mina. If you've read this whole text, right-click to close the screen. Van Helsing thinks Dracula is with Mina now. We'll see Hendrick walk into this room, so Van Helsing has to get out.
Go back through the sword door to the secret passage and.........
..... in the secret passage you click with your feet on the steps and.
...... we will end up back in Mina's house:
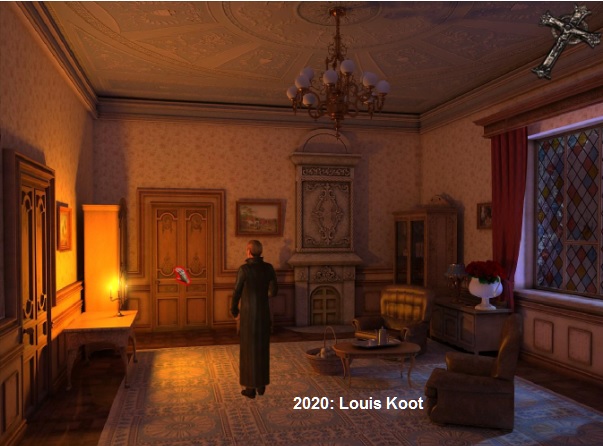
Part 4: Back in Mina's home:
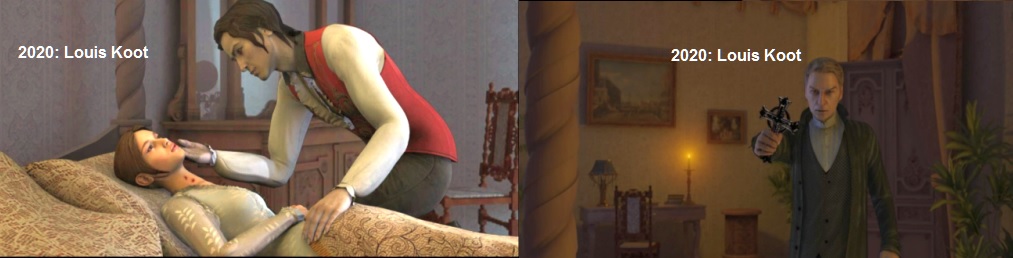
Van Helsing is back in Mina's salon. At the round coffee table is a basket of garlic. Look at the basket. Because the garlic is still in the basket, the garlic has no effect, says Van Helsing. Click on the door next to the fireplace. That's the door to Mina's bedroom. Van Helsing feels a presence. In your "Items" select the Crucifix and then click on the door again and.....
Video: Van Helsing enters Mina's bedroom and.... Unfortunately.... too late..... Dracula has already bitten Mina and turns into a bat and flies away.
Van Helsing is now sending a telegram to Seward, the director of the Carfax Sanatorium. Read the telegram.
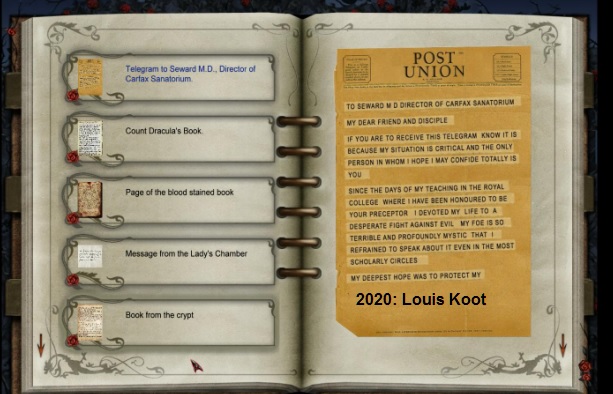
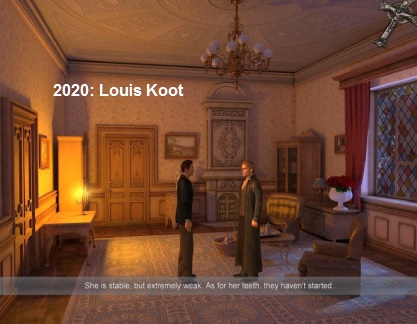
Van Helsing asks for Steward's help in the telegram. Help for Mina and for his crusade against the vampires. Close the screen and that Seward comes in. So we're back in Mina's salon and a conversation between Van Helsing and Steward follows. Van Helsing will go after Dracula.
Steward then walks away to the map of London, which hangs behind the red curtains on the wall. Walk down, too, to the London map.
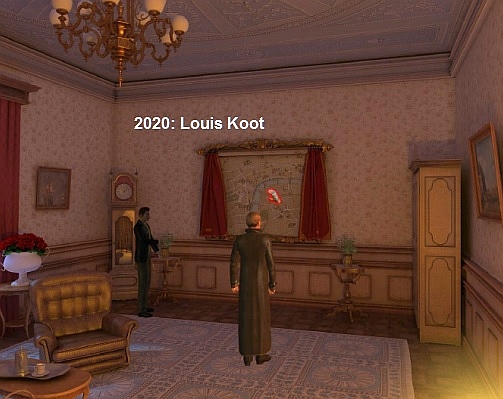
Click on the London map and Van Helsing will now put the map of Europe in your screen. On the Europa map you have to click on the round of the city where Van Helsing thinks Dracula has gone now. If you click on the wrong city, Van Helsing says you're in a state of emergency. Well... If you've been paying attention, you'll know that Dracula has now gone to Cairo, the capital of Egypt. So click, bottom right on the map, on Cairo and.....
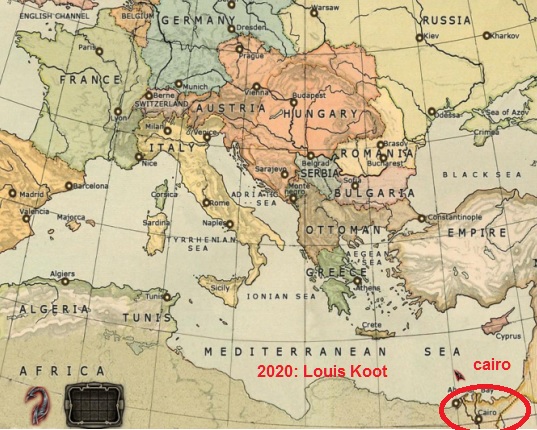
........"Perfect".... van Helsing says and explains to Seward why he thinks Dracula can be found in Cairo. you end up in:
2013 / 2020 Walkthrough by: Louis Koot