Dracula Origin:
2013/2020: Walkthrough by: Louis Koot
If you have found this walkthrough via google search or via another site then you have probably not visited my site.
A lot more very detailed game walkthroughs can be found on my site at: www.pcgameswalkthroughs.nl
2020: This game has been re-released on Gog.com
Chapter 2: Cairo:
Part 1: In Cairo:
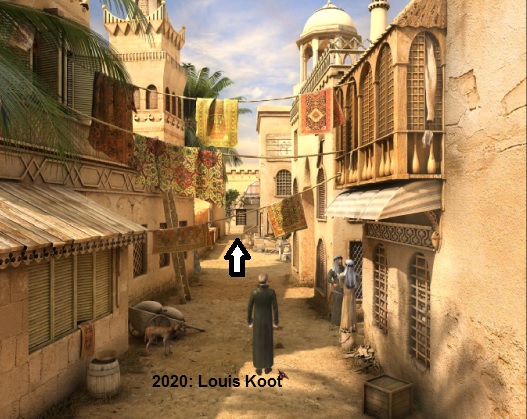
Van Helsing is located in one of the narrow streets of Cairo. There are also 2 men in the street.
Try to talk to the men by clicking on the gray man with your mouth cursor.
But unfortunately .... the men only speak Arabic and Van Helsing is not fluent in this language. Continue down the street and you will arrive at:
Market Square:
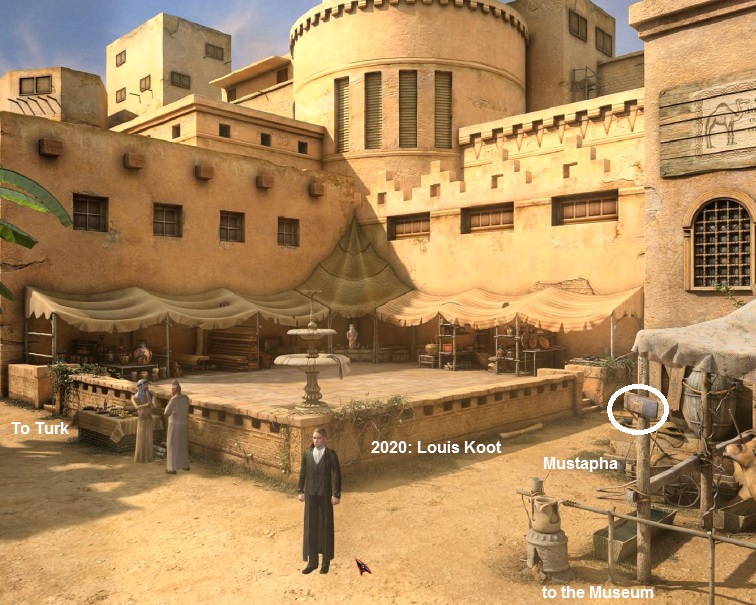
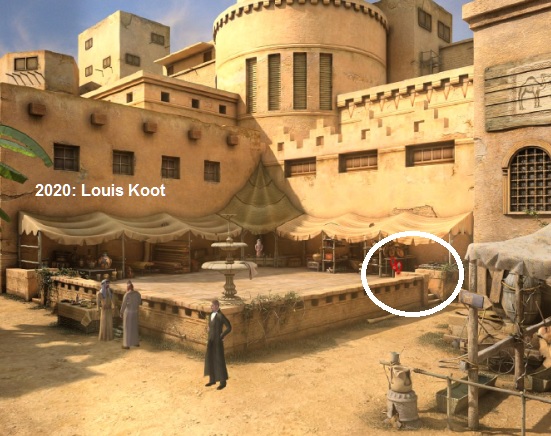
At the large terrace there are again 2 men. You also don't have to try talking to those 2 men by the terrace. They also speak and understand only Arabic. At the bottom right you see a camel tent. You can just see the head of a camel. There is a sign on the pole of that camel tent. Check out that sign. The sign points the way to the museum, but if you want to go to the right via the bottom right, Van Helsing refuses to do so.
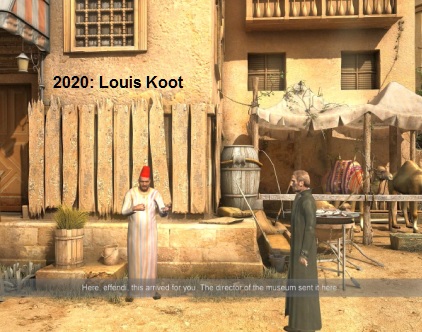
Click with your feet in front of the camel tent. You then stand in front of the camel tent and you see a man with a red fez standing in front of the building. On the side of the building, above the windows, is a large poster. Read that poster. You then read about Mustapha. Mustapha is the guy with the red fez. Talk to Mustapha.
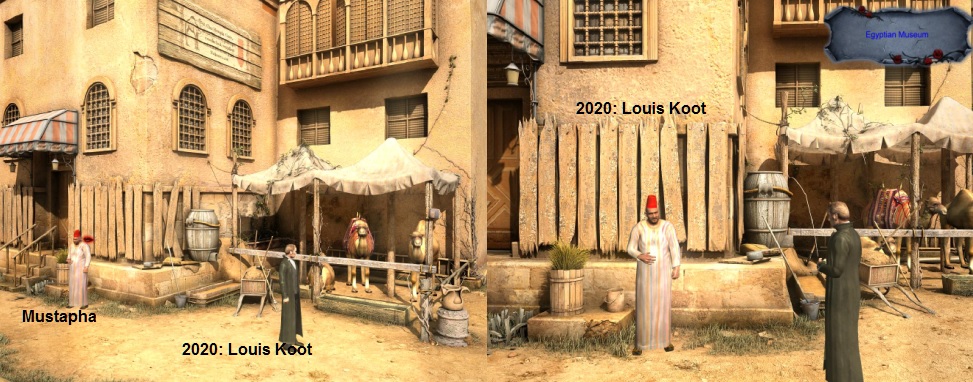
From Mustapha you can get everything, a room, camels, a guide and much more. You automatically rent a room at the "hotel" of Mustapha. Then ask Mustapha about the Egyptian Museum. Mustapha explains where the Egyptian Museum is and how to get there.
Say "Goodbye" to Mustapha and you will be standing in front of the camel tent.
Via bottom right. go back one screen and then go to the Museum via bottom right.
Cairo Museum:
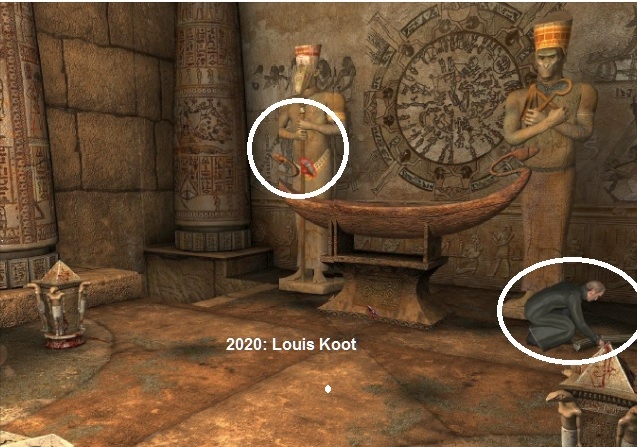
You then end up in the museum. Van Helsing stands inside at the door of the museum. There are 2 statues next to the door. Via the feet at the left statue you can move a screen to the left. Via the feet at the right statue you can move a screen to the right. Via the feet at the bottom of the screen you walk a screen down. Walk down the screen via the feet at the bottom of the screen.
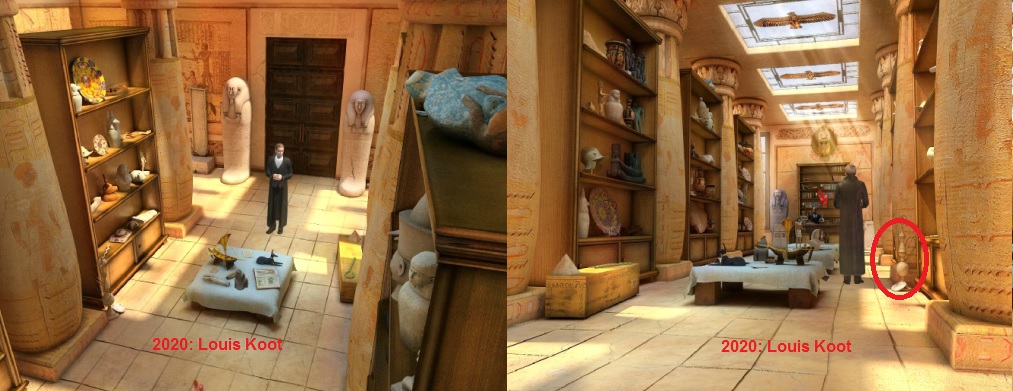
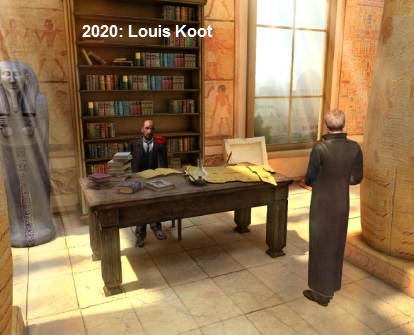
You now see Van Helsing on his back and you see even more cupboards. At the end of the room, you can see Smail Quahab, the assistant director of the museum, sitting at his desk. To the right of Van Helsing is a hookah (Hooah) near the pillar. Look at that hookah with your eye. Click with your feet on the assistant director and Van Helsing walks towards the man. Talk to Smail Quahab, the assistant director.
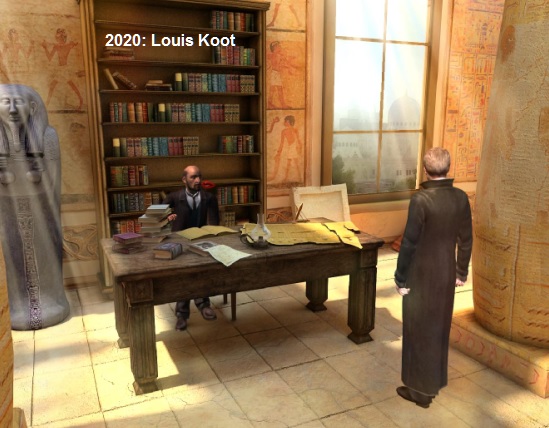
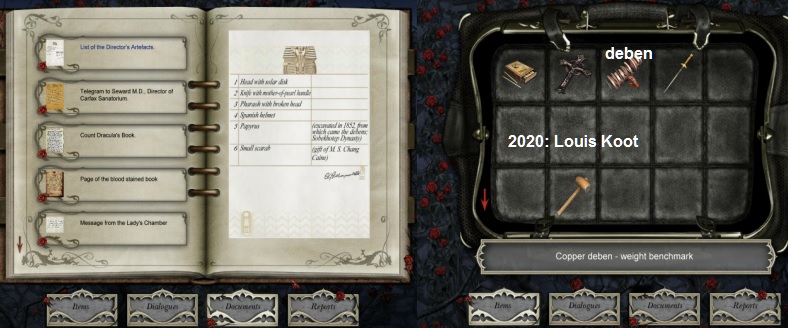
Smail Quahab is too busy to help Van Helsing. He has to describe and catalog a lot of objects from some excavation and therefore has no time to answer Van Helsing's questions. So offer to help, so say "Help you". Van Helsing now gets a list of objects that he has to look for in the museum.
The list is stored in your "Documents". Read the list. At number 4 "Papyrus" you also read something about a "Deben". Close the screen and then ask Smail Quahab what a "Deben" is. A "Deben" is an old weight unit to determine the weight of copper and gold. Smail Quahab gives you a "Copper Deben" and a Stiletto (Scribe Stylus). Say "Good-bye" to end the call. Check your "Items Inventory" to see if you actually have those "Copper Deben" and the Stiletto (Scribe Stylus). Read the list of objects that Van Helsing now has to look for in the museum in "Documents".
On Smail Quahab desk is a paper against a book. Click with your hand cursor on that Paper.
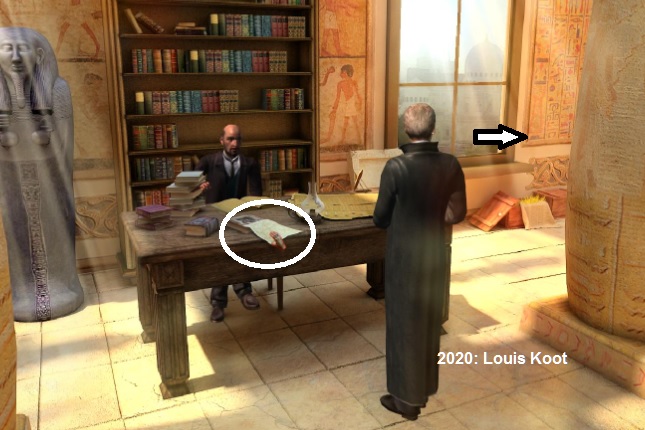
Van Helsing asks if he can borrow that paper, and that he is allowed. It is the "Giza Pyramids" paper and it is stored in your "Documents".
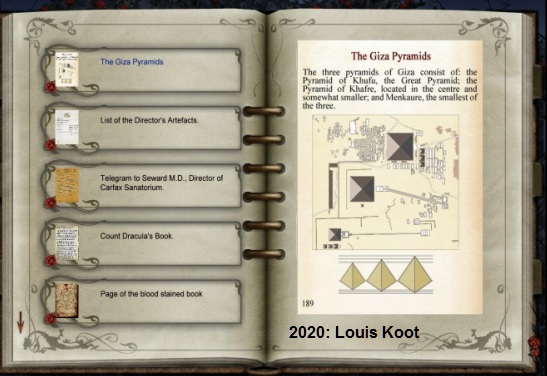
You see a map of the 3 Giza Pyramids and you read that there are 3 pyramids: The Khufu pyramid also called the Great pyramid, the Khafre pyramid which is of medium height, and the small Menkaure pyramid. The sketch also shows you the correct height of each pyramid.
Find the Items from the list of Smail Quahab:
|
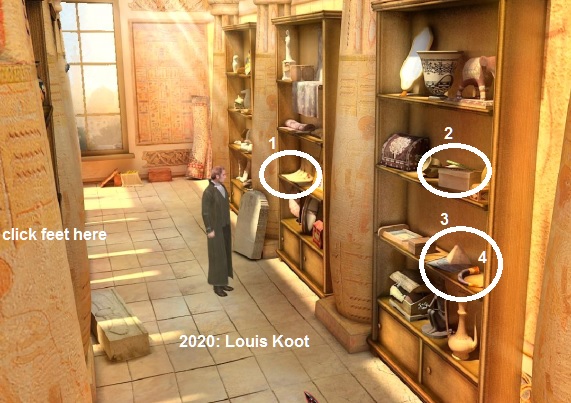
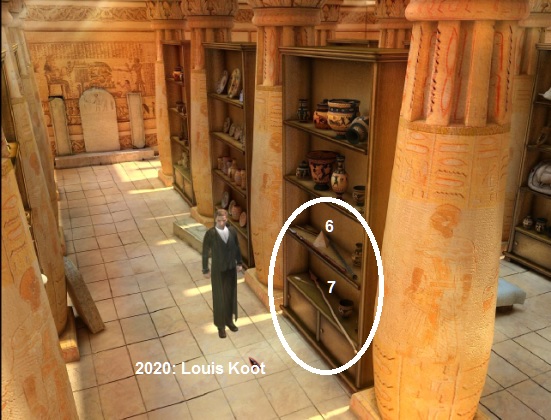
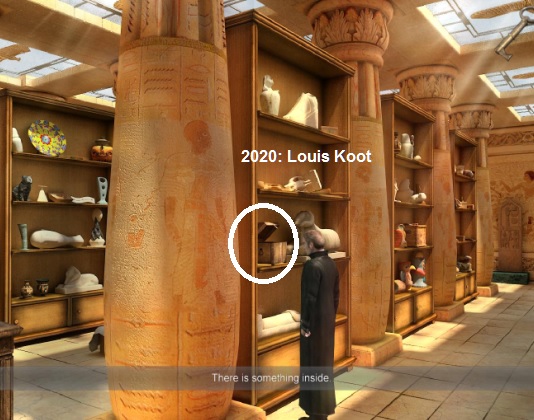
We are now going to look for the 6 objects that Van Helsing must find for Smail Quahab. However, you grab everything you can, including objects that are not on the list. If you press your space bar you will see in your screen all Hand Cursors, Foot Cursors and Eye Cursors on the objects that you can view or grab. In the following pictures I have numbered the objects you need to grab. To the right of Smail Quahab, go one screen to the right. You will then see 3 cabinets.
Then take a "Miniature Pyramid" (6) and the "Mother of Pearl Knife" (7) from the front case. Walk back through the bottom of the screen to Smail Quahab and then back through the bottom of the screen to the middle aisle overview screen. Press your spacebar again to see where the hand cursors appear
Walk through the bottom of the screen to the door of the museum. You will then see the left front case again. Press your spacebar again to see the hand cursors.
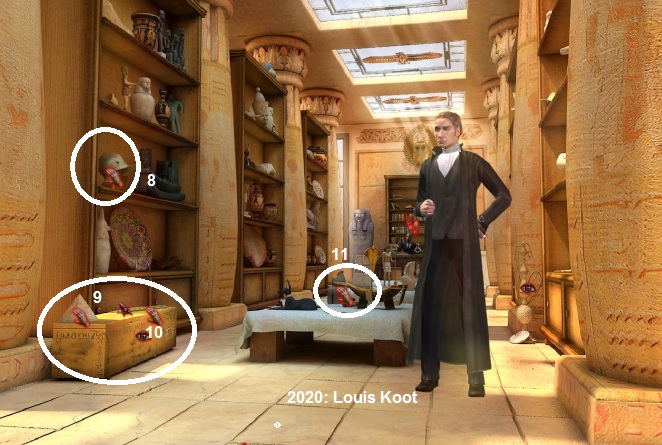
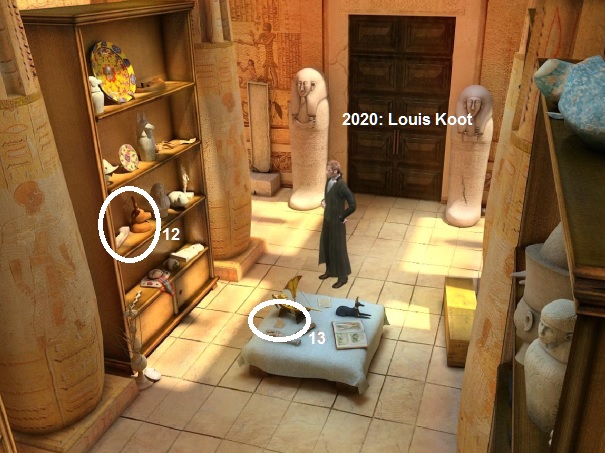
Take the "Granite Scarab" (12) from the left cabinet and take the 4th "Miniature Pyramid" (13) from the table. Click with your feet on the right image next to the door to move a screen to the right. You will see 3 cabinets again. Press your spacebar again to see the hand cursors.
Take the "Head with Sun Disk" (14) and your 5th "Miniature Pyramid" (15) from the front case. On the 2nd shelf is a box (16). Click on that box with your hand cursor. Van Helsing tells you that it is a "Saracen" chest, but the lock has recently been repaired. Van Helsing does not pick up the box. In your "Items" select the Key (4), which you took from the front cabinet in the left row, and then click on the box with your hand cursor. Van Helsing opens the box with the key. Click on the box again to get your 6th "Miniature Pyramid".
Walk to the right again via the bottom right.
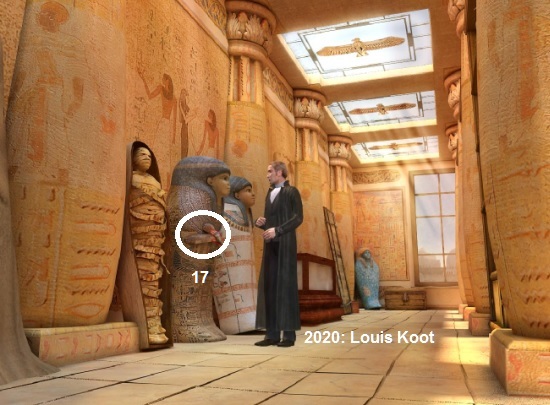
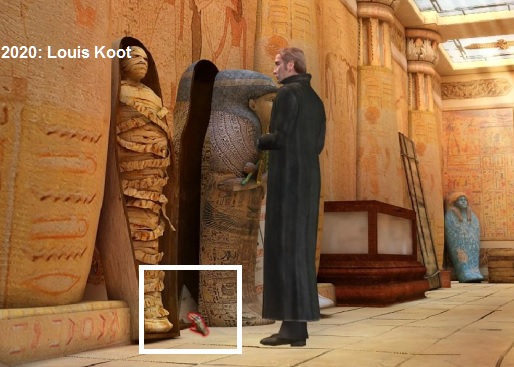
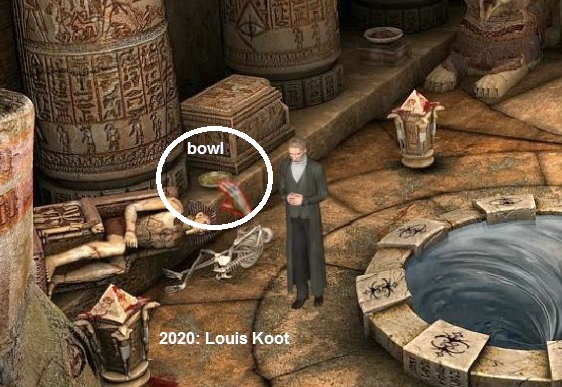
You will now see the left wall of the room. There are 3 sarcophagi against the wall. Press your spacebar again to see where the hand cursors appear. The hand cursor thus appears on the hands of the middle sarcophagus (17). So click on the hands of the middle sarcophagus. Van Helsing tells you that something is missing from the sarcophagus. In your "Items" select the Curve Stick (Heka, Insignia of the Pharaohs) and click again with your hand cursor on the hands of the middle sarcophagus. You place the crooked stick in your hands. In your "Items" select the Stick with Plume (Nekhnekh) and place this stick with pumice in the hands of the middle sarcophagus and .... the sarcophagus slides open. At the bottom of the sarcophagus is the 7th Miniature Pyramid.
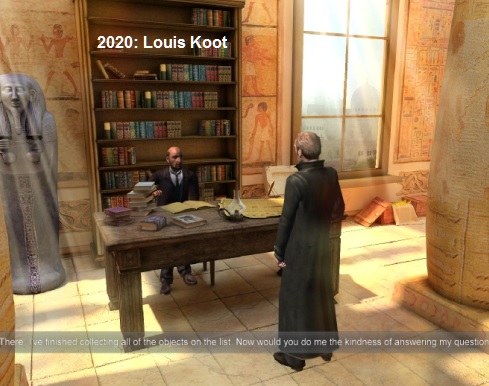
Grab the Miniature Pyramid from the sarcophagus. Go back to Smail Quahab and talk to the man again and say "My questions".
|
Van Helsing says he has found all the items on the list and now wants the Director to answer his questions. Ask about "The Demonomicom". Smail Quahab then talks about the "Tomb of the Demonomicom" and he also mentions the "Black Sphinx". Also ask "How to get to the tomb?". The Director then tells about the "Blood Rocks". A Bedouin found a golden Sun Disc there. This Bedouin went crazy shortly after and died. Say "Good-bye" and walk back to the door of the museum.
Leave the museum and you will be back on:
Market Square:
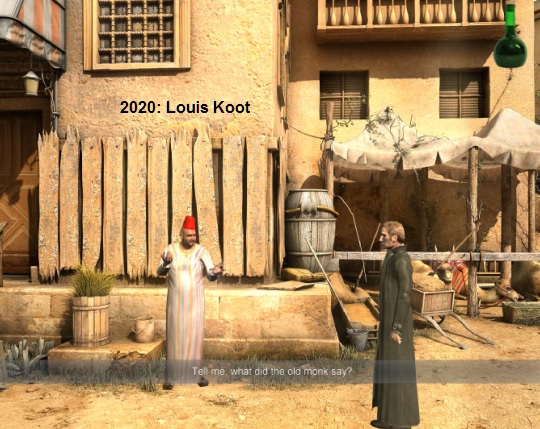
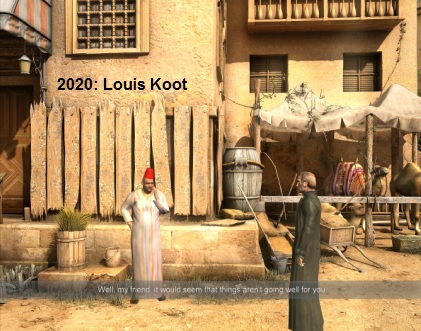
Walk back to the front of the camel tent and talk to Mustapha again.
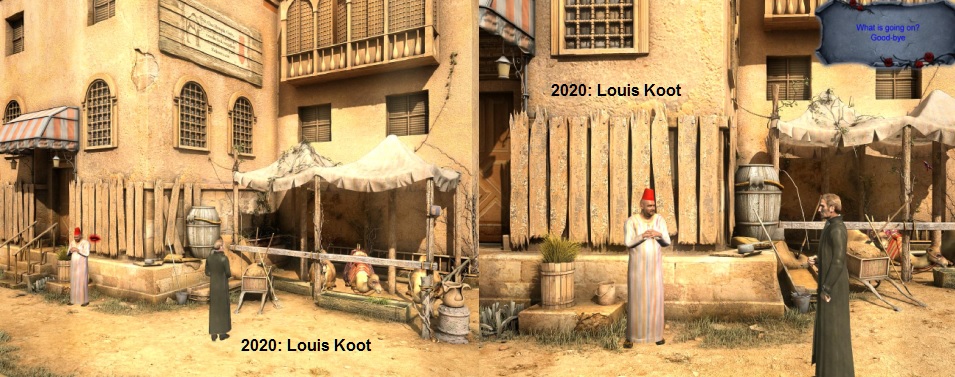
Mustapha is sad and angry. Ask what's going on. Mustapha's camels have become ill, so Van Helsing cannot rent a camel. Tell Mustapha that you want to go to the Blood Rocks. Mustapha talks about a Christian Monk who may be able to heal his camels. Mustapha also explains where to find that monk.
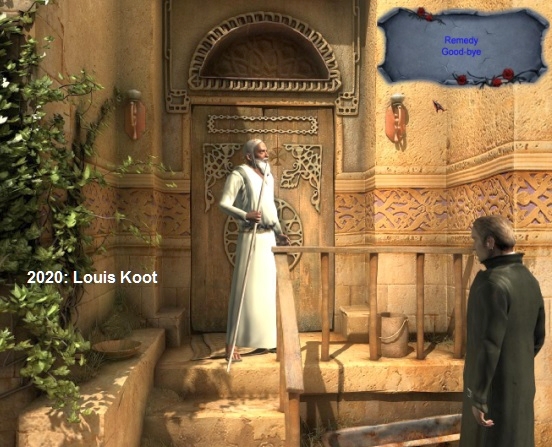
So say "Goodbye". Go, via the feet to the left of Mustapha, one screen to the left and you will see the Monk.
Walk down the street and click with your mouth cursor on the white monk to talk to him
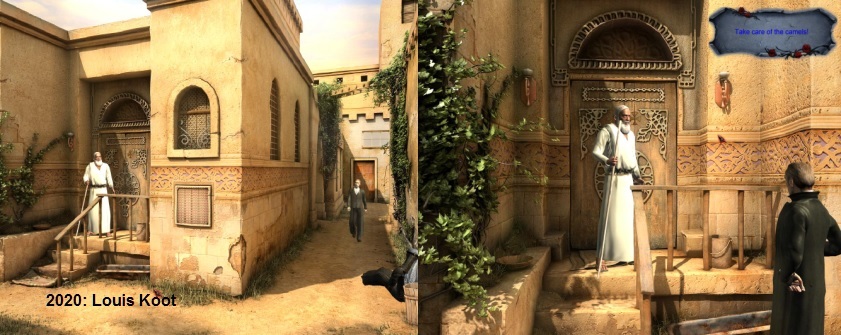
Ask the monk "Take care of the camels". The monk wants to know why you need a Mustapha camel. So say you need a camel because you want to go to "The Blood Rocks". The monk first wants to know how / why Mustapha's camels got sick because he can only help if he knows that. So say "Goodbye" and go back to Mustapha
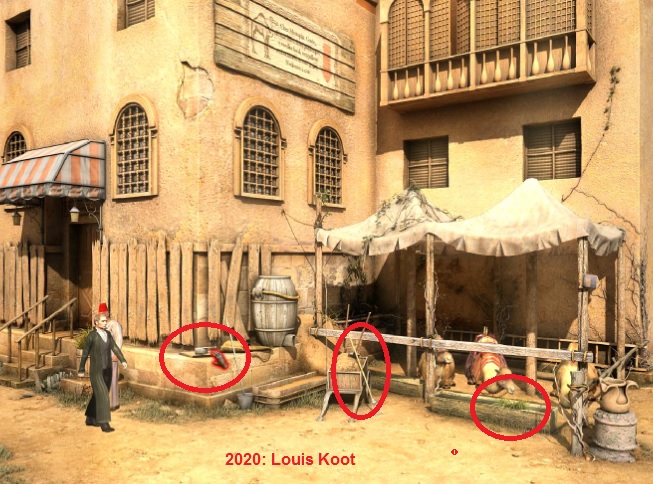
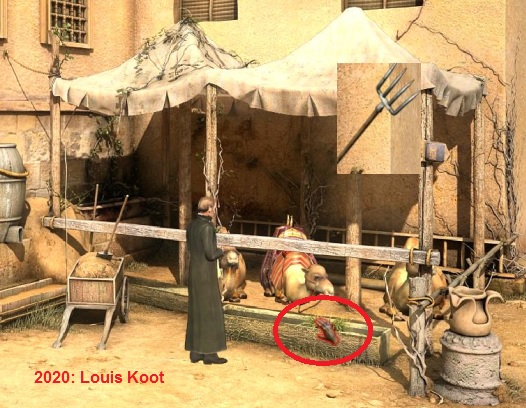
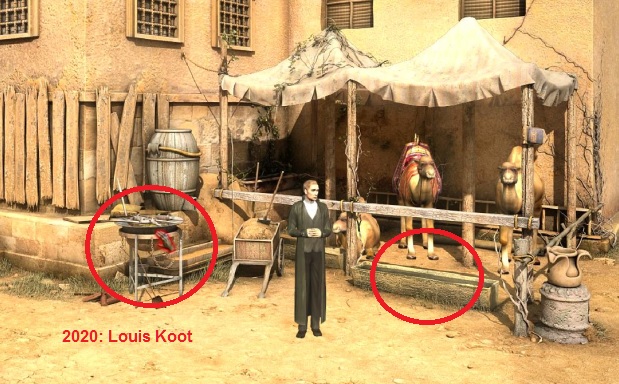
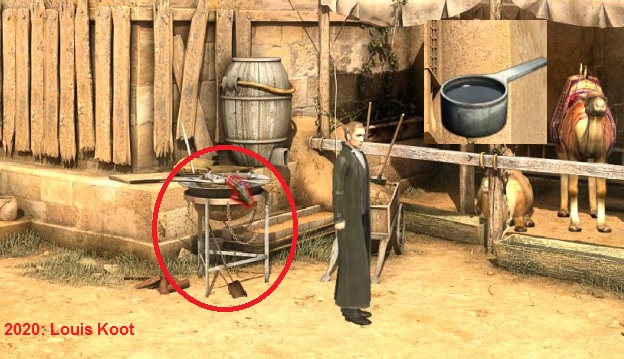
On the corner of the stone ledge, behind Mustapha, is a small saucepan (Casserole dish). Grab the Saucepan. There is a wheelbarrow with hay at the camel tent. There is a Pitchfork (Fork) against the wheelbarrow. Grab the Pitchfork. In front of the 3, now sitting camels, you see the drinking trough. A pile of green plants floats in the drinking trough. Look at those plants in the trough with your eye. Use the Pitchfork on the plants in the drinking trough to fish out those plants (Curious plants).
Go back to the monk. Select the Plants (Curious plants) in your "Items" and then address the monk again.
Van Helsing shows the plants to the monk who tells they are poisonous plants. The drinking water of Mustapha's camels is therefore deliberately poisoned and the camels have become ill as a result. Ask if there is an antidote (Remedy) and the monk will give you a bottle of antidote. The monk then warns Van Helsing about the "Blood Rocks" and also tells about a night bird that flew into the desert 2 days ago.
Return to Mustapha. Select the bottle of Camel medicine and then speak to Mustapha again.
You then give the medicine to Mustapha and ... well ... you now get a camel and Mustapha takes you to the:
Part 2: Blood Rocks:
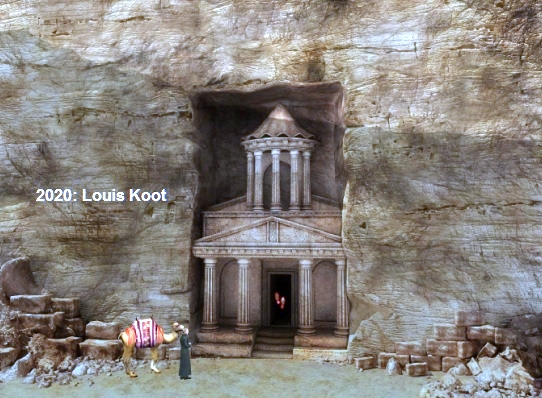
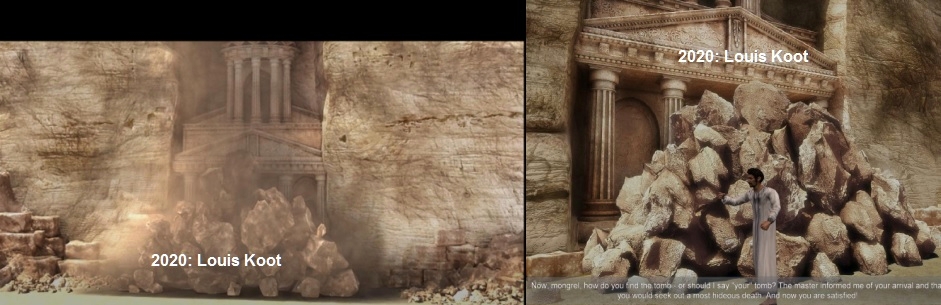
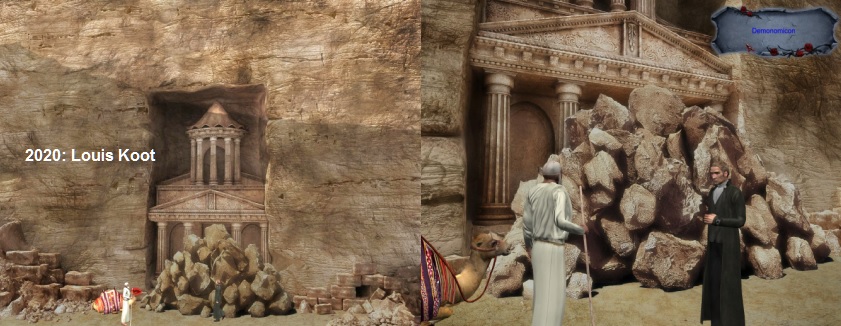
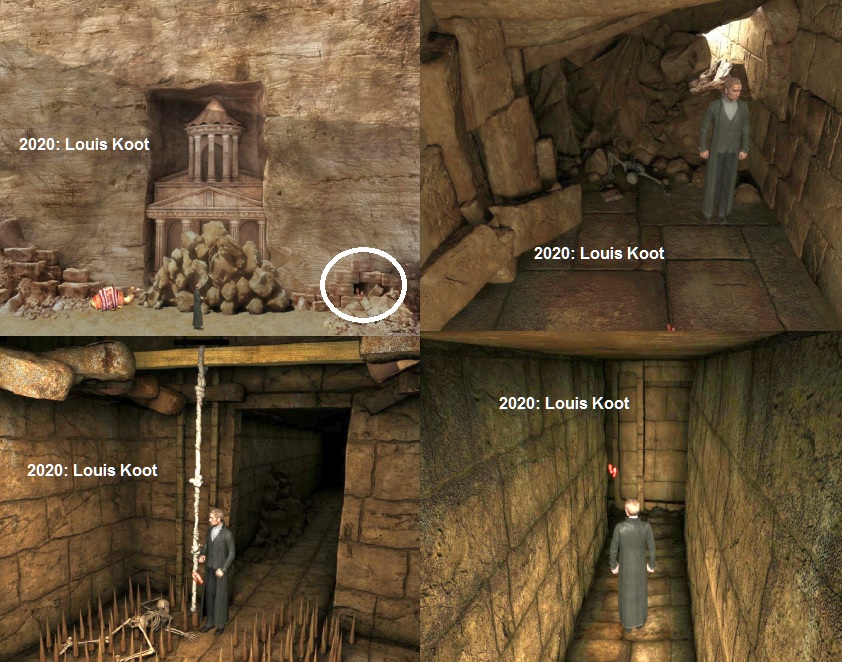
Mustapha immediately went back to Cairo. Van Helsing stands for a pyramid-like entrance to the temple. Enter and .....
oops ..... a shower of boulders follows, closing the entrance. It is the work of one of Dracula's henchmen.
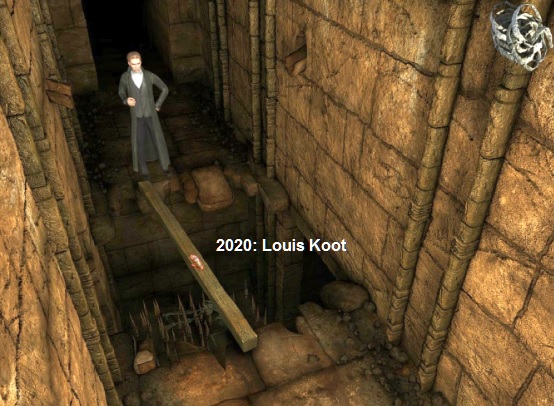
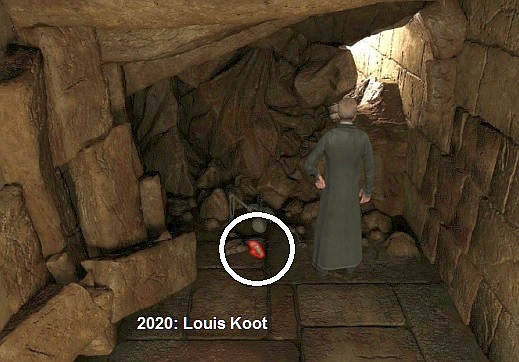
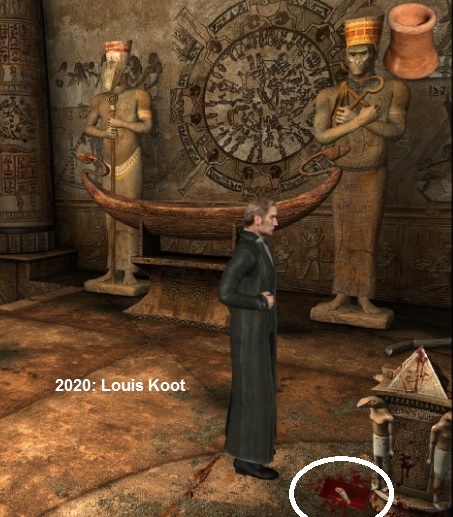
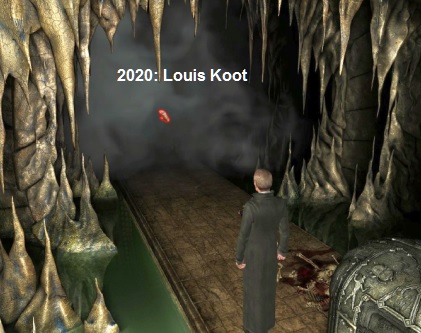
Van Helsing is in the first room of the temple. On the right is a skeleton. To the left is a stack of wooden beams.
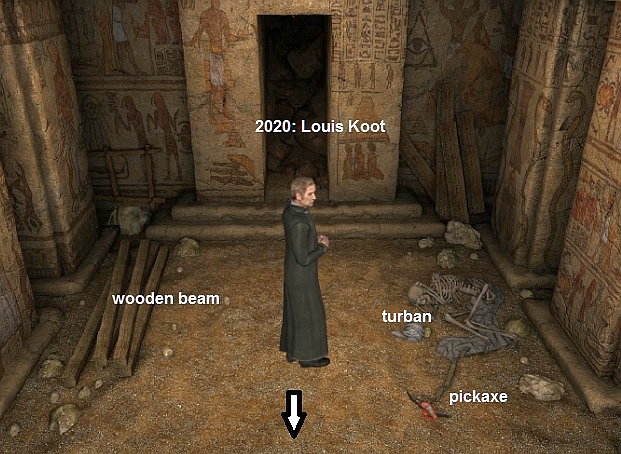
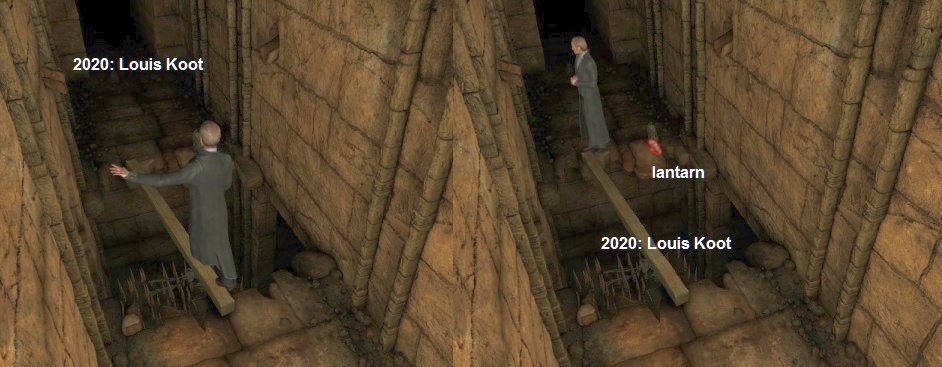
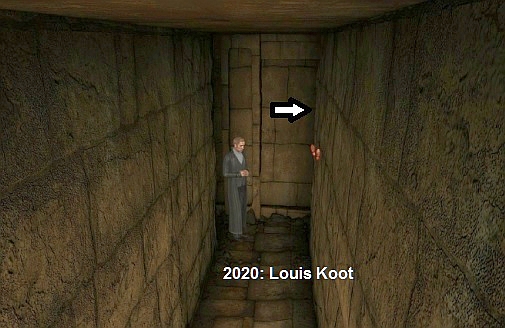
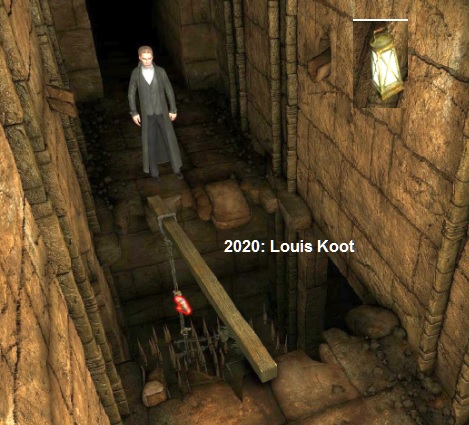
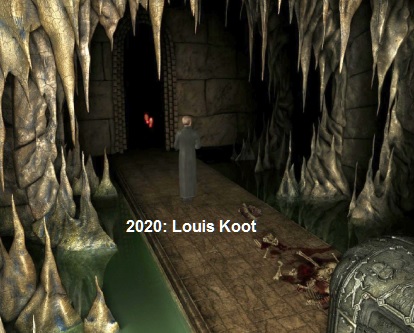
Look at the skeleton ... it's not an old skeleton ... it's quite recent. The skeleton has a Turban and a Pickaxe (Pick head). Grab the Turban and the Pickaxe. Take a wooden beam from the stack of beams. The turban can serve as a rope and Van Helsing only picks the head (pick head) from the pickaxe. Walk a screen down and then click with your feet on the right wall in the corridor and .... Van Helsing then turns right around the corner and ends up at a hole with spikes. On the other side of the hole you see a lantern. Down in the hole there is a dark opening on the right. Take the Wooden Beam from your "items" and then click with your hand cursor across the hole to place the beam over the hole.
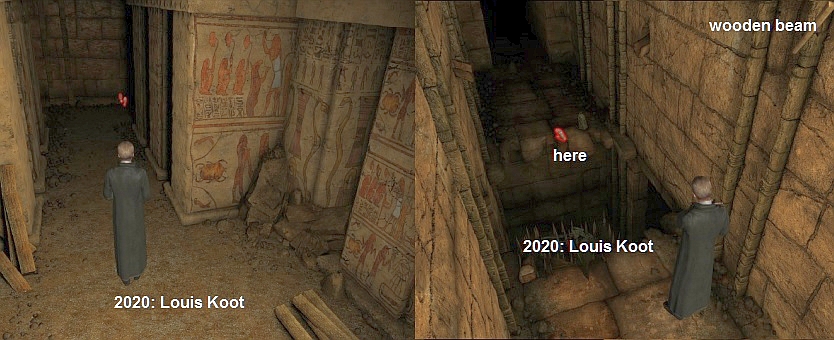
Then click with the feet on the other side of the hole and Van Helsing walks safely across the beam. Then grab the Lantern.
Walk further into the dark corridor. At the end of the narrow corridor you can go left and right.
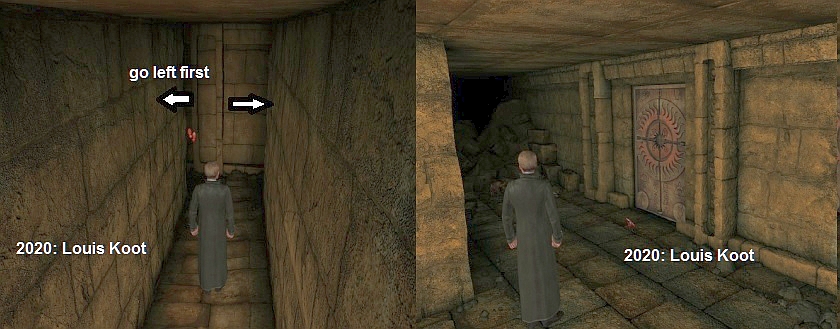
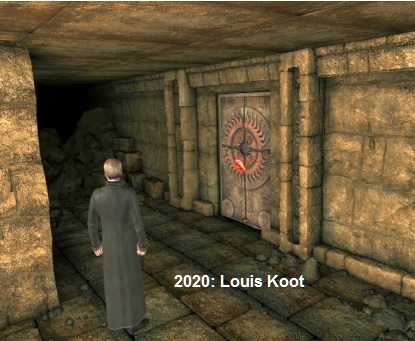
Go left. You will then see a wide metal door with a cross and a large sun. Walk through to the door
The Cross Door:
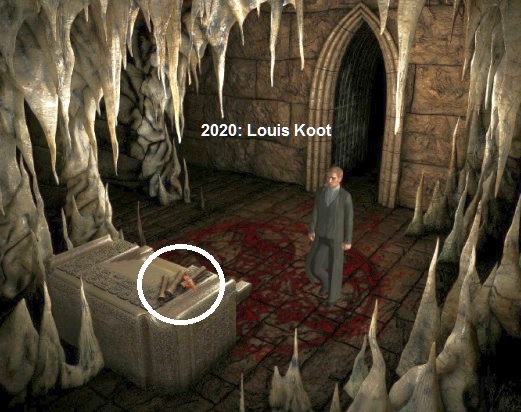
On the left is a collapse and in front of that rubble lies the body of a young girl. Examine the body with your eye cursor. It's the body of a young girl who was killed less than 2 days ago. The dead girl is dressed in a black Sari. Van Helsing is sad because apparently Dracula has gotten the "Demonomicom" and suddenly he sees no hope to save Mina
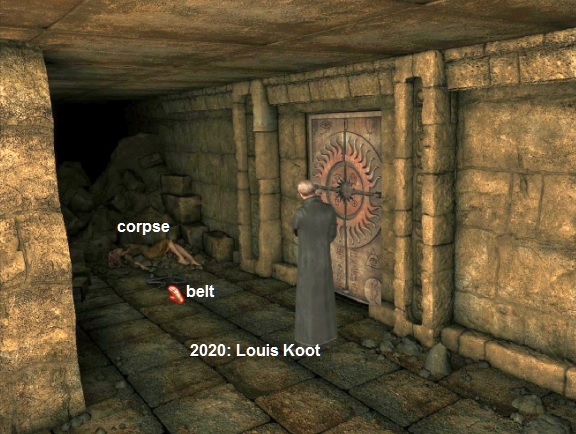
A Belt lies in front of the corpse. Grab the Belt.
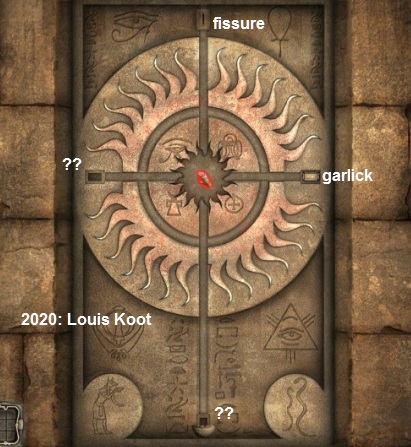
Click on the door with your hand. You enter the close-up of the door. Something has disappeared in the center of the Sun and you see 4 symbols. The 4 ends of the cross each have a "tray". Click on the 4 ends of the cross and Van Helsing will tell you something about it. The top tray has a narrow slit (fissure). The right tray smells of garlic (. The bottom tray needs liquid and the left tray also needs something.
Zoom out the door and walk back through the bottom of the screen to the narrow corridor. Back in the narrow corridor you now go one screen to the right and ....
Van Helsing ends up in the:
Mummification Chamber:
View everything you can view. Press your space bar to see the feet, eyes and hands. Check out the mural on the wall between the 2 large statues. There is a Linen Strips on the large stone table. Grab the Linen strips. On the small wooden table, which is placed against the right wall, is a small Oil bottle. Take that Flask of oil.
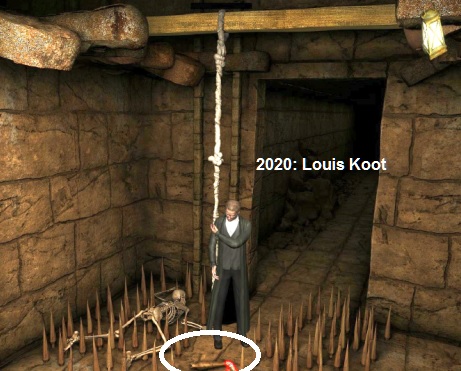
Leave this room and walk back into the narrow corridor, back to the hole with spikes. Van Helsing now has to go down into the spikes hole. In your "Items" combine the Linen strips with the Belt and you have a Rope. Combine the Rope with the Turban to make the rope longer. Select this Rope, close the "Items" screen and then click with the hand cursor on the Beam that you have placed over the hole and ......
.... via the rope you can now safely descend into the hole. Click on the rope with your hand cursor and ... Van Helsing complains that it needs light because it is very dark down in the hole. So combine in your "Items" the Oil bottle with the Lantern and then combine the filled Lantern with the Matches and ... you have a burning lantern. Select the now burning lantern and click your hand on the hanging rope again and now Van Helsing climbs down the rope.
Van Helsing is down in the spikes hole and in front of the spikes. A tunnel starts behind Van Helsing.
A broken Spike point lies on the ground in front of Van Helsing. Grab that broken Spike .
Double-click with your feet in the tunnel to enter the tunnel. Unfortunately, the tunnel has collapsed and is therefore blocked. A skeleton is buried under the rubble. At the top right, however, you see a hole in the rubble. The boulder in that hole seems to be somewhat loose. In your "items" combine the Pick head with the Spike and you have a pickaxe with handle. Select the pickaxe, close the screen, and click with the hand cursor on the loose stone in the hole and Van Helsing will ram that stone out of the way. You have lost the pickaxe but you still have the Spike.
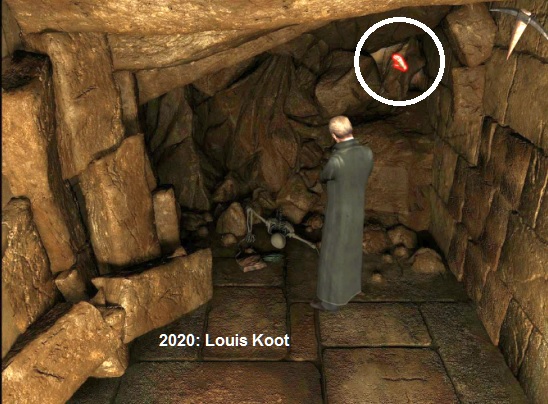
Hold on ..... don't go through the hole just yet. Now you can also see the skeleton buried under the rubble.
There is a heap of plants in front of the skull of the skeleton Grab that heap of plants.
They are the same plants with which the drinking water of Mustapha's camels is poisoned. Van Helsing has seen it here for the time being and wants to return to Cairo. So click with your feet in the hole and Van Helsing climbs out and ends up in front of the entrance. Hey ... that white monk is here now too.
Talk to the Monk and ask him about the "Demonomicom". Van Helsing now tells the monk why he is here in Cairo and why he needs that "Demonomicom". Then ask "Who are you really". The monk now tells who he is. Monk is Herodotus of Judah, a Coptic Priest. Herodotus now tells the story of one of his predecessors of his order who entered this damn Demonomicom temple. Then ask Herodotus about "The Seal" and you will experience all kinds of things about the objects you need to open that Cross door. These objects were once stolen from the temple and are located in the museum of Cairo. Herodotus gives you a list of the objects needed to open the Cross Door. We end up back in Cairo ourselves
Part 3: Back in Cairo:
Market Square
A long conversation follows with Mustapha, who talks extensively about his cousin, Abdul. Abdul's daughter, Mustapha's niece, has disappeared for a few days. A few nights ago, that girl was seen in the company of a stranger when she went to get water from the well. The girl has not been seen since
Ask Mustapha further about "The Niece" and Mustapha tells that the girl was dressed in a black sari. Van Helsing promises Mustapha that he will look for the missing girl and the conversation will then end. Well ... a beautiful young girl who has disappeared in a black sari ..... Van Helsing does not want to tell Mustapha, but Mustapha's niece has ended up as a corpse at the Cross door in the temple of the Blood Rocks.
Walk down a screen to the terrace. On the side of the large market terrace, 2 men are standing at a sales table. The market stalls are on the terrace. Van Helsing now has to collect the items needed for the Cross Door. You can get to the market terrace in 2 ways. Either you click with your feet on the leftmost market stall or you click with your feet on the rightmost market stall. If you don't get the feet on those market stalls, first press your space bar to see all the feet.
Go to the right market stall. On the right table is a scale and behind the scale is a hip flask. A string of Garlic hangs from the left wooden post.
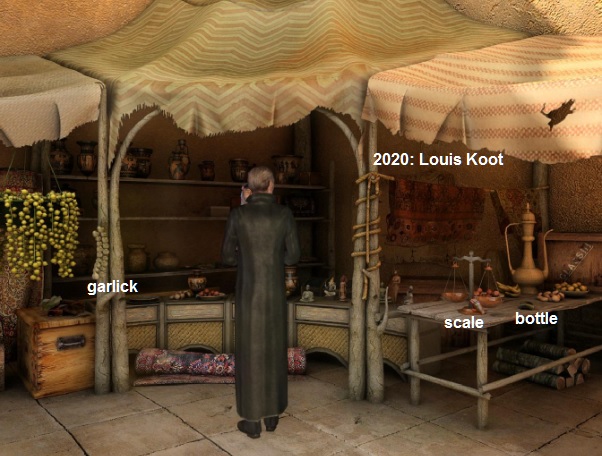
Grab the Scale. Grab the Flask/Bottle. Grab the Garlic.
Van Helsing now wants to return to the museum. So click the feet in the bottom right of your screen to return to the terrace.
Click again in the bottom right of your screen and you are back in the:
Museum:
Walk straight on to Smail Quahab, the assistant director and speak to the good man again and ....
Dracula's knife-throwing henchman tries to kill Van Helsing.
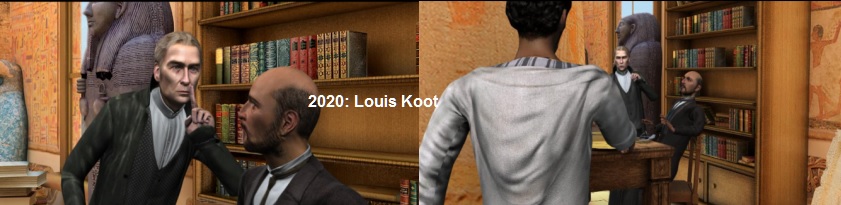
Van Helsing sees it just in time and the knife misses him, and Smail Quahab
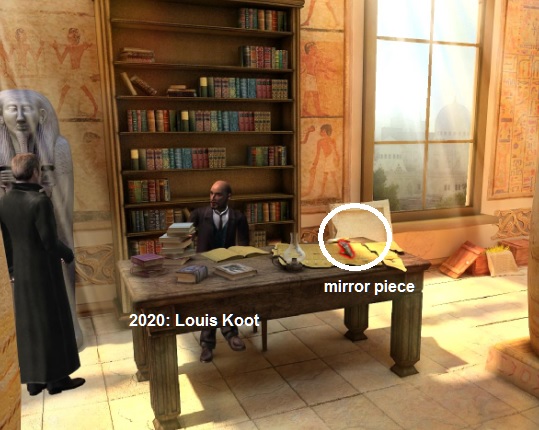
The knife protrudes behind Smail Quahab in the left upright of the bookcase. Grab the Knife.
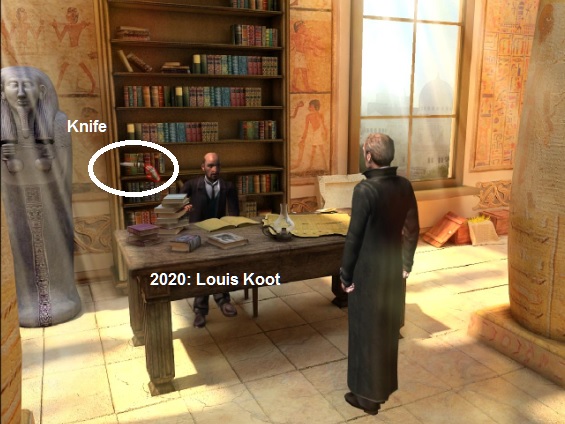
There is a strange substance on the knife. On Smail Quahab table is a large yellow paper.
Behind that yellow paper is now a piece of a Mirror. Grab the piece of a Mirror.
In your "items" select the Herodotus List and then talk to Smail Quahab again.
Ask Smail Quahab about the "Coptic Artifacts". Van Helsing then hands the list to Smail Quahab and asks if he can have the items on the list. Well ..... Smail Quahab is a civil servant and so the correct procedure must be followed to obtain items from the museum. And besides .... the Coptic Order is currently not so good in Egypt. Continue asking "If we cooperate?" Smail Quahab then gives Van Helsing a Necklace with a precious diamond and a Tray of a Hinu (Receptacle, the capacity of a hinu).
Smail Quahab offers Van Helsing a deal. If Van Helsing can find the Artifacts that were stolen from the museum and bring them back to the museum, Van Helsing can get those Coptic artifacts. The necklace you got from Smail Quahab is an example of what the stolen museum pieces look like. Select in your "Items" the Knife of the knife thrower. Then talk to Smail Quahab again and ask him about "The Knife". However, Smail Quahab knows nothing about the knife and suggests inquiring about it in the city. So say "Goodbye" and leave the museum.
Market Square:
Go back to Mustapha and ask him about the knife now. So select the knife again and then talk to Mustapha and ask him about "The Knife".
Mustapha is shocked when Van Helsing shows him the knife. So ask further and you will learn from Mustapha that the knife is an Ottoman Knife and belongs to a Turk. This Turk is the leader of a smugglers and thieves gang. That Turk lives nearby and Mustapha says that this Turk is not at home today. So ask for that Turk's "House" and Mustapha explains where to find that Turk's house. Say "Goodbye" again
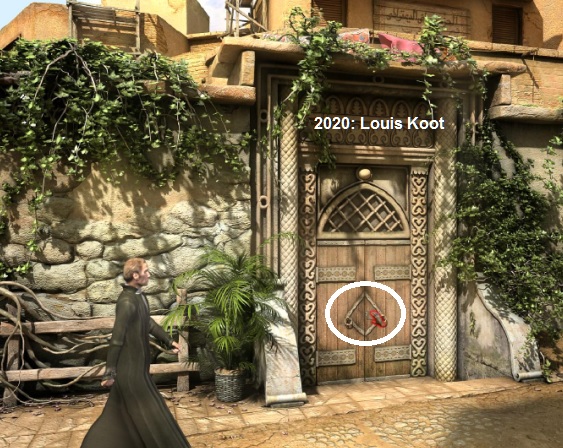
Go down another screen, so that you are back on the large overview screen of the market square. Mustapha has said that the Turk's house is beyond the market square. Click with your feet approximately in the middle of the left edge of the screen and Van Helsing will walk to the left of the large market terrace and then he stands in front of the street where that Turk's house is. You can already see the double wooden door of the house. Walk down the street and look at the door with your eye cursor.
Part 4: The house of the Turk:
|
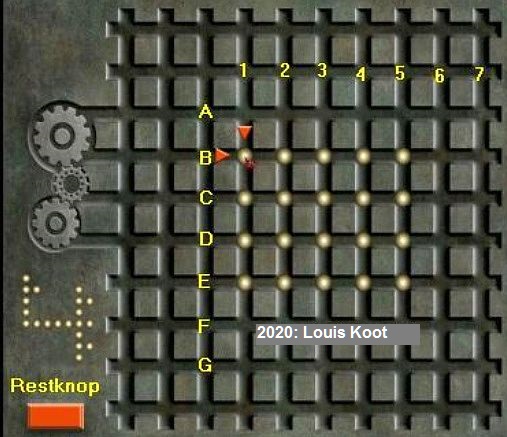
Click with your hand cursor on the lock of the door.
Door lock puzzle: Van Helsing tells you that the door has a complicated lock, but that he can open the lock with some logical thinking and a little luck. You end up in the close-up of the door lock. You see a fence. On the left there are 3 gears on the fence. There are 20 marbles in the middle of the fence. beneath the 3 gears you see a kind of 4 made out of marbles. You now have to move the marbles in the fence to make a 4, such as you see beneath the gears. The orange button, bottom left, is the Reset button that allows you to reset the puzzle to the starting position should you ever make a mistake. You can only move the marbles in a limited space, so not over the entire grid. It will be quite a job and there are probably several solutions possible. The "playing field" is slightly larger than the field where the 20 marbles are now in. It is best to define the playing field for yourself by numbering the columns and rows in which you can move the marbles. Number the columns, from left to right, 1 to 7 and number the rows, from top to bottom, A to G. As in this picture:
If you place the arrow cursor on one of the outer marbles, small orange arrows appear. By clicking on an orange arrow you move the marble up or down or to the left or right. You can move the marbles one by one. But you can also move a whole row or a whole column of marbles. As said ... there are a lot of solutions possible and one solution is more, or less, work than the other, so I am not going to offer you a step by step solution Move the 20 marbles so that you have made an exact copy of the 4 as you see under the gears. The numbering of the columns and rows makes it easier to move.
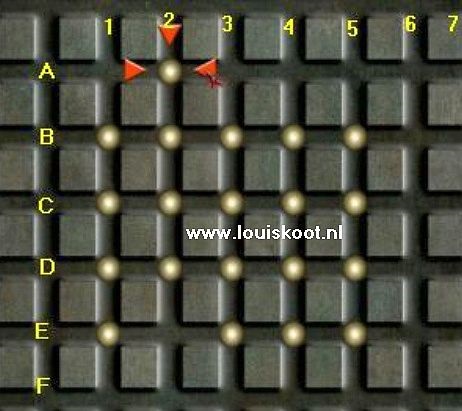
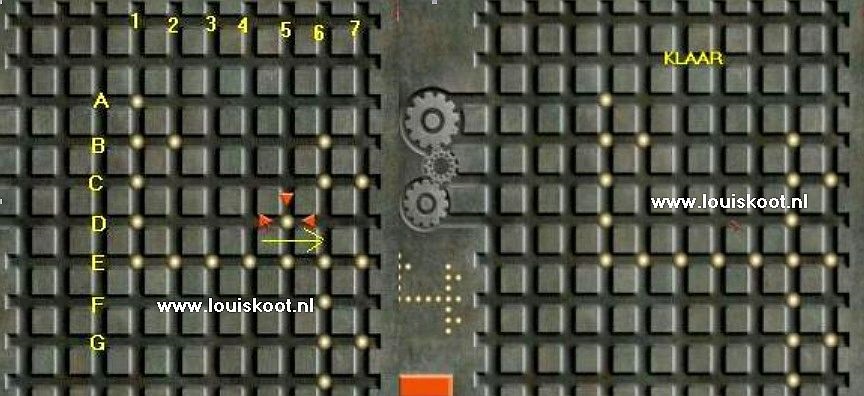
Here are 2 more screenshots that show you how it should be in the end. In the left screenshot you see that there is 1 last move to be made and in the right screenshot you see how it should be in the end.
When you have succeeded, Van Helsing will automatically step through the door.
|
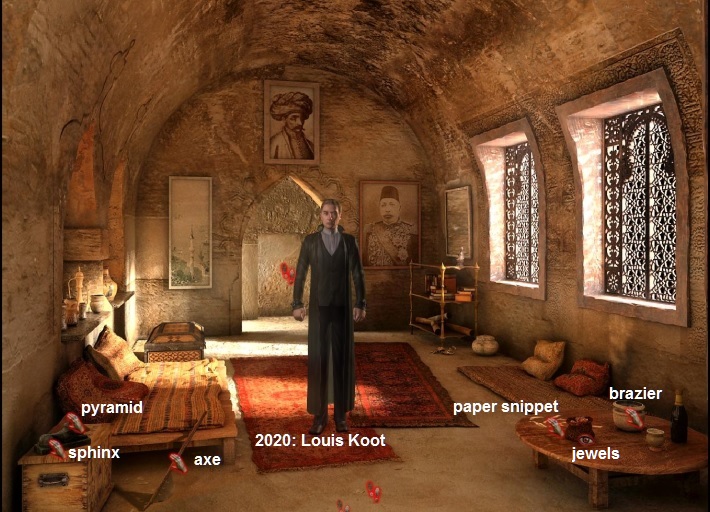
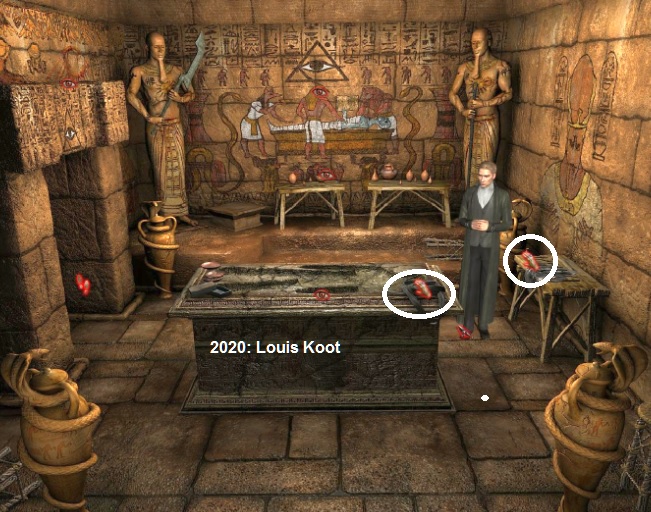
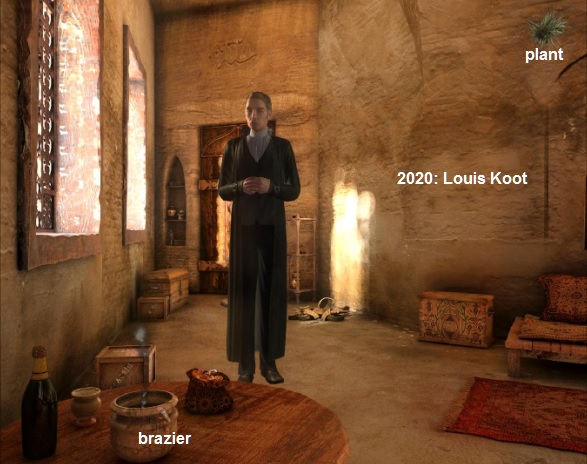
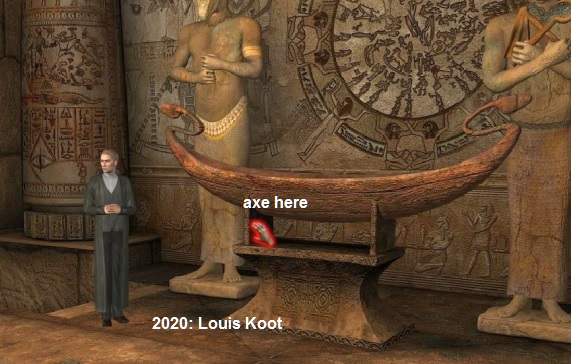
View everything you can view. Use your spacebar again to see all the "hotspots". Walk forward until Van Helsing is between the round table and the wooden bench. On the left wall is a chest. On the chest is a black Sphinx. Grab the black Sphinx. The Sphinx has no face but there are a few hieroglyphics on it. You will see those hieroglyphics in your "Documents". Close the "Documents" window. You will see that there is also a Pyramid on the chest. Also grab the Pyramid of the chest. This pyramid is larger than the pyramids you have found in the museum. There is an Axe against the sofa. Grab the Axe.
On the round table is a bag of jewelry. Look at that bag with your eye. Van Helsing concludes that the jewelry in the bag is part of the jewelry that was stolen from the museum. Behind the jewelry bag is a smoking pot. It's a Brazier and you get your hand cursor on it, but you can't grab that Brazier. To the left of the jewelry bag are Parchment Scraps. Grab the Parchment Scraps and put them back together.
Parchment scraps puzzle:
Left click on a piece to pick it up and drag it to the right and release.
Right click on a piece to rotate it. The "puzzle screen" is the middle part of the screen.
Put the 24 pieces together and you have a parchment with hieroglyphics. First do the side pieces and then fill it in with the other pieces.

When you are done, the whole document is saved in "Documents" as "Hieroglyphs on a parchment Found at the Turk's".
When you have done everything on this first screen, you go a screen down, via the bottom of the screen. You will then see a door.
To the right of the door is a large stone Urn. Click on the lock of the door. The door is locked. Click on the Urn and ....
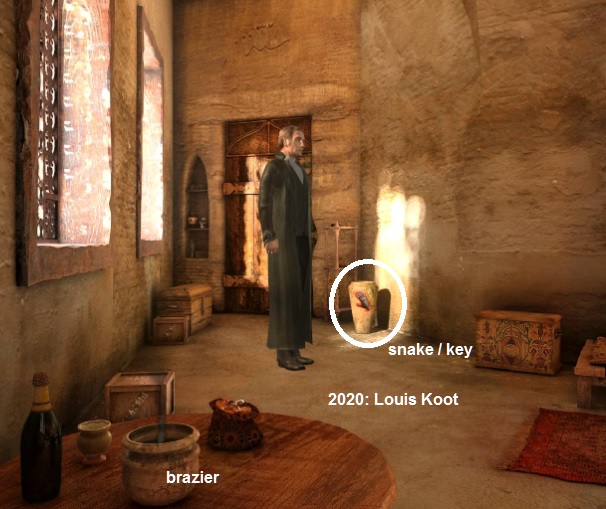
That big urn falls over and a poisonous cobra snake crawls out. The cobra positions itself in front of the door to guard the door, because that is its job.
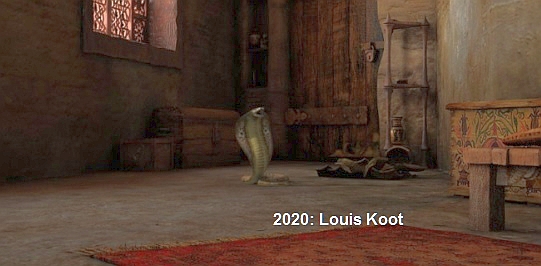
That cobra must therefore be eliminated. At the bottom left of your screen you see the round table with that smoking Brazier on it.
Select the poisonous green plant (Curious plants) in your items and then click on the smoking Brazier and ....
...... the poisonous vapors that now rise from the brazier by the plant are too much for the cobra
Click with your hand cursor on the shards of the broken Urn, from which the cobra crawled out. You will find a small key.
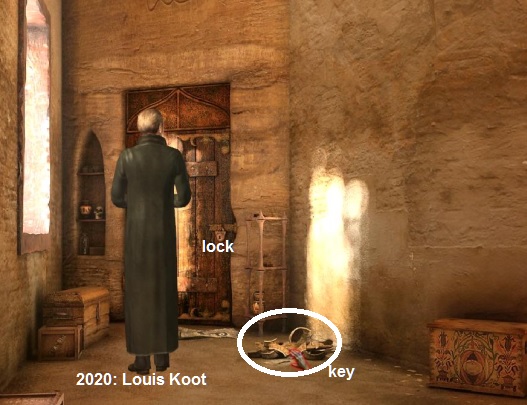
Select this key in your "Items" and then click again on the lock of the door and .... the door is then open.
Click on the door with your feet to proceed to the next room.
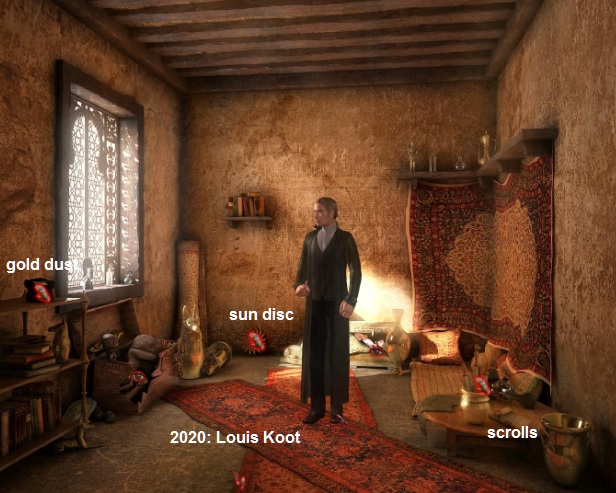
View everything again. At the window is a broken chest that you can look at with your eye. Everything in this room is stolen as well. On the box to the left is a bag of Gold powder. Grab the Bag of gold powder. Against the back wall and right under the bookshelf, there is a Sun Disc. Grab the Sun Disc. On the table to the right is a vase with Scrolls in it. Next to the vase is another scroll on the table. Grab all those scrolls and read them in "Documents". They are a "Letter found at the Turk's" and a "Piece of a letter found at the Turk's". You read that the Turk must kill Van Helsing and then bury the body.
Close the "Documents" window. Van Helsing wants to go back to the museum now, to tell the assistant director what he discovered in the Turk house. So walk back 2 screens and then click in the doorway and Van Helsing is outside on the street again. Go back to the overview screen of the market square 2 and then back to the museum
Museum:
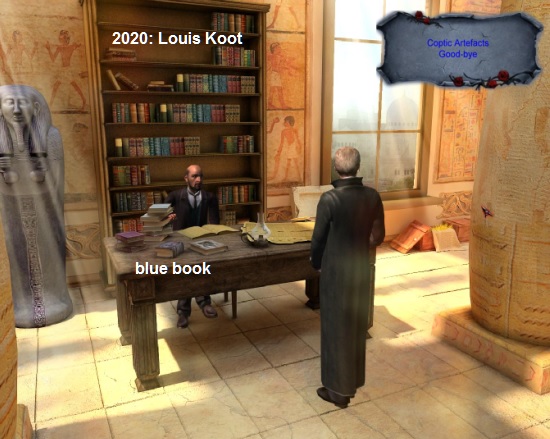
A conversation with Smail Quahab follows, who is grateful that you found the stolen items. So ask Smail Quahab further about the "Coptic Artifacts" and you will now receive a bag containing the Coptic Artifacts. You can also keep the necklace. Say "Goodbye" but don't leave yet.
In your "Items", select the Hieroglyphics Parchment you have pieced together in the Turk house (Turk's letter) and then talk with Smail Quahab again. Smail Quahab will point you to a book where you can look up the explanation of the hieroglyphics. That book is on his table...it is the blue book. Leave the hieroglyphic paper in the top right of your screen and click with your hand cursor on the blue book, which is on the left front of the table of Smail Quahab. You end up in the:
|
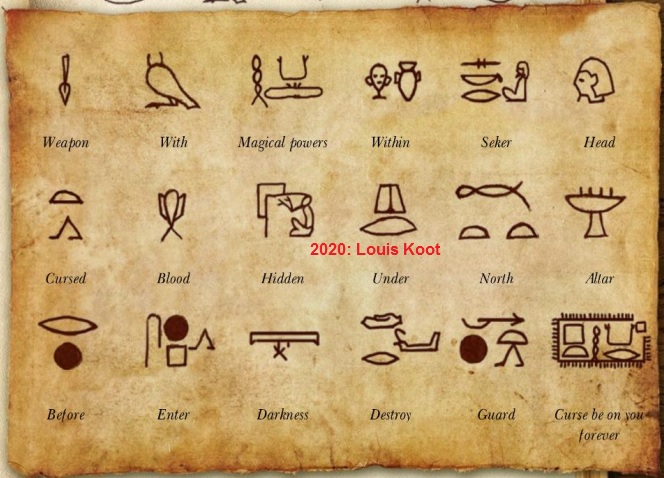
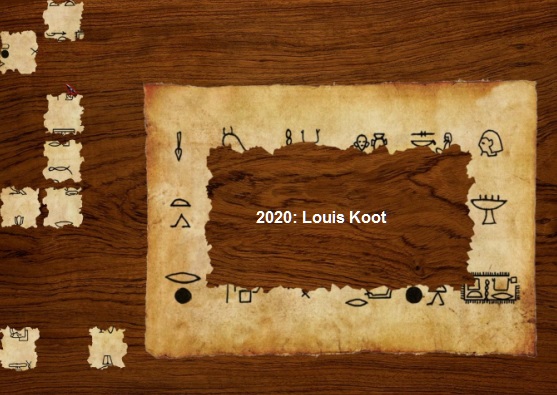
Hieroglyphics puzzle: The hieroglyphic paper fills the right page. On the left are the words that you must place under the hieroglyphics. The paper has 3 lines of hieroglyphics.
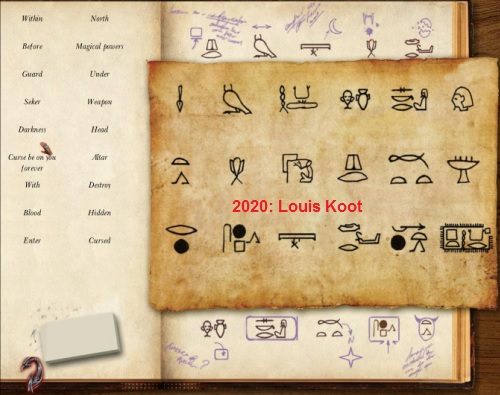
Each line has 6 hieroglyphics. Click on a word on the left and then place that word under the correct hieroglyph. It is not difficult if you think logically and recognize the images and understand a little English. Line 1. From left to right: Weapon, With, Magical powers, Within, Seker, Head.
If you do it right, all the hieroglyphics will turn red and in your "Documents" you will read the text: "Weapons with magical power within Seker head. Cursed blood under the north altar. Before you enter the darkness destroy the guard but a curse be on you forever " |
Close the "Documents" window. In your "Items" select the Black Sphinx and click on Smail Quahab again and ask him about this "Statuette". Smail Quahab tells you that the hieroglyphics on the sphinx mean "Ny ar lut hotep", but he does not know the English translation. Say goodbye and leave the museum.
Market square
Walk back to Mustapha and talk with him again. Mustapha is evicted by his wife because of the missing niece. Mustapha now disappears into his house. Go one screen to the left, to the house of Herodotus, the white monk. Herodotus is waiting for you at his door again. In your "Items" again select the Black Sphinx and then talk to Herodotus.
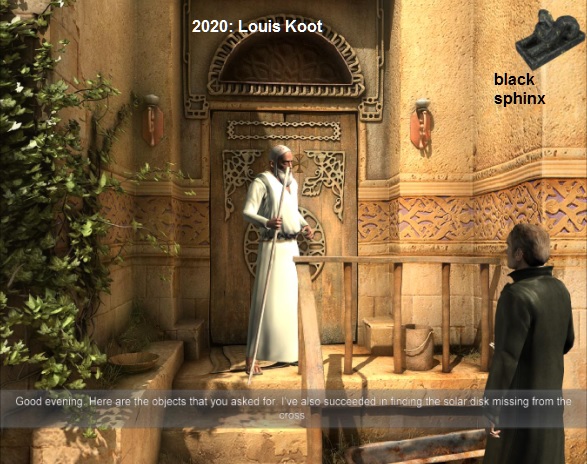
Van Helsing shows Herodotus the Coptic Artifacts and receives a Hosti from Herodotus. However, 2 more artifacts are needed, but Herodotus does not know which they are, only that they are "feared by demons". Ask Herodotus further about the "Other Artifacts" and Herodotus will tell you that you also need Holy Water for the Cross door. Van Helsing must therefore bring Herodotus pure rainwater. Herodotus will then bless the rainwater to make it Holy Water. Now ask further about the "Statuette of the Sphinx". Herodotus believes that you better break the black sphinx. Ask for the "Inscription". Herodotus does not know "hieroglyphs" but knows that "Ny ar lut hotep" must deal with the "Black Man without a face". Say goodbye to Herodotus.
So you have to look for rainwater "that has not yet been in contact with the earth".
Unfortunately, it is now the dry season, so it can take days, if not weeks, before it starts to rain. Return to Mustapha's camel tent
Making Holy Water:
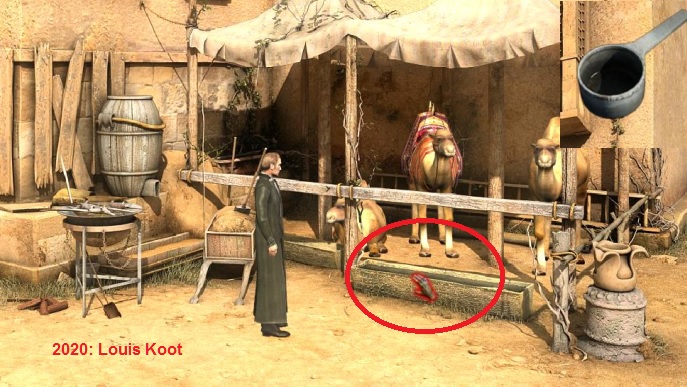
In front of Mustapha's house there is now a barbecue near the wheelbarrow. A skewer with meat is smoldering on the barbecue. Click on it with your hand cursor and Van Helsing will tell you that it is piping hot. So there is rainwater in the drinking trough of the camels, which is rainwater that has never been in contact with the earth. Select in your "items" the saucepan (Casserole dish), which you have previously taken from the stone edge. Then click with your hand cursor on the drinking trough of the camels to fill the saucepan with pure rainwater.
Select in "items" the now filled saucepan and click with the hand cursor on the barbecue again and you have a pan with hot water
In your "Items" combine the Broken piece of mirror with the Saucepan and you then have a Mirror with Condensation. Then combine the Hip Flask with the piece of mirror and you have a Flask with condensation Hip Flask. In your "Items" combine the Knife with the Necklace to take the Diamond out of the necklace. Then combine the Diamond with the piece of Mirror to cut a Square Mirror. The square mirror is the 5th item you need to open the cross door. Check in your "items" whether you now have the 4 items for the Cross door. These 4 items are: The square mirror, garlic, hosti, solar disc. The 5th item is the Holy Water, but you will get that from Herodotus in no time.
Select the hip flask and go back to Herodotus and talk to him again.
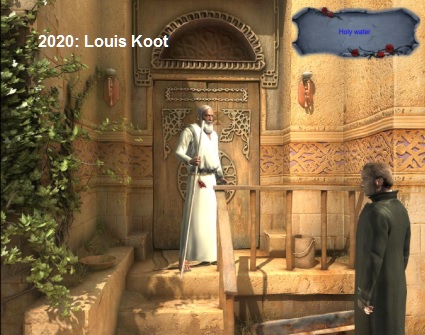
Ask Herodotus about the "Holy water" and Herodotus puts a little of the water in a beautiful blue bottle and blesses him. You now have a beautiful blue bottle with Holy Water. Continue asking "What have you found?" and then "What Should I do?". Herodotus found the body of Mustapha's niece at the cross door and gave her a Christian funeral. Herodotus then tells you what to do if you have managed to open the Cross Door in the Blood Rocks Temple. Say "Good-bye" when everything is asked and tells and .... we end up back at the Blood Rocks and so in:
Part 5: Blood Rocks 2nd time:
You cannot enter the temple through the entrance because of the boulders. But on the right you see the hole through which Van Helsing crawled out the first time. So go back in through that hole now. Then walk down a screen and Van Helsing is back at the bottom of the spike hole. Click on the hanging rope with your hand cursor and Van Helsing climbs up the rope.
Back up you walk back into the narrow corridor and at the end you turn left again, to the Cross door:
|
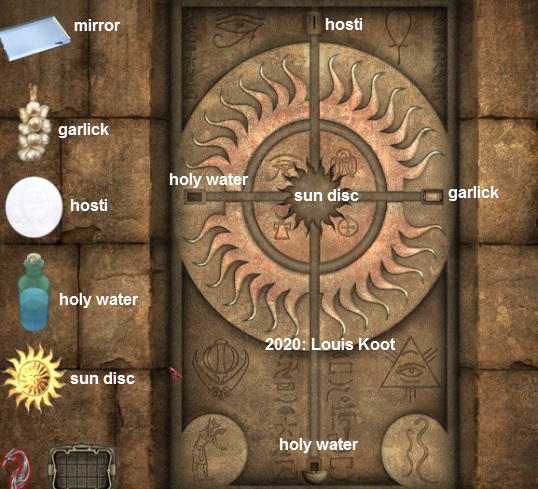
Open the Cross Door: Click on the Cross Door again to return to the close-up screen. On the left are the mirror, the garlic, the hosti, the Holy water and the sun disc.
Place the Solar Disc in the center of the door.
You zoom out and Van Helsing then mutters the spell he learned from Herodotus and ... the Cross door slides open. So go through the now opened Cross door and you will end up in the: |
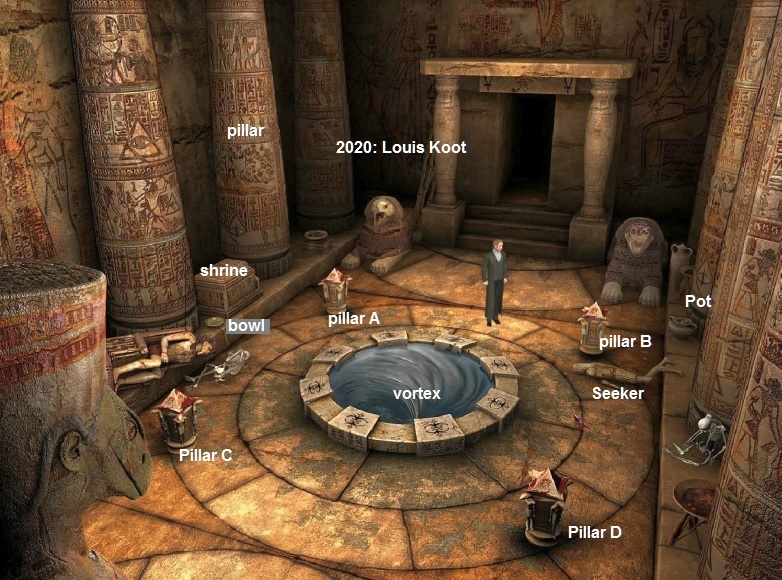
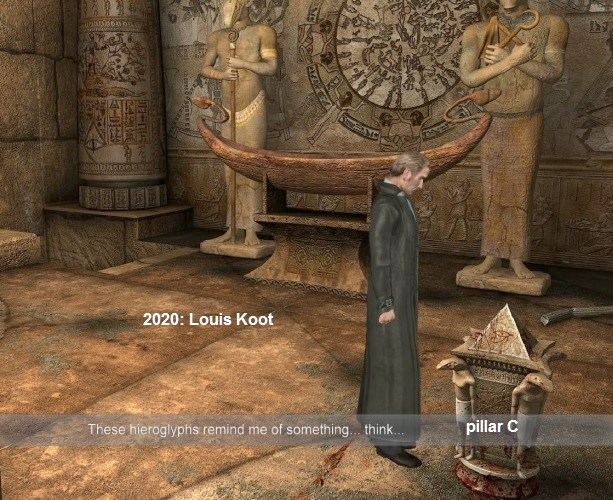
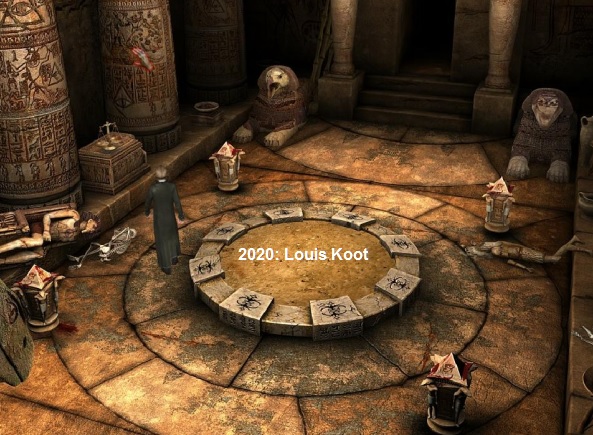
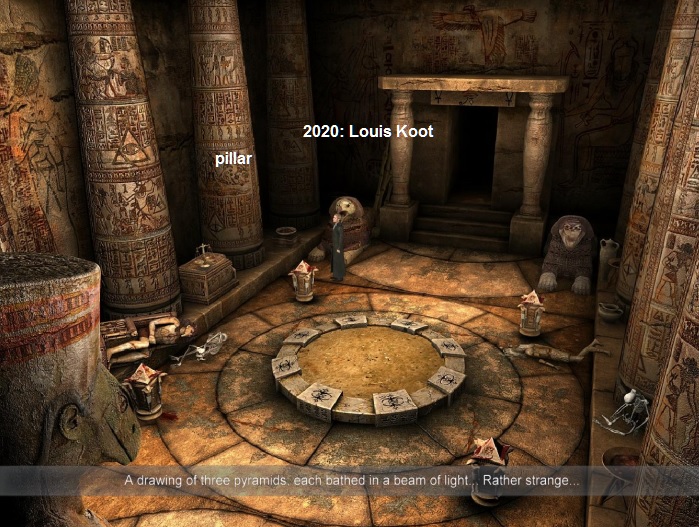
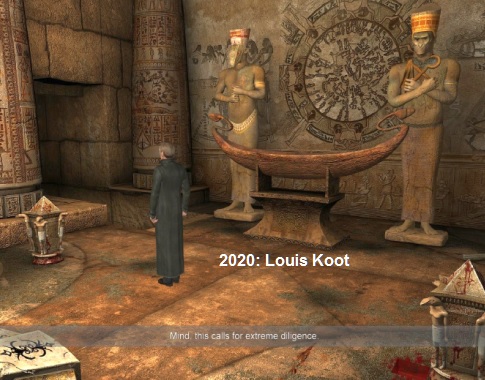
Great Temple Room:
You have ended up in a large colonnade room. Press your spacebar again to see all the "hotspots". In the middle of the room is the "Whirlpool". The water in the "Whirlpool" is a swirling whirlpool. The "Whirlpool" is the center of a circle. The circle consists of 3 rings. In the outer ring of the circle are 4 small pillars. Those 4 little pillars are little altars. Name the top left pillar A, the top right pillar B, the bottom left pillar C and the bottom right pillar D. Between the large pillars on the left wall, so to the left of pillar A, there is a small altar. Next to that small altar is a wooden bowl. At Pillar B lies a statue on the floor and on the ledge stand a Pot
Find a "Weapon with Magical Powers"
Here in this room you need the translation of the hieroglyphics that you have put together in the Turk house. Line 1 of those hieroglyphics says "Weapon With Magical Powers Within Seker Head". So there must be a "Weapon with Magical Powers" in Seker's Head. View the Seeker statue on the ground in front of Pillar B with your eye cursor. Van Helsing tells you that this statue is the Seeker. Select the Axe in your inventory and then click with your hand cursor on the broken head of the Seeker.
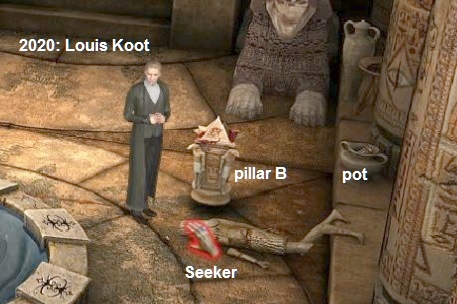
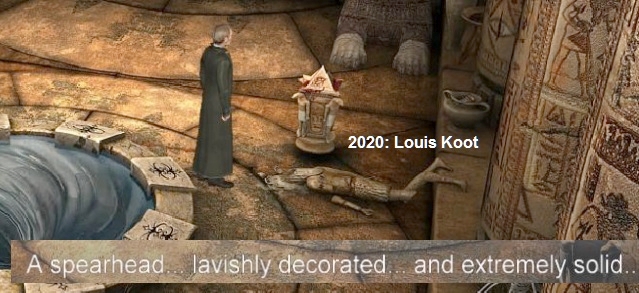
You cut the head of the Seeker even further. Store the axe and then click with your hand cursor on the chopped Seeker head and ..........
Van Helsing picks up an Spearhead. Could this be the "Weapon with Magical Powers"?
Now click with your hand on the pot, which is behind the Seeker, on the stone ledge. Van Helsing takes a Copper Deben from the pot.
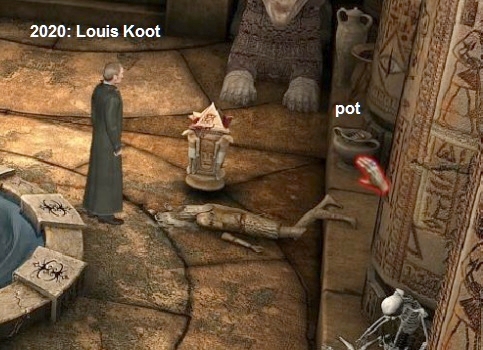
So you now have 2 Copper Debens in your "items" inventory. You have solved line 1 of the hieroglyphic riddle.
Line 2 of the hieroglyphic riddle read: "Cursed Blood Hidden Under North Altar", so below the North Altar must be "Damned Blood".
Find "Damned Blood"
If you calculate from the entrance, pillar C, the bottom left pillar, is the North altar. Click with your hand cursor on pillar C, so on the bottom left pillar.
Van Helsing walks towards pillar C and you enter the close-up of the pillar.
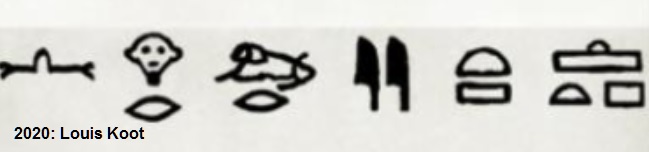
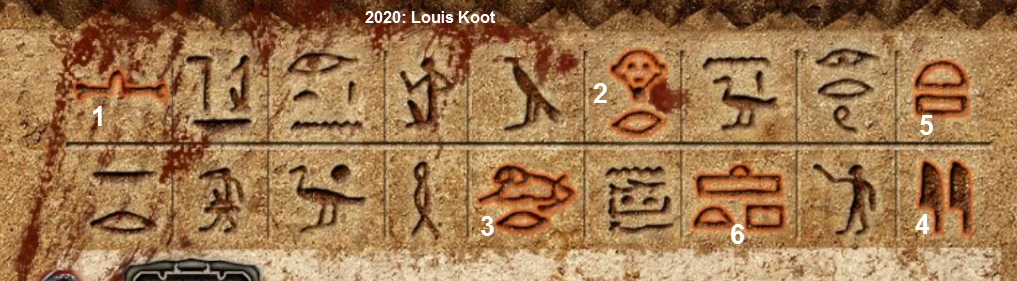
You will see 2 rows of Hieroglyphics on the pillar. Among these hieroglyphics are also the hieroglyphics that are on the Black Sphinx.
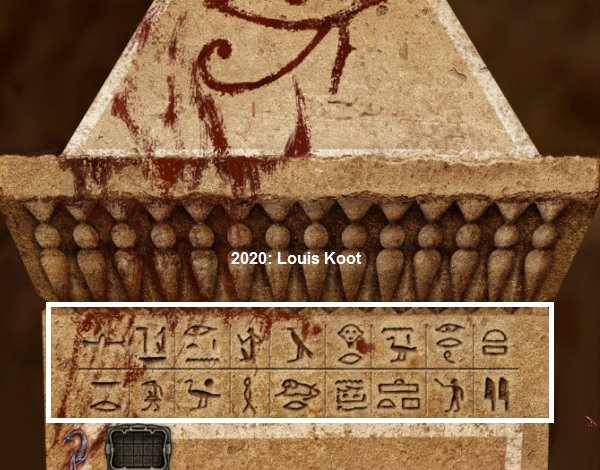
Smail Quahab has said that the hieroglyphics on the black sphinx mean "Ny ar lut hotep", and Herodotus has said that this means "Messenger of the Gods." If you click on a hieroglyph, that hieroglyph turns red. The "Black Sphinx" hieroglyphics are stored in your "Documents", so check them out again.
In the 2 rows of hieroglyphics on pillar C, click only on the hieroglyphs that are also on the black sphinx and do that in the correct order.
If you do this correctly, the pillar turns away and .... a blood hole appears under the pillar. In "Items", select the Hinu urn (Receptacle, the capacity of a hinu) and then click with your hand cursor in the blood hole to fill the Hinu bucket with the Blood.
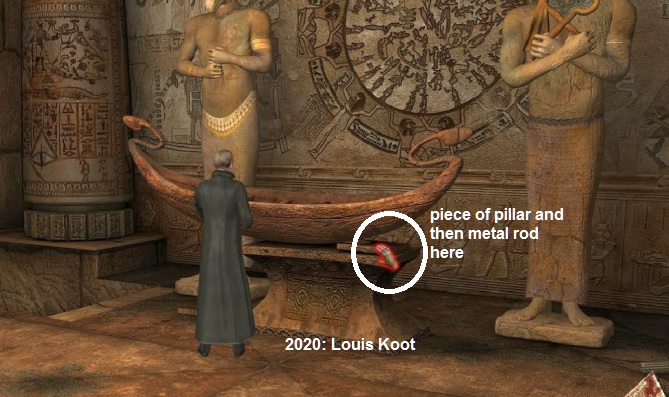
On the back wall are 2 life-size statues and a Papyrus Boat on a stand.
The left statue has a long metal rod attached. In front of the right statue is a piece of broken Pillar.
Grab that piece of broken Pillar. Grab the Metal Bar from the left statue.
Now also remember what Herodotus said about what to do after opening the Cross door. Herodotus said, "To open the secret passage just after the cross, you must put a golden deben and a hinu of cursed blood into the basin." So ... to open the secret passage you have to throw a Golden Deben and the Hinu Bucket with blood into the whirlpool. However, you do not have a golden Deben. But you do have 2 copper Debens and a bag of gold dust powder. And you have a scale. Walk back a screen.
The scales/ Balance puzzle
So on the left is that altar between the large pillars. Van Helsing has said that the top of the altar is nicely flat and that he could put the scales on it.
To the left of the altar is also a wooden bowl. Grab That Wooden Bowl
In "Items" select the Scale and place it on the altar, which is between the left pillars. Then click on the scale and you end up in the close-up screen. On the left is the bag of gold powder. On the altar you will find 2 Copper Debens, the Stiletto (Scribe's stylus), and a spoon. On the front of the altar is the Reset Button with which you can return the puzzle to the starting position if you go wrong. You must weigh now.
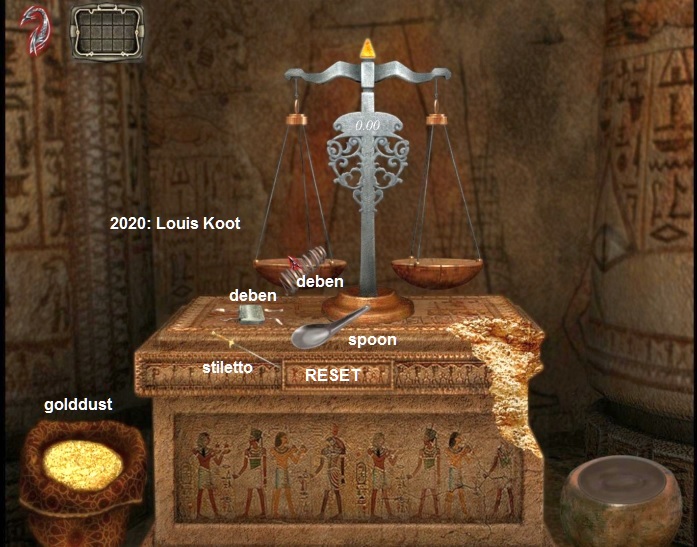
You need to find out how much each of the two Copper Debens weighs and how much the Stiletto weighs. For this you have to use the gold dust Place a Copper Deben in the left bowl of the scale. Then take the spoon and click with it on the bag of gold dust and then click with the spoon on the right bowl of the scale. Place as many spoons of gold dust in the right bowl of the scale as needed to balance the two scales. Then read the weight. Do this for both the copper debens and the stiletto
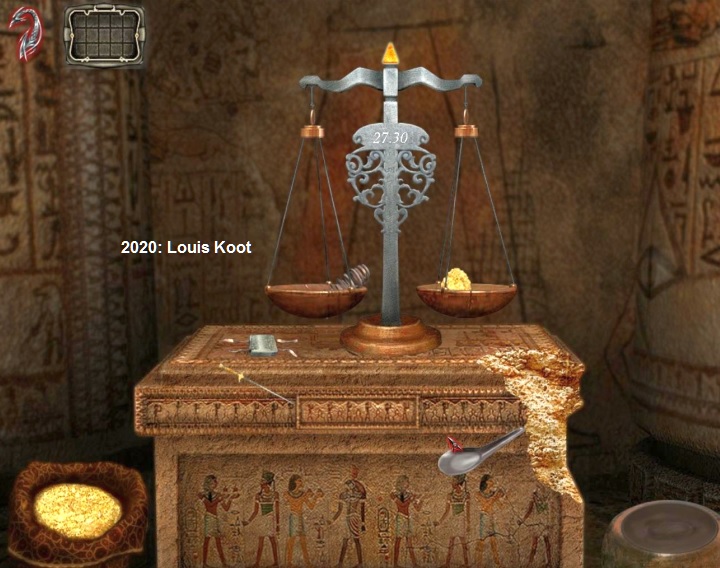
The 2 Copper Debes each weigh 27.30 grams. The Copper Deben from the pot also weighs 27.30 grams. The Stiletto weighs 41.0 grams.
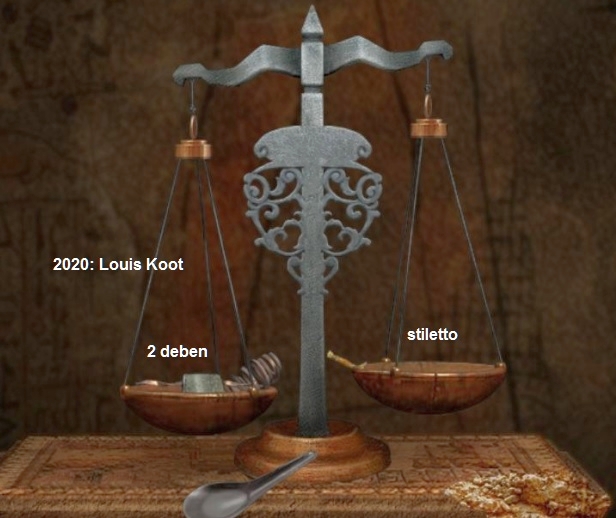
According to Smail Quahab, 1 gold deben weighs 13.6 grams. (You can look this up in the "Dialogues" section of your inventory). Empty the bowls of the scale by clicking the reset button. Then place both Copper Debens in the left bowl of the scale. There is then 54.6 grams (2 times 27.3) in the left bowl of the scale. Place the Stiletto in the right bowl of the scale. The scale will not be in balance, because the left bowl now contains 54.6 grams and the right bowl 41.0 grams.
Add 3 spoons of gold dust to the right bowl of the scale to rebalance the scales at 54.6 grams. The Wooden Bowl, which you just grabbed from next to the altar, now appears on the right. Now take the 3 scoops of gold dust from the right bowl of the scale with the spoon and click the spoon always empty into the Wooden Bowl.
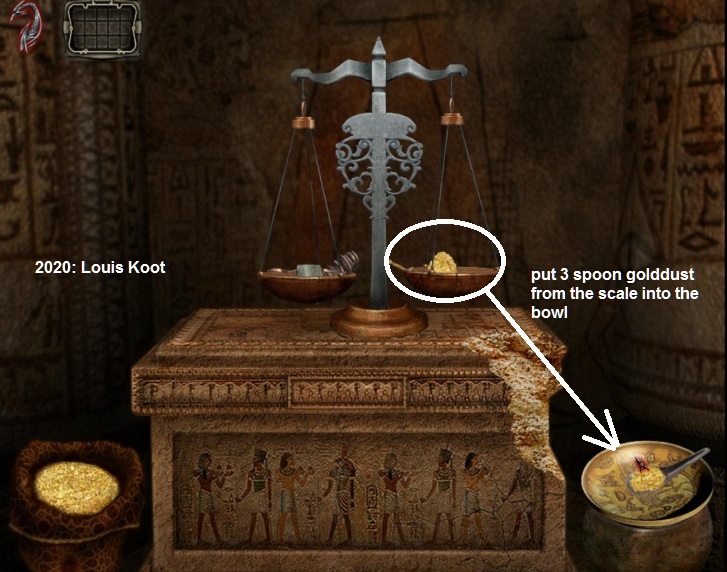
You then have 13.6 grams of gold dust in the wooden bowl and this is your Golden Deben ....... "There .... perfect ...." says Van Helsing and you automatically go out of the puzzle. Select, in "Items" the hinupot Blood and click with your hand cursor in the "Whirlpool" to pour the blood into the whirlpool. Select the Golden Deben and also throw it in the Whirlpool and .... the whirlpool turns into ....... SAND ....
What else did Herodotus say? You can look it up in "Dialogues, It was ....."Directly afterwards, the sun must hit the summit of the Pharaoh's tombs ".
Open up the Secret Passage:
Click with your hand cursor on the left middle wall pillar. Van Helsing stands in front of the middle pillar and he sees a drawing of 3 pyramids on it.
But he needs light to see the drawing more clearly. So select the burning Lantern in your "Items" and then click on the pillar again.
Van Helsing then tells you that you have to find the right pyramid and you end up in the close-up of the:
Pyramid puzzle:
At the top left are the 8 miniature pyramids from your "items". You also see 3 Triangles. There is a slider beneath the 8 pyramids. You can click the slider up or down via the arrowheads. The lantern is at the bottom. You can slide the lanterns directly under one of the 3 triangles via the left and right arrows. The lantern is now under the left triangle. The aim of the puzzle is to find the correct Large, Medium and Small pyramid by the way in which the shadow of the lanterns is reflected by the pyramids in the triangles
Name the 3 triangles A, B, C. Number the 8 pyramids, from top to bottom, 1 to 8.
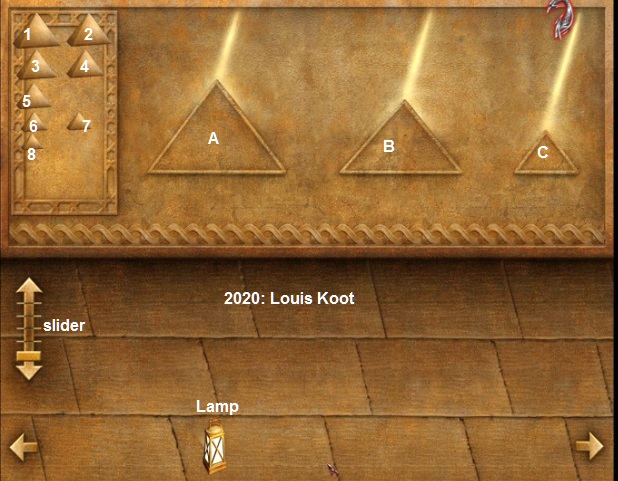
Pyramids 1 and 2 are Large Pyramids. Pyramids 3, 4 and 5 are Medium pyramids. Pyramids 6, 7 and 8 are Small Pyramids.
If the lantern isn't under triangle A now then place the lantern, with the left arrow, under triangle A. Pick up the large Pyramid 1 or 2 and then click the pyramid above lantern. You will then see the shadow of the pyramid in / on Triangle A. But the shadow of pyramid 1 does not correspond to triangle A. By clicking the slider in the scroll arrow up or down, you can make the reflection of the pyramid exactly coincide with Triangle A. The correct pyramid is then the pyramid where the triangle turns black when the slider in the slider arrow is on the middle line.
It is best to immediately put the slider on the middle line and leave it that way. It will save you some work. When you have found the right Large Pyramid, then you slide the lantern to Triangle B and look for the right medium pyramid. When you have found the right medium pyramid, slide the lantern to Triangle C and find the right Smallest Pyramid. Again .... the correct pyramid is always the pyramid from witch the shadow of the pyramid coincide exactly with the triangles A, B, C when the slider is on the middle line.
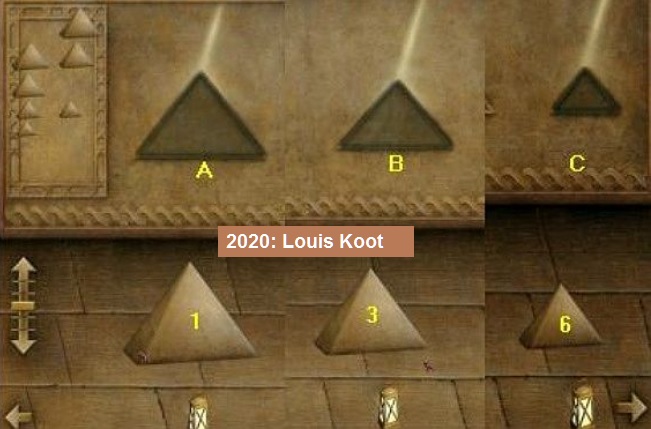
The correct Large Pyramid is Pyramid 1. The correct Medium Pyramid is Pyramid 3 The correct Small Pyramid is Pyramid 6
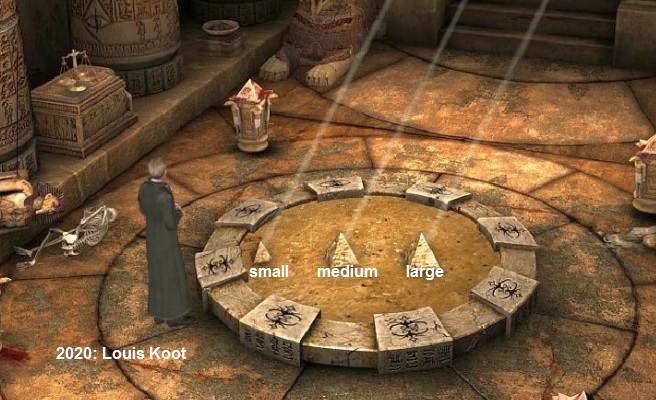
When you have found the 3 correct pyramids in this way, Van Helsing says again .... "There .... Perfect ..." and you automatically leave the puzzle. In your "Items" you only have the 3 correct Pyramids. The other 5 pyramids are gone. In "Items" you then have a Large Pyramid, a Medium Pyramid and a Small Pyramid. Select these 3 pyramids one by one and then place them in the round sandbox, which used to be the "Whirlpool".
Place the Great Pyramid on the right, the Medium Pyramid in the middle and the Small Pyramid on the left in the sandbox and .......
3 rays of sunlight shoot from above the entrance to the 3 pyramids and through this a secret door opens in the corner to the left of the Papyrus boat.
Read the 3rd line of the hieroglyphic riddle. This 3rd line read, "Before Enter Darkness Destroy Guard Curse Be On You Forever".
Walk down to the Papyrus boat and first view the secret entrance with your eye.
Van Helsing warns to be extremely careful. Now you can leave the room via the secret door.
So click with your feet in the secret passage and ..... oh well .... crocodiles ....
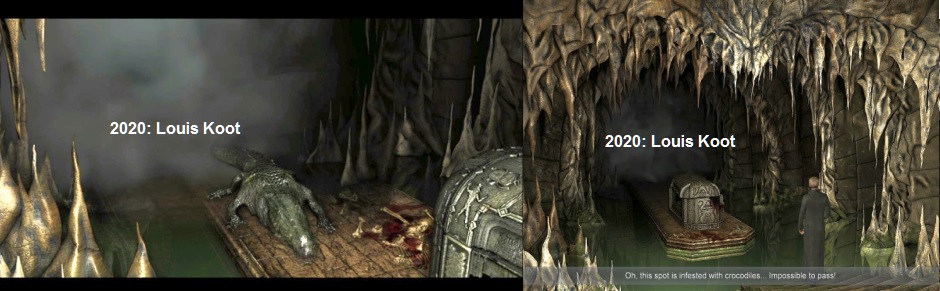
Van Helsing is then at the bottom of the stairs in a cave. There is water, so a large, dangerous crocodile swims in the water. On the path, across the street, is a large stone Tomb containing an "Undead". View that tomb and read about the "Undead" in "Documents". Close the screen and walk back up the stairs via the bottom right, back into the main hall. You are then back at the papyrus boat and the two large statues. The papyrus boat is on 2 struts. Click with your hand on one of the 2 struts. Van Helsing then says that if you can break the struts, the papyrus boat will fall off the stand.
Select the Axe and then click on the right strut under the boat. You ram both shelves out from under the boat, but the boat is still on the platform. Select the Piece of column and then click with the hand cursor on the right side of the platform to place the piece of pillar on the right under the boat. Select the Metal Bar, which you previously stole from the left statue, and click on the piece of pillar that is now on the right under the boat and you have a lever to lift the boat off the platform so that the boat.
So now click with your hand on the Metal Bar and ......

The boat thunders down the platform and ends up in the water of the cave. So go through the secret opening to the cave again and see ..... via the papyrus boat you can now cross to the path where the "Undead" tomb stands. Click with your hand on the papyrus boat and Van Helsing is then on the path.

The "undead" inhabitant of the coffin keeps peeking out, but don't worry about it. Click with your feet in the gray mist to continue behind the coffin. Now click with your hand cursor on the gray mist and ..... the mist is a "Supernatural Force Field" and Van Helsing cannot get through it.
Remember Line 3 of the hieroglyphic rhyme ..... the Guard must be eliminated ...... well this mist is that "Guard". In "Items", combine the Axe with the Black Sphinx to cut the Black Sphinx into two pieces. Then select the, now broken, Black Sphinx (Broken statue) and click again with the hand cursor on the gray mist and ..... the mist disappears.
Click with the feet in the big dark gate and ..... you end up in the:
Altar room:
Grab the 3 scrolls that are on the altar. The scrolls are written in a language unknown to Van Helsing. The ground starts to vibrate and shake ... things are about to collapse. Quickly .... click again with your feet in the gate and ... Van Helsing leaves the Blood Rocks and naturally you are back in:
Cairo
You are back at the camels of Mustapha. Turn left again, to Herodotus. Talk to Herodotus and this conversation will go by itself.
Herodotus tells about a Brother Alberto who can read the 3 language in which the 3 scrolls are written.
Brother Alberto resides in St. Carousel Abbey in Vienna. Van Helsing says goodbye to Herodotus and then tells him to visit Mustapha.
Walk back to the camel tent and see .... Mustapha is outside again. Talk to Mustapha.
Mustapha now gives Van Helsing a letter and Van Helsing now tells Mustapha a false story about his niece, because he does not dare to tell Mustapha the truth. Talk further through the options you get and Van Helsing will then give the gold powder and necklace to Mustapha. We end up, after the video in which Van Helsing reads the letter he received from Mustapha, in:
2020: Walkthrough by: Louis Koot