
2020: Walkthrough by: Louis Koot
If you have found this walkthrough via google search or via another site then you have probably not visited my site.
A lot more very detailed game walkthroughs can be found on my site at: www.pcgameswalkthroughs.nl
Chapter 3: The Thinking Scenario
I assume that you first have played the General Chapter 1 and then Chapter 2: the Sophia scenario.
So you will now how things works in this game. I'm not going to explain it all detail in this chapter anymore.
You will be playing this THINKING SCENARIO if you said "You're right, I better think this through alone" at the end of the General Chapter 1. Indy now continues alone, without Sophia. Sophia has given you the names of 2 people you have to visit and they are: Alain Trottier in Monte Carlo and Omar Al-Jabbar in Algiers. Both places are now on the map. First to travel to:
Monte Carlo: Alain Trottier:
Indy stands in front of the hotel where Alain Trottier has a room. Stand still. Indy doesn't know what that Alain Trottier looks like. Men and women always enter and leave the hotel. There is no point in talking to those passers-by. They don't tell you anything about Alain Trottier now. However, you also see a somewhat older man in a brown suit with a flower in the buttonhole of his brown jacket walking in and out of the hotel. Talk to this man and ask if he is Alain Trottier.

The man wants to know who he has in front of him, so say, "I'm Dr. Indiana Jones or Barnett College." The man has heard of Indy as being the famous archaeologist. Remain humble and answer: "Actually, I'm just a simple professor". The man now introduces himself as Alain Trottier. Ask further: "What can you tell me about Atlantis".
Trottier then asks Indy a question and you have to answer it correctly. The answer to Trottier's question can be found in Plato's Lost Dialogue. Trottier wants to know what Plato's biggest mistake was and the correct answer is "Translation". Trottier is delighted with this answer and is now giving Indy his Business Card. Trottier disappears. Click "Use" on the purple Taxi and travel to:
NB: The question Indy has to answer can be different in every game. But you can always find the answer in Plato's Lost Dialogue.
Algiers:
Indy has arrived on the market square of Algiers. A lot has changed compared to the Sophia scenario. Only the beggar and 2 passers-by are now present on the market square. Walk straight to the left and through the alley to the shop of Omar Al-Jabbar. You can also see that the greengrocer's is now closed. A guy in a white dress is in Omar's store. Talk to the man and ask if he is Omar Al-Jabbar.

So this is not Omar, but it is Omar's servant Paul. Ask: "Can you arrange a meeting with Mr. Al-Jabbar?". Paul doesn't feel like bothering his boss for a stranger. You can keep talking to Paul until you have a dry throat, but he simply refuses to go get his boss. So close the conversation again. Then give Alain Trottier's Business Card to Paul and ..... This does it..... Paul disappears now to see his boss and he says Indy has to wait here. Don't wait here, but follow Paul to the market square. As soon as Indy comes out of the alley you see Paul disappear in the bottom left. Follow Paul further, so also disappear at the bottom left and .... you are now on the map of Algiers.
The man with the Red fez:
|
Talk to the red Fez man and say, "Nice fez" and then "No, but that's quite a hat" and then "It's better than a sharp stick in the eye" and then "It's kind of festive" and "I am a little frustrated " and ..... Indy then gets the red Fez from the man. Say "Thanks a lot" Okay ... now that Indy has the red Fez, go back to Omar Al-Jabbar's shop at the back of the alley. Paul returns and says his boss is terribly sorry but he doesn't have time to talk to Indy now. Give the red Fez to Paul. Paul wants to know why you want to give him a red Fez. Now choose the correct answer so that Paul accepts Indy's red Fez. You can always give 1 answer. If that is the wrong answer, you have to give Paul the Fez again to try another answer. For me, "It makes you look taller" was the right answer. If Paul accept red Fez, he'll put it on his head right away. Talk to Paul again and ask him, "Could you go see Mr. Al-Jabbar again?" and .... Paul leaves again to see his boss. Follow Paul again. You see Paul disappearing again at the bottom left. So disappear also at the bottom left again and you will end up on the street map of Algiers again: Follow Paul through the streets of Algiers: You are back on the map. You will see a red square walking through the streets again. So that red square is now Paul wearing the red Fez. There is also and black square walking around. The black square is Indy. Follow the red square closely, so always click right behind the red square. But you shouldn't get too close to the red square. You have to make sure that Indy stays close to the red square. So that Indy is always on / in the same street as Paul. At some point Paul will enter a house and if Indy is close then Indy will say "The servant's ducking into that house". The house where Paul then entered is called "Omar's House".
Click on that house and ... Indy goes inside. |
Omar's House:
Indy overhears a conversation between Omar and his servant Paul and then enters. Omar sends Paul away to warn the police. Talk to Omar and just follow all the options. Omar will not cooperate. Behind Indy you see 2 pillars and behind those 2 pillars you see a separate room. That separate room is a closet. Walk into the Closet. Omar also walks into the closet.

Now click Close closet door quickly and .... Indy walks out of the closet and closes the door and Omar is now locked in his own closet and is now constantly cursing Indy. Look around Omar's house. On the far left are 2 small statues. One statue is a bird statue and the other statue is just a statue. Take the two statues. So take the bird and also take the other statue.
In a large pot there is a Pole. Grab the Pole. It is a bamboo stick. Omar's laundry hangs on a washing line. However, there is also a red cloth (hanging cloth) on the line. There is a map behind that red cloth. Use the Bamboo Stick on the red Cloth to get the Map from the line and ... Indy has the Map (folder). Look at Omar's map in inventory. There is a large X on the map. In the back you see a window. Through that window you see a Camel. Click "Use" on the camel and .... Indy mounts the camel and you end up on the map of the Desert:
Find the X in the desert:
Unlike in the Sophia scenario, you do not now fly over the desert by hot air balloon, but Indy gallops through the desert by camel. Go from screen to screen and visit the Nomads Camps. You start on the first screen. Top left is the city of Algiers where you come from. You can go down and to the right.
In the desert you can also see other camels hopping around. Those are desert police camels patrolling the desert. If Indy gets too close to such a desert police officer, he will be arrested and sent back to the home screen. However, you can try whether such a policeman is bribable. You can offer the policeman one of the 2 statues you stole from Omar and he will let you go. Sometimes this works, but sometimes it doesn't work. And you only have 2 statues, so you can try to bribe a policeman twice.

So go from screen to screen, try to avoid the police and visit the nomad camps. Then ask the nomads where the X is So address the nomad and then ask "What do you make of this map". The nomad then gives you directions in the form of the direction to take. For example, a nomad may say that the X is a short distance south and east. He means that you have to go further south-east from him. In one of the camps you will find the nomad who tells that Indy has come very close to the X. The Red X then appears on the screen.

Then gallop to the Red X and ... Indy is in the desert and says "Looks like I lost those guy's".

Now walk one screen to the left and you arrive at the:
Dig Site:
You largely follow the Sophia Scenario here.
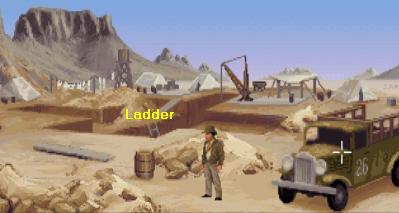
Just like in the Sophia scenario, Indy ends up in the dark excavation pit below. Search the dark screen for the Rubber Hose and then pick up the hose (Pick up long tubular thing). Then, slightly to the right, look down the screen for the Clay Pot and pick it up (Pick up Clay thing). In the Clay Pot Indy finds an Orichalcum Bead.
Climb back up the ladder and walk back to the truck. Above the rear wheel of the truck is the cap of the fuel tank (gas tank). Open the fuel tank. Use the rubber hose on the gasoline tank and then use the clay pot on the end of the rubber hose to fill the clay pot with gasoline. Indy automatically picks up the filled pot again. Take the Rubber Hose back from the petrol tank and close the cover of the petrol tank. Open the door of the truck, so the door with "26" on it. You will then see the red driver's seat.

There is a piece of paper on the chair. Take the piece of paper from the chair and .. The paper is a telegram in which Indy reads that Alain Trottier will be kidnapped by the Nazis. Open the hood of the truck and then look at the Spark plugs . Indy tells you there is a spark plug missing.
Go down the ladder again and find the place where you read "Walk to metal thing". Then click "Touch Metal Thing" and Indy will tell you that it is a generator. Right next to it you get the spot "Walk to little metal thing". Click "Touch little metal thing" and Indy tells you that it is the on / off button of the generator. Right above the generator spot will find the spot that reads "Metal Cap" Click "Touch metal cap" and Indy tells you that it is the cap of the gasoline tank of the generator. So click "Open" on the Metal Cap and this thing will be called "Gas Filler Pipe". Use the gasoline-filled Clay Pot on the Gas Filler Pipe to fill the generator with gasoline. Now find the power button again, so find the "Little metal thing" and then click "Use" to turn on the generator. You now have light

Behind the generator you see a wall painting on the wall. View that mural via "Look at". Indy walks over to it and then tells something about it. The painting shows 2 figures. There is a chest between the 2 figures. Between the outstretched hands of the 2 figures is a Disc (Round object). Click "Push" on that disk (Push painting or round object) and .... at the bottom of the wall a secret compartment will open. There is a statue in the secret compartment.

Pick up statue. It's the same kind of statue that Kerner stole in Chapter 1 of Indy. Behind the generator is the skeleton of a ship. Take the right back Ship Rib from the ship's skeleton. Walk to the right and use the Ship Rib on the Crumbling Wall to uncover the mural. Take a look at that mural (look at mural) but .... Unfortunately ... If it was a map of Atlantis, it is now illegible. Open the side of the generator and then try to take out the Spark plug. Indy says he has to switch off the generator first, so click "Push" on the on / off button. It is then dark again. Find the spot called "Ceramic thing" and then click "Pick up Ceramic Thing" to get a spark plug from the generator.
Climb up the ladder and walk back to the truck. Place the spark plug under the hood.. Close the hood and then click Use truck. Unfortunately ... the truck will not start yet because the battery is empty. Open the hood again. In inventory, combine the Orichalcum Bead with the Statue. Then use the statue on the Spark plugs and ... Indy "sparks" with the figurine's horns on the spark plugs and the engine starts. Close the hood again and click "Use" on the truck again and .... now travel back to:
Monte Carlo:
Indy wants to warn Alain Trottier that he will be kidnapped. Wait until you see Alain Trottier again. Then click "Talk to" on Alain Trottier to talk to him again. First ask Trottier, "Are you here to see Madame Sophia?". Trottier says he wants to talk to Sophia about his new theory regarding the location of Atlantis. Continue with "What theory? I'd love to here it." But Trottier refuses to discuss this further and disappears. Wait patiently until Trottier reappears and then speak to him again and tell him now "Monsieur Trottier, you're in trouble" and ......
Indy reads to Trottier the telegram stating that Trottier should be kidnapped.
Trottier doesn't believe it, but then 2 Nazis turn up and drag Trottier into a car. Indy gets in the yellow car to chase the Nazis

Chase the Red Car:

You are now on the map of Monte Carlo. The red car is the Nazi car that Trottier is in. The yellow car is Indy. The idea now is to hit the red car a few times with the yellow car to eventually crash both cars. So you have to chase the red car and then collide with it. Keep clicking in quick succession in front of Indy's car. Make sure you bump into the red car about 3 or 4 times. After 3 or 4 times both cars crash. The 2 Nazis run away and Trottier then lies on the floor.

Walk to Trottier and talk to him again and ask, "Excuse me. Are you hurt?". Trottier then stands up and says that he has nothing wrong. Say "Yes I did, and I saved your life". Trottier is grateful to Indy and wants to help Indy now. You now have the option to ask Trottier about his Stone Key, so say, "I'd like your stone key."
Trottier, however, has something much better for Indy, which is the location of the entrance to Atlantis. Say "Go on" and Trottier will tell you that the entrance to Atlantis can be found on the island of Thera, south of Greece. Say "Really" or "Amazing" and Trottier would like to know if you have read about the Lesser Colony in Plato's Lost Dialogue. Say "Of course" and Trottier then says that he is convinced that There is such a Lesser Colony of Atlantis and that you can enter the real Atlantis from there. Trottier would like to give Indy his Sun stone but he no longer has that Sun stone. Ask: "WHAT? Where'd it go".
Trottier threw the Sun stone out of the red car window during the chase to prevent the Nazis from getting their hands on the Sunstone. Say, "That was pretty fast thinking" and then "Where did you throw it?" and .... Trottier then mentions the corner of 2 streets where he threw the Sun stone out of the car. Indy asks if Trottier wants to repeat it and Trottier then writes the street name on the telegram. Trottier then disappears.
NB: The street name that Trottier mentions here is different every game. For me this was the "Boulevard Napoleon and Rue Framboise".
Find the World Stone
There is a sign pole behind the 2 car wrecks and there is a street sign on the pole. Check out the street sign and Indy will tell you where you are now. To the left and right of the street name pole you see a sewer pit. Check out those sewer pit. Ok now you have to look for the corner of the 2 streets that Trottier has just mentioned. Walk a screen to the left, or to the right, to return to the street map.
Now always click on the corners of the streets. Indy then walks to the corner where you clicked. You will always see a pole with a street sign on it. Always look at the street sign and Indy will then read the street names. Keep doing this until you find the right street corner. You will always find sewage pits on the street corners. Always look at those sewage pits. If you have found the right street corner, Indy sees something in one of the sewer pits. Then open this drain and ... Indy will have found the Sun stone. When you have found the Sunstone, make sure that you get back on the street map. Then click on the hotel, which is the high building that the blue car is in front of, and Indy ends up in front of the hotel again. Click "Use" on the taxi and then travel to:
Thera:

Indy has arrived on the island of Thera and is standing on the jetty of the harbor. A man in a gray suit walks around in the foreground. That man is the harbor master. On the left is a house and a fishing net is attached to that house. Walk to the left to the house where the fishing net is attached. The house appears to be a shop.

There is a very large basket in front of the house. Grab the hanging fishing net. Try to get that big basket, but the harbor master says to keep your hands off it. The harbor master is also the owner of the shop and therefore also the owner of the basket. Ask "What do you want for the basket?". The man says that an archaeological excavation is taking place in the mountains and that he would like to have a souvenir of it.

Continue to the left. Behind the store you will see another house. The path goes up into the mountains along that last house. Go up the path and ... Indy ends up in the valley. In the background you can see the mountains. There are 3 paths through the mountains. You have to find those 3 paths with your cursor. The paths are called "Gap", "Notch" and "Cleft".

2 of these 3 paths are dead ends but the 3rd path brings Indy to a cave. It is different in every game which of the 3 paths brings Indy to the cave. So you will have to try all 3 paths. I had to take the "Cleft" path . So the path takes you to a cave. The cave is on the left. On the right you see steam coming from an opening in the mountain. There is a chest in front of the cave entrance. The lid of the chest is open. Close the chest, so click "close" on the chest and .... a white invoice is attached to the lid of the box. View the invoice.

It is an invoice for an observation hot air balloon. Take the Invoice.
Now enter the cave and then further left through the opening. Indy lands on the 2nd cave screen and .... you experience an earthquake. The entrance to the cave has now collapsed and Indy can no longer exit the cave through the entrance. There are some chests on the floor. A Shovel (Entrencing tool) lies against the left chest. Take the Shovel.

There is a cupboard in the wall. The cupboard door is open. Close the cupboard door and ... on the right side of the door a niche opens and in the niche you will see a Peg.

Place the Sun stone on the Peg. Read in Plato's Lost Dialogue which of the 4 symbols on the Sun stone you should place under the Tall Horns. Then click "Use" on the Sun stone and then turn the appropriate symbol under the Tall Horns. Then click on the Spindle. I had to put the Setting Sun under the Tall Horns.

You will hear "Click". Write down which symbol you had to put under the Tall Horns. Leave the Sun stone on the spindle and open the door again.
In the wall, behind the door, you now see a plaque (carved sign). View (look at) the plaque. Indy says nothing. Take the plaque.

Now close the door again to open the compartment where the Sun stone is still in. Take the Sun stone out of niche now. Walk through the right gate back to the 1st cave screen and ... Well ... the entrance to the cave is completely blocked by a mountain of earth. In inventory, click "Open" on the Shovel to expand the Shovel. A note from Sophia comes out of the shovel. Sophia writes that she was kidnapped by the Nazis.

Use the shovel on the mountain of sand and .... Indy starts to shovel the sand out of the cave and .....
While Indy is shoveling we see Kerner, Sophia and that crazy German professor on the jetty.

Kerner and the professor then take Sophia to a submarine. Kerner and that professor need a living Sophia in Atlantis. Indy has finally dug himself out. So walk back to the harbor, so first a screen up and then a screen to the right, via bottom right. Back at the store, walk to the right to the jetty. Give the Invoice to the harbor master and then say "I'd like to claim my balloon". Indy is now the rightful owner of an observation hot-air balloon, but he still has to find and assemble that thing himself. There is a crate next to Indy. Open that crate and ... there is a nice yellow hot air balloon in the crate. Take the hot air balloon.

Give the plaque (carved sign) to the harbor master and ask "Would you accept this ancient sign for the basket?" and ..... The harbor master reads the text on the plaque and now Indy knows that Kerner is on the way to Crete with the submarine. Indy may now also have the big basket. So walk back to the store and grab the big basket now.
In inventory, combine the fishing net with the balloon and then the balloon with the basket. Now the balloon has yet to be inflated. Well ... didn't you see steam coming from a crack in the mountain at the cave. So go back to the cave. Back at the cave, combine the green rubber hose with the balloon. Then use the balloon on the steam slit (use deflated balloon rig with hose with vent) and ... the balloon is filled with hot air.

Save your Game now because you have to go fly the balloon to find the submarine. Use the balloon and ....
Indy gets into the basket and the balloon takes off and automatically drifts to the right and ends up above the open sea.
Ballooning: Find the Submarine:
This balloon flight works in exactly the same way as in the Sophia scenario. The only difference is that you are now floating above the open sea. So I'm not going to explain this here again. You can move screens down, left, right or up again. So you are looking for the submarine and if you have found it, you must land with the balloon right next to the submarine. Good luck with it.

So you do not land on the submarine but close to it in the water.

Indy then automatically climbs out of the water onto the deck of the submarine and knocks the sailor, who is on the deck, unconscious.
Indy then puts on the sailor's clothes.
Submarine
Walk up the ladder to the cannon and then open the hatch above the fish. Descend via the white ladder to the lower deck.

There is a guard on the left. On the right you see a clothesline with laundry hanging on it.

Walk to the right to the clothesline. One deck below you see Kerner, Sophia and the mad professor engaged in a heated conversation.

Continue to the right to the Torpedo compartment. A red oil cloth hangs from the rear of the lower torpedo. Grab the red Oil cloth.

Walk all the way back to the left and then past the guard to the galley. In the galley, take the Bread (Indy also cuts 2 slices of bread) and the Cold Meat (Cold cuts).

In inventory, combine the slices of meat with the 2 slices of bread into a sandwich.
Continue to the left and talk to the sailor in the next compartment. Ask the sailor "What are you working on, chief?". The sailor explains that an idiot has exposed the wires from the torpedo tube in the stern and that this can cause a fire. Walk to the left. You end up in the rear compartment and here hangs the "Heidi" torpedo. On the far left you see 2 round meters. Just before those 2 round meters you see a few black wires sticking out. Under those black wires you see 2 orange buttons (control panel) and in front of those 2 orange buttons is the launching lever. On the right is a hatch in the floor. View all this via "look at".

Then walk all the way to the right again, to the compartment where the soldier is waiting and where there is also the ladder to the tower. To the left of the soldier is a kind of desk and at the bottom of that desk you see the doors of 2 lockers. If you try to open those 2 lockers, the soldier intervenes.

Talk to the soldier and ask "What are you doing here, soldier?". The soldier says that he is standing here to guard a stone on behalf of Kerner. The soldier has been waiting here for hours for his replacement. Talk to the soldier again and say "I'm here to relieve you, soldier". The soldier is hungry but only takes orders from Kerner. Stay next to the soldier and click "Use" on the sandwich in inventory, and ... Indy takes a bite out of the sandwich. The soldier doesn't find this very polite of Indy.

Indy asks why the soldier doesn't go to the galley to make a sandwich for himself. After some hesitating the soldier then disappears to the galley. Quickly now ... now that the soldier is gone, take your chance. Open the door of the lockers and then grab the Moon stone from the left locker and then take the Torpedo instructions

Walk to the right, to the compartment where the laundry is hanging and ..... the submarine changes course and sails to Crete (Knossos).
The submarine moors at the jetty and we see the professor and Kerner arguing about the lost Moon stone.

The professor, Kerner and Sophia then leave the submarine. Indy is now in the submarine tower. Above Indy, a heavily armed soldier stands guard on the tower, so Indy can't just leave the submarine. Go down a deck via the ladder and then go all the way to the left, to the rear compartment, so to the "Heidi" torpedo.
Use the red Oil cloth on the black wires. Indy puts the red cloth over the black wires. Use the Torpedo instructions on the control panel (the 2 orange buttons) and Indy will say the torpedo is ready to fire. Open the hatch in the floor to the right behind Indy. Then click "Pull" on the large Launch Lever and ..... Indy now starts a fire and quickly climbs down the floor hatch. All sailors now run to the "Heidi" compartment to put out the fire, while Indy walks to the right. Indy has then ended up below the galley. Open the hatch here and then climb through the hatch into the galley.

Then walk to the right to the compartment where the clothesline hangs. On the left is a cupboard. Now grab the Clothesline.

Then open the closet door, in the corner to the left of the beds. Stand in the closet and close the door again.
Then, in inventory, click "Use" on Indy's Hat and Whip (Use Indywear by Lucasfilm) and ...

Indy changes into his own familiar clothes again. Open the closet door again and walk all the way to the right, to the torpedo room where you got the red cloth. Continue all the way to the end. On the torpedo launchers you will also see 2 orange buttons and this is also the control panel. The launch lever is also on the floor here.
Use the Torpedo manual on the 2 orange buttons to prepare a torpedo for fire. The green light on the control panel then lights up.
Use the Clothesline on the Launch Handle. Open the lower right launch tube. Then crawl into the opened launch tube and .....

When Indy is in the launch tube click "Pull" on the yellow Clothesline and .... Indy shoots himself out of the submarine and he ends up on the jetty.
Crete:
Just like in the Sophia scenario, you see, on the far right, the stone pillar on which you have to place the Sun stone and the Moon stone. So walk over there. Then place the Sun stone and then the Moon stone on the Spindle. Zoom in on it and place the 2 correct symbols below the Tall Horns. and click on the Spindle. If you do this correctly, the Secret door will now open in the wall. Write down which 2 symbols you had to put under the Tall Horns and take back the Sun stone and Moon stone from the Spindle. So for me the two symbols were the Setting Sun and the Full Moon. Then enter through the opened secret door into the Cave Maze:
Cave maze:
Well ..... if you have played the Sophia scenario then this is known territory. This is about the same as in the Sophia scenario.
I am not going to make new pictures for this now. Just look at the places in the Sophia Scenario walkthrough for the right route through this maze.
Also now you end up in the first cave where the 3 Heads are on the shelf. Now also take 2 heads from the shelf. So leave the right head on the shelf. Then walk through Gate A to the next hall. You are in the hall where gates B, A, C and D are. You came through gate A. Use the Whip, through gate A, on the head, that you left standing on the shelf, to get that 3rd head as well. Indy automatically picks up the head and Gate A is then closed.
At the top of the stairs go through Gate C and then left through Gate F. You will enter the hall with Gates F, I and J. Place the 3 Stone Heads on the shelf at Gate J to open Gate J. Do not walk through the now opened Gate J but walk back up the steps and then through Gate I. You will end up in the Minotaur Room.
Stand in front of the Minotaur on the lift platform and use the whip on the Head of the Minotaur and .... The head also falls on the lift platform. Put Indy back on the lift platform and the combined weight of Indy and the head will lower the platform. So Indy ends up at Sternhart's corpse.
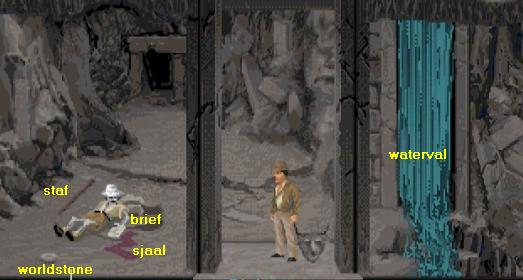
Grab the World stone in front of the corpse and grab the Staff next to the corpse. The lift platform has then gone up again. Sternhart has a letter in his right hand and there is a wool scarf on the floor in front of the right hand. View the Letter with "Look at". Indy reads the note. In the note, Indy reads that the presence of Orichalcum can be detected by static electricity. Grab the Wool Scarf. A rubber comb comes out of the scarf.
On the right is the waterfall. View the waterfall via "Look at". Indy finds the chain on which the weight of the lift hangs. So click "Use chain" and ... Indy climbs up through the chain, back to the Minotaur room. Walk, via the stairs under the Minotaur, to the left Gate I and then disappear again through Gate I. You end up in the hall with Gate J. Now follow the route, from the Sophia scenario, to the upper elevator shaft room, where the Golden Chest is.

Across the gap is the Golden Chest. Use the Staff on the Brake Chock here to release the counterweight of the lift. Now follow the route back (see Sophia scenario) to the lower elevator shaft room, ie the room where the Big Head is. Put the Staff in the mouth of the head and ...

Also now Indy goes up with the lift platform back to the upper Elevator shaft room.

Take the Golden Chest. There are 2 Orichalcum Beads under the chest so Indy also picks up those 2 Beads.
Disappear through the gate behind Indy and you will end up at the Excavator. View the excavator. A hatch is open on the back of the thing.

In your inventory, combine an Orichalcum Bead with the statue you found in the Dig of Algiers. The statue becomes hot.
Use the hot statue on the open hatch of the excavator and ... the excavator will start moving and digging its way through the wall.

So follow the excavator through the hole and you end up in the room where the Miniature Atlantis is:
Miniature Atlantis:

Well ... in the middle is the Spindle. Place the Sun stone, Moon stone and World stone on the Spindle.
Then zoom in and put the right symbol on position 3, under the Tall Horns, on all 3 discs, just like you did in the Sophia scenario.

Then click on the Spindle and .... the robot turns around on the rails again and 1 of the 3 doors opens. Take the Sun stone, Moon stone and World stone from the Spindle again and go through the open door. Indy ends up in a room with a waterfall. Now is the time to try out Sternhart's theory.
You read on the note from Sternhart that you can find Orichalcum with static electricity. In inventory you open the Golden Chest. Then put all the Orichalcum beads you have in the gold chest and close it again. Combine the clothesline with the rubber comb. You then have a comb on a rope. Then use the wool scarf on the comb and ... the comb is then statically charged. Then click "Use" on the comb and ... Indy now uses the comb just like the Fish in the Sophia scenario. The comb then points to the right gate.

So go through the right gate. Indy then ends up on a ledge with a deep gorge on either side. There are some bones on the floor.

Use the wool scarf again on the comb and then use (use) the statically charged comb again and ..... the comb points to the bones on the ground. Look at the bones and Indy will pick up a few Orichalcum Beads. Walk back to the previous room, so to the waterfall. Use the scarf on the comb again and then use the comb again and .... the static comb now points to the wall, to the left of the waterfall,

Use the Ship Rib on that wall and ... Indy digs out a closed gate.

Open the gate and walk through and .... Indy ends up at the underground Metro cart. In front of Indy's feet is an Orichalcum Bead. Pick up the Bead.

The Mouth is located in front of the metro cart. Open the Golden Chest to take out the Orichalcum beads. Then use 1 of your Beads in the Mouth of the metro cart and ..... the cart gets activated and Indy quickly takes a seat in the cart and ..... ends up in the AIRLOCK room of ATLANTIS,

Ok .... this was it. From here you follow CHAPTER 4: Atlantis and Endgame. I no longer do the Fighting Scenario because I have had enough of that fighting scenario. If you also want to do the Fighting Scenario then you have to this all by yourself, without my help.
Chapter 4: Atlantis and End Game.
2020: English Walkthrough by: Louis Koot


