
2013:Original
Dutch Walkthrough by: Louis Koot
2018:This English translation by: Dick Leeuw
Screenshots and lay-out by: Louis Koot
If you have found this walkthrough via google search or via another site then you have probably not visited my site.
A lot more very detailed game walkthroughs can be found on my site at: www.pcgameswalkthroughs.nl
Chapter 1: Tomahna:
A: Through the Gorge:
Atrus and Catherine have sent their young daughter Yeesha to pick you up to escort you to the office of Atrus.
Together with Yeesha you make a gondola flight
through the gorge. Enjoy it, because these are your last quiet moments.

Yeesha
likes to chat and she sees your beautiful new camera, that you have with you and
she asks if you do not want to try it out. Yeesha knows a nice place to take a
picture. Just before the gondola reaches the landing platform of the office
Yeesha stops the gondola to give you the opportunity to take your photo.

Yeesha
talks to you a bit more and then you turn around and you see the Office hanging
against the big stone arch, above the waterfall.
You
can now take a picture. At the bottom left of the game screen is your photo
camera and your journal. If you have switched on the Zip mode in the game
options, you will now also see the Zip Compass, at the bottom right of the game
screen. In order to activate your photo camera, you now have to
"freeze" the screen. You do this by holding your right mouse button
for a few seconds. The camera, the Log and the Zip Compass are then more visible
and you can now move your hand up or down without the screen moving.
Click
with your Hand on the photo camera. Your screen is then the lens of the photo
camera. You are now looking through the camera lens.
Make
sure you have the Workroom in the middle of the lens and then click with your
left mouse button to take your 1st photo.

After
you have taken the picture, Yeesha will start the gondola again to take the last
part through the gorge.

The
gondola then arrives at the landing platform of the Work Room. Yeesha gets out
and she calls out that she will tell her father that you have arrived.
Yeesha
then pulls a lever through which the "Iris door" of the Workroom opens
and Yeesha runs inside.

Then
you also step out of the gondola and you stand next to that lever with which Yeesha
opened the "Iris door". Turn clockwise until you see the lever with
which Yeesha has opened the "Iris door". Place your hand on the
handle. Your hand will then become a "grab hand". Click and hold down
your left mouse button and then pull the lever towards you.

The
"Iris door" opens again. Place your hand cursor in the middle of the
opened "Iris door" and your cursor becomes the "pointing
finger".
Advance
one time through the now opened door and you are inside the:
B:
Work room of Atrus:
Turn
right. You see a thick black ball thing and electric flashes come out of that
thing. You can also see the cupboards and desks of Atrus. Go up the stairs 1
time and then turn clockwise. On the round beginning of the front desk furniture
is a device. It is a planetarium and there is a handle on this thing.

Grab
the handle and then pull the handle to the right and ........ you see the
planets spinning around for a moment. There are 3 drawers under the planetarium.
Pull open the top drawer. You do this by placing your hand on the button of the
drawer, then holding down your left mouse button and then pulling the drawer
towards you. Then place your hand cursor in the opened drawer. As if by magic, a
magnifying glass appears in your hand. This is your ZOOM IN lens.

There
are some items in the drawer, but you cannot do anything with them. Click with
your right mouse button to zoom out of the drawer. Close the drawer.
Look
at normal height again and turn to the left. Go forward 1 time and then turn
right. You are now standing in front of the middle desk.

Left on this desk is a small box. It seems like there are 12 small drawers in that little cabinet, but that is not the case.
Those drawers are fake because it is
the door of the cupboard. Open the cabinet door. You do this by opening the door
with your grip on the right side of the door.

Zoom in on the box. You cannot take any of the bottles out of the cupboard, so zoom out again with a click of your right mouse button. Close the door again. There are 7 drawers in the desk. Left 3, right 3 and in the middle 1. Open the drawer in the middle and zoom in on the contents. There are sheets of paper and pencils in the drawer. Again you cannot do anything with it, so just zoom out and close the drawer. Then open the top left drawer and zoom in again. In this drawer is a tray containing 7 colored crystals. You cannot pick one up.

Zoom out again and
close the drawer.

Atrus
tells about his sons Sirrus and Achenar, whom he banished 20 years ago to their
own prison worlds to pay for their deeds. Catherine, Atrus's wife, is of the
opinion that both their sons repent for their deeds and that they can therefore
be set free again. Atrus, however, doubts the sincerity of their repentance. He
says that you are the only one he can trust to give a truly objective opinion on
this. Atrus wants you to visit his two sons in the two prison worlds, Haven and
Spire. Before he sends you to these two worlds, he wants to give you a glimpse
into these worlds through his old Crystal Viewer that he has modernized. There
is, however, a problem with that thing. The crystal viewer first has to be
calibrated and you can help with that. Atrus assigns you the control panel of
the crystal viewer and he himself stands at the crystal viewer. You
automatically turn around and then stand in front of that large control panel of
the Crystal Viewer.
Calibrating the crystal viewer:

Zoom
in on the large control panel. You see two screens. Under the left screen is a
large slide that you can slide to the left and right. Under the slider you see 3
knobs that you can turn left or right. By sliding the large slider to the left
or to the right you always select another signal that appears as a line in the
left screen. With the 3 knobs you then set the correct Amplitude, the Frequency
and the Phase. The Left button is for the Amplitude, the Centre button is for
the Frequency and the Right button is for the Phase.

Listen
to Atrus. He first give you the Signal for HAVEN. A Yellow Line and a Blue
Line appears in the right screen. The intention is that the Blue Line exactly
coincides with the Yellow Line. So this has to happen twice. First to correctly
calibrate the coordinates for Haven and then to calibrate the coordinates for
Spire correctly. The first part is not difficult. Just do what Atrus tells you.
If Atrus tells you that you have to choose another SIGNAL then you move the
Slider to the left or to the right.
|
Part 1: The Coordinates for HAVEN:
The
coordinates for HAVEN are fixed by Atrus. Now the coordinates for Spire have to
be chosen and this is going to be a lot harder. Part 2: The Coordinates for SPIRE: Save
your game before you begin with this second part of the puzzle. I
cannot help you here. You must now listen carefully to Atrus and do what he
says. It is a matter of a lot of patience and you have to be very precise as you
turn, with small jerks,
the 3 turn buttons to the right or to the left. Every
time Atrus tells you to choose an OTHER SIGNAL, slide the Slider left or right
and then follow his instructions. Again
you have to drop the Blue Line exactly on the Yellow Line in the right-hand
screen. Atrus will tell you again that you have done well. It
may very well be that if you need too much time, you will not hear Atrus give
his instructions anymore. When this happens then
exit and load your last save game to start this second part again. Ultimately,
this should also succeed |
NB:
Are you unable to calibrate the crystal viewer? No worries .... it is not bad
because you can still continue with the game. The difference between succeeding
and not succeeding is that Atrus becomes somewhat grumpy if you do not succeed.
Furthermore, it has no consequences for your game. If you zoom out of the
control panel before you have the coordinates for Haven and Spire well and Atrus
has told you this, then the game goes on but then Atrus gets pretty pissed.
Immediately you see the video in which the Crystal Viewer breaks down. However,
you can continue with the game
Once
you have completed the calibration process correctly you will see a happy Atrus.
But his joy is only short-lived. Now everything goes wrong with the
Crystal Viewer.

There
are a few explosions and Atrus says that he will have to go to Rime to fix it.
But first he has to go to the Gorge to pick up some tools. He asks you to go to
the Water Wheel Control Room in the meantime to restore the power supply. Then
you can contact Atrus in Rime via the Crystal Viewer. The Crystal Viewer Code
for Rime can be found in the journal of Atrus hat
is on his desk here. Atrus then walks away, but before he really goes away he
tells you that the antenna, which is on the roof must first be extended. Also he
asks you to keep an eye on Yeesha. And Atrus is gone.
C: Restore the power supply:
Damn
... It's always the same with that Atrus. From the moment, 20 years ago, that you accidentally end up in Myst, you've always
had to go out off your way to clean up the mess
of Atrus. Nothing nice to enjoy your old age here in beautiful Tomahna, no warm
welcome with coffee and cake or a nice glass of wine. No... Atrus is in
trouble again and you are supposed to fix it again. Well, you have little choice, so
be it again.
You
look in the direction in which Atrus is gone. Turn to the left. You see the round
end of the desk and the wall of cabinets. This round end is to the right of the
cupboard where the calibration panel of the crystal viewer is located. There is
a device on it and there are 3 drawers in it. Open the top drawer. There is a
thick book in this drawer.

Zoom in on the book in this tray. The book comes life-sized in your screen. This is....
The
journal of Atrus:
Open the book by placing your hand cursor at the bottom right of the cover and then pulling it to the left.
In this way you can also browse through the pages. There
are 20 pages of text that you can read.

97.9.15:
It always amazes me how good it feels to return home after a trip. During the
day the air vibrates over the rocks, a comfortable warmth surrounds me. At night
a light breeze wrinkles the lake and often I hear Catherine singing for Yeesha.
The sound of their voices fills me with joy. And I wonder why I ever left. Maybe
that's what catches me up tonight, considering how long I've been alone in Rime.
That trip had to be done. It was weeks since I had seen the prison Times of
Sirrus and Achenar, and I wanted to know for sure if they were safe. The crystal
viewer did not show much, so I decided to improve it. I am sure that I could get
a clearer picture if I adjust the device myself. I still have to tell Catherine
about these plans. I do not want to make her happy with a dead sparrow.
97.9.22:
After a much too short visit to my family I am back in Rime for the first tests.
The freezing cold in this Time is essential for the functioning of the crystals,
but it is much harder to work in this cold. Perhaps I can simulate extreme
temperatures inside the viewer myself, so that I can install it in Tomahna when
it's done. You will see a sketch of the Crystal viewer on page 4. Take a photo of
it with your photo camera. When you have taken the photo, click with your right
mouse button to return to the Journal and continue reading the other pages.
97.101:
No experiments this evening, but a little time for myself: have looked at the
lights in the sky of Rime. They are as beautiful as when I saw them for the
first time. I could not enjoy it, because it reminded me of Sirrus and Achenar
and the months we spent here to build the towers. And so a beautiful memory was
sullied by regret. I think I never will find out why my sons are so greedy. I
only know that when they watched the Times in my library - fantastic worlds that
you can travel to by touching the page in the Book - they only saw power and
wealth. They came up with a plan. A snood plan. When I did not pay attention
they went to my Times, robbed them empty and destroyed them. I know that Sirrus
and Achenar must pay for these crimes, but I do not like it that they are being
stuck in the two uninhabited Times I wrote for my library thieves. I hope so
that one day my sons will be able to turn for the better.
97.10.27:
After having tested a number of liquid gases, I found a pressure variable with
which the crystal viewer can work in Tomahna. Tomorrow I am going to Releeshan to hire help from the Mechanics guild.
98.110:
Catherine said very little when I showed her the new drawings. She thinks the
viewer does it, but she just wants to visit our sons. I want too, but until I am
convinced that they have remorse, I want to prevent them from escaping.
98.4.7:
I was convinced that the evaporators would do it and I got a blurry picture of
Spits in the empty book of the new viewer. But I need a better fault eliminator
to stabilize the image. Guild master Andritus proposed placing several geodes
under the roof of the Observatory and aiming them with the help of an antenna.
As a result, the frequency is sufficiently amplified so that the crystal viewer
does it.
98.6.29:
Success! Not only was I able to see Spits and Haven clearly, but also my
laboratory at Rime. The crystal code for Rime was equally difficult, because I
have not used it that often. I have to make a overview of all codes soon, but
for now I keep Rime's code on hand. At the bottom of this page you will now see 5
colored crystals.

This is the Crystal Code for Rime. The crystals are in the order: Red, Light Blue, Yellow, Light Green, Dark Blue.
Take a picture of this
page and save this picture in your log.
98.10.9:
I always knew that my sons had a lot to offer. But today I saw something
amazing. Sirrus uses electricity! At least, that's what I think. For I saw in
the spotlight something that I have never seen in this Time. Must be made by
human hands! Interference blurred the image before I could view the device
properly. But that it is proven that at least one of my sons makes something of
his situation. And not in self-pity.
98.10.15;
That interference surprised me. Has often disturbed the viewing of the Times. At
first I thought it was a problem with the geodes, but now I suspect that it is
subsoon. I think the roof antenna picks up wave fluctuations from one or more
Times. If so, I may be able to use the fluctuations to listen to what happens in
a Time. I must think about that very hard.
99.4.26:
It has been two exciting weeks. Catherine, Yeesha and I have just returned from
Releeshan where I spoke to several Guild Masters for a long time. I am now
convinced that the shape and color of a crystal give it its own resonance
signature. By combining the resonance's of 5 crystals, I can detect a global
emission pattern - a kind of auditory signature - that is unique to the viewed
Era. Guild master Andritus helps me with the construction drawings for a filter
panel with which the antenna can be aimed at specific wave fluctuations. I can
now hear what happens in a Time! (Drawing) Tomorrow I start on the panel. I
decided to use Rime as the default, because in that Age I could make a crystal
viewer for the first time.]
99.7.21:
The panel is ready. I am too tired to test it now.
10.0.1.2:
Catherine tried to hide it, but what we heard from Achenar Prison-time made her
cry. I reassured her that it is safe, and told her about the structures I have
seen that show that he is adapting to the environment. I managed to convince
her, but she wants actual proof. I am afraid that she will take action sometime.
I must confess that I too want more information than what the viewer shows.
Tomorrow I'm going to Rime. I am thinking of an adjustment, a kind of
"moving eye" with which I can change the viewpoint of the crystal
viewer. If that works, I can finally see if my sons have come to repentance.
This
was the last readable page. Click with your right mouse button to close the book
and put it back in the drawer. Close the drawer
Turn
to the left and go forward one time to the broken and still smoking Crystal
viewer.

Then
turn to the right. Go ahead to the large round window and look out the window
for a moment to enjoy the beautiful view of Tomahna.
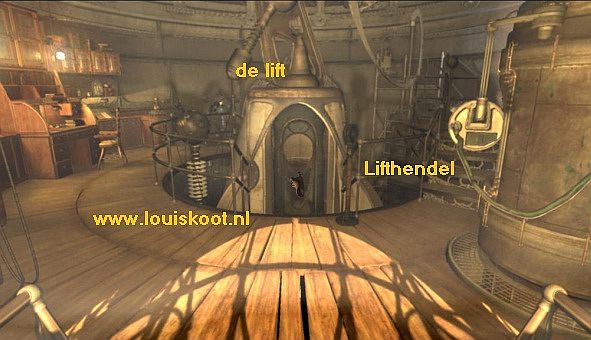
The Lift, the Greenhouses and the
Waterwheel:
Go
forward 1 time. You are standing in front of the stairs that go down to the
elevator. The door of the elevator is closed, so you cannot enter the elevator.
Turn
slightly to the right. Place your hand on the round top of the pole and pull the
handle down. The elevator door opens.

Go
forward quickly into the elevator. If
you wait too long then the door of the elevator closes again. Then pull the
lever down again to open the lift door again. In the elevator, turn clockwise
until you see the Lift Lever. The lift lever is now at the top of the three
buttons. Apparently there are 3 levels and you are now on the upper level. Pull
the lever down to the middle button and .......

.....
the lift lowers and stops 1 floor lower at the middle level. Turn clockwise.

The
elevator door opens and you automatically end up outside the elevator. Turn
clockwise and follow the wooden walkway 2 times ahead. You end up in the round greenhouse.

Because
of a large wooden bucket you cannot go right through the greenhouse, so turn
left and then go left through the greenhouse.
You
do this by first going forward one time, then turning slightly to the right and
then going forward again to the exit of the greenhouse.

You
automatically turn to the left and you see Yeesha appear, in the rear entrance of
the greenhouse.
"Hey ..... come here! You have to see this", Yeesha
calls to you.

So
go 2 times ahead and you end up in the rear of the greenhouse. You automatically turn
to Yeesha. Sssttttt ..... she does. There is a green animal on the railing. It
is a Gecko.

The
animal runs away after a few seconds. "Don’t matter” says Yeesha. I
will find the animal again later. Yeesha shows you her AMULET, which hangs on a
chain around her neck. Yeesha received this Amulet 2 weeks earlier in a place
called Serenia. Through the Amulet she can see things and places. Her father,
Atrus, did not believe her and said that the things in Serenia are not real. Her
brothers believe her.
Yeesha
then runs away. You cannot follow Yeesha, so turn left again and go 1 time
forward, follow the path through the greenhouse. Turn to the right and you will
see the exit of this greenhouse. Go forward and turn left. Through the exit you
see 2 wooden walkways. One path goes to the left and the other path goes to the
right

Go
out of the greenhouse 1 time in advance. You are then at the junction of the
paths. To the left, the path leads to the large building with a domed roof that
stands on a high rock in the middle of the lake. We do not go there. Follow the
path to the right one time. You are standing in front of the narrow entrance of
a kind of cave. The path goes down like a staircase. Go forward one more time
and you are in the:
Water wheel cave.
You
are standing in a round and open cave. In front of you is the large metal dam
where the large Waterwheel is located. The wheel is not in motion. In front of
you is a lever. If the water wheel would be in motion, it would provide the
power supply for Tomahna. Look at the lever. On top of the thick round part is a
button that you can press. You also see two orange illuminated symbols. If you
want you can take a picture of it with your camera. You can see the handle in
front of those two symbols. Now pull this lever towards you. Oh ... those two
orange symbols now go out.

Press
the button. Nothing happens......... The water wheel does not move. There is
no power. Turn around and go back 3 times on the path back to the
greenhouse. Go inside and turn right and walk 1 time ahead, then turn left and
go forward once again. Turn left and go forward 1 time
and then go out the greenhouse.

You
are back on the platform between both greenhouses. Turn left. You stand in front
of Catherine's Garden Room. Yeesha is in here. Go inside.

Yeesha
is a smart girl. So she knows that there is a problem. Daddy once again has
blown up the fuses. Yeesha says that, at the urging of her mother, Atrus has
installed an emergency generator here in the garden room and Yeesha shows you
this aggregate. She walks to a cupboard with a shutter that hangs in the garden
room.

But
... here too is something wrong.
Listen to what Yeesha tells about the lights. Yeesha closes the cupboard again
and then sits at the table looking at her beetles.
The Emergency generator:
Go forward to that shutter box. You automatically turn to Yeesha, who makes you aware of her beetles and then leaves the greenhouse.

Turn back to the roller
shutter box and zoom in on it. Pull up the roller shutter.

You
look in the box and see 6 columns with lights in the back wall. There are now
only lights in 2 of the columns and under these 2 columns you see a white
illuminated symbol that looks like the 2 orange symbols that you saw on the
handle at the water wheel. You also see 2 rows of push buttons. each row has 6
push buttons. The top row of 6 push buttons is to send power and the bottom row is
to receive power. Left in the cupboard is a lever. That is the Reset lever.
There is a button in the front right of the cupboard. That is the Enter button.

|
You
must now restore the power supply to the Waterwheel dam and you will do that by
pressing a key in the top row and a key in the bottom row of keys and confirm
this by clicking on that Enter key. Number of 12 push-buttons, from top left to
bottom right, as 1 to 12. Do the following: 1st series: Click on button 1. Click on button 10. Click on Enter. 2nd
series: Click on button 4. Click on button 11. Click on Enter. 3rd
series: Click on button 5. Click on button 9. Click on Enter. 4th
series: Click on button 1. Click on button 12. Click on Enter. 5th
series: Click on button 3. Click on button 12. Click on Enter. The
lights of Columns 3 and 4 light up and under these two columns the symbols that
you saw at the water wheel now light up and the roller shutter closes
automatically. Success. NB:
if the roller shutter does not close itself now, then you have done something
not correct. Then click on the Reset lever to reset the puzzle and try again. |
Good.
So back to the dam. I assume you know the route now. Back in the Dam Cave you
look again at the lever. The two symbols are now illuminated in white. Click on
the button on top of the thick round part and ...... the water wheel will turn
and a waterfall of water will pass through the dam.

The water wheel will turn faster and faster due to the power of the water and will provide the power supply for Tomahna again. Turn around and go back 1 time through the stairs, out of the cave. You see Yeesha coming out of the back greenhouse. She gently waves at you and then she walks to the right to the dome building.
Go forward one time and ....... O .... you .... O ... You ... That
Atrus indeed makes wonky things. Due to the heavy vibrations, caused by the rapidly
rotating water wheel, the path collapses under your feet and you fall into the
lake. You are underwater. Quickly, turn left until you see the remainder of the
wooden path. Place your cursor on the top of the hanging plank path and click.
You climb the water and then stand safely in front of the entrance of the rear
greenhouse.

It
has become dark by now. Turn around for a moment.

Well,
via the path you will no longer be able to reach the dam and the water wheel and
you can no longer use the path to the dome building where Yeesha has gone. Turn
around again and enter the greenhouse again. Now follow the route through the 2
greenhouses back to the Lift. Pull the lever, which is in front of the lift,
down to open the lift again and then step into the elevator.

In the elevator you turn clockwise again, to the elevator handle with the 3 lights. Slide the lift handle back up to the top of the 3 lights.
The lift goes up again
and stops at the top level again. Turn right and open the lift door by pulling
up the door handle. You automatically leave the elevator and then stand in the
Work Room, in front of the large round window with the crystal viewer to your
left.
D: Connect with Atrus in Rime:
Focus the Telescope Antenna:
Turn
to the left. To the left of the crystal viewer, that is to say between the lift
and the crystal viewer, the walkway goes up a few steps to a corner of the Work
Room where you have not yet been. You see a light on the wall there. Go 2 times
forward to get to that corner via those few steps. You will see three round
monitors in the wall.

Continue
forward to those three round monitors and zoom in on them for a moment. In each
of the three monitors you see a part of Tomahna. Under each monitor you see
levers and buttons but you cannot do anything with it. So zoom out again. Turn
to the left. You then look at the end of the walkway that you can reach via
three steps. So go 1 time ahead to get there. Then turn left.

He
.... a chair........ Do not sit in the chair. Look up. Above the chair hangs the large
telescope viewer. You see the back of the telescope. Watch the chair again and
turn anti-clockwise to see those 3 round monitors again. Go 1 times forwards to
those three monitors. You are then standing in front of a drawing. On the
drawing you see a sketch of the lake and the buildings around the lake. Place
your cursor at the bottom right or bottom left, on the drawing and then click
your left mouse button. Roll the drawing upwards and make sure the drawing
remains rolled up.

Then
click with your right mouse button to be able to move again. A different sketch
hangs under the sketch of Tomahna. Here you see the big telescope.

You can see that the telescope is connected to the antenna on the roof. You also see that the chair can take you to the telescope.
Turn clockwise, so that you look at
the back of the elevator. Just before the steps, which go down to the crystal
viewer, there is a post. There is a lever on top of this post. You see a small
white light on the pole.

Go
1 time ahead and you are at the pole. If necessary, look down until you see the
handle and pull the handle, which is on top of the pole, towards you.
This
opens the large shutters in the dome roof and you can now aim that large
telescope.

So turn again to the 3 round monitors, go 1 time ahead, turn left, 1 time forward, turn left and now take place in the chair by clicking on it.
You're in the chair. On the right-hand side of the chair you see a red flashing button. Click on the red button and ..........

.......
the chair will bring you up to the back of the large telescope. Zoom in on the
large round screen of the telescope. To the left and right of the round
telescope screen you see a red dial and buttons and meters. It is now the right
side that you are interested in. To the right of the round telescope screen you
see, from top to bottom, a "Lighthouse button", a round meter and a
red wheel. Click on the "Lighthouse button". The button turns orange
and you will now hear that the antenna is being extended on the roof. Now place
your hand on the button of the right red turning wheel and hold down your mouse
button. Now turn the turning wheel anticlockwise and you will see that the large
Planet comes into the telescope screen. Keep turning the dial until the Planet
fills the entire telescope screen.

Zoom
out via a click with your right mouse button and click on the red button of the
chair again. You drop down again but ............. the chair does not lower all
the way back and does not turn back to the path. Click with your right mouse
button on the screen to be able to move again. Now move your mouse down so that
the chair sinks further down until it stops. Turn around with the chair and then
click forward to get out of the chair.
Turn
right and walk back to the 3 round monitors, turn right and go forward to the
lever pole. Then turn slightly to the left and go back down the steps and you
are again at the big crystal viewer. Turn slightly to the left so that you are
right in front of the round screen of the crystal viewer and zoom in on it.

Entering the Crystal code of Rime in the crystal
viewer:
Before
Atrus left for Rime, he told you to contact him in Rime when you have repaired the
power supply in Tomahna. Well, that’s what we are going to do now. You see 2
round screens. The left screen is full of "snow". Under this
"snow screen" you see 5 grid boxes and under each grid you see a small
Orange button
Now
look at the right round panel. Here is a television screen. Below the television
screen you see a transverse slot in which you can slide a button from left to
right, and back. The button is now fully left in the slot. Call this button the
Slider. Under the Slider button you see the Rotating Handle. You can put the
Rotating Handle on each of the 6 colored dots. At this moment the rotating
handle is on the red dot.

In
the diary of Atrus you have seen the Crystal Code for Rime on page 11. You took
a picture of it. You can now view this photo in your Log every time you click on
your Logbook device. Do that now. You will see that each of the 5 crystals has a
certain shape and that the color code is: Red, Light Blue, Yellow, Green, Dark
Blue

Close
your log with a right click. At the moment the Rotating Handle is on the Red dot and that is good because Red is the first
color of
the code. Now pull the Slider to the right through the slot. You notice that 8
differently formed crystals appear in the television screen. You have to ensure
that you get the right crystal in the television screen not only in terms of color, but also in terms of shape.
Practice
a little with the slider. First place it all the way to the left in the slot so
that no crystal is visible in the TV screen. Then pull the slider slowly to the
right through the slot and number, for yourself, the crystals that you see
appearing in the television screen, from left to right, as 1 to 8. Then move the
slider all the way to the left.

Well,
let's do it. Eh ...... to be certain,
it might be better if you first save your game here.
The Red Crystal:
The
color / rotating lever is still on the red dot. Red is the first color of the code. Now slide the Slider to the right through the slot to the 6th
crystal that appears in your television screen. Stop. This is the right red
crystal. Red is the first color of the code, so click on Button 1 under the
round "Snow screen". Box 1 opens and now the correct red crystal is in
there.

The Yellow Crystal:
Now move the
Color Lever 1 position up to the Yellow Dot. The
red crystal in the television screen turns yellow, but of course this is not the
right crystal. Now slide the Slider all the way to the right and you will see
the 8th crystal. This is the right Yellow Crystal. Yellow is the 3rd color of
the code, so click on Button 3 under the round "Snow screen". Box 3
opens and now contains the correct yellow crystal.

The Green Crystal:
Now place the rotating Lever on the Green Dot. The yellow crystal
in the television screen turns green. The shape of the Green crystal is the same
as the shape of the Yellow crystal. So stay away from the Slider. Green is the
4th color in the code, so click on Button 4 under the "Snow screen".
Box 4 opens and in here is the correct green crystal.

The Light Blue Crystal:
Now set the Rotation Lever to the Light Blue dot: The
crystal in the TV screen becomes light blue. It is obviously not of the right
form. Slide the Slider all the way back to the left and then right again until
you have the 3rd crystal in the television screen. Light blue is the 2nd color of the code, so click on Button 2 under the "Snow screen". Box 2 opens
and now contains the right light blue crystal.

The Dark Blue Crystal:
Put the Rotation Lever on the Dark Blue dot. Slide the Slider
all the way to the left and then to the right again until you have the 2nd
crystal in your screen. Dark blue is the 5th color of the code so click on
Button 5 under the "Snow screen". Box 5 also opens and now contains
the correct Dark Blue Crystal.

Okay, you've got all the right crystals now. Now click on Button A and ......
If you
have done well, Atrus will now appear in the "Snow screen". You have
made contact with Atrus in Rime.

As
usual Atrus doesn’t have good news because……
something
is wrong in Rime. There is a violent electric storm and Atrus cannot leave Rime.
He tells you to go to his bedroom. His desk is in his bedroom. The top drawer of
that desk has a symbol. If you press that symbol, two secret boxes open. In
these two secret boxes you can then find his note about Haven and Spire. The
connection is then broken. Click with your right mouse button to zoom out of the
Crystal Viewer.
E: The Amulet of Yeesha:
Turn
right and go forward 1 time. Turn right again. You are right in front of the
elevator again. Place your hand on the lever, in front of the lift,
and pull the lever down again to open the lift door. Go forward into the elevator.
In the elevator you turn clockwise again to the lift handle and you now slide it
all the way down to the bottom light. The lift now drops all the way down to the
water of the lake and the elevator then goes over a rail in the wall to the rock
in the middle of the lake. There the lift goes up again and then comes to a
standstill.

Go
up the stairs 1 time and then turn to the left. You are standing on a
semi-circular "balcony" and in front of the round building, in which
the bedroom of Atrus and Catherine is located. Just call it the Bedroom. Turn
around here to enjoy the view. On the right you see the 2 round greenhouses and
below you see the living quarters of Atrus and Catherine and the room of Yeesha.

Turn
back to the bedroom and enter it now. The doors will open automatically and you
will automatically go inside.
The Bedroom of Atrus and Catherine:
Stay
calm and look around in the round bedroom. You see the bed of Atrus and
Catherine. To the left and right of the bed is a small table in the corners. In
front of the bed is a comfortable armchair and a crate. The
Fireplace is right in front of the bed. A painting hangs above the fireplace. To
the right of the fireplace is a large double bookcase. To the left of the
fireplace is a large double wardrobe and to the left of it is the large desk.
Right next to the bed is a large plant and another large closet.
Alright....look at the bed again and now move forward to the table in the corner right next
to the bed. Then look down at the table.

There
is a note on the table. Zoom in on it. You read:

“My
love, we must be united in this. Can you find it in your heart to listen and to
forgive? For I cannot be strong in this alone.”
A
letter from Catherine to Atrus? Do they have a fight? Is that why Catherine is
not there? Zoom out and turn all the way around and now head for the big desk.
The desk has boxes. In the middle of all those boxes you see a little door.
Place your hand on the button of that door and then pull the door open to the
right. Then zoom in on the opened box.

There will be a large drawing in your screen. Look closely and read what is written on it. It is a sketch of the fireplace, here in the bedroom

You
see that you can enter the Fireplace, but you also have to activate two Lasers
that are in the fireplace. You activate these two lasers by turning on the two
lights that can be found in the bedroom. The two lasers then give a CODE on the
panel behind the painting on the inside of the Fireplace.
Zoom out to put the drawing back in the box. Look down at the desktop. On the left on the desk is the first of the two lamps.
There is a tiny small switch on top of
the lamp. Click on that switch with your finger to turn on the lamp.

Turn
clockwise so that you look at the fireplace again. Go 1 time ahead to the
fireplace. Zoom in on the painting that hangs above the fireplace on the wall.
You see Catherine and Atrus together with their still young sons Sirrus and
Achenar on the Myst Island. Zoom out and turn around to the bed. Now go to the
table in the corner to the left of the bed. Look down at the table again.

The second lamp is on this table. Turn on this lamp by clicking on the tiny little switch on top of the lamp.
Both lamps are now on and according to the drawing,
the two Lasers in the fireplace should now also be activated. So turn back to
the fireplace. Indeed you now see light in the fireplace. Go forward to the
fireplace and then look down so that you can see the inside of the Fireplace.

In the fireplace you can see,
in the left corner, the Amulet of Yeesha lying on the floor.
Enter the Fireplace now. When you're in the fireplace you turn to the left and you
automatically pick up the AMULET of Yeesha from the ground. The Amulet will
appear in the bottom left of your screen, with your Logbook and your Photo
Camera.

Say,
didn't you see Yeesha going to this bedroom building, when you walked back from
the Water Wheel to the greenhouses just before you fell down into the lake? Her
Amulet can now be found here in the Fireplace, but WERE IS YEESHA ???? A Laser
is now burning in the two rear corners of the fireplace. Follow the laser beams
with your "eyes". You can see that the two laser beams create a number
of red dots on the wall panel, above the entrance of the fireplace. Below this
panel you will see a button.. You do not know enough yet to press that button
now. But remember this button. Look down again and crawl back out of the
Fireplace. You're back in front of the bed. Turn around to the fireplace.
F: Where did Yeesha go?
Recollect
the Memories of Yeesha:
Do you remember that Yeesha has said that she can SEE THINGS with her Amulet? Well, you are going to try that now.
Zoom in on the painting above the Fireplace and
if you are zoomed in on it, the Amulet will flash. Click on the Amulet. You
"flash" in a memory of Catherine.

You
hear Catherine: "Such a beautiful day, I wish ..... oh, I want so much,
Atrus, tell me, have we done the right thing?" . Zoom out of the painting.
Say,
didn't Atrus say that there are 2 secret compartments in his desk, where he has
hidden his notes about Haven and Spire? So turn left and go back to the desk.
Open the door again, where the sketch of the fireplace is in the box. When
you have opened the door again, press the small brown tile under the box. Two
narrow secret boxes open. In the left box is a thick Brown Book and in the right
box is a thick Blue Book.

Zoom
in on the Brown Book. The Amulet will flash. Click on the Amulet to activate the
book. Then turn over the cover of the book and turn to the 1st page. You hear
Atrus. Atrus reads the pages. That is because you clicked on the Amulet. Do not
click on the Amulet again because you will not hear Atrus anymore. Listen to
Atrus as he reads the pages aloud. Then always skip the right-hand page to go to
the next pages. On one of the pages you will see a Crystal code. Take a picture
of this and note on the picture that this is the Crystal code for Spire.

SPIRE BOOK:
I've
called it spire. I had that image in mind when I wrote the Book that links to
this Time. A high Spire of stone and crystal rising from the dense cloud cover
like the watchtower of a castle. Now that I am here myself and exploring this
Time I discover that it looks just as I had in mind. Beautiful, but oh so
deceitful.
From
the tower on which I am, a sea of clouds spreads out beneath me. Rough stone
steps lead to it and ended on an empty terrace. The steps were created by the
centuries-long grinding action of the wind and are so uniform that it looks as
if they were made by human hands. But that is impossible! Because Spire has
never been populated. Steps are not the only example of how well the illusion
succeeded that I wanted to create in this Time. Shortly after I arrived, I
walked through gigantic colonnades of stone, looking for the land under the
clouds.
As
I walked, it seemed as if the spirits of a former civilization were joining.
This feeling was reinforced by the beautiful harmonic sounds that I heard
everywhere. I would have liked, although it was for my own learning, to find the
origin of these sounds, but there are other priorities. I have found the caves
with plants and now I am sure that human life is possible at Spire.
Time
to go. I even have a little more peace with my decision to use this Time when
necessary as a prison. And yet I regret that I have to go. I can learn so much
about Art by simply staying here longer and comparing this Age with what I had
in mind. But I know that once I click away - and drop my Myst book into the
clouds - I will never return here. And I really have to leave. Because I have
yet to view another prison time. "
Zoom
out of the book via a click with your right mouse button. Zoom in on the Blue
Book and click on your Amulet again to activate the memory of Atrus. Open the
Blue Book and scroll through the pages again. Listen to Atrus and take another
picture of the Crystal code on the last page. This is the code for Haven,
because this book is:
HAVEN BOOK:

"Do
not lose heart because of an error, Atrus," my grandmother Anna always
said. "Try to learn from it and you will be able to do great things".
At Haven today I saw the words of my grandmother being realized. The broken ship
that is stuck in the causeway near the coast of Haven is exactly what I had
hoped for. A promise of adventure and intrigue, so tangible that my heart beat
me in the throat when I saw it. I figured out how much fun Emmit, Branch and
Will - the guys I met in the Stone ship Time - would have here. And the wish came
to me to bring their children here to play. But if I want to use this Time as a
prison, then Haven must remain forbidden territory for everyone. During my visit
to this Time I have found that people can live there. Of course no one lives
there now.
The
interior of Haven consists largely of a dense tropical rainforest full of fauna.
I have seen a number of animals on my trip, but they stayed at a distance. A few
fruit eaters in edible trees looked at me curiously as I walked through their
nests. They had never seen a human before, so they did not fear me. If I had
stayed longer, they might have had the courage to befriend me. But that did not
work, because time was pressing. I was convinced that I should protect my Myst
library in case a greedy adventurer discovered it.
I
wanted to go home as soon as possible. I enjoyed the setting sun just above the
lake in Haven before I swam to the middle of it and went back home. The key book
will meanwhile have sunk in the lake and be destroyed. I have to do that before
I can go to sleep. I have to write two key books tonight, for Haven and for
Spire, my other prison world. And then I have to put them in the library. In
addition, I have to warn Sirrus and Achenar to stay away from them. And if
everything is done, tell Catherine of course. "
Zoom
out of the book via a click with your right mouse button. Turn anticlockwise
towards the double doors and go 2 times forwards. You end up outside on the
"balcony". Look down at your "feet". Just before the fence
of the "balcony" you see a small gray plaque in the shelf of the
floor. Zoom in on it

You
read: "The end was not written yet." Tomahna ".

On
the other side you can see the illuminated Living room building. Go 1 time ahead
to the lantern post, on the left of the elevator. Beware that you do not
collapse down the lake. You are now standing on the edge in the opening of the
fence. You will now see a handle on the left side of your screen. Place your
hand on the handle and then pull the handle with a slight jerk to the right.
The long staircase, which goes from the living room down to the lower building,
now rises and turns towards you and is then a connecting bridge between the lift
platform and the living room building.

Living room / kitchen:
So
move forward 1 time over the bridge, turn to the right and go forward one time
to the terrace in front of the living room. You come out in front of the
entrance of the living room. Do not go inside yet, but turn to the right to the
table on the terrace. There is a white jug and a cup and an inkwell on the table
and there are two books and a writing block with a writing feather on the table.
Zoom in on the opened book. Yeesha's Amulet will flash again, so click on the
Amulet. You see Yeesha and Atrus. Atrus tries to teach Yeesha the writing of an
Age, but Yeesha finds this very difficult.

The
opened book shows you two pages with D'ni letters and gives the translation in
our language for every D'ni letter. Take a picture of these two pages and then
close your camera screen again with a click with your right mouse button. Then
zoom out of the book and turn around to the entrance to the Living Room. Go
forward 1 time. You are then right in front of the Fireplace which is in the
middle of the round room.

There
are two photos on the mantelpiece. Zoom in on both photos. The left is a photo
of Sirrus and on the right side is a photo of Achenar. If you have looked at
both photos, then you look down at the fire in the fireplace. It is a pleasant
fire, but you may not find it comfortable enough.

Go
forward 1 time in the kitchen and then turn slightly to the left and go forward
to the large round sink. Stand right in front of the sink. The crane handle is
located on the right side of the crane. Pull up the crane handle. Water comes
out of the tap. Turn left to the left wooden countertop. Above the worktop, a
number of cooking pans hang on an iron bracket. Zoom in on those pans. The
Amulet will flash again, so click on the Amulet. You can hear Yeesha fooling her
father a bit about his art of cooking: "You do not cook this often, do you
know, Dad, maybe we have to hide the pan before Mom comes home."

Zoom
in on the stove. Again the Amulet will flash, so click on the Amulet again. You
can hear Catherine talking to Yeesha. "Your father is coming home tonight
..... we will use the pretty plates ...". Zoom out of the stove again. Go
back into the living room, 2 times forwards, to the right of the Fireplace. You
are in the right corner at the semi-circular corner table. Turn to the right and
look up. There is a photo of Yeesha hanging on the stone wall. Zoom in on it.
Zoom out again and then look down at the half round corner table. There is a
chess game on the table.

Zoom
in on the chess game and click on the Amulet again. You hear Atrus: "If he
thinks ahead, he sees the trap I set up and leaves my lady alone, if not .....
Maybe I can win this in two moves .......". Zoom out of the chess game.
Turn anti-clockwise to the entrance / exit of the living room and go back up the
terrace 2 times forward. Then turn clockwise. You will then see the pole with
the lever in front of the bridge.

So
move forward one time to the Lever Pole. Place your hand on the handle and pull
the lever to the right again.

Turn
slightly to the right and go forward / down via the stairs / bridge 1time, turn
slightly to the right and go forward to get through the open doors into:
Yeesha's room:
First
look around the round room for a while. You see Yeesha's bed. In front of
Yeesha's bed is a coat rack over which a long robe hangs. On the left you see
Yeesha's desk and a large bookcase. If you look to the right you will see a box
with a large fish tank. Zoom in on the aquarium. You cannot do anything with it,
so just zoom out again.

Now
move forward to Yeesha's bed and then look down at the pillows on the bed.

Yeesha's Diary:
Well .... I know .... it is "Not Done" to look at the diary of a young
girl, but in this case you have no choice. You want to know what happened to
Yeesha, don't you? Perhaps the diary contains some clues. So zoom in on the diary. At the
same time Yeesha's Amulet will flash again, so click on the Amulet. The diary
then spread a bright white light. Yeesha's memories that are stored in the diary
are now activated.
Open
the diary via the lower right corner of the cover. In this way, you can also
browse through all the pages described. There are 10. Because you clicked on the
Amulet, Yeesha now reads her diary herself. The Amulet remains activated.
However, if you click on it again you will no longer hear Yeesha, so do not do
this. Listen to Yeesha and read along and continue browsing to the next pages.
On the 5th page you see a sketch of 5 colored crystals.

This
is another Crystal code for the Crystal Viewer. So take a picture of this page.
Also take note of what Yeesha write on page 7 about the lock of her bookcase and
about book names that she should note on the books of her father in the D'ni
language.
Zoom
out of the diary via a click with your right mouse button. Turn left and zoom in
on the long garment hanging over the coat rack.

The
Amulet will flash again, so click on it. You can hear Yeesha talking to her
mother Catherine: "May I wear it today, Mom? No, don’t you want to keep
it neat for the Serenia ceremony next week?" Anya said you would add a
special necklace to her .... Zoom out from the coat rack and turn slightly
to the left. Go forward to Yeesha's desk. Then look down at the desk.

In
the middle of Yeesha's desk is a luminous Crystal. Zoom in on the crystal and
click on your Amulet again. You hear Yeesha: "
Zoom
out and turn slightly further to the left and then head for the large bookcase.
Go stand right in front of the bookcase. The upper part of the bookcase contains
two open compartments. In each box there are 8 beautiful bound books. So there
are 16 books. On the backs of the books are the titles of the books, but in D'ni
language. Just like Yeesha says in her diary. Below these two book boxes you can
see two glass doors. Zoom in on the two glass doors. You cannot open these two
glass doors, but you will see 2 thick books and a cloth with blue letters in the
box: V = 11.
Zoom
out of the glass doors and look up again at the 16 books. Now click on random 5
of the books. You slide back the books you have clicked on, but as soon as you
click on the 5th book, all 5 books will slide back. This happens every time with
every series of 5 books you click on. Apparently you have to click on the RIGHT
5 of the 16 books. But which 5 books are the right ones? And would those two
glass doors open? Make sure that none of the 16 books are pushed back
We
are now leaving this Bookcase puzzle. But of course we will come back later to
solve this puzzle. However, there are still more Memories to pick up, and that
is what we will do first. Turn to the left and go forward to the open door of
Yeesha's room, turn slightly to the right and step outside. Turn left and go
back up via the bridge / stairs. At the top of the stairs, turn around to the
turning handle. Grasp the Rotating Handle again and then pull the lever to the
left.

The
bridge / staircase rises again and turns to the left and again forms the
connection between the Living Room and the Lift.

Turn
right again in the lift and pull the lift handle to the middle button. The lift
drops down and goes back over the lake and delivers you back to the middle
level, the Greenhouse level. Open the lift door by pulling up the door handle.
You automatically leave the elevator. Turn right and go 2 times ahead on the
walkway and you are back in the:
Front
greenhouse:

You
are standing in the greenhouse and next to the large wooden bucket. Look down.
You see the top of a ladder that goes down to the bottom of the greenhouse.
Click on the top of the ladder and you end up at the bottom of the greenhouse.
You are standing in front of a post with a round Globe. Below the Globe you see
a tiny red button and on the left side of the Globe you see a lever / handle.
Click on the red button. A bundle of light comes out of the Globe.

Look
to the right of the Globe. There is a wooden bench against the wall. Zoom in on
the wall above the wooden bench. It is a plaque but it is too dark to see it
well. Zoom out again and turn back to the Globe. Now place your hand on the
handle and hold it firmly. Then move your mouse up and down. So you move the
Globe to the left and to the right. Aim the beam of light that comes out of the
Globe to the right so that the wall plaque is completely illuminated by the
light from the Globe. Then let the Globe stand like this and zoom in again on
the plaque.

On the plaque is the family tree of Atrus. However, the names are written in D'ni. In the meantime your Amulet is flashing again, so click on the Amulet. You hear Atrus explaining the family tree to Yeesha: "This is just a small part of our family tree, Yeesha, and we can trace our lineage back to when our forefathers came in D'ni."
Take a picture of the pedigree plaque and zoom
out twice. Turn around to the ladder and click the forward cursor on the ladder
and you will be back up in the greenhouse. Turn clockwise and go 2 times forward
through the greenhouse, then turn slightly to the left and go forward 1 time out
of the greenhouse. Turn right. You stand again at the:
Garden room of Catherine:
Go
inside and then to the left to the emergency energy unit. Stand right in front
of it and zoom in on the shutter of the box.

Your
Amulet flashes again, so click on
it. You hear Catherine: "That's already the fifth time this week,
Atrus. If you really want to stop the stops, you also have to take care of an emergency
generator, suppose someone gets stuck in the elevator." Zoom out and turn
clockwise. On the right side of the table you see a large glass cabinet in which
a flock of fireflies fly. You also see a narrow blue door. Go forward 1 time.
You are standing in front of that narrow door. Click on the door handle of this
door. However, the door does not open. Look down at the floor in front of the
door and zoom in on it. Click on your Amulet. You hear Yeesha: "I have the
key, I have the key"
Zoom
out, look at eye level and turn left to the glass firefly cupboard. Zoom in on
the top of this glass case and then click on the Amulet again. You hear Yeesha:
"Don’t touch Daddy! You screw up my experiment"
Zoom out. Turn
clockwise to see the 2 large round plants containers with the round illuminated
windows. Behind each window there is a plant in the round box. Go forward and
you are standing in front of the left container. Place your hand on the handle
of the middle round door and then pull the handle upwards.

The
door opens. Zoom in on the plant in the box and click on your Amulet again. You
hear Catherine: "Poor plant ...... Sirrus said he had tried everything, but
it did not feel at home in this garden ... A few days in here, it looks better
....." Zoom and turn slightly to the right and then 2 times forward to
leave the garden room and end up on the path. Turn left and follow the route
back through the first greenhouse to the Lift. Open the lift door by pulling
down the handle for the lift again, step into the lift and pull the lift handle
to the highest position to return to the:
Work
room
of Atrus:
Open
the elevator door via the lever and you will step out of the elevator again.
Turn left and go to the Crystal Viewer. Zoom back in on the screens of the
Crystal viewer and then click on your flashing Amulet. You hear Atrus: "Do
you understand, Catherine? The new design means that we don’t have to go to
Rime anymore! We can see the Times of the boys from here ..." Zoom out and
turn left. Go forward twice to enter the corner with the 3 round monitors via
the steps. Zoom in on the 3 monitors and click on your Amulet again. You hear
Atrus and Catherine: "I do not want to be burgled again. But camera’s ...
I just feel looked at ... I only put them in the most logical inputs, you just
forget they're there, really" .
Zoom
out and turn left and go to the end of the path, turn left and take place again
in the seat of the telescope. You may now have to turn the seat yourself to the
telescope, with your mouse, to click on the Red button. Then do that and click
on the Red Button and you will go up to the Telescope again. Zoom in again on
the large Round Telescope screen and then click on the Amulet again. You hear
Atrus explaining to Yeesha: "Do you see that really bright star?" Uh -
Uh Long ago ... when your great-grandmother Anna and her father mapped this
desert ... she used this star to find her way back home ".
Zoom
out and press the Red Button again and the chair will lower again. Then move the
chair all the way down with your mouse and turn the chair to the path and get
out of the chair. Go back to the elevator, go straight in front of the elevator,
pull the lever down and enter the elevator again. Put the lift handle in the
lift all the way down again and the lift will deliver you to the Lift platform in
front of living room. Open the lift door via the door handle and you are outside
again. Turn clockwise and go to the swing bridge / stairs and walk over to the
other side. Then turn around to the turning handle and pull it to the right
again so that the bridge / staircase is back down to the room of Yeesha.

Walk
down and enter Yeesha's room again.
G: Back in Yeesha's room:
The Bookcase puzzle:

Turn
left and go to the large bookcase. So there are 16 thick books in the bookcase.
You know that if you randomly shift 5 books backwards, those 5 books will slide
back. So you have to push the RIGHT 5 books backwards. Which books should you
now move backwards? Well, for every Atrus family member there is a book between
these 16 books. Unfortunately the names are written in D'ni language on the
backs of the books. On the terrace table in front of the Living Room, however,
there is an open book in which you have read the translation of the D'ni
alphabet. You took a picture of it.

With
that photo you can now translate all names on the 16 books. You also took a
picture of the Pedigree Plaque at the bottom of the First Greenhouse.
You
can now also translate the Pedigree Plaque now and then you know the order of
age of all 5 family members.
If you know all that then you know which of the 16 books you have to move backwards and in which order you have to do that. This is quite a bit of work. Fortunately, I've already done this for you, so I'll just give you the solution. Number the 16 books, from top left to bottom right, as 1 to 16 and then click on the next 5 books:
12, 6, 8 , 3, 14

and ..

Click
on the top of the ladder and you will end up under Yeesha's room, on the
platform near the lake. Turn anti-clockwise and advance 1 time. Look down at your
feet. In front of your feet are two flippers and a snorkel on the deck. Look
again at normal eye level and turn slightly to the left. In the distance you see
a burning lantern at the end of the platform. Go forward to those lanterns and
turn left. You are in front of an easel with a painting on it. You cannot do
anything with it, so turn left and go back 2 times over the platform and then
turn right again. You are right in front of the ladder again. However, you
cannot climb back up to Yeesha's room now because the bookcase has come back up.
Fortunately, there is a lever right next to the ladder.

Pull
the handle down and you will see the bookcase lower down. Climb on the ladder
and you'll return to Yeesha's room. Well, leave Yeesha's room and go up the
stairs / bridge again. At the top of the living room you turn back to the
rotating handle and pull it to the left again so that the staircase / bridge
connects the living room with the lift. Go over the bridge and then to the
stairs for the elevator. Go up the stairs, turn left and enter the Bedroom
again:
H: Back in the Bedroom of Atrus and Catherine:
Turn
left and go to the Fireplace. Look down and crawl into the Fireplace.

Now click on the BUTTON. The panel drops down and you see a new panel with 48 BOXES. The red laser dots are in some of the 48 squares. You now have to click on some of these 48 boxes. However, I have not found an explanation about or Hint up to now, so I solved this puzzle through "Trying". Do the following: Number the 48 squares, from the upper left to the lower right, as 1 to 48 Click on the following squares, in this sequence:
10, 33, 27, 28, 22, 40, 46

Each time a number of boxes turn red and eventually the panel looks like this and ......

......The
floor of the fireplace appears to be a lift and you drop down.
NB:
if you don’t press the right
buttons you will not go down with the elevator. Then press the BUTTON twice to
reset this puzzle and try again:
I: The Linking Books to Haven and
Spire

You've
landed in a cave. Go forward 1 time, turn left, 1 forward and zoom in on the Big
Wheel in the rock. Your Amulet will flash again, so click on your Amulet and
listen to Atrus. Zoom out and turn right. You stand in front of the staircase
that goes to the Big Golden Globe chamber. At the top of the stairs you see a
lever. Go forward up the stairs. You cannot move further forward because the
Globe Room is closed.

Place
your hand on the lever that is on your left and pull this lever towards you.
Watch how the Globe Chamber opens and when that is done you go forward into the
Globe Room. In the Globe Room you see two books. Turn right. Above the Right
Book you see a small lever. Turn this lever all the way to the right.

This
closes the Globe again and turns around and the two books open and are now right
in front of you.

The Left Book is the SPIRE LINKING BOOK. The Right Book is the HAVEN LINKING BOOK. Which Prison Era will you go first? It does not really matter that much, but Atrus always uses the sequence HAVEN and SPRITE when he talks about these two prison eras. And you also held this order when you had to calibrate the Crystal Viewer from Atrus in the beginning. So it might be wise to follow Atrus in this.
So let's first go to HAVEN. Place your Hand on the Link Photo of the RIGHT BOOK and CLICK your right mouse and ......you end up in
Chapter 2: Haven: The
Prison of Achenar
2013:Original
Dutch Walkthrough by: Louis Koot
2018:This English translation by: Dick Leeuw (Lion_1251)
Screenshots and lay-out by: Louis Koot