Obduction
2018: Walkthrough by: Dick
Leeuw and : Louis
Koot
If
you have found this walkthrough via google search or via another site then you
have probably not visited my site.
A
lot more very detailed
game walkthroughs can be found on my site at: www.pcgameswalkthroughs.nl
Chapter 6: Maray: part 2
Maze Mania
|
EXPLANATION OF THE MAZE
This explanation of how the Maze works comes from mike_bn, a member of the gameboomers community, and I have his permission to use his explanation in this
walkthrough: Louis
Regarding the maze: I am German, so its hard for me to explain in English, but I will give it a try:
The first thing you need to understand is how teleportation works in this game. If you got to the maze without a walkthrough, I think you know the mechanics, but just to be sure I shall explain it a little bit......
When you get teleported from place A to B, its not only you that gets moved from A to B, but everything near you as well. Just imagine a sphere of lets say 5 meters in size with you in the centre of it gets teleported from A to B while
at the same time everything that was in 5m distance from point B gets teleported from B to A. So if you don't teleport right back form B to A to reverse the effect, you swapped two spheres of matter from two places.
When you look at the maze from the top you can see 4 circular areas: C1, C2, C3, C4 .
Lets say C1 is at position 12 o'clock, C2 at 9 o'clock, C3 at 3 o'clock and C4 at 6 o'clock (from where you are looking)

When you press the buttons on the top floor (the floor from which you can see the whole maze), only the whole mazes turns/rotates, but none of the 4 inner circles rotates. But they obviously have to be turned in the right position to
form a path. So how do you turn one of the inner circles? You can always only rotate one circle at a time. To spin lets say circle C1 (the one that is at 12 o'clock) you have to move it to position 6 o'clock by turning the whole maze, then go two levels down using the elevator

Use the Teleporter there to teleport to Hunrath, which does not only teleport you to Hunrath, but also the circle C1 you want to spin.
Right at your teleport destination you'll find two buttons. Pressing them turns C1.
The bottom button turns the sphere 90 degrees clockwise and the top button turns the sphere 90 degrees counter clockwise.
So if you hit one button one time and then teleport back, you have turned C1 90 degrees.
If you want to turn another circle, lets say C3 ,just do the same again: rotate the whole maze until C3 is at position 6 o'clock, use the elevator to go down two levels and proceed like you did with C1.
So now you know how to turn every Circle C1, C2, C3, C4. But this is not enough.
Remember what I mentioned about teleportation? The point is when you teleport yourself and lets say circle C1 to Hunrath, what actually happens is that C1 is replaced by a fifth circle C5
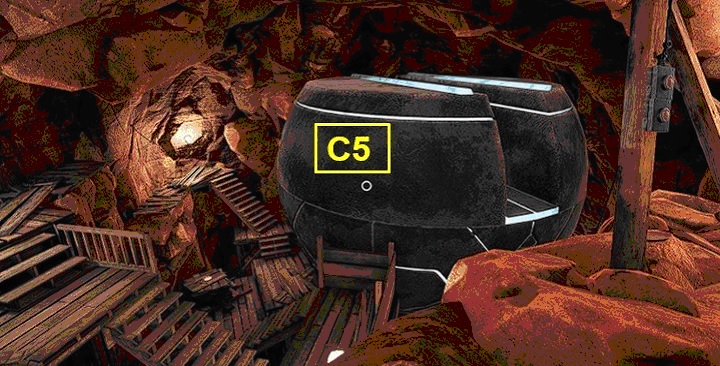
(C5 was in Hunrath, and when C1 got teleported to Hunrath, C5 was teleported from Hunrath to Maray at the position where C1 was). So C1 and C5 swapped places..
To see C5 in the maze, instead of teleporting back from Hunrath to Maray with the teleporter you just used (which woudl reverse the effect of C1 and C5 swapping places), use a different teleporter in Hunrath (for example the one you used the first time
to get to Maray) and simply walk to the maze.
Then you will see that C1 is gone (because it is in Hunrath), but C5 is there.
From: mike_bn (edited by Dick Leeuw)
Thanks
to mike_bn for his explanation.....we go on with the walkthrough from here
|
When you stand at the top floor of the maze and before the pole with the 2
buttons you see that the maze has 3 exits. Those exits are L, M and
R.

The entrance of the
maze is down at the elevator. Exit L goes to a Villein building, exit M
goes to a Villein blob machine and exit R will bring you to a path that goes to
a transition wall. You have to go through the maze to
exit L but you have to open a gate at the exits M and R first. You can do this in two
ways. You can first complete the
path through the maze to exit L. From exit L you can go anywhere but then you have to walk around a
number of times. You can also partially make the path first and then cross over
to exit M, then back to the elevator and finish the path further. We are going
to do the second option in this walkthrough.
But
a warning first:
it is quite possible that in your game the starting position of the maze is different than
in my game. You see the starting position of the maze in my game in this
picture

If
the starting position of the maze look
different now in your game then just press the button
on the button pole to rotate the maze in its entirety until it looks like you in the image above.
All right.....let's
do this dammed maze now......
From the initial state of the maze, as shown on the image above
.....Turn around to the post with the white button.
Press the right button once to turn the maze
counter clockwise, circle 2 is then right under the button pole. Go back on the elevator
platform and go down with the elevator twice.

Go into the dome and
use the hanging switch machine to switch to the mines in Hunrath. On
arrival Dome 5 went to Maray and Dome 2is now here in Hunrath. Go out of the
Dome and up the stairs and then go right into tunnel B.

Follow tunnel B to bridge 5.
Go over Bridge 5 to the cave with the 3 switch machines.
You must use one of
those 3 switch machine to return to the Maze...... I have used the rear switch machine, which is on the wooden stool

Activate the switch machine and ...... You will return to the dome with the 3 change machines in Maray.

Go over Bridge
4 and then through the small Dome, back to the entrance of the maze. Call up the elevator, via the button on the left,
and go with the elevator up 2 times

Back up again go
stand beside the button post and look down again to see how the maze looks
like now..... You now see a circle with a straight path under the pole, it still has to be turned, but you do that
later.

Now turn the maze 180 degrees, so press the left or the right button twice....it
should then look like this

Go down again with the elevator and use the switch machine in the dome
again. Again you'll end up in the dome in the mines of Hunrath. Go out of the
dome and up the stairs, right into tunnel B and follow it again to Bridge 5.
Cross over Bridge 5 again and then use the rear switch machine again to switch back to the maze in Maray. Back in Maray you walk again, via
Bridge 4 and the small dome, to the maze entrance. Press the elevator button again
to call the elevator and go up with the elevator. Stand beside the button pole
to look over the maze to see if it looks like this picture now.......

Now press the left button once to turn the maze clockwise.

Dome1 is now right under the
button pole and you see that this dome has to be turned 180 degrees. With the lift down again. Again use the switch machine in the dome and ...... You'll end up in the Hunrath
Dome in the mines again. Walk out of the Globe and go up the stairs. Now go
left to the pole with the 2 buttons

Press the bottom button twice and ........ the
maze dome turns 2 times counter clockwise ......

Go down the stairs to the bottom opening in the
Dome. Step back in the Dome again and use the switch machine in the Dome
to change back to the Dome under the maze in Maray. Walk out of the Dome and go up again with the elevator to the upper level. Walk back to the button pole and look down again and see .......
The maze now has a continuous corridor from the elevator to exit M.

Now go down with the lift once and ........ walk through the Maze corridor
to exit M.

Walk to the edge of the platform, to
the Villein blob machine and then look to the left......above the waterfall
you'll a rail with 2 gates, but these gates are closed. Go to the Villein blob
machine, which opens. Complete the connections, then press the blue button. The front gate
in the rail goes open but the rear gate stays closed.

The other gate in
the rail must be opened somewhere else. Walk back through the maze to the elevator and
take the elevator up again.

Now press the left button
on the post 1x, to turn the straight path again under the post. ...

However, this dome with the straight path must be turned once again in the
mine of Hunrath
So go down again with the elevator and use the switch machine in the dome again to switch back to
the mines of Hunrath.
Go out of the Dome and go up the stairs, turn to the left and go
once again to the pole with the 2 buttons. For this Dome it doesn't matter how you turn it, so
press 1 of the two buttons 1 time

Go back downstairs and use the switch machine
in the Dome again to switch back in the dome under the maze in Maray. Go back up again with the
elevator and look down again at the Maze

Pus the left button
of the pole 1x again.....the maze turns again

You see that if you turn this
Dome 90 degrees counter clockwise you'll t get a path from L to M.....but you
have to do this in de mines of Hunrath again
So go back down and use the switch machine in the dome again to
switch back to the Hunrath mines again
Go back up to the pole with the 2 buttons and now
the top button 1x......... The Dome rotates counter clockwise.
Go down and enter the
Dome and use the switch machine again to change back to the Dome under the maze. With the elevator back up and see how the maze is now .....

You now have to turn the whole maze into the right position. You can go to
Exit L first but that does not make any sense.
So you have to turn the maze so that there is a path from the elevator to
Exit R. Press the left button twice and see
....You now have a corridor through the maze from the elevator to the exit R

Down with the
elevator 1x and then walk through the hallway and at Exit R you leave the labyrinth, at a rock wall
at R3

Go through the wall R3), you now come to -L3-. Follow the path to L2 and go through the wall again and you are at R2.

Follow the path and you will come back to a Villein blob machine
Walk to the blob machine, above it hangs the gate. Complete the connections inn
the Villein machine and press the blue button, the second gate in the rail opens.

Follow the whole path back to the maze,
go back through the maze and take the elevator up again

Press the left button on the pole once
and then look at the maze, you now have a path to Exit L in the maze

You have completed the Maze now. Go down with the
elevator 1 floor again and then through the maze to Exit L and follow the path. You come to a Villein building.

You can climb the slope here, you will do that later. First go to the right and follow the path.
You come here again at a Villein blobmachine. You can make another bridge here, to the dome with the 3 switch machines.

This is Bridge 6, but you do not need this bridge now. You only need
Bridge 6 if you first made the path in the maze and did not go to Exit M in between first, then you really need this bridge. But you do not need
Bridge 6 in this walkthrough. Turn around and walk back to the Villein building and then go up the slope.

At the top you go left or right ..... you walk down a bit. There you see a screen with a blue button
....

When you are close to the screen, you can see Josef there. He tells you to
hurry up

When Josef is gone, press the blue
button....... a capsule goes up. Turn around and go back to the slope, now go further up.

There you see the capsule, walk towards it and walk into the capsule and .........Automatically
you turn around and you'll see the rail and the 2 gates that are both open now.
Enjoy the trip along the rails. You fly into another Villein
building....... you automatically turn around and get kicked out of the capsule

The capsule goes down then. Go down the slope. You can go to the left and then to the right, but that
will bring you at a dead end, so go right here and walk down.

A path goes to the left, on the right a platform rises up, or maybe it is already up. Go to that platform
......it's a Villein blob machine.....don't touch it now

Turn right and follow the path to the left and then go through the gate ...... you end up
on a square.

Now you can have a small problem: there is an old version and an updated version of the game. If you play via Steam or have purchased the game later, you will have the updated version. If you do not have the updated version
then you have the old version without all the patches and updates that have been released since the
first release of the game. ... the two versions differ slightly from each other
from where we are now. I assume that you are playing the updated version, but
I will also tell you how to proceed in the old version
When you play the Old version of
Obduction without all the updates and patches
Then follow the path from the blob machine and you will also enter the
little square

You see 4 screens against the walls and left is a wounded Villein under
some debris. On the screens the number 222 appears.

The wounded Villein says
something but you don't understand Villeins
There is also a closed gate. On the other side of the
square there is a book on a small table, click the book on it (2x) to read it.\

It is a list of names with the number of the tube they are in ....... 222 is the number of Josef, Farley has number 194.

You now have to go back to the platform with the Villein blobmachine, from here the 2 versions will be the same for the time being.
When you play the New
version with all the updates and patches
From the blob machine you have followed the path to the
little square
You see a Villein blobmachine on the right
side. In the left corner lies the badly injured Villein person. At the blobmachine is a table with a book. You also see a closed gate. Walk to the wounded Villein.
There is a screen at the wounded Villein. The wounded Villein says something
but you do not understand Villeins .... .Fortunately what the Villein says
is being translated on the screen because the number 222 appears on it
On the other side is a table with a book on it. Walk to the table and then double click on the book and you will see that it is a list of names and numbers.
222 is the number of Josef, Farley has number 194.
Click the book away again and stand in front of the Villein
blob machine ...... The Blobber opens again ...... If you peek at the bottom right of the blob machine see a closed gate. Make the connections in the blob machine and you will see that the gate opens right next to the dome. (In the old version you must also do this)

In both the old version and the new version you have to go back to the lift platform with the Villein
blob machine now

Walk to the blob machine and enter the number 222 ........ you have practice
this on the blobber in the garage of Hunrath

The elevator platform takes you down and
a tube gets pulled out. Look in the tube who or what is in it, it is Josef. You can also check who is in 194, that's Farley.

Walk back to the blobber machine and click / wipe all connections away on the
blob machine and .........

Give Water to the Maray Tree
of Life
The elevator brings you back up. Walk back to the
square and see..... the gate in the back wall is now open.

Go through the gate and follow the path down, before you
lies a corpse on the path, half human, half Mofang.

To the right is a cave, that you will enter
later. On the left you see the strange red cube shape that you also saw on the posters on the houses in Hunrath. Those posters have warned you about this
cubical shape. If you come too close to that red cube you will be destroyed and it will
be GAME OVER and you will have to load the autosave.
You have a problem now because you have to get past that spinning cube to go
to the tree. Forward you see a hill and on top of that hill is a blue laser, with which you have to destroy the red cube. So walk up the hill and go
stand in front of the joystick of the blue laser. With this laser you can destroy the
spinning red cube
Click on the button that sticks on top of the
joystick and then hold down your left mouse button ...
then move the joystick with the blue ray to the red cube, to destroy the red cube

As you can see, you can also direct the beam on that strange corpse, then nothing remains
of it. If you have destroyed the cube then walk down the hill again and then
walk along the remains of the red cube to a Villein blob machine standing there.
You have to build Bridge 7 in the blobber, so do that with the standard combination that you have used so far for all bridges and then click the
blue button

Go down button to Bridge 7, cross it and follow the forest
path. The short forest trail will take you to a forest pond ......

Turn left and ...... You'll see the MARAY
Tree

Go into the tree and follow the tunnel down to the roots of the tree and
go to the water tap

Click the lever of the tap to the left and wait
until the pool has filled with water ....

The lever automatically goes back to the right. The Maray tree is now also healed. Follow the
water hose to the Hunrath passage

Now both the Hunrath Tree and the Maray tree have
water and there is now a connection between the roots of both trees. So walk through the stone arch and you will
enter the Hunrath Tree cave
Hunrath

Go up the stairs and follow the tunnel until you reach the top.

We continue in:
Chapter 7: Mofang:
2017: Original Dutch Walkthrough by: Dick
Leeuw
2018: This English translation,
screenshots and lay-out by: Louis Koot