
2018: Walkthrough by: Dick
Leeuw and Louis Koot
Text by Dick Leeuw and screenshots by Louis Koot
If you have found this walkthrough via google search or via another site then you have probably not visited my site.
A lot more very detailed game walkthroughs can be found on my site at: www.pcgameswalkthroughs.nl
Part 1: The Village
Chapter 1: Arrival
The game starts in a closed area. You see a large stone arch, shaped like an A
How you got here is not clear but when you woke up you saw a green light between the legs of the big A.

a push button in the shape of a hand is on the right leg of the A. You can push the hand to light it up but nothing else happens

On the backside of the legs of the A you can see some lighs but you do not know what these are for.

When you turn around, you see a door and a table. Go take a look at that door

The door is locked. There is a lock in the door, but the lock is missing a quarter piece, so you can't open the door just yet

Go to the table. On the table you will find the missing quarter piece of the doorlock and also a letter, it will be pointed out to you by a big arrow.

Click on the envelope to extract the letter. Read the letter.
At the bottom of the letter you see a drawing. You need this drawing in the next area.

Take the quarter piece of the door lock (door piece).

Walk to the door, you see again that a quarter of the lock is gone. You will also see 3 triangular holes in
that space.
Open the inventory with your Q-key and try to place the door lock piece in the space of the lock but the piece won't fit

You must adjust the lock piece so that it will fit into the lock
Open up the inventory again and now take a good look at the piece of the lock.
You now see 3 triangular shapes on the back of the piece but they are not correct orientated to fit in the holes of the lock

If you click on the triangular pieces you can rotate them.
You have to look carefully at the 3 triangular spaces in the lock and then turn the pieces 1, 2 and 3 in the right position.

Go out of your inventory and stand with your cursor on the missing piece in the door.
Your cursor will now become a gear. Click it and the piece of lock is now placed in the lock.

and the door opens.

In the lower right corner you see that a autosave is being made. This happens regularly when you solve puzzles or when you open up new areas. You only had 1 item in your inventory now so there was no choice. If you have more items in your inventory then you first have to put the object you want to use in the middle (selection tray) and then click with the gear cursor on the place where need to use it.
Step through now opened door and ..... you end up in:
Chapter 2: Main Square:

You are now on the MAIN SQUARE, you can look around everywhere, but al the huts here are locked.
In the middle of the square you see a rock with the central tower on top of it. If you look to the left of the tower you see a hut, walk towards it.

You reach the hut via a stone staircase. This is the Crystal Lab but the hut is closed.
Right in front of the hut is a construction with a tray with stones in it, this is the weight puzzle.
You can't solve this yet because it's missing a lever that you have to find first. You need a lever with a 6-angled pin on it's backside

Turn slightly to the left and you will see a low table on the left and further on a closed gate. On the left in front of the gate you see a pole with a push button in a niche, this is the entrance to the mine, but the button is not yet active.Behind the closed gate is the area with the Watch tower.

Turn around and walk back to the central tower

In front of the tower you see a round plate in the ground, this is a sunken pillar that you have to bring up in one way or another.

If you look on the left side along the central tower, you see another hut and a door. That hut is the Engine room. Walk towards it. Door of the Engine room hut are locked, in the door there is a 5-angled hole and on the right side on the wall 2 half circles. The Lever to open the hut has disappeared.

Turn slightly to the right and you will see 2 huts. To the left is the locked gate to the North Shore
Walk forwards to those 2 huts. The left hut is the Mechanics hut and inside the right hut you will find the Lever for the Weight puzzle.

Go look at the door, above the wooden stairs, of the right hut.....you can't enter the hut because it has a lock puzzle that you must solve
Half of the solution for this puzzle is in the first letter that you have found on the table at the big A.

The Mechanics hut is also locked. Between the 2 huts a path goes back under a wooden walkway to a closed door....this door must be opened from the other side

Walk up the wooden stairs and turn right over the wooden walkway and under the stone arch gate.
Hanging Platform
You now come on a wooden platform that adheres to the rock. On the rock you notice a blue marker. Follow the path and you come to the half of a drawbridge.

To the right of the bridge you see a lever, pull the lever
and this side of the bridge sinks down.

You cannot cross yet, but later on you can lower the other half from the other side.
Walk on and you will see a
table and a water well. Walk on to the table. .

There's a torch with an yellow crystals lying on a table. There is also a letter on the table.
Take the yellow crystal torch. The thing ends up in your inventory. Grab the letter and read it

At the bottom of the letter you see the drawing that you also saw in the first letter.
On this drawing are 3 rings with 3 black pieces. Remember this because you need this right
away

Close the letter and turn around. Behind the well is a table with a small chest on it, but you cannot open that small chest yet. The well has a rope with a hook that you can lower into the well and then turn it up again but you have no bait, so you won't be fishing anything up from the well now

So go back to Main Square over the Hangin g Platform
Main Square:
You now have found 2 letters and those 2 letters have the solution for the lock puzzle of the door of the lever hut.

Follow the path back down the stairs and then go up the stairs on the left, to the door of the left hut.
You can solve this door lock puzzle now
Door puzzle:
The door is a fence door with a circle lock with 5 rings and a pointer

On that pointer is a sliding slot that you can shift back and forth over the 5 rings. The sliding slot is now on the outer ring and if you click on the large button in the middle, the black surface on the outer ring shifts 1 place. By clicking on the large button and sliding the sliding slot you can put the black areas in the right place. If you combine the 2 drawings from the letters, you know where al the black surfaces must be

So solve this puzzle to open the door.

When you open the door you walk inside, right in front of you there is a chest .

Stand with your cursor on the handle of the lid of the chest and pull the lid up with the left mouse button pressed.
Inside the chest you will find a lever with a 6-angled pin at the back. Take this
lever because you need it to solve the weigh puzzle at the Crystal lab

Turn around to the door and you will see a few drawings on the wall to the right of it.
1 is from a fish that supplies power with a fishing rod with a pine cone as bait. This is a hint that you need later.

Leave the hut and walk back to the Crystal Lab

Open up the Crystal Lab:
Weights Puzzle
Walk up the stone stairs to the construction at the Crystal Lab hut. You see the tray with stone blocks in it and also a metal block. On the right side of the tray with stones you see a 6-angled hole, here you can use that lever you found in the lever hut. Select the lever in your inventory and then click with the gear on the 6-angled hole. The handle fits there. Then click on the right side of the handle .

The tray of stones is now lying horizontally, so you can now move the stones. Go up the steps and solve the slider puzzle.

The intention now is to get that block of iron out and put it in the box that hangs on the rope
As a result, extra weight will be attached to the rope, if successful, you will see what happens.
The metal block is now at bottom left in the tray and you have to move it to the top right position of the tray

There are more then 1 solutions possible, as long as you make sure that the metal block ends up at the top right position in the tray
Here is a step by step solution, made by Dick Leeuw:

If you follow Dick's solution then the
blocks in the tray are like this at the end.

But here's another possible solution, done by Louis

If successful, click on the lever handle again to tilt the tray again.

Walk down the stairs and see....the metal block is now at bottom left, so you can now slide the metal block to the left into the box.
So slide the metal block to the left into the box and.....

.........the box now drops down and the rope pulls down a staircase. You can now enter the Crystal Lab

Before you enter the Crystal Lab,, turn left and walk to the low table next to the rock. In the center of the table is a plate with pine cones, grab that plate.

You will need the plate with pine piles to catch an electric eel from the well, as you saw on the picture in the lever hut. But we will do that later.
Walk back and enter the Crystal Lab now.
Crystal Lab:
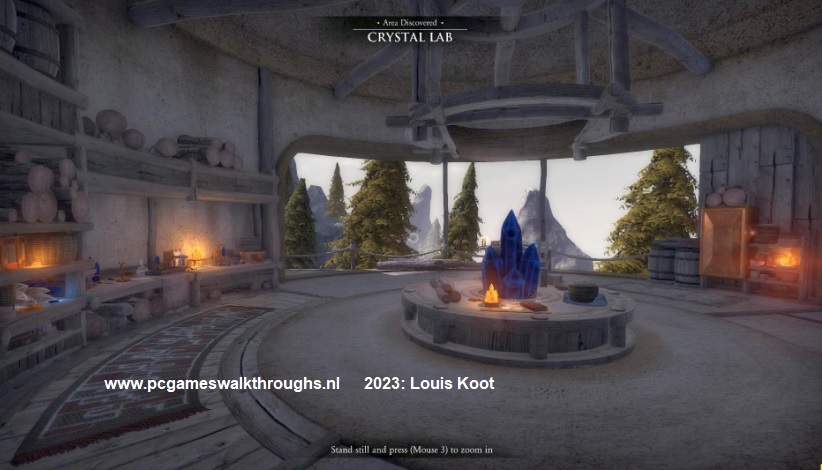
In the middle of the hut is a large blue crystal on a large round table. Go to the round table
There is another letter and a notebook on the table.

Read the letter and pick up the notebook.
You now have the notebook and you can now use your P-key to make drawings of importent pictures / codes to store them in the notebook
Turn around to the door, on the right
side of the door a lever device hangs on the wall with a drawing above it.

Walk to the lever. The drawing looks suspiciously like the closed metal gate at
the mine entrance.
Pull the lever down to unlock that gate. You can now go to
the Watchtower, but first look around here in the Crystal lab

To the right of the lever device is a power generator that is connected to a standard.
Take your yellow / orange crystal torch from your inventory and put it in the standard.
Then click on the handle of the generator and your crystal will be charged. Take back the now powered up yellow crystal torch

Further to the right you can see more things standing on the low table along the wall. On a tray see 2 crystals torches standing, a yellow one and a blue one, with a slider in between. Pull the slider down so that the light of the yellow crystal shines on the blue crystal. You can now see that the fluorescent paint is visible before the blue crystal.

Next to the right of this device is a note with a drawing of crystals, strange signs and vertical stripes. Pick up that note
are those symbols coordinates but of which? You cann ot take this note with you, so make a drawing of it in your notebook

Turn to the right and you will see a table in front of or on the balcony. There is a book on it, read this book

Furthermore, there is a windmill on this table, it is connected with a blue crystal. Apparently you have to charge blue crystals with the generator. If you now look to the left you will see a half ball on the wall and in front of it you see a tripod with a ring on it......is it a mirror or a lens holder? If you look outside the ring you will see the Watchtower.

Now walk back to the door........The cupboard an the left is locked. to the left of the entrance is a keyboard....go there .

Look at the keyboard......it has 25 keys with strange characters.....Unfortunately, not all the characters of the Crystal note are on it.
You cannot do anything with it now, so don't touch those keys now

Leave the Crystal Lab and go to the gate at the mine entrance to continue with:
Part 1: Chapter 3: The Watchtower
2018: Walkthrough by: Dick
Leeuw and Louis Koot
Text by Dick Leeuw and screenshots by Louis Koot