
2018: Walkthrough by: Dick Leeuw and
Louis Koot
Text by Dick Leeuw and screenshots by Louis Koot
If you have found this walkthrough via google search or via another site then you have probably not visited my site.
A lot more very detailed game walkthroughs can be found on my site at: www.pcgameswalkthroughs.nl
Part 2: Underground
Chapter
13: Underground Square: Left Tunnel:
You are on the Underground Square and you have just open up the left tunnel.

Walk
to and then through the left tunnel now that it has a floor. Just follow the tunnel until you get
into a cave.

Cave
with niches and ladders:
In
the cave you see 3 rails running along the walls, in the middle there is a
construction with pulleys and ropes.
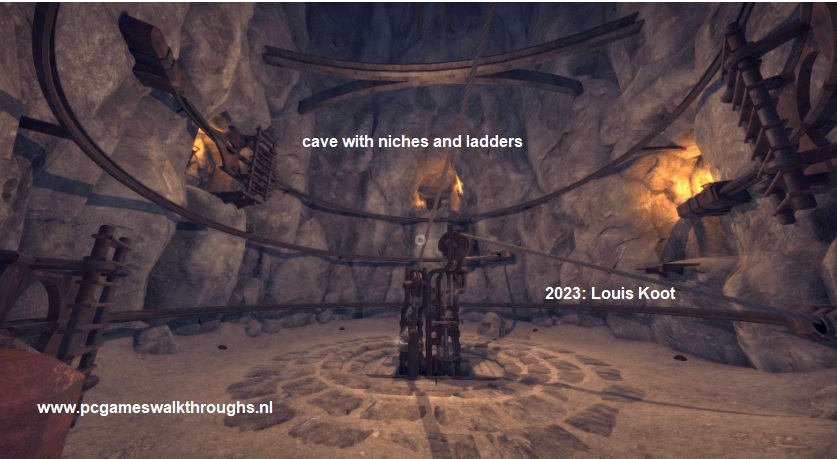
A rope goes to every rail. There are pieces of ladder hanging on those rails. Furthermore you see 3 niches in the wall, each at a different height.
Name the
lowest niche as A, the middleniche as B and the upper niche as C.

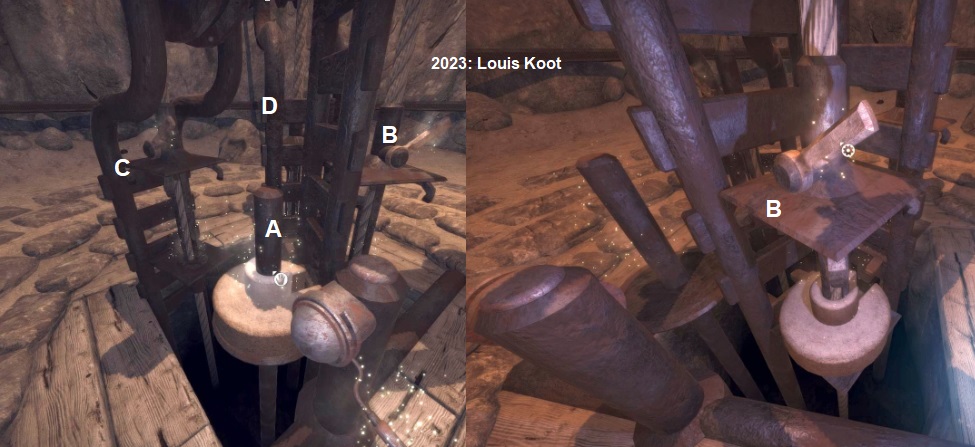
If you want to get into the niches, you have to make sure that the pieces of ladder are in the right places. Go to the construction in the middle. In a hole there are 4 iron poles. On three of these poles is a pulley with a rope running over it. The rope comes off the rail and goes down over the pulley along the poles. On each rope there are also 2 plates with a lever on the top plate. There are 2 weights on the shortest pole, a large one and a small one. Next to this pole there is a short pole with a lever on the edge.
Name the pole with the weights
pole A, to the right of it is pole B. The pole to the left of pole Ais pole C and the pole
at the back is pole D.
If
you look closely you can see that pole B is connected to the lower rail, pole C
with the upper and pole D with the middle rail.

Niche
A:
You start with niche A. To climb into Niche A the piece of ladder has to be moved on the bottom rail.
First take the
2 weights from pole A and place them both on the lower plate
of pole B, then click the lever, on the top
plate of pole B.
The rope is pulled down by the weights and the piece of ladder slides over the bottom rail to Niche A.
Climb
up the ladder into Niche A and take the weight
that stand on a
stand there.

Turn
around and climb / jump down and walk back to the center.

Go to the pole that's next to pole A and click on the lever. This lever will reset the pieces of ladders and also reset the weights.
2
new weights will come up on pole A. Take
both weights of pole A.

Niche
B:
You
can see which weight you should use as you look at the wall. Along the wall 6 black stones are on the
floor. Count how many stones you have to go with the piece of ladder and that
determines the weight. You now have 3 weights in your inventory, small, medium
and large. If you look at niche B, you see that the bottom part of the ladder
only has to be moved a little to the right, but the middle part of the ladder has to be moved slightly further.
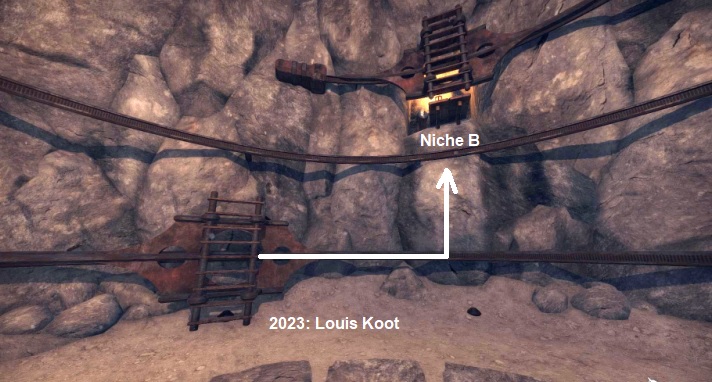
The bottom piece of ladder should only be pushed aside.
Select the smallest weight and place it on pole B, click on the lever on top,
then select the middle weight and place it on pole D. Click also on this lever.
Finally select the
largest weight and place it on pole C and click on the lever on top.

Walk
to the ladder and climb into niche B.

Take
the weight that lies there and climb / jump down again.

Niche
C.
Walk back to the pole next to pole A and click on the lever, the ladders will be reset.
There are now 3 weights on pole A.

You now have 4 different weights in your inventory.
The smallest moves a piece of ladder 1 black stone, the largest 4 stones and the others 2 and 3 stones.
Now count how far each piece of ladder should move and then place the correct weight on each pole.
The middle section of ladder has to be moved 5
stones so put the largest and the smallest weight on the pole D. Click on the
lever.

The bottom piece has to be moved 3 stones so place the second largest weight on pole B and click on the lever.
Now take the last weight and place it on pole C and
click on the lever.

If
all goes well, the whole ladder is now under niche C.

Climb up to Niche C and walk into to tunnel. Keep following the tunneluntil you get to a door.
Click on the button to the right of the door. The door opens, go inside
and the door closes behind you.

Underwater
Corridor.
Room
1 (A) and Corridor 1:

You have entered a room. This room 1. In the middle there is a standard for crystals, also the green teleporter fits on it.
On the wall is a plate with a diagram drawn on
it, which shows the route from rooms A to B or from A to C.

But
who or what is A, B and C? Look around, you also see a pipe from the wall and
there is a corridor with a door at the end.

Walk into the corridor. This is corridor 1, between the rooms 1 and 2. On thye right wall are 4 levers, like clocks.
Walk to the door and click the
button on the right, the door will open but there's also a fence that you
cannot open.

Look
through the fence into the room.....You look into room 2.
You cannot enter the room because the gate is locked. You see a
green crystal in the middle of a standard. Zoom a bit closer in and look at the
standard, on it is the letter B. Above
it hangs a prism / lens and on it is the letter
C. To the right of the fence two
pipes protrude from the wall above each other and on the other side there is
another pipe.

Walk back to room 1 and go stand at the standard in the middle.
You see the letter A on it. Now
put your green teleporter on the stand, the light beam goes to the pipe.

If you now click on the Hand plate you won't be transported to room 2.
If you go look into room 2, you do not see a green beam. You must first set the clocks lever in corridor 1 correctly.
Look at the diagram on the wall how the levers
should stand. You want to reach the green crystal in room 2 so you look at the
route A to B .
Corridor
1: 1st time
Leave your green teleporter on the stand and enter corridor 1 again
From room 1 to room 2, name the clock like levers that are on the wall A, B, C, D

By clicking on the big rod you can
turn the "hands" of the "clocks" to set them on the correct
"hour"..

Look at the diagram to see how the "hands" of each "clock" should stand. On the adjacent drawing is the same diagram but in reverse.
That makes it a little easier to see how they should stand.

Put the
"hands" of the "clocks" A, B, C, D on the correct
"hour".

Then walk back to your green teleporter in room 1 standard and click on the hand and.....

.....you
now teleport to room 2 via the green
beam.
Room
2 (B) and Corridor 2:
Take a look around. You've already seen a lot when you looked through the fence of the door from Corridor 1.
On the wall is another diagram, take a look at it

The door to Corridor 2 is closed and it has no push button. Look up at the center of the dome, above the green crystal.
There you see
a cord hanging from de ceiling.

Pull the Pull cord down and see what happens.
You see that you are under a glass dome now
that the roof is gone. You’re underwater and he door to corridor 2 is now open.
Underwater Corridor:

Walk through corridor 2 to Room 3.
Notice
the 4 "clocks with "hands" that are also on the wall in this
corridor. Don't mess with those clocks now..

You enter in room 3. Look around and then walk to the round window. Look through the window.
You see. through the
water, another round window with behind it a green crystal,
you have to go there.

In the middle of the room is a stand with the letter D.
You also see 2 pipes sticking out of the wall,the bottom pipe is covered with a plate that hangs on a rope
Next of the top pipe you see the letter E

The
intention now is to get the green beam, from room 1 to the prism of room 2 and
further to standard D in this room and then you can get transported into that
room thast you saw through the round window. The
green beam cannot fall on the prism in this room 3 now because the lower pipe is blocked.
Corridor
2:
You
start from room 2. Name the clocks, from room 2 to room 3, as A , B, C, D.

These 4 "clocks" are slightly more difficult than those of corridor 1. You can now also move the arrows with respect to each other.
With the upper lever you can choose from an angle of 90o or 180o by clicking that lever Up or Down. All 4 levers are Up when you start

Check the diagram on how to get from C to E.
Here again is a drawing of the
diagram but then in mirror image to make it easier to see how the
"clocks" should stand.

Clock B is already OK
So you only have to set the "clocks" A, C and D and this screenshot shows you how they must be set

When
done you walk back to
room 2 and there you click on the hand
plate of the green crystal to go back to room 1.

Corridor
1 the 2nd time:
From room 1 go into corridor 1 and set the clocks in such a way that the beam now ends at the prism / lens C.
Look at the diagram how they should stand, this is
the solution.

If
you now look at room 2, you see that the green beam falls on the prism. Go back
to room 1 and ake
your green teleporter back and put the red crystal in its place,

Take back the red crystal and put the green teleporter back on A.
But
if you now click on the
hand plate nothing happens because the beam does not fall on the green crystal in
room 2.

You
have to put the clocks / handles in corridor 1 back to the previous positions.
So
set the "clocks" in corridor 1 again like the 1st time
Walk to the teleporter and click on the hand to teleport back to room 2 and then walk into corridor 2 again

You also have to change the clocks in corridor 2 to send the green beam from C to D.
This
is how the clocks should be set the 2nd time.

If you have set it up correctly go back to room 2 and click on the hand plate again.
Once back in room 1 you
have to change the clocks in corridor 1 once again.

That
is how they these clock should stand now.

Now, in room 1, click on the hand plate again and..........
.....
you now travel from A via C and D to the room with a green
crystal on the other side of the water.

You
are now in the Underwater Hideaway.
Chapter 14: Underwater Hideaway
2018: Walkthrough by: Dick Leeuw and
Louis Koot
Text by Dick Leeuw and screenshots by Louis Koot