
2018: Walkthrough by: Dick
Leeuw and Louis Koot
Text by Dick Leeuw and screenshots by Louis Koot
If you have found this walkthrough via google search or via another site then you have probably not visited my site.
A lot more very detailed game walkthroughs can be found on my site at: www.pcgameswalkthroughs.nl
Chapter
9: Teleporters and teleporting:
Mechanics:
The Teleport cannon:
You are back in the Mechanics hut where you just raised the spiral staircase from the floor

Walk
up the spiral stairs and when you are upstairs look around for a moment.

Along
the wall you see a device with 3 bulbs, below the middle bulb is a letter.
You
can also see 3 drawings on a round board that's on the wall. Make a sketch of
this in your notebook. And you also see a blue
marker on the wall with a lever underneath it.

When you have read the letter, turn to that blue marker.
Select your transmitter stick and point it at the blue marker on the wall and then left click to activate the lever

Then walk towards it and
now pull the lever down.

Part
of the Dome wall slides open and the whole dome rotates and you see a kind of cannon
coming down from the ceiling. From the cannon comes a light beam that also emits a pattern.
Under the opening is
the device with the 3 bulbs, and now those bulbs are open.

Walk
to the bulbs device. Through the "window" you look out over Main
Square. The
device has a compass on the left
and in the middle are 4 buttons. On the right you see a lever with 3 positions.

With
the lever you control the rotation speed of the dome, Up is fast, down is slow
and middle is neutral.. Between the compass and
the 4 buttons you see a small round disc with a pattern in it. This is the same
pattern as you see in the round screen to the right of the opening. You must aim
the cannon on a target to unlock a new area, but where is that target?. Go take
another look at the drawings that are on the wall. They are 3 drawings of 3
marker discs with the number of degrees and the Roman numerals I, II and III.

First you go looking for target I and this is at 70 degrees, so you must aim the cannon on that target with the 4 buttons. So stand in front of the Targing console again and use the buttons to aim the cannon's light beam at the disc on the rock peak behind the North Shore jetty. That rock peak with the disc is at 70 degrees, so you can look at the compass to see if it points at 70. You previously have activated this marker disc with your transmitter,

Look
carefully and you will see that marker disc on the rockpeak that you have activated not long
ago.....it's the marker disc on the rock behind the jetty on the North Shore.

You must now adjust the pattern of the cannon to match the pattern of the target.
Stand next to the
cannon. On the backside of the cannon you will see a white handle.

Pull
the handle down and a rack with lenses comes down.

Zoom in on the rack with lenses.
You can lower the lenses and raise them again with the levers. You can also rotate the lenses.
The
first big lens is fix....you cannot rotate that lens. Name
the lenses with the levers, from left to right, A to G

With the levers pull all lenses down and then pull them up and down again 1 by 1.
In
the round screen G, right of the opening, you
will then see which lens
has which pattern.

By playing with the lenses you have to make the pattern of the target in screen G
Click Lens C and empty holder D down and then rotate the lenses A, B, E until you have the pattern in screen G as in this screenshot

This
is 1 way to do this, other combinations of lenses are possible. With only lens B and lens E this
pattern can also be made.
If
you see the correct pattern in screen G, you click again on the handle
of the cannon and the lenses
disappear into the cannon again.

Go
back to the control panel.
Now
Use
the down button to aim the light beam exactly on that marker disc on the rock. If you aim
well, you will see a huge flash of light.

You have now open up the door to the Swamp Islands. You are done here with the cannon at this moment, but you will come back here later to activate another target with the cannon Go down the spiral staircase and leave the Mechanics hut, on the Hanging Platform side. You can't leave the hut on the North Side now because you've rotated the dome

Walk
to the North Shore and walk along the left side of the oven in the direction
of the jetty
with the chest.

Do
not go up the jetty but walk along the path to the left of the jetty.

Go
up the stairs and follow the path to the suspension bridge.
The gate on the other side is now open because you have open up this gate just now with the cannon..

Walk across the suspension bridge to the other side
Swamp
Islands: Teleport puzzle:

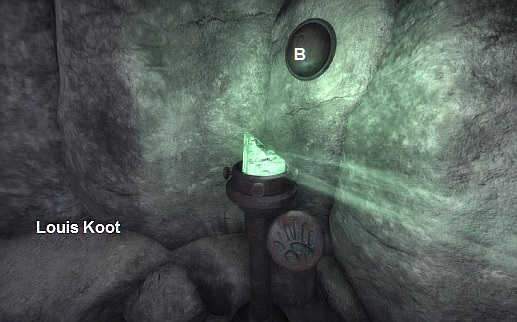
Immediately
a green light on the rock attracts your attention. That beam of light is directed
downwards. On the rock above it you seea hemisphere with the letter
A. In front of it is a
pole with a ball of glass
sphere
on top and it also has alenses. Walk to the right to
the gorge. Unfortunately the suspension bridge is broken but you will see a
green light on the other side. If you take a look at the green light (you can
zoom in on it), you will
see that it comes from a green crystal. You also see that you can turn the beam.
Next to the beam you also see a round disk with a hand on it.
Go to the post with the glass sphere , you see that it is directed to the wrong side.
You can
turn the
big ring, do that and direct the lenses towards the green light on the other
side of the gorge.

Turn to the green light beam and turn the light beam 90 degrees, so that the light beam is shining in your eys

The
green beam is now focused on the glass sphere and from there the rays goes to
the green crystal on the other side of the gap.

Click
on the hand next to the crystal and you will be teleported across the gorge.

Other side of the gorge
Here
is also a green crystal, above it you see a hemisphere on the rock with the
letter B.
If
you look at the broken suspension bridge you see a lever on the left.
Pull
the lever and ..... on the other side of the gorge
the pole with the glass sphere is
pushed up.

If you want to go right back to the other side, you have to lower the pole again, but if you first solve the puzzle here, you have to leave it up there.
I'm going to solve the teleporter puzzle here now, so I leave the pole up
now. Turn to
the right and follow the path.

Aacross a wooden
bridge you come to device X. Device X is
connected with a teleporter that's inside the rock behind it. Further on
you see Device Y and behind device Y you also see a
rock with an teleporter in it. At the end of the path stand a table.
Take a quick look at Device X but don't touch anything
right now. In the center of device X you see
button A and diagonally underneath it you see button
B. On the right you see a lever, sticking
out device X.

Walk
on to device
Y and take a good look at it. On top you see 7 lights. 3 of the 7 lights are
now on.

Walk to the table,

On
the table
you will find 3 things, a bronze object, a letter and a
drawing.

Take
the bronze object and view it in your inventory, it is a quarter circle.
Read
the letter under the bronze object and then click on the
drawing.
Go back to device X and number the circles
C to G. Name the Lever as
Lever H.

Go
back
to device Y and number the lights 1 to 7. The
ghts 1, 2 and 6 are now lit.

Light
6 is now also lit and it's linked with circle F of device X,
so on device X circle F is now selected.
If you leave one of the other lights on, another circle on device X getsselected: 3 = C, 4 = D, 5 = E, 6 = F and 7 = G.
Go back to device X and now click lever H down. Device X will be activated and a pointer will appear in circle F at the 4 position and it points to button A.

You have to set the pointer
in F correctly. If you click on button A, the pointer will move 1 place. The pointer in F must point to the next circle G as shown in the drawing.
But don't click button A yet, we'll do that later.
You
also see that a teleporter pole with a lens on top has come up behind device Y, you have to aim
it and you do that with the pointers in the circles of device X.
So now put lever H up again and ...... that teleporter behind device Y disappears again, but the levers L, M, N, O of device Y are back.

Go
back to device Y. You will now turn all the lights
of this device on.
With
the levers K, L, M, N, O you can switch the lights off and on.
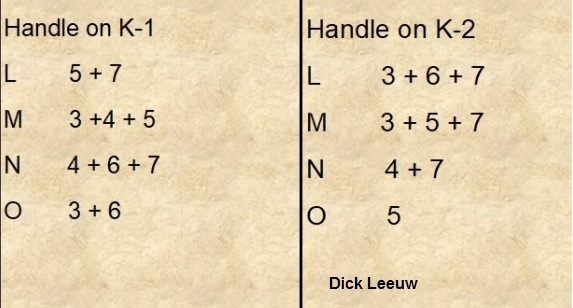
Your starting position must be that only lights 1, 2 and 6 are lit now.
If
lights ights
1,2
and 6 are now lit, with lever K on K-1, then click on
levers L and M.
Then put K on K-2 and then click on lever O.
All lights are on now

With
all lights on on
device Y go back to device X and lower lever
H again.

If you look closely you can see that the pointer in E and F must both rotate 5 places but you can't do this now because all light on device Y are on now and so if you click Buton A now then all pointers of device X will rotate, You first have to make sure that you can only rotate the pointers E and F into the correct position. Move lever H up again and then go back to device Y.
Put K on K-1 and click on L and then
on M.

Back
to device X and lower
H. You will now only see pointers in E and F.
Click
5 x on button A and........ the pointer in E then points to F and the pointer in F points to G.

Put
lever H up again and go back to device Y.
Lever
K is still at K-1. Click lever O. Set K to K-2 and click again on
lever O. Now lights 1,2 and 3
are on.

Go back to device X and turn H down again.
Only
C is now selected. Click 3 times on button A and the pointer in C will then points to D.

Put H up again and go back to device Y.
Lever K is on K-2, click lever O. Set K to K-1 and then click on lever M.

Back to
device X and lower H.
Click
4 times on button A and the pointer in D now points to E.

Now
all the pointers are pointing in the right direction,
put H up again and go back to device
Y.
Now
you need to turn all the lights on again, put K on K-1 and then click L and O.

Back to device X and put H down again and.....
....
there are now 5 teleporters up and they are now all pointing in the right direction.

Do
not put lever H Up again
again because otherwise the teleporters will disappear and you will not be able to
travel.

Click
on the plate with the hand again and you will be teleported back tot he source of the
light beam by another route.

You
are now back at the extended post and you see the beam of light but you also see
another green crystal, only the beam is not aimed at the correct position.

The green crystal is higher but there is also a glass sphere on top of the pole. Now aim the beam upwards, but the beam now goes the wrong way.
Next to the pole is a lever, pull it and the pole lowers, also turn the light beam down again.

Turn the ring so that the beam goes in the direction of the other green
crystal but the beam is too low for the other green crystal

Pull
the leveragain and the pole will rise again. Then turn the light beam
upwards again.

Now
you see that the beam is on the green crystal so click on the plate with the
hand again and you fly to the other side.

Arrived
at the crystal you see 2 iron cupboards, a larger and a smaller cupboard. Behind
it is a low round light box.

Walk
to the largest cupboard and click on the lock.
Electrical
cabinet puzzle 1

The cupboard opens and you find a puzzle in it.
. You have to make a path from point A to point
B. By clicking on the circles you can rotate them. It is not that difficult, but
here is the solution.

The light switches on in the round light box and the small cabinet slides open.
Inside you will find green teleport crystal and below it a
lens for the cannon. Take the
crystal and the lens.

Back
to the Watchtower:
You're
done here now, so click again on the plate with the hand at the green crystal and
you're back at the source of the light beam.

Walk
across the suspension bridge to the other side.

Stop
at the cupboard, at the bottom of the stairs. In the top box is a drawing of a pillar and a quarter of
a round disc.

You have just found a quarter on the table at device Y, is this some clue where an other quarter is hidden?
Make a note of this and then go up the stairs on the right, follow the
path and go up another flight of stairs.

Follow the path and turn right at the end. Walk to the Watchtower. You are now going to a new area. but you need the telescope for this
Chapter 10: New area: The Summit:
2018: Walkthrough by: Dick
Leeuw and Louis Koot
Text by Dick Leeuw and screenshots by Louis Koot