
2019: Walkthrough by: Louis Koot
If you have found this walkthrough via google search or via another site then you have probably not visited my site.
A lot more very detailed game walkthroughs can be found on my site at: www.pcgameswalkthroughs.nl
Part 2: Find the 4 Blue Fragments in the Secret Cave
Chapter 8: The Underground Railway

Enter the Railcar and turn right. You look into the Rail Car Tunnel through the Railcar window. There are 2 Square Orange buttons under the window. Right is Forward, Left is backwards. Click on the right orange button. The railcar moves forward through the tunnel and stops at:
Station 1: The Ships Paintings Gallery

Through the window of the railcar you can see that the rail tunnel splits, further on, to the left and to the right. There is a switch in the rail there. Turn right. You look at Station 1 and you see a yellow wooden door on the wall that is connected via a pipe to a panel with 9 squares, just like the railling monitor. This is the switch box, but let's leave it alone for now

Step out the rail cart. You are then standing in front of the 9 squares panel. Turn right. To the right a ladder goes up and you see another Gray Plate on the wall.
Go forward, look at the Gray Plate and note this down it again. This Gray Plate has 3 black lines at the top right and the numbers Red 8, Blue 20, Green 12.

Turn right to the ladder. Look up and click 3 times ahead on the ladder to climb up. When your Up turn left. A window.

Through the window you can see the back of the Tower. On the left side of the window you see that the Blue Pipes and the Purple Pipes come in here. You also see that the Blue Pipes change into Yellow Pipes and that the Purple Pipes become Green Pipes. Click in the window to look outside. Then look down. You look at the foot of the tower and you now see a Blue Symbol.......Draw it over on a piece of paper

Look up again and zoom out the window. Turn left. A closed fence. Through the gate you look into the Paintings corridor.
The Yellow and Green pipes go there. Turn left again. Again a fence and again you look into the paintings.

This painting corridor is the Ships Gallery. Turn left again and you are again in front of the ladder hole.
Look down and descend the ladder. Down again, turn left twice.

On the left is a Metal Door and on the right a ladder. On the back wall is panel with 7 black circles. This panel is connected to the metal door via a pipe and a red button. Go forward to the panel. Press the red button. Unfortunately .... the metal door does not open. If you click in the black circles, colors appear in each circle. You can get 6 colors in each circle.

Turn right to the ladder and look up. Above your head the ladder hatch closed off with a grid. Look down again.

To the right of the ladder is a Square Red Button on 2 green pipes. At the top of the first ladder you have seen that the Purple Pipes become green pipes. In the switch box, at level 1 in the Tower, you have just made the connection for the purple pipes. So this ladder button should now have power. So click on the Square Red Button. You hear that something is sliding open. Look up again along the ladder and ..... Yes .... the grid is gone now.

Climb up ladder now and when you're up turn right. You see that you are now on the other side of the fence. Turn right again. There is a hatch in the wall

There is a red button above and below the hatch and in the hatch are 3 blue bars that form a figure. When you click on the red buttons you change the figure that the 3 bars make. By clicking on the red buttons, you can create many different figures with the 3 bars. This is Hatch 1. Turn right. You trough the
Ships paintings Gallery:
Ships Paintings are on the walls in this corridor. Go through this corridor to the other end and look at the paintings and count how many paintings there are on the walls
Go forward, left, forwards, left and....... you are standing at Hatch 2.

This Hatch also has 2 red buttons and 3 blue bars that you can put in many positions. Turn right, forwards, left, 1 forwards, left and you are at Hatch 3.

Well .... same as Hatch 1 and Hatch 2. Turn right, forward, left, forward. You are now at the end of the paintings corridor. Turn left.

You are standing in front of a Monitor. A green box is under the monitor. The Monitor is connected to Purple Pipes Press the Monitor button. ....nothing happens. There is no power for the monitor. Call this MONITOR 1 To activate this monitor it is necessary that the Metal Door, below, opens. But first of all, that panel with the 7 circles must be activated.
Walk back through the paintings corridor to the ladder and while you do that, take a good look at the paintings. You notice that the paintings are connected to each other via the Yellow Pipe. At the window you have seen that the Blue Pipes, from the pipe chamber of the tower, change into the Yellow Pipes. You also saw that the panel with the 7 circles is attached to a yellow pipe. You now have to go back to the Electric Switch Cabinet in the Tower to make the Blue Pipe Connection with the 6 switches, so that the paintings and the panel with 7 circles get power.
So go back to the beginning of the paintings and go back down the ladder and make sure you get back in the rail cart.

In the rail cart, press the left orange button to drive backwards, back to the start point underneath the Tower.
Get out and climb up the ladder through the metal hatch and go back to the

Electric Switch Cabinet:
Open the Electric Switch Cabinet gain.
Actually, you first have to check out the connection between the Blue Pipes and the main power box in the Pipe Room, but I will save you this hassle.
For the Blue Pipes the switches should be as follows: 1 and 2 = left, 3 and 4 = right, 5 and 6 = left.

When you have this, go back to the rail cart and drive back to Station 1. Get off again and go to ladder and climb up again to the:
Ships paintings Gallery:
Walk through the paintings to the 6th painting...Look at that painting

You now see, in the front of the ship in this painting, 7 colored circles. Note down this color sequence.

This color code is randomly determined, so you probably get a different color code, but It is the code for the panel at the Metal Door.
Go back to the ladder and climb down again and then turn left to the panel with the 7 black circles.
Click in the circles and put the same color in every circle as you saw on the 6th painting:

Then click the red button and turn left to the Metal Door. The Metal Door is now open.

Go forward through the now opened Metal Door. You're in front of a Green Button ... it's a lift button. Turn right. You will now see such a Monitor again and this too has no power. Call this MONITOR 2. Turn left again and now press the Green Button. You appear to be in a lift and are now going up. When the lift is stationary again, you will see Yellow and Purple Pipes on the wall. Turn to the left and to the other walls of this square elevator shaft.
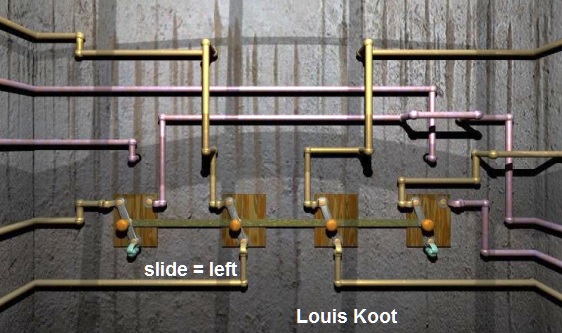
The Yellow and Purple Pipes are on all four walls. You also see that the pipes go through the walls. The pipes go to Hatch 1, Hatch 2, Hatch 3, Monitor 1 and Monitor 2. Take the Green Button as a starting point and then turn left 1 time. You will see the pipes on this wall and under the pipes you will see a GREEN SLIDE with 4 buttons on it.

You can click the Green Slider to the left and right. If you click the Green Slider to the left, the slider connects the Yellow Pipes and MONITOR 2 will have power. If you click the Slider to the right then the slider connects the Purple Pipes and Hatch 1, Hatch 2 and Hatch 3 will have power. You must now do the same here as you have done in the Pipe Room of the Tower. Look, on every wall, how to connect the Purple Pipes and the Yellow Pipes to each other at the points where they enter the WALL, and thus connect with the Hatches behind the wall. The pipes will make a figure at that point. You have to do this in your mind, or draw the pipes over on a piece of paper and then draw the red lines in them.

You then have to create these figures on the 3 Hatches in the painting gallery to actually make the connections. Remember that you see it here in mirror image. When you have found the connections between the pipes, then turn around to the wall with the Green Slider and move the Green Slider to RIGHT, so that the Purple Pipes are connected.

Then turn around to the Green button and press it again to go back down.
Turn around, get out of the elevator and climb up the ladder again to the Ship Paintings gallery

Now go to the 3 Hatches and make the figures of the connections between the pipes by clicking on the red buttons of the hatches. This is how it should be:

After you have set up Hatch 1, Hatch 2 and Hatch 3 correctly, go to MONITOR 1, at the back of the painting corridor. Press the orange button on Monitor 1 and .... You will now see a diagram in the monitor. You see an "arrow". The "Arrow" points up and consists of 5 triangles. There are numbers in the triangles ......Make a drawing of this

Then go back down, via the ladder, and open the Metal Door again by clicking on the button of the 7 circles panel again.

Go up again with the lift and turn left to the pipe wall with the Green Slider. Now move the Green Slider to the LEFT so that the Yellow Pipes are connected.
Turn back to the Green Button and descend again.
When the elevator has come down again, turn clockwise to MONITOR 2 and press the orange button on the monitor and ........

In Monitor 2 you now also see an "Arrow". This "arrow" points down and here you can see numbers in the triangle boxes. Draw it over.
These two "arrows" are the solution for a puzzle that you have to solve later in Station 2. You have to put them together, on a piece of paper, to make it into a square with 8 triangles in it, in which you put the numbers as in the 2 "arrows". But you can forget about this, because I'll give you the solution for that puzzle later on.
We are ready at this Station. So go back to the Railcar and into it and press the Forward button again.
The Railcar continues through the tunnel and at the junction we enter the left tunnel and then we stop at Station 2.

However, we do not want to be at station 2 now because we need some more instructions. So immediately click the orange Forward Button again to continue to:
Station 3: The Doors Hall:

Turn right, 1 forward, right. You see a closed hatch in the wall. Go forward and press the Red Button next to the shutter. The hatch does not open.
Turn left. You look at a beautiful double door, at the top of a few steps.

Go forward 1 time. You then stand at the steps. Turn left. On the left wall is a Screen Panel. Go to it and then click on the Red Button below the panel. A line appears in the screen. There are a number of geometric figures through the line. If you click on the green buttons, next to the screen, you scroll the line of figures in the screen to the left or to the right.

There are a lot of geometric figures on the line. Draw them all over. You will encounter these geometric figures later on at another puzzle. If you have done this, turn around completely. There is a hatch in the wall to the right of the steps. Go there and open the hatch. Through the window you can now see the Rotating Huts Maze at Station 2.

Look down ...... Beneath the huts you see the 2nd geometric symbol ... draw it again..this is a green symbol

Look up again and go out of the window. Turn right. You stand in front of a narrow roller shutter door. Click on the Red Button, on the left of the door. Nothing happens....... This Red Button is connected to the brown box via a green pipe. From the cupboard come 4 green pipes that then go left and through the window wall and then they disappear through the Double Door wall. When you have seen all of this, go up the steps to the Double Door, open the Double Door and the take step forward You are now in the:
Doors Hall: Part 1:

Stand still. You can divide the hall into the Front hall, the Middle Hal and the Back (Rear) Hal. You are now standing in the Front Hal. To the left and right you see a Brown Door. In the Middle Hall you see, left and right, a Green Door. In the back of the Back Hall you see again steps that go up to a double door. Now first go 3 times forwards to the Back Hal. You then stand at the steps. A panel is in the left wall. Purple Pipes go along the left wall to the Double Door wall and disappear through the wall. Now click with your Slanted left Finger to stand in front of the Panel in the left wall.

Above the panel is a Golden Pipe that goes into the wall on the right of the panel. The panel has 4 squares, each with a circle. Turn completely around to look at the right wall. There is a window in the right wall. The Golden Pipe goes through the hall to this window and then, left of the window, disappears through the wall. Go forward and look through the window. You see a Metal Door. On the left you see a lever that sits in the Golden Pipe. On the right you see just a part of a Gray plate, of witch you have already discovered 4

We now only limit ourselves to the Brown Door Left, in the Front Hall and the Green Door Left in the Middle Hall.
So go back to the entrance of the hall and turn right. You are now in front of the Brown Door Left
Brown Room Left Side:
The Brown and Green Doors are locked. But on the 3rd Level Back Side, of the Tower, you have found a Key behind a grid. With this key you can open the 2 Green and 2 Brown Doors here. So take the Key from your inventory and click on it on the key hole of the door. The key will automatically disappear to your inventory again

Now open the door with the hand. You see a Metal Hatch in the floor of the room. Go forward and look down at the hatch. Click on the hatch but it does not open.

However, you can see that the hatch is connected to the Green Pipes. Look up again. Turn right. You see a lever in the Green Pipe. Click this Lever. Nothing happens........ Turn right again. You can see that the Green Pipe is going straight across the inside of the door and then further around the room. However, the "connection" of the Green Pipe is broken as long as the door is open. Now close the Door.

Turn left again to the lever. Click on the Lever again and...... Now the lever goes down and stays down. Turn left and look down again at the Metal Hatch.
Click on the hatch again and now it will go open. Go down the ladder and turn right. You are in a narrow cellar corridor.

On the left and right there are LETTERS on the walls. Go back through the hallway but always look at the letters and NOTE THEM DOWN. These letters are an indication for a later puzzle:

At the other end of this "letter" corridor you climb up the ladder. At the top of this ladder you are in a narrow stone shaft.
Above the ladder you see a green square plate with 8 circles and 1 square pink button.

This square green wall plate is the first indication for the new area, but you can not do anything with it yet, but remember that this Plate is here.
Turn left. On the wall you see another Gray Plate with 3 black lines and the numbers Red 14, Blue 1, Green 21. Note it all down....

Turn left. Golden Pipes come out of the wall. Turn left. The Golden Pipes go to a lever. A small red light is on the lever.
Click on the Lever. The lever goes down and up again but now the small light is green.

Turn left, look down and descend the ladder and go through the "Letter corridor" to the front hallway and climb up again to the Brown Room.
Turn around and open the door and step forward again in front of Hal. Turn left, 1 forward and click with your slanted left Finger on the Green Door Left Side.
Green Room Left Side:

Open this Green Door again with the key from your inventory and then with your hand and step into the room.

|
Look around. There are 3 metal plates on the 3 walls. There is a button above each plate. The Metal Plates are connected to the Purple Pipes. Look carefully at the plates. You notice that the plates have an Outside Square and an Inside Square. In the Outside and in the Inside Squares of each Plate there are Screws. Click on the buttons above each of the 3 plates. The button will then have a color. So there is a Blue Plate, a Green Plate and a Red Plate. Then count, for each plate, the number of screws that are in the Inside Square and that is in the Outdoor Square and then mark these numbers behind the color.
Do you have this? Then leave this room again to the Middle Hall. |
For now we are ready here. Of course you can also open the Brown Door and the Green Door on the right side of the hall to look around in the 2 rooms. And you can also go through the Double Door in the back to also have a peek there. In the two rooms on the right side of the Front Hall and the Middle Hall you will find 4 screens where you can not do anything with it and if you go through the double door, in the back of the Back Hall you will notice that you will end up in a gap stand where you, now, can not go any further. In PART 3 B of the walkthrough we come back here to do the rest of the puzzles here.

So go back to the Railcar and back in again. Click the Reverse button again to drive back through the tunnel to:
Station 2: The Rotating Huts Maze:
The 1st Blue Fragment:
Turn right, 1 forward and turn left. Another metal hatch in the wall and a red button. Click on the Red Button. The hatch does not open. Turn left 2 times. You see a Metal Door with a Red Button on the right side. On the left a window and on the right you see a panel with a square on top of it that is divided into 8 triangles. A blue pipe goes from this panel to the Red Button of the door.

Go forward to the door and press the Red Button. The door has no power, so the door does not go open. Turn clockwise to the triangle panel. Well ..... you have seen this before. On the 2 Monitors in Station 1 you have seen the 2 halves of this panel. In the triangles were the numbers 1 to 8 where in. I then told you that you had to merge those two "Arrows" into a " on his point standing square with 8 triangles". Well .... that's this square. You can click on each triangle. The triangle will then turn orange. So you have to do that according to the numerical order that you saw in the two "Arrows". So as follows:

So click on the triangles according to the 1 to 8 order and then turn left to the door. Now click on the Red Button again and now the door will open.

Go forward 2 times. You are now in:
The Rotating Huts Maze:
Turn counterclockwise to see the 4 Huts that are in this cave. The Huts have doors on each side and the are connected by paths.
There are High Paths and Low Paths that can be reached by ladders. Start by naming the Huts: Left Front Hut, Right Front Hut, Left Rear Hut and Right Rear Hut.

Let's go and see what is required of us here. Turn right, forward one time, left and forward to the Right Front Hut.

Open the door by clicking the red button. You see that the path through this Hut now goes to the left and then further to the right side of the Left Front Hut.
Follow the path to the Left Front Hut and open the door of that Hut...... and.....He.... you can not enter the Left Front Hut from this side.

Turn around and return to the Right Front Hut, open the door and step back into the hut and then go 2 times at an angle and then 1 turn forward and turn right. You are now back on the start path but now stand at a double Metal Hatch that's on the iron pillar that stands in front of the Right Frond Hut. To the right of the hatch is a lever that is up now. From that Lever a Golden Cable goes to the back of the Right Front Hut. There is also a Blue Rail, along the ceiling, that goes from here and then goes along the right wall, to the back wall behind the Right Rear Hut
Open the Metal Hatch. You'll see a panel with 4 Circles. There are red lines in the 4 Circles. This is the Hut Rotation Panel.

If it is now in your game the same as in my game then the red lines in the Top left and Bottom left circle are Vertical and the red lines in the Top right and Bottom right circle are as a "Back Slash". These 4 Circles represent the 4 Huts. By clicking on the circles you turn the Huts.
Now name these 4 Circles exactly as you have named the Huts.....as in this screenshot

I'm going to explain it to you first. In this Hall there are 2 Metal Doors that you have to reach. One door is in the left wall, on the left side of the Right Rear Hut. The 2nd Metal door is high in the back wall, at the rear of Left Rear Hut. You have to make an uninterrupted path to these 2 doors and to do that you will have to turn the Huts a few times. It's going to be complicated, but he......everything is complicated on this from God Forsaken Rhem Island
A: To reach the Metal Door left of the Right Rear Hut
On the Hut Rotation Panel you click the Left Rear Circle once, to place then red lines in that circle Horizontal.
Leave the Left Rear Circle and the Left Front Circle as they are but click the Right Front Circle 1 once to change the Back Slash to a Slash.

Turn right. You now see, on the right side of the wall, a small metal shutter. You probably have noticed this shutter earlier. Go forward and turn right, or go to this shutter via the slanting finger. Open the Shutter by clicking the button. A lever with a red light. Click on the Lever. The lever goes down and up again and the red light is then green.

With this you have activated the Red Button of Metal Door, to where you are now on your way to
Turn around to the Right Front Hut and go forward to the hut. Open the door of the hut and look .......
Due to the fact that you have alter the "Back Slash" of the Right Front Circle, on the Hut Rotation Panel, into a regular Slash the path through the hut now goes to the right...You have turn this Hut one turn..... Okay ...... we are now going to follow the route to the 1st Metal Door. Be careful and try to make no mistakes......... It can be quite confusing.
Go Forward, slanting right, look down and descend the ladder to the bottom path,

2 times clockwise, slanted right, 4 times ahead, climb 3 times up the ladder, slanted right , you are at the Left Front Hut, open the door of the hut, 2 times ahead through the hut, right,

look down and descend the ladder, 2 times right, 4 times ahead, left, 2 times ahead, climb the ladder, diagonally left, you are behind the Left Rear Hut

open the door of the hut, forward, diagonally, to the right, turn to the left, look down and climb down the ladder again,

2 times right, 2 times forward, left, forward, climb the ladder, diagonally right, you are now at Right Rear Hut, open the door of the hut.

Through the hut you now see the 1st Metal Door. Go through the hut twice and you stand in front of the Metal Door. Click on the door. Unfortunately, it does not open. Turn back to the hut. This side of the Hut has 2 Red Buttons. Click on the Left Red Button. You hear something open sliding. Turn back to the Metal Door and see ..... it is now open.

NB: If you can't open this metal door now, after you have pressed the left red button, it is because you have forgotten to click that lever behind the small wall shutter down. You will then have to go back to that shutter to do this.
Go ahead into the red stone room. There is a window above the small ladder. Click in the window. You then stand on the small ladder and look through the window.

Through the window you look into the Doors Hall of Station 3. To be precise, you look at the panel that's on the left wall in the Back Hall of the Doors Hall. You are now in the room that you already saw when you looked through this window in the Doors Hall. The Golden Pipe begins on this side of the window, and goes all the way around the window and then through the Doors Hall to that panel on the other side. Right next to the window are 2 Red buttons. To the left of the window is a Golden Button with a pointer.
Click once on the top Red Button and see what happens...... In the panel, on the wall in the Doors Hall, you will see a Yellow Dot going through the 4 circles of that panel. Click the Lower Red Button and see what happens with the Pointer in the Golden Button..... With the lower red button you can change the pointer in the Golden Button 1 position. Click on the Upper Red Button again. Again you see the Yellow Dot go through the panel, but now in a different order.
Let me first explain it to you again.
When you click the Upper Red Button, you'll se that the Yellow Dot goes in a certain order through the 4 squares. When you click the Lower Red Button you move the pointer of the Golden Button 1 position and when you then click the Upper Red Button again the Yellow Dot goes through the 4 squares in a different order. The sequence in witch the Yellow Dot goes through the 4 squares makes a LETTER.
See the Golden Button as a CLOCK and the Pointer as the Hand of the clock. With the Lower Red Button you can put the Pointer at 12 positions. These 12 positions are the HOURS of the Clock. This is what you must do" set the Pointer of the Golden Button at all hours and then always click on the Upper Red Button and see in witch order the Yellow Dot goes through the 4 squares, on the panel.....That order is a PARTICULAR LETTER. Write down those letter at the HOURS of the Clock.
NB: you must see the 4 squares in the panel as dots. .......When you click the Upper Red Button then the "Yellow Dot" describes a "line" from square to square and in this "line" you can recognize a letter. You have seen The Letters that the Yellow Dot makes in the "Letter corridor" under the Left Brown Room of the Doors Hall.
Start at the 1 o'clock position and then click on the Upper Red Button and note down the Letter that you see the Yellow Dot make .Then set the Pointer to 2 o'clock and click the Upper Red Button again and write down the letter again. Continue until you have gone all the way around the clock. Note it all down in a scheme, something like this:
|
Hours of the Golden Clock |
Letters of the Yellow Dot |
| 1 | C |
| 2 | Reverse N |
| 3 | U |
| 4 | Reverse U |
| 5 | X with line left |
| 6 | X with line below |
| 7 | Reverse Z |
| 8 | Reverse C |
| 9 | X with line on top |
| 10 | X with line right |
| 11 | N |
| 12 | Z |
|
|
|
Do you have this? Then zoom out of the window and turn left. Another Gray Plate.
I lost track on how many of those for Gray Plates we already have seen.....

This one has 3 lines that make a figure and the numbers Red 6, Blue 15, Green 10. Anyway....note it down again.
Turn around to the other wall. A lever with a red light. The lever is attached to the Golden Cable. Click the Lever. The red light will now turn green.

With this lever you have activated the button of the 2nd Metal door, and that is where we have to go now. But first you have to go back to the Hut Rotation Panel. So follow the route back in a reversed order. I will not write this out again step by step for you. It is just following the route in reverse order. I'll see you again at the Hut Rotation Panel
B: To the 2nd Metal Door behind the Left Rear Hut
Back at the Hut Rotation panel, open the hatch again.
Now place on the panel the Right Rear circle on the Slash position and the Left Front circle in the Vertical position

Go back to the Right Front Hut and open the Hut Door. Now follow this route: Forward, diagonally, right, look down, descend the ladder,
2 times right, diagonally right, 4 times ahead, climb the ladder, diagonally right, open the door of the Left Front Hut, 2 times ahead, right,
look down, descend the ladder, 2 times right, 4 times ahead, left, 2 times ahead, climb the ladder, diagonally left, forward.
You are back at the Left Rear Hut. Open the door of the hut and ...... the path through the hut now goes to the left, to the rear of the Right Rear Hut

Go through the hut to the back of the Right Rear Hut. Here the Hut has 2 Red Buttons.

The left Red Button is connected to the Golden Cable. Click the Left Red Button. You hear a "Ding" sound and the light on the button is green. Unfortunately, you now have to go back to the Hut Rotation Panel, so follow the route in reverse order again and make sure you are again in front of the closed hatch of the Hut Rotation Panel.

Back at the Hut Rotation Panel you click now the Lever that hangs on the right and is connected to the Golden Cable. The lever goes down and up again and you hear something shift. Open the Hut Rotation Panel again. He..... the Rotation panel is gone. You have sent it up through the pole and instead of the circular panel there is now a Map here. Zoom in on the map to view it in close-up

So it is a sketch of this Huts Maze The green lines are the cables that you have already activated here. The red circle, behind the Right Rear Hut, is where you end up eventually and where you will find the 1st Blue Fragment. You see the 2 metal doors. You also see that from the 2nd Metal Door the Blue Rail goes right through the room to ..... the Pole of the Hut Rotation Panel. So now we are going to the 2nd Metal Door. Z
Zoom out of the floor plan and close the hatch. Click again the Lever, right next to the hatch. Open the hatch again and .... The Hut Rotation Panel is now back.
Now set the Left Rear Circle to Vertical, the Left Front Circle on Horizontal and the Right Front Circle on Back Slash.

Close the hatch and click the LEVER again....Don't forget this....... Go back to the Right Front Hut, open the door and follow this route now
Forward, diagonally right, forward, open the Hut door, 2 times forward, right, 3 times forward, right, forward, left,

Open door of the Left Rear Hut, 2 times forward and climb the ladder. At the top of the ladder you are standing in front of the 2nd Metal Door. The light on the Red Button is green, so this button has power. That is because you have pulled the lever behind the 1st metal door. So press the Red Button. The Metal Door opens. Go forward and turn right. He .... You're in a Tram

The Tram is hanging on the Blue Rail, so it is actually a cable car. Press the Square button and .....

The Tram now passes through the room via the Blue Rail and delivers you at the TOP of the Pole where the Hut Rotation Panel is located. Turn clockwise. A Ribbed Metal Hatch. Open the hatch and ..... The Hut Rotation Panel is now up here. Now set: the Right Rear Circle on Back Slash and the Right Front Circle on Slash

NB: If you do not see the Hut Rotation Panel now, you have forgotten to click the Lever of the Rotation Panel again. You will then have to go back to do so.
Turn back to the window and click the button again. The Tram goes backwards and delivers you back behind Hut Left Rear. Turn right. We are now going to follow the route to the Right Rear Hut as follows: Forward, look down, descend the ladder, 2 times right, open the Hut door, 2 times forward, right, forward, left, 3 times forward, left,

open the Hut door, forward, diagonally, forward, and you are now standing in front of the Right Rear Hut, open the door, forward, diagonally, right and ......

a ribbed hatch at the end of the path. Go forward to the ribbed hatch and press the red button above the hatch.

The hatch opens. In the hatch is the 1st Blue Fragment ... take it
You now must return to the Cable Car at the 2nd Metal door. So zoom out of the hatch, turn around and follow the route back to the ladder behind the Left Front Hut. Again this is just follow the route back in reverse order. Climb the ladder again and open the Metal Door and enter the Cable Tram again. Press the button under the window again and the tram goes back to the top of the post. Turn right and, on the Hut Rotation Panel, put the Front Right Circle back on the Back Slash:

Go back with the Tram to the 2nd Metal Door and get off the tram and follow this route back to the front of Hut Right Back, so to the lower hatch of the Hut Rotation Panel: Forward, look down, descend the ladder, 2 times right , open hut door, 2 times forward, right, forward, left, 3 times forward, left, open cabin door, 3 times forward, open hut door, forward, 2 times diagonally and you are back at the beginning.
Right in front of you is now again the "station house". Go forward three times, press the Red Button to open the door and go forward 2 times and turn left.
You are back at the Railcar. Step back into the Railcar, turn right and press the Forward button.

The Railcar now brings you back to Station 3: The Doors Hall
Station 3: The Doors Hall: Part 2:
The Railcar has delivered you again at Station 3 of the Underground Railway. I assume that you still know what it looks like here and what you have already done here in PART 3A.
From the Railcar you go diagonally, diagonally left and then forward through the doors.

You are again standing in front of the steps with the Double Entrance Door of the Doors Hall.
Turn right and go back to the metal window hatch that is in the right wall. Open the hatch again and click again in the window.

You look back into the Huts cave. Look down. You will see again that Green Symbol, at the end of the bottom path at the Left Front Hut...

...If you haven't draw this symbol the first time you saw it, then do this now.
Look up again and zoom out the window. Turn again clockwise to the narrow roller shutter door. As you know, this door will not open if you click on the Red Button. We are going to change that now. Note that the Red Button is stuck to the Green Pipes. Turn clockwise and go diagonally to the steps and then to the Double Door. Open the door and step forward. You are back in the Front Hall.
Last time we went through the Brown Door and the Green Door on the left side of the Hall. Now we take a look at what is behind the Brown Door and the Green door on the right side of the Hall So open these 2 doors with your key and look inside the two rooms.

In both rooms you will find 2 panels, so in total there are 4 panels. Each panel has 4 squares and there is a black circle in each square.
If you click on the top 3 circles of each panel, a yellow ball will appear. In the bottom circle of each panel you can click different figures.

Just play with it and also note that these 4 panels are connected to the Green Pipes, so with the Red Button of the narrow Roller Shutter Door. What should you do with these 4 panels? Well .... if you are finished with the panels then go to the Back Hall. There are 4 lamps in the Back Hall. Each lamp has 3 balls and each lamp is fixed to the wall with a wall plate.

|
There are 2 lamps on the left wall and 2 on the right wall. Take a look at these 4 lamps and note, for each lamp, witch Ball is On and also note the Shape of the Wall Plate with which the lamps are attached to the wall.
Do you have this? You now have to simulate the situation of the lamps on the 4 Panels in the 2 rooms. Go to the: Brown Room Right Side:
Green Room Right side:
|
Do you have this? Now go back to the narrow roller shutter door. Back at the roller shutter door, click again on the red button and .... the door will now go open

Go into the small room. Turn left to the left wall. A Green Plate with, to the right of it, a Lever. This Green Plate is the back of the Roller shutter in the left wall of Station 2. Click on the Lever to lower it. Turn around to the other wall. Also a Green Plate with Lever. This is the back of the Roller shutter that is on the other side of this wall, in the first hallway of this station. Also lower this lever.

Turn right and go back through the narrow door. Turn left and then go diagonally to the gate, next to the roller shutter door and right in front of the steps.
Go forward through the gate and turn left.

You are standing in front of the roller shutter that you could not open before. Click on the Red Button and ...
. ........the hatch will now open. In the wall box is the "1st Fragment of the Arithmetic Disc"....Take It:

Turn around and return to and in the Rail Car.

Click on the Reverse button again and the Rail Car will return to:
Station 2: Rotating Huts Maze
Turn right. In the left wall of Station 2 you see the metal shutter again. Now go straight ahead again via the slanted left arrow and press the Red Button again. This roller shutter will now also open and the "2nd Fragment of the Arithmetic Disc" will appear in the wall box, so TAKE IT

Go back into the Rail Car and press the Reverse button again to drive back to:
Station 1: Ships Gallery.

The rail switch in the tunnel has to be converted so that the Rail Car can go to the right through the tunnel if you go forward again. Turn right. You will see the 9 Square Panel that is connected to the Green Wood Cabinet on the left wall. That is the switch box. Go forward and turn left to the green box. Click on the Red Button. The box does not open. Turn clockwise to the 9 Square Panel. Well ..... On the Railing Monitor of the 1st Level of the Tower, you have seen in which order you have to click on the 9 squares. I told you then that you had to note that order down.
Now click here on this panel on the squares according to the 1 to 8 sequence that you have seen on the Rail Monitor.

Click, finally on the middle square 9.

Then turn left again to the green door and click the Red Button again. The green door now opens.
The switch lever is located in the box. The lever is now to the left. Click the Lever to move it to the right.

Close the box and return to the Rail Car and drive forward again by clicking the Forward Button.
The Railcar now enters the Right Tunnel at the turnout. It is only a short piece because your cart stops at a collapse.

Turn left. Another Metal Hatch in the wall. Click on the button to open the hatch.
You see a circle that is divided into 9 spaces. The numbers 1 to 9 are shown in the boxes. You need this right away, so note it down

Click on the Back button of the Rail Cart and drive back to Station 1 again: Ships Paintings Gallery.
Open the switch box again and turn the lever to the left again.

Dive into the Rail Car again and drive forward again and now all the way to the end of the Left Tunnel. You are now on:
Station 4: The Squares Puzzle:

Turn clockwise in the Rail Car......... You see a big Green Circle, a Red Button and a Metal Door. Go forward to the green circle and click the Red Button.
However, the Metal door does not open. The Green Circle has 9 boxes. Well .... you've just seen this in the right tunnel.

So click on the 9 boxes according to the 1 to 9 sequence that you have just seen in the black circle, behind the hatch in the right tunnel. Then click the Red Button again.
Turn right. The Metal Door is now open and you are looking into a small square room.

On the back wall there is a large panel on which you can see a Square. That Square is divided into an Outside Square and a Middle Square. On the left wall hangs a large panel with color boxes and on the right wall you see 2 round boxes. Go forward. You stand in front of the Square Panel. Left and right you see a line. The left line enters the Outside Square and the right line enters the Inside Square. The lines have an upper arrow and a lower arrow that you can click on. Turn clockwise to the 2 round boxes. There is a lamp in the top round box and a green lever in the bottom round box. The green lever is now set to "12 o'clock" and the lamp is white. If you click on the Green Lever, you will move it to the right and the lamp will change color.

By clicking on the Green Lever you can give the lamp the colors: Red, Green, Purple, Dark Blue, Light Blue, Yellow, Orange and White. Make sure the lamp is white again. Turn around to the large panel with the color boxes. The panel has 8 color boxes. They are the 8 colors of the lamp. Next to each color box you see, left and right, a number box where now the number 0 is in. You can not click anywhere in this panel.
What is the intention now? In the Green Room Left, from the Doors Hall in Station 3, you have seen 3 Square Metal Plates. Above each plate was a button that had a certain color when you clicked on it. Those 3 Metal Plates were also divided into an Outside and an Inside Square and I have let you count the Screws on those Metal plates and the number of screws you then linked to the Color of the button above the plates.

Well .... Now, here on the Square Panel, you now have to enter the number of screws for the Inside and the Outside Squares of the colors Red, Blue and Green
Take your note of the numbers of screws now. Turn around to the Lamp. Now make the Lamp Red by clicking on the green Lever.

Turn counterclockwise to the Square Panel: RED: The screw numbers for Red was: Outside = 4, Inside = 9. Now click 4 times on the Upper Left Arrow and then 9 times on the Upper Right Arrow. If you go wrong, you can lower the number via the Lower Arrows. Then turn to the left, to the Color Panel. You now see the numbers 4 and 9 next of the Red Box.

Now set the Lamp to GREEN and turn again to the Square Panel:

GREEN: Click 6 times on the Top Left Arrow and 9 times on the Top Right Arrow.

Now set the Lamp to LIGHT BLUE and turn again to the Square Panel:
LIGHT BLUE: Click 8 times on the Top Left Arrow and 4 times on the Top Right Arrow.

Turn to the Color Panel and check that the correct numbers are next to the colors Red, Green and Blue:
You have now activated those 3 Metal Plates, in the Green Room Left Side of the Doors Hall. But as you can see, there are still 5 colors left on the Color Panel. So I think we have to look for these colors / numbers somewhere else. Dive back into the Rail Car and drive backwards all the way back to the start of the railway tunnel, so to the TOWER. You are then back at Station 0, so at the tunnel under the Tower. Get out of the railcar into the tunnel and climb up to the entrance of the tower on level 1 via a steep ladder

We now continue with:
Chapter 9: The Tower: Part 2: The Circle Tram
2019: Walkthrough by: Louis Koot


