
2019: Walkthrough by: Louis Koot
Chapter 4: The Ring Line of the Tram: Part 1:
At the end of Chapter 3 you have found the 1st Golden Fragment in the Bell Tower courtyard and you have returned to the 9-Doors Hall and here we start with Chapter 4. In Chapter 3 we have investigate the area behind Door 5 and now we want to open Door 1. So leave the hall via back door again, turn around and press the orange button until you get a door code that contains Door 1.

Then open Door 1 with that code.

The area behind Door 1:
The Ring line Tram:
Step through Door 1 and when you are outside on the path, look to the left. You then see that doors 2, 3 and 4 lead to a "balcony" in the lake.

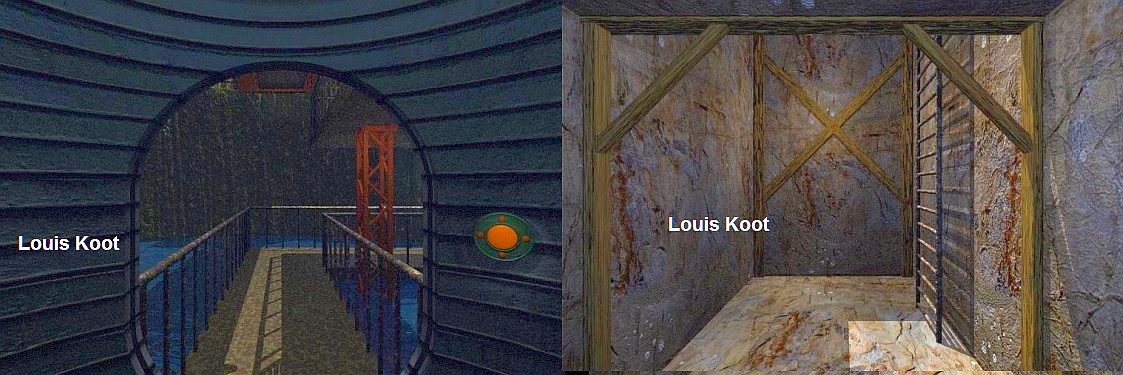
Turn back clockwise. The straight path goes to a low building with a lattice window and a gray door. The right-hand path goes to a pole with a traffic light and a flat cabinet. Everything is connected to each other by cables. Follow the right path to the traffic light and then open the flat cabinet

In the flat cabinet you see a round circle with 6 times 2 little circles in which either a cross line or a vertical line. This is the "Traffic Light Code Diagram", but this scheme only becomes important in Chapter 6. You can rotate the circle by pressing the red button, but do not do that yet. The traffic light above the cabinet has two lamps, which are not lit now. Close the cabinet again and turn around and follow the path to the gray door in the building. Before you click on the green door button, turn right. Through the grille window you will see a room with another door. Turn back to the gray door and now click on the green button to open the door.

Step outside. Right in front of you is an elongated wall with a gray door. On the wall you see 5 large round discs. A pipe goes right from each drive. Walk on. You then stand against the wall and right in front of 1 of those 5 round discs. If you place the cursor in a round disc, the number 1 appears in the disc. The number 1 appears in all 5 disks. Look to the right. You see another gray door and to the left of the door is a small box where the 5 pipes of the 5 discs disappear.

You can not open that door now. Go to the left gray door, so the door between the 2 left round discs, and open the door by pressing the green door button.
Step through the opened door and go to the Tram

South stop of the Tram

... you are at the South Stop of the Tram, 1 of the 4 stops of the Tram ring line. The path also turns right, but first walk to the Tram. Go stand straight in front of the Tram but do not get on the tram yet. Behind the Tram you see a purple button on the railing. You can not get to the purple button because the Tram is now in the way.

Get in the Tram and turn right. In the Tram you then stand in front of the control panel. The left arrow button is to ride the tram backwards and the right arrow button to drive forward. The Tram does not start, because a Starter disc must be placed in the blue circle, between the two arrow buttons. You will have to find that Starter disc first.
Water reservoir and the Central Lift:
Turn right and get off the Tram again and follow the path now, to the left, to a large square hole in the ground, at the end of the path. Go stand right in front of the hole and then look down. Via an iron ladder you can descend to the bottom of the hole. Climb downwards, via the downward finger, and when you are down you turn around. You look into a tunnel. Follow the tunnel. The tunnel will take you on a path that goes over the crater lake to a round lift tower.

Follow the path to the round Lift Tower. Press the red button to lower the lift and when the round door is opened you step into the elevator.

When you're in the lift do not press the yellow button directly but turn clockwise. On the right wall of the elevator tower there is a diagram of the tram rails around this lift tower.

On the diagram you see the Tram Ring line. You see that there are 4 Stations in the Ring line and that there is a switch in each Station that ensures that the Tram can go to the Stops points behind the stations. The Tram is now at the bottom station and that is the South Station, where you just were. Turn left twice to the left wall. On the left wall you see card with numbers. Copy this numbers card to your Documents Inventory by clicking on your Plus Booklet. This is the Digit card.

Turn right again and now click the yellow button and .... the elevator will take you upstairs. When the elevator is stopped, you look out through a hole in the wall.
West Station of the Ring Line

You see a brown metal house, on the other side of the ravine. That brown house is one of the 4 Stations in the Tram Ring line. However, the path to the Station has collapsed. Stay in the elevator and turn around and you will notice that you can leave the elevator on all sides because there are 3 closed doors with a letter / digit code panel. None of the 3 elevator doors are now open and you can't open them now because you do not know the door codes yet.
Turn back to the hole in the wall. This hole was once the 4th door of the elevator. Now step through the hole. You then stand for the deposition. Now look around first.

So you are actually on top of a large round crater with the round lift tower in the middle. The brown houses are the 4 stations of the Tram Ring Line and from the round Lift Tower there is a path to each station. The 4 stations are located on the North, East, South and West. Behind each Station is a stopping point of the Tram but to reach such a stopping point the switches have in the brown Stations must be set to the right direction. The Tram is now on the South Stop and you are now on the West side of the Elevator Tower. The brown Station that you see is the West station. If you look at the elevator tower, you'll see that every door of the elevator leads to a station via a path
Turn back to the road block board. The station on the other side, which you can not reach because the path has collapsed for your feet, is the West station. Look down.

You look into the crater and see the lake and also a lower path. You can not reach the West Station because some of the paths have collapsed. There is a "male" on the road block board. Draw this the male figure over because you have to remember the position of his arms and feet. Click on the board and ..... the board turns around. On the back of the sign you see a yellow round flap. Click on yellow flap to open it.

In the board is the Starter Disc for the Tram. Take the red Starter Disc (Amulet). The flap closes and the sign turns again.
Look up again, turn around and step back into the round elevator tower, then turn around again to the hole and press the yellow button and .... You go down again. When the elevator has stopped again, turn around and press on the orange button to open the door. Get out of the elevator and follow the path and the tunnel back to the ladder.
Look up the ladder and then climb back up and follow the path back to the Tram. The Tram is now at the South Stop, behind the South Station of the ring line. Step back into the Tram and turn clockwise again to the control panel. Take the Starter Disc (Amulet) from the inventory and place the disc in the circle.

Then click the left arrow button and ..... The Tram drives backwards into the South Station and then turns right and stops. You are with the tram in the South Station of the Ring Line
The 4 Stations in the Ring line:
A: South Station
Turn right. The Tram is now in the South Station of the ring line and you look, from within the tram, to the round lift tower. If you press the right arrow button now, the Tram will drive back to the South Stop because the switch in this South Station is set to lead the tram to the left. Get out of the Tram and walk to the elevator tower and stand against the door. Turn around and make sure the compass is visible under your screen.

The compass tells you that you indeed look at the South Station, which now also includes the tram
Turn back to the elevator door and place your cursor on the door. A scheme of squares appears on the closed door of the lift tower

Draw the scheme over and note that this scheme is for the South door of the elevator tower.
Walk back to the South Station, press the red button to open the door and enter the Tram again. Turn right and click the Left Arrow button again and .....
the Tram will drive back out of the station and drive, backwards, over the ring line to the next station.
B: East Station:
When the tram is stopped again, turn right again and walk again over the path to the Elevator Tower. Back at the door turn around again to look at the station. The compass tells you that the Tram is now in the East Station of the ring line. Turn back to the elevator door and place your cursor back on the elevator door. Also on this door appears a scheme of a scheme with squares. Draw the diagram over again and note that this diagram appeared on the East door of the elevator tower.

C: North Station:
Turn around and go back into the Tram and drive the tram backwards into the next station. Then step right again and walk on to the door of the elevator tower and turn around again. The compass tells you that the Tram is now in the North Station of the ring line. At the door of the elevator, a diamond scheme appears again, so draw the diagram again and note that this scheme is for the North door

D: West Station:
Get back in the Tram and drive the thing backwards to the next station. Get right out of the tram again and ..... You are now on the other side of the broken walkway and here too there is a fence board hanging on a rope. First turn around and look at your compass. The compass tells you that this is the West Station of the ring line. Turn back to the deposit.

Because of the collapsed path you can not continue to the West door of the Elevator Tower. Now look down and carefully draw over the male figure on the board. This male has the hands up and the legs straight. Look up again and turn right and then look down. Via the ladder you can climb down to the lower walkway.
So, climb down and turn clockwise and follow the bottom walkway.

Pipe screen code
Just before the path goes around the corner to the left, there is another pipe screen in the left rock wall.

So, just before the bend, turn left and zoom back on the pipe and put your hand back on.
In this pipe you see a 6-angle of which now the top left and the bottom left side is red. In the circle you see a dash at 3 o'clock. Draw the 6-angle accurately again.

The path takes you into a tunnel and a round door, which looks just like the 3 doors of the Elevator Tower. This door does not open either.

This is the Lower West door and you are here in a tunnel under the elevator.
Also on this door appears a diamond scheme, so draw it over again and note that this scheme is for the West door.

Turn left. On the wall is a prohibition sign on which you see the same male as above at the West Station. The board is attached to a pink cable and that cable disappears behind the door. If you click on the male, the arms and legs get a different position. Click on the male and keep doing so until the male's arms and legs are in the same position as the male on the prohibition sign, at the top of the West Station.

The door here now gets power but you still can not open the door, no matter how often you hit the orange doorknob.
Turn around and follow the path back to the ladder and climb back up the ladder to the West Station.

Open the door of the Station and enter the tram again. Now click the right arrow button to drive the Tram forward, back to the South Station, via the North and the East Station. Back in the South Station, click the right arrow button again and .... The Tram then automatically turns left and goes back to the South Stop, where the Purple Button at the end of the rail is. Get out of the Tram and follow the path back to the square hole. Go down the ladder again and follow the tunnel and the path back to the lower door of the Central Lift Tower. Click the orange button again to lower the lift and then step into the elevator and press the yellow button to go up again with the lift.

When the elevator has taken you up again you look again through the big hole to West Station. Stay in the elevator because we are now going to open the other 3 doors of the elevator.
The Elevator Lift door codes
You have seen that the doors in the Elevator Tower have a letter / number panel on which you have to put a code consisting of a letter and a number. You now have to find the right code for each of the 4 doors. You now have all the information you need to determine the code for the elevator doors, so we're going to do it now. In Chapter 1 you have found the Letter Paper in the "L T" cabinet above the table in the bedroom of the Studio of Kales. You then made a copy of the Letter Paper and that copy was saved in your Documents Inventory. In the Elevator Tower you have made a copy of the Digit Card and on the outside of the 4 Lift Doors you saw a scheme of squares and you have draw them over
Note: It is useful if you make drawings of both the Letter Paper, the Digit Card and the 4 square schemes on transparent paper so that you can also lay your drawings on top of each other.
Now first take those 4 drawings of the 4 square schemes and give each of these schemes a color ...... like this:

Now take the Letter Paper out of your Documents Inventory and also draw it over accurately, preferably on transparent paper. The Letter Paper has 100 squares and in some squares are Letters. They are the letters A, B, C, D and E. In the top left corner and the bottom right corner is the number 0 and in the upper right corner and the bottom left corner is the number 9. Now draw, on the Letter Paper, the shapes of the 4 square Schemes and do it in the same colors. You will then have this drawing:

On the Letter Paper you can see which Letters fall into each of the 4 square schemes diagrams. You can also see that in the red diagram 2 times the 9 falls and 1 times the 0. In the green diagram also falls a 0. Now grab the Digit card and also draw this on translucent paper. The Digit card also has 100 squares. Place your drawing of the colored Letter Paper next to, or on, the Digit card and then see what number comes in the boxes where on the Letter Paper the letters are for each Elevator door....like this

So combine the Letters with the Numbers and the colors and put all this information for yourself in a table and then you have the code for each elevator door .... Thus:
| South door (red in the drawings) | East door (purple in the drawings | North door (Blue in the drawings) | West door (Green in the drawings) |
| A 3 B 0 C 2 D 6 E 5 |
A 1 B 1 C 1 D 3 E 7 |
A 2 B 3 C 0 D 4 E 6 |
A 0 B 2 C 1 D 5 E 4 |
You now know the Code for each of the four doors. Each code consists of 5 times a letter / number combination.
Open the 4 doors of the Elevator:
You are still in the round elevator and are looking through the hole to the West Station of the Tram Ring Line. Turn right once and look at the Compass. You're standing at the North door of the elevator. To the left of the door is the code box and on the right the orange door button. The code box has 2 screens and 2 green buttons. In the upper window you have to put the Letters and in the bottom screen the digits of the code for this North door. You do this by clicking the green buttons

|
The North door: Look in your Door code table for the North door for ABCDE code. The code is therefore: A2, B3, C0, D4, E6.
Turn clockwise. You stand for the East door: The code for the East door is: A1, B1, C1, D3, E7.
Turn clockwise. You stand for the South door: The code for the Eastern door is: A3, B0, C2, D6, E5.
|
From now on you can open these 3 elevator doors, both inside and outside. So you do not have to enter these codes again and again. The West door has disappeared here, but you know that there is another door beneath the West station. Turn to the hole and look again at the man on the board that is hanging on the floor. Turn again to the East door and step out of the elevator through the East door. On the path you turn right and you look down. Here too, you can go down to the lower path via a ladder.

So descend via the ladder and follow the path and you will be back to a door in a tunnel.

If you stand against the door and then look at the compass, you will see that you are looking at the West. This is the other side of the Lower West door. Turn clockwise to the sign that is hanging on the wall. There is also a male on this board. Click on the male until the male has the same posture as on the board above, near the elevator.

|
Turn back to the door and now enter the codes of the West door on the code box: Lower West door in the tunnel: The code for the West door is: A0, B2, C1, D5, E4. So
You now also have the East-West connecting door open and you can now also open this door from both sides when you click on the orange door button |
Switching the Switches in the stations:
Until now, the Tram has always parked at the South Stop, via the South Station in the Ring Line, but now that you can open all the doors of the Central Elevator, both inside and outside the elevator, we can change the switches so that we can also ride the Tram to the other stops. So turn around and follow the tunnel and path back to the ladder under the East door and then climb back up the ladder.

Then turn right and press the orange door button to open the East door of the Central Elevator and then step inside. Press the yellow elevator button and ..... the elevator will take you back down. When the elevator is stopped, turn around and press the orange door button to open the door. Get out of the elevator and follow the path across the crater lake back to the ladder of the large square hole and climb back up and follow the path back to the Tram.

You are back at the South Stop of the Tram. Get back in the Tram and press the left arrow button to ride the Tram backwards into the South Station of the ring line. Then click the left arrow button again to drive the Tram to the East Station in the ring line. Turn right and get out of the Tram and walk to the East door of the Elevator Tower. Then turn around to look back at the Tram and convince yourself, via the compass, that you are now looking to the East. If the upper arrow point of the compass is now the white point, you are now looking at the North. The Tram is in the North Station of the ring line. Now look at the East, the white arrowhead of your compass is then on the left, then you are well. Turn back around and open the East door of the Central Elevater and step back into the Elevator Tower. Inside the Tower you stand again before the big hole and look at the West station of the ring line.

Turn right to the North door. Check your compass to see if you are actually in the elevator now and in front of the North door.

Open the North door via the orange button and then walk along the path to the North Station of the ring line. Click on the
orange door button of the station and ....... The orange door slides down. There is now no Tram in this station but on the dark gray inner wall you now see a small control panel with which you can convert the switch in the station.
You see the piece of ring rail and a piece of rail that leaves the station at the rear. The circle in the switch indicates that
this switch is now set on "Follow Ring Line" and that means that the Tram will continue to follow the Ring Line from this station. Click in the panel to set the switch to
"Leave Ring Line".
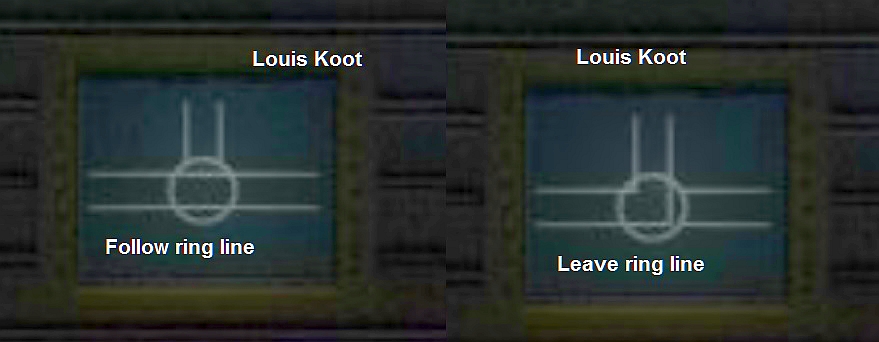
If you now ride the tram into this station, the Tram will turn left and then stop at the North Stop. However, the switch in the South Station is now also on "Leave ring line", so you must now convert that switch to "Follow the ring line". Turn around and enter the Central Elevator Tower again and then exit the Tower again through the South door (Look again on your compass).

Walk to the South Station of the ring line and open the orange door. The switch in the South Station is on "Leave Ring Line", so set this switch to "Follow Ring Line".

Turn around again and enter the Central Elevator Tower again and leave the tower again through the East door. Walk to the East Station, open the door and get on the Tram again.

The Tram can only leave the ring line (the Circle) if you are driving ahead, so drive the tram ahead by clicking on the right arrow button, and do it 3 times. Via the South Station and the West Station the tram will arrive in the North Station. In North Station you click again on the right arrow button and .....
The Tram turns left and goes over a bridge, to the North Stop of the Ring Line and then stops:

North Stop of the Tram:
Statues gallery
Turn right and get out of the Tram. Follow the path. The path goes left and through the doorway you step into the Statues Gallery:

Look at the 6 statues that are here. The 6 statues each carry 6 stone balls above their heads and on those stone balls are letters.
Between the statues there is always a sign on the wall with always 4 letters on it.
At the end of the gallery is a gray door with a green door button.....This is Door A but the door does not open. However, you can see that the green door button is connected by an orange cable, with the letter box that is to the left behind the fence. If you stand right in front of the code box you will see that the box has 6 screens where you can put letters. In all screens there is now an A.

Walk back and now enter the side path. You then end up on a cross path and near a gray wall. On the gray wall are three pink cabinets that look a bit like radiators. On the left behind there is another gray door B in the wall and this door also has a green door button and this door does not open either. The green door button is connected to the 3 pink cabinets via a blue pipe.

Pipe screen code
Walk to the railing, past pink cabinet 3, and when you stand in front of the railing, turn right .....
You then stand with your nose against the wooden fence. Between the 5th and the 6th shelf you see, below, another pipe screen.

Click with your hand, or with your normal cursor on the 5th and the 6th shelf, just above the round pipe, and ....... the 2 boards are slightly different then you can zoom in on the pipe ... .So zoom in on the pipe and put your hand on it again. In the round pipe you can see a window again ..... the right-hand side of the window is red and in the circle the two lines make a corner of 12 hours to 9 hours. Draw this over again accurately and zoom out

|
Now go open the 3 pink cabinets ..... When you open a pink cabinet you will see that there are 4 circles in each cabinet with a letter. You can rotate the letters in each circle to positions 0, 1, 2 and 3.
If you number the 3 cabinets, from left to right, as 1, 2, 3 then you see
Go back to the 6 Statues and look at all 6 letter boards that are between the Statues on the wall. Note how often a Letter from the 3 boxes appears on those 6 signs. When you start on the left you see signs: GWQV, CGFW, XVGB,? ZXF, BXJZ, QQFC.
So count how often a letter appears on the 6 signs: B = 2 times. C = 2 times, D = 0 times, F = 3 times, G = 3 times, J = 1 time, Q = 3 times, V = 2 times, W = 2 times, X = 3 times, Z = 2 times and ? = 1 time. Now go back to the 3 pink cabinets. Open each cupboard again and put the letters in the circles on the number that indicates how often the letter appears on the 6 signs near the statues. Start with Cabinet 1, then Cabinet 2 and then Cabinet 3. Close the cabinets again.
When you have done this, you walk back to Door B Now click on the green door button again and ..... now the door will open. So walk through the now opened door. |

You are on a walkway that runs over a large square lake. If you look to the left, you see that there are 3 buildings. The lake is fenced on all sides by a brick wall. Walk straight over the bridge to the gray door on the other side. Press the green door button and ...... Well ..... this door does not open now either. Turn around and walk back to the metal cylinder that sticks halfway to the railing. Stand straight in front of the metal cylinder. The cylinder is red inside and has a cavity where you have to put something in. However, you still do not know what to put in this cylinder.

There are 3 buildings in this watery courtyard, left, center and right. A green cable goes from the left building to the right building. The Cylinder is attached to an orange cable that, in the left of the middle building, disappears into the water. Turn left and walk back to the door and then turn right and walk to the end of the side path. On the head wall of the left building is a box and a green button.

Click on the green button to open the box. There is a piece of paper in the cupboard. Zoom in on the paper.
You view the paper in close-up. On the paper are 2 gray balls and 2 lights.

The lights shed their light on the balls. The left ball has a shadow and there is a red cross over the sphere. The right bulb has no shadow and is circled green. This drawing is a hint for the Stone Balls that the 6 statues carry above their heads. Get out of the close-up, turn around and go diagonally to the door. Open the door via the green button and step back into the corridor with the 3 pink boxes and follow the corridor back to the 6 Statues:
Open Up Door A
Go to the leftmost Statue and stand straight in front of it. You see the statues1 and 2. Look at the balls that the statues carry above their heads. The lamps give a shadow on the balls, but each statue has one ball that has no shadow. Go to each statue and note down the letter of the ball that has no shadow. Also note on which ball that letter is written.

|
Statue 1 = KYATOS = the O on sphere 5. |
With these letters you must make a word a word of 6 letters. Put the 6 letters in the right order and you will get: SETIOK.
Go to the letter box, at Door A and put the SETIOK word in the screens.

Turn right and click on the green door button and ...... the door opens.

Step through the now opened door and ..... you are in the first of the 3 buildings
House of Meneandes:
There is no bridge to cross over the water to the middle building. Click the green button, right next to the gate and .....
there is still no bridge but in the rear building you see a door goes open and then you see in the distance a red door ....

Turn right. On the right side wall is a glass ball and in the ball a gold coin rotates around. There is a Lever under the Glass Globe. Turn around. You look into the side room. In the side room you see a cabinet on the wall. There is a round video screen right next to the entrance. Click on the button, which is on top of the round video screen and ...... and ...... you see a video of a gentleman named Meneandes.

Meneandes welcomes you to his house and he apologizes that he is not at home.
Meneandes hopes, however, that you can find something here that you can use in your further research on this part of RHEM.
You are in the house of those Meneandes and this house consists of the 3 buildings. This front building has 2 rooms. Enter the side room. You are then standing in front of the cabinet that's on the long wall. If you press the red button, the cabinet will not open. Look at the right wall and the left wall. Both on the right wall and on the left wall there are 3 panels, each consisting of 6 bars and each bar has 5 boxes. The 1st box in each panel is now gray. Next to each bar you see a picture of a door. The wall cabinet is connected to each of these 6 bars via the 6 pipes.
Do you remember the Entrance Hall in Chapter 1? The Entrance Hall has 6 doors and at each door you saw a bar with 6 boxes of which 1 was gray. The gray box indicated the number of the door. Every door in the Entrance Hall opened up in a certain way. I told you then to note down in which way each of those 6 doors in the Entrance Hall opened. Well .... you need this knowledge here now. The 6 bars that you see on the walls are the 6 Door Bars of the 6 Doors in the Entrance Hall. The door images next to each bar indicate how each door slides open. You now have to make the right box gray in each bar to indicate that the panel belongs to door 1, door 2, door 3, door 4, door 5 or door 6 of the Entrance Hall. The door images tell you which panel is for which door.
|
In the Entrance Hall it was like this:
So look at the door bars at each panel and then use the arrows in the images to see how the door slides open and compare this with your notes from the Entrance Hall. Then make the appropriate box gray in each bar to indicate that the door is 1, 2, 3, 4, 5 or 6. Thus
Then turn back to the wall cabinet and press the red button again and..... ...If you have grayed out the right box in the 6 door bars then the cabinet will now open. There is a pile of Silver Coins in the cupboard. Take the Silver Coins.
|
Turn around and walk back to the other room. You then stand against the side wall where the glass ball and the Lever are attached.

The Glass Ball sticks on a tube that disappears into the wall. A Gold Coin rotates around the glass ball. Click on the Lever and ...... The golden coin disappears into the tube.
Turn right and open the door via the green door button and step into the Statue Gallery again and follow the path to the right door B, where the pink cabinets are on the wall. Step back outside through door A. Turn right on the walkway and go again to the cabinet where the drawing of the 2 balls is located. Open the cabinet again and see ...... the Golden Coin is now in this cabinet. Take the Gold Coin.

Look in your items inventory and you will read that this is the Gold Coin 2 .
This is for the time being everything you can do here in the North area of the Ring Line, but we will come back here later. Go back into the Statue Gallery and leave the gallery through the door at the left statue and follow the path back to the Tram. Step into the Tram and drive with the Tram in 3 times back to the South Station in the Ring Line. When you have stopped in the South Station you step out of the Tram and you enter the Central Elevator Tower via the South door. Leave the Elevator Tower immediately through the North door and walk to the North Station. Open the door of the North Station and then click the switch back to "Follow Ring Line".

Close the door and return to the Elevator Tower and leave via the East Door to the East Station of the Ring Line. Open the door of the East Station and click the switch to "Leave ring line".

Back into the Tower and via the South door back to the South Station, where the Tram is. Get on the Tram and drive the Tram forwards now and .....

.........in the East Station the Tram will turn left and deliver you at the :

The East Stop of the Tram:
As you drove out of the East Station of the Ring Line you saw that this is an area with lots of water and ruins. When the Tram has stopped you first look through the left window. You see a door with a panel next to it. However, you can not reach this door because your Tram has no exit on this side.

So turn around and step out of the Tram and follow the path to the entrance of a tunnel.

Put one step into the tunnel and then turn to the right. A red ball protrudes on the right wall of the tunnel.
Place your hand on the red ball and ..... A triangle appears with 14 dashes beneath the red ball. Remember this.

Turn left again and continue walking out of the tunnel. Outside the tunnel, you look directly to the left. On the railing sticks a control panel with an up button and a down button.

You see the Tram on the other side of the water and the building in which the door is located that you already saw from the Tram. If you press both buttons then you notice that they do not work. This button panel is connected to a yellow pipe. Turn around and .... The path continues to a building and on the wall, on the right, you see a panel with 4 screens and orange buttons.

The yellow pipe of the button panel goes to the panel that sticks to the wall here. Stand right in front of that panel. In the 4 screens you see squares with a dash. If you click on the orange buttons, the lines change position on the 4 squares. It is a code but you have no idea what the correct code is that you need to enter here. You will notice, if you click on the orange buttons that the buttons influence each other. Turn left and step through the gate. You are in:
The Clock building
This building has 3 rooms and you are in the middle room. Turn left and enter the left room.

You are standing in front of a power box. From the power box a dark blue pipe goes to the left and to the right.
Look at the left wall. A white clock hangs on the left wall. To the right of the clock there is a fuse box in the pipe.
Do you remember the two Clocks, in the 2 inlets near the Studio of Kales? In Chapter 1 you took the Fuse of the right clock from the fuse box. You should still have that Fuse in your Items Inventory. When you took the Fuse out of the box the clock, in the right inlet, stopped at a certain hour and for me it was at 1 o'clock. Well ... you now must put the pointer on that position here on this clock.
Take out the Fuse from the inventory and place the fuse here in the Fuse Box. Then click on the red button below the clock until the clock's hand is at the hour , where you have stopped the clock on in Chapter 1,when you took the fuse out of the box. For me that is 1 o'clock.....but you must stop this clock at the same hour that you have stopped the clock in Chapter 1.

When you have done this, turn around to the right wall. There is a box on the right wall. In the box you see a light bulb holder and 2 red buttons are beneath the box. If you have listen to me in Chapter 1 then you have taken the Light Bulb from the Entrance Tower with you. Take that light bulb from inventory and click the thing here in the lamp holder. The lamp does not light up, however, and if you press the two red buttons, nothing happens.

NB: Have you forgotten to take the Light Bulb out of the Entrance Tower?....... then you
now have a problem because you will first have to go back to the Entrance Tower to get the light bulb. It's
doable........ you can get back to the Entrance Tower from here but I'm not
going to tell you how you can do this.........Figure it out yourself..... if you use your brains a bit, you will
find that it is not even that complicated.
Turn right and walk through the middle room to the right room. In the right room you
can not open the narrow brown door.

The door button is in a pipe that goes all the way through the room and is connected to 2 number panels on the right wall and to 2 number panels where a dice picture is hanging above.

If you click on the red button of the Dice panels, random numbers will appear in the two panels. At the dice panels you see an image of a parchment roll. Unfortunately ...... at this moment you can not do anything here . You need some more clues to be able to continue here and we need to find those clues somewhere else ......... Turn back to the entrance ...... You look into the middle room again and ...... right next of the doorway there is a paper between the blue pipe .... Click on the paper and ... .... it turns out to be a letter from Meneandes ...... Read it and then click the note back behind the pipe

Step back into the middle room and then turn left, towards the entrance / exit of this building and ......... A panel is hanging to the left and right of the entrance.

On these 2 panels you see 6 diamonds with a circle with a dash in it ...... all dashes in the 6 circles now indicate 6 o'clock ....... If you click in a circle you change the position of the dash ...... do not do this yet. Well ....... these 6 diamonds with the circles seem suspiciously like the screens you've seen so far in some of those round pipes screens ......... Make sure that all dashes now indicate 6 o'clock, so do not change anything now, we will come back later to solve this puzzle too.
Now go back to the Tram. Get back in the Tram and drive back with the thing, in 2 times, to the North Station of the Ring Line. Get out of the tram in the North Station and enter the Elevator Tower again. Leave the tower right through the East door and continue to the East Station of the Ring line. Open the station door and reset the switch in the east Station to "Follow ring line". Walk back to the Elevator Tower but do not enter the tower now. Standing in front of the east door of the tower, turn left and descend the ladder to the bottom path. Then follow the down path to the Lower West door, in the tunnel.

Click on de orange door button to open the door and follow the tunnel and then the path to the ladder below the West Station of the Ring Line.

Climb up the ladder and open the West Station door and then set the switch in the station to "Leave the Ring Line".
Turn left and climb back down the ladder and follow the tunnel and the path back to the East side of the elevator tower, in the tunnel you have to open the Lower West door again. Climb up the east side again via the ladder and go back to the Tram in the North Station via the Elevator Tower.

Step back into the Tram and drive the thing towards the West Station where the Tram will turn left and deliver you, through a tunnel, in:

Chapter 5: The Ring line of the Tram: Part 2
2019: Walkthrough by: Louis Koot


