
Röki
2020: Walkthrough by: Louis Koot
If you have found this walkthrough via google search or via another site then you have probably not visited my site.
A lot more very detailed game walkthroughs can be found on my site at: www.pcgameswalkthroughs.nl
Text and Screenshots by Louis Koot
You can buy Röki on Steam but also on gog.com I have version 1.07 and have had no problems with the game
NB: Tove has a lot to do and she has to do it in various areas. She will also have to go back and forth between the different areas here in the Deep Forest. As a player you now have a lot of freedom to do things. There is no set order in which to do things. My walkthrough tells you how I did it but this is not the only way you can do it all. You can do things in a different order if you want
Chapter 6: The Deep Forest: Part 5: The Bear and the Spider and the Bear Vision
A: The Beer Guardian
We are back in the church. Walk up through the hall, but first go and have a look at the front left tombstone.
This is the stone of Karl Karlsson with the year 1623. On the stone you also see a crescent moon
Continue to the back and then dive down through the hole in the floor to the basement. Zoom in again on the bear, behind the church bell

Bear puzzle 1 part 2:
Under the bear are 4 holes in the wall and under the 4 holes you can also see the crescent moon. When you were here the first time in Chapter 4, there were a square stone in 2 holes with 3 dots and 2 dots on it. If you did not take those 2 stones then they still stick in those 2 holes. Here in the basement you also found the stone with 1 dot and the stone with 6 dots you found in the lair of the Nokken.
So you now have 4 stones with 1 dot, 2 dots, 3 dots and 6 dots on top. At the top of the church hall floor you have seen the tombstone of Karl Karlsson. The tombstone has a crescent moon and the year 1623. The crescent moon on Karl Karlsson's tombstone therefore refers to the crescent moon here at the 4 holes. With the 4 stones you can make the year 1623 because 1 dot = 1, 2 dots = 2, 3 dots = 3 and 6 dots = 6

So now you have to place the 4 stones here in the correct order in the 4 holes and that order is the year 1623.
So place the 4 stones here in the 4 holes so that they form the year 1623.

The piece of wall then sinks into the ground

Walk through the opening and then down the stairs and then go to the right and ........ Tove ends up in the Bear Hall.

Bear puzzle 2:
In the center of the room is a circle on the floor. Stand on the center of the circle to see that part of the floor in close-up. In the middle of the circle are 4 round holes A, B, C and D. In hole B is a round stone. Holes A, C and D are empty. Start by taking the round stone from hole B. All 4 holes are then empty.

Tove then has 4 of those round stones in her backpack. On each of these 4 round stones you see dots and a line. On the floor you also see a line drawing, but the 4 holes are 4 missing pieces in that line drawing. The missing parts of the drawing are therefore on the 4 round stones. The line drawing on the floor is the same drawing of the star concellation drawing that you had to restore in the wolf canyon, so now you have to place the 4 round stones each in the correct hole.
In this screenshot I have marked the 4 stones as A, B, C, D.
Place stone A in hole A, stone B in hole B, stone C in hole C and stone D in hole D and ......

...... The drawing on the floor is then restored and .......

....... Tove drops a long way down on the middle circle and .....

........ we end up in the
Bear Cave
Go over the long stone bridge and then climb further up until Tove reaches sleeping Bear

There is another horn in front of the Bear, but stay away from it for a while. This is the Beer Guardian Jötunbjörn but he is also fast asleep because of such a Nattamare Parasite.
Try to grab the Nattamare Parasite but Tove can't do that now

Go back to the horn. Tove can't blow the horn because the thing is overgrown with spider silk.
Chop away the spider web with the dagger and then try to blow the horn, but .....

........ A very huge white spider is now emerging. This is Widow Drau and she is hungry for a nice and tender human child.

Drau grabs Tove and we now switch to:
Utangard
Röki's transformation into a human child is already taking shape

But Mommy Rörka gets a bit exhausted again so she takes a break where she is then informed by a raven about what happened to Tove, and this all turns out to be going according to Rörka's plan. Röki is hungry and puts some food in his mouth, but he also allows Lars something to eat.
Now you have to grab some of that purple stuff a few times and then give it to Lars via the grasping hand and the left arrow. You have to do this about 3 times.

After 3 times Rörka has had enough and continues with the ritual and then we switch back to Tove.
B: Crystal Tomte Cave:
We do it with mirrors
As is stated on the homepage of my site, I am Dutch. English is not my natural language so it will be inevitable that my English will not be quite correct here and there
rau has encapsulated Tove and she hangs from a thread like a cocoon. Next to Tove hangs the Chief Tomte and there is a long conversation between Tove and the Chief, so listen carefully to this conversation. Tove has lost all her belongings, but you can see the dagger at the bottom right, but it is inaccessible for Tove

The White Widow then appears. The Chief tells that Drau is afraid of the light and that Tove must use the crystals in the cave to reflect the light to drive away the spider.

The Chief then conjures up a beam of light and this beam of light shoots up the white widow.

With his last bit of magic, the Chief causes Tove to get loose and she falls down but lands safely on her feet on the ground of this huge cave. However, Spider Drau also descends and blocks Tove's path to the left. A beam of light shoots up to the right. Behind Tove hangs a mirror and in the light beam you see mirror suspension point A.

Take the mirror. In inventory you can see that this mirror is facing down to the left. Now place the mirror on the suspension point A and .......
.... the mirror bends the vertical beam of light horizontally towards the Spider and because of this the Spider flees upwards. The ray of light stops at a crystal

Tove can now continue to the left so do that. Tove then first comes to the climbing stones 1.
So this is the central part of the cave and here is also the spider, but it is now hanging higher up

Walk further to the left. You will first arrive at mirror suspension point B and then at the climbing stones 2. On the far left is mlrror suspension point C and Hatch 1.
Open hatch 1 and ..... through hatch 1 now also a ray of light enters and this ray also goes to the crystal

Walk back to the right and continue to Suspension point A. Now take the Mirror again from A. This will now make this right beam go vertically up again.

Walk back to climbing stones 2 and now climb up via these stones and .....
Tove reaches the 2nd mirror that is hanging on suspension point B. Take the mirror. This mirror faces down to the right

Climb back to the ground and walk back to climbing stones 1

Climb up via the climbing stones 1. When Tove stops climbing you can go further up or to the right. On the left you see suspension point D behind hatch 2. On the right is suspension point E behind hatch 3. The merry Widow is hanging slightly above hatches 2 and 3. However, hatches 2 and 3 are closed and Tove has to open them, but then she must first get Widow higher up. Now climb to the right and ........

...... continue to suspension point E

Now put your mirror down to the left on suspension point E and ...... the vertical light beam now goes towards Hatch 3, but hatch 3 is still closed

Climb back to the center via the stones.
Tove doesn't dare to climb any further because of our cheerful Widow hanging there, so climb back down to the ground

Back down you walk to the left until you have Tove at suspension point B. Put a left-up mirror on B and .... the left light beam then goes up from B here to suspension point D.

So climb up again via climbing stones 2 to suspension point D and hang your remaining down- righ mirror on D and ....... the light beam now bends off to Hatch 2

Climb down again and walk back to B. The white widow has now also come all the way down, so take back the mirror from B. The spider now shoots up again

Climb up again via climbing stones 1 and then to the right again, to suspension point E.

Take the mirror back from E. The right beam shoots up again. Climb back to the point under the spider and .......

....... then climb further back down to the ground and then go right to suspension point A

Put the mirror that you just took from E here on A and ..... the beam bends horizontally again towards the crystal and this causes the spider to shoot up a little further

Climb up again via climbing stones 1 but now climb further up until Tove is hanging between hatch 2 and hatch 3.

First go to the left and then open hatch 2 .......

.... then climb back to the right and continue to hatch 3 and open hatch 3 now

slide back to the center and climb back to the ground

Take back the mirror from A.

Climb back to suspension point E via climbing stones 1

Put the left-down mirror on E and ... the beam now shoots through the opened hatch 3.

Climb back to the ground and hang the left-up mirror on B and .......

... the left beam shoots up and then goes through the mirror on D through hatch 2. The two rays touch each other through hatches 2 and 3 and the widow flees even further upwards. Now climb up via climbing stones 1 to above the light beam and thus past hatches 2 and 3. Continue climbing until Tove is just below the spider. On the left you will see hatch 4. Hatch 4 is closed. You see the dagger on the right

Go left, to hatch 4. Open hatch 4. On the plateau above hatch 2 hangs a Tomte gnome.
Slide Tove back to the center and then climb down until Tove stops just below hatch 4. Then go left and Tove then climbs to the plateau where that Tomte gnome hangs.

Tove can't free the gnome now because she hasn't got her dagger back yet. Continue to the left and Tove will reach suspension point F. Unfortunately Tove now has no mirror that she can put on F here, so she first has to go back to the ground to take back the mirror from B. But you now at least know where suspension point F is. So now climb all the way back to the ground

Back on the ground, take back the mirror that you hung on B earlier here. Then walk to C and put the mirror on C.

The left beam now shoots straight up from C. Climb to D via climbing stones 2 and take the mirror from D and climb back to the ground

Climb back up via climbing stones 1 to the Tomte gnome that hangs above hatch 2

Continue to suspension point F and hang the downward right mirror on F.

The left beam is deflected by F and shoots through hatch 4 to the crystal and because of this the widow flees further upwards and you then see hatch 5, above hatch 4.
Climb back to E and get the mirror from E. The right beam shoots up again

Climb back up to the point where you can climb to the left to the Tomte and F but now go to the right and .....

..... Tove has then reached suspension point G. Hang the left down mirror on G and .......
The jolly Widow flees to the Dagger platform and will stay there now. The spider is now level with Hatch 5

Climb back into the climbing stones and climb up until Tove can climb to the right, to the dagger. Take the dagger

Tove now has not only her dagger back but also all her other things that she had in her backpack when she was grabbed by the widow.
Climb down again to the hanging Tomte gnome and then free the gnome with the help of your reclaimed dagger

The liberated Tomte disappears through a hole in the cave wall. Climb up again and climb all the way to Hatch 5

Try to open hatch 5 but that is not possible because hatch 5 is stuck with the sticky cobwebs of the white widow. So cut the cobwebs out of the way with the dagger

Then open hatch 5 and see what happens ...

........ the beam of light blows widow Drau completely out of the way ........

Climb further up and then to the left and Tove is at the top at the exit. Continue to the exit.

To the left is a Tomte and even further to the left is a Tomte and the Chief Tomte now also appears.

Go talk to the two tomte at the exit and then free that hanging Tomte, which will disappear

The stone in the exit is an elevator stone. Stand on the stone and .......
...... the 2 Tomtes then try to get the lift stone up with their magic power, but their power is not strong enough yet

Meanwhile that 3rd Tomte has also turned up so talk to that too and then stand on the stone again and .....

... also the combined strength of 3 Tomtes is not enough to lift Tove. Another Tomte has to be added
Go back to the climbing stones and climb further up and ...... Tove then reaches the 4th Tomte. Free this Tomte with your dagger too

Climb back to the exit and talk to the newly liberated 4th Tomte to get his cooperation too

Stand on the stone again and ...... the power of 4 Tomtes is enough and ........

...... Tove got out of the Crystal Cave and she is back with the still sleeping Bear.
C: Wake up the Bear
Unfortunately ..... Tove's happiness is short lived because ........ the Merry Widow shows up and plans to eat Tove after all.
Run to the left and then to the Horn and now blow on the Horn and ........

Bear wakes up now and ...... Bear eats the spider ....... You have earned a new Badge

There is a conversation between Tove and the Bear and eventually you can then pull that Nattamare Parasite out of the head of the Bear, so do that.

....but......The Nattamare Paradise now takes Tove into:
D: The Bear Vision
In the vision, Tove is back in her parents' home, but the house is a mess

Walk to the left and ...... the basement hatch in the floor opens, so dive down through the opened hatch to the basement

In the basement, move Tove to the right. Take the white sheet and ....... a piano will appear. Tove has stored the white sheet in her backpack

Tove thinks about a tune she and her mother played on this piano, but she has forgotten how that tune goes and then the basement changes. There is now only the piano and 3 doors A, B, C. Door A brings Tove into the attic, door B brings Tove into the living room and door C brings Tove out onto the veranda. Tove is supposed to remember the tune her mother taught her on the piano

Step through door A and ....... Tove ends up in the attic. Tove is big, but everything in the attic is tiny. A tiny Lars sits on the floor.
Continue to the left and then pick up the tiny Wind chimes on the floor there

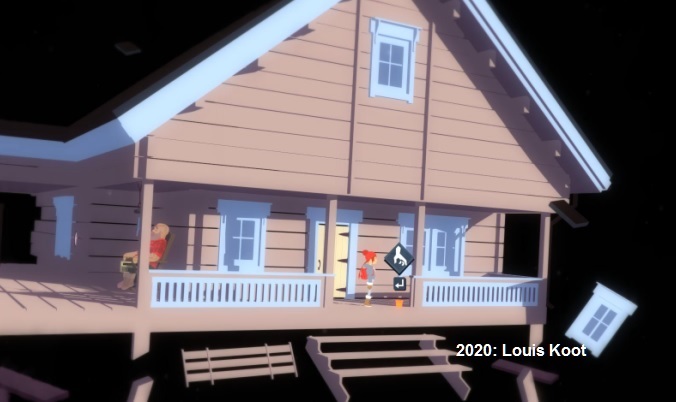
Back through door A to the piano and then through door C to the outside veranda. Papa Hendrik is sitting outside on the veranda in his rocking chair. A clock hangs on the facade by the window. There is a radio to the left of Hendrik. At the top right of Hendrik is the bar on which the Wind Chime hung. A steaming cup of coffee and a plate of cheese are on the floor in front of Hendrik.

Walk to Hendrik and then hang the Wind Chimes on the bar

Take the steaming Cup of Coffee and also take the Cheese plate
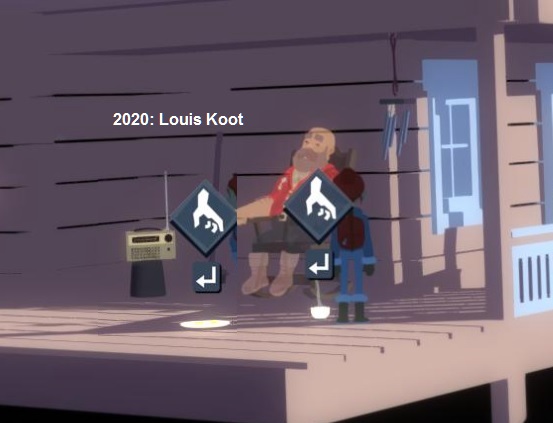
Walk around the corner and to the front door. There is an empty flower pot at the front door. Take the flower pot
Back to Hendrik and to the radio. Click on the radio and keep doing this until you hear the weather report that says there will be strong winds at 12.45

Go to the clock and click on the clock

You now have to turn the hands of the clock at 12.45. You put the small hand on XII and the big hand on IX and .....

... the wind will blow and the wind will bring Tove a Music Paper. Take the music paper.

Back through door C to the piano and then through door B to the living room. Cat Stoker's drinking bowl is to the right of the door.
Pour the steaming hot coffee into Stoker's drinking bowl

To the left of the door is the mouse hole in the wall. Place the Cheese Plate on the ground in front of the mouse hole. The mouse comes out of the hole to eat the cheese.

Walk to the left. Stoker is eager to gaze at the parakeet in the bird cage. Throw the white sheet over the bird cage and .....

.... Cat Stoker now turns his attention to the mouse and jumps over the table and a cooking pot falls to the floor.
As a result, a second music paper also falls on the floor. Take the 2nd music paper

Walk to the right and take the cooking pot, which has ended up on the floor

Back through the door to the piano and then again through door A to the attic. Tiny Lars is sitting on the floor by the tiny rug.
Give the flower pot, the empty coffee cup and the cooking pot to Lars and .....

... Lars plays a tune on the 3 items and this brings the 3rd music paper flying. Take the 3rd music paper

Back to the piano and now place all your 3 music papers on the piano and .....

..... we see Tove's memory and .....

.... the vision is over and we are back at the Bear. There is another conversation with the bear and Tove now also has the 2nd Nattamare Parasite in her backpack.

Tove now has the 3 items needed to brew the Invisibility Mask .....

So follow the route back to the Bear hall / cave and .....

... then go up the stairs in the right corner and ...... via Karl Karlsson's tombstone Tove returns to the church hall

Leave the church and return via the Waytree and the Mother Tree to The Poisoned Forest

Chapter 7: The Deep Forest: Part 6: The Poisoned Forest part 2:
2020: Walkthrough by: Louis Koot
Text and Screenshots by Louis Koot