2017: Original Dutch Walkthrough by: Louis Koot
2019: This English translation
by: Dick Leeuw
If you have found this walkthrough via google search or via another site then you have probably not visited my site.
A lot more very detailed game walkthroughs can be found on my site at: www.pcgameswalkthroughs.nl
Chapter 2: Sam 1
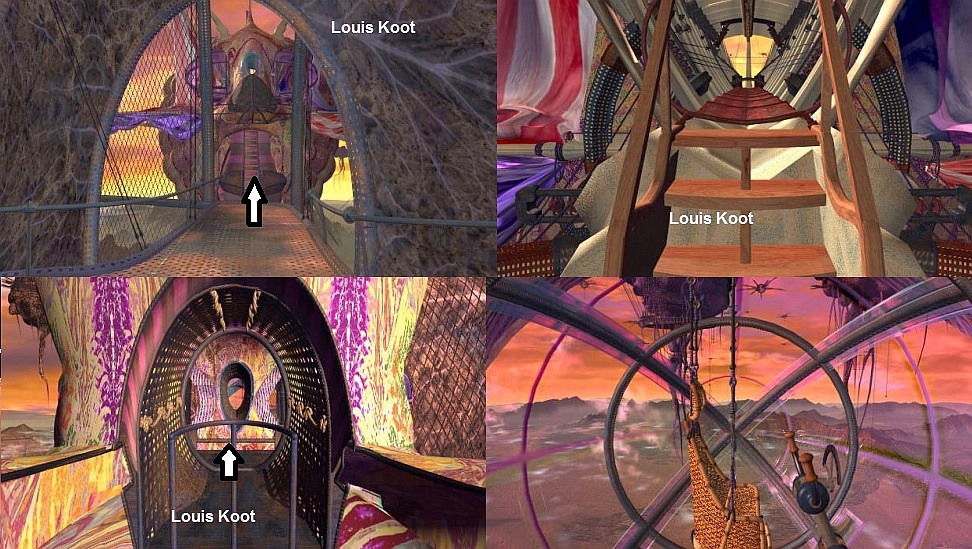
Compass Island
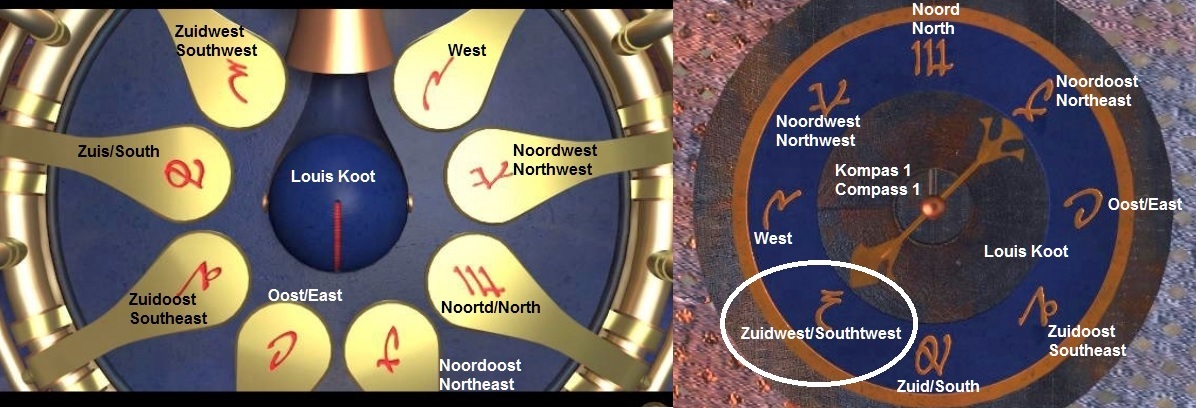
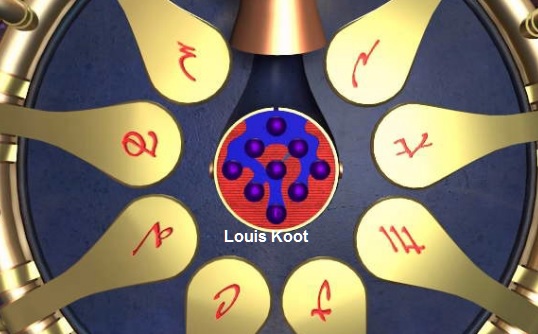
Immediately before your feet you see a compass lying in the floor. This is Compass 1. Zoom in on it.
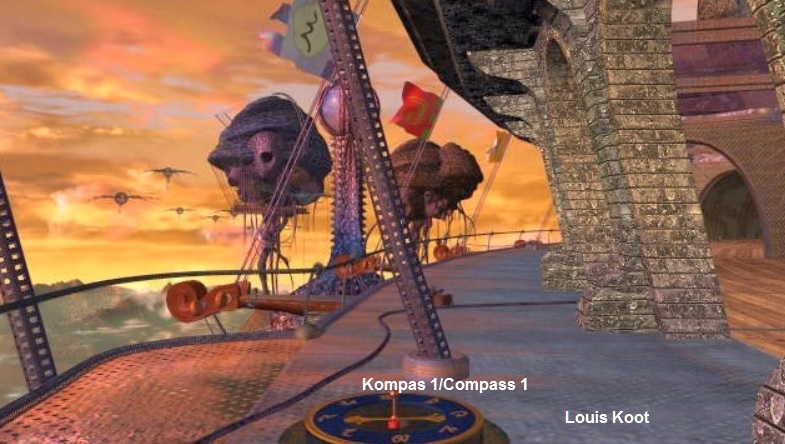
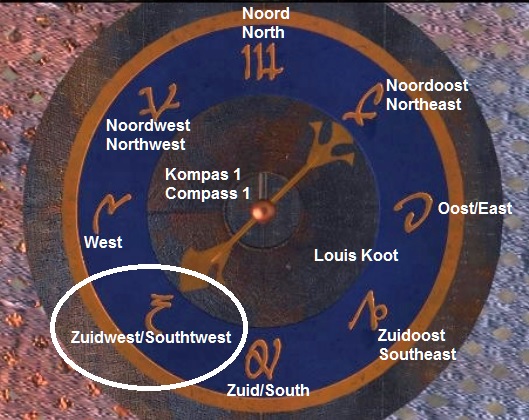
As soon as you zoom in on the compass, the arrowhead of the compass needle points to one of those 8 characters.
IMPORTANT
Random: The sign that a compass will point to, when you zoom in on it, is determined every completely randomly so I can't tell you which sign the needle will point
in your game. This is compass 1. Because I give this compass number 1, you can probably already imagine that you will come across more of these types of compasses. For each compass, make a note of the sign that the compass needle points to and write down at
witch direction the pointer is aimed on, and especially note that this is from compass 1, compass 2 etcetera. Then zoom out.
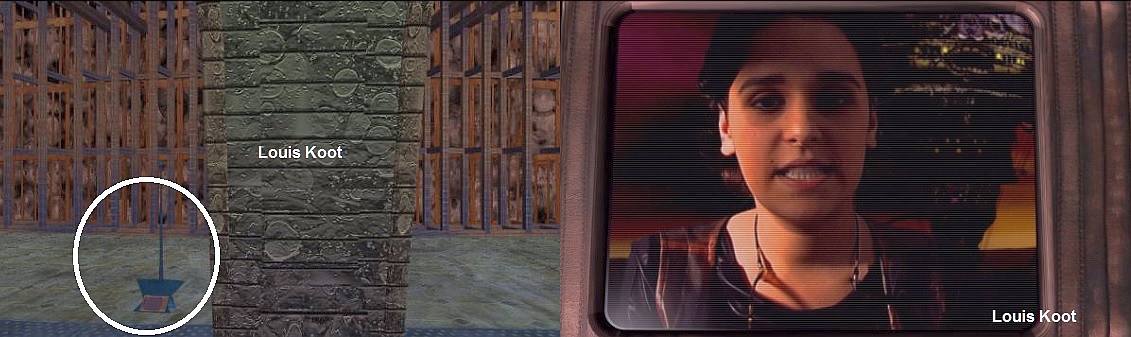
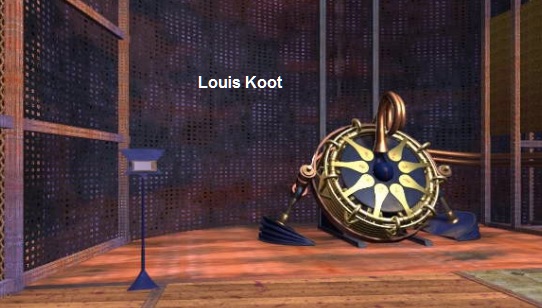
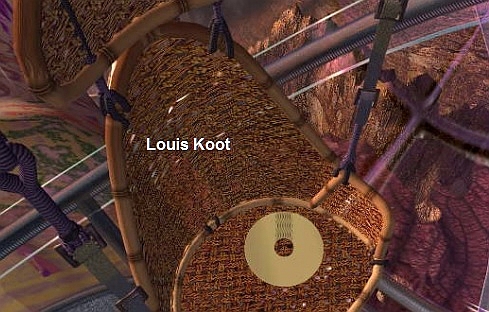
Turn to the right. In the distance you see a large kind of wheel with a sort of "Yellow Star" on it. To the left of that wheel is a very thin bluish
"Pole". Click 1 time forward and then zoom in on that "pole". Sam says that this is a mission log of one of the missing mission members and that there is 1 registration on it. Click on the screen and watch the short video, which suddenly
disappears due to a malfunction.
Zoom out again and go to the big wheel. Then zoom in on the big wheel.
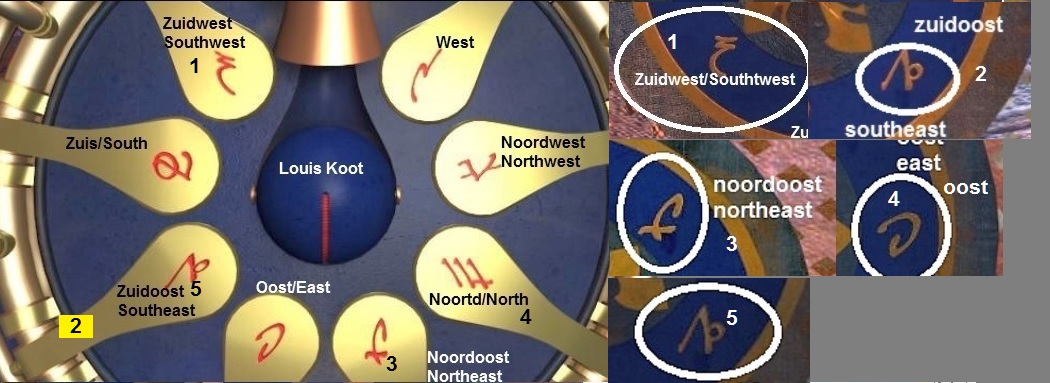
Grab your list of wind direction signs and write the correct word behind each wind direction, as below:
The words
North = Ardumm
South = Somhah
Nothing else is happening now, so zoom out and turn around so that you look again with your face in the direction from where you came from (ie towards compass 1).
Then click 1x forward and turn to the right. Then click 1x forward across the gallery, then turn to the left and you will see, behind the pillar, compass 2 in the ground.
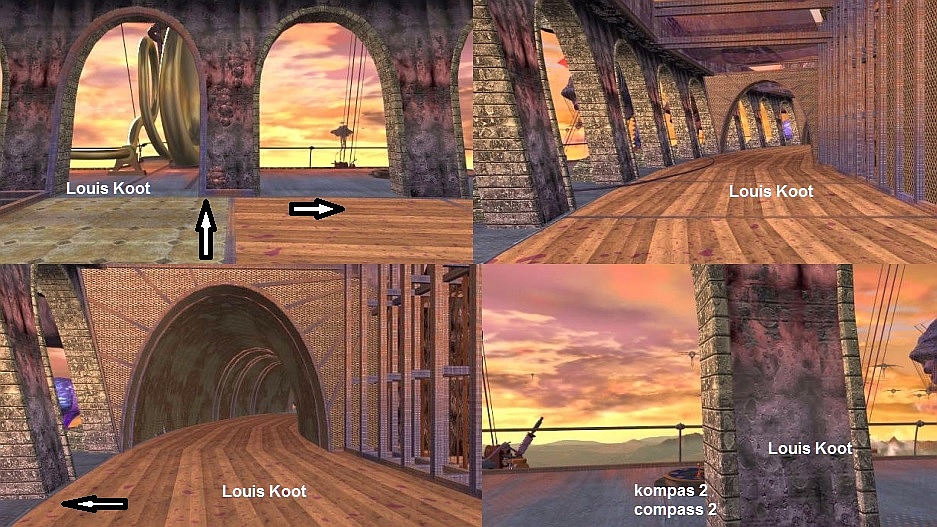
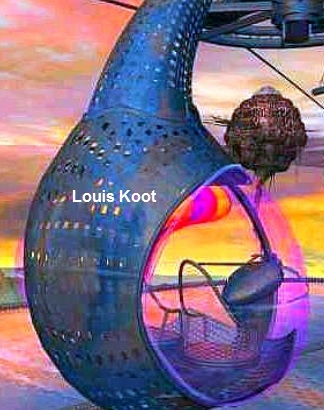
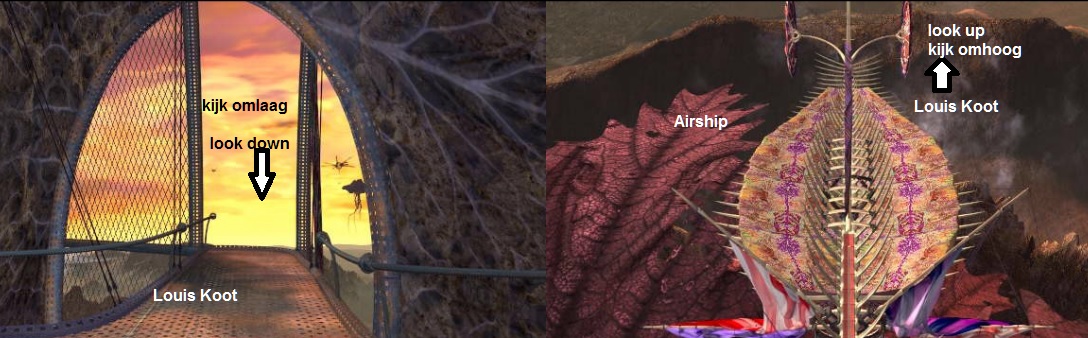
Zoom out, turn right and go forward 1x back to the gallery, turn left and click 2x forward to go through the tunnel. You then end up at a cabin of a cable car. Do not
enter this cabin yet, but click to the right of the cabin, 1 x forward to go past it. Then turn left and you will see Compass 3
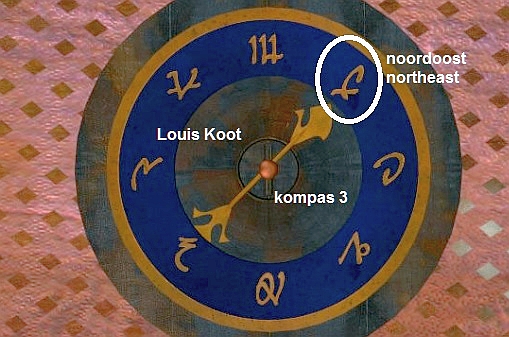
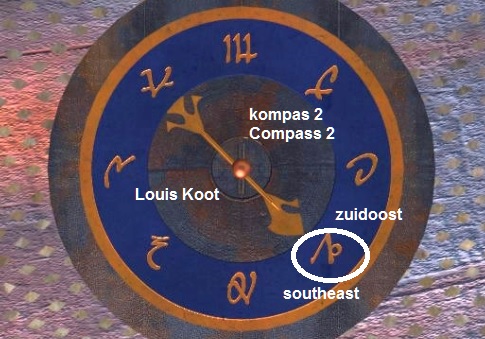
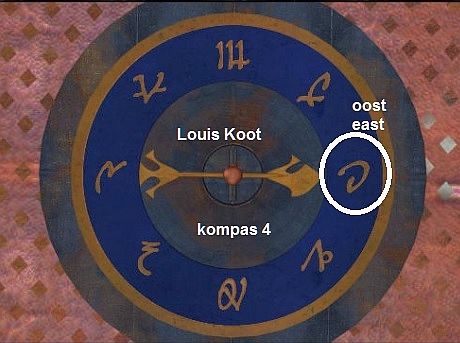
Zoom in again on compass 4 and again note the sign that the needle points to.
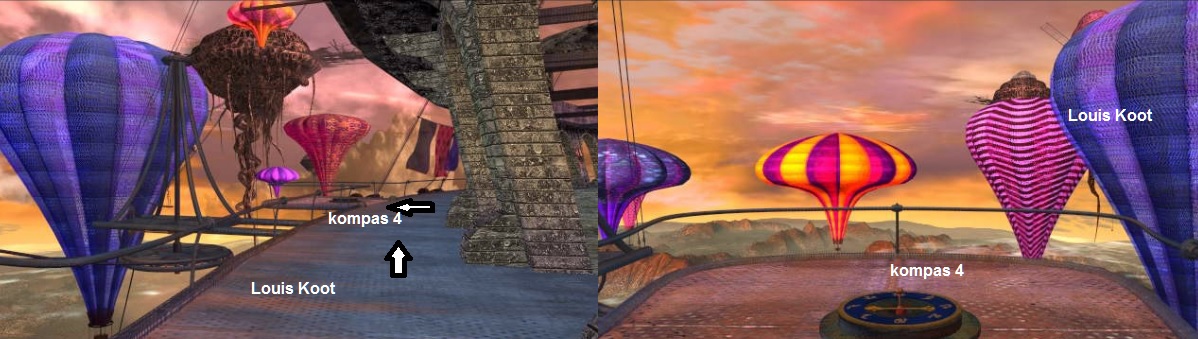
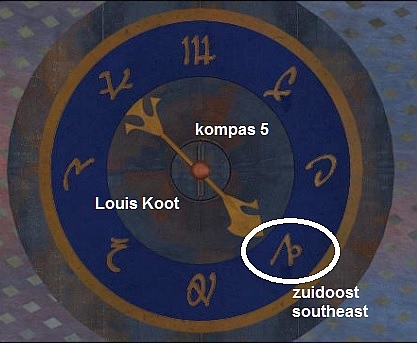
Zoom out, turn right and go forward 1 again and you will come to compass 5.
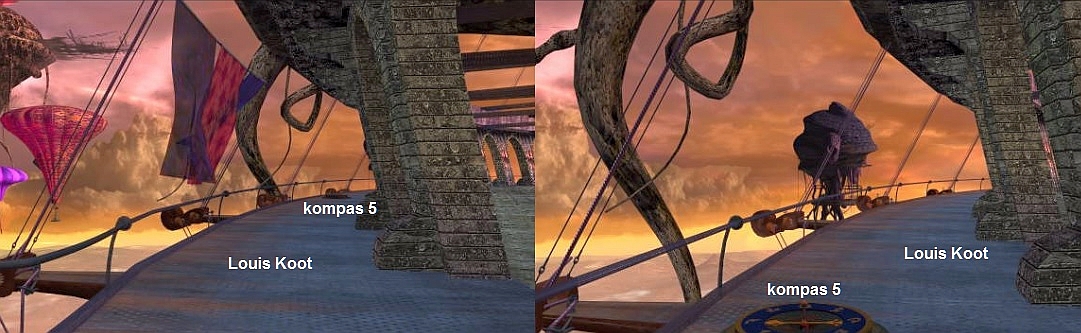
Zoom in again on compass 5 and again note the sign that the needle points to.
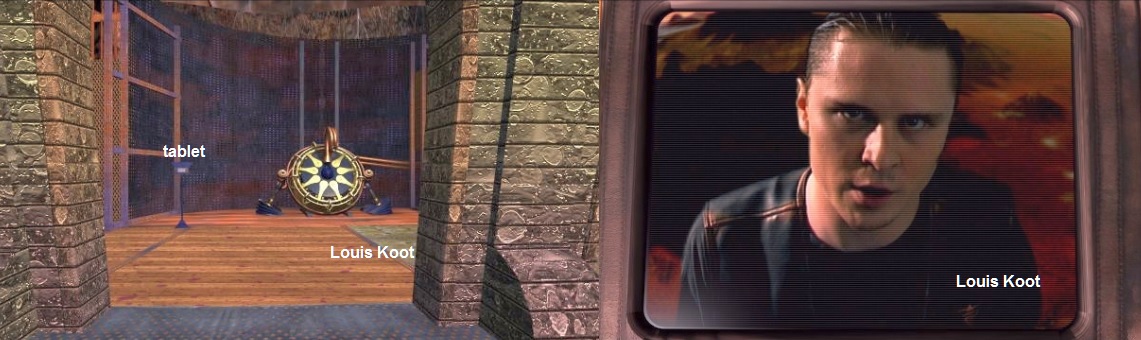
Zoom out, turn right and you will see another blue pole. Zoom in and watch the video of the report by Dr: Francis Bremmer.
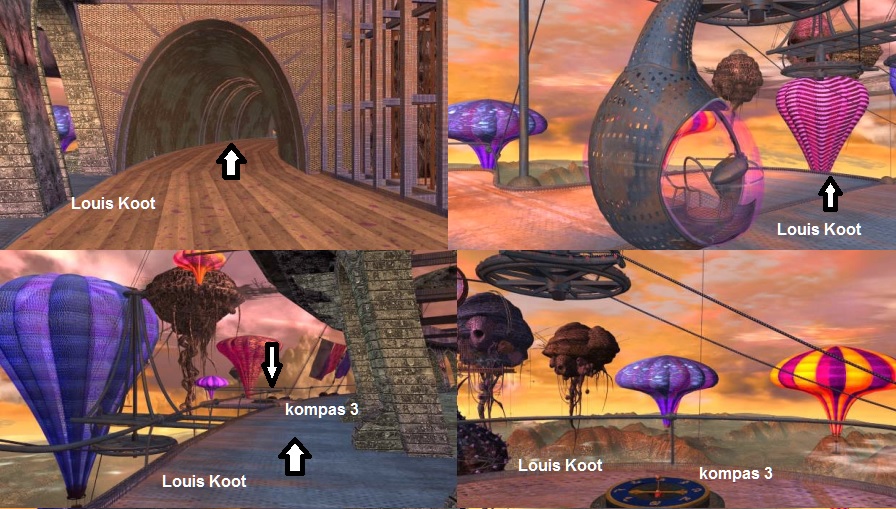
Then zoom out and go all the way back to the Big "Star Wheel". So turn right and click 3x forward and you are back at the cable car cabin. Then turn left
and click 2x forward to go back through the tunnel and then click forward once again. Then turn left and go to the big wheel. Zoom in again on the wheel.
Now click one after the other and in the correct order on the 5 characters indicated on the 5 compasses by the compass needles.
Gas collectors Island
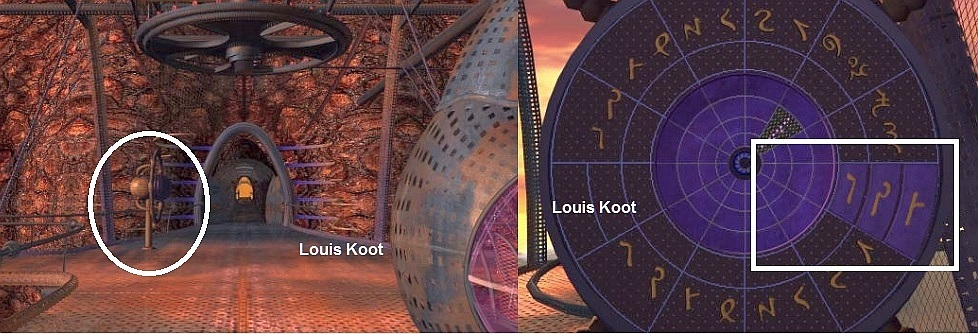
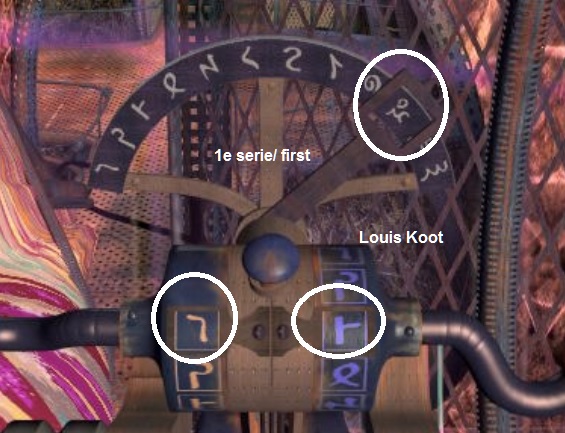
The wheel is divided into various circles and each circle again into segments. Each segment of the outer circle has 2 symbols. Right from the centre of the circle you
can see that there are 3 segments, each with a symbol of a different color. Now draw these 3 symbols over on a piece of paper. There are 3 under each other. These 3 symbols are the 3 Main symbols of the Airship's Control Stick.
Dr. Bremmer pops up and she screams that you have to go to the Bosch tunnels
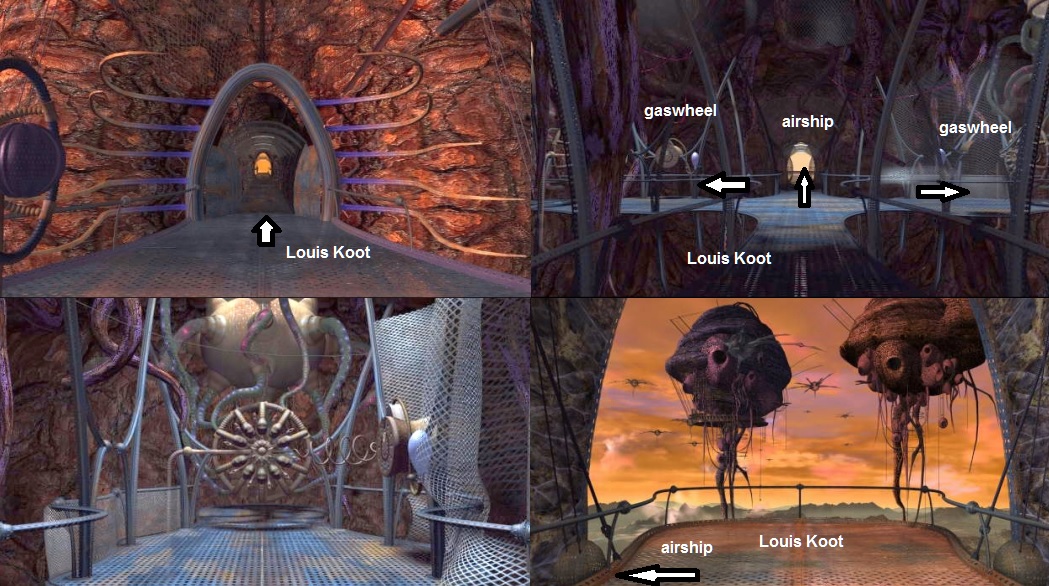
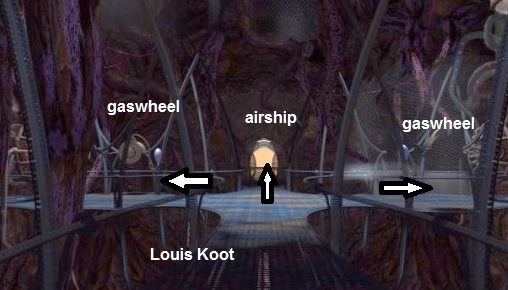
'Then turn right and go forward 2x, back to the crossroad in the hallway. Left and right are now those 2 identical gas collector wheels.
First go left to the wheel.
Sam says something about it.
Now walk back and forth on the paths and then return to the
intersection, at the 2 gas wheels and ..... Dr. Bremmer then pops up again
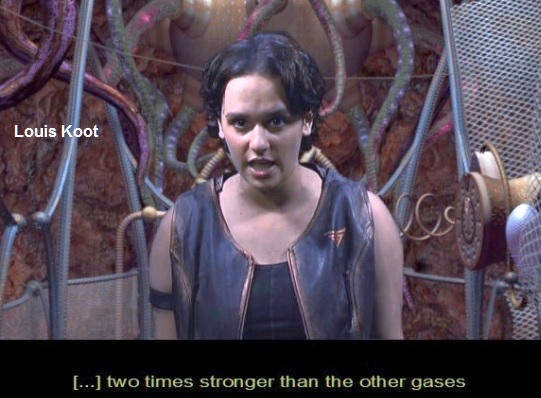
Bremmer says that you need 1 gas that must be twice as heavy as all other gases to make the ship rise. However, there is a problem, the gas collectors, the large
wheels, are unstable, so you do not know which of the 10 valves has the correct gas. And it gets even worse because every time you pick a wrong valve, the setting of the puzzle changes.
This is a Random puzzle that you only can solve by Trial and Error.......There is no ready-made solution for this puzzle.
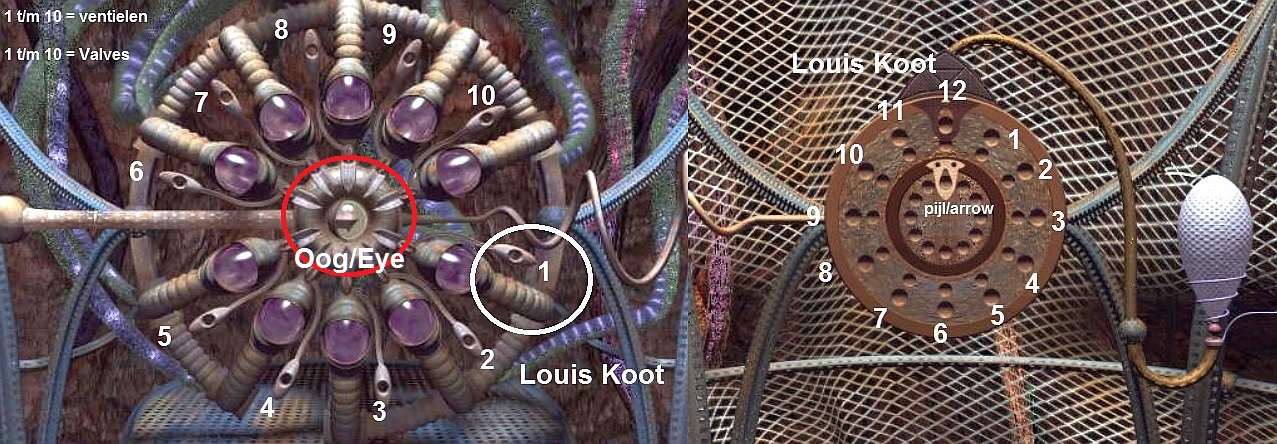
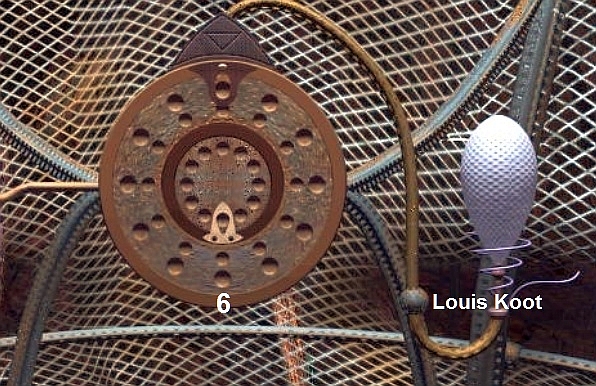
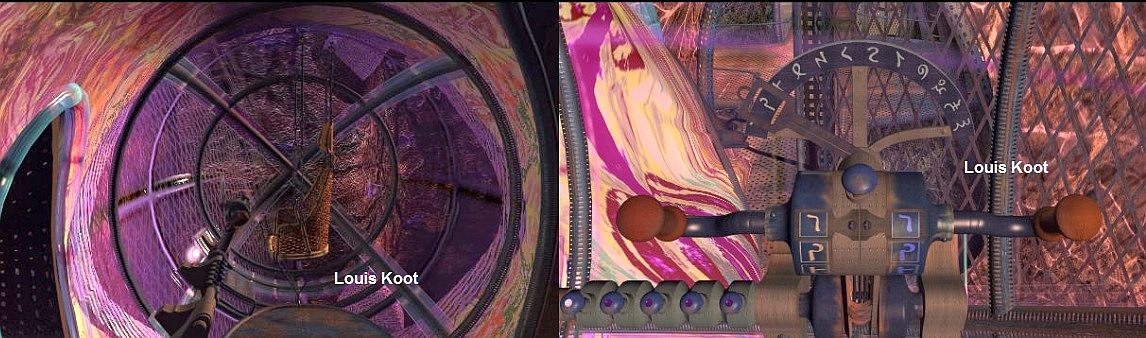
In the middle of the big wheel you see a "Glass Eye" with a black arrow pointing to the right. Around the glass eye you see 10 tubes that lead to 10 glass
balls. Next to each sphere a valve, which you can click on. There is gas in those glass balls, but there are 10 different types of gas. DO NOTHING. Turn to the right and you will see a smaller wheel with an arrow and next to it a balloon. This is a pressure
gauge. The circles in the outer circle indicate the height of the pressure. At the moment the arrow is at the top at 12 o'clock.
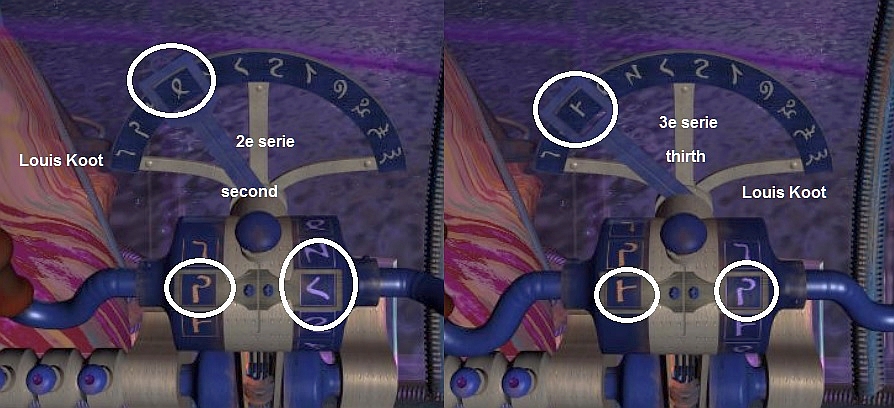
|
You must now first number the 10 valves. Again consider the entire wheel as a clock and then number the Valves as follows: Valve 1 at 4 o'clock; Valve 6 at 10 o'clock; When you have done that, first turn to the right to the pressure gauge (Pressure gauge). Now number the outer holes according to the hours of a timepiece, so 12, 1,
2, 3, 4, 5, 6, 7, 8, 9, 10, 11 |
Start by clicking the valves 1 to 5 and then click on the eye.
You are then automatically turned to the right, to the pressure gauge. Now there are two possibilties:
The arrow points to hole 5 or lower: When this is the case then the good gas (which is twice as heavy) is NOT with these 5 valves that you have clicked. Then turn back to the wheel and
then click the valves 2 to 6 and click on the eye again. Again turn to the pressure gauge and if the arrow again indicates 5 then it is not good yet. Then click on the valves 3 to 7, if the pressure gauge indicates 5 or lower again, then continue with the valves
4
to 8 and so on, until you see that the arrow points on hole 6, or higher, on the pressure gauge. If that is the case, then make a note of which series of 5 valves that is the case and then SAVE
YOUR GAME immediately because that will save you a lot of trouble.
The arrow indicates hole 6 or higher. As soon as you see that the arrow on the pressure gauge indicates 6 or higher, then SAVE
YOUR GAME. It means that in
this series of 5 valves, one must be the correct valve, but you don't know which of these 5 is the correct one. If you then click the wrong valve, the entire puzzle will reset and the gas you want will be placed under any other valve and you will have to do
everything you have done here with this wheel all over again. For me it was true that on the first wheel (and it doesn't matter which of the 2 you take first) the pressure gauge was on 6 after I pressed the valves 1 to 5. But with you so that may be with the
valves 3 to 7 or 4 to 8 or even higher.
I assume that with you it is now just like with me ......
That the arrow of the pressure gauge is at 6, or higher, and that you know which series of 5 valves that was.
And you have saved the game.
Now you go pressing those 5 valves of this serie of 5 and you do that 1 by 1. So press the 1st valve of that serie of 5. If that was the serie 5 to 10 for you, then you start with
valve 5. If you do not see the airship rising then this was NOT the correct valve. Then load your save and then click on the 2nd valve of your serie of 5. If the ship does not take off again, this was also not the good one, so load your save game again and
try number 3 out of 5. You have the right valve when you see the airship take off almost to the top.
When you have risen the Airship all the way up then SAVE YOUR GAME because the ship is not yet high enough. Even more gas has to go in and that has to come out of that other gas wheel. Then go
to the 2nd gas wheel and now repeat this whole process in the same way as you did at wheel 1. As soon as you get the gas meter at 6, or higher, you SAVE YOUR GAME again, because if you then press the wrong valve, you will see the ship fall all the way down again and you
have to repeat the entire puzzle from the beginning and then the correct gas will be under a completely different valve.
When you have also found the correct valve for the second wheel, you will see how the airship now ascends and reaches the top.
De Beak opens and the stairs come out.
SAVE YOUR GAME again.
Airship:
The airship has now landed at the top and Sam can enter it. Turn around completely and go forward 1x until you reach the intersection ........ now it depends on which
of the 2 gas wheels you came from whether you have to go right or left through the tunnel to the Airship . You will find it. So enter the airship. You are then again in front of a staircase. Turn around completely and you will see the cockpit in front of you,
behind the fence. Click 1x forward to get there. Then turn left and click forward to the left seat.
Zoom out, turn around completely and you will see the right-hand seat. Click 2x forward to get there and zoom in again.
This time you will not get to the seat but to
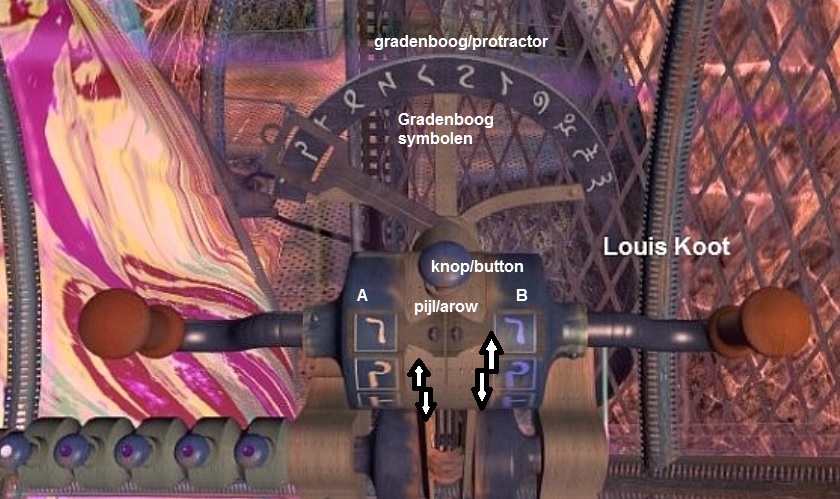
the steering system in front. Take a look at the steering, but do not click on anything.
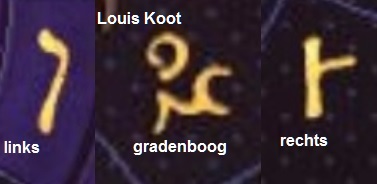
You now know the 3 main symbols, these are the 3 symbols at the left control stick. But which 2 other symbols then always belong to one of those 3 main symbols? You
don't know that yet, so we're going to find out now. Do you remember where you have seen those 3 Main symbols of the left steering stick before? ........ on that large circle wheel on the pole at the landing place of the cable cabin. So go all the way back
now. And as follows:
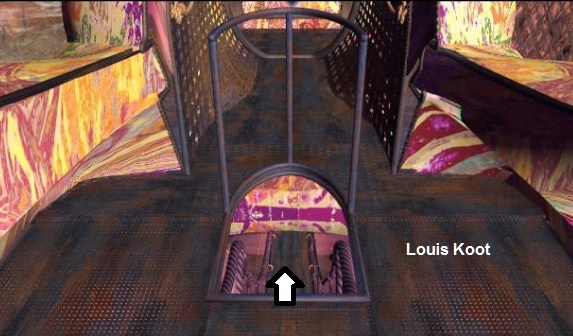
Zoom out and turn right and click 1 forward, turn left and click 1 forward to the stairs. Turn around completely so that you look at the cockpit again. Do NOT click
forward now but keep your mouse pressed. Your cursor now becomes a set of three arrows. Then drag your cursor down and click 1 forward to get through the stairwell to get out of the airship.
Then go 1 forward, turn right and then click 4 forward through the corridor. You are back at the cable cabin. Turn to the right and zoom in on the Wheel on the pole.
Now place your CD in the middle of these circles. So you can see the 3 main symbols of the left steering stick again to the right of the middle. Click on them one by one. If you do that, then the CD will always spin and then a symbol will be lit in the
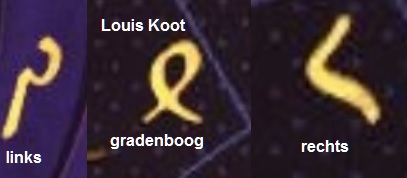
UPPER PART and the LOWER part of the OUTER CIRCLE. These 2 symbols belong to the MAIN SYMBOL that you have clicked on. The Symbol in the Upper Half of the Circle is for the Protractor, and the Symbol in the Lower Half of the Circle is for the Right Hand
Control. You do this for each of the 3 main symbols so that you have 3 combinations of 3 symbols each.
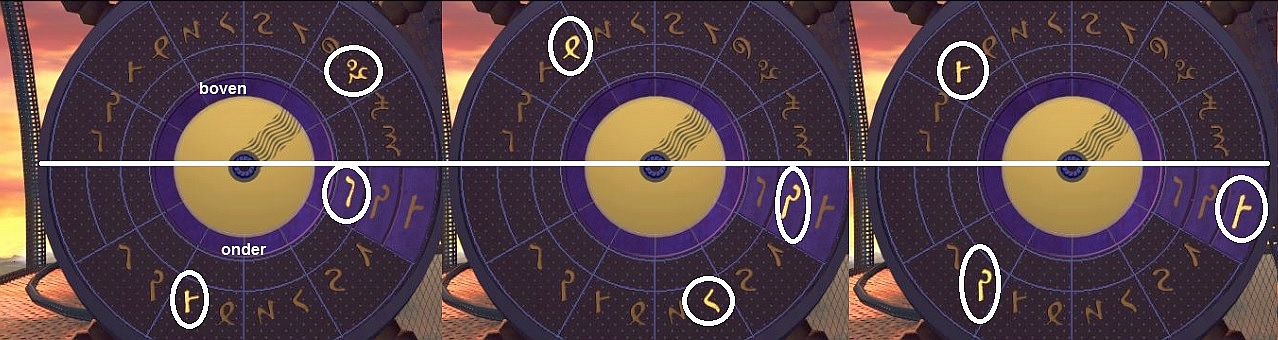
Make a note of the characters that apply to you in a table ......... something like a table below:
|
LEFT CONTROL STICK |
PROTRACTOR |
RIGHT CONTROL STICK |
|
Here you draw the main sy |
Here you draw the corresponding symbol from the TOP of the circle |
Here the corresponding symbol from the Bottom of the circ |
Then zoom out and return to the controls in the cockpit of the airship and zoom in again on the steering
Airship puzzle
|
The steering system has various parts:
|
Explanation
for me it is these symbols, not sure if this is the same in every game:
It will look like this on the steering system
The Airship will then dock at an intermediate station. You cannot leave the Airship because you must now set the other 2 series of symbols on the steering.
So do that ...... for me it is these 2 series of 3 symbols each

Chapter 3: Sam 2: Bosch Tunnels
2019: This English translation
by: Dick Leeuw