2017: Original Dutch Walkthrough by: Louis Koot
2019: This English translation
by: Dick Leeuw
If you have found this walkthrough via google search or via another site then you have probably not visited my site.
A lot more very detailed game walkthroughs can be found on my site at: www.pcgameswalkthroughs.nl
Chapter 3: Sam 2: the Bosch tunnel:
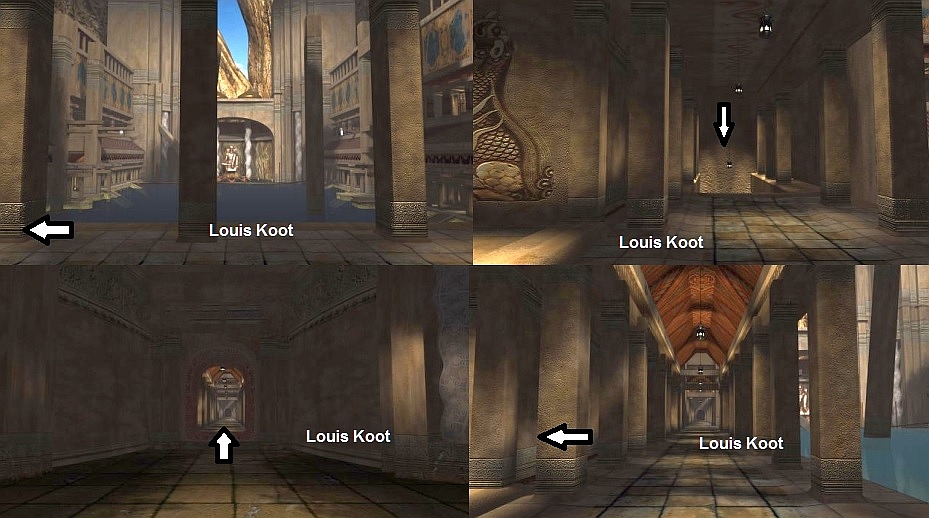
Leave the airship and when you are outside you are standing in front of a rock wall on a platform. Hannah now reports on the radio and she
and Sam are having a conversation. After this you turn to the right and click forward and you go down a flight of stairs. You end up on a large round platform with a number of thick pipes. Click 1x forward and then turn slightly to the right.
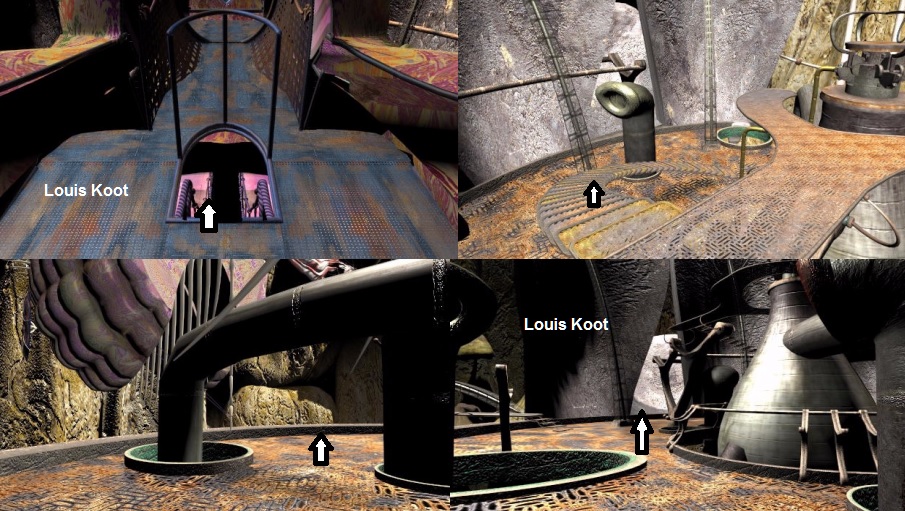
Click one more time forward, turn slightly to the left and you will see a round house at the end of a walkway. Click 2x forward to the house. To the right of the
doorway is a button, so click on the button and ........... In the "house" a platform will rise. It is an elevator. You end up on the elevator and turn left and click on the lever. Sam sinks with the lift platform down. Click forward to exit the
elevator house.
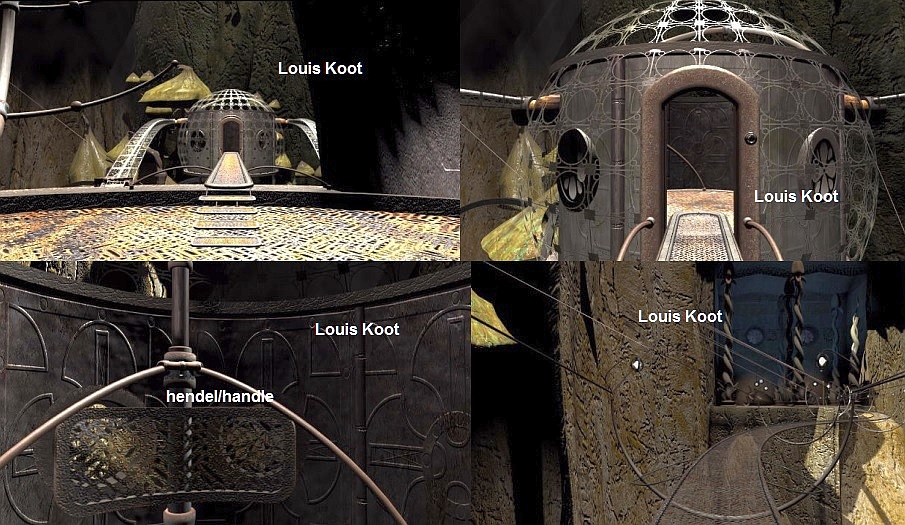
Sam is now on a "Floating" Metal path. Follow this path 6x ahead, to a sort of cave room with strange pillars. At the back of the cave you see a large door.
Click forward 2x to that door, then turn left and click forward again 1x and you are faced with a 2nd door. Turn slightly to the right and then zoom in on the yellow bar immediately to the right of this door. Then click on the button on the
wall.
The door opens and you go through it. Then go forward 2x, turn right and go across the walkway to the rock platform on the other side.
Then click 1x forward to the
stairs. This appears to be an arch bridge.
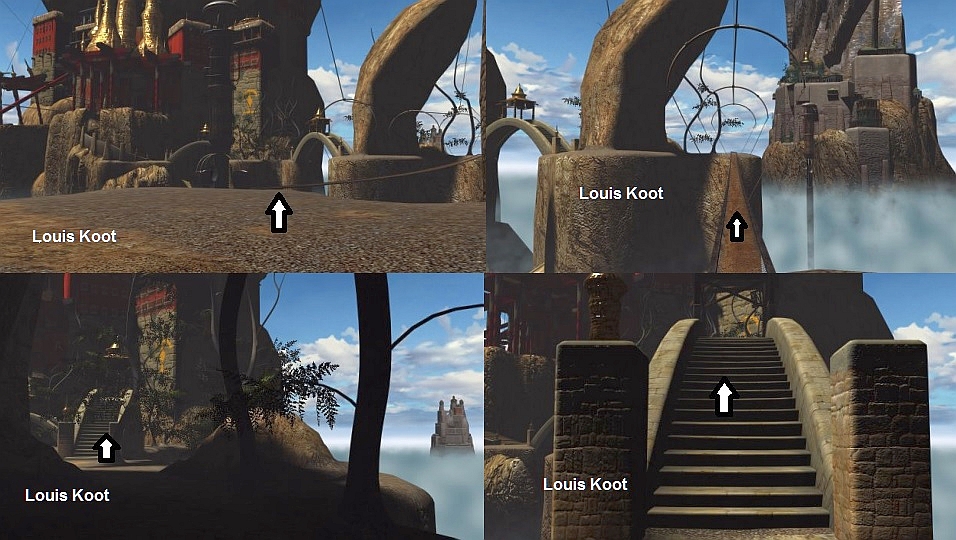
Go forward twice over the bridge and then follow the path to the next arch bridge and ......
You turn around automatically because a "ghost" appears ....
the guy is calling something but you can't understand his language. The only word you recognize
is "Matia".
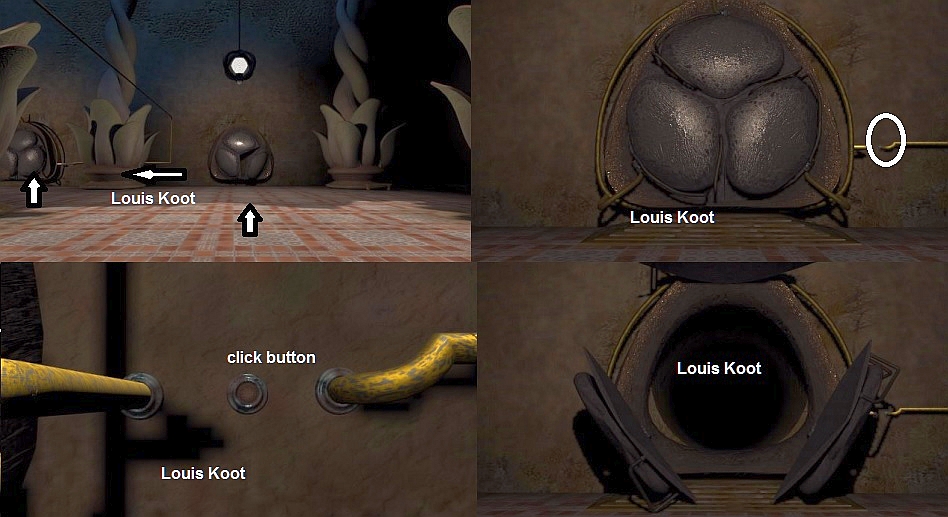
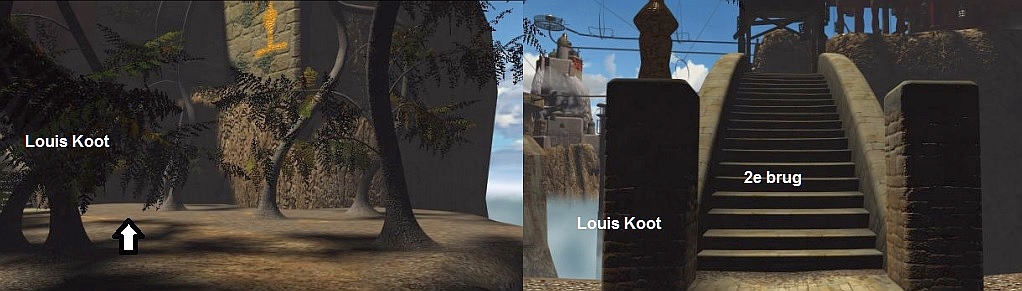
Turn back to the 2nd arch bridge and cross over here too and then go up the wide staircase via 4x forward.
You then end up in front of a large dark tunnel entrance.
There is a single rail on the floor.

Turn to the left and go forward 1x towards the red pillars ......
Sam tells Hannah what he sees ...... Sam sees in front of him Base 1 but he can't go there. Sam is
also talking about a temple. Turn to the left and you will see a tapered obelisk. Click 1x forward to the obelisk and you end up at the rail behind it. Turn to the left so that you can see the obelisk again and zoom in on the panel in the obelisk and then
click on the button.
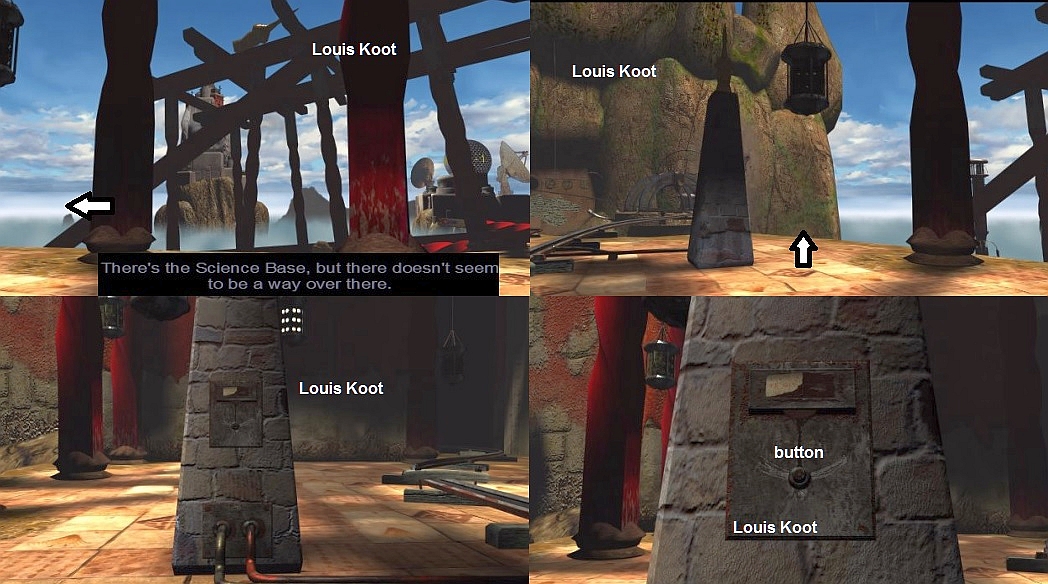
A railcar now runs over the rail. If the railcar has stopped then click ahead on that trolley and you will sit in it. Click on the right lever and your journey will
begin. You enter a dark tunnel and then the cart stops and you turn to the right. Click forward to walk through a dark tunnel and you will find yourself in a very large cave.
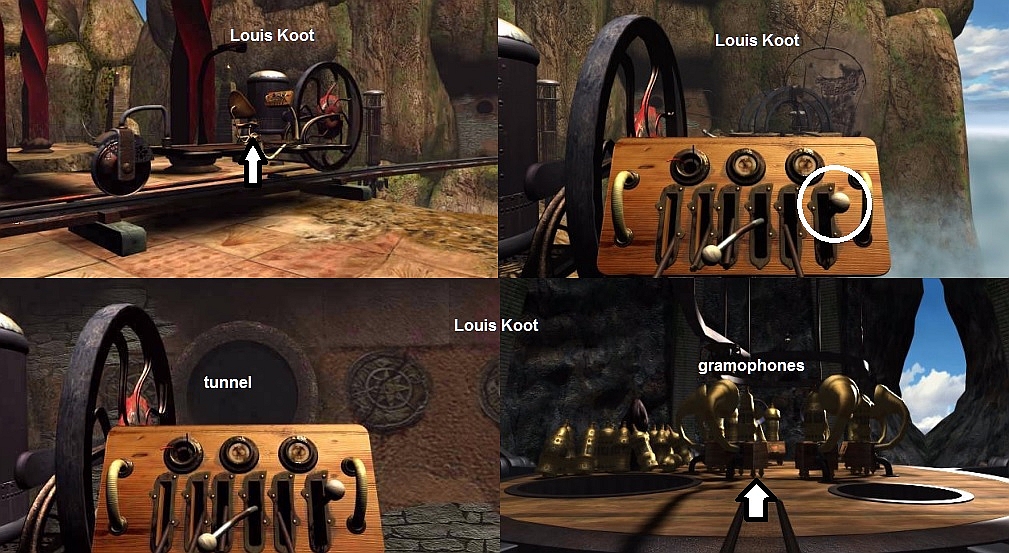
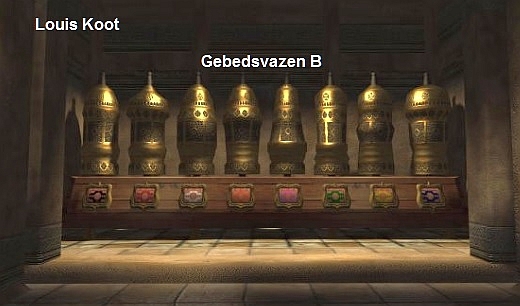
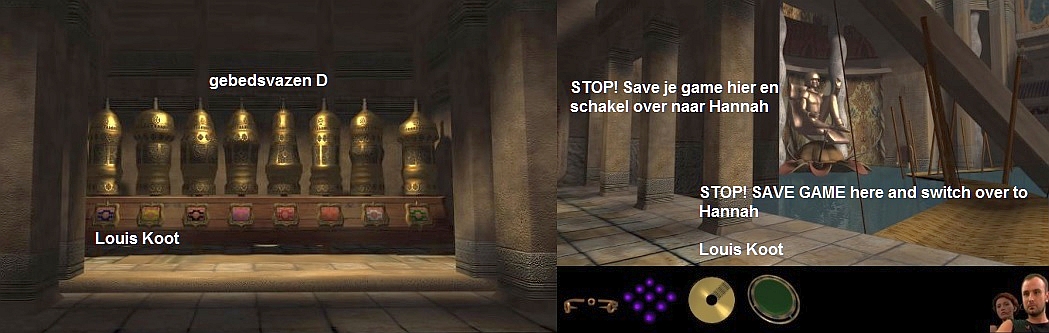
Sam has landed in a cave and is standing in front of a large circular platform with in the middle a couple of...... well what actually .... gramophones?
Click forward to get to the platform and Sam says they are prayer vases.
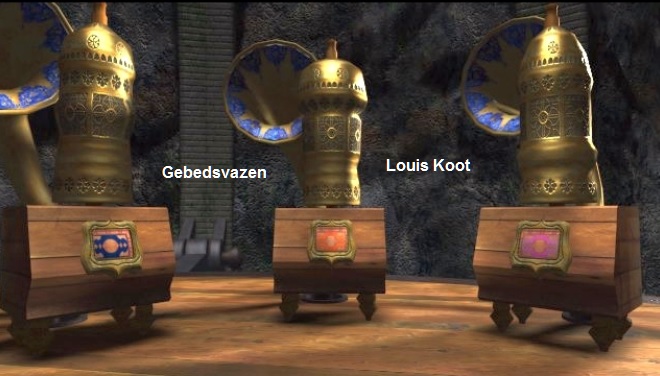
Sam is now in the middle of the circular platform and in the middle of a circle of 8 prayer vases that are all on a chest. A large horn protrudes from the back of
each of these boxes and on each box you see a coloured screen, each with a different color. Just stand as you are now and take a good look at the vases. There are 2 click places per vase / box. One click place in the middle of the vase itself and also on the
screen in the box you can click and then you can scroll this screen up or down and you find out that each screen has 8 colors. If you click on the centre of a vase you will hear 2 words.
Now turn around completely and you will notice that there are 8 vases on 8 crates and that not one vase has the same shape. Each vase has a slightly different shape.
Click again in the middle of a vase and you will hear 2 words again and the vase will turn. The FIRST word that you hear per vase refers to the SHAPE of the vase and the SECOND word that you hear per vase refers to the COLOR in the box screen that was set at
the time of clicking.
Now turn around so that you are facing the entrance to the tunnel from which you just came. Make sure you can see the tunnel entrance between, on the left the
"yellow" vase and on the right the "green" vase. We now first determine the first wordof all vases, so determine the FORMWORD (we leave the screens in the boxes alone now) and we start with the "green" vase. Number this as 1 and
click on the vase and write down the 1st word you hear. Then always turn clockwise to the next vase and number it as 2, 3, 4, 5, 6, 7, and 8.

Always click on the vases and always write down the 1st word behind the vase number.
When you have had all the vases, you are again facing the tunnel entrance and you
have made the following list:
|
Prayer Vases Form Words |
Color words |
|
Vase
1 = Doss Vase 2
= Leszz Vase 3
= Dihmah Vase 4 = Aahrih |
Yellow
= Nakrih · Purple
= Ruehsah Orange
= Lhezadjih Green
= Tundrah Black
= Thanduh |
Now we limit ourselves to one vase, no matter which but I have taken the "yellow" vase. By scrolling the 8 colors in the screenscreen of the yellow vase, we
will now determine the 8 2nd words, the COLOR WORDS per color. So always set a different color in the screen and click on the vase and then write after the color always the 2nd word you hear and you make the following list:
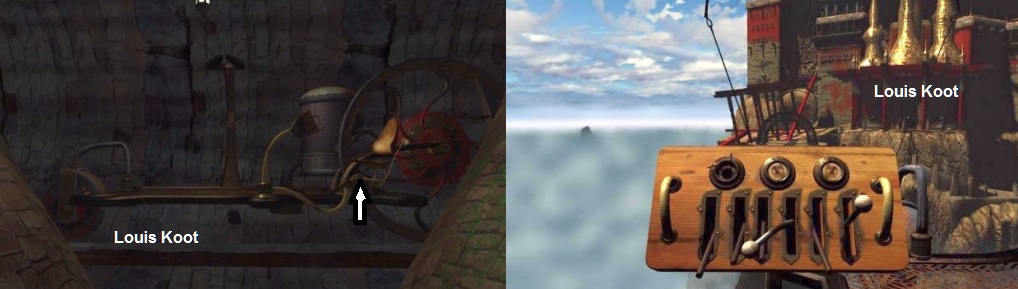
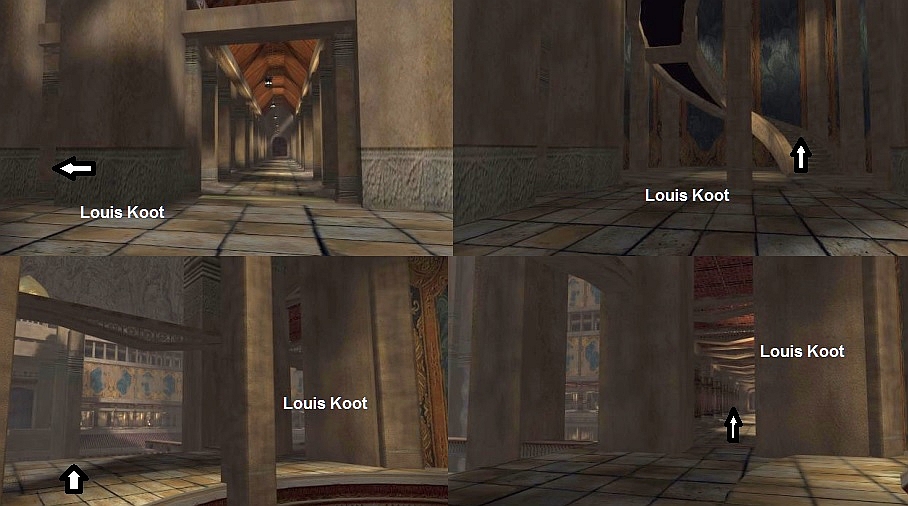
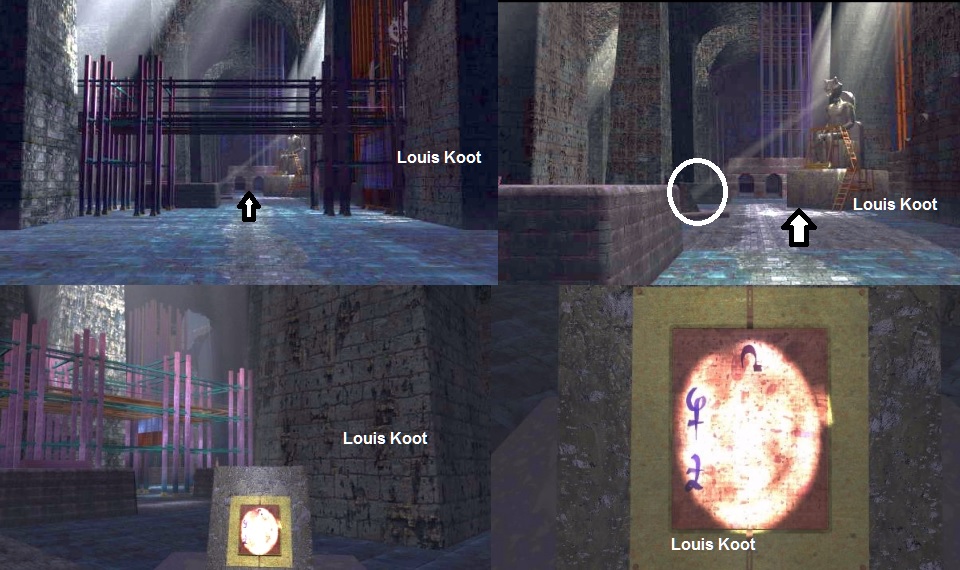
Back at the obelisk you walk 1x forward, turn right and go 1x forward again, turn left and you are back at that big dark tunnel entrance.
Click 1x forward to go
through this tunnel.
You arrive in a large and high room with a large "swimming pool".
You cannot go to the right, so turn to the left and then click forward 1x to enter the gallery. Then click 1x forward again and then turn left.
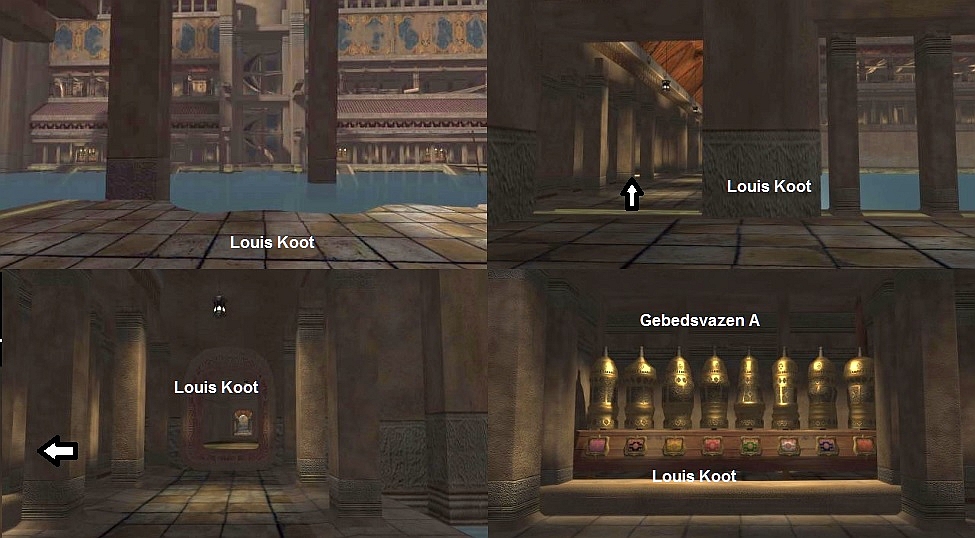
In the niche you can now see the 8 Prayer Vases with their screens underneath. These are the Prayer Vases A. Zoom in to hear what Sam says about it. Sam still doesn't
know what to do with these vases, so turn to the right again and continue forward 1x through the gallery. You enter a hall and here you turn to the right and then you go 1x up the large stairs. At the top of the stairs, turn to the left and click forward once
and you will arrive in a room where you see a painting of a priest hanging above an altar in the back wall. Let's call this room the Altar Room.
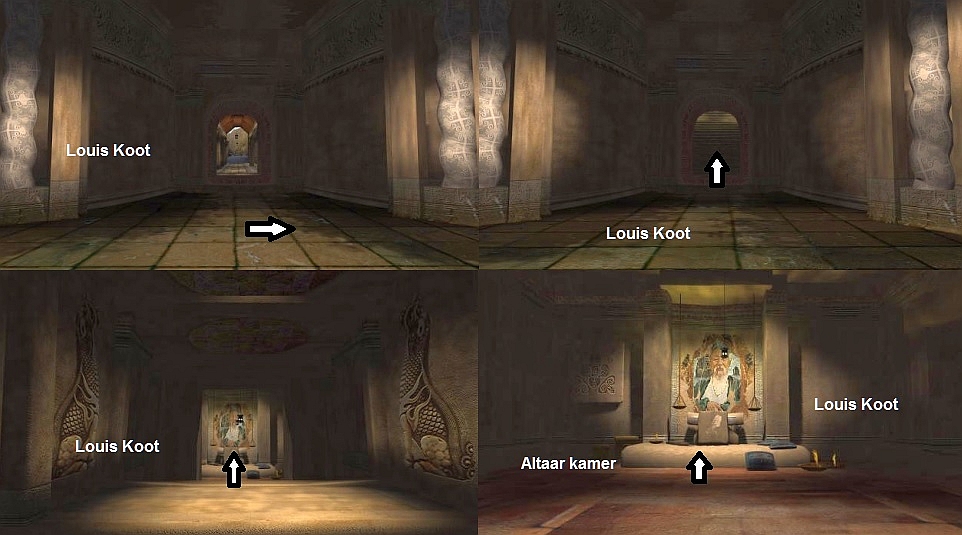
Click 1x forward to get to this altar.
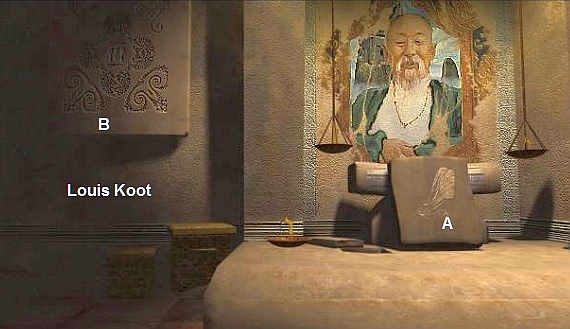
A stone tablet (A) leans on the altar and a stone tablet (B) hangs on the wall to the left of the altar. Zoom in on the
stone tablet (A) that is under this painting on
this altar. You see a relief of an insect on it. You have also seen this insect when you, as Hannah, were at that Pear with the 11 characters on it. The insect was there on the wall of the house behind that pear and you could see it when you zoomed in on the
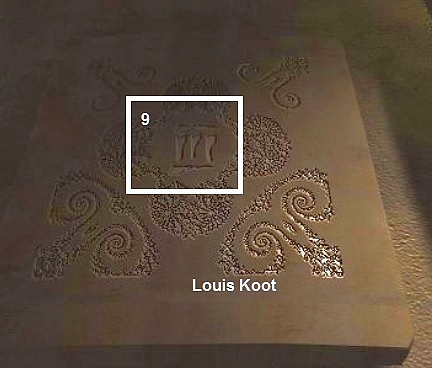
board to the right of the pear. You also saw this image on the wall behind that pear. Zoom out and then zoom in on the Wall Tablet (B). On tablet B you see a number of drawings but in the middle you see one of the 11 characters that have already been seen on
that Pear with Hannah. Copy this. It is the sign for our number 9.
Zoom out again, turn around and click 2x forward to get to the top of the stairs again.
Turn to the left and click 1x forward to go down the big stairs and then turn
to the right. Then click 1x forward in the gallery.
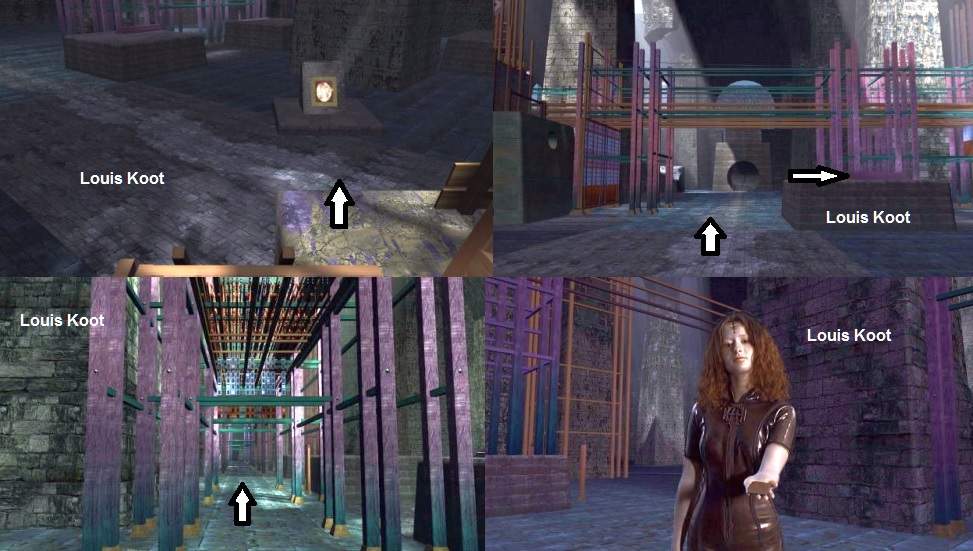
You are now on the other side of the "swimming pool".
Turn to the left and you will see another niche containing the 8 prayer vases. These are the Prayer
Vases B
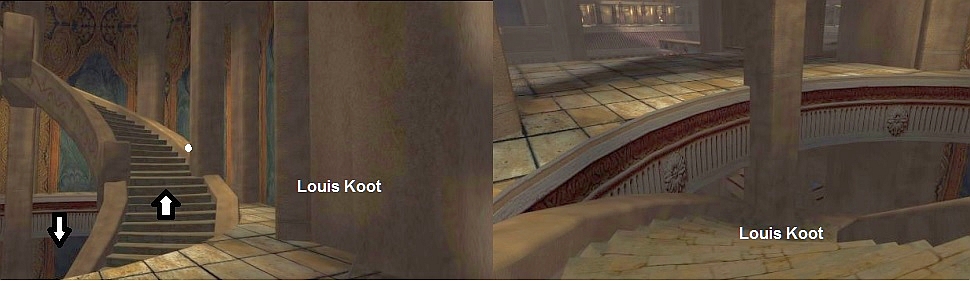
Turn right again and then continue forward twice across the gallery. You are now in the middle of this gallery. Turn to the left and you will see a staircase. Click
2x forward to go up this staircase. You can't go any further halfway up the stairs, so turn to the right and you'll see the bottom of the floor.
Click forward to get to this floor, then turn right and go to the upper gallery. Then click forward once more and turn right and enter the room.
Turn to the left and you will see a machine with 5 meters on it and 5 levers behind it.
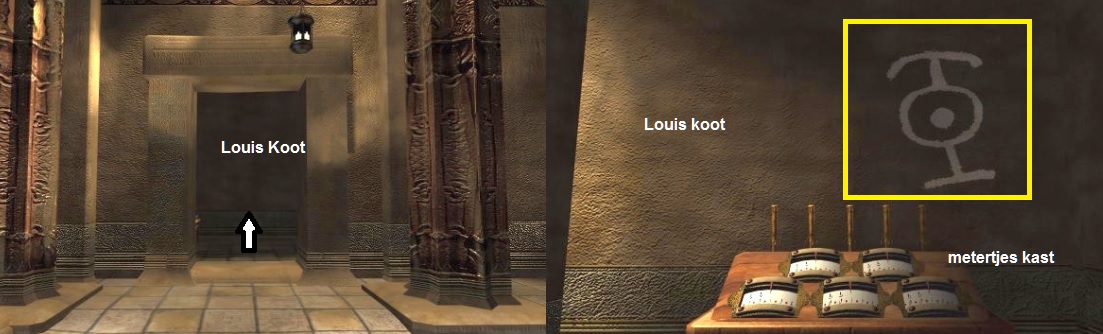
Sam is now in the Meter cupboard room. On the wall you see a drawing. Copy this wall drawing. Zoom in on the meter cupboard. Sam has no idea what to do with these
meters and the levers, so zoom out again. Now turn around completely so that you see the right wall of the room. You see a large mural on it.
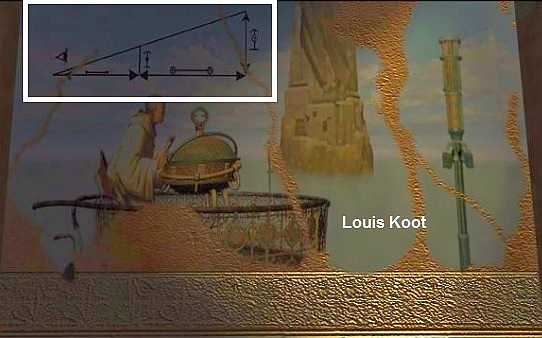
The wall painting represents a 17th or 18th Century Scientist who is measuring something with a spherical optical measuring instrument.
Above the head of this
scientist you see a large triangle drawn. Zoom in on that triangle to view it better

You can see that the triangle is divided in two by a perpendicular. There are also 4 symbols drawn in the triangle. 2 on the BASE (the bottom line of the triangle).
There is also a symbol next to the vertical line on the right and the vertical line that divides the triangle in two. Copy this entire drawing just as precisely. Again you don't have a clue what all this means, but apparently something needs to be measured
somewhere. You have to determine the height and length of something somewhere.
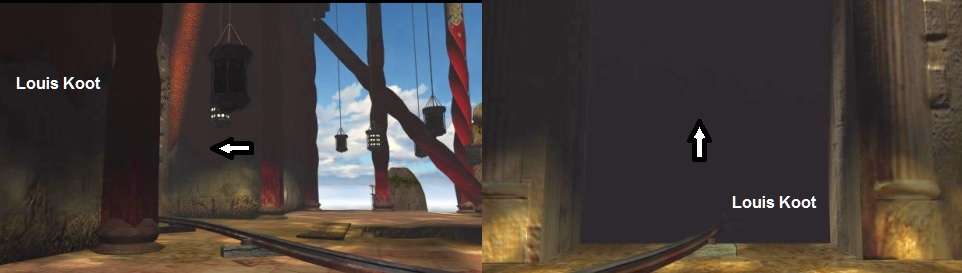
You can do nothing further here but remember this room in the temple because we will be back here soon. Now go all the way through the temple back to the exit where
you entered the temple. Turn right, 1x forward, turn left, 2x forward, turn left, 1x forward to get back on the stairs.
Then turn left and look down and click 1x down the stairs down. Down you go forward 1x, turn right and then you go forward 3x through the gallery. Turn left and go
forward twice over the high stairs to the other side. Turn left and go forward 3x to the end of the gallery. turn right and go forward through the dark tunnel and you are outside again
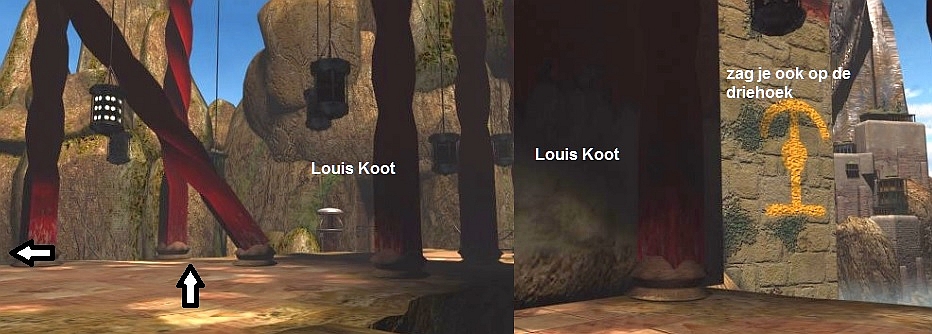
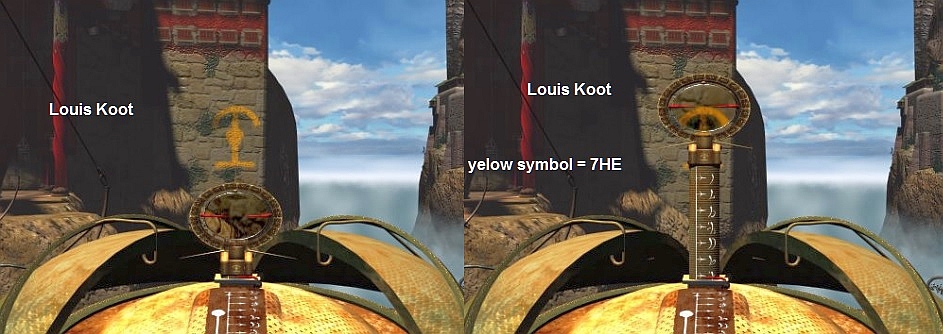
Take your drawing of the triangle and you will see that this yellow symbol is the same as the symbol drawn in the triangle next to the perpendicular that divides this
triangle into two parts. Turn to the right until you see the start of that sloping red pillar and then click forward 1x. You then arrive just before an iron walkway, with another tapered pillar to the right of it. Click 1x forward again and you are faced with
this pillar. Then turn slightly to the left and then, to the left of this pillar, 1 forward and you are on that iron walkway.
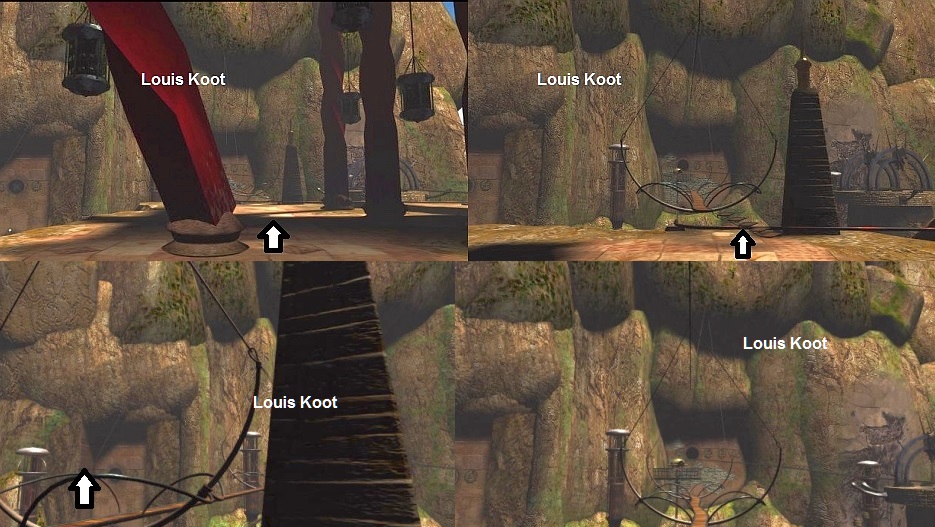
Go forward 3x over the walkway ........
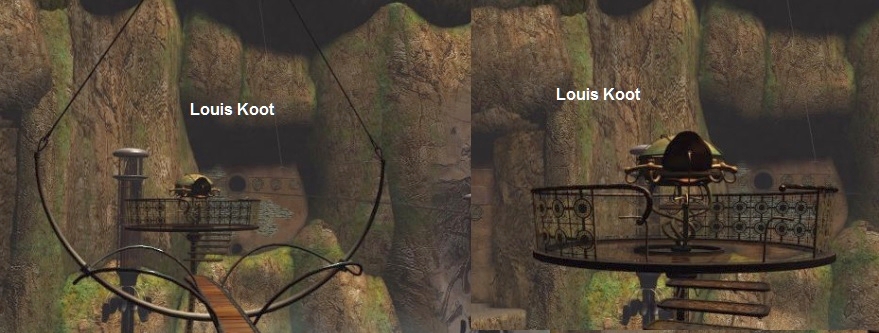
The Optical Measuring Instrument
Sam arrives on a round iron platform. On the platform is a chair for a large spherical instrument. This spherical instrument is the Optical Measuring
Instrument,
which you also saw on the mural in the meter cupboard room on the top floor of the temple.
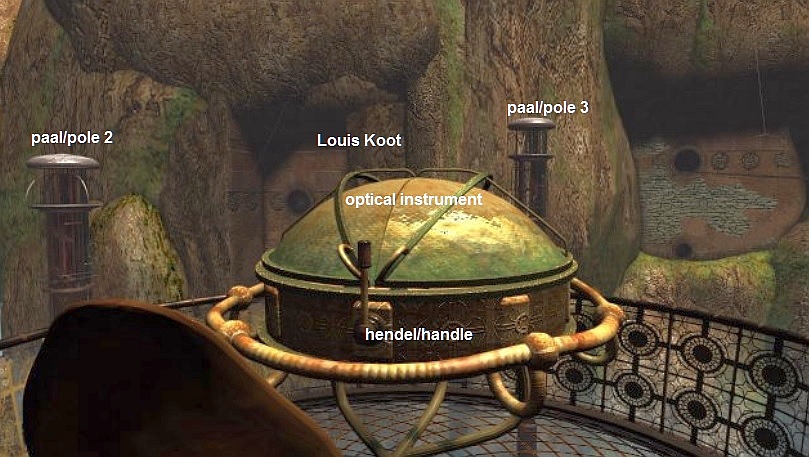
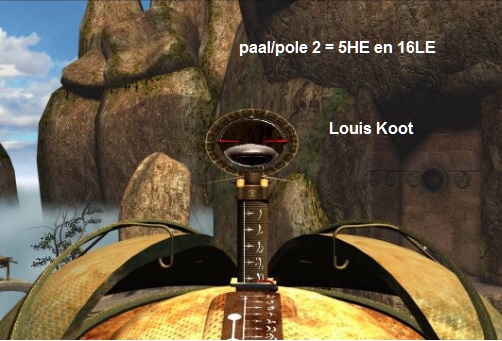
Don't zoom in on this globe right away, but first take a look at it. Behind the Optical measuring instrument you see the rock wall and you see that there is a pole in
the water between the instrument and the rock wall. This is POLE 3. There is another pole to the left of the instrument and that is POLE 2. Now hold your cursor over the instrument and click and hold your mouse button and ......... You cursor now becomes a
left / right arrow. Now just turn to the right, but do it slowly and piece by piece. Turn all the way in this way until you reach POLE 3 again.
You will find out that you can rotate the entire platform and that there are a total of 5 POLES around this platform, such as posts 3 and 2. But all these 5 poles are
at different distances from the platform and therefore also of the measuring instrument. This makes it appear that one pole is longer than the other. You will also see the Yellow Symbol again. These 5 Poles, which stand in the water around your platform,
therefore correspond to those 5 levers that you saw on the upper floor of the temple, on that machine with the 5 meters (near the Triangle).
Once you have done this, zoom in on the sphere of the instrument.
Click your mouse on the sphere and then drag your arrow cursor down. Then click on the Handle at the
bottom of the sphere.
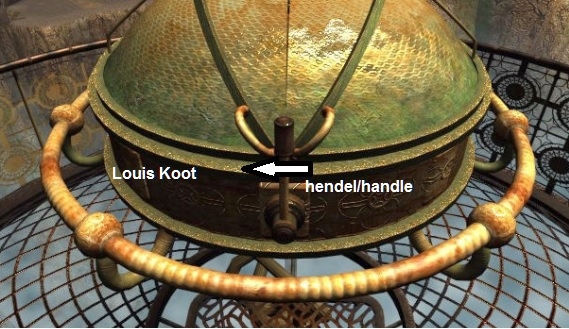
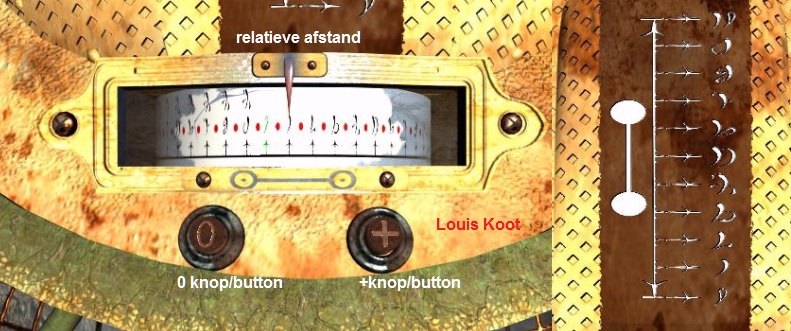
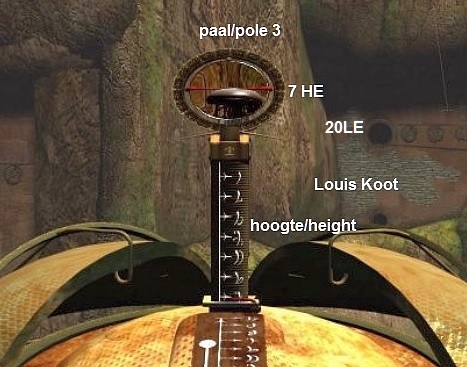
The sphere now opens and you see a round / oval viewing window with a red horizontal line there. You can raise this window by clicking on it with your cursor and then
pulling it up. Below the window you will see a scale. This is the Elevation distribution and the distance between 2 lines is 1 Height. Now pull the window upwards until the red line is at the same height as thethe top of Pole 3, behind the instrument and you
can then read the height on the scale. For this Pole 3 this is then 7 Height units (HE).
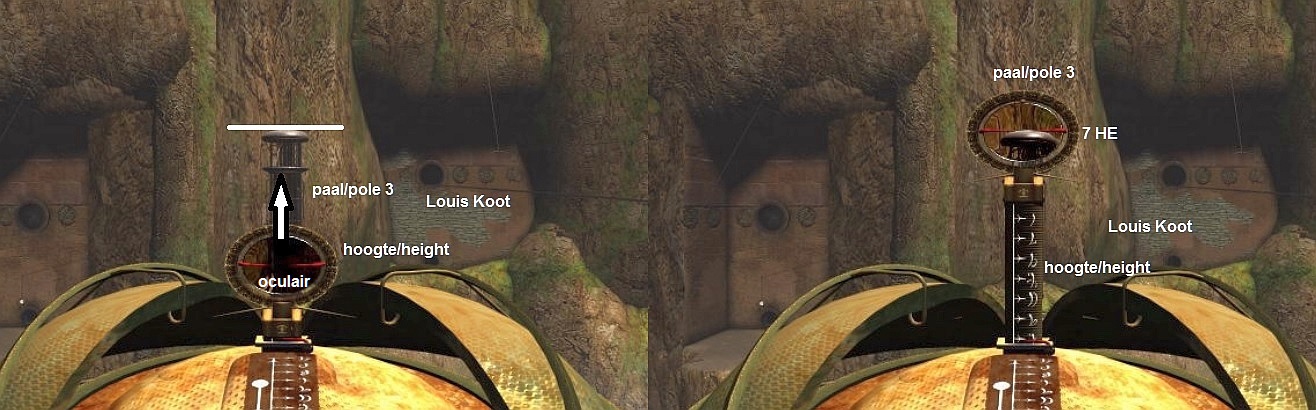
Now zoom in again on the sphere under the viewing window and you will see another scale. So here you see the Open Dumbbell symbol that you also saw in the Triangle of
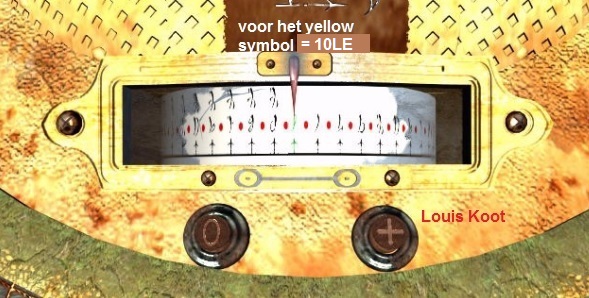
the Mural. Below this scale is a 0 (zero) and a + (plus) button. This scale is the Relative Distance Scale. Zoom in just above this scale on the brown area above it and you will see a fixed length scale with the Dense Dumbbell symbol from the triangle beside
it. This length scale has a fixed length of 10LE, that is the length of the baseline of the triangle where this halter is placed (10 length units, where 1 LE is the distance between 2 lines.).
What you need to do now is to measure each of the 5 Poles their Relative Distance to the Yellow Symbol on the Temple. You have to do this through a complex
mathematical calculation and we take the yellow symbol on the temple wall as a starting point. I don't really know how to explain it, but the point is that, through a complicated calculation of the relative height of the 5 posts and their relative length to
the yellow symbol on the temple wall, you get the correct height of each of the 5 poles determined. I will explain it as well as possible, but I didn't understand much of it myself either, so if you want to know the solution right away, skip the next part and
look in the table below for the solution:
Phase One:
The Yellow Symbol
Now point the measuring instrument at that yellow symbol and measure its height by keeping the red line in the eyepiece exactly on top of this yellow symbol.
Then read the Height on the scale. That is 7 HE (Height units)
Then zoom in on the measuring instrument on the lower measuring scale and click on the 0 button. The arrow of this scale will then appear on a green line.
If you now press the + button, this arrow will remain on this green line. We already know that the LE (unit length associated with this yellow symbol) is 10LE.
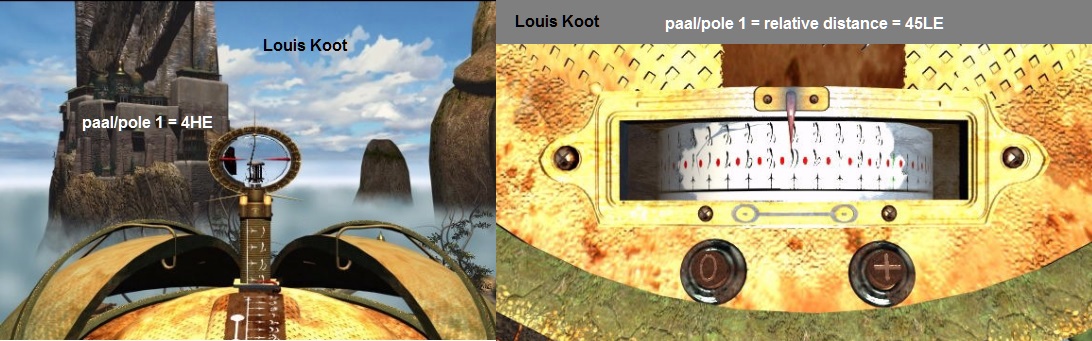
Phase Two: Pole 1
Now turn the entire measuring device to the right until you see pole 1 and repeat the height measurement on it, that is 4HE, then view the lower meter and press the 0
button to put the arrow on the green line and then press the + button. The scale turns to the left and then indicates a value. Through a complicated calculation we come to the conclusion that the relative distance from this post 1 to the yellow symbol on the
wall is 45 LE.
Phase 3: Pole 2
Phase 4: Pole 3
Phase 5: Pole 4
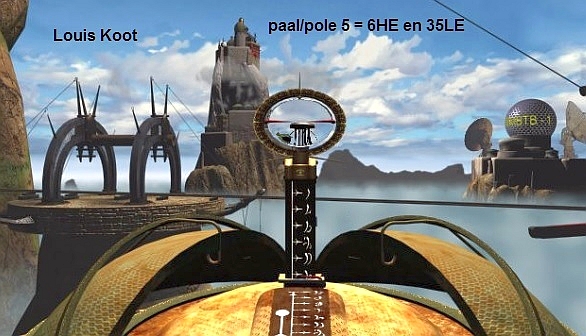
Phase 6: Pole 5
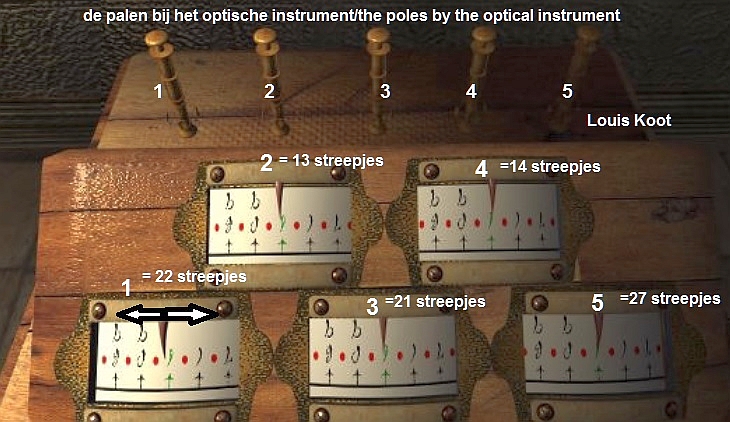
We then finally get the following list:
|
Pole1 = 4 HE and 45 LE Pole 2 = 5 U and 16 LE Pole 3 = 7 HE and 20 LE Pole 4 = 4 HE and 25 LE Pole 5 = 6 HE and 35 LE With the LE value of each pole we always add the 10 FIXED LE value of the yellow symbol so that we can now determine the following HEIGHTS of the 5 poles via a certain calculation: Pole height 1 = (4HEx55LE) / 10 = 22 ·
Pole height 2 = (5HEx26LE) / 10 = 13 ·
Pole height 3 = (7HEx30LE) / 10 = 21 ·
Pole height 4 = (4HEx35LE) / 10 = 14 ·
Pole height 5 = (6HEx45LE) / 10 = 27 |
Now we know the values that we have to set on the 5 meters in the meter cupboard room of the temple, so we go back to that room. Zoom out of the optical instrument
and then follow the route all the way back to the room on the top floor of the temple, so the room where those 5 meters with the 5 levers are located.
Temple: Meters cupboard room:
The 5 poles that are above the meters are actually the 5 poles that are outside around the optical measuring instrument. With the 5 meters we will now adjust the 5
posts here to the height found. Look at the image below to see which meter belongs to which pole.
When you start you will see that on each of the 5 meters the arrow is on the green line. What you need to do now is to hold down your cursor on a meter and then pull
this cursor to the left, move the meters so that you put the arrow on the correct line for each meter. This is really a precise job ..... Always try to move the arrow line by line in every meter and count the number of lines that you have to move.
|
Me Meter 1 = drag the arrow 22 lines to the right of the green line ·
Meter 2 = drag the arrow 13 lines to the right of the green line ·
Meter 3 = drag the arrow 21 lines to the right of the green line ·
Meter 4 = drag the arrow 14 lines to the right of the green line ·
Meter 5 = drag the arrow 27 lines to the right of the green line If you do this well, a drawer will open underneath the meters and you will take the Mirror out of it. This is basically an Optical Filter (Mirror / optical filter) and you will need this thing later in the game.
|
If When you have taken the Optical Filter then you leave this room again. Back on the gallery,
turn right and go forward 1x. Then turn right again and ......
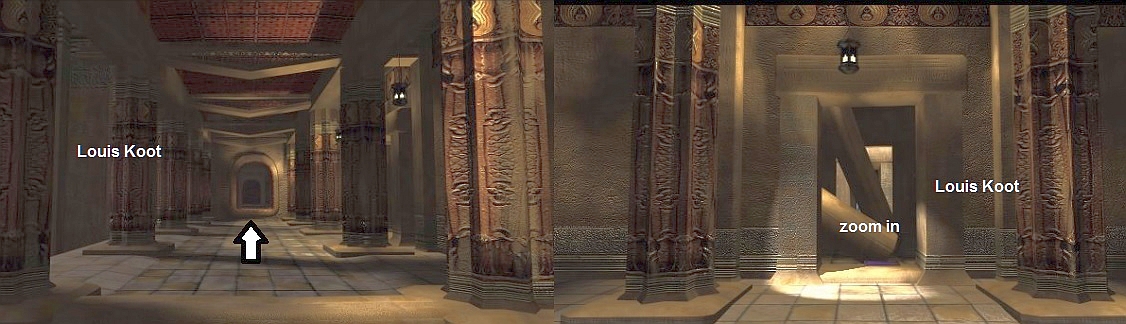
Sam is now in front of a 2nd room, but he cannot get in because of the blockage.
There is a tablet in front of / under the pillar, so zoom in and watch the 3 videos
on this tablet
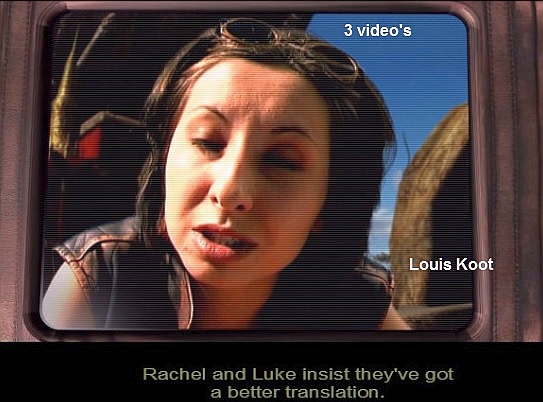
Have you watched the 3 videos of this girl then zoom out. Turn right and now go back down via the spiral staircase (ground floor). Back down you go to the left and
then click 1x forward through the gallery, then turn left again and you see another niche with 8 prayer vases. These are the prayer vases C
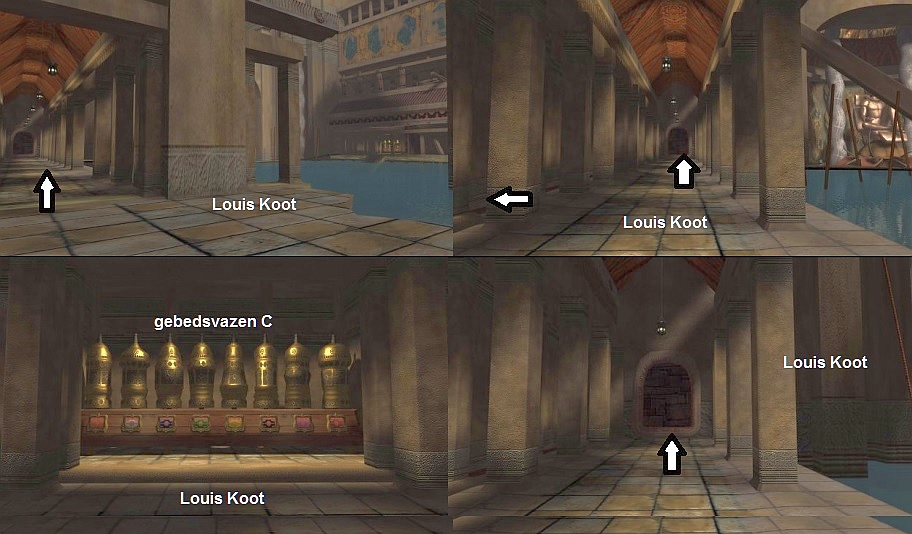
Turn right again and click 1x forward across the gallery. You cannot move forward. Turn
left and you will see the 4th niche with 8 prayer vases. So these are the prayer vases D.
To the left of the walkway you see a large statue at the head of the "swimming pool". Do not continue now but stay here and .......
SAVE YOUR GAME now (This is very important) and then Switch to Hannah to continue with her.
Chapter 4: Hannah part 2: Bosch Tunnels:
Hannah is still in exactly the same place where we left her, namely at the beginning of the Cathedral. She is actually up in the same temple complex that Sam is now,
but we are now in a different part. The point is now to prepare the reunification of Hannah with Sam.
You see a scaffolding of tubes and behind it you see a large Statue where a beam of light falls from the head to the left on the floor. Click 2
forward and you are next to this statue. Turn to the left and you see that the light beam from the statue falls on a stone with an image on it. Zoom in on this stone and you see that the light creates an egg shape on the stone with 3 symbols inside.
You already know the two left-hand symbols on the egg. The 2 symbols were in the middle of the 2 Coordinating wheels on which you set the Coordinates for steering the
ship at the end of Hannah part 1. Anyway, copy this image. Then turn around to the statue. To the right of this is a ladder. Click 1 forward to go up this ladder, then turn left and then zoom in on the top of the 2nd ladder.

You then zoom in on the face of the statue and you see that it wears a sort of Visor from which that beam of light comes. Zoom out and look down, then turn left and
click 1 forward to get back to the egg plaque on the floor. Turn to the left and go forward 1 towards the entrance. You are now back under the scaffolding. Then turn to the right and you will see a long gallery in front of you. Click 1 forward and ....
.... You come to an intersection and you now automatically turn to the left and you have a meeting with a female inhabitant of this world.
Hannah now receives a Metal Plate with an unknown symbol from this girl.
Then turn back to the right and follow the gallery straight ahead until you can go no further. Then turn right and walk all the way back. You can't go further here
either. You are in front of a tunnel entrance but you cannot enter it (Sam will emerge from this tunnel). Turn around and walk back and ...... after 1x forward somebody appears .......
The guy says Hannah can't trust anyone, not even Sam. The guy disappears and Dr. Bremmer appears and she explains a few things.
When Bremmer has also disappeared, you go further ahead. You then run into a kind of stage. You cannot pass under it, but a staircase goes up to the right of this
stage. Aim at the stairs and click 1X forward to go up, then turn left and click again 1 x and you end up on the podium. Turn to the right and you are now standing in front of a large "church organ". Zoom in on it.
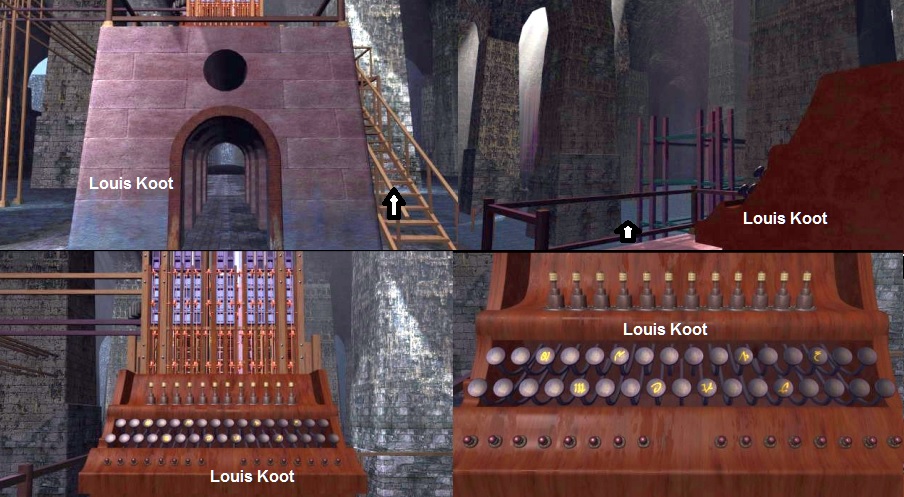
The "church organ" appears to be a strange machine with all kinds of buttons that you can press and a kind of keyboard with different keys having a symbol.
Do nothing because you have no idea what to do. Zoom out and stay here now.
Important
Save your HANNAH game now immediately next to your previous SAM Save.
Switch back to SAM
Chapter 5: Sam: Bosch Tunnels 2:
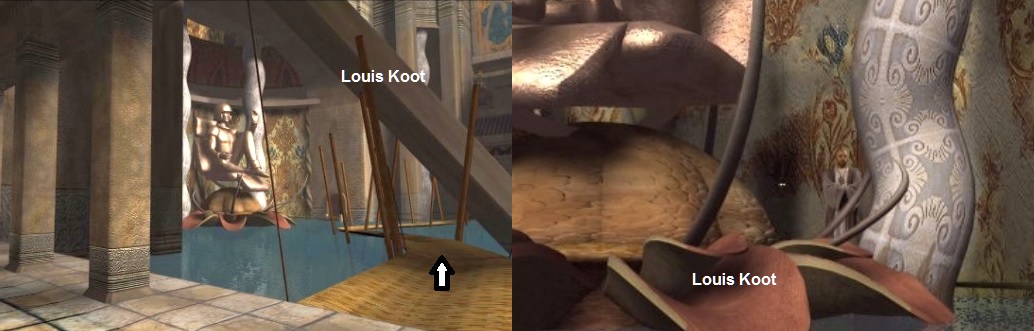
So Sam is still standing in front of that wicker bridge over the "swimming pool" and to the left of that you see that white statue. It represents an
astronaut.
.. the priest tells Sam the following sentence of 6 words: DOSS THANDUH THULDIH HELLAH DRAHIN TUNDRAH.
After this the priest disappears through a secret door behind the statue, which closes again.
Explanation
Now look carefully at the 6 words of this sentence and you will notice that you have heard these 6 words before. You heard them when you stood in the cave in the
circle between the 8 Prayer Vases and you found that each vase made 2 words. Then you probably also noticed that if you clicked on 3 of those vases one after the other, you also heard a sentence. Now of this sentence of 6 words that the priest now spoke to
Sam, there are 3 so Form words and 3 so Color words. If you cut this sentence into 3 blocks of 2 words, the first word of each block is always the Form word and the second word is always the Color word. So as follows:
DOSS THANDUH
THULDIH HELLA
DRAHIN TUNDRAH
This sentence is therefore the key to open that secret corridor behind the statue.
Compare these words with your previous list of Form and Color words and you will come to the following list, made from the words of the sentence:
FORM WORDS COLOR WORDS
|
· DOSS = Vase 1 · THULDIH = Vase 8 · DRAHIN
= Vase 3 |
· THANDUH
= Black · HELLAH
= White · TUNDRAH
= Green |
The intention is now to have a combination of 3 vases recite this sentence, so that the secret corridor behind the statue opens again. But where do you do that. You
still look at that astronaut statue now. Turn right and go forward 1x to continue across the walkway. Then turn right and go forward once again and you cannot continue. You are standing in front of a brick wall. Turn to the left and you will see
Niche 5 with 8
prayer vases E in it.

Zoom in on these vases and number the vases from left to right as 1 to 8 and then set the color to black in the screen of
vase 6.
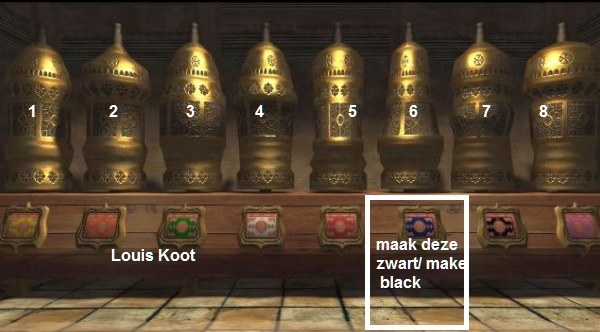
This also changes the colors of all other vases so that Vase 3 is now White and Vase 6 is now Black and Vase 8 is now Green.
Then click successively on Vase 6, then
on Vase 3 and then on Vase 8.
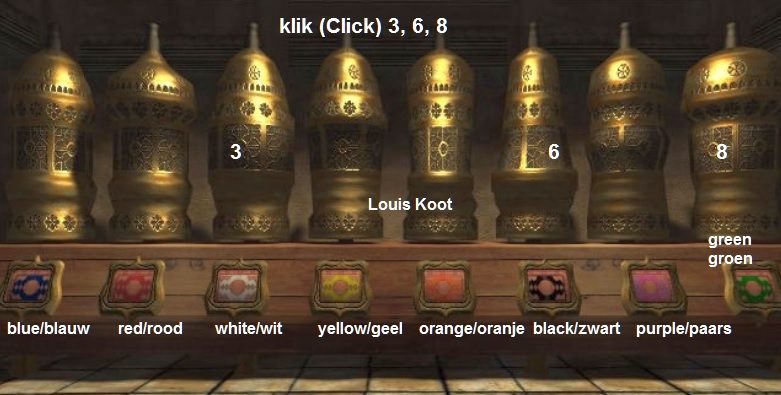
After you have clicked on Vase 8 you will hear the correct sentence from the loudspeaker horns and you will see how the secret tunnel behind the statue opens. Zoom
out and turn to the left and first go forward once and then once again forward through the dark tunnel. You will then come out next to the statue. Walk one more time ahead and you are behind the statue. Turn to the left and you are in front of the entrance to
the now opened secret tunnel.

Click 1 forward in the opening and ...........
Cathedral
Sam then walks through the secret tunnel and thus ends up in the Cathedral where you left Hannah. Sam will walk all the way to the stage with that "church
organ" on which you left Hannah. Sam and Hannah talk to each other over the radio. Apparently something is wrong. Hannah and Sam are in the same place at the same time, but they cannot see or touch each other. They can talk to each other. They are both in
a different dimension, but in the same place.
2017: Original Dutch Walkthrough by: Louis Koot
2019: This English translation
by: Dick Leeuw