
2018: Walkthrough door: Dick Leeuw and Louis Koot
Text by Dick Leeuw and Screenshots and lay-out by Louis Koot
If you have found this walkthrough via google search or via another site then you have probably not visited my site.
A
lot more very detailed
game walkthroughs can be found on my site at: www.pcgameswalkthroughs.nl
Chapter
4: The Corridor with Bedrooms and Bathroom
Part
1:
The
Corridor
From
the Library you have gone up through the stairs and now you end up in a long
wide corridor.
Take
a good look around first. Immediately to the right you see a door with another
strange lock, of course it is locked.

There
are a number of cables on the ground that run to that door from the different
rooms.
Turn
to the right, you will see a niche to the left of the stairs. In that niche you
see such a holder as below.

Turn
further to the right, you will see a door and a corridor with a door at the end.
2 holes in the wall on the right.

Zoom
in on the door at the end of the short corridor, it is locked but on the top
panel there is a drawing with 5 figures. Remember this drawing you need later.

Click
on the door in the small piece of slanted wall, the door opens. Click on the
door and you will enter the bathroom,

Bathroom:
in the windowsill behind the bath you will find another holder. Zoom in on the
cabinet under the sink.
The
doors open and you see a device with 5 sliders and 4 positions for those sliders
but in which position these sliders need to be.

Look
even further and you see a painting with birds, you can zoom in on this
painting.

Zoom
out, turn back and zoom in on the device in the cabinet.
Now place the sliders from left to right at positions 1, 2, 3, 3 and finally at
4. The device opens and there is a miniature rocket, take it.

Look
even further, to the left of the door is a cupboard. Click on the doors to open
them.

Zoom
out again and look up, you can see the pull string hanging from a loft ladder.

Climb
up, it is very dark except for a light spot from the ladder.
You see a pull cord hanging there, zoom in on it and pull it. Unfortunately the
lamp is broken, click on the lamp to remove it.

We
have to look for another bulb. Now click in the opening of the ladder and go to
the bathroom, now leave the bathroom.

Corridor

Now
click further down the corridor and you will reach a few rooms at the end of the
corridor. You see 3 doors, 1 is locked, the other 2 are open.

Behind
you is a niche, to the right of the niche is a narrow table with a letter on it.
Zoom in on the letter and read it.

Look
at the niche, on a table there is a chest, unfortunately it is closed. On the
right side on the wall we see something that we have seen before, a device that
requires 1 handle, but we do not have one yet. Look also at the lower part of
the pillar right on the corner of the niche. On the side of the niche you get
the round cursor, the sign that there is something you can interact with. Zoom
in on it.

You
will then see such a square puzzle again. You also have to turn the pieces into
the right position again.
A
panel opens and behind it is the first doll / action figure of the 3 you can
find in this section. Grab this doll.

To
the left of the niche is a narrow table / cupboard, zoom in the table and you
will find a box on top. Open the box and take the key that is in it.

Zoom
out and turn around to the 2 doors opposite the niche. Zoom in on the door on
the right, bedroom 2 and click on the door handle.

The
door opens and you zoom out, click on the door and you enter the room, look
around.
Bedroom
2:
Right
in front of you is a trashcan on the floor, to the left of the trashcan is a
chest on a table, to the left of it is a cupboard.
Zoom
in on the trashcan. There is a letter in the trash. Read the letter.

Zoom
out and zoom in on chest 1, which is on the table. Slide open the lock of the
chest and the lid opens.
Rotate
the 3 circles to correct the image.

Successfully,
a panel will open where a star is behind. Grab this star. In the green area
there is a space that fits a cross.

Zoom
out and turn to the left and zoom in on the cupboard, open the doors of the
cupboard. ......... a "firefly" flies out of the closet.
On top of the cupboard you get the round cursor, so zoom in and grab the photo
you see. Just behind there is also
a drawing, click on the drawing.

Grab
the Photo and view the drawing.

I
do not know what this drawing means, it could be that this is an indication for
a hidden space behind a bookcase ??? Zoom out again. To the left of the large
cupboard is a cupboard with glass doors where you have something to do with it
but it is closed. Above the cupboard is a painting that is pretty mixed-up. The
cupboard under Painting A is locked but in this cupboard is a device to help
unlock the door in the hallway. You can now solve the painting yourself, it is
not too bad when you figured out the trick, but there is also a simpler way. We
will come back to that in a moment.

To
the left of the door is a bed with above it another painting that is also quite
mixed-up, before the bed is a chest and this is chest
2. You can also solve the painting above the bed yourself, but we will do
it differently, easier. Patience. Now zoom in on chest 2 and slide the lock open
and the lid folds up. Here, too, you must correct the image by turning the 3
circles.

Here
too a panel opens and there is a cross. Grab the cross.

In the green area there is a opening for a star, so drag the star from your
inventory to the chest. The green surface will pop up.

In
the lid you will see a sort of code with golden points, in the bottom you see a
mechanism to set 6 letters but yes which name should be on here? Zoom out and go
back to box 1 and drag the cross to the green plane. We now get to see the same
thing as with the chest at the bed, but with a different code for a different
name. Again, we do not know which name.

We
now focus our attention on the bookcase.

There are 2 coins on the shelf, take
them. Zoom out and zoom in on the spider web in the left box, there you will see
3 coins. Also take this and zoom out.

Zoom
in on the shelf, above the spider web ...... you will see a book about paintings
there. Click on it.

The
book opens and shows pictures of 3 paintings,

There
is a year under each painting, you can now solve the puzzle paintings yourself
or fill in the correct dates under the paintings. For the rest of the game it
does not matter what you do, when the puzzle is solved the painting slides up
and a hole appears where something needs to be inserted. So note the 3 years and
zoom out from the book and the bookcase.
Turn
around and zoom in on Painting A. This is the "The Expulsion of the Demons
from Arezzo" painting

The painting is quite mixed up ... You have to make the painting correct again by clicking on the boxes or you enter on the counter the year of this painting to solve the puzzle in one go.
You have read the year in the painting book and that
is 1297

When
the painting puzzle is resolved, it slides up and a round hole is visible in the
wall.


This
painting also slides up when you have solved it and here too you see a round
hole in the wall, where you have to put in
something you do not have yet. You done here for the moment, so leave this room
and zoom in on the door next to it. Click on the latch and then on the door and
you come in
Bedroom
1.

Take
a look around in the room, in the niche at the window you see a box where a
cable is attached to.

To
the left of the orange bed is a chest. This is locked so drag the key to the
lock and the chest opens,

There
is another miniature rocket in the box, take it. What you have to do with it you
do not know yet but then you already have them.

Zoom
out and continue to the left, you will see a cupboard. Click on the doors to
open them.


Continue
to the left, on the wall there you first see a sign with letters and golden
points, solution for the box puzzles?
There
is a chest of drawers at the bottom left of the letter board. Look down at that
chest of drawers

right
next to the cupboard you see a loose floorboard, zoom in on the floorboard and
slide this plank to the wall and ....
you have found another action man, so get the guy.

Zoom
out and look to the left ..... There is a table with a music box on it, open it.

You
have 2 miniature rockets so you will try and yes this fits and ..... the music
box becomes active and plays the tune and .........

Further
along the wall a lamp is lit above a painting.

Zoom
in on that painting, it is also mixed-up but it is not so difficult to solve.
Solve this puzzle and ......

.......
the box that stands on the table under the painting opens, in the box is a
turning handle. Take this.

Zoom
out and zoom in on the box at the window, on the lid you will see a puzzle.

You
have to put 3 symbols in the right place, you have to make sure that you have 3
identical symbols 3 times. First put the comet between the stars and then the
moon between the comets. Now take back the comet and then the moon, now put the
moon between the stars. Now you can put the comet in its place. Pick up the moon
again and put it in its place and finally put the star in its place.
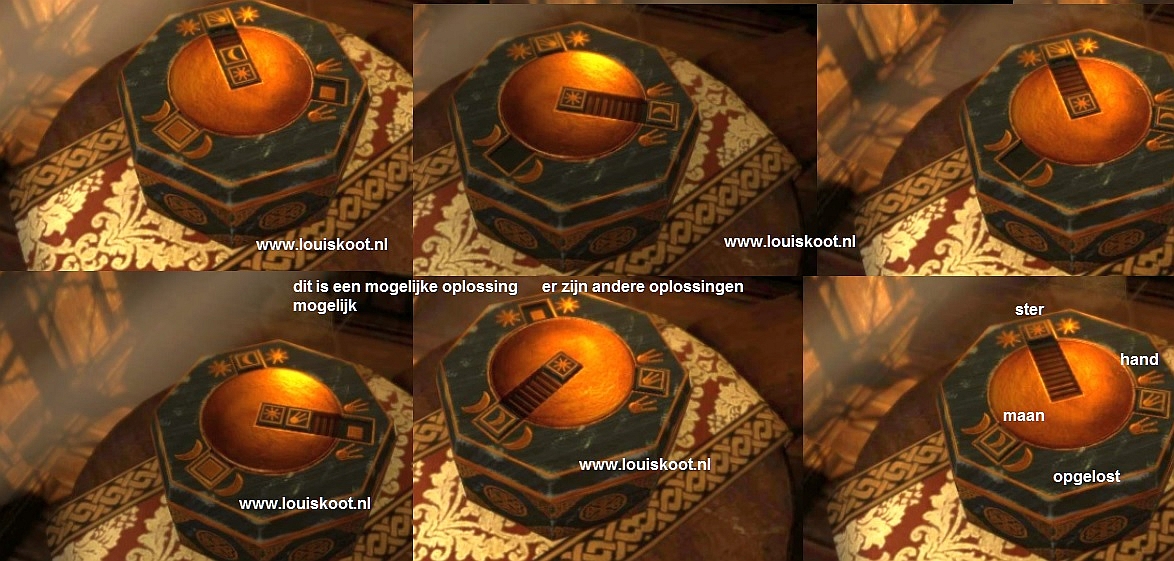
The
box will open, inside you will find a device to help unlock that door in the
hallway, click on to activate it.

This
is necessary to open the door to the next area. If you have looked closely at
that door, in the beginning of this floor, you know that you need a triangular
slab, but there are also 4 connections on the door, 2 on the right and 2 on the
left. If you look at that door now, you will see that 1 light is lit on the arch
of the door.

Between
the two beds hangs a mirror / photo with something in the middle that looks like
a yellow Orb, you cannot grab it ...... you can light 3 blue lights on the
mirror but which 3 should that be? Remember what the picture of the earth and
the moon looks like, in this mirror.

At
the left bed is a bedside table, right next to the chest where you took the 2nd
spaceship.
A
spider web hangs from the right paw of this box. Zoom in on that spider web,
behind it is a drawing / letter

Take
the letter / drawing and read the text. This is the 2nd clue for the stone wall
in the secret room of the library

Turn
now to the sign with the letters and the golden points, you can slide the
letters up and down so that you see more or less golden points.

Now
think of the 2 chests in the other bedroom and the codes of golden points that
you saw there. By shifting the letters you can reproduce the code and with that
you get a name that has to enter underneath. For the box on the table that is
POLLUX and for the box for the bed that is CASTOR.

You
are done here now so go back to the other bedroom.
Bedroom
2:
Go
to box 1, on the table and turn the letters so that there is POLLUX and ......
......
the plate with the letters folds up and underneath is now a round disc with an
elongated opening and next to it is a cylinder, take the cylinder.

Zoom
out and go to box 2, in front of the bed. Turn the letters so that CASTOR is
placed.
The
plate with letters flips up and a round disc with an opening with 3 slots
appears along with a cylinder. Take the cylinder.

You
now have 2 cylinders in your inventory. Click on the cylinder that you just took
from box 2. The cylinder is now in the middle of the screen. It is a device with
2 legs and 3 segments, these 3 segments can be twisted separately. There is an
image on the segments and there are 2 slots for the legs. You now have to twist
the segments so that the slots for the legs but also the image must be correct.

Drag
the handle with the 3 legs to the round disc in the box and click the handle in
the slot and ...

.......
the box will open. There is a turning handle in the box. Take the handle

The cylinder then slides back together and you hold a lever with 2
legs.


The
cupboard, under the painting opens, zoom in on the cupboard. On the right you
see a device, click on it and a blue light will come on.

A
second blue light is now lit at the door to the next area. On the left of the
same shelf is a letter, click on it and read the letter. Where have we seen 2
holes for 2 handles? In the hallway next to the bathroom to the locked door with
the signs on it. Zoom out and go out of the bedroom, go in the direction of the
bathroom, turn to the short corridor and you will see the 2 holes in the wall.

Zoom
in on the holes and drag the 2 levers to the holes.

You
now have to turn the levers in a certain order, the order is on the door of the
junk room
You
start with the left lever, then the right lever, then the left lever and so on
..... Below you see the order

After
each right symbol you get a green light
If
you have done it correctly, the door of the junk room will open. Then go in
there

Junk
room

Look
around because there is a lot to see. In the niche is a table with a dagger
holder on it, left and right of the niche a lamp hangs on the wall. Remember the drawing you found in the bedroom 1 wardrobe? On that note you
saw that you can turn the lights, these are those lamps. There are a few puzzles
in this room to solve, I start with the lamp puzzle. You can turn both lights
all the way around but that gets you nowhere. According to the drawing you have
to turn the right, lamp A, a quarter turn and the left, lamp B, half a turn.

You
zoom out and you see a panel slide open. The secret compartment is now open, so
zoom in on it

In
the secret compartment you see another device connected to the door style on the
right, click on the device and a blue light comes on. On the left is a plaque,
grab it.

So we have to look for the key. On the plaque, which you have just found in the secret box, there is room for 4 prisms and they are hidden in the room.
The
first yellow prism is placed on the shelf on the left above the bed / sofa. Go
get that one.

Zoom
out and turn left and ...... Right next to the door is a stone case where the
plaque fits.
But
this does not work yet because the plaque is not complete yet. Prism 2 is
located on a ledge above the stone case.

Yellow
Prism Number 3 can be found behind a spider web under lamp A ......

But where is number 4 now? Take number 3 and zoom out, turn to the right and
click on the cupboard doors to open them.
At
the bottom of the cupboard you will find 3 coins on the right in the corner,
take them out and zoom out.

On
the top shelf you see a box, zoom in and you see that it has a lock with 3
symbols but which symbols should we use here. You can find the code in the room
on 3 different boxes. The first one is on a box to the right of the bed, you see
that this is the third symbol.

The
second symbol can be found on a box under a table between the cupboard and lamp
A.

The
last symbol can be found on a box that is located between a number of other
boxes in front of the bed / couch, near the tip of the screwdriver.

Zoom
back in on the box and put the right symbols in the lock, the box will open and
you can take the last prism.

Turn
to the stone case next to the door, click on the plaque in your inventory and
drag the 4 yellow prisms to the slab.

Click
the plaque back and zoom in on the stone case.
Now
drag the plaque to the stone case, click it into place and then the plaque
turns around. You will find a bronze plaque in the middle now, take it.

We have to do something else here, on the column under lamp B you see a keyhole
with the roman number 2 above it. Where is the key?

On
one of the beams of the ceiling near the lamp you will find a series of symbols,
zoom in on them and note the symbols:

Now
another puzzle ......... next to the closet you will find a round mirror / photo
only this one is twisted.

The
middle piece is in the right place and the 3 rings you have to rotate until the
image is correct, then 3 blue lights are lit.

On the other side of the wall is the bedroom 1 with the 2 beds and this is the
back of the mirror / photo that hangs between those beds. And in the middle you
saw a yellow Orb there. Remember which 3 lights are on and go to bedroom 2, with
the 2 beds, zoom in on the mirror and click on the same lights as in the other
room.

The
middle part rotates and the yellow Orb is no longer visible.
Go
back to the junk room and zoom in on the mirror. You can now take the yellow
Orb.

You are done here for this moment, we will not be back until we
have found the key.
Leave
the junk room, turn again to the short corridor to the junk room and zoom in on
the 2 handles on the wall.

We
have just found a code on the ceiling in the junk room, enter the code here and
press the button.


You
zoom out and turn around, on the other side of the corridor a panel opens,
behind it is a photo. Take this.

You
think maybe it is enough here on this floor but we still have to investigate a
room only the door is still locked. Go to bedroom 2, with the 2 painting puzzles
and 2 boxes. Above the bed there is a hole in the wall where the painting first
hung. Zoom in on that hole and drag the bronze disc to it,


Text by Dick Leeuw and Screenshots and lay-out by Louis Koot