2019 Walkthrough by: Louis Koot
If you have found this walkthrough via google search or via another site then you have probably not visited my site.
A lot more very detailed game walkthroughs can be found on my site at: www.pcgameswalkthroughs.nl
Timelaps is an older point and click adventure game from the Windows 95 era. It was then graphically, and in terms of gameplay, a beautiful game in which you had to solve difficult to very difficult puzzles to get further in the game. In that gray past of Windows 95 I once did a walkthrough for Timelaps, then without screenshots in it.
In 2015 I have installed the gog version of Timelaps on my Windows 8.1 64x computer and I did not experienced any problems with the game, except that the cut scene movies look very "blocked" .... but well ... what do you expect from a game that is as old as Timelaps is. I also cannot get the photos, that you take in the game with the photo camera, visible in the game through the photo album. But these are small problems that do not prevented me playing the game.
In Timelaps you travel to Easter Island because a friend of yours has disappeared. That friend was on an expedition to find the lost land of Atlantis. Now that friend has disappeared from the face of the earth and you are going to look for him and, after the intro movie, you end up on Easter Island. By pressing your Spacebar on your keyboard you open up the menu screen. In the menu screen you will find, in the right column, the "Save" the "Load" and the "Quit" function. You can save as many times as you want and at any time in the game.
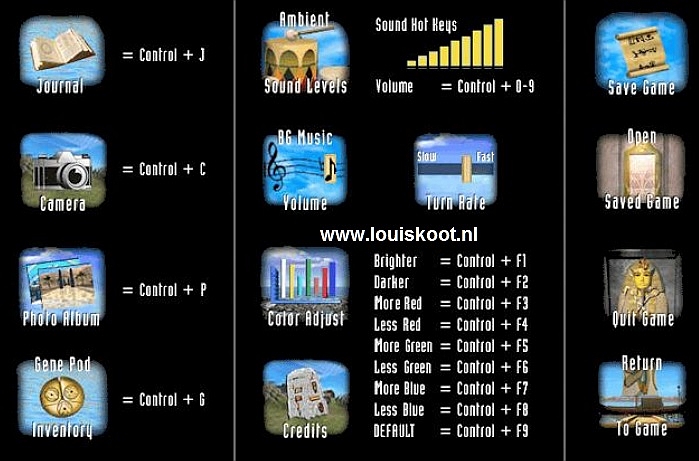
In the left column you see the buttons to open / activate the Journal, the Photo Camera, the Photo Book and the Inventory. However, you must first find the Photo Camera and the Diary. The middle column explains how you can set various game options to your own preferences. Via "Return To Game" you close this screen and return to the game.
Chapter 1: Easter Island.
A: Find the Photo Camera and the Journal
You are facing a number of stones. Move your cursor to the right edge of the screen and you will see the Right Arrow. So click your mouse to turn clockwise.
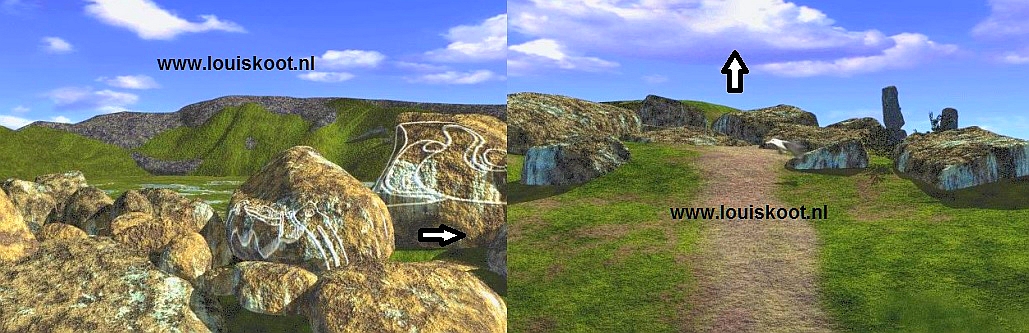
You are now at the start of a dead end path. Move your cursor up to the blue sky. You will then receive the Forward arrow. Now go 2 clicks Forward and then move your cursor to the right edge of the screen for the Right arrow. Click your mouse to turn right. You are now standing in front of a rectangular boulder. ....... On the left side of the boulder lies the Photo Camera of your disappeared friend .... However, you cannot grab the camera here yet ....
Move your cursor back to the blue sky for the Forward arrow and click your mouse to move forward 1 click and .....
You are now Zoomed in on the rectangular boulder and now you can grab the camera ......
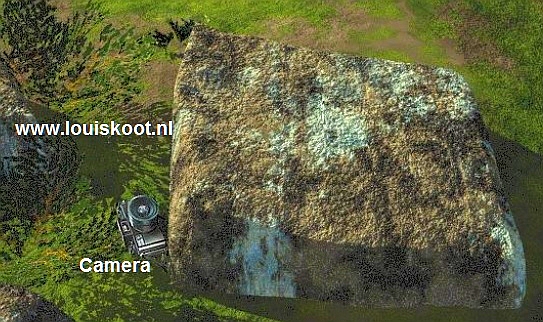
So pick up the photo camera. The camera disappears into your bag. From now on you can take 32 photos in the game with the camera, and that is handy because you can look back those photos in the Photo book. Move your cursor to the bottom of the screen. You will get the Zoom Out arrow ..... it looks like an asterisk. Click your mouse and you have taken 1 step backwards.......Well you now know how to find the most important movement arrows and from now on I'll just tell you to go Forward, Left, Right or Backward.
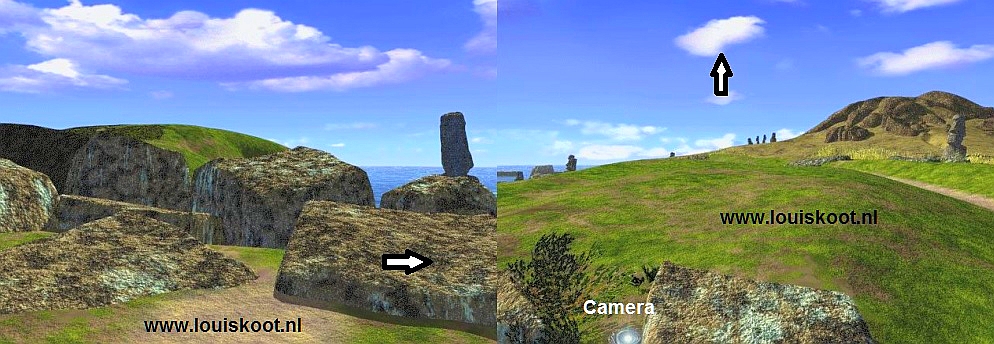
Now turn right and then 2 clicks forward. Then turn left. You are now at the start of the main path that goes all the way across the island to the ocean.
Follow this path first 5 clicks ahead and you are at a right turn.
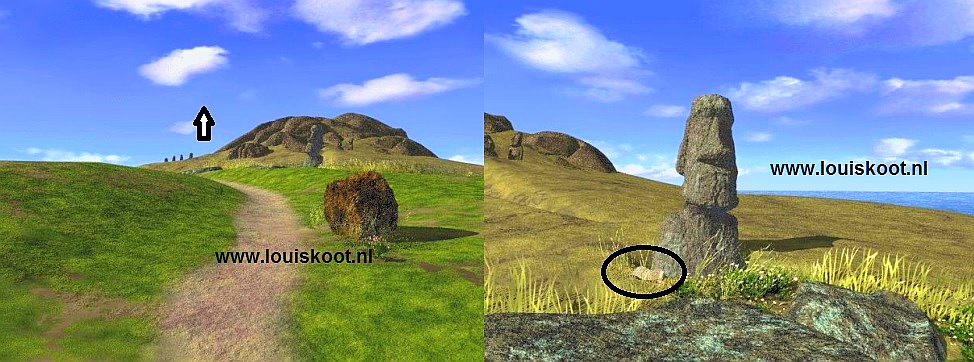
Turn right and ...... you are standing in front of such a "Stone Head" that made Easter Island famous. Your friend's Diary lies in the grass. Go one more click forward to the "Stone Head" and take the Diary / Journal of your missing friend. Take a moment to browse through the Journal. Press your Space bar to get to the Options screen and then click on the Journal.
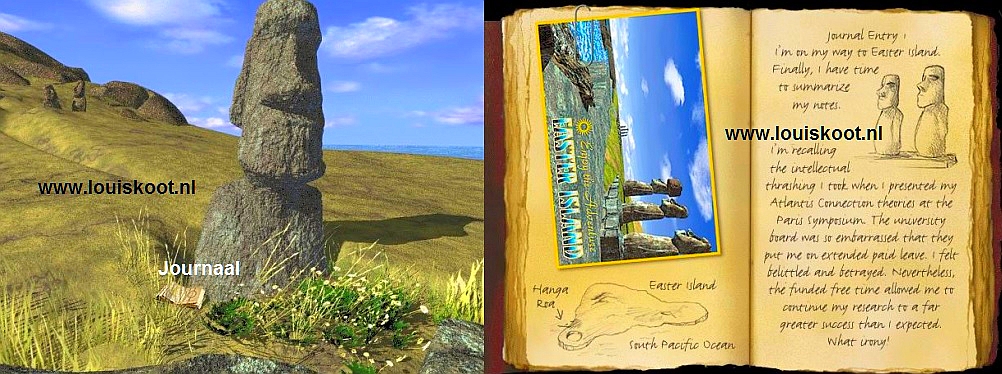
The Journal opens. Because you are now on Easter Island, the Journal now contains your friend's notes about Easter Island. Read the pages. Also take good note of all the drawings and photos that are in it. If necessary, draw over the drawings themselves. A large number of the drawings are instructions for puzzles that you will have to solve during the game. When you have finished reading, put the journal away and press your space bar to return to the game..
B: The 3 Statues on the beach
Take 1 step back (asterisk at the bottom of your screen), then turn left and you are back on the main path.
Follow the main path then further 4 clicks forward, left, 7 clicks forward, right......

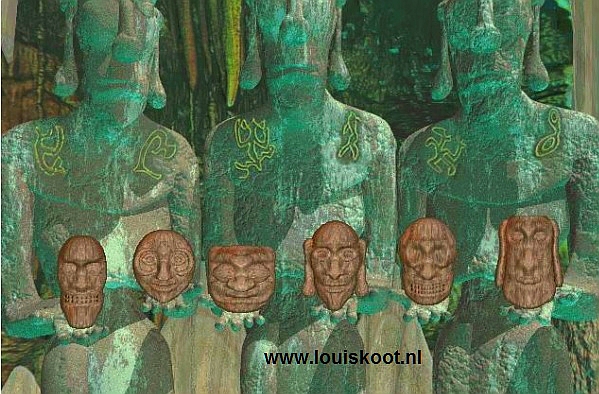
........ 4 clicks forward, left and then 5 clicks forward. You are now at the ocean. Turn right. You now see, right in front of you, 3 life-sized statues on the beach.
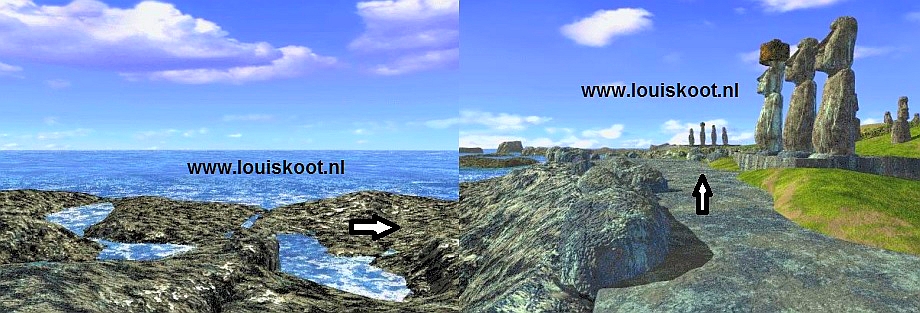
Those 3 statues stand next to each other in a row. Go forward 4 clicks and then turn right. You are now standing in front of the left of the 3 statues. Because they are so large, you now only see the "foot" of the statue. On the "foot you see an IMAGE. It looks like a FISH. Draw the fish over on a piece of paper. Then move your cursor over the Statue until you get the Forward arrow. Then click 1 click forward and you look up at the breast of the statue and..... A "SYMBOL" appears on the breast. This symbol disappears quickly, so if you want to see it again, zoom out and click again 1 click forward and the Symbol will appear again. Draw the breast Symbol over and remember that this symbol belongs to the "FISH symbol".
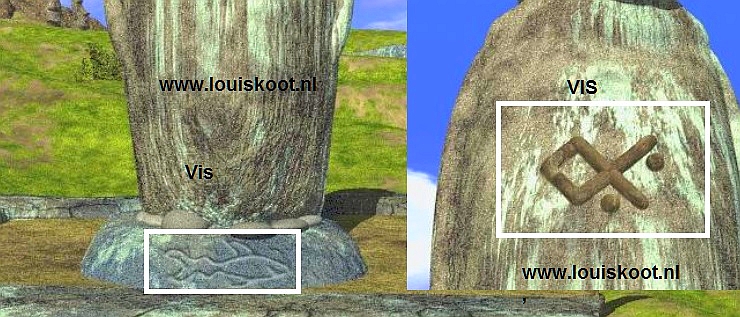
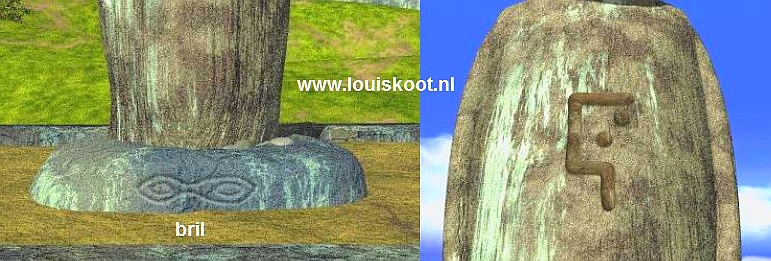
Zoom out (asterisk) and turn right and go 1 click forward and then turn left. You are now in front of the Middle Statue. Here too you can see an IMAGE on the "foot". Draw this over again. It looks a bit like glasses. Go 1 click forward (up) again to the breast of the statue and draw the Symbol that appears on the breast and remember that this symbol belongs to the Glasses.
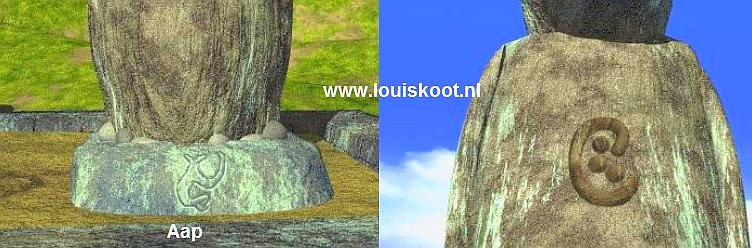
Zoom out, turn right, 1 click forward, turn left. You are in front of the right statue. On the "foot" you see an Image of a "Monkey". Check it out. Look at the "breast" of the image and draw the Symbol that appears on it and remember that this Symbol belongs to the "Monkey".
So now you have 3 sets of drawings, each with the symbol of the "foot" of the statue and the corresponding Symbol of the breast of the statue
C: Camp site
Zoom out of the 3rd image, turn to the right and now follow the "beach path" 8 clicks ahead.
You almost are at your missing friend's camp site. Go another 5 clicks forwards and you are in the "tent" and are zoomed in on the large table.
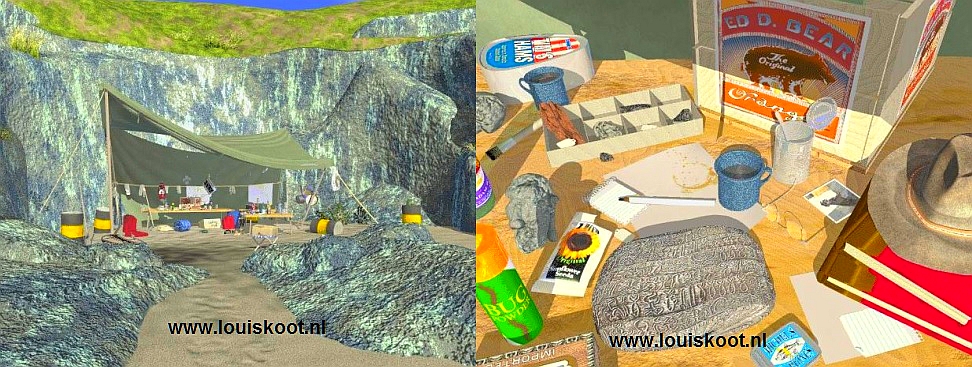
On the table lies a large Stone Tablet and on this Stone Tablet you can see rows of Hieroglyphics.
Above the Stone Tablet lies a white pencil and to the right next to the Stone Tablet are a few sheets of white paper.
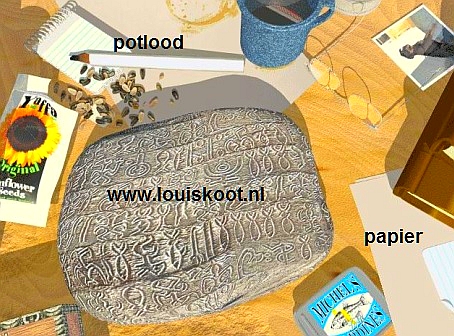
Now place your "hand" on the white paper and press your left mouse button. Hold down your mouse button and drag the sheet of paper to the left until it is completely on the Stone Tablet. Then release your mouse button. Now do the same with the white pencil, so drag it down to the paper and then release your mouse button. The pencil now traces all the hieroglyphs on the paper. You will see that 3 sets of 2 images each are bold ".
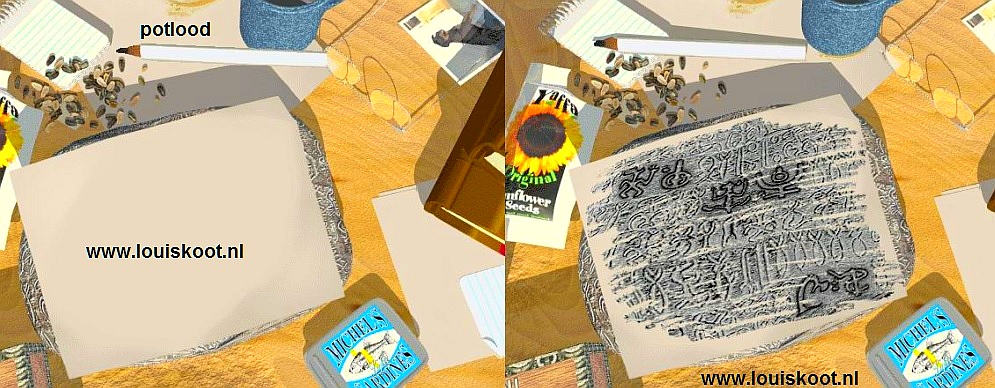
Draw those 3 bold sets of hieroglyphs over or take a photo of the entire paper.
Zoom out of this table and turn right. You then stand in front of the other table. Move 1 click forward to fully zoom in on this table.
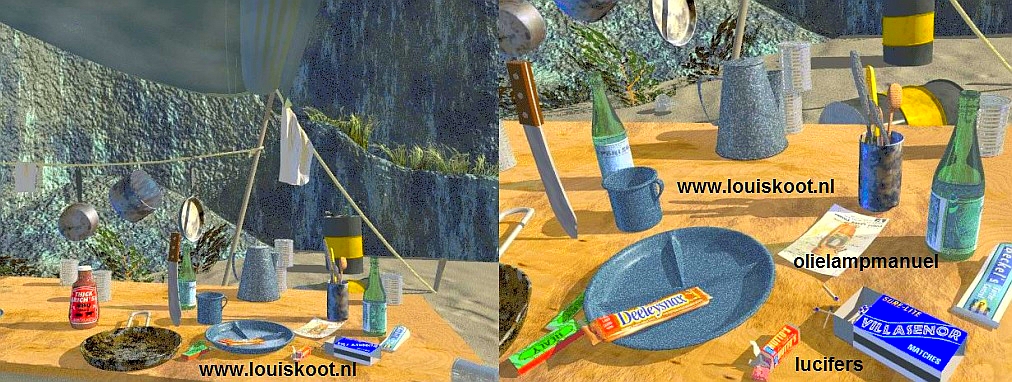
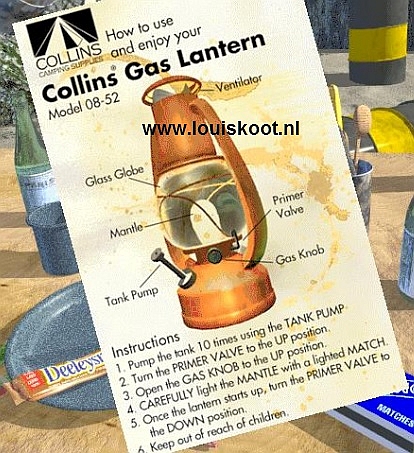
There is a piece of paper on this table and you can see the image of an oil lamp on it. Click on this paper. View the image and carefully read the INSTRUCTIONS for lighting the oil lamp. You have to do this yourself in a few moments, so read it carefully. Just take a photo of it. You have to take two photos, one of the Oil lamp and then one of the Instructions.
Then zoom out and then do immediately 1 click Forward to zoom in on the table again. At the bottom right of the table is a blue box of matches. Take the blue matchbox. The box will appear in the lower right of your screen and will remain there until you have used it. Zoom out, turn right and go 1 click forward and then turn left.
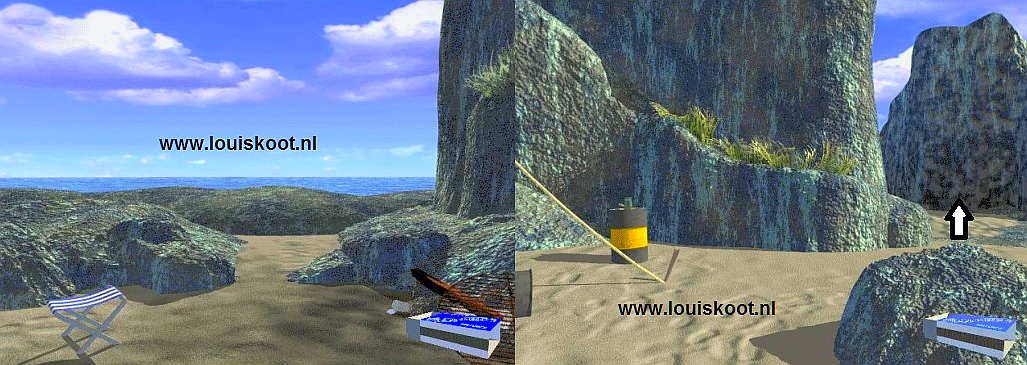
Now follow the sand path 2 clicks ahead, right and then 14 clicks ahead. You are now at the entrance of the cave. You can read about this cave in the Journal.
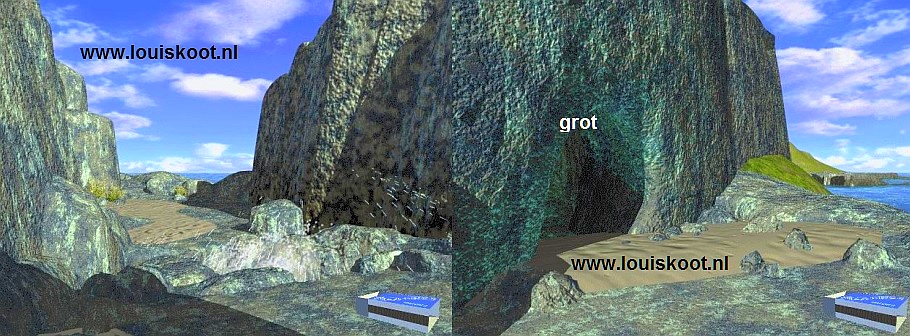
D: The Cave:
Light up the Oil lamp
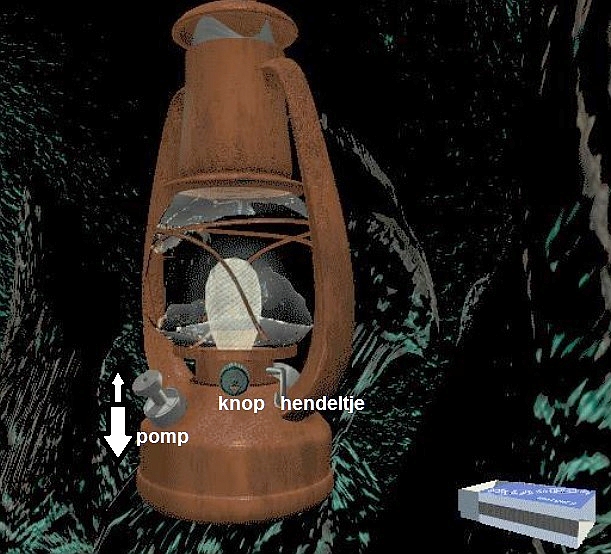
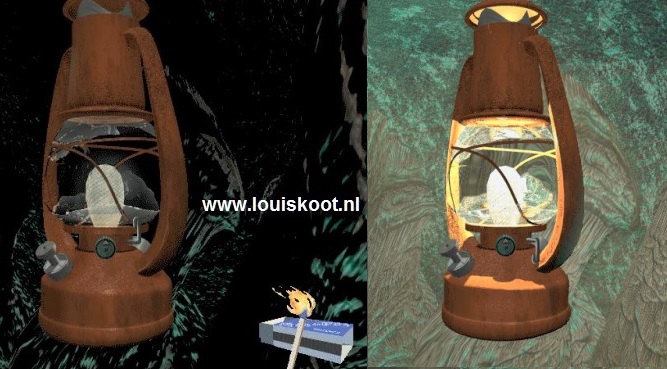
Continue into the cave ....... In the cave you see an oil lamp.
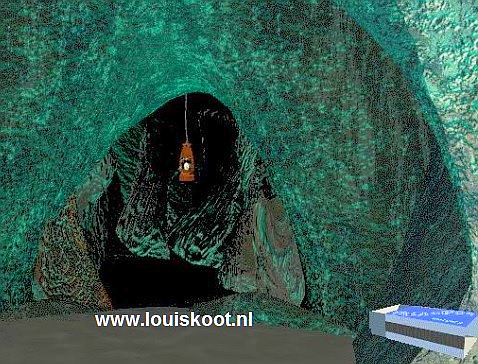
Go further 3 clicks forward and then click with your "finger" on the Oil lamp .... You are then in the close-up of the oil lamp ... You must now light the oil lamp and ensure that the lamp also stays on. Otherwise you can't go further into the dark cave. You can read how to do this in the Instructions you found in the tent on the 2nd table.
 \
\
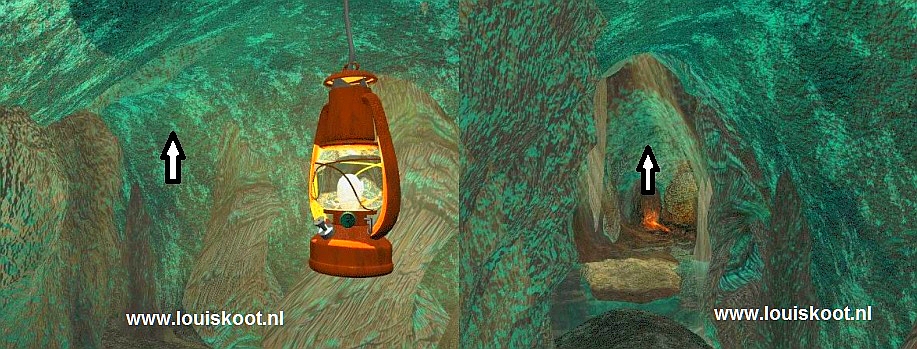
First move the "Pump button" up and down 10 times......you must then hear a "thud" sound and you must do this moving up and down without interrupting. The pump must therefore always be fully raised and then fully lowered again. Once you have done this 10 times, click on the little lever to raise it. Then click twice on the round button so that the red arrow points up. Then grab a match from your match box and stroke with the match over the side of the box. If the match burns, click with the burning match on the "wick" of the oil lamp. The lamp comes on. Finally, click the lever down again..... Now the lamp will stay lit and you'll have light in the whole cave.
NB: If you do not click the lever down when the lamp is lit, the lamp will go out again when you step back. Your match box will return to the table in the tent, so you will have to go back to that table to pick up the match box again and then return to the cave to try to light up the oil lamp again.
The Masks puzzle:
When you've successfully light up the oil lamp take a step backwards to zoom out the lamp and then continue forward through the now well-lit cave.
After about 13 clicks, you cannot move forward any further. You see a face in the rocky wall
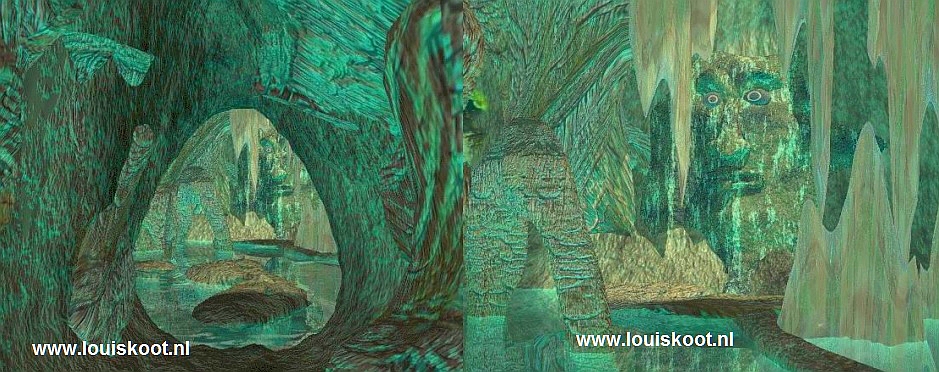
Turn left and continue 3 clicks forward. Again you see a face in the rocky wall......This face has 2 red eyes.
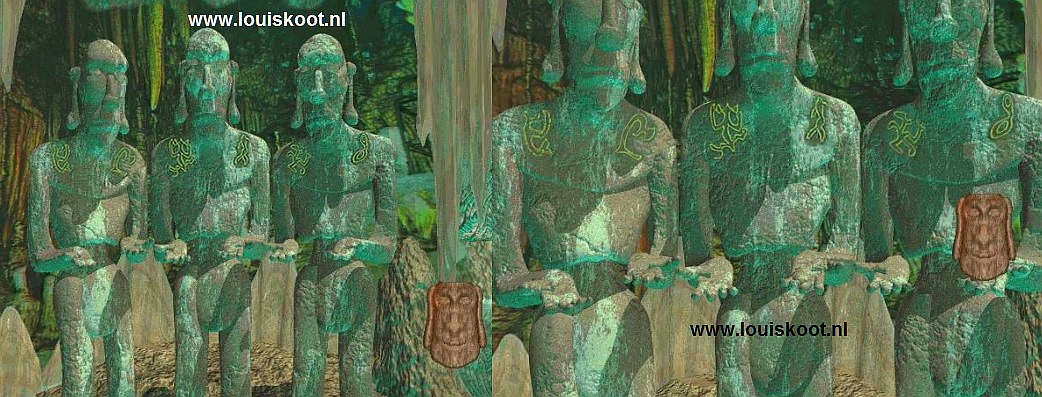
Stop and turn right. You now stand in front of 3 large statues.
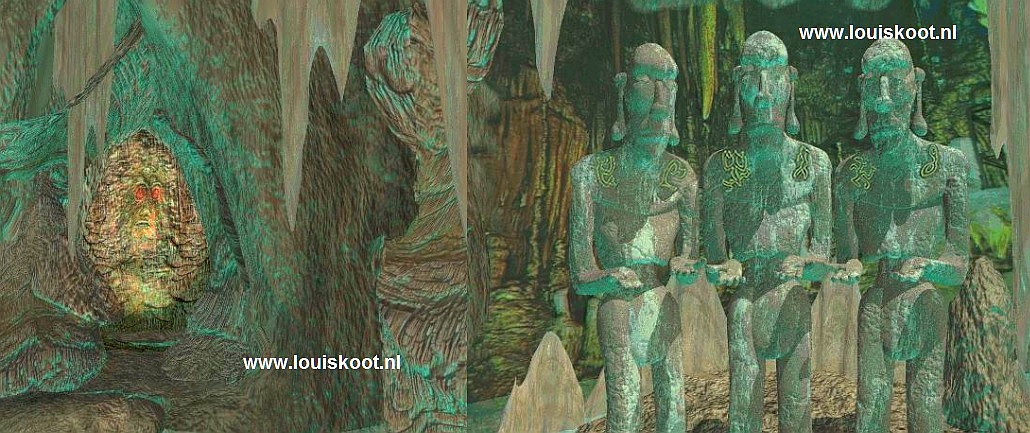
The three statues extend their hands towards you. Move forward 1 click and you are zoomed in on these 3 images.
On each shoulder of the 3 statues you see a symbol....they are the symbols that you also saw on the "Foot" of the 3 statues on the beach and the 3 left images of the 3 bold sets that you saw in the tent on the Stone Tablet, of which you have taken a photo.
Take a step back and then turn 2 times counterclockwise and then go forward 1 click. You now see a Head in a Rock.
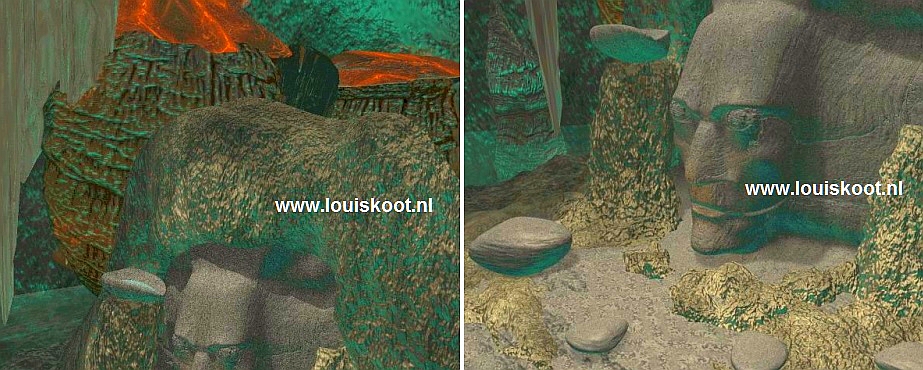
To the left of the head is a bowl on top of a pillar. Click on the Head. Hot lava then flows from the mouth of the Head and a MASK is formed in the lava and in both eyes of the Head you see a Symbol. It is one of the breast Symbols that you have seen on the 3 Beach Statues.
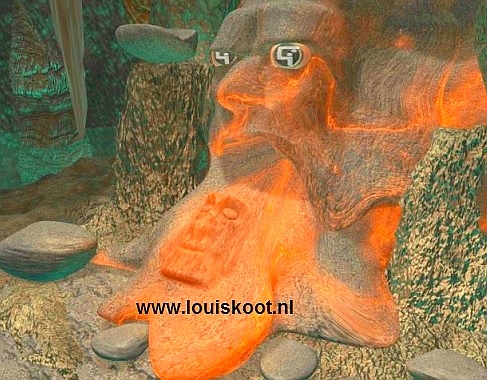
So the Mask in the Lava belongs to the Symbol that you now see in the Eyes of the Head. By clicking on the eyes, a different Symbol will appear in the eyes and a different Mask will appear in the lava. By clicking on the scale, water flows from the scale onto the mask, causing the mask to cool down. You can then grab the mask and the mask will be at the bottom right of your screen.

So now you must bring 6 different masks to the 3 stone statues and then place the mask on the right of left hand of a statue. So in the Eyes of the Head you can set 6 different Symbols, 3 in the left eye and 3 in the right eye. So there are 6 masks. The 6 Symbols belong to one of the 3 "foot" images of the beach statues and to the 3 left images that you have seen on the Stone Tablet. All these 6 symbols are also on the Shoulders of the 3 Stone statues here in the cave.
So click on the Eyes. There will then be a Mask in the Lava. Then click on the Scale to cool down the Mask.
Take the mask and zoom out once.
Then turn left twice and then move forward 1 click and then place the Mask on the hand of the statue that has the symbol that belongs to the mask you're carrying
If you place a Mask on a wrong hand, the mask, and all other masks that you have already placed, will be crushed and you will have to start all over again. Have you put a mask on the right hand then you step back, turn 2 times left and you are back at the Lava Head. Put another symbol in the eyes and cool down the new mask, take the mask and go back to the 3 images and put the mask back on the right hand.
This is how it ultimately must be:
If you have put all 6 masks on the right hands, you will hear a sound. Then zoom out and turn left. The Red Eyes in the face are now flickering. Go 1 click forward to the face and then click with your "finger" on the red eyes and .... oily .... the face disappears and the entrance to the Transporter Room is now open.
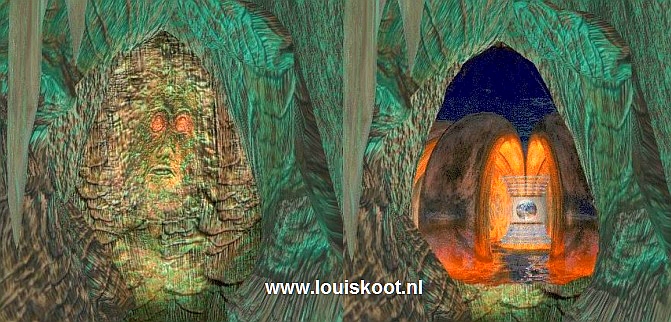
Go forward 7 clicks and you are zoomed in to the Transporter Table.
In the large sphere a video appears in which you are addressed by your missing friend.

When your friend has finished speaking, wait a few seconds because your friend appears in the sphere again. Listen again to what he has to say. Your friend will disappear and will not return. View the Transporter. It is a large round table on which you have 10 smaller circles. The 5 front circles are colored and each contains an image.
The rear 5 circles are gray. If you click on the 5 front circles, 3 of them will show a video of a landscape in the sphere. So 3 of the circles are active and 2 are not active now. These circles are so-called Gene pods and they are your connection to 3 other worlds. If you now number the 5 front circles, from left to right, as 1 to 5, then Number 1 is Egypt, Number 2 Anasazi, Number 3 is inactive, Number 4 Maya and Number 5 inactive.
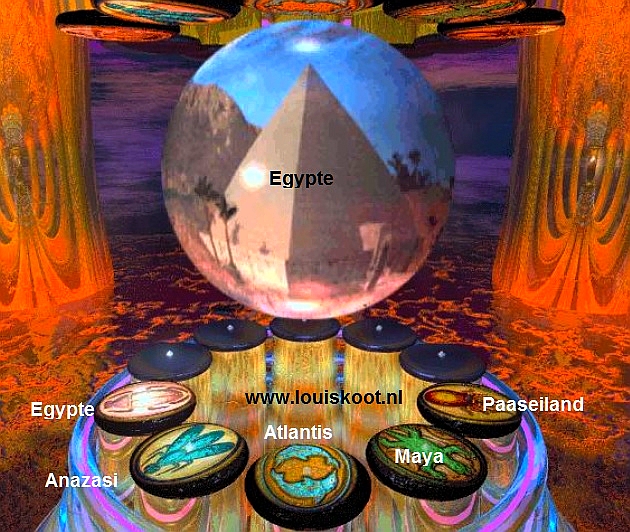
So you can now travel to: Egypt, Anasazi or Maya. You do that by clicking on the circle in question. The video of the landscape in question will appears in the Sphere, then click in the Sphere during this video and you will be transported to that landscape. It doesn't matter in which order you play for the game, but this walkthrough uses the following order: Egypt; Anasazi; Maya and ultimately Atlantis.
So now click on Circle 1: Egypt and then, during the movie that appears in the sphere, click on the Sphere and ...... you travel to Egypt
2015: Original Dutch Walkthrough by: Louis Koot
2019: This English translation by: Louis Koot