2019 Walkthrough by: Louis Koot
If you have found this walkthrough via google search or via another site then you have probably not visited my site.
A lot more very detailed game walkthroughs can be found on my site at: www.pcgameswalkthroughs.nl
Chapter 2: Wasteland:
A: Get a Train Ticket for the Train:
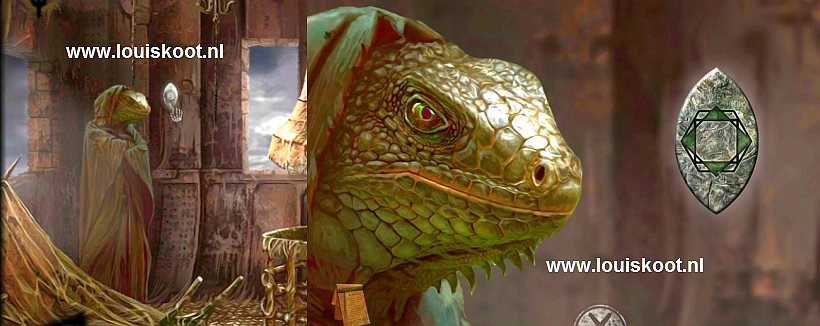
Now that you have escaped from the castle you want to look for your identity, because you still want to know who you are and where you came from. You are welcomed by a lizard-like figure sitting on a rusty mine cart. The Lizard tells you that you have to travel to a village near the Frozen Tears for answers to all your questions.
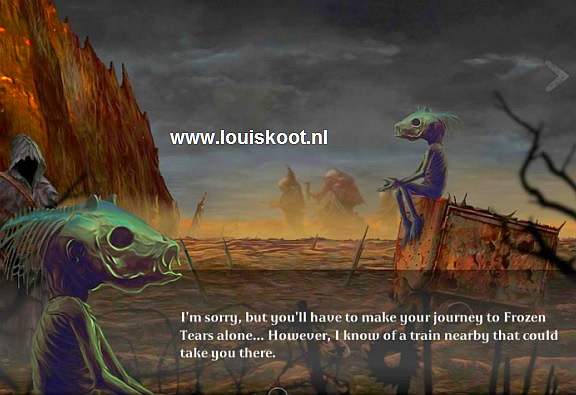
The lizard tells you that your have to find the way to the Frozen Tears on your own. But fortunately there's a train that leaves for the Frozen Tears. So you have to go look for that train. The lizard then disappears. You are alone again in the wild and desolated landscape.
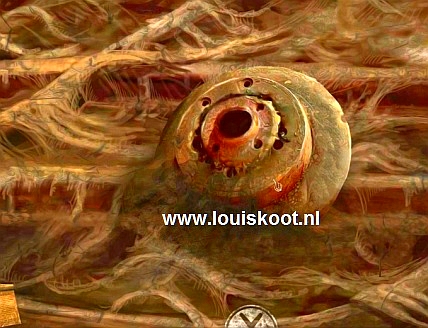
The mine cart sticks with the wheels deep in the mud so it is no use to you, but 1 of the wheels lies in front of the mine cart. If you don't see that wheel right away, scroll the screen to the right so that you can see that wheel. Take that Mine cart Wheel it might be useful to you
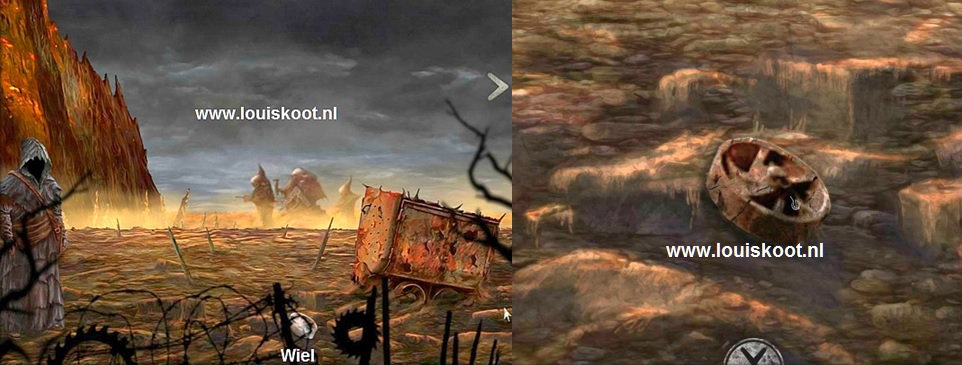
Get out of the close-up. Now click on the mine cart .... You then look in the cart .There's a photo in the mine cart. Click the photo to view it in close-up ....

On the photo you can see the Train where you have to go and which will take you to the Frozen Tears.
Go out of the close-up. You can move one screen up and to the right. First go one screen to the right ....... You end up at:
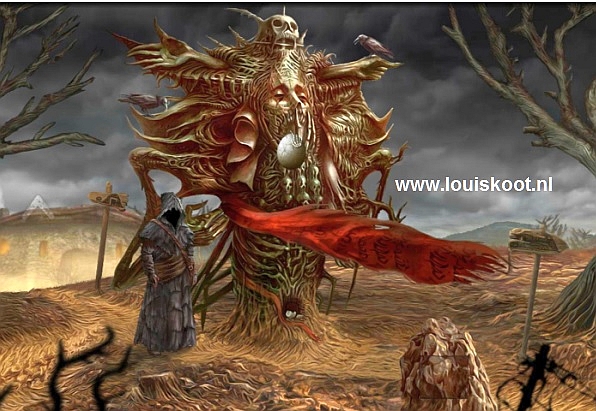
The Sad Statue:
There are a few mean crows sitting on the statue and those crows peck with their sharp beaks in the statue.
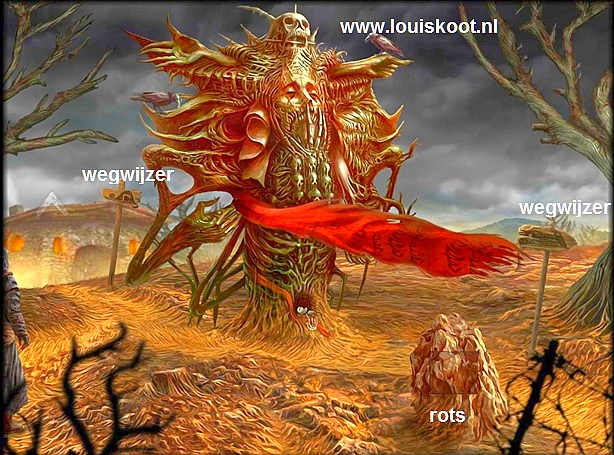
At the bottom of the statue is a hole with something in it. Click on the statue or in the hole to talk to the statue.
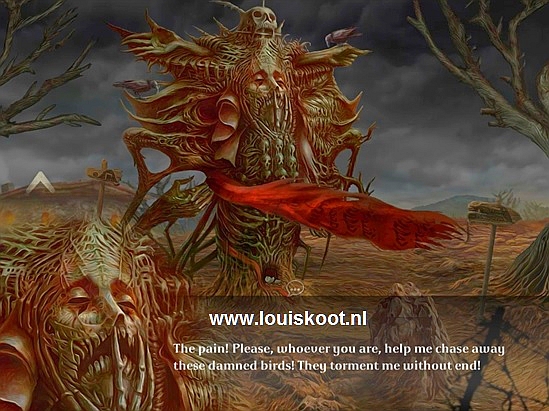
The statue asks you, no.....it begs you, to free him from those miserable crows. The statue used to have the power to scare the birds away, but it no longer has that power. The statue got that power from a "Storm Egg" but that egg is broken. The statue asks if you want to go find a new "storm Egg" for him and he promises you a reward if you succeed.
There are 2 signpost signs. View the 2 signpost. The sign behind the Sad Statue points to the Mine. The sign in front of the Sad Statue points to the Train. In front of the Sad Statue there is also a pointed rock ..... There is a panel on the pointed rock. Click on the pointed rock and .... In the close-up you see the panel .... .You need a "key" to open the panel. Get out of the close-up and go another screen to the right and .... you end up at the:
Bridge:
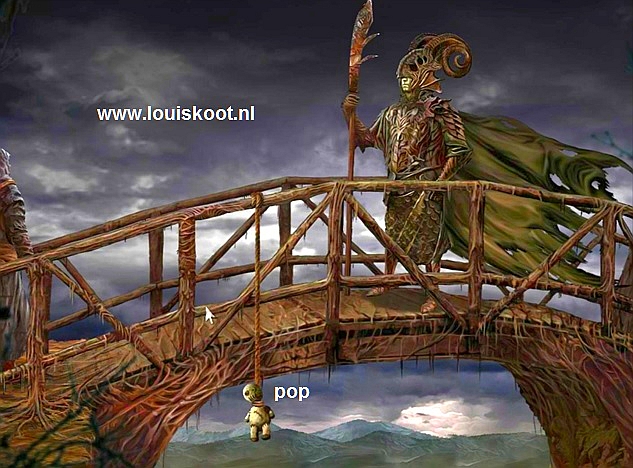
The Bridge Guard is on the bridge ..... if you try to cross over the bridge then the Guard will stop you .... No one is allowed to cross the bridge. Talk to the guard .....To be allowed to cross the bridge, you must prove to this guard that you are worthy to do so. You must give this Bridge Guard a trophy of 1 of the wild beasts that populate the mine. A Doll hangs on the railing of the bridge. Get the Doll.
Go back 1 screen to the left. You are then back at the Sad Statue. Now go to the Mine, so click the up arrow at the rear signpost. You arrive at the house of the Rat.
Ignore this house now .... scroll the screen to the left and then click the left arrow to move one screen further to the left and .... you will arrive at the entrance of:
The mine:
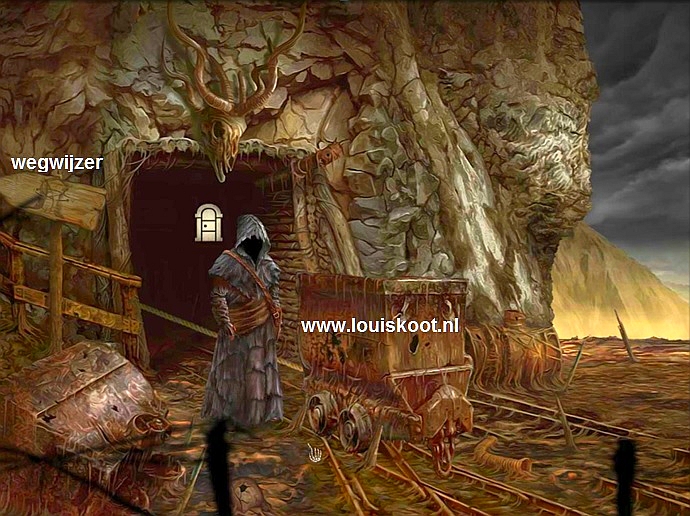
There is a mine cart, on the rails, in front of the mine entrance. However, the mine cart lacks 2 wheels. There is a signpost on the left. View the signpost ......

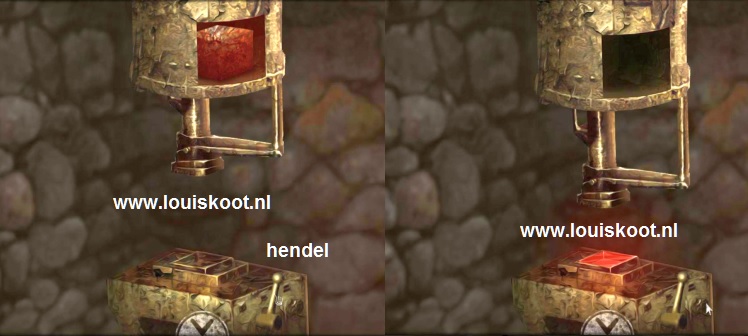
On the signpost you see the solution for the Tower Puzzle, which we must solve later on. Go out of the close-up. The signpost points to the left ..... so you can still go a screen to the left, to the Tower of the Lizard. But we are not doing that yet. Now enter the Mine. You end up in the mine at the elevator. The elevator is not here. To the right of the elevator shaft gate is a switch. A Mine cart Wheel is on the rails in front of the elevator shaft.
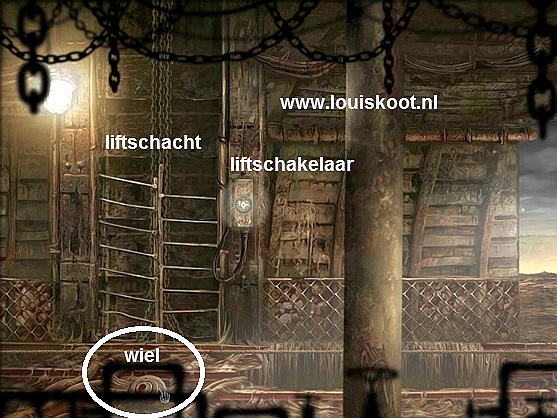
First take the Mine cart Wheel.......
You now have 2 mine cart wheels. Get out of the close-up and now click on the elevator switch .... in the close-up you see that a lever must be inserted in the switch box. Get out of the close-up again and walk one screen to the left. A horse is in the air. A Treadmill wheel stands in front of the hanging horse.
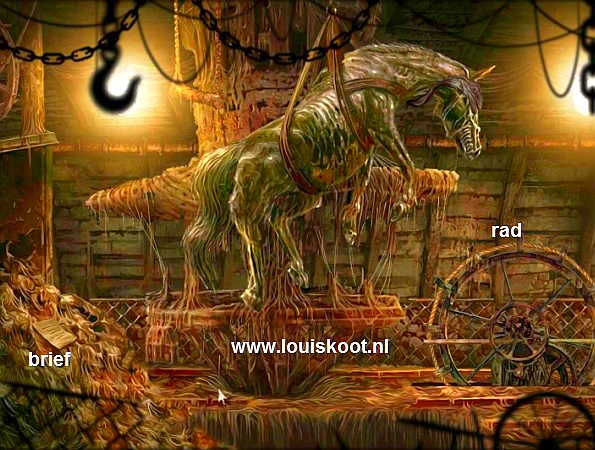
There is a note behind the hanging horse. Read that note ...it says..... "Day 56 ..... The horses were used to pull the mine carts". Close the close-up screen. Click on the Treadmill wheel and in the close-up you click on it again. The wheel is missing something. Get out of the close-up and go back to the right and then out of the mine. Back outside you zoom in on the mine cart to be in the close-up of the rear wheel axle. 2 wheels must be placed on the wheel axle ...... You have 2 mine cart wheels in your inventory box. Open your inventory box and take the 2 wheels out and click the wheels on the 2 axes .....
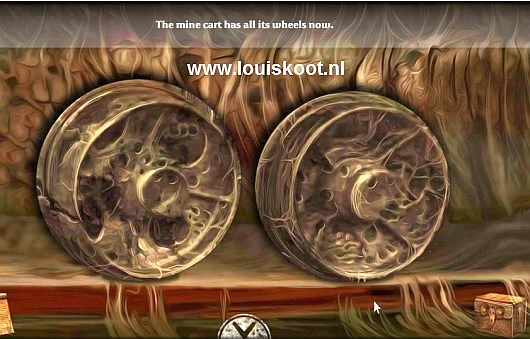
You automatically leave the close up. The mine cart can now enter the mine but we are not doing that yet.
Now go one screen to the left .... you climb up the mountain and end up at the:
Vulture:
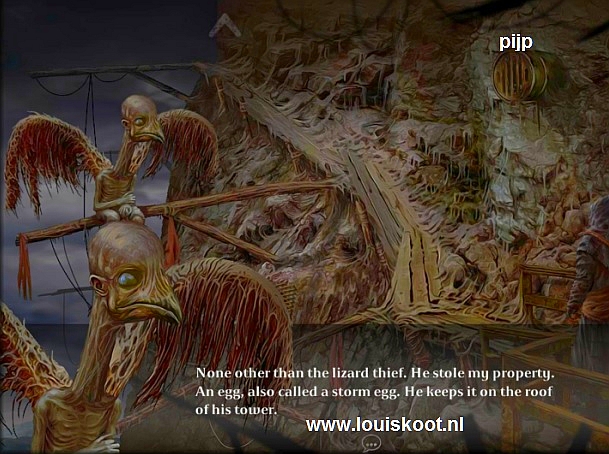
The vulture greets you and tells you who lives on top of the mountain in the Tower .... that is the Lizard and according to the Vulture that Lizard is a thief. De Vulture tells that the Lizard has stolen his Egg and has hidden it on top of his tower. Unfortunately, the Tower is guarded by a Monster who lives in the mine. De Vulture asks you to steal the Egg back from the Lizzard for him. As a reward, the Vulture will then give you the key for the panel in the rock near the Sad Statue. There is a part of the Train in that rock.
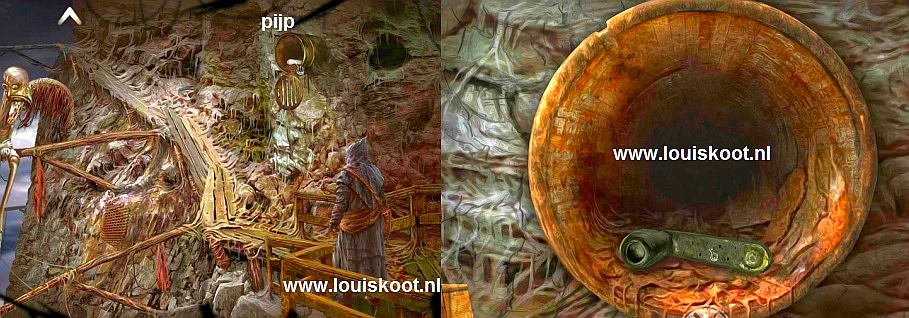
When the Vulture is done speaking to you, click on the pipe that protrudes from the mountain wall at the top right and ......
....... you open the lid of the pipe ..... there is a Crank in the pipe ..... Take the Crank from the pipe
Close the close-up screen. Now go back to the Mine, so go back one screen to the left ( or was it one screen to the right).
The Mine 2nd time:
Walk back in and through the mine to the horse and the treadmill wheel. Zoom in again on the treadmill wheel.
Take the crank from your box and place the crank on the shaft in the middle of the treadmill wheel.
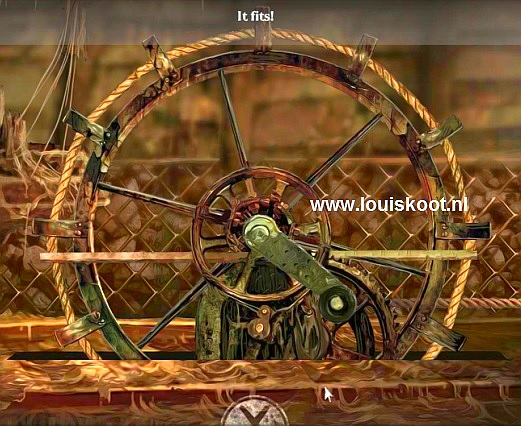
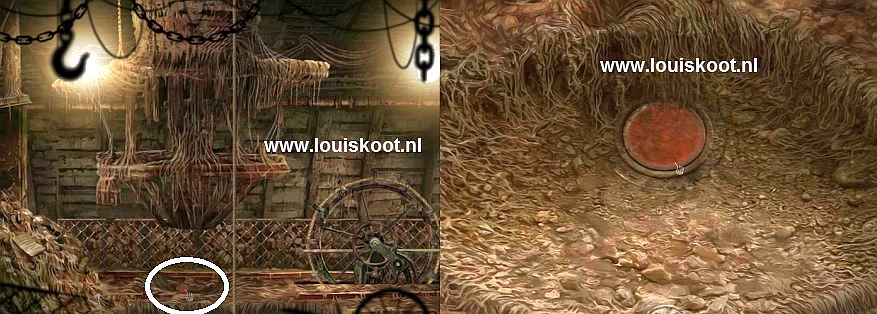
Then click on the Crank to activate the wheel and...... The horse gets pulled down and something comes up and ....
a mine cart is pulled into the mine and falls down. Underneath the huge thing that has been lifted up is something ..... Zoom in on it ...
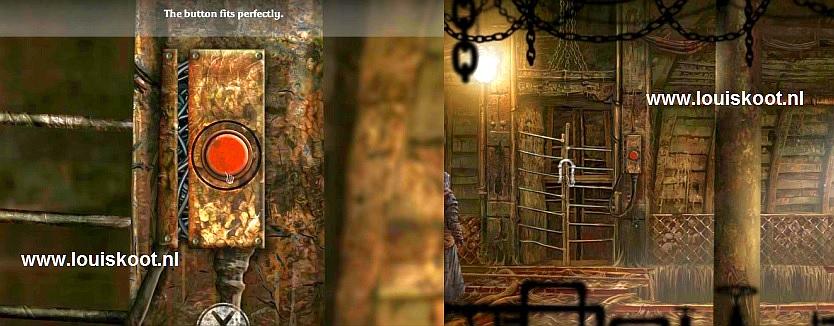
it is the red button of the elevator switch .... Take the red button.
Close the close-up and walk back to the elevator. Zoom in again on the elevator switch and place the red button on it ..... then click the red button and ......
.... the lift comes up and you go out of the close-up again.
Now go down with the elevator .... you end up in the lower mine corridor. To the right of the elevator is a drill with 2 faces. To the left of the left is a note on the pole.

Read that note and then go one screen to the left and ...... a huge monster is blocking your further progress through the mine. Fortunately the monster is behind a fence. Click on the monster ...... you do not think you can beat the monster, but perhaps you can dislodge it? ..... There is a box in front of the fence. Open that box .... there is a metal object in the box ...
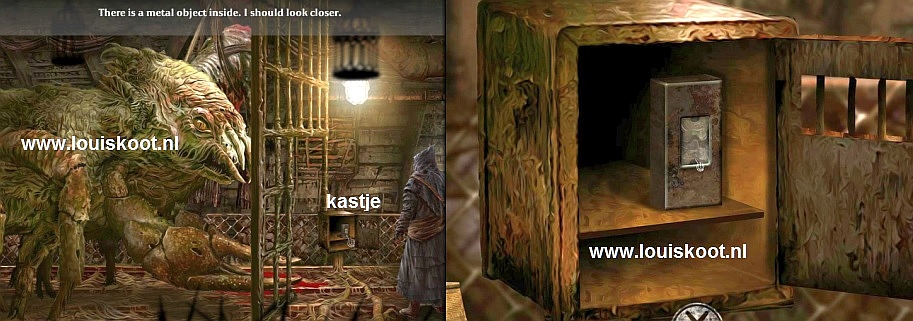
Take the metal object out of the box ........ it is a metal box with cogwheels in it ..... Close the close-up screen and walk back to the elevator and the drill.
The drill has 2 "faces" ....click on the faces and they slide up ..... you will see the mechanism of the drill .....
click on the mechanism ..... you end up in the:
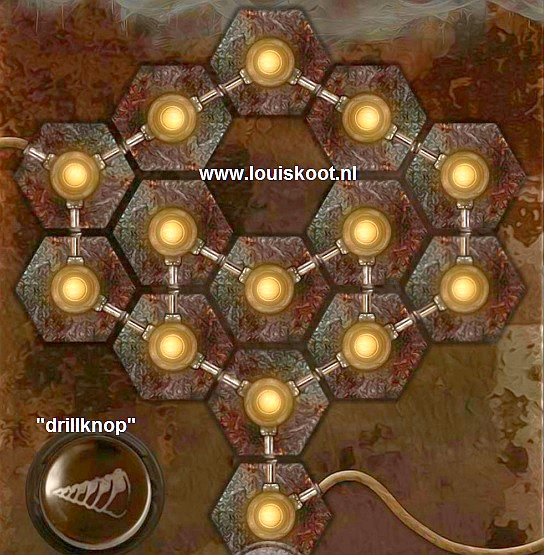
Drill machine Connector puzzle:
It is a turning puzzle ..... you have to connect the hexagonal segments so that the flow can go from left to right. But first you have to place on the right-hand side that box that you have just found in the box. So open your inventory box, take the metal box out and place it in the empty box on the right.
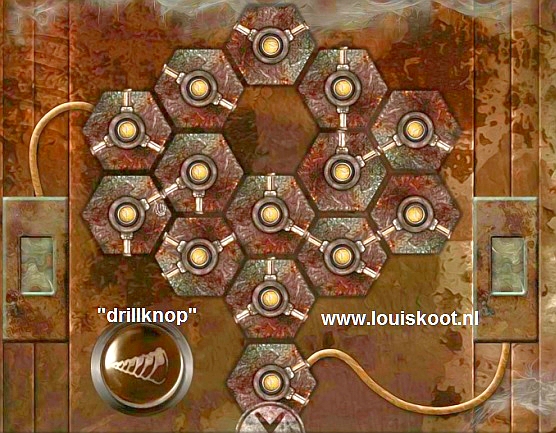
Now you have to rotate the hexagonal segments to let the flow go through the segments from left to right. It is not a difficult puzzle ...... Click on a segment to rotate it and then connect the pipes of the segments to each other in the only logical way ..... If you do it right, all the lights of all segments will go burn ...... Then click on the large round "Drill button" and ....
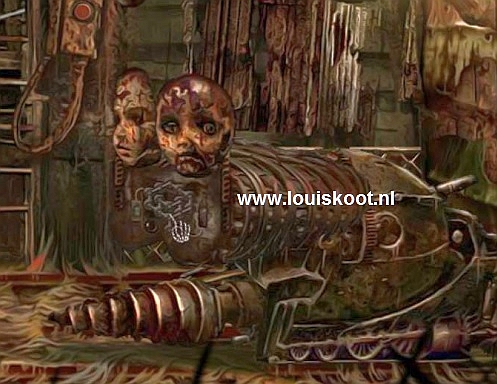
WELL DONE ..... the drill goes to the left and drives the monster away. Walk to the left again ...... the monster and the drill are gone ...... a piece of the monster is still hanging behind the fence. Below that piece of monster lies another piece of bone from the monster on the ground. Grab that monster bone ..........
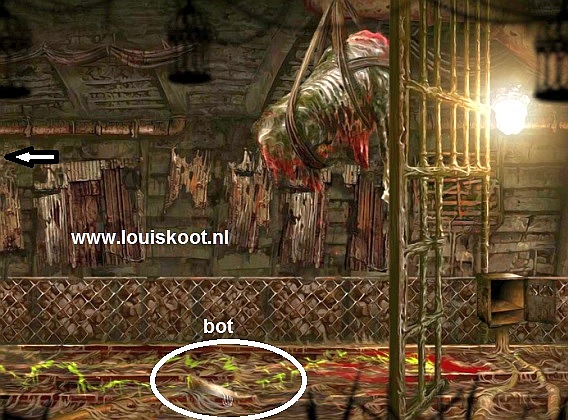
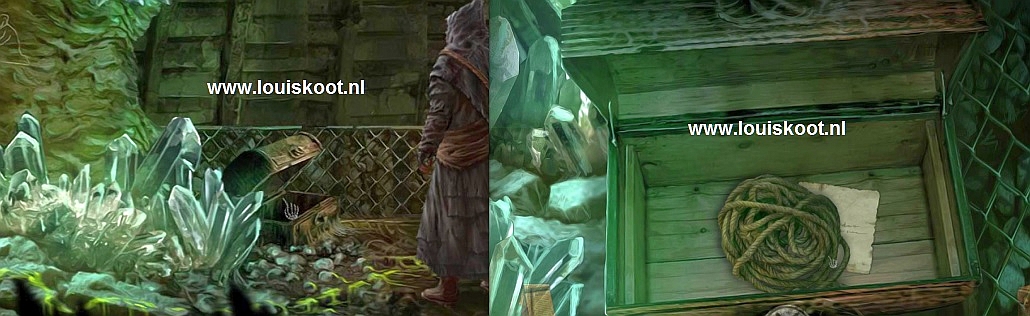
... the bone is your trophy that you can give to the bridge guard. Get out of the close-up and then go one more screen to the left. You reach the end of the tunnel. Crystals "grow" up from the ground and from the walls. The drill machine blocks the further passage. On the wall you see a drawing and there is a chest here.
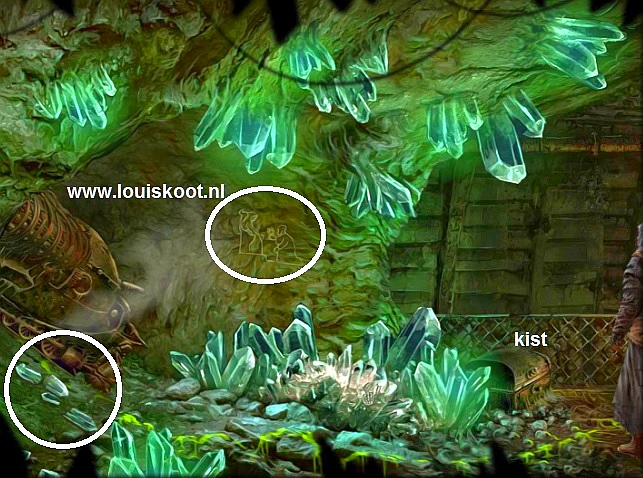
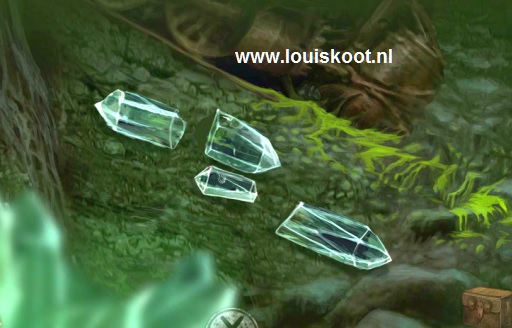
Click on the wall drawing to view it in close-up .... the kneeling person offers the person on the throne 2 crystals. At the drill are 4 broken crystals on the slope
Click those 4 broken crystals ...you'll see them in close-up ......grab these 4 crystals and get out of the close-up screen again.
Now click on the chest ..... the chest will open ..... there is something in the chest so click in the opened chest .....
Take the Rope from the chest and read the note.
Close the close-up screen. Time to leave the mine. So go 2 screens to the right and then back up via the elevator. Back up you walk out of the mine and ...... Well ..... as soon as you leave the mine the entrance is completely blocked with boulders. Continue one screen to the right ..... you are back at:
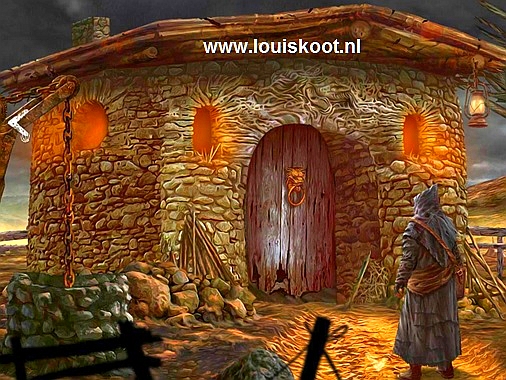
The Rat house:
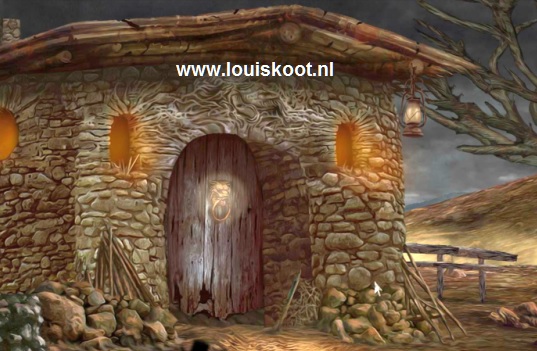
An oil lamp hangs from the overhanging roof edge. A door knocker sticks on the door. Click the door knocker ..... you knock with the knocker on the door ..... the rat screams that strangers are not welcome .... friends are welcome but they know the secret sign. So you have to let the rat know that you are his friend. Zoom in on the oil lamp .... in the close-up you can see that there are 4 crystals in the oil lamp. Take your 4 crystals from your inventory box and put them in the oil lamp and ...... well ..... the oil lamp will light up and you can now go inside.
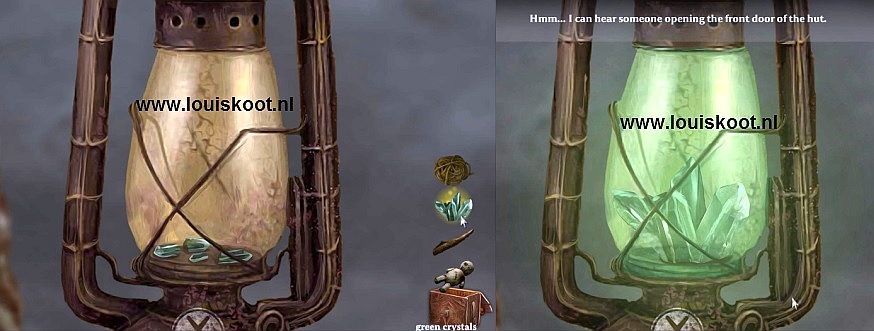
You go out of the close-up again. So go inside. The rat welcomes you warmly ......
well ..... after all, you saved his life because this is the rodent that you have freed in the castle from the cage, at the mole.
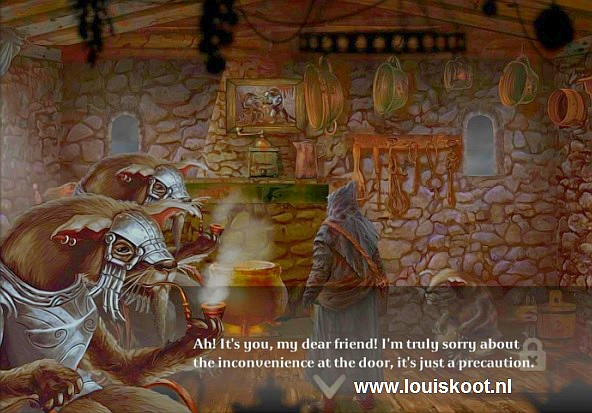
Rat tells about the 3 monuments in the desert ..... Those 3 monuments are the tombs of the ancient Kings of this empire. According to legend, there is a magic item in that tomb that can give the owner a lot of power. Rat asks you if you want to pick up that magical item for him from the tomb. In exchange for that item, rat will give you a key to the place where you can find a red Monolith that you need to forge a fuel cell for the train. Rat also gives you a painted tile, which his son has found close to the tomb.
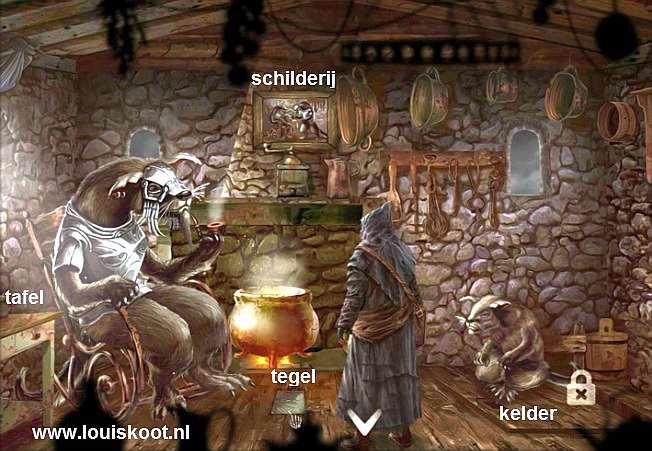
When Rat is done speaking, he throws that Tile on the floor. Take the Tile ...... the tile is painted. Exit the close-up screen again.
Rat's son is sitting on the basement hatch. Above the cooking pot is a painting .... View that painting .... "one happy family" ..... Behind the rat is a table with 2 drawers. Open the left drawer in that table and then look in the drawer and then take the wooden figurine out and read the note.
Get out of the close-up. Click on the basement hatch ....... the son of the rat has lost his toy when he was playing outside ..... son disappears if you give him something he can play with. So take the Doll that you found on the bridge, from your inventory and give the doll to the young rat .....
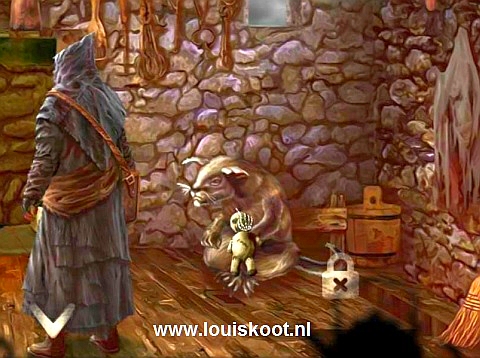
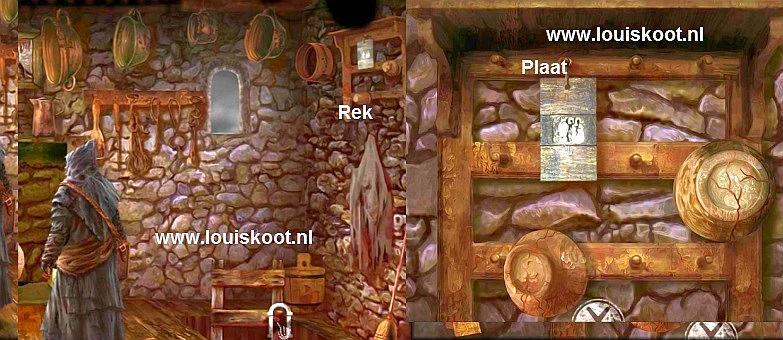
Young Rat is happy that he has his doll back and disappears to play "Mister Hangman" with his doll again. You can now go down to the basement. Wait a little longer ..... A broom leans against the wall and above that broom a wooden rack hangs on the wall. A metal plate hangs from that rack ...... Zoom in on the metal plate and then grab it ..... a drawing has been painted on the plate.
Zoom out and now descend to the basement. Behind you, so in front of the ladder, is an open barrel ... Look in that barrel.
There is a drawing in the barrel and you automatically draw the drawing in your sketchbook.
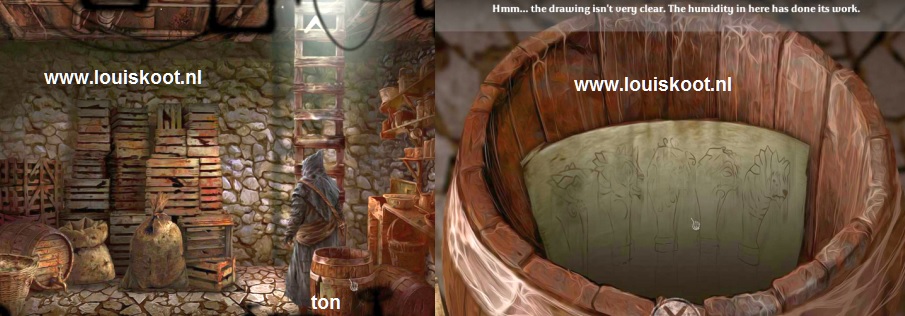
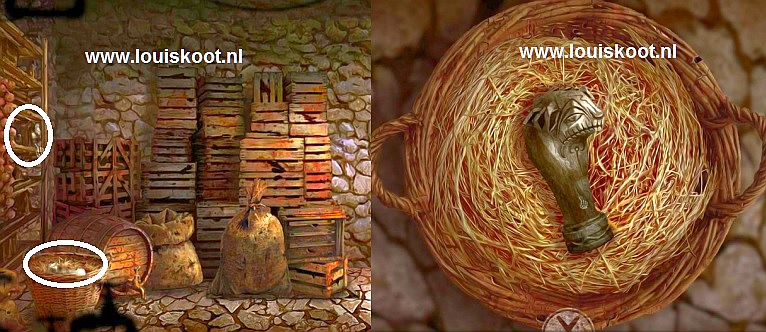
View the drawing. The drawing shows you 5 wooden figurines, each with a different head. You already have 1 such a figurine because you found it in the drawer behind the rat. This drawing is the solution for the puzzle that you have to solve here. Close the close-up screen. Scroll the screen on the left. There is something in rack and there is also something in the basket. Click in the basket and then take the 2nd wooden figurine out
Get out of the close-up again and click on the rack. You get into the close-up of the:
Wooden figurines puzzle:
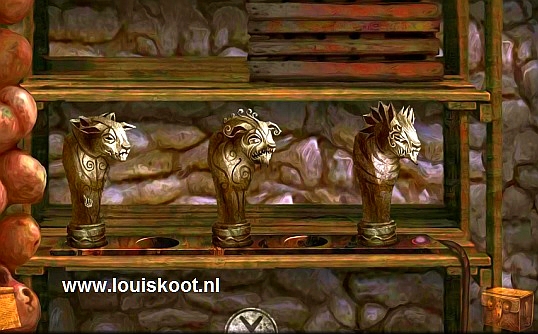
There are 3 wooden figurines on a copper plate in the rack. However, there should be 5 figurines because there are 2 empty slots. So take the 2 wooden figurines from your inventory box and place them, one by one, in the 2 empty spots on the copper plate and ......... the 5 figurines are jumbled up because they change places.
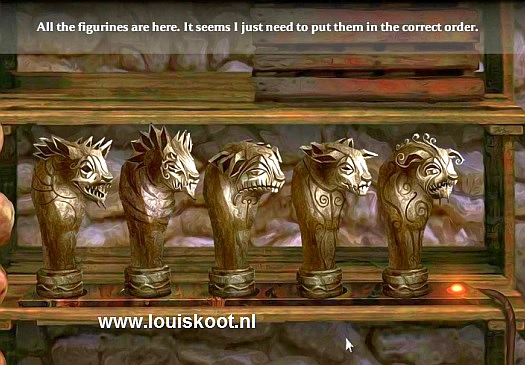
You now have to place the figurines in the proper left / right order again. So they are 5 figurines of the same animal but each figurine has a different face. On the drawing in the barrel you saw the order of these 5 figurines and you have redrawn that drawing in your sketchbook, so view the sketch in your sketchbook. Then exchange the figurines with each other until you have placed them in the correct order. Click on a figurine to select that figurine and then click on another figurine to have the two figurines swap places ...... this is how it should be ....
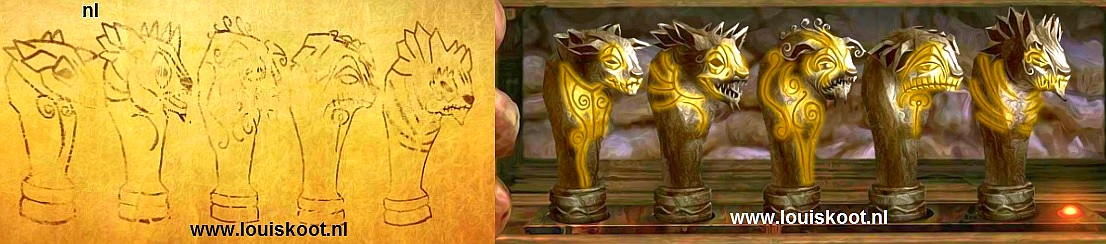
When you have put the figurines in the right order, you will automatically go out of the close-up and ........ the secret passage to the torture cellar will be opened.
So go through the secret passage and .... you end up deeper under the ground in the Torture room of the rats.
A victim of the rats is locked up in a cage and the other cage only has some bones.
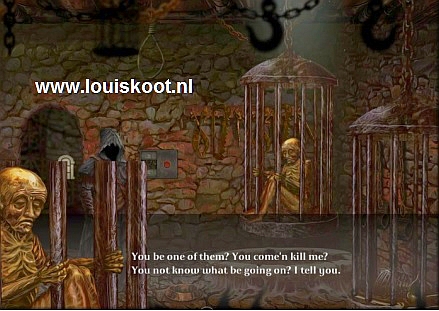
The poor victim tells that the rats lure their victims to the house to lock them up in the cages, when they are deeply asleep, to eat them later.
This victim has a ticket for the train and he is willing to give you his train ticket if you let him escape.

There is a panel with a red button on the wall. There is a sketch on the left wall and a press machine in the corner. First view the sketch.
The sketch shows you how to make a power cell for the train, with the machine in the corner. Zoom in on the wall panel with the red button.
Moral Choice 5: Save the prisoner or drown him:
The panel consists of 2 parts. The red button is in the right part. In the left part you see 2 plates with a drawing on it ....... In the middle there is a plate missing but you also found one like that upstairs with the rat. Take that Plate from your inventory and place it in the left part of the panel. You can now click the top and bottom plates to get an Up arrow or to get a Down arrow ....... So you now have to choose between the Up arrow and the Down arrow.
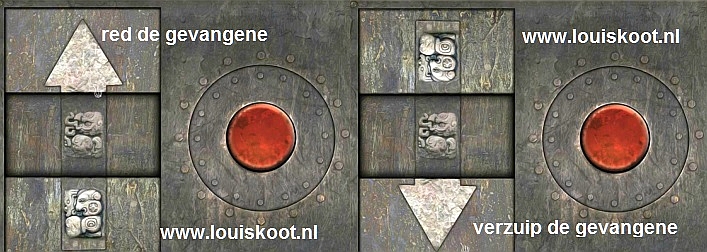
If you choose the Up arrow and then click the red Button, the cage with the prisoner goes up to freedom..... If you choose the Down arrow and then click the red button you will drown the prisoner in the well beneath the cage ..Again......it's your choice ......I did the "good" option again, so I have clicked the Up arrow and then the red button and ...... the cage with the prisoner goes up and the prisoner escapes disappears NB: If you choose the Down option, the cage will sink into the well and drown the prisoner. Then look into the well to fish out the train ticket. So I let the prisoner escape so I don't have the train ticket yet.
Go back upstairs to the Rat. The Rat doesn't know yet that you robbed him of his next meal. Leave the Rat house and .......
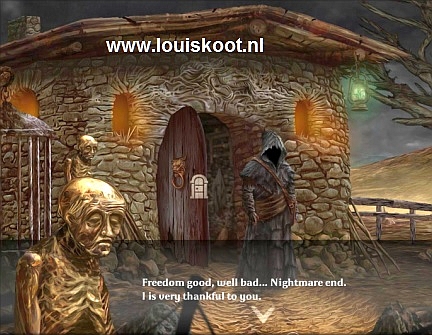
the prisoner that I just rescued from the horror cellar of the Rat is grateful to me and he leaves his Train Ticket for me. So take the Train Ticket.
B: The Storm Egg:
You need another Storm Egg, to give to the Sad Statue or the Vulture. Go back to the left, to the mine, and then another screen to the left. You are then back at de Vulture. Then click the Up arrow, above the vulture, and ..... you end up on top of the mountain and at the:
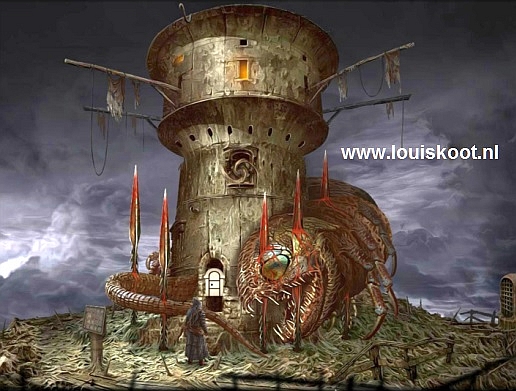
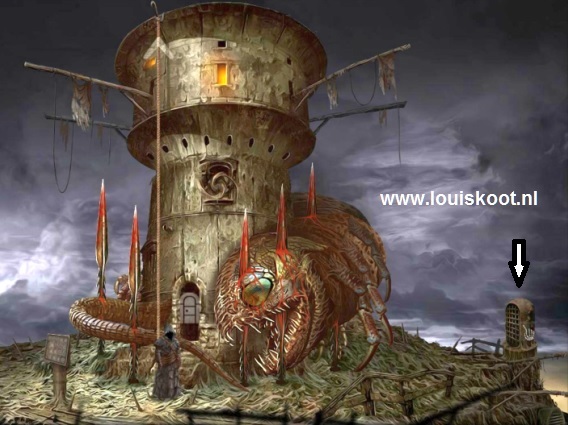
Lizard tower:
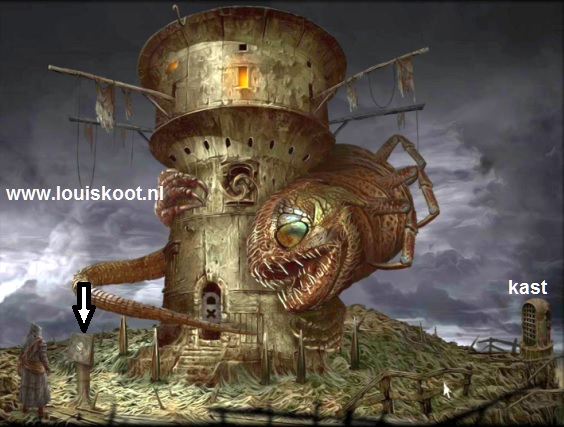
A huge monster has wrapped itself around the tower. So you cannot enter the tower as long as the monster is hanging around it. You are standing in front of a panel on a pole. If you scroll the screen slightly to the right, you'll see that there is a cupboard behind the tower on the right. Zoom in on the panel that is directly in front of you. This is the
Lizzard panel puzzle
See it as a clock with the "hours" I (1), II (2), III (3), IV (4) and V (5). The lizard in the middle is the wiser. You must turn the tail of the Lizard in the correct order to the "hours". So you click on a number to turn the lizard with its tail. You have seen the solution for this puzzle on the signpost at the entrance of the mine. On that sign you saw a sketch of this tower with arrows pointing to the numbers I, II, III, IV, V ...... well you have copied that sketch in your sketch book, so look at that sketch again
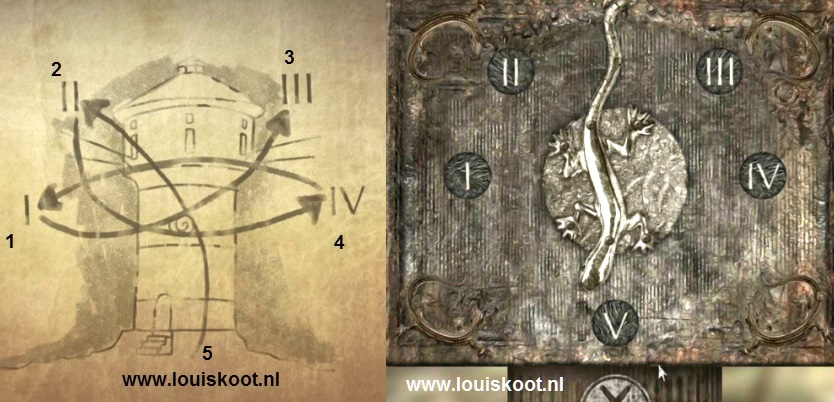
The sketch shows that the arrows go from V (the entrance) to II, then from II to IV. Then from IV to I and then from I to III. The solution is therefore V, II, IV, I, III. So click in this order on the Roman Numbers: V (5), II (2), IV (4), I (1), III (3) and ...... Success ...... the lid disappears from the panel and you get into:
Gears Puzzle:
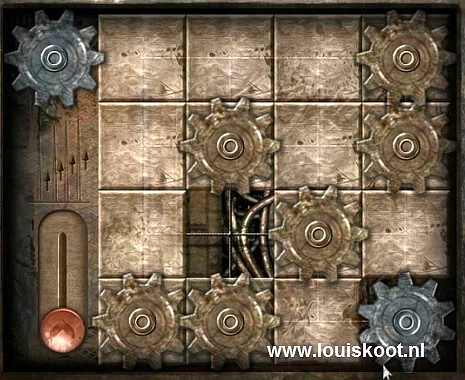
It is a block slide puzzle. Bottom left is a red slider. Top left and bottom right a gear. The bottom right gear turns. There are blocks in the panel .... 6 blocks have a gear. It is a sliding puzzle .... move the blocks so that all the gears interlock and start turning. Grab a block, then hold your mouse and drag the block up, down, left or right, depending on where the empty space is. You will have to do this entirely on your own and multiple solutions are possible. When you have connected all the gears, they will all turn.
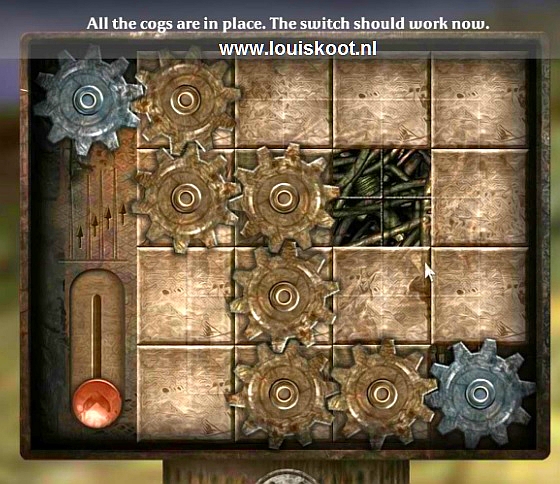
Then click the red slider up and ....... Well .... the monster is dead because it is speared by skewers coming up from the ground.
You can now go inside, so go into the tower. You end up on the ground floor.
Via the spiral staircase you can go further up to the floor but do not do this yet. Piles of books are here.
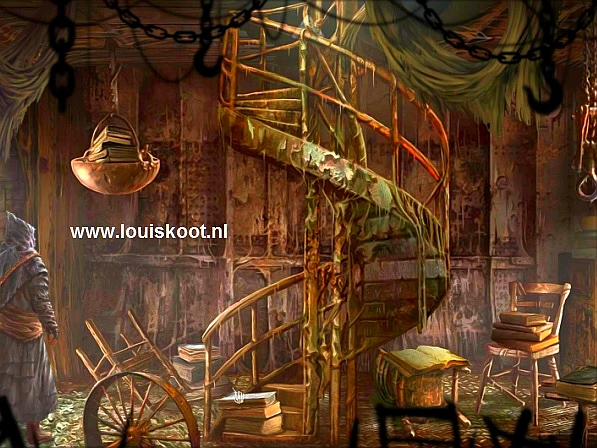
Click on all books to "read" them ...... This gives you a Steam Achievement, but you may not miss a book. In one of the books you see a picture of the train and you read that the train needs a Blood Monolith as fuel. In another book you read that a Storm Egg can often be found on the roofs of houses and other buildings. Have you read all the books then you go up via the arrow above the spiral staircase and ..... you meet the Lizard .....
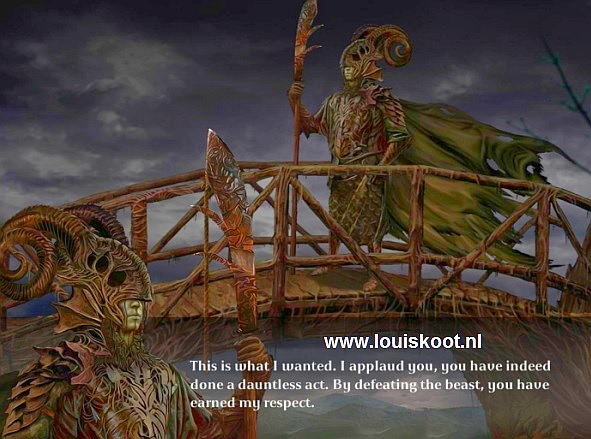
The Lizard is grateful to you for killing the monster. The Lizard tells that he has a Storm Egg on the roof of his tower, but that the Vulture wants to steal his Egg. The Lizard then asks if you want to look for an artifact for him .... that artifact is the "Crown of the Damned", from the Tomb of the Ancient Kings.
When the Lizard is done talking, a Tile floats in front of his snuffer .... you need that tile so grab the Tile .... this tile is also painted.
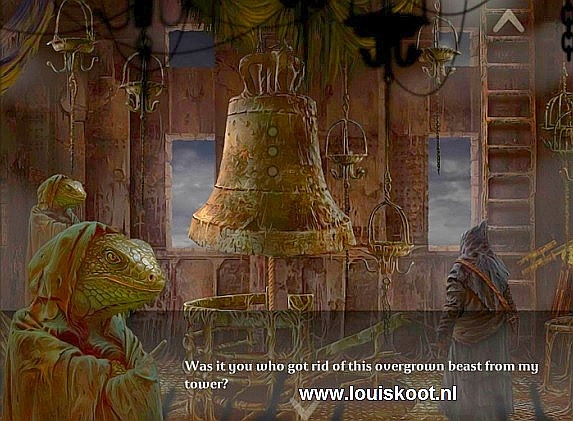
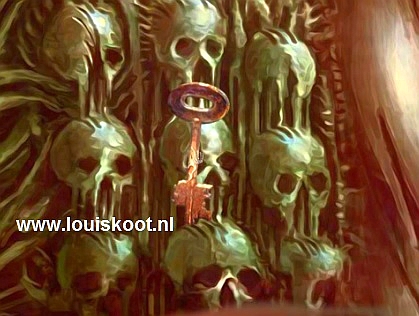
The enormous bell of the tower hangs between you and the Lizard. Click 3 times on the bell clock and ..... After every click the bell rings and this ringing of the bell causes a small earthquake .... a light comes on the bell .... If you have clicked the bell twice, there have been 2 earthquakes and ...... there is a key falling down and that key falls into the front hanging cup. Click a third time on the bell clock and ..... You will see the Tomb of the Ancient Kings rise up

Take the Key from the front hanging cup .... the key has an egg-shaped handle.
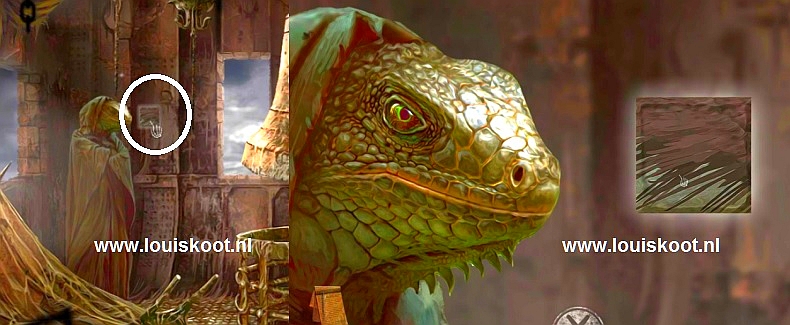
Go out of the close-up. To the right, in front of the ladder, is a telescope viewer. Click on the Telescope:
Telescope:
You are standing in front of the eyepiece of the telescope. You see 4 red arrow buttons. Use the arrow buttons to move the telescope.
Click twice the left arrow, once the down arrow, once the left arrow and ..... in the telescope you will see a symbol ...
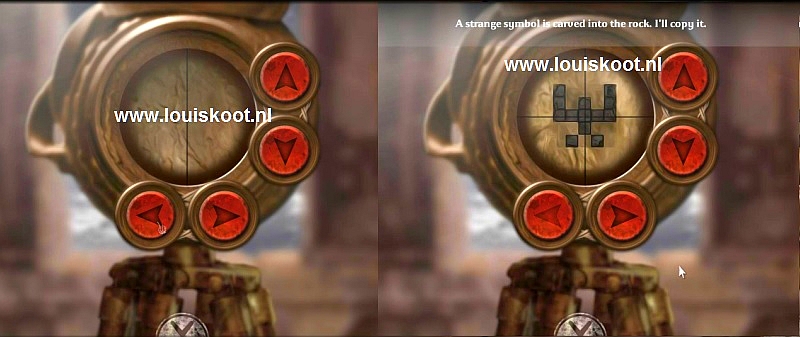
.. you draw this symbol in your sketchbook. It is the solution of a puzzle that you will do later. Go out of the close-up.
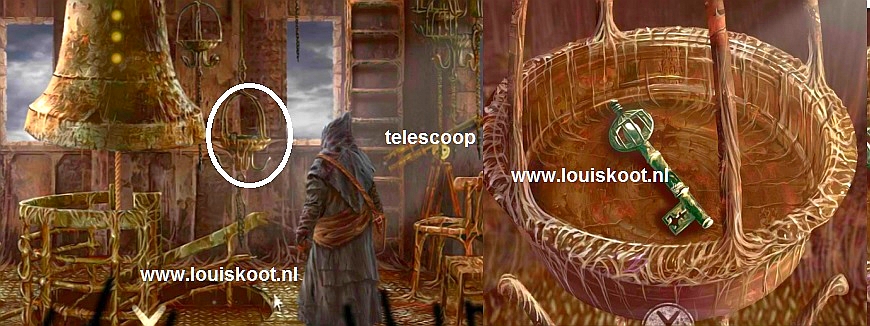
Now climb up the ladder to the roof of the tower. The Storm Egg is on top of the roof. A Bracket sticks in the eaves.
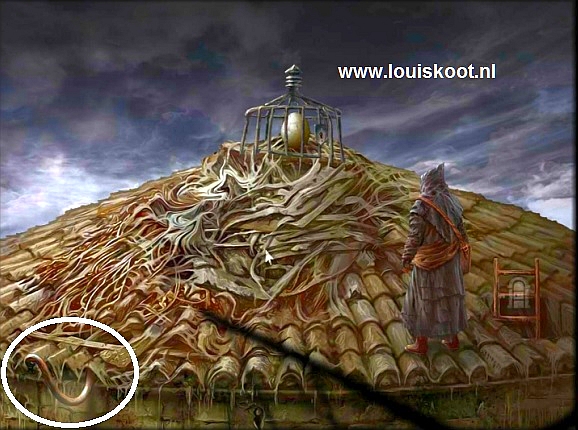
Click on the Egg .... In the Close-up you see that the cage in which the Egg is located is locked.
So take the Key that you have just found from your box and put it in the keyhole to open the cage door.
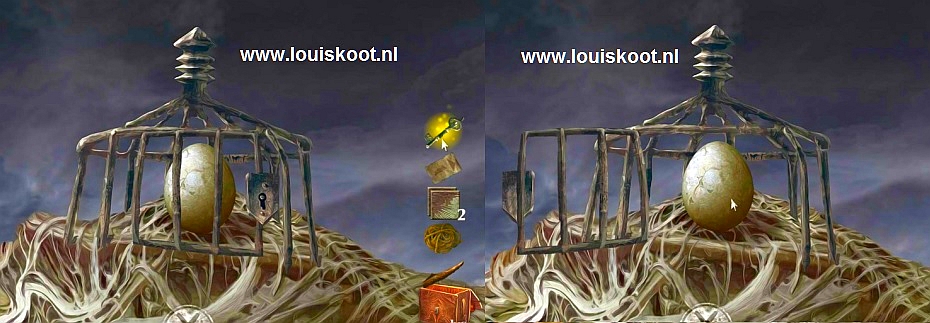
Then grab the Storm Egg and exit the close-up screen.
When you go back in via the ladder, the lizard sees that you have stolen his Storm Egg and he will take the Egg from you. So don't do this. You must get away from the Tower in a different way if you want to keep the Storm Egg. A Bracket protrudes from the eaves. Click on the bracket .... you get into the close-up of the bracket. Take the Rope from your inventory chest and tie the rope to the bracket ....
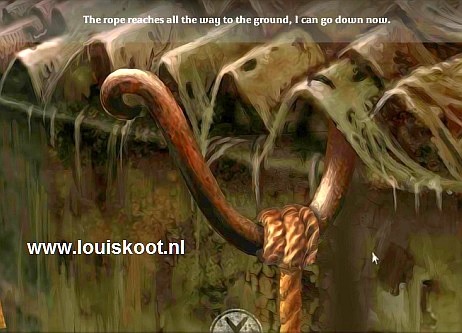
you will automatically exit the close-up screen. At the bracket and the rope you get the Down arrow ....
Click the Down arrow to climb back to the ground via the rope. Then, via the down arrow, go back to the:
Vulture:
Moral Choice 6:
You now have to make a choice again ....
Bad Choice = Give the Egg to the Vulture. Good Choice = Give the Egg to the Sad Statue. I do NOT give the Egg to the Vulture.
So now I go all the way back to the Sad Statue, 2 times to the right and then one screen down at the Rat house.
Sad statue:
Take the Storm Egg from your inventory chest and give it to the Sad Statue and .......
The storm Egg disappears to the hole at the bottom of the statue. The Statue is grateful to you and he has a Key for you ...
The key then hangs above the red "wing" ..... Grab the Key and go out of the close-up.
The crows have disappeared thanks to the Storm Egg. Now zoom in again on the metal plate that sticks out on the pointed rock. In the close-up, take the Key that you obtained from the Sad Statue from your inventory. Insert the key into the slot of the metal plate and ...... pick up all items from the box and read the letter. The items are parts for the train.

Go out of the close-up. You have taken a bone from the mine monster in the Mine to give as a trophy to the bridge keeper so that you can then cross the bridge. Do not do this yet because once you cross the bridge you cannot go back to this area. You still have to steal that artifact for the Lizard from the Tomb of the ancient Kings, so now go back to the gate of the castle. So go back one screen to the left.
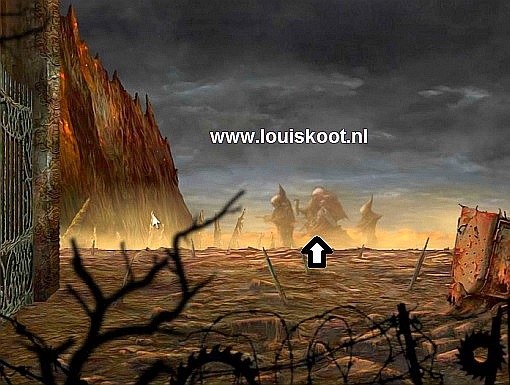
Back at the castle gate you see those 3 huge Tomb statues in the distance, so go up one screen and you are at the:
C: Tomb of the Ancient Kings:
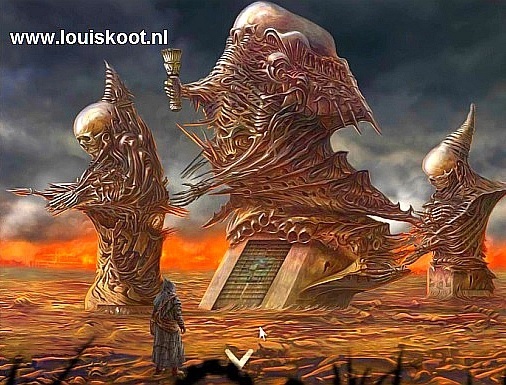
You stand in front of 3 statues. The middle statue is the Tomb and in the "foot" of it is the entrance but you have to open it by solving a puzzle. But before you do that, first click on the foot of the left statue ...... On the foot of the left statue are the names of the makers of this game and a "Hangman" drawing. Go out of the close-up and zoom in on the foot of the statue on the right and ..... you see 3 Bells drawn on it ...... but this is "old news: because in the Lizard Tower you already sounded the ball 3 times. So go out of the close-up again and now click on the Door, in the foot of the middle statue and .......you must solve a puzzle...
Tile Puzzle:
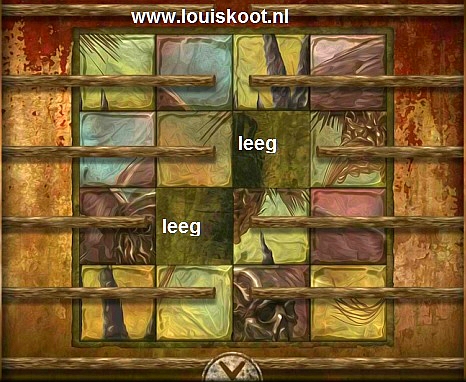
It is a swap puzzle. However, 2 tiles have disappeared from the grid, but you have now found those 2 tiles.
So take those 2 Tiles from your inventory chest and place them in the grid ...
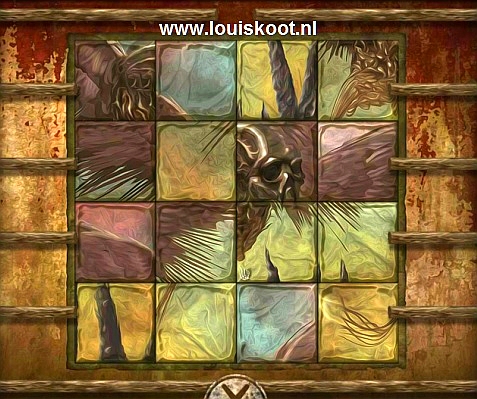
The bars then slide away and you can now move. You have to restore the image and it is an image of a strange bird.
To restore the image you have to swap tiles. Click on a tile and then click on another tile to make those tiles change places.
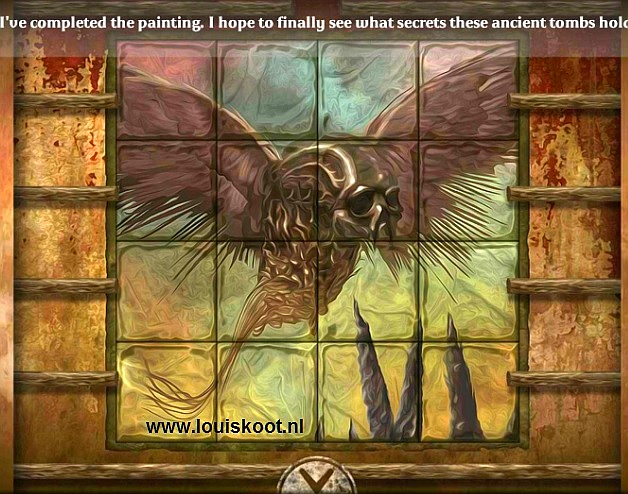
Once you have restored the bird to its full glory, you will automatically get out of the puzzle and enter the Tomb. There is a Cube in the Tomb.
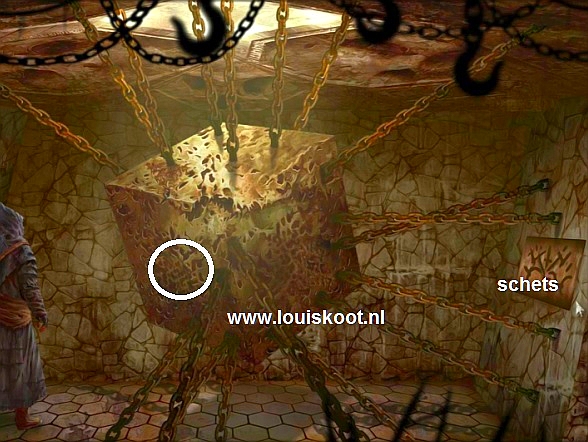
On the front side of the Cube you see a spot light up. Behind the Cube there is a sketch on the wall. First look at that sketch ..... no idea what this sketch means and you don't draw it in your sketch book either. Go out of the close-up and now click on the front face of the Cube and .......... ...... you might better not have done that because ..... you press a button in and this closes the door and ......
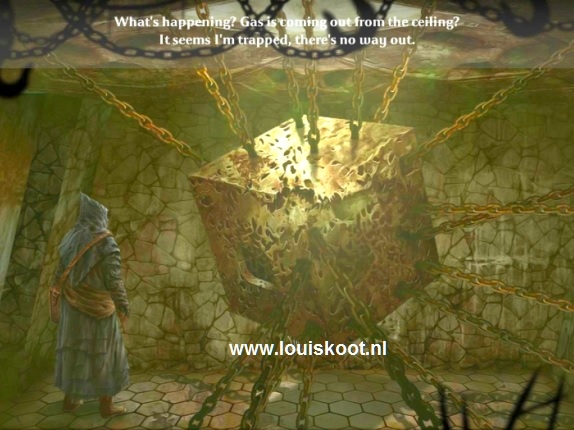
Gas flows into the room and you become unconscious ...... But you wake up again
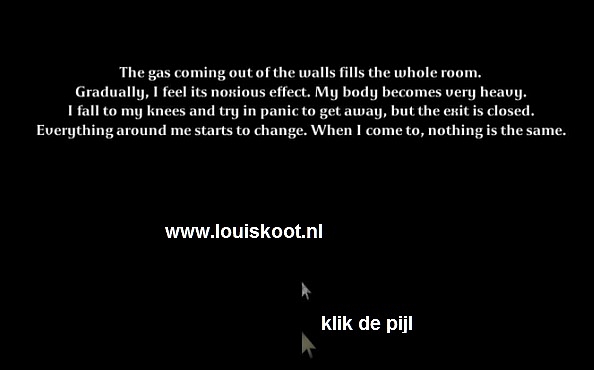
..... Click on the arrow in the black screen to continue and ............. The room has changed ...
The Cube is still there but now hangs freely ...... skeleton hands stick out of the floor, the walls and the ceiling on all sides.
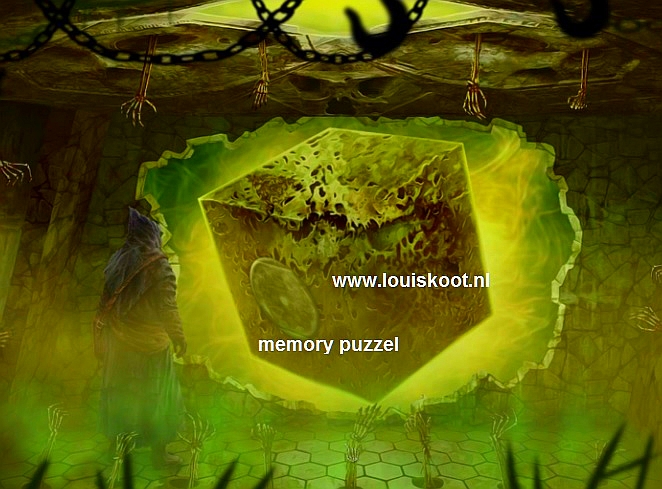
In the front of the cube you now see a large Circle ....... Get ready for the most difficult puzzle in the game ....
Click on the Circle on the Cube and ..... you end up in the:
Memory Puzzle:
This puzzle goes on a TIMER ..... and you have 30 seconds......
The puzzle does not start immediately .... you will first see which pairs to look for ....
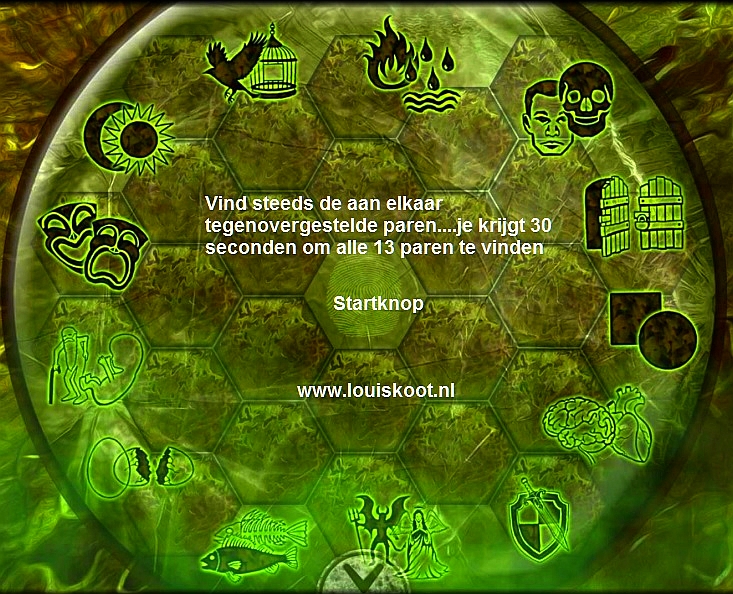
in a regular Memory puzzle you have to look for 2 MATCHING images ... but in this puzzle you have to find the OPPOSITE IMAGE .... You have to find 13 pairs, but not of 2 the same images but from 2 opposites of each other . So Fire and Water, Moon and Sun, Old Man and Baby ... and so on ........ The game shows you all the pairs to look for and keeps doing this until you START the puzzle by pressing the Start button, witch is the fingerprint in the middle. As soon as you click the Start button the puzzle will start and you have 30 seconds to solve it
When you start the puzzle the circle is empty but the circle fills up with water quickly and when the circle is completely filled with water and you have not found all 13 pairs then you have to start again. Fortunately, all pairs are put back in the same place ..... it is a matter of remembering and finding the pairs quickly.
Click on the Fingerprint in the middle of the circle to start the puzzle .... and do your best to find all pairs quickly .... I can't help you with this and it goes fast.......always try to find the 2 opposites of each other and also try to remember where they are in the circle ..... Like I said ..... if you can't make it in the 30 seconds you get then you will have to start over again because the pairs that you did find will get lost again ..... But you will know where those pairs are ....... The best what you can do is first find out where each image is in the circle ... write it down on a piece of paper, for example 1 match with 5, 2 match with 9 or something similar. If you know in this way where each pair can be found then you can eventually find them all in 30 seconds.
If you are unable to solve this Memory puzzle then this is the END of the game for you.
If you manage to find all 13 pairs before the 30 seconds are up, then you end up in the Cube and you can continue with the game because you have ended up in the:
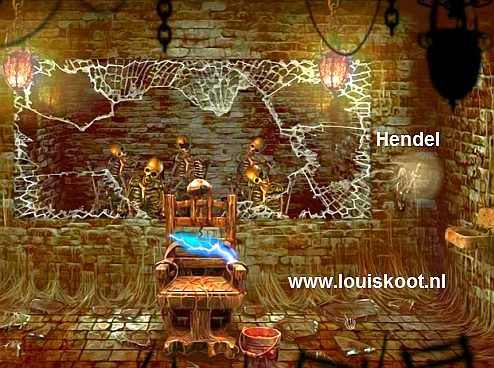
Execution Chamber:
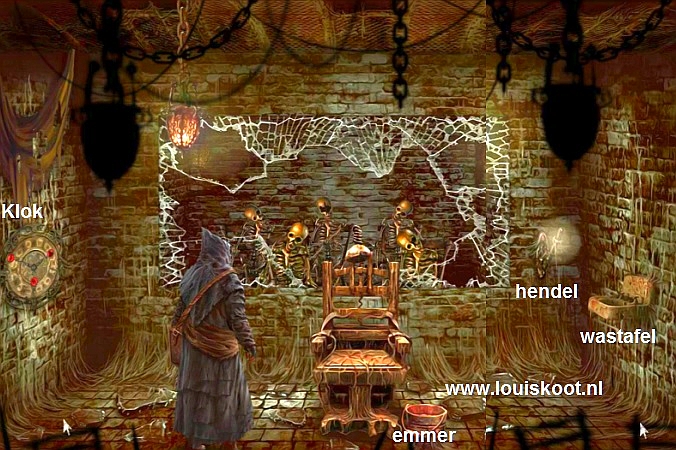
The "public" is watching as the person sentenced to death is put to death on the electric chair. A clock is on the left wall. There is a sink on the right wall and a lever in the corner. A bucket is in front of the electric chair. If you click on the lever you will notice that there is no movement. Zoom in on the Bucket. There is a note in the bucket ..... read the Note ..... it is a poem and it gives you a part of the solution of the Clock Puzzle, which you must solve in a moment ..... the most important words in this poem are "five" (5) and "twice" (2). Get out of the close-up and then zoom in on the sink. Also in the sink is a note with a poem ... also read this poem because it is the 2nd part of the solution for the Clock Puzzle .... the important word in this poem is "Thrice" (3). Get out of the close-up, scroll the screen to the left and then click on the "Clock"
The Clock puzzle:
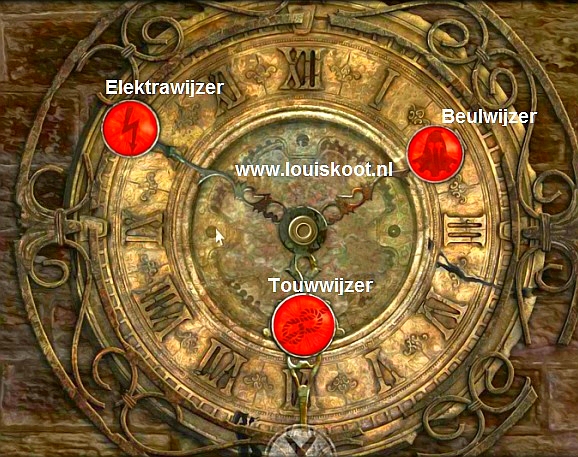
The clock has 3 pointers ..... an Electric pointer an Execution pointer and a Rope pointer.... The clock also has Roman numerals I (1) to XII (12). You now have to turn the 3 pointers to the correct Roman numeral ..... The 2 poems, in the bucket and in the sink, have given you the solution ...... "Five", "Twice" and " Thrice "..... So put the Electric pointer on II (2), the Rope pointer on III (3) and the Executioner pointer on V (5) ....
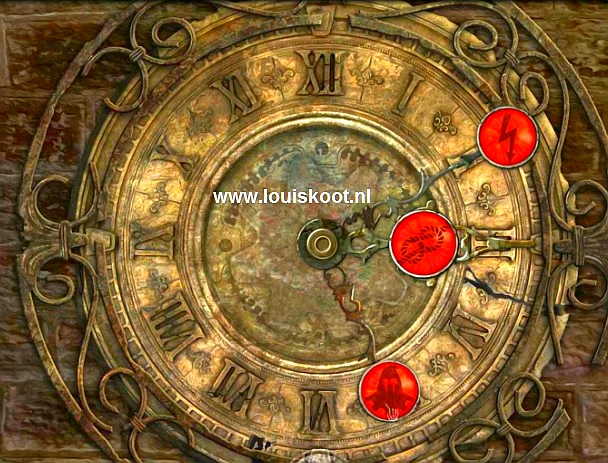
You automatically go out of close-up and ..... The electric chair is now powered and the Lever on the wall now has power also ..
Zoom in again on the Lever and in the close-up click the Lever up and .........The spirit of the Convicted Man appears in the electric chair .....
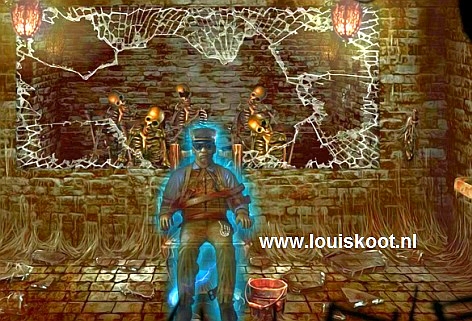
Click on the ghost to talk to him ........ The ghost disappears again and on the electric chair the Crown appears ...... Take the Crown ......
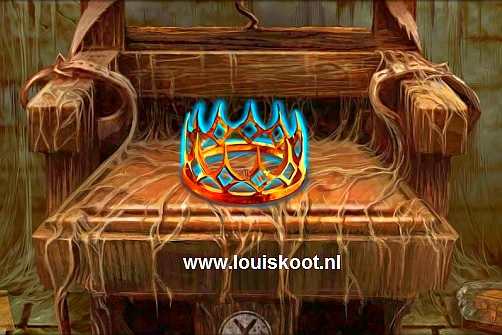
This Crown is the artifact that the Rat wants but it is also desired by the Lizard. Get out of the close-up and leave the room via the down arrow in front of the electric chair ..... you're out of the cube again. Leave the Tomb ..... You have to make a choice again ..... Are you going to give the Crown to the Rat or to the Lizard ..... the bad choice is the Rat .... the good choice is the Lizard ....... If you keep follow me then we will now go back to the Lizard Tower. So go one screen down from the Tomb and then one screen to the right .... you are then back at the Sad Statue. One screen up, Rat house, screen to the left, Mine. Screen to the left, Vulture ..... and ...
The Vulture is not happy with you because you have given the Storm Egg to the Sad Statue ....
The Vulture is pissed off and flies away .... However, you will encounter the Vulture later. Screen up and .... you are back at the:
Lizard Tower:
Go inside and up the spiral staircase to the Lizard. Give the Crown to the Lizard and ...... The Lizard is grateful to you and gives you an "Oval Key" with which you can open the cupboard, right behind the tower .... The key then floats in front of the lizard ..... take the "Oval Key".
Close the close-up and leave the tower. Back outside, scroll the screen to the right and then zoom in on the cupboard, which is on the right behind the tower
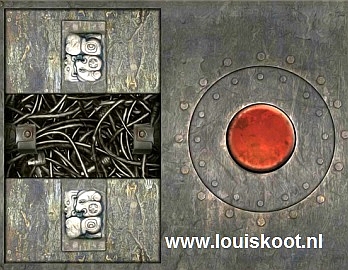
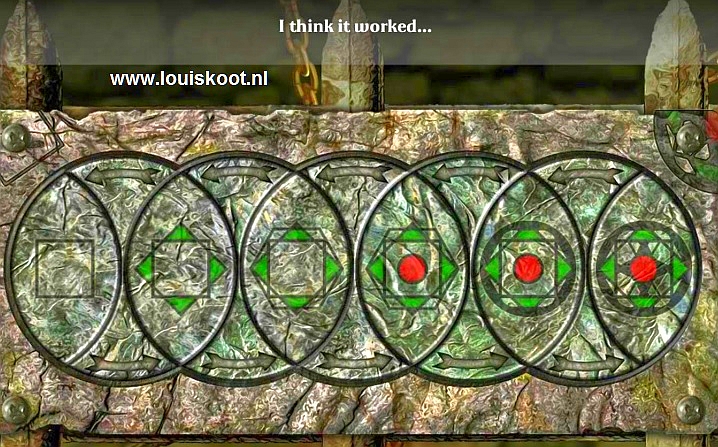
Oval Keys puzzle:
The gate of the cupboard is locked and you have to open it. The "lock" has 6 Oval Keys but there are only 5 .....
Place your Oval Key in the empty oval ....The puzzle is then activated.
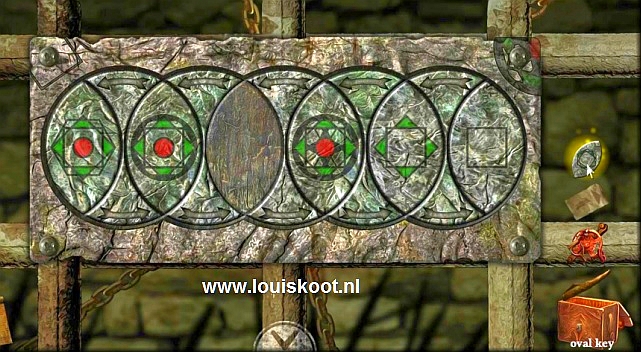
5 circles that overlap each other ..... You must now put the Ovals in the right order ....... From empty square to the fullest square ..... So it is a Rotary puzzle but also a Slider puzzle .......... In the circles there are squares in various stages ..... You have to get those squares in the right left / right order ..... On the left the empty square and the fullest square on the right ...... So you have to get those squares in ascending order. Click in the circles on the arrows to rotate the circles. Start with the right circle and then work to the left to first get the empty square all the way to the left .... turn them and keep doing that until you have the "Keys" in the circles in the right left-right order."
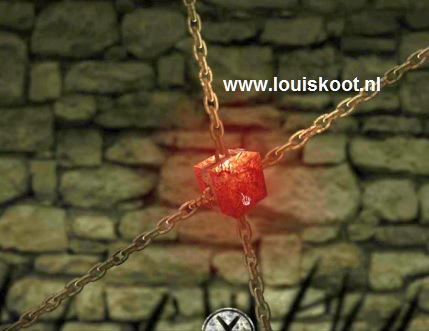
When successful, the gate of the cupboard will open .... A small Cube hangs in the cupboard, it's the red Monolith. Take the Cube / Monolith .
Go out of the close-up. You now have to transform the red Monolithic cube into a power cell for the train and you do so in the torture cellar of the Rat house. So return to it:
Rat house
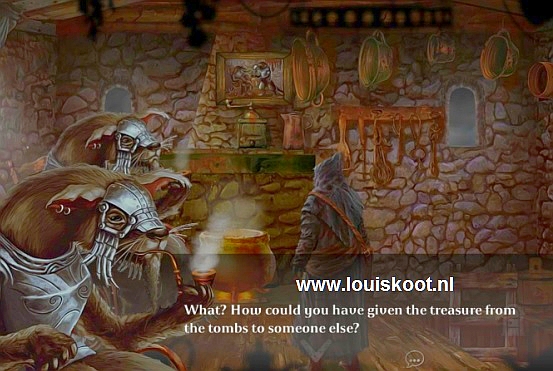
Go inside and ...... The Rat is disappointed because you have given the Crown to the Lizard, but he forgives you because you have saved his life after all. But the rat doesn't want you ever to come back. Nevertheless, you can still go down to the torture chamber in the basement, so do that. Back in the torture chamber you zoom in on the press machine in the corner. The sketch on the wall, which you also copied in your sketchbook, shows you what to do .....Take the Monolith cube from your inventory and place the cube in the compartment of the upper part of the machine. Then click on the lever of the machine and ........... The Cube is squashed ..... Pick up the squashed cube ..... it is now a power cell for the Train
Get out of the close-up and leave the Rat house. Now go back to the Sad Statue. Back at the mournful statue, find the right arrow and then click to finally return to:
The bridge:
Take the bone of the mine monster (Claw) from your inventory and give it to the Bridge keeper and .... the bridge keeper is happy and disappears.
Scroll the screen to the right and then click the right arrow again and ..... you end up at:
The train:
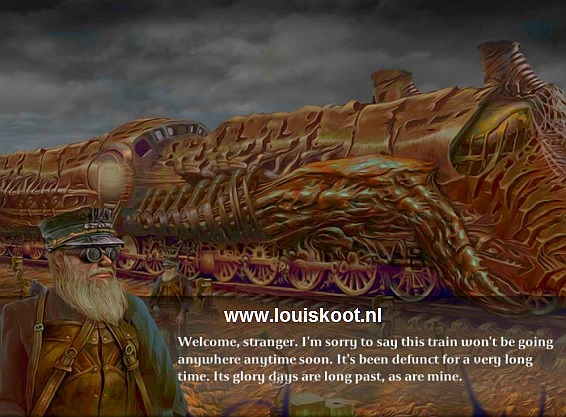
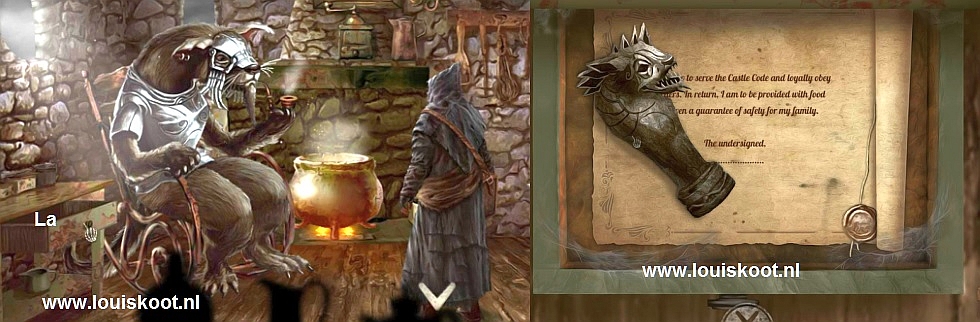
You will be welcomed by the Train Operator and he says that the train is defect and has been for a long time now The Train Operator has also sealed the door of the locomotive with a code lock, but he has written the code for that lock on a stone and has hidden that stone somewhere. Unfortunately, the Operator no longer knows where he has hidden that stone with the code. The Operator wants to drive his train one more time ..... if you help him repair the train he will drive you to the Frozen Tears with train. You also need to have a train ticket and you need a power cell for the train.
Well .... You already have a Train Ticket and you already have the parts for the train. All you have to do is to open the door of the locomotive.
Click on the locomotive door and ..... solve the puzzle.
The Locomotive door Puzzle:
A grid with 25 squares. You can press each square, but you only have to press a few square. In the Lizzard Tower you saw a figure through the telescope .... that figure looked like a "little man". Well .... you have to copy that "little man" here in this grid. Number the squares, from top left to bottom right, 1 to 25. Then only press the following squares: 1, 5, 6, 8, 10, 11, 12, 13, 14, 15, 18, 20 and 21 ..
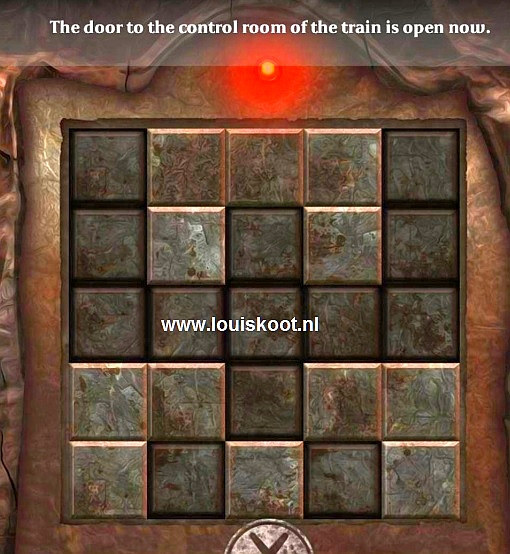
Solved .... the door of the locomotive opens ...... the Operator is happy and goes inside. Also enter the locomotive. Give the Train Parts to the Operator .... the Operator immediately installs the new one below share. Then give the flat monolith (Fuel Cell) to the Operator and finally your Train Ticket and ......... the train goes on its way and delivers you in:
2019: Walkthrough by: Louis Koot