
2018: Walkthrough by: Dick Leeuw and Louis Koot
Text by Dick Leeuw (edit by Louis Koot) and screenshots by Louis Koot

Part 2
You're in a courtyard. Look around first, so you'll know where everything is.

On
the right you see a stone block with a rune sign on it. Right in front of you
is a small gate in the wall with a hint sphere in front of it.

If you look around further you'll also see 2 working fans A and B with an air stream

First
go to the hint sphere and read its message. The small wooden gate, in de wall
behind the hint sphere, does not open. You'll need the wind to open that wooden
door for you. One of the 2 moon pillars is blocked by lianas, so before you can
move that moon pillar you first have to burn those lianas away. There are
coconuts lying around, so pick up a nut an set it to fire at the fire scale,
next to the small gate. Carry your burning coconut to the moon pillar with the
lianas and burn the lianas away use your burning coconut.
When that is done you have to slide the 4 pillars in 1 line so that you can jump from fan B to the platform with button 2 on it. It's daylight now, so first slide the 2 sun pillars to the right positions. Then make it night by standing on the "Day and Night disc" and then slide the 2 moon pillars to the right position.
This screenshots shows you the right position of the 4 pillars

When you have the 4 pillars lined up right you can make it day again by standing on the "Day and Night disc" again.
In
daytime go to Fan A, in the left corner

Don't use the "Wind disc" now....Go to the left side of the plateau and jump into the airflow of Fan B and then jump to the plateau were Button 1 is standing on

Press button 1 and............ On the other side, above the platform with button 1 , fan C unfolds on the left column of the wall.

Fan D, on the right column, must be activated with button 2, so you now have to jump via the 4 pillars to button 2.
Go stand on the edge, left of button 1, and then look down ....you are standing right above the 1st sun pillar .....so jump down and make sure you end up on top of the 1st pillar

When you stand on top of the first pillar then jump through the other 3 pillars to the platform with button 2. Press the button and you will see that fan D, on the other column, also opens up

The
fans C and D are unfolded now but they are not turning hard enough yet to
open up the small wooden door, but we'll fix that in a few moments. First you
have to move the 2 moon pillars on the floor again, so that you can jump
over the 4 pillars to the platform where the Rune Sign stands. So jump
down to the floor. To move moon pillars it must be night, so go stand on the
"Day and Night disc" to make it night again. Then move the 2 moon
pillars
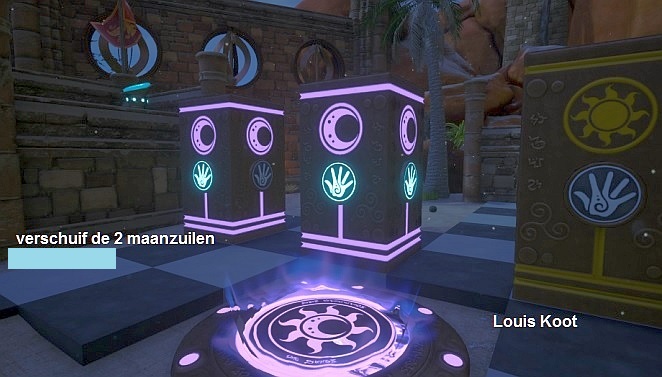
This picture, below, shows you the right position of the 2 moon pillars and the 2 sun pillars, to reach the Rune sign from the platform with button 1.....You don't move the 2 sun pillars

You can make it day again of you want. Now back to Fan A and go backup to the platform with the "Wind disc"

Go stand behind the "Wind Disc", so that you look over the "Wind Disc" to the small wooden gate ......Then step on the "Wind Disc" and......You direct the wind to the wall where the wooden door is in and... The wind makes the fans C and D turn faster and because of this the wooden gate is blown open (Louis says...sorry...I didn't make a screenshot of this). Jump, via the airflow of fan B, back to the platform with button 1 and then jump down again to land again on top of the first pillar and then over to the other pillars and finally to the platform with Rune sign. Pick up the Run sign.

Jump down to the floor and now walk through the now open small wooden door.

Go down the stairs and the over the fallen pillar to the pedestal and continue across another pillar to the other side.

On the left you'll see a hint sphere and a light scale where you have to put something in.
Go there and read the message of the hint sphere and see which object you need to put into the light scale......It's a magic oil lamp. It could be that there is a magic oil lamp lying next of the light scale.....if that is the case then you can use it. But you have to search a little further, otherwise you'll miss a Sarid paper roll 9. Walk back a bit and then go left into the cave. Go through the small gate at the back of the cave.

You'll
see Sarid paper roll 9 and a chest. First jump to the paper scroll and read it,
then jump to the chest......If there wasn't a magic oil lamp lying at the light
scale, or if you didn't use that lamp, then open up this chest and take the oil
lamp.

The lamp splatters and on the other side a chest appears on the pedestal. Go back over the fallen pillar to the chest.
Click
on the lock of the chest to open it and pick up the quarter door piece that
comes out of the chest

Climb the stairs back to the courtyard and take the quarter piece to the light scale, in frond of the big door. Put the quarter piece in the beam of light and........ the door opens.


You'll need to cross the canyon to the other side because there you must go further on your way. But the water of the river is to low to cross over, so you have to raise the water level.
Continue walking to a building with
2 stone camels next to it. Just in
front of it is a hint sphere, read its message.

Go up the stairs. You come at a broken bridge and a "Rain disc". Go stand on the "Rain disc" to let it rain and.....The water level of the river rises.

Go back the way you came and..........You'll see 3 wooden platforms floating in the river. Go there and jump through the platforms to the other side of the river

When you have reach the other side then take a left to the chest. Open up the chest and take the Eagle figurine that comes out of it.

You'll carry the Eagle with you. Turn around and walk up the stairs and then down on the other side of the platform, to the light scale. Place the Eagle in the light beam of the light scale

The Eagle will burst and a "Rain disc" appears.

Turn around and walk up the stairs again and down at the other side. Go left and got o the "Rain disc" Step on the "Rain disc" to stop the rain and the lower the water level in the river again

Go stand on the edge
and look down.....Below
you see a fan, jump into the airflow of the fan...You go up.... Jump out of the airflow
to the plateau ...

Walk on, you'll have to jump on the ledges ....... You'll come to a hint sphere and bit further on you'll see a "Day and Night disc"

After reading the message of the hint sphere, walk on to the "Day and Night disc" and then look to the left .........You'll see a Sun door and a blue button. A Sun door only goes open in daytime, so if you have it night now, then go stand on the "Day and Night disc" to switch to daytime. In daytime push the button to open up the Sun door. But....in de alley the back door closes

Walk through to now open Sun door into the alley and press the next button, it opens the back door and closes the front door

Go onto the "Wind disc". Don't stand on it yet, bit look to your right......You'll see that the double wooden door is closed and you can not open it....You'll need the wind to open up the doors for you. Go stand behind the "Wind disc" and face the doors and then step onto the "Win d disc" and........ you direct the wind to the wooden doors and the wind blows them open.

Walk to Sarid paper roll 10 and read it.

There
is a lot to see here. Fans, floating beams, floating discs, drums and blue buttons.
It's one big puzzle that you going to solve in 2 stages.
I
made a drawing of this area and the solution of solving this area is based on this
drawing.

Don’t
push any buttons yet, if you want to use this solution you need to have the
starting position of the puzzle.
Before you start to solve the puzzle first walk ahead, along the right side. In he middle of the right wall is a 3-angled bay window with 4 round iron grids

Look
through the 2 bottom grids to the turtles and to the propellers on top of the
turtles to see in witch direction the wind should blow, to make the turtles blow
air ....... The left turtle, at drum T3, the wind should come straight from the
front. For the right turtle, at drum T 4, the wind should come from the left or the right. Take a
good look around this whole area ...... try to recognize everything on the basis of the drawing
.....
part 1 of the puzzle:
opening the Exit Door.....
When you stand in front of the bay window.....turn around and go to the other side, enter the room under platform X.

In
the room under platform X you'll
find the blue button K 1, press the button and you'll see beam B 2 go up

Now
go
to fan V 1, step into the air stream of the fan and float onto beam B 1.

Walk
over beam B1 and jump on disk S 1 and then take the white ball of P 1.

Throw
the white ball on drum T1.....The ball bounces from drum T1 to hit button K2 in the building.

Disk S1 takes you higher up to the same level as beam B2 is floating . Jump on beam B2 and then on disc S2, then jump to the left onto beam B4.
Walk
over B4 and
jump onto the platform with the "Wind disc".

Stand
behind the "Wind disc", facing beam B4. Step on the "Wind
disc" to direct
the wind over B4 straight to the other side........the glass plate G1 rises

Walk
and jump via B4 and S2 to the square platform. From there to bar B5 and then
turn left to glass plate G1.

Go over glass plate G1 to the blue buttonK3............

.....press button K3 and you'll see drum T3 coming up


You are at the chest ....... press the push button K5 to lower the 2 fences

Now open the chest and pick up the quarter piece ....... Take the quarter piece to the big door and put it in the light scale and..... .

... the door opens ..... You could now go through the door but then you miss a rune sign and you need it for the end game...
.....so on to round 2
of the puzzle ....... use the drawing again
to orientate yourself
Part 2: Get the Rune Sign of this area:
From the now open exit door go back to the chest and go back up the right stairs to platform Y. Jump to and walk over B3, G1, B5, S2 and B4, back to the "Wind disc"

Step on the "Wind disc" again but this time aim the wind to the left or to the right........the glass plates G2 now rises.
Jump to the ground and walk back to the chest but now up the left stairs
to platform X. At the top of the stairs you'll button K6 in the right room and
on platform X you'll see a "day and Night disc".

Go stand on the "Day and Night disc" to make it night. Then go to button K6 and press it once ..........
Then go look at how beam B5 is now. Beam B5 must go from glass plate G2 to the platform between beam B5 en disc S2.

Is beam B5 not in the good position after you have pressed button K6 once, then you have to press button K6 again, until you see that you can cross over glass plate G2 to beam B5 and then to S2 .
When you have beam B5 turns the right way go stand on the "Day and Night disc" again to switch back to daytime.
In daytime go back to button K6 and press it 1x again to turn de Beams B1 and B2 in the right position and to turn beam B3 straight to the large gate.

Then
jump
from platform X to beam B2 and walk over beam B2 and glass plates G2 to
the buttons K8 and K 7. Ignore button K8 but press buttonK7 and ......... drum T 4 comes up.

Go
back to glass plate G2
and back over beam B2 to platform X. Go to the left side of platform X and jump
down to the lower plateau. Then jump on beam B1 and walk across beam B 1 to the other
side.

Jump from B1 onto the rock and go to button K9 ....... behind the wooden gate you see button K10 ...... Press button K9 and the gate before button K 10 lowers.

Jump to the
ground and go back to platform X, via the left stairs at the chest. Jump from platform X back on
beam B2 on and go over B2, G2, B5 to S 2. Make sure you are on disk S2.

Take
the white ball from post P2 and throw it to drum T2.........when the white ball has
hit the drum it flies back to P2. You have to throw the white ball 2 times
on drum 2. The first time the ball flies from drum T2 to drum T 3 and then
hits button K4. The second time, the
ball goes from drum T2 to drum T4 and then hits button K8. This causes beam B3 and
disc S2 to rise.
Then take the white ball again and take it with you. Jump to beam B3and walk over B 3 to S3. Make sure that you stand on disk S3.....Now throw the ball on drum T5 and......
.....The white ball flies from
drum T5 to drum T6
and then hits button K10. Disc S3 goes up and you can now jump on the plateau
with the cat.

Go
to the left, to fan V2, jump into the air stream to go up to a higher plateau.

Jump out the air stream to the plateau..... Go left and then right up the stairs to the Rune sign..... Grab the Rune sign.

Jump down and walk to the Exit door. You're done here, so go through the big door to the next, and Final area of this Desert of Naar world

2018: Walkthrough by: Dick Leeuw and Louis Koot
Text by Dick Leeuw (edit by Louis Koot) and screenshots by Louis Koot